Fun Technique With The Wild Roses Stamp

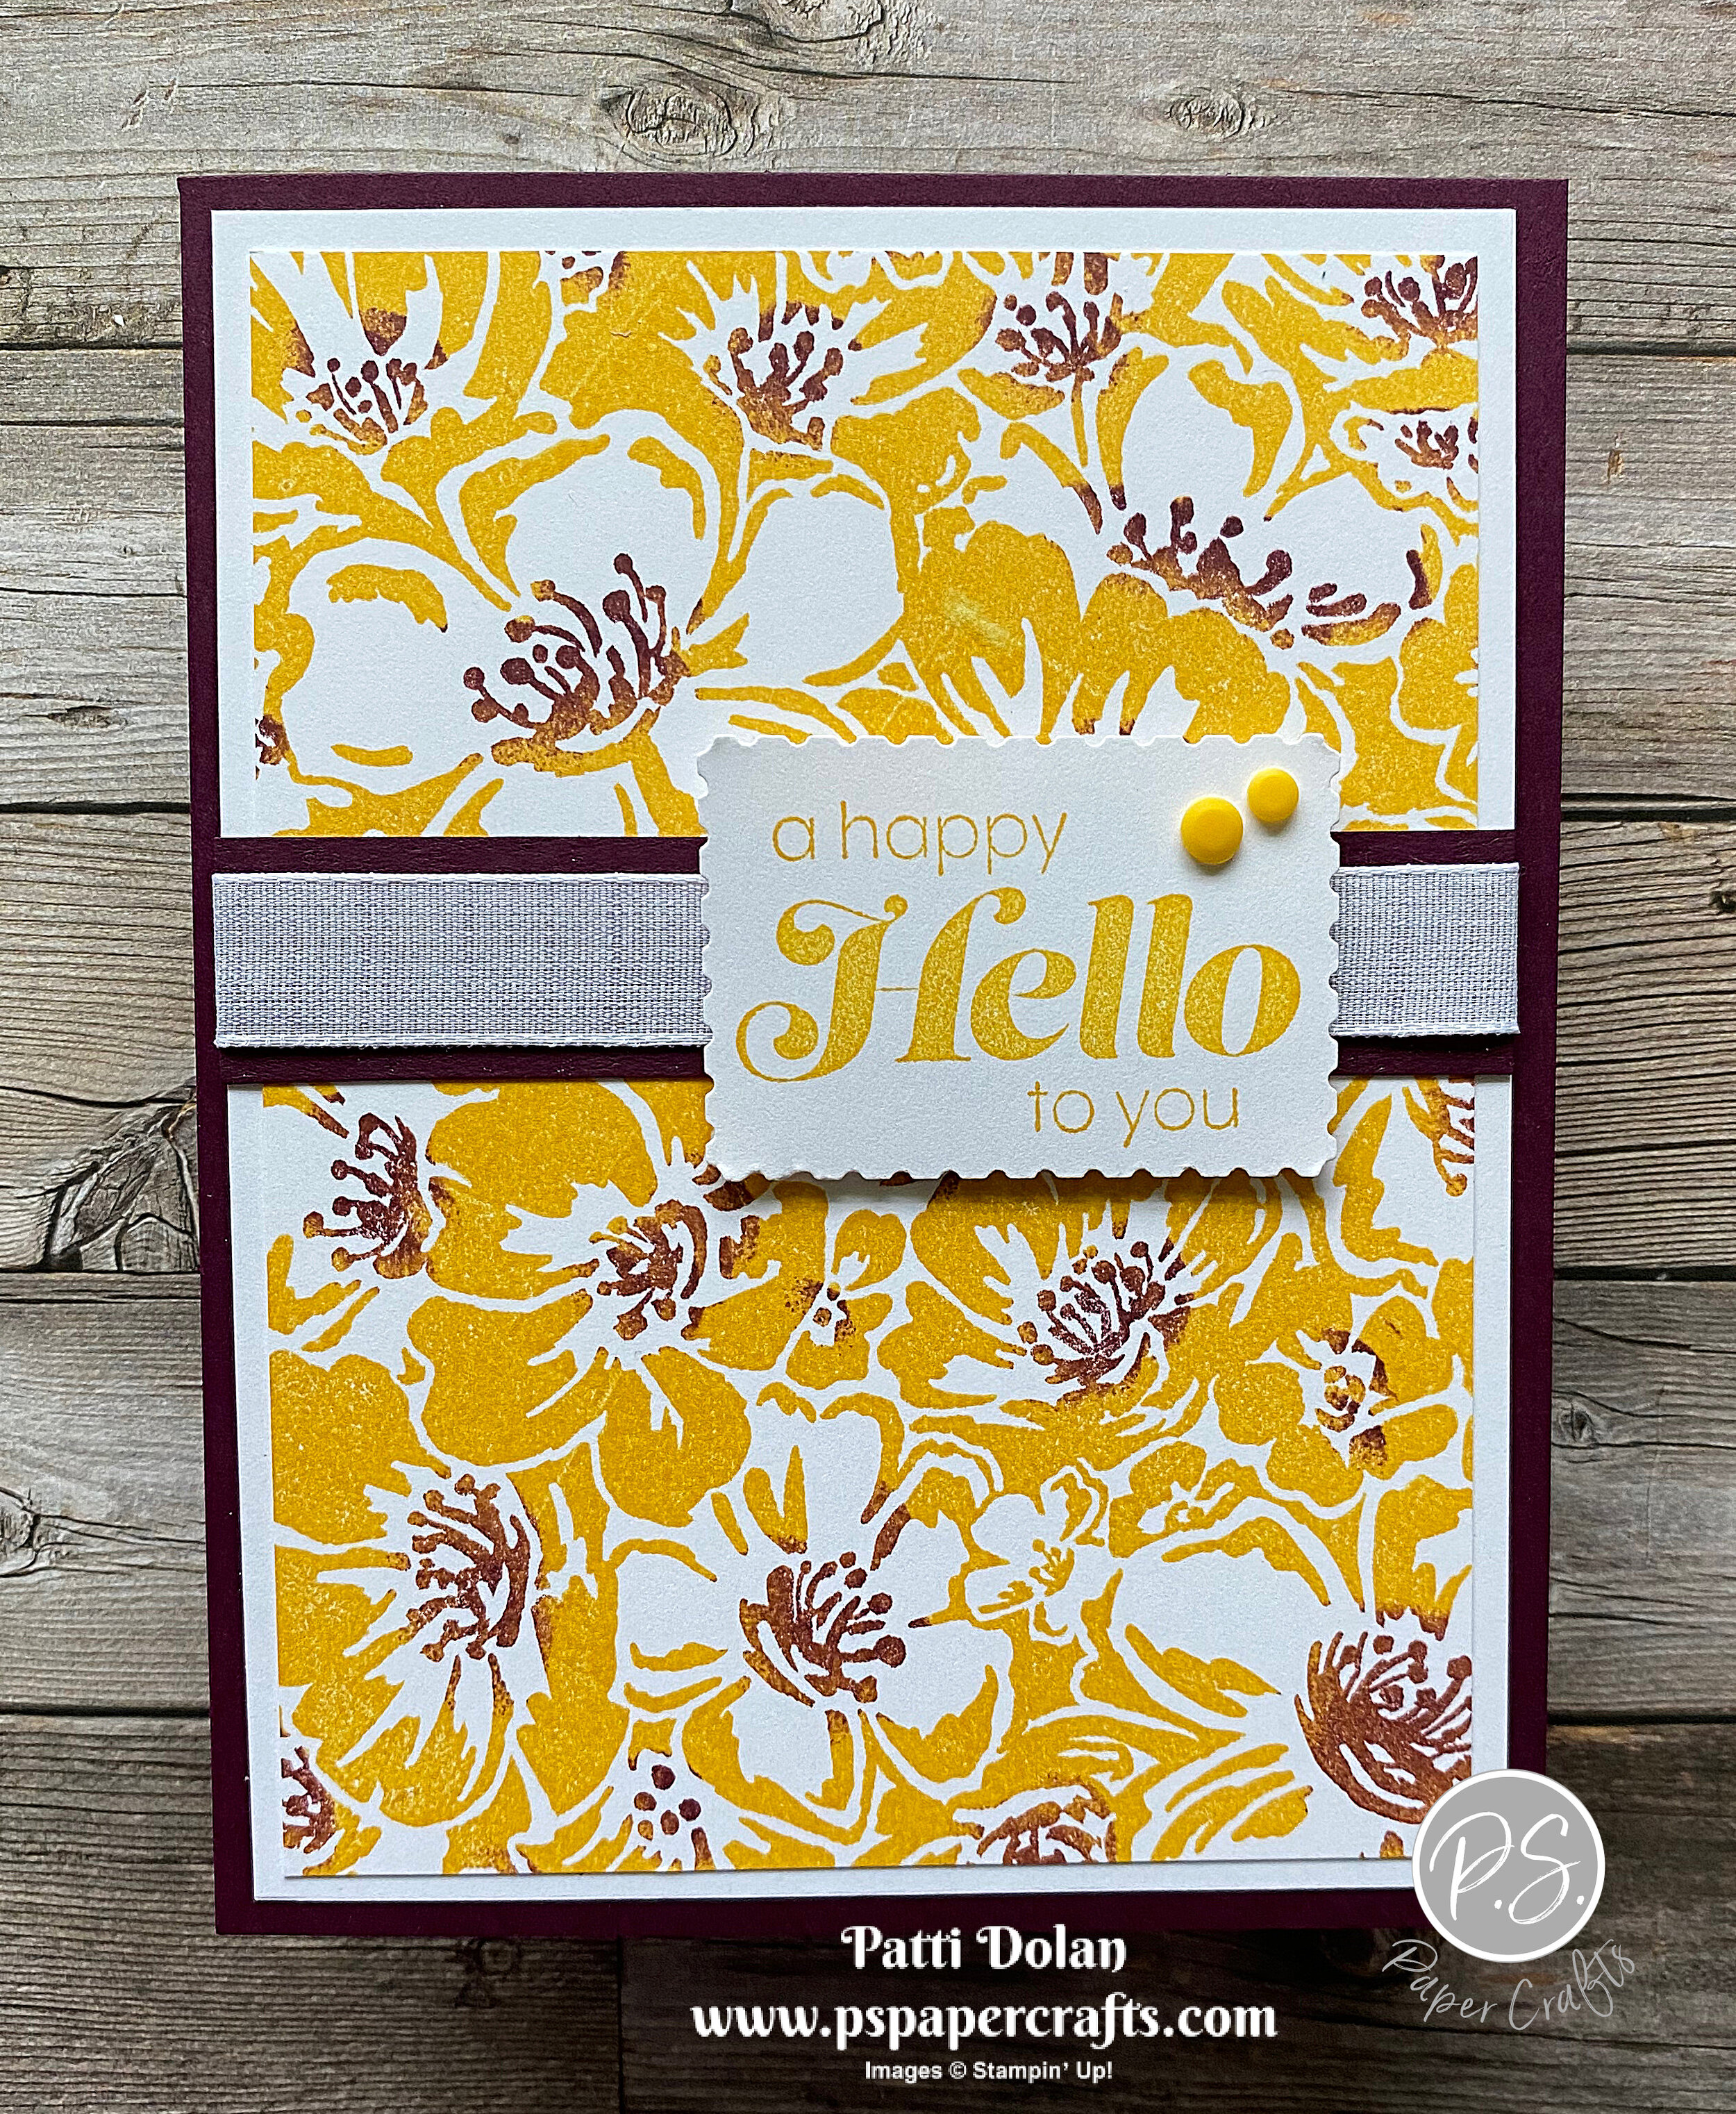
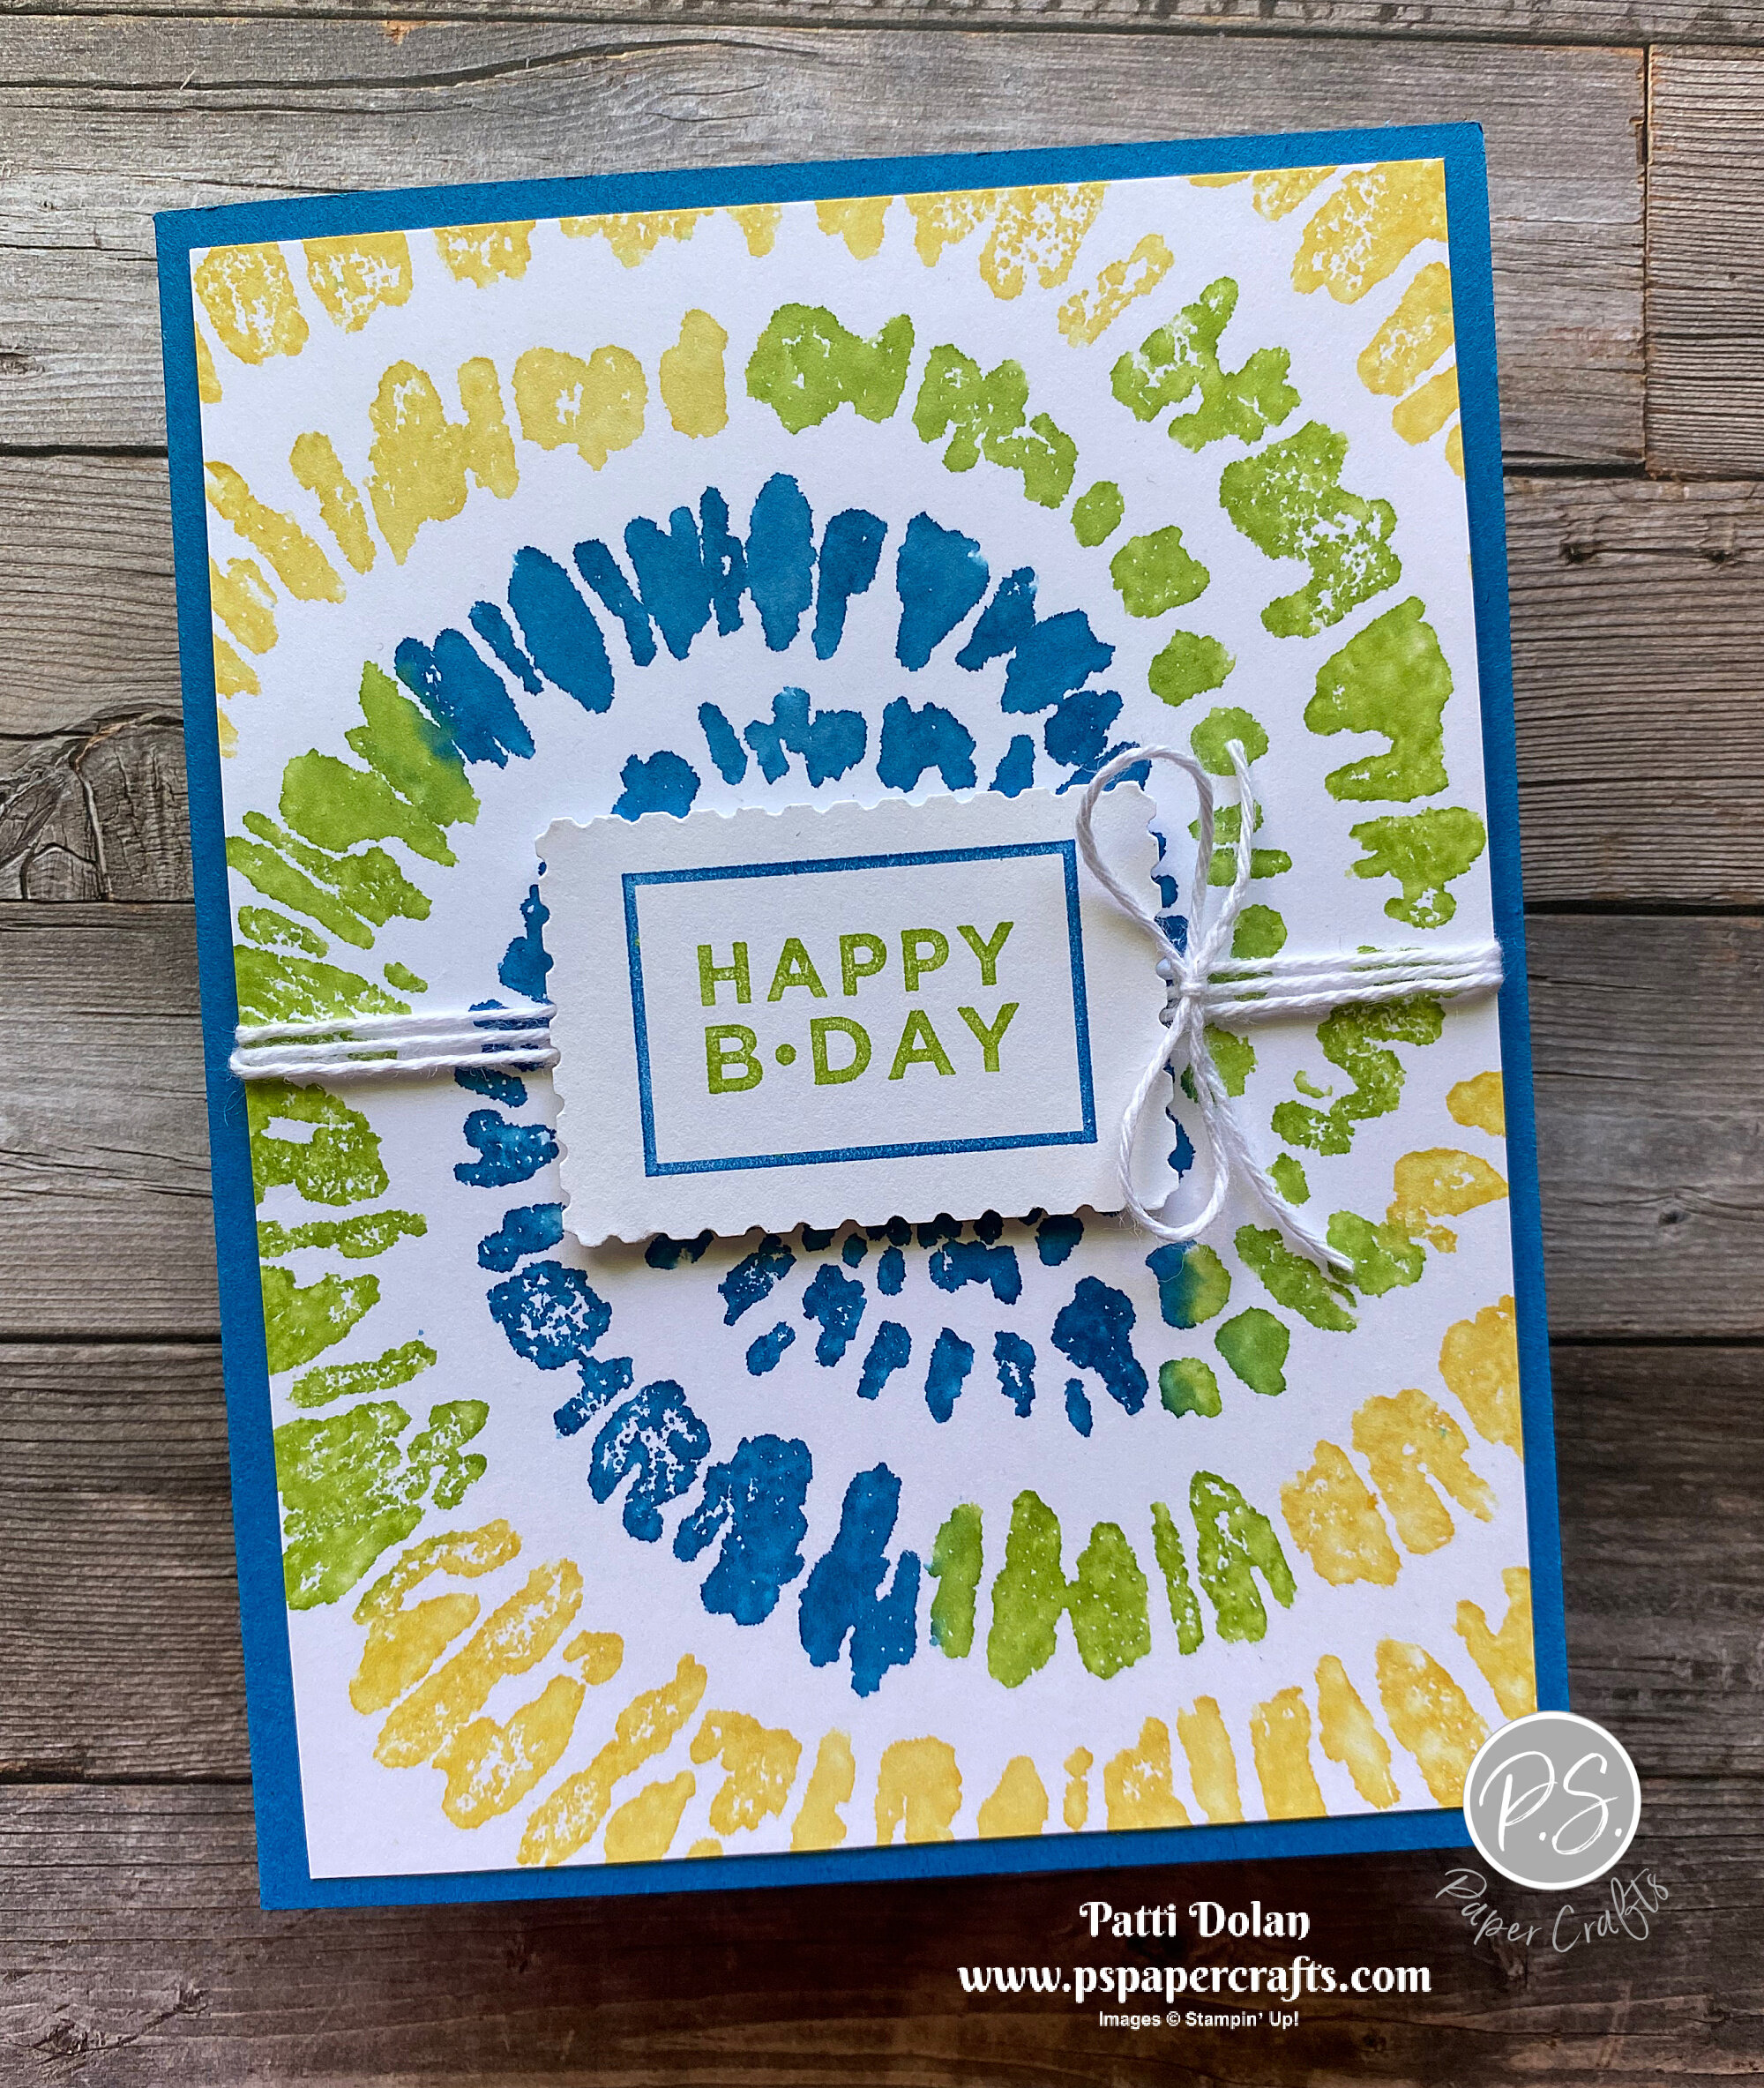
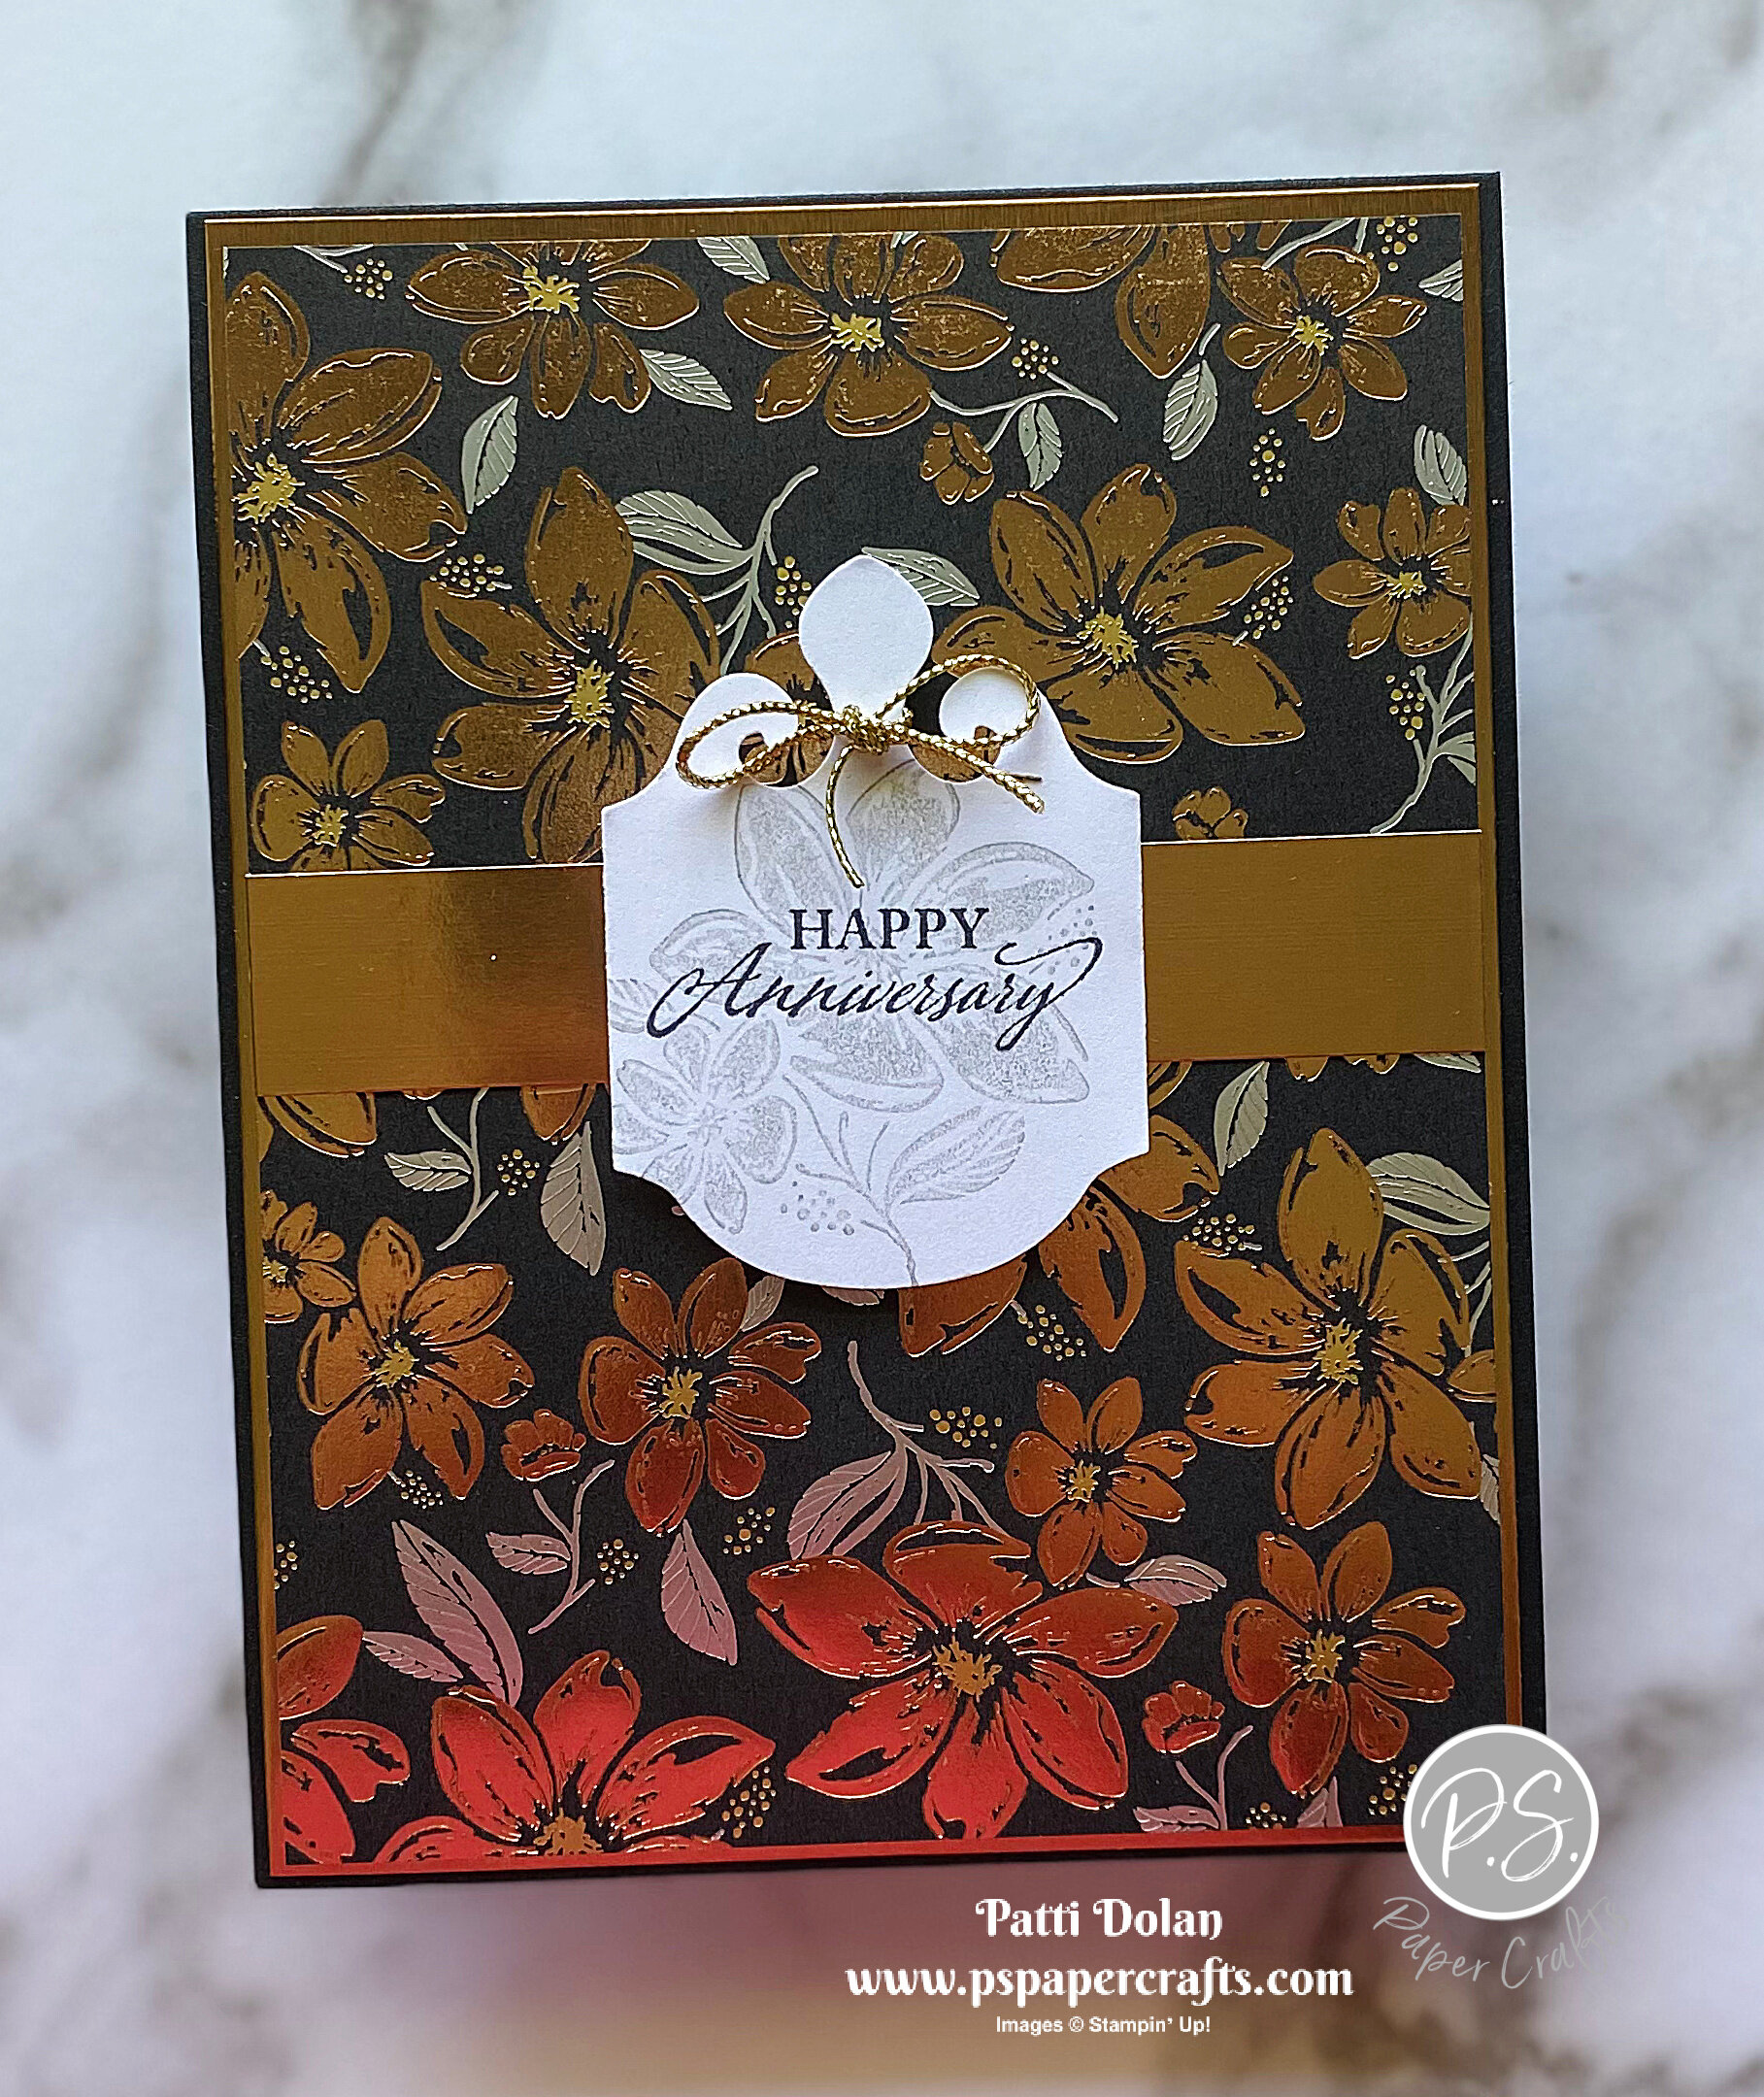
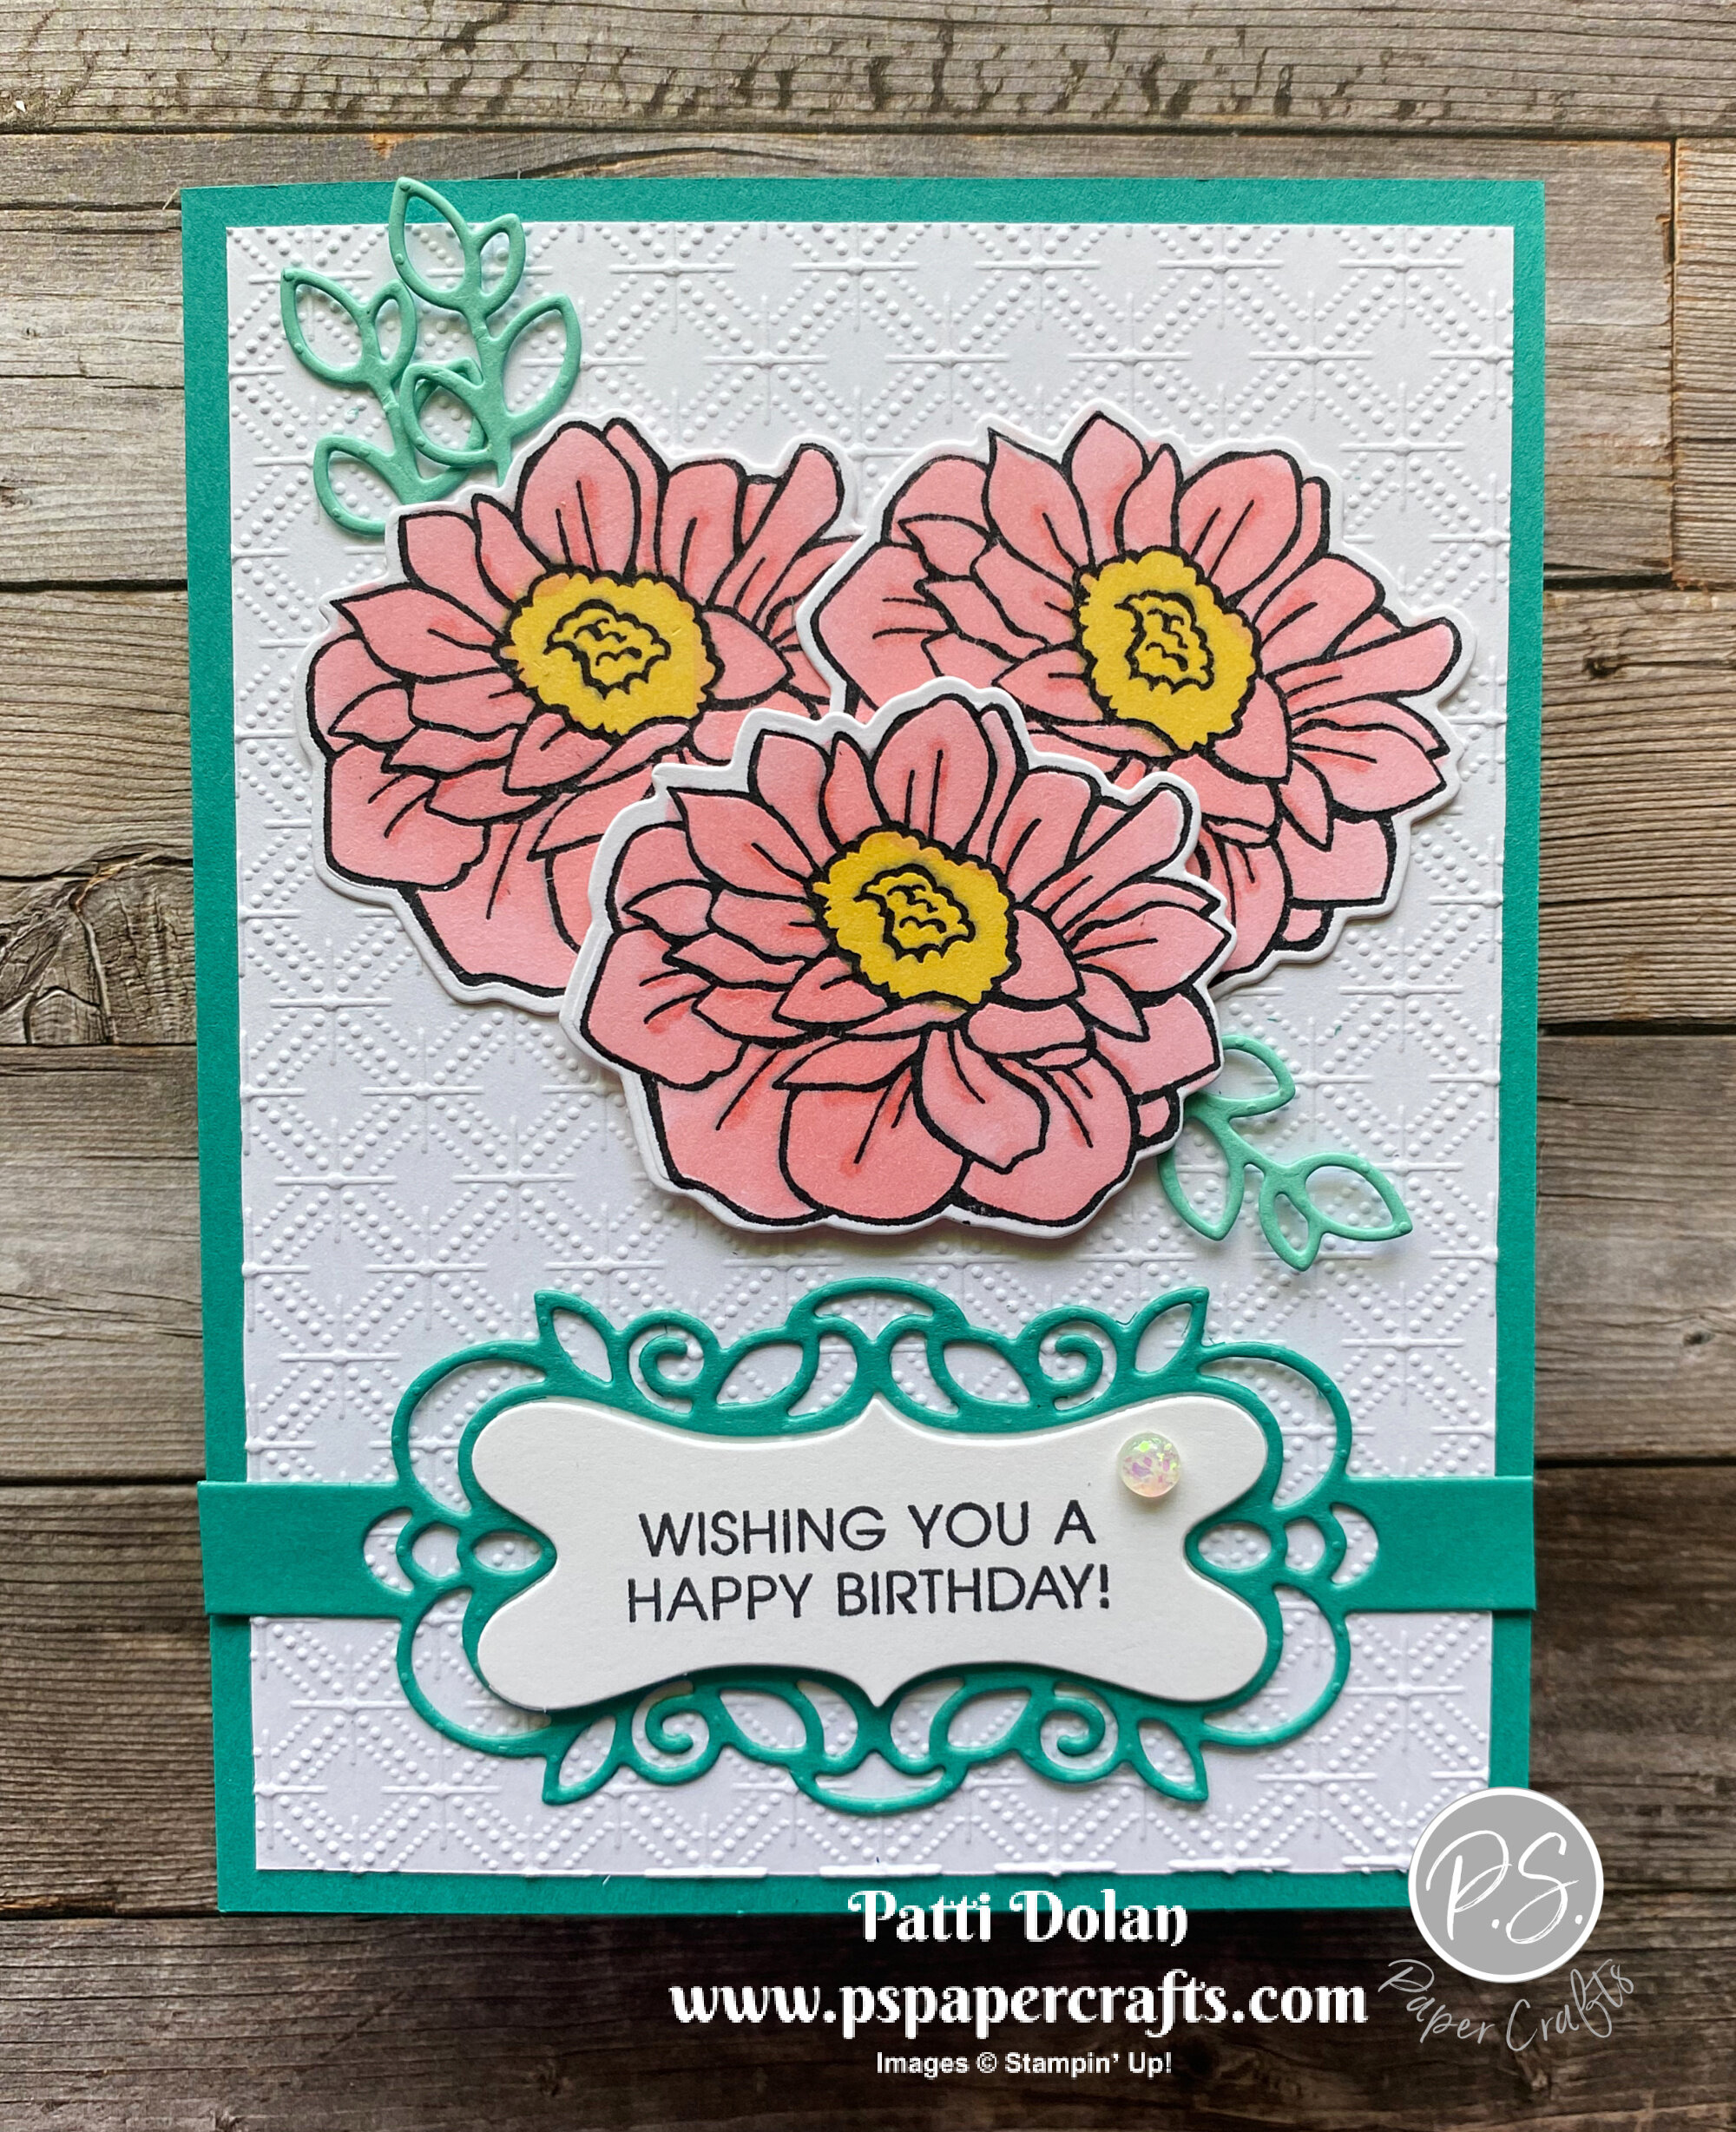
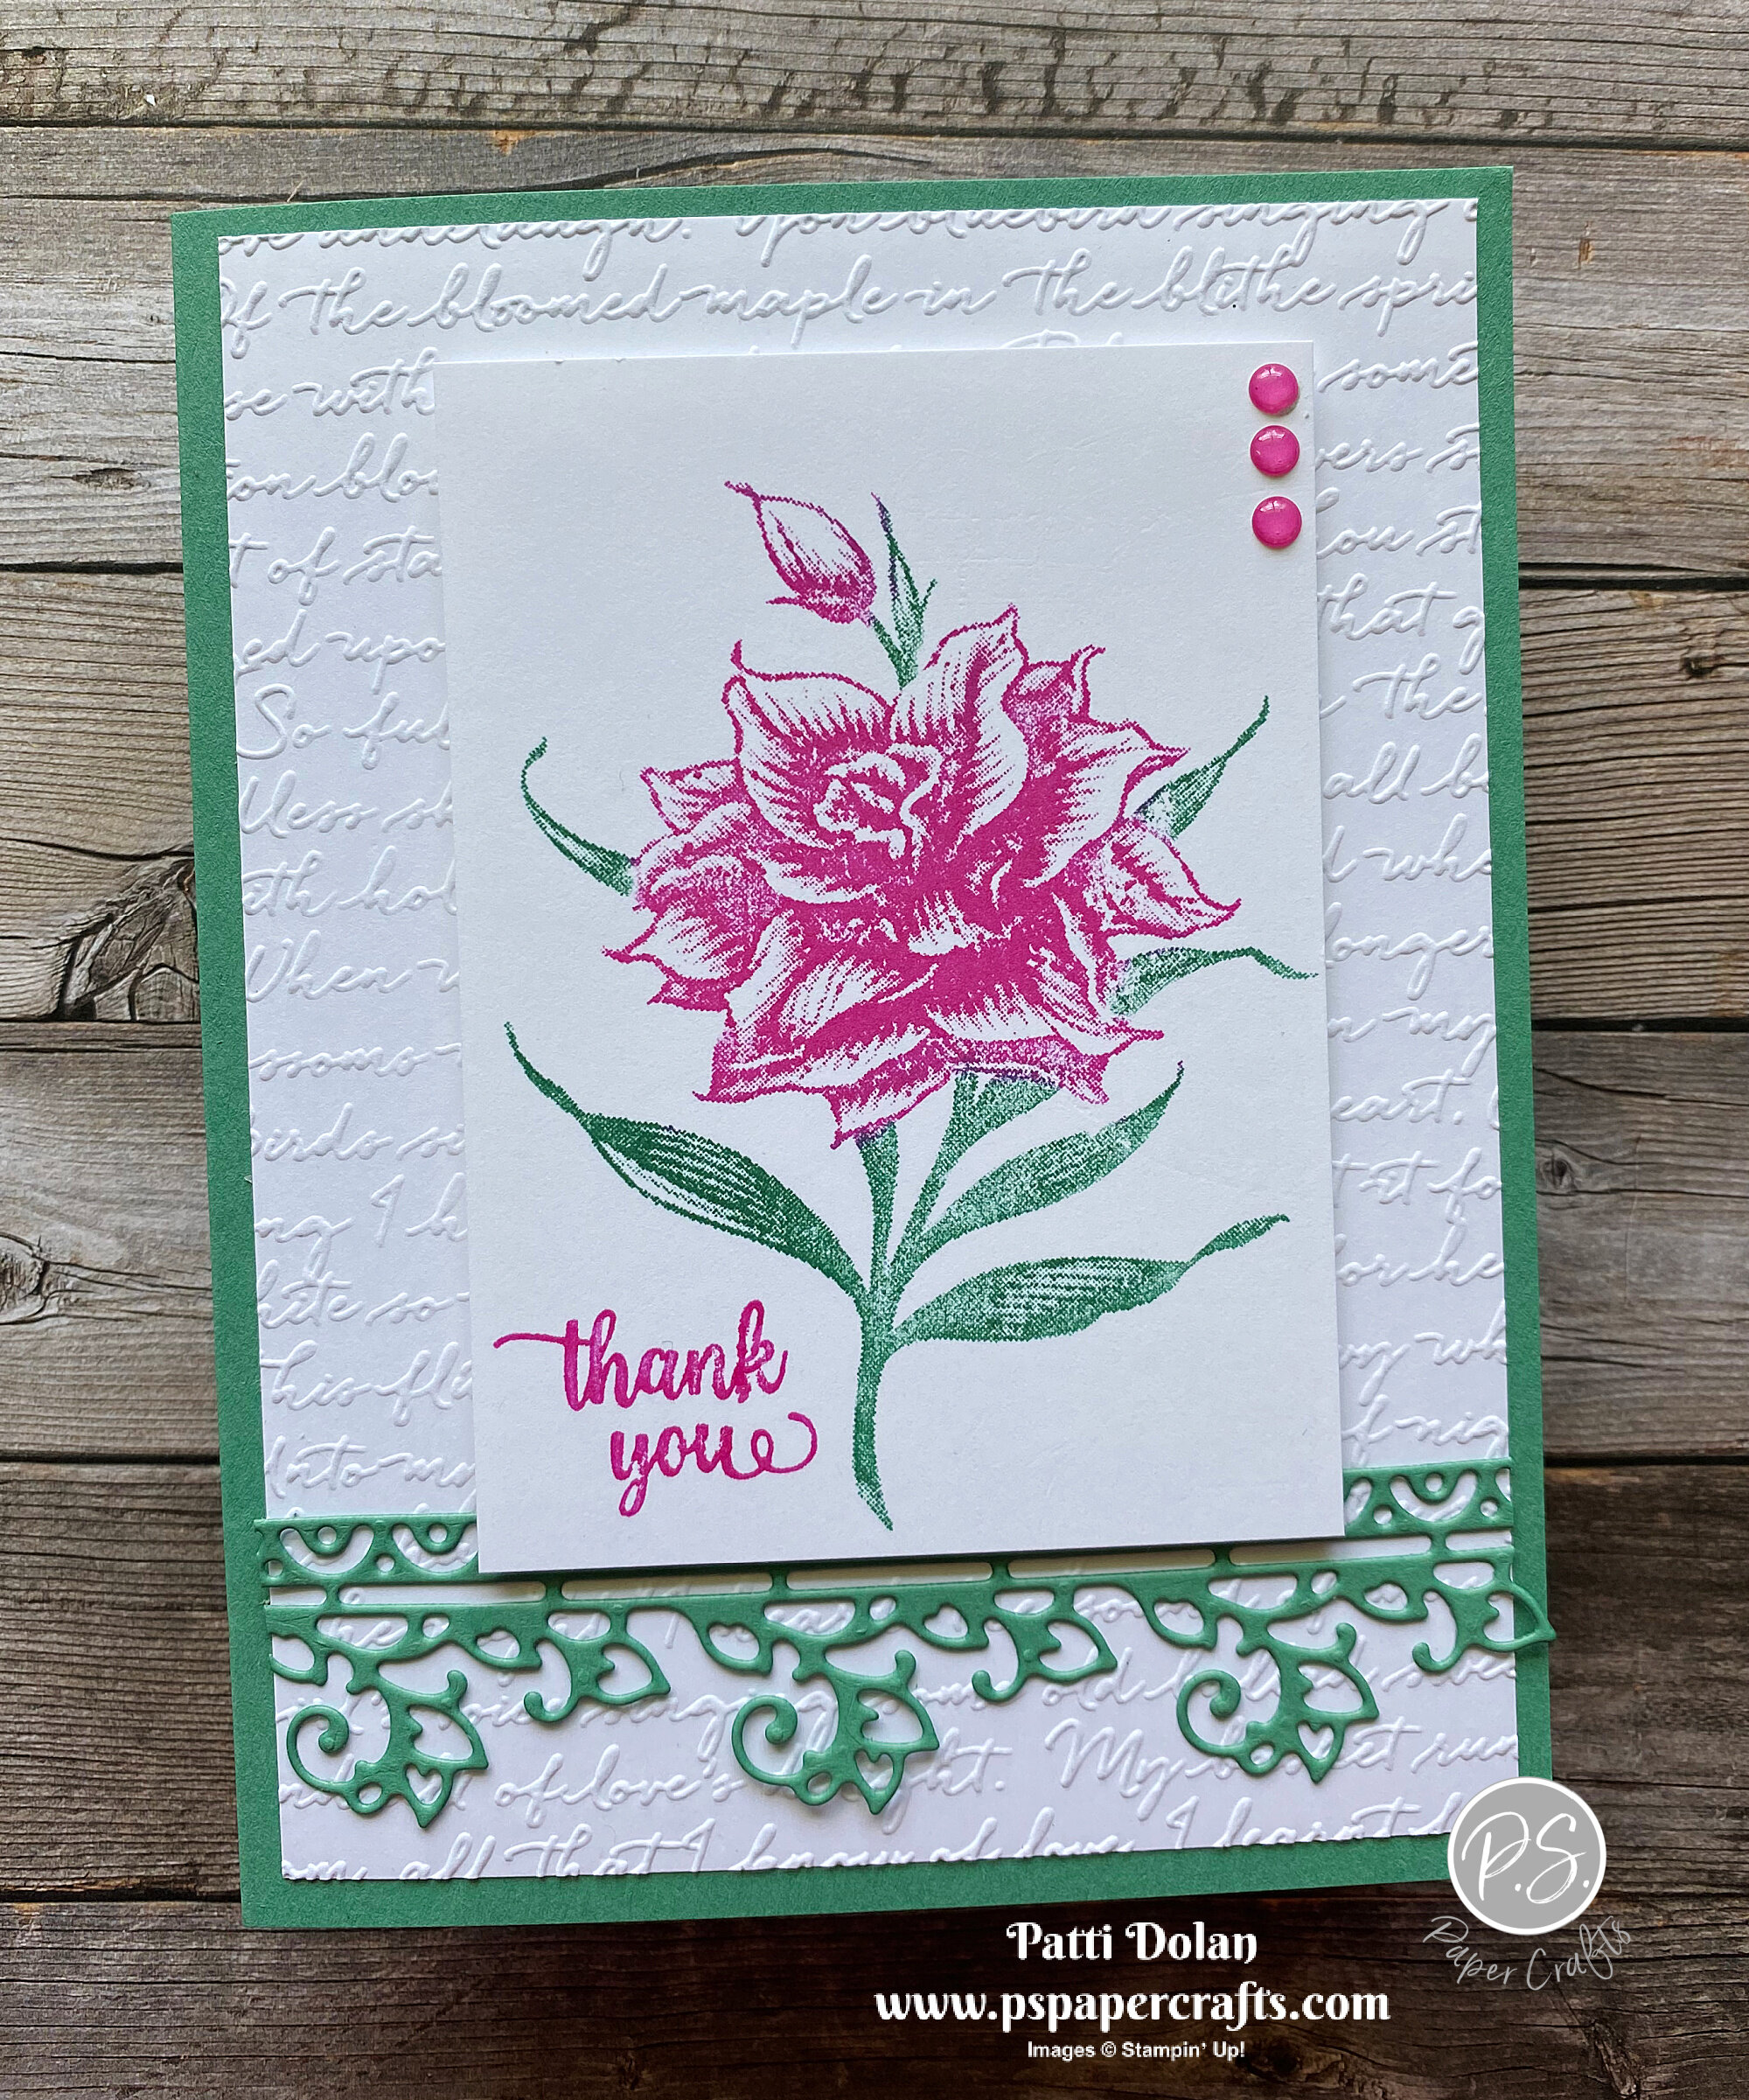
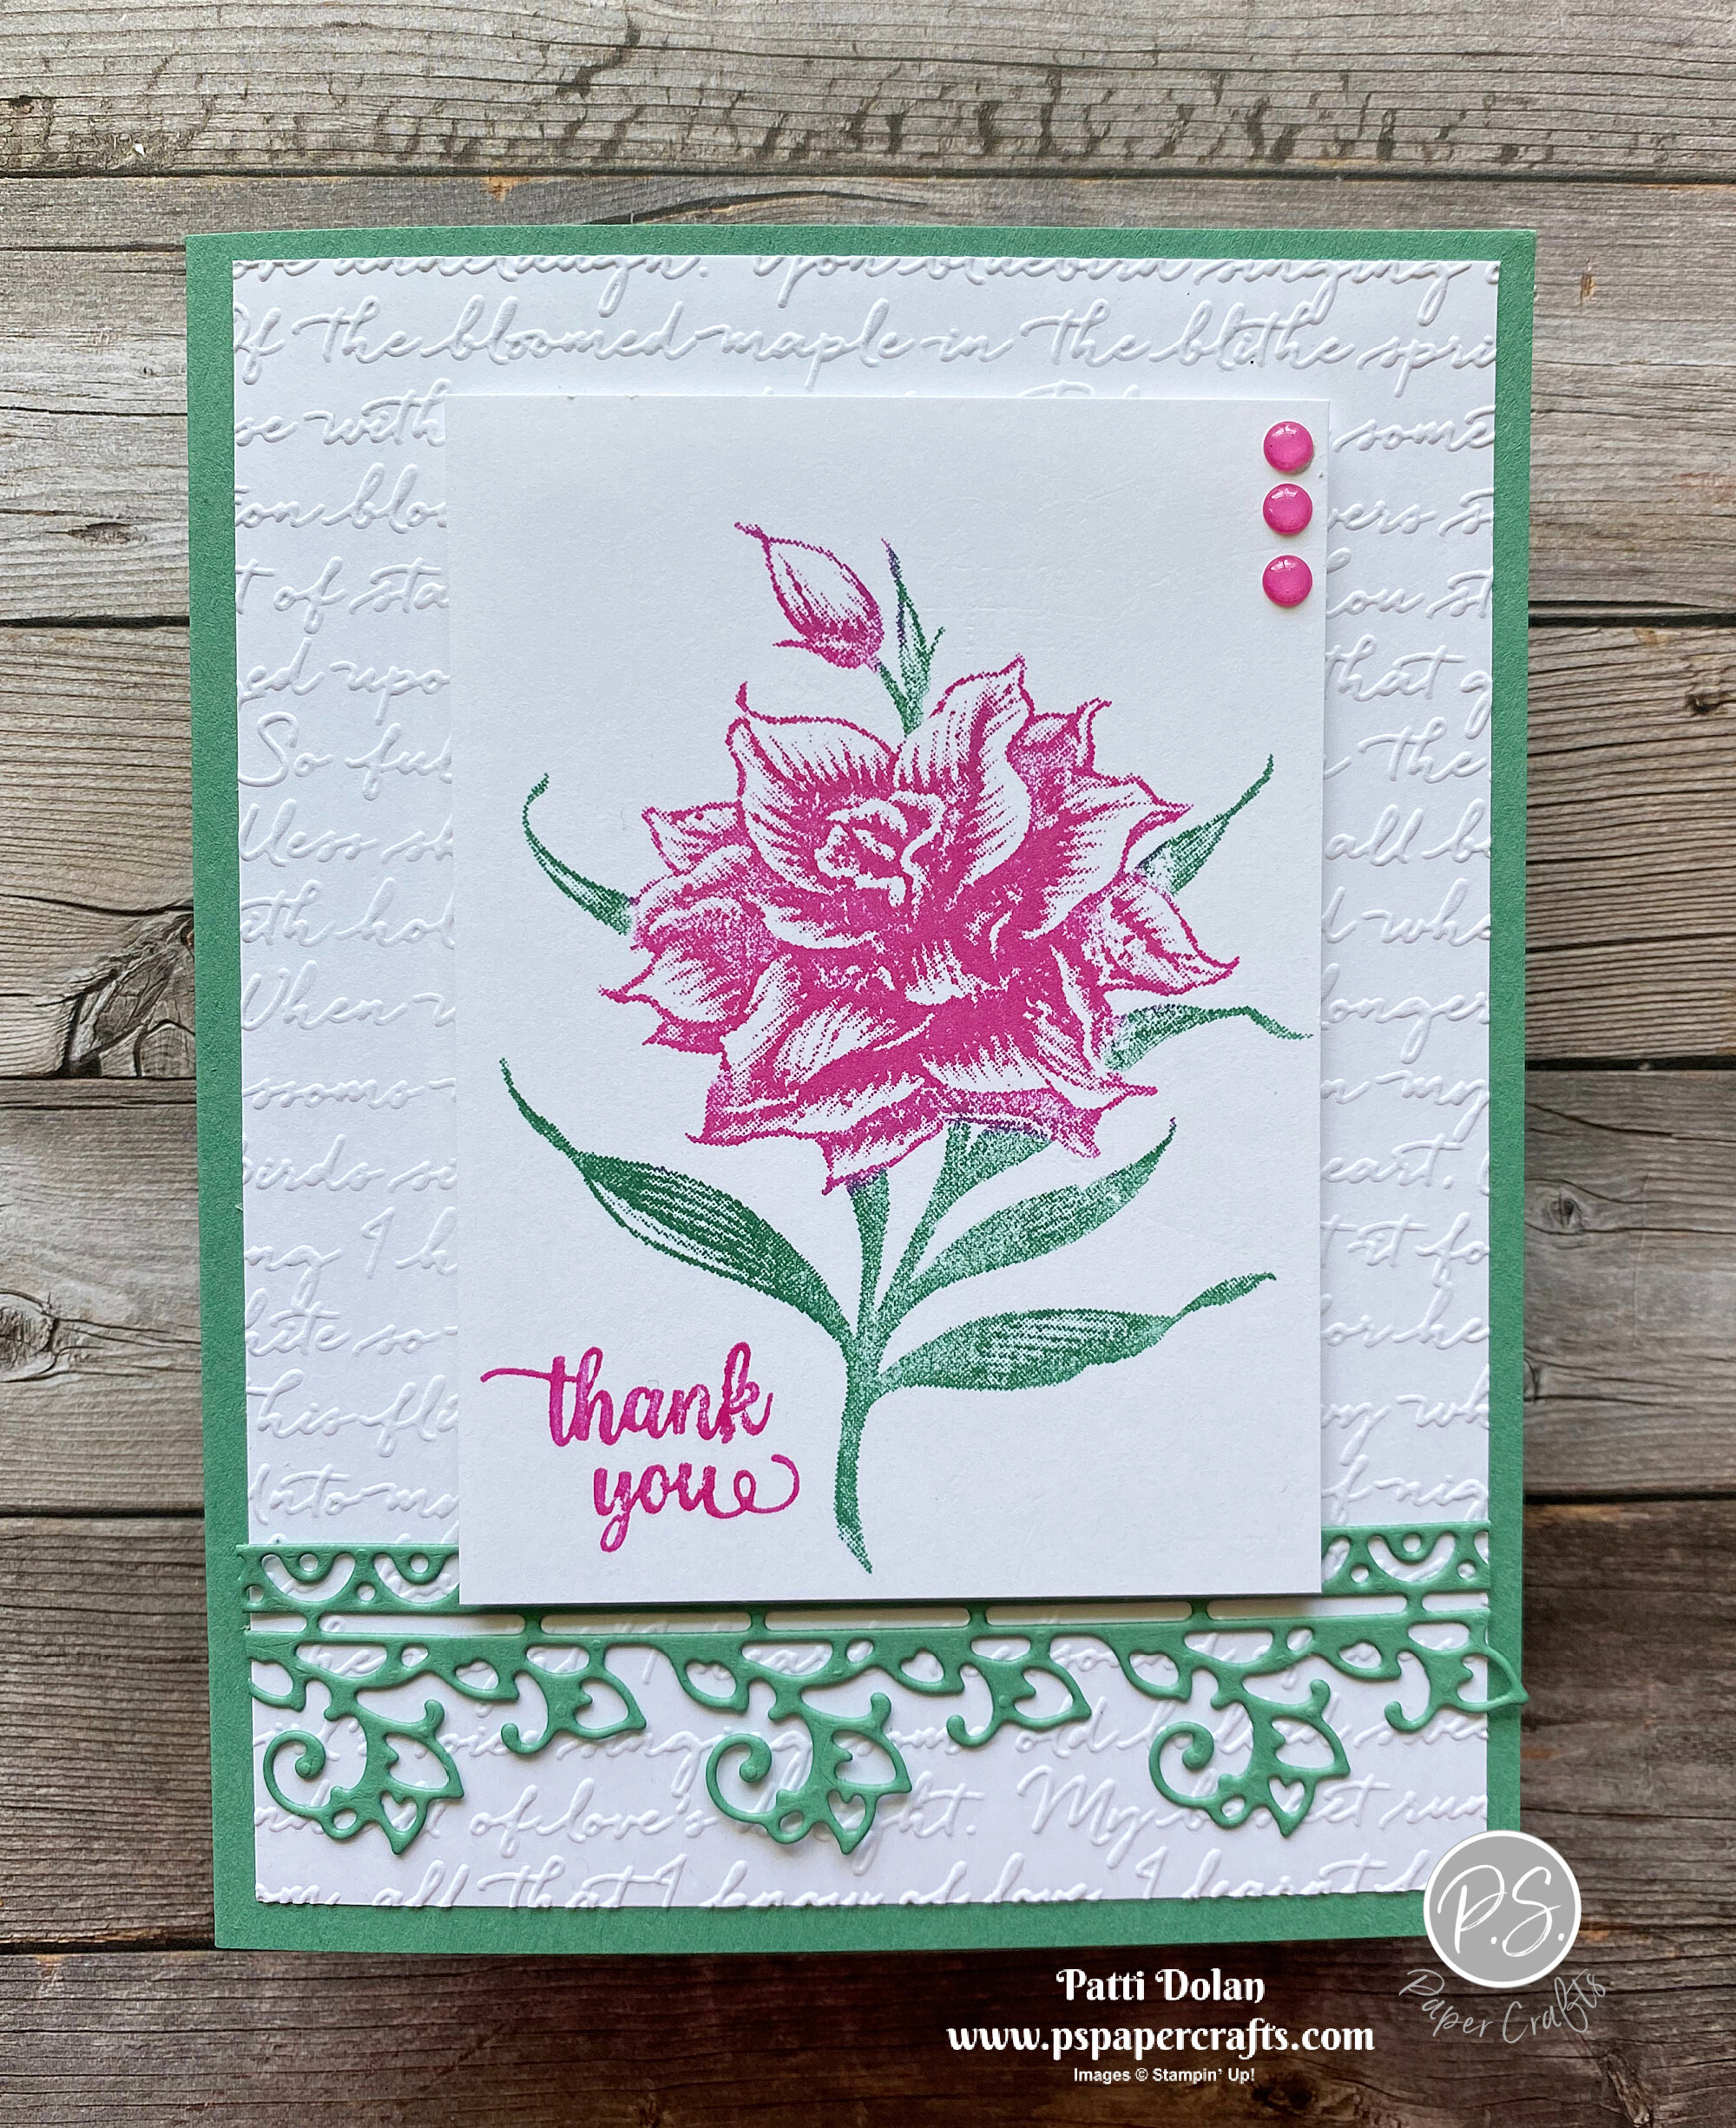
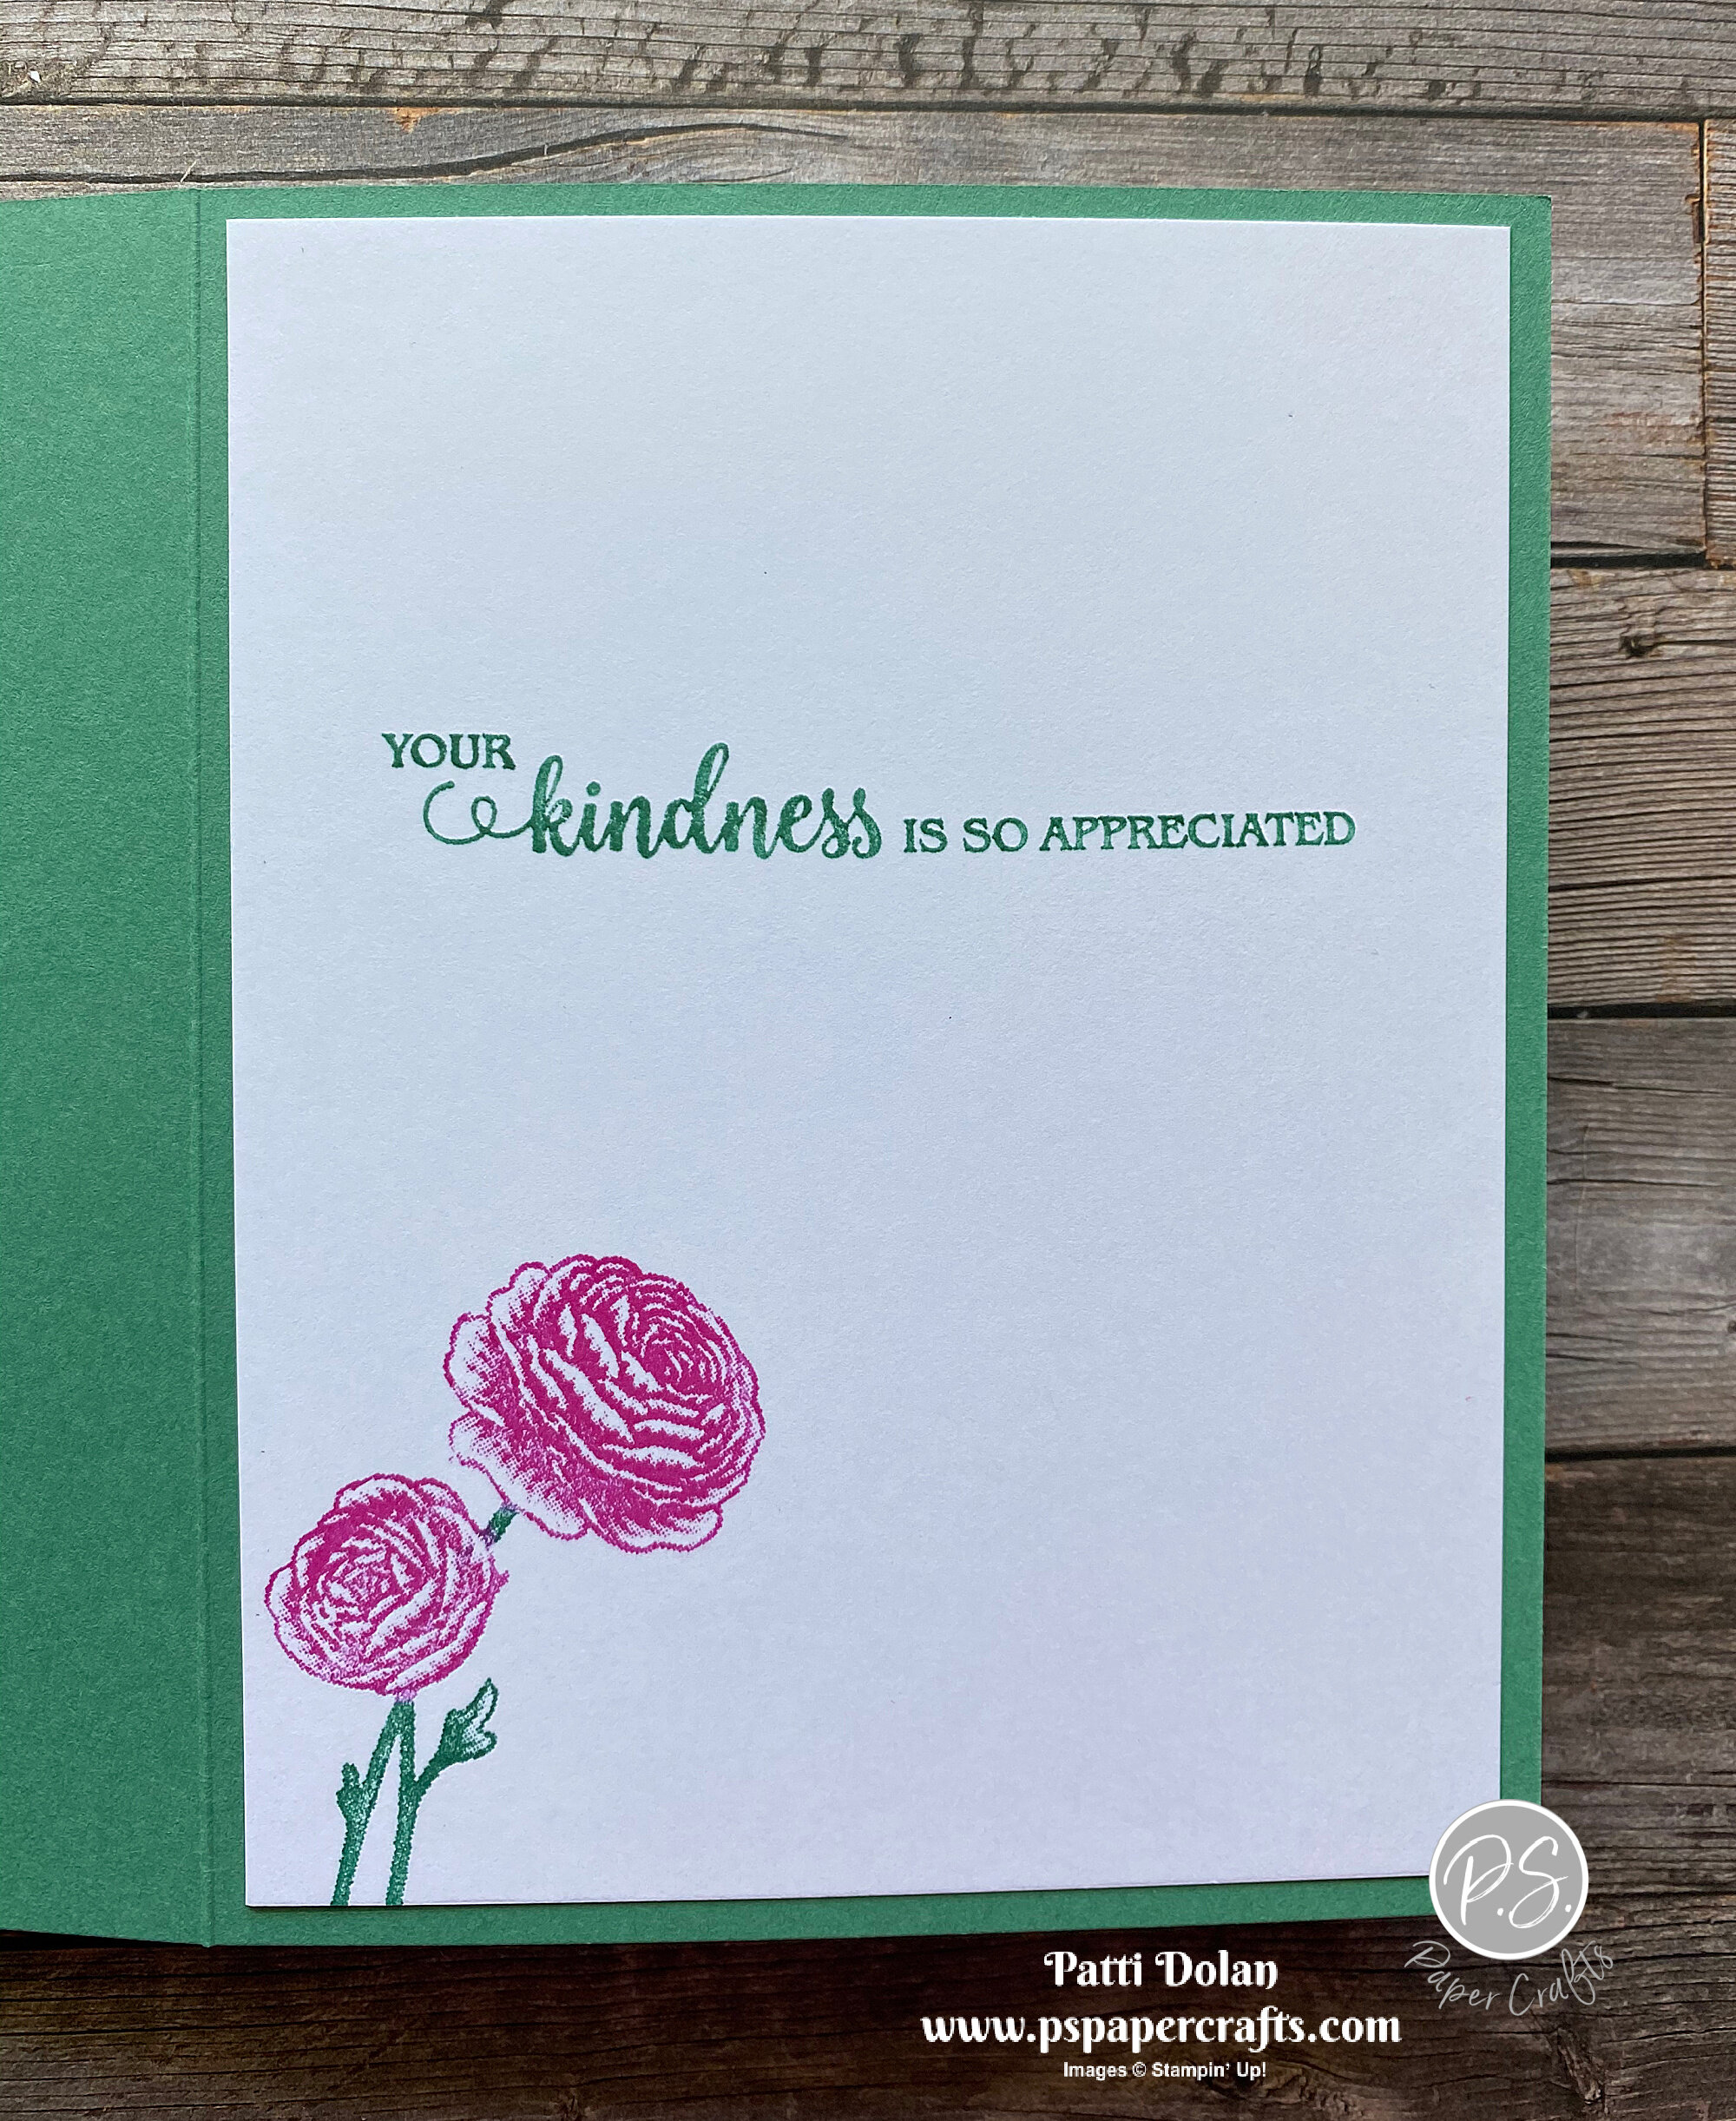
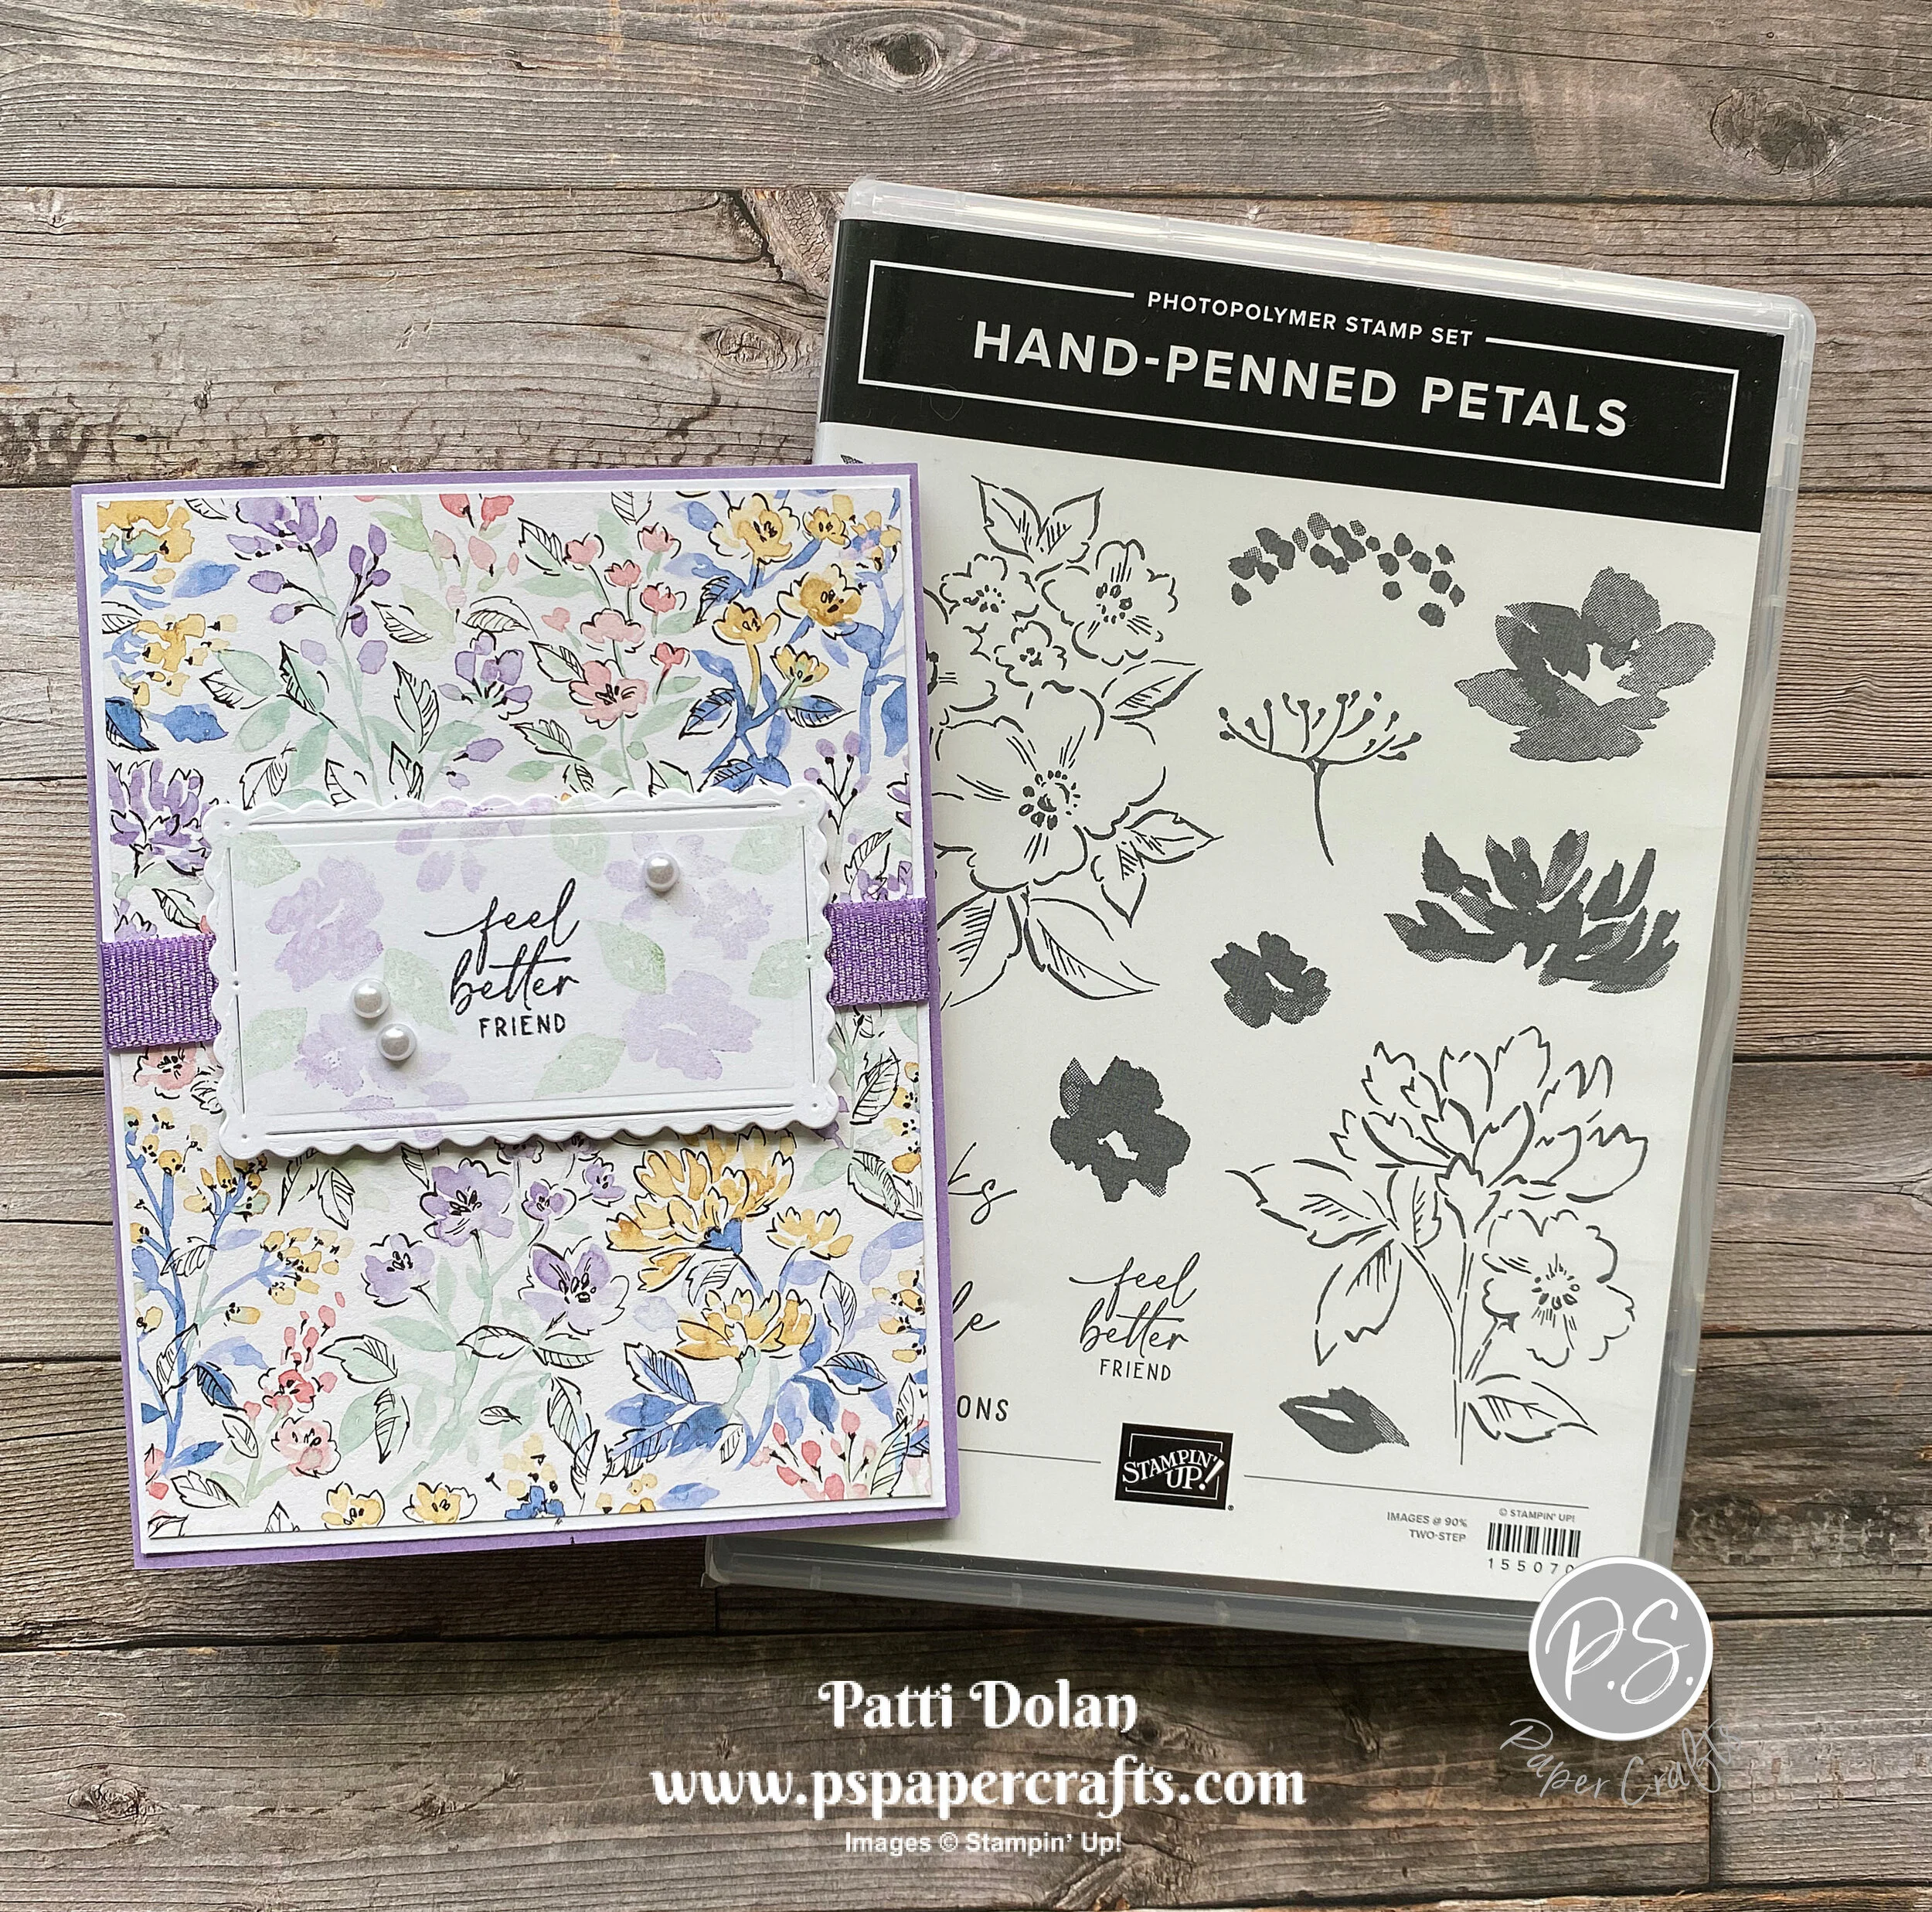
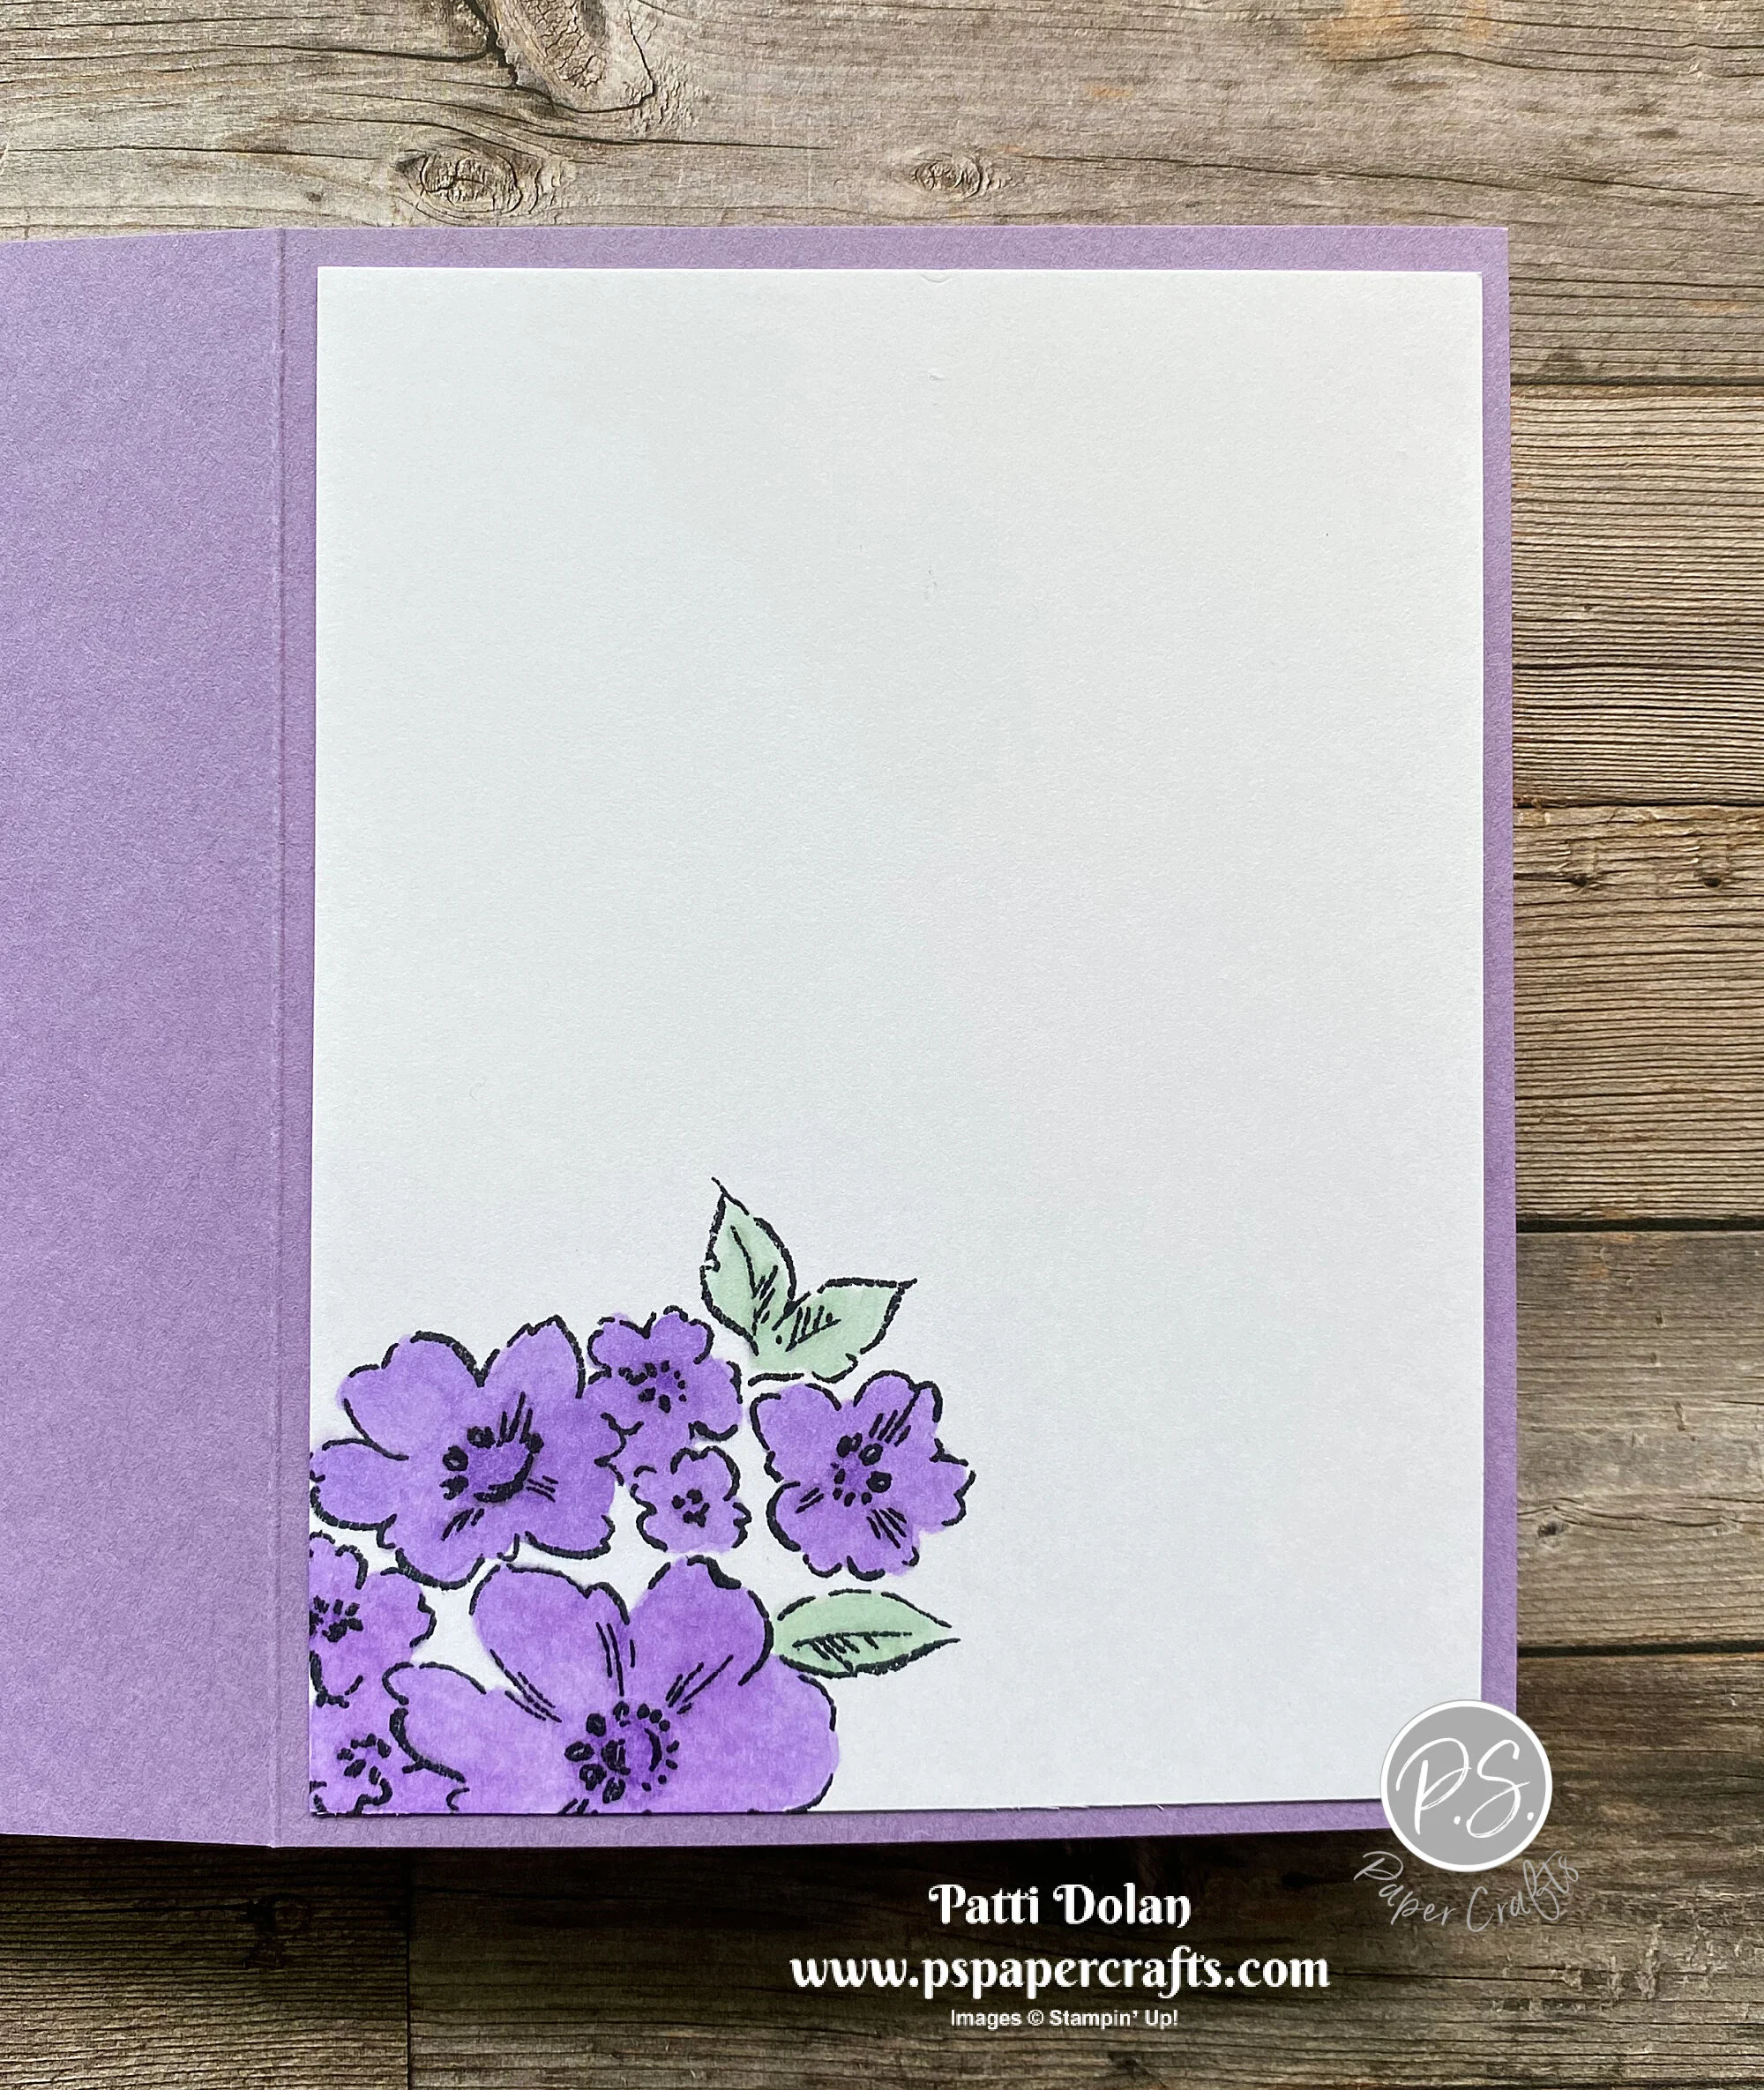
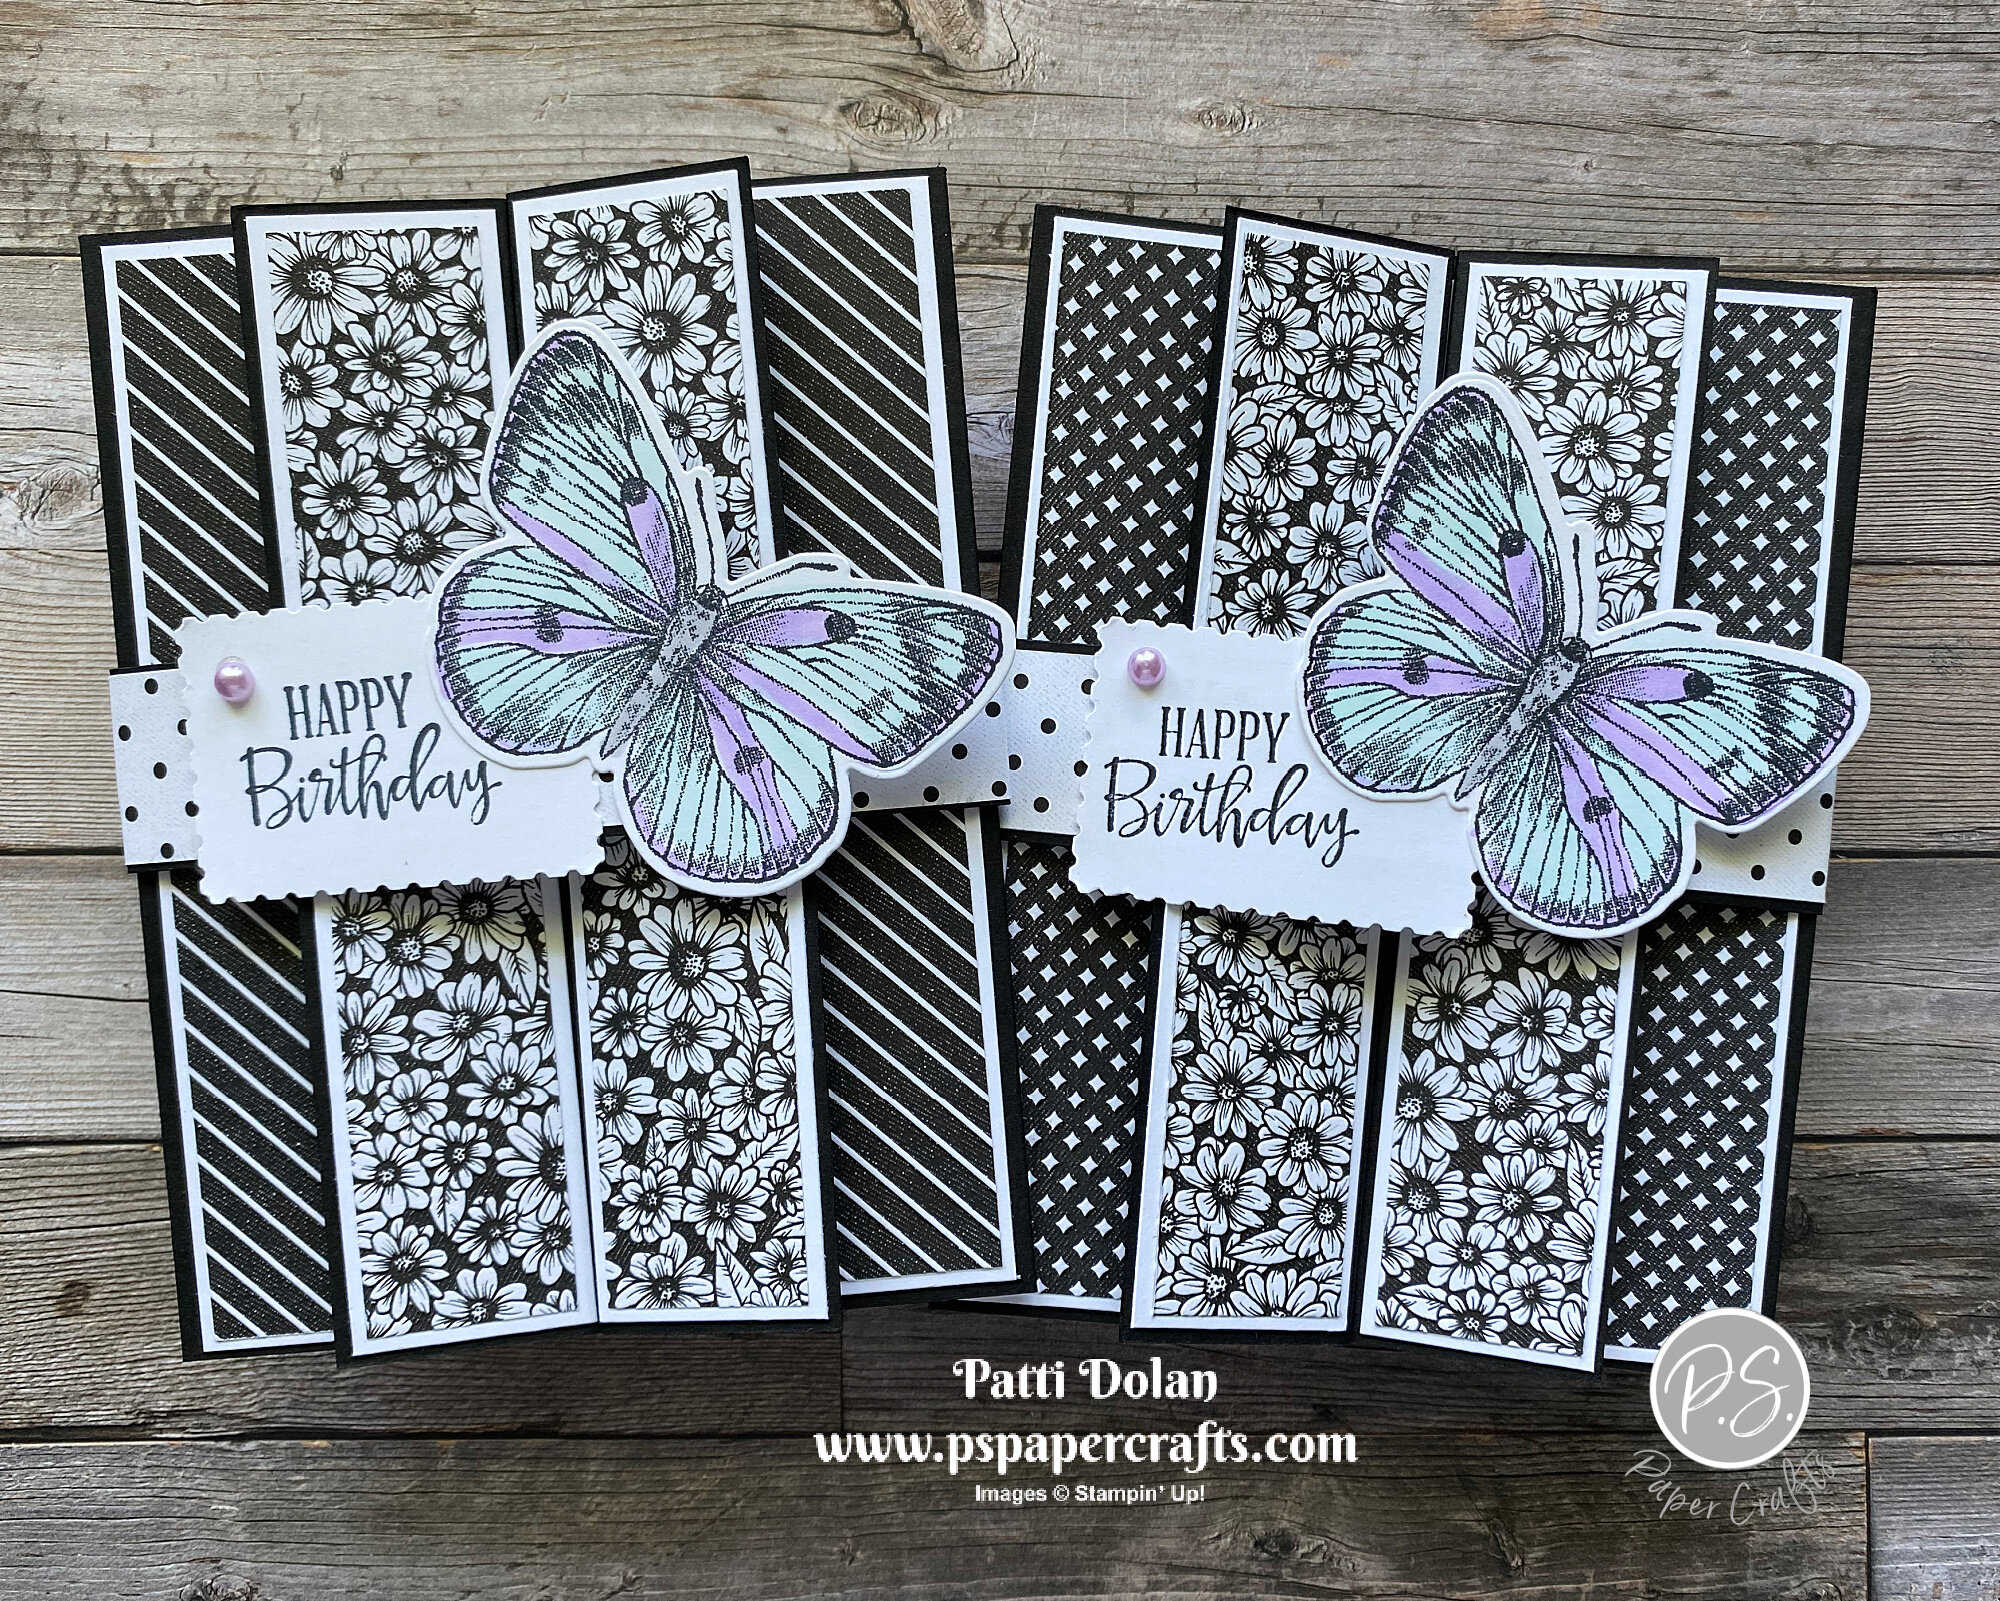
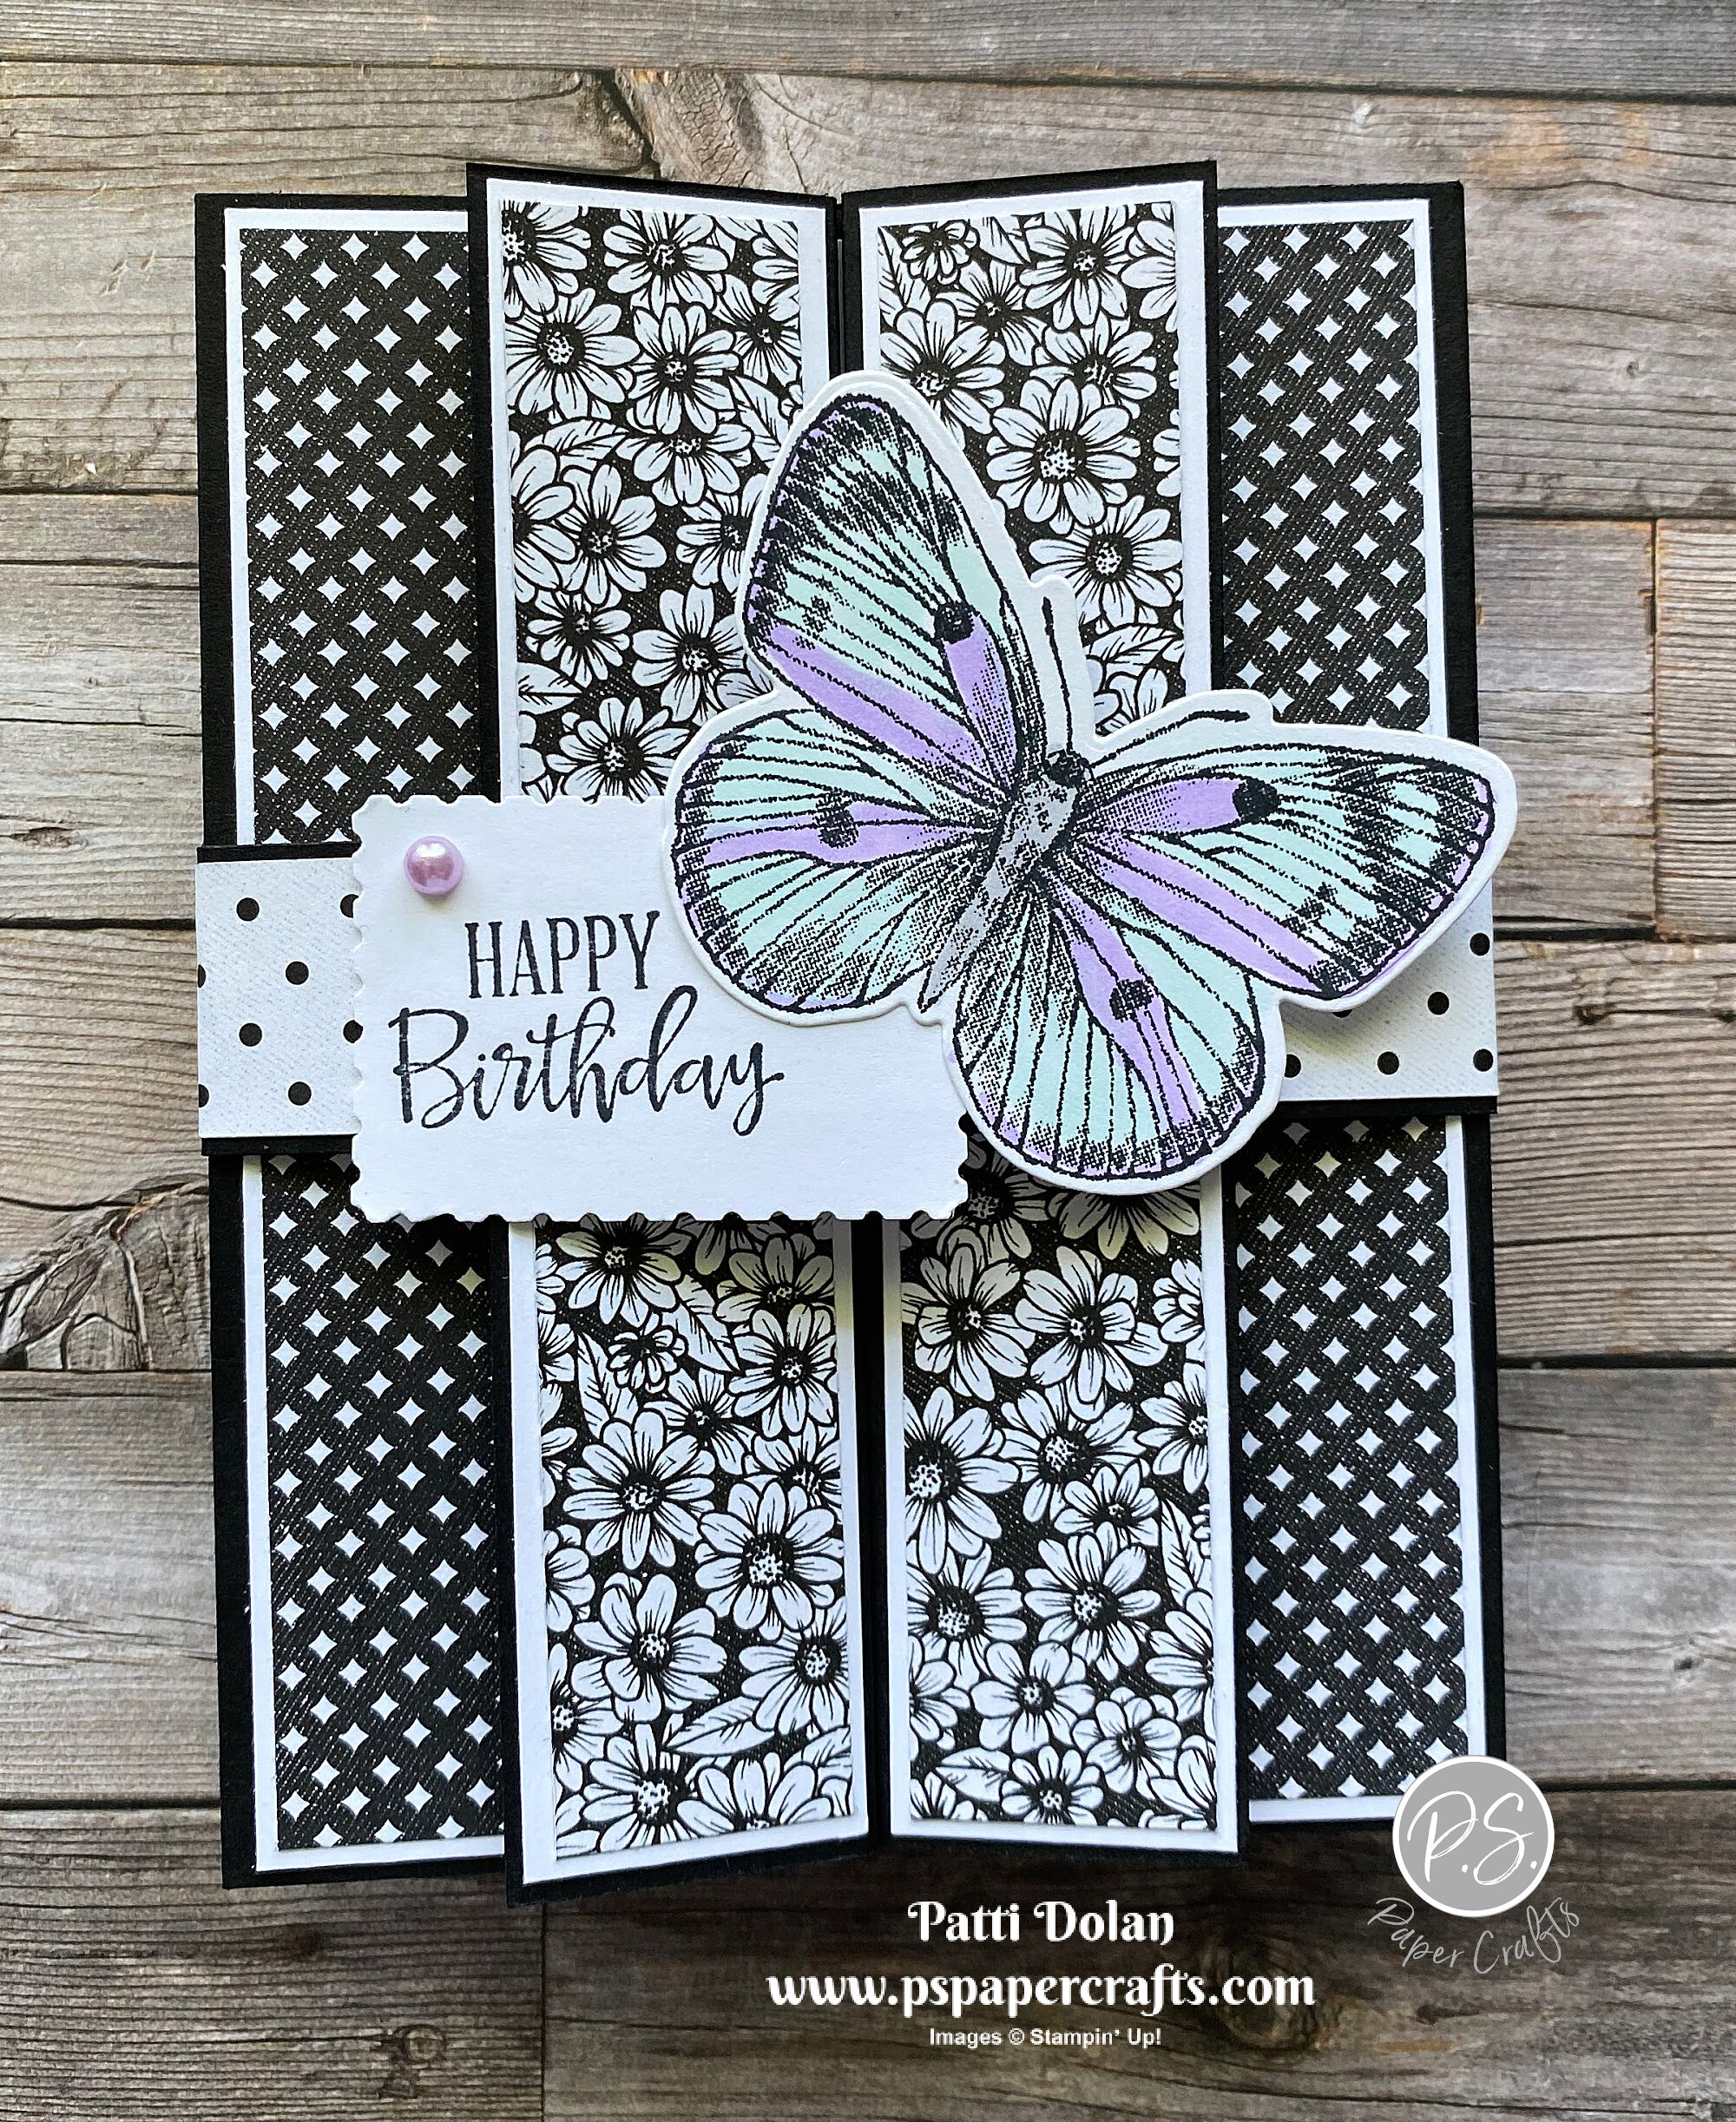
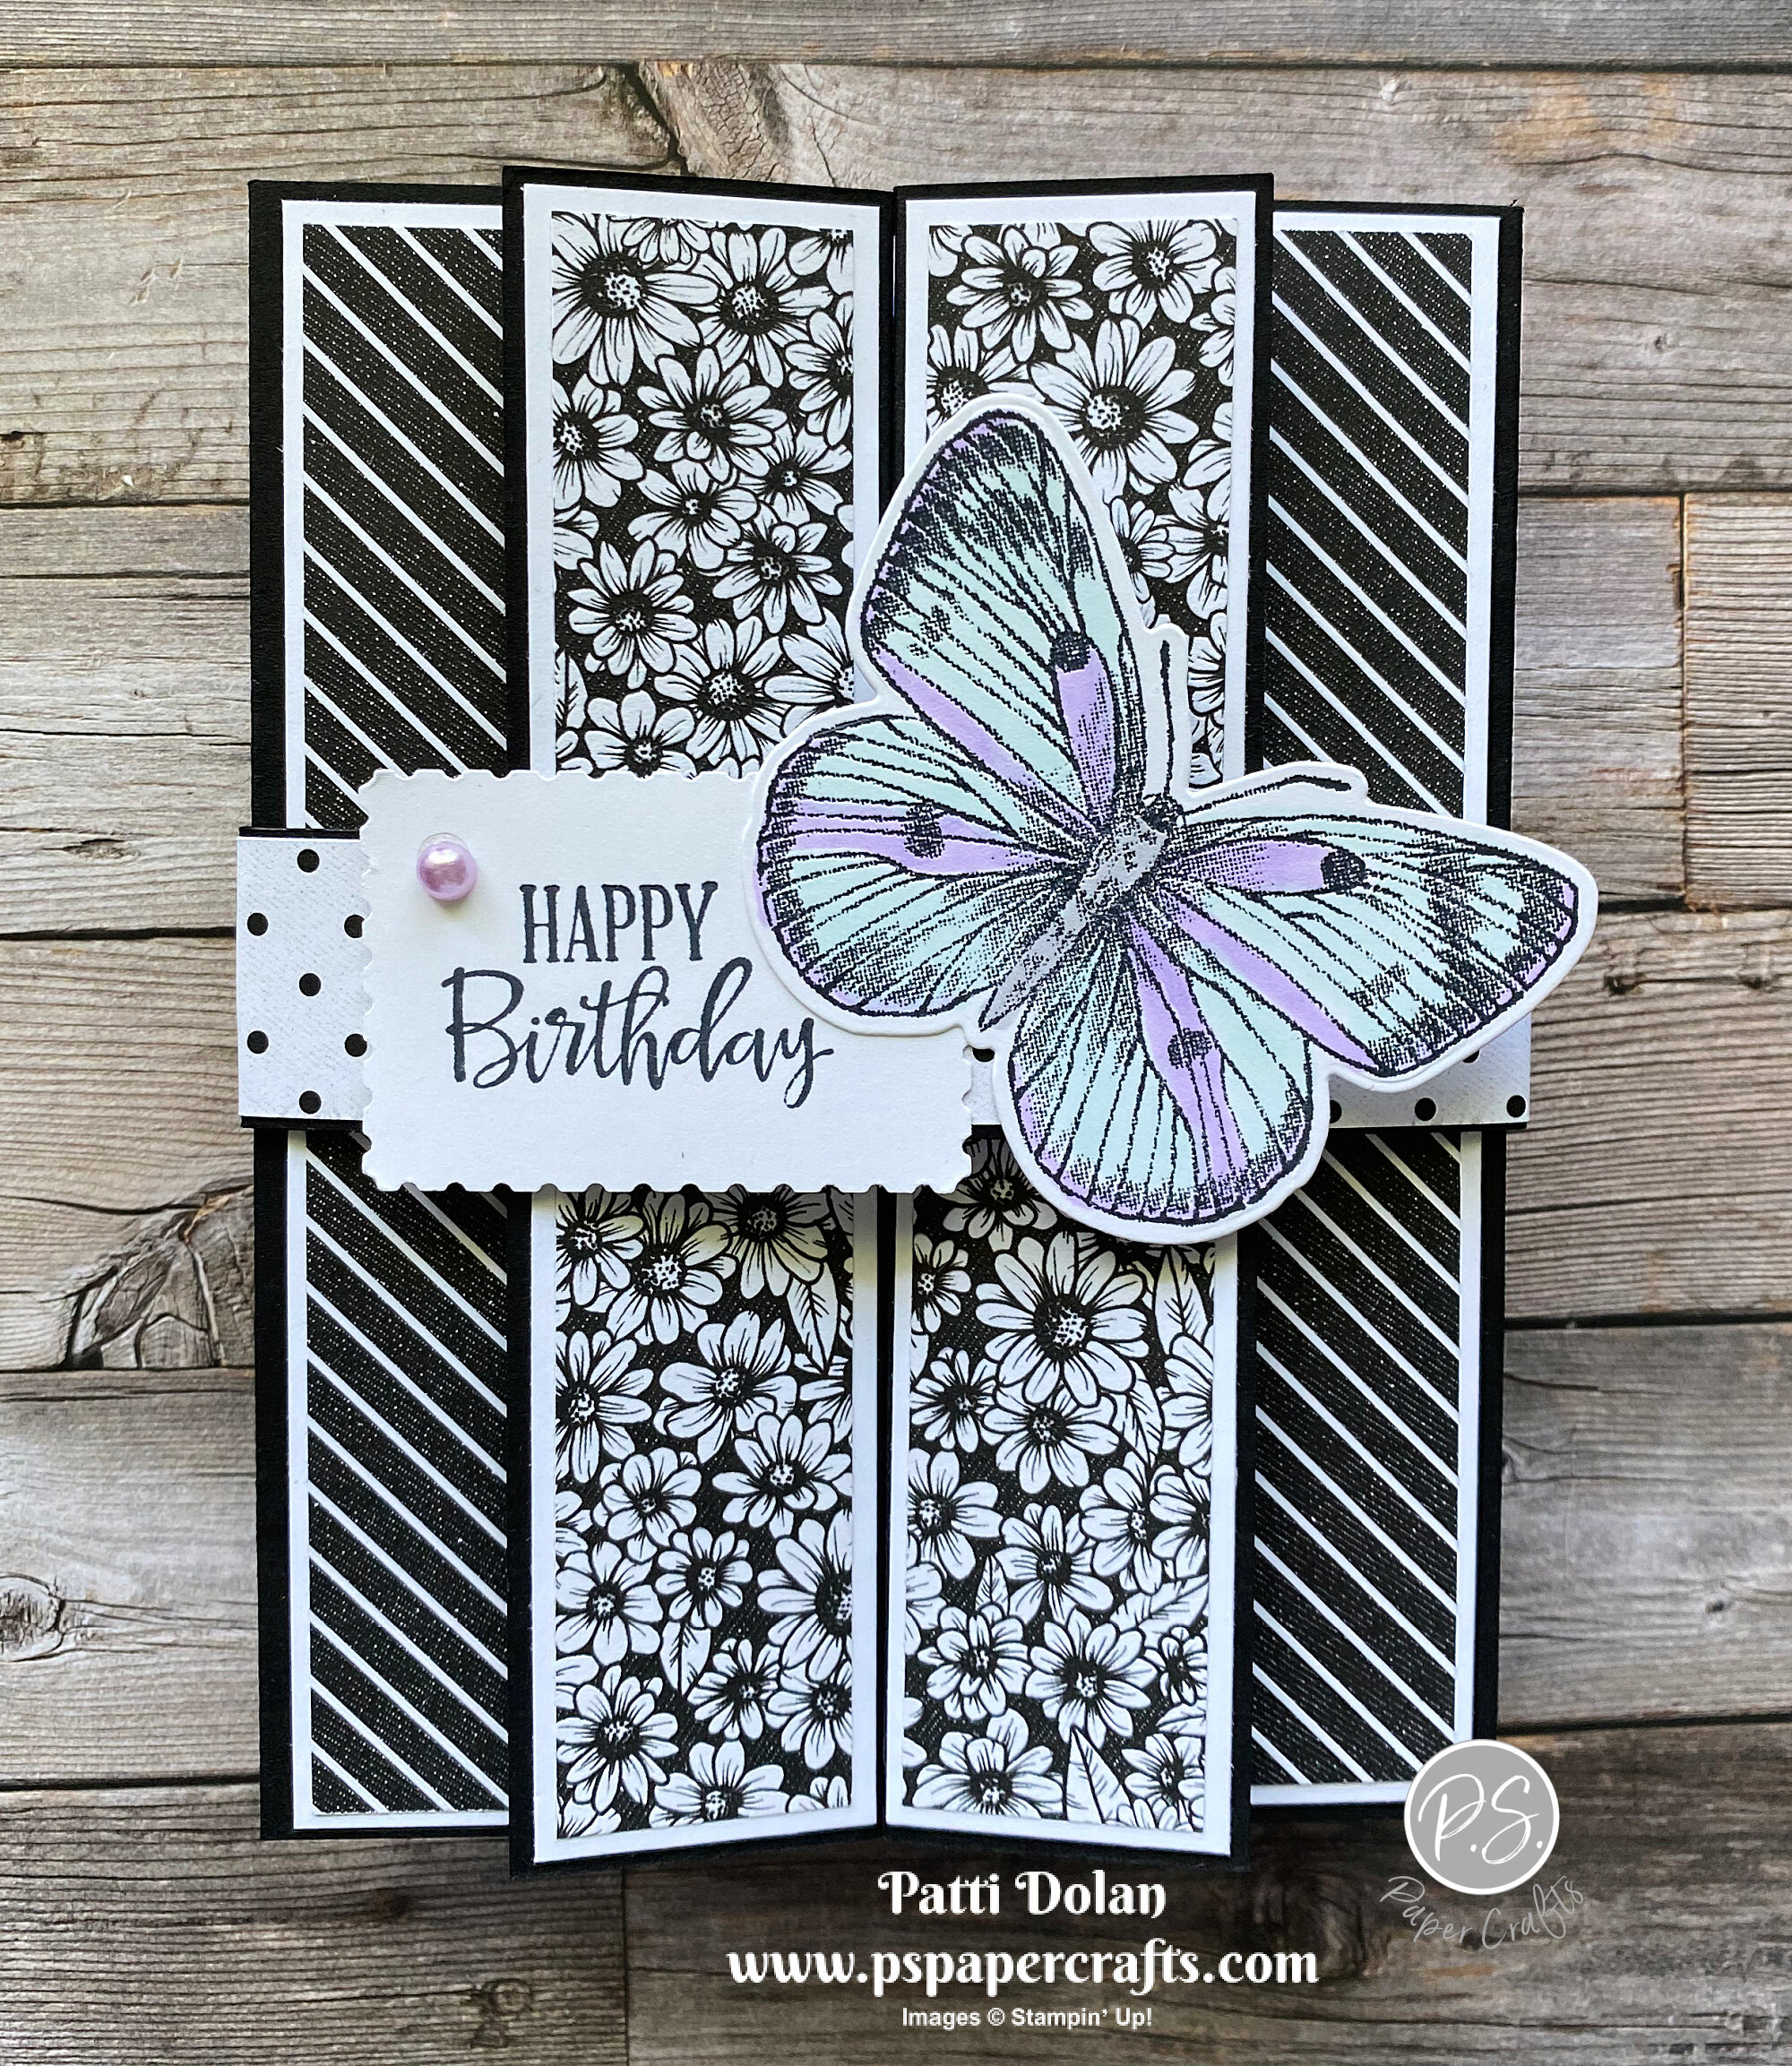
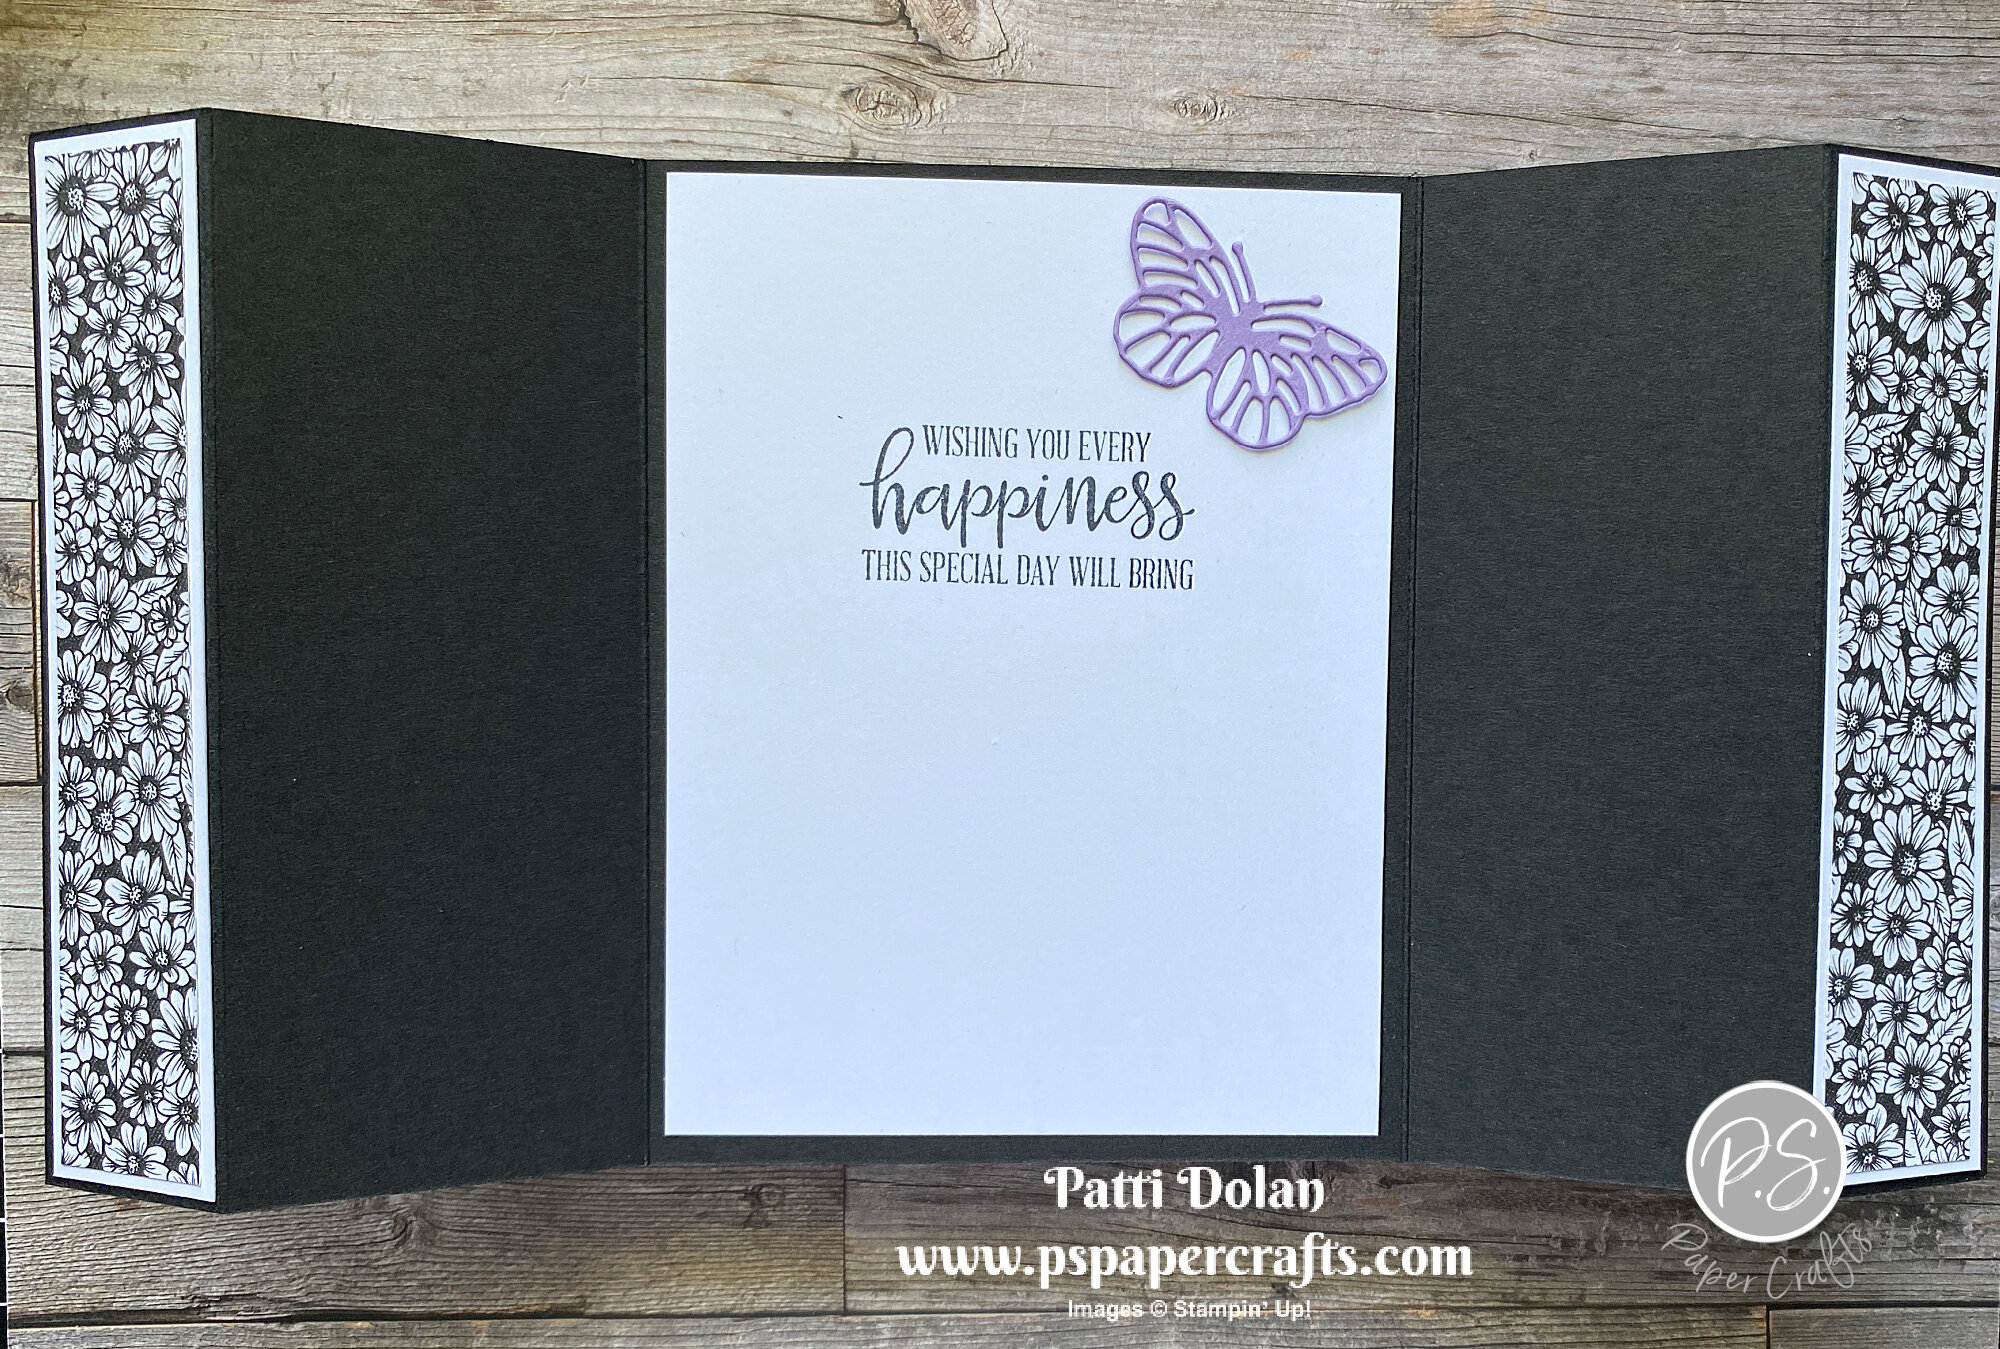
I’ve been using background stamps lately and wanted to play with the Wild Roses Stamp. It creates such a beautiful background. The sentiment is from the Sunny Sentiments Stamp Set. These sentiments just make me happy!!!

 
Sunny Sentiments Hello Card stamp.jpeg
 

In the video I’ll show you how to ink up the stamp and then used a Sponge Dauber to color the centers of the flowers. I used the Stamparatus because the stamp is so large.


Tips & Procedures

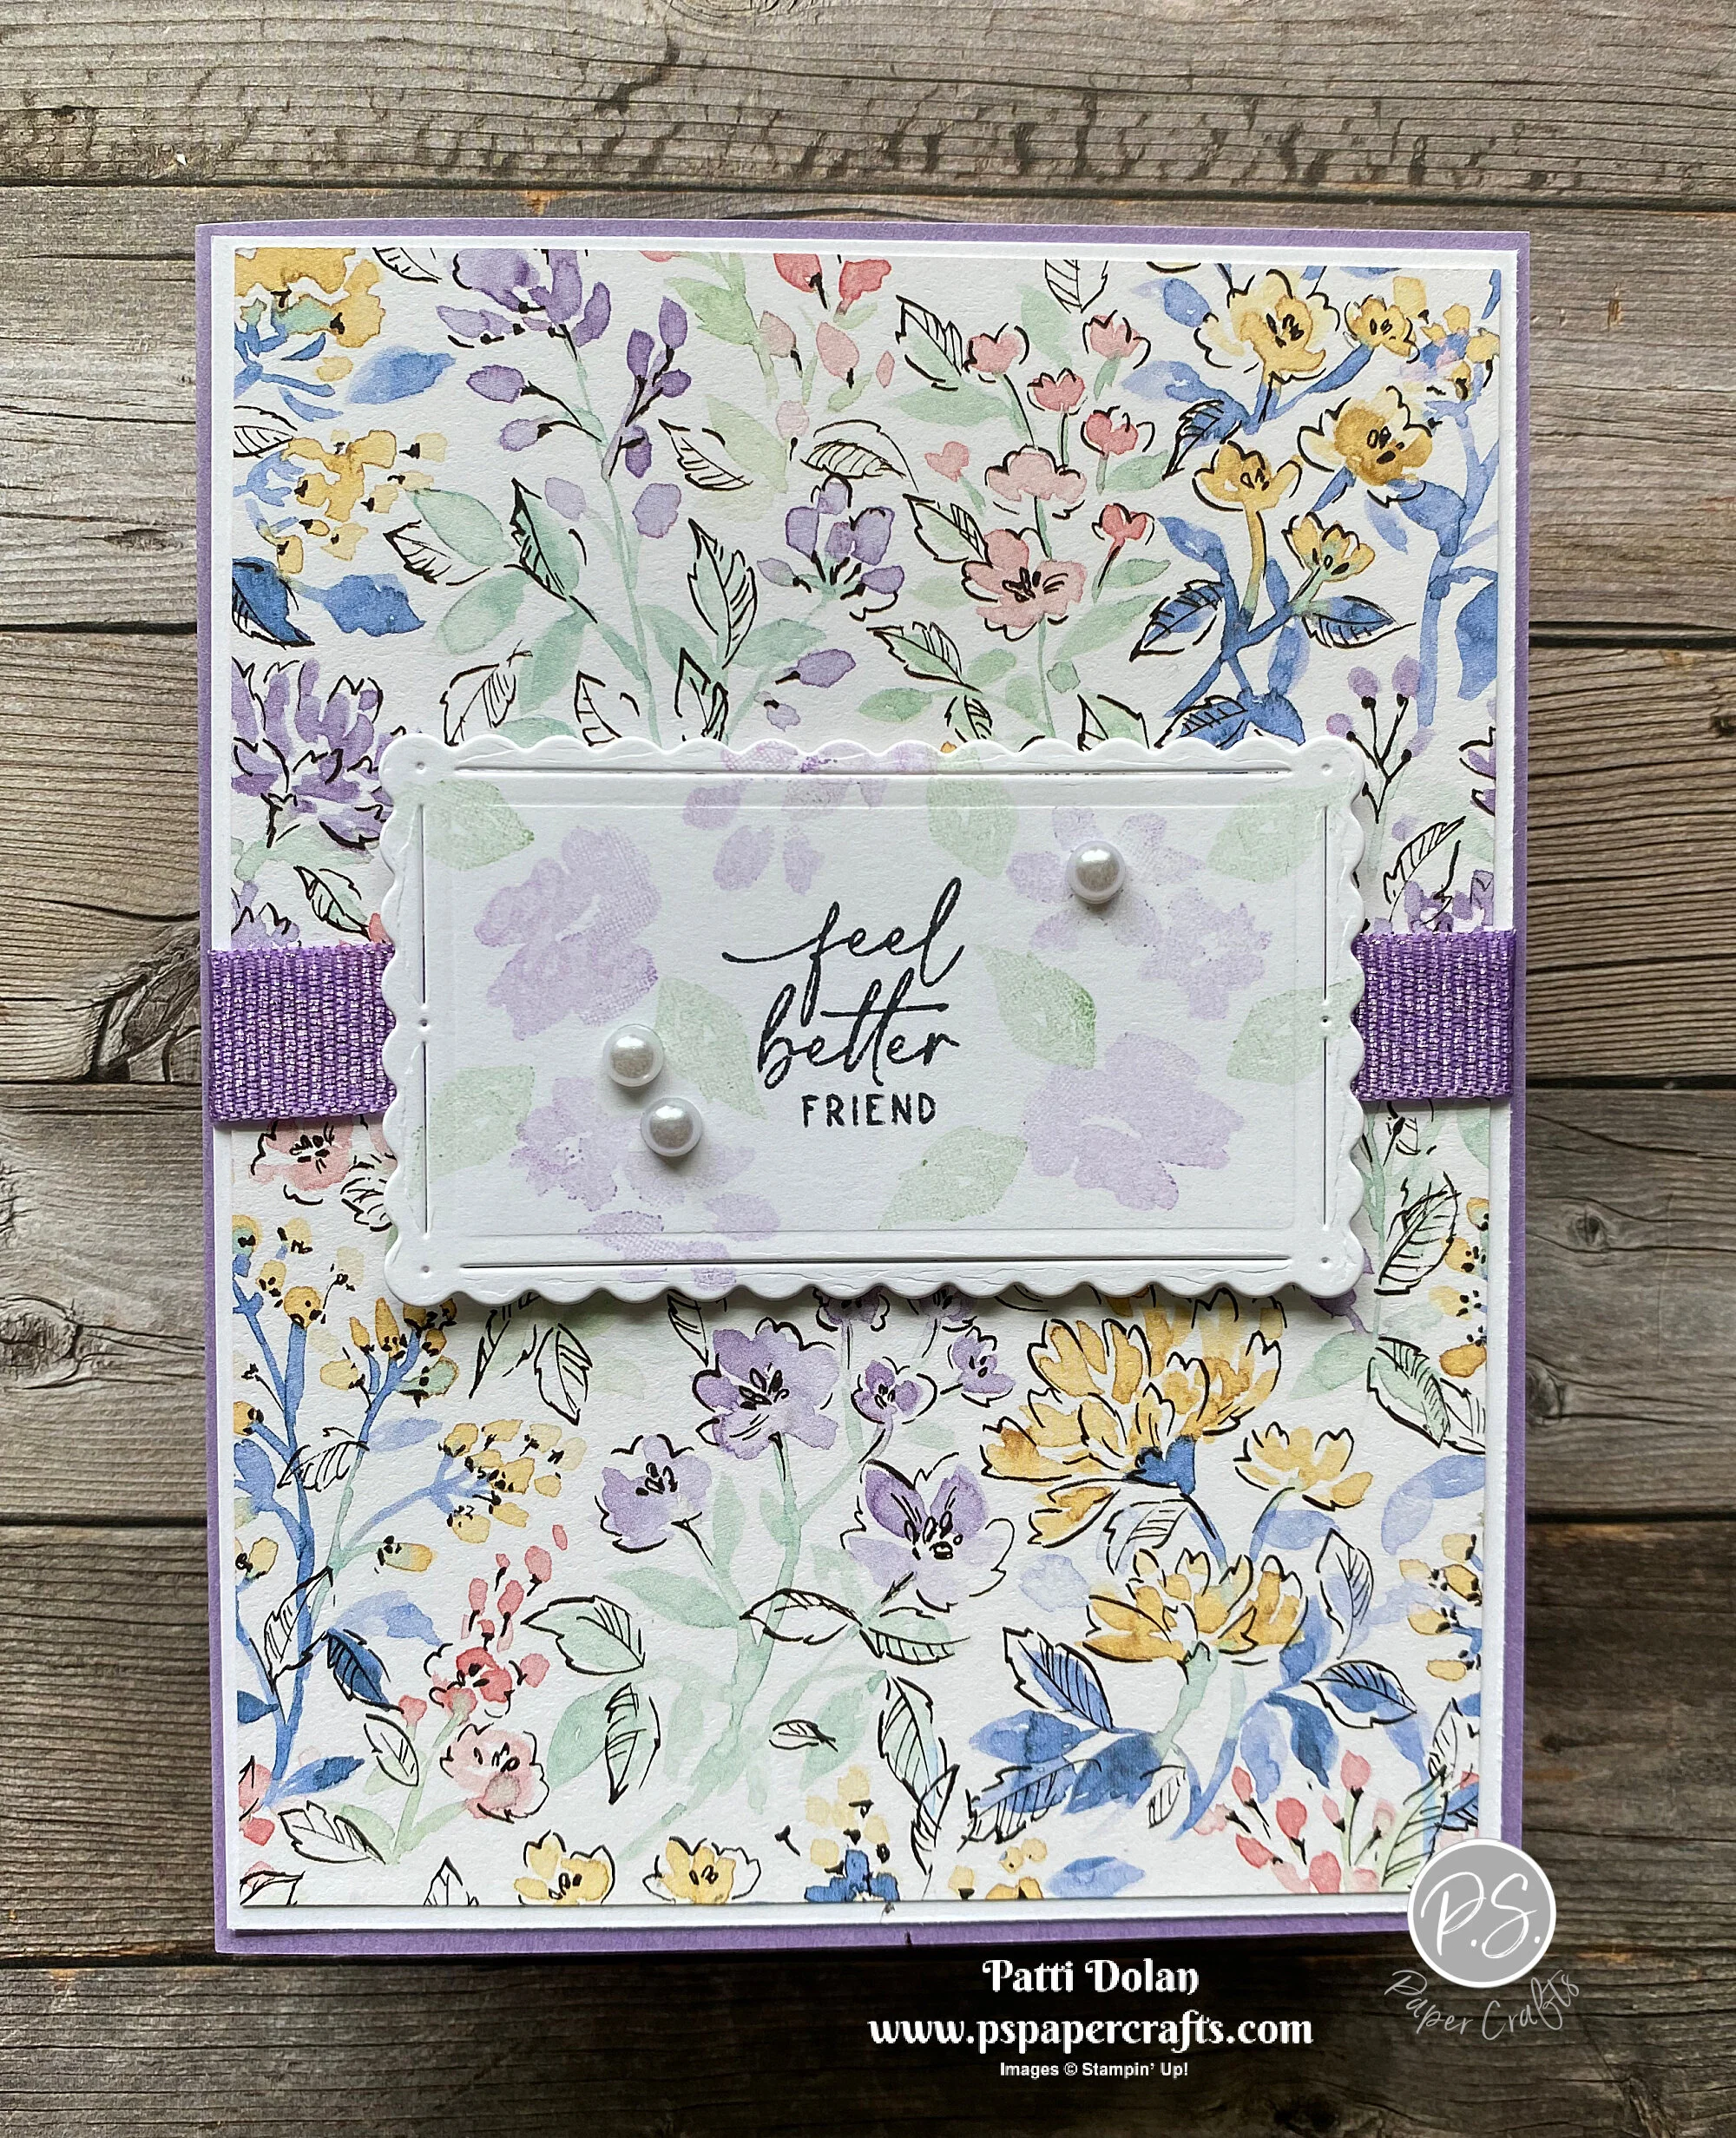
  • Mango Melody Card Base - 5 1/2 x 8 1/2, score at 4 1/4

  • Basic White Layer - 5 1/4 x 4,

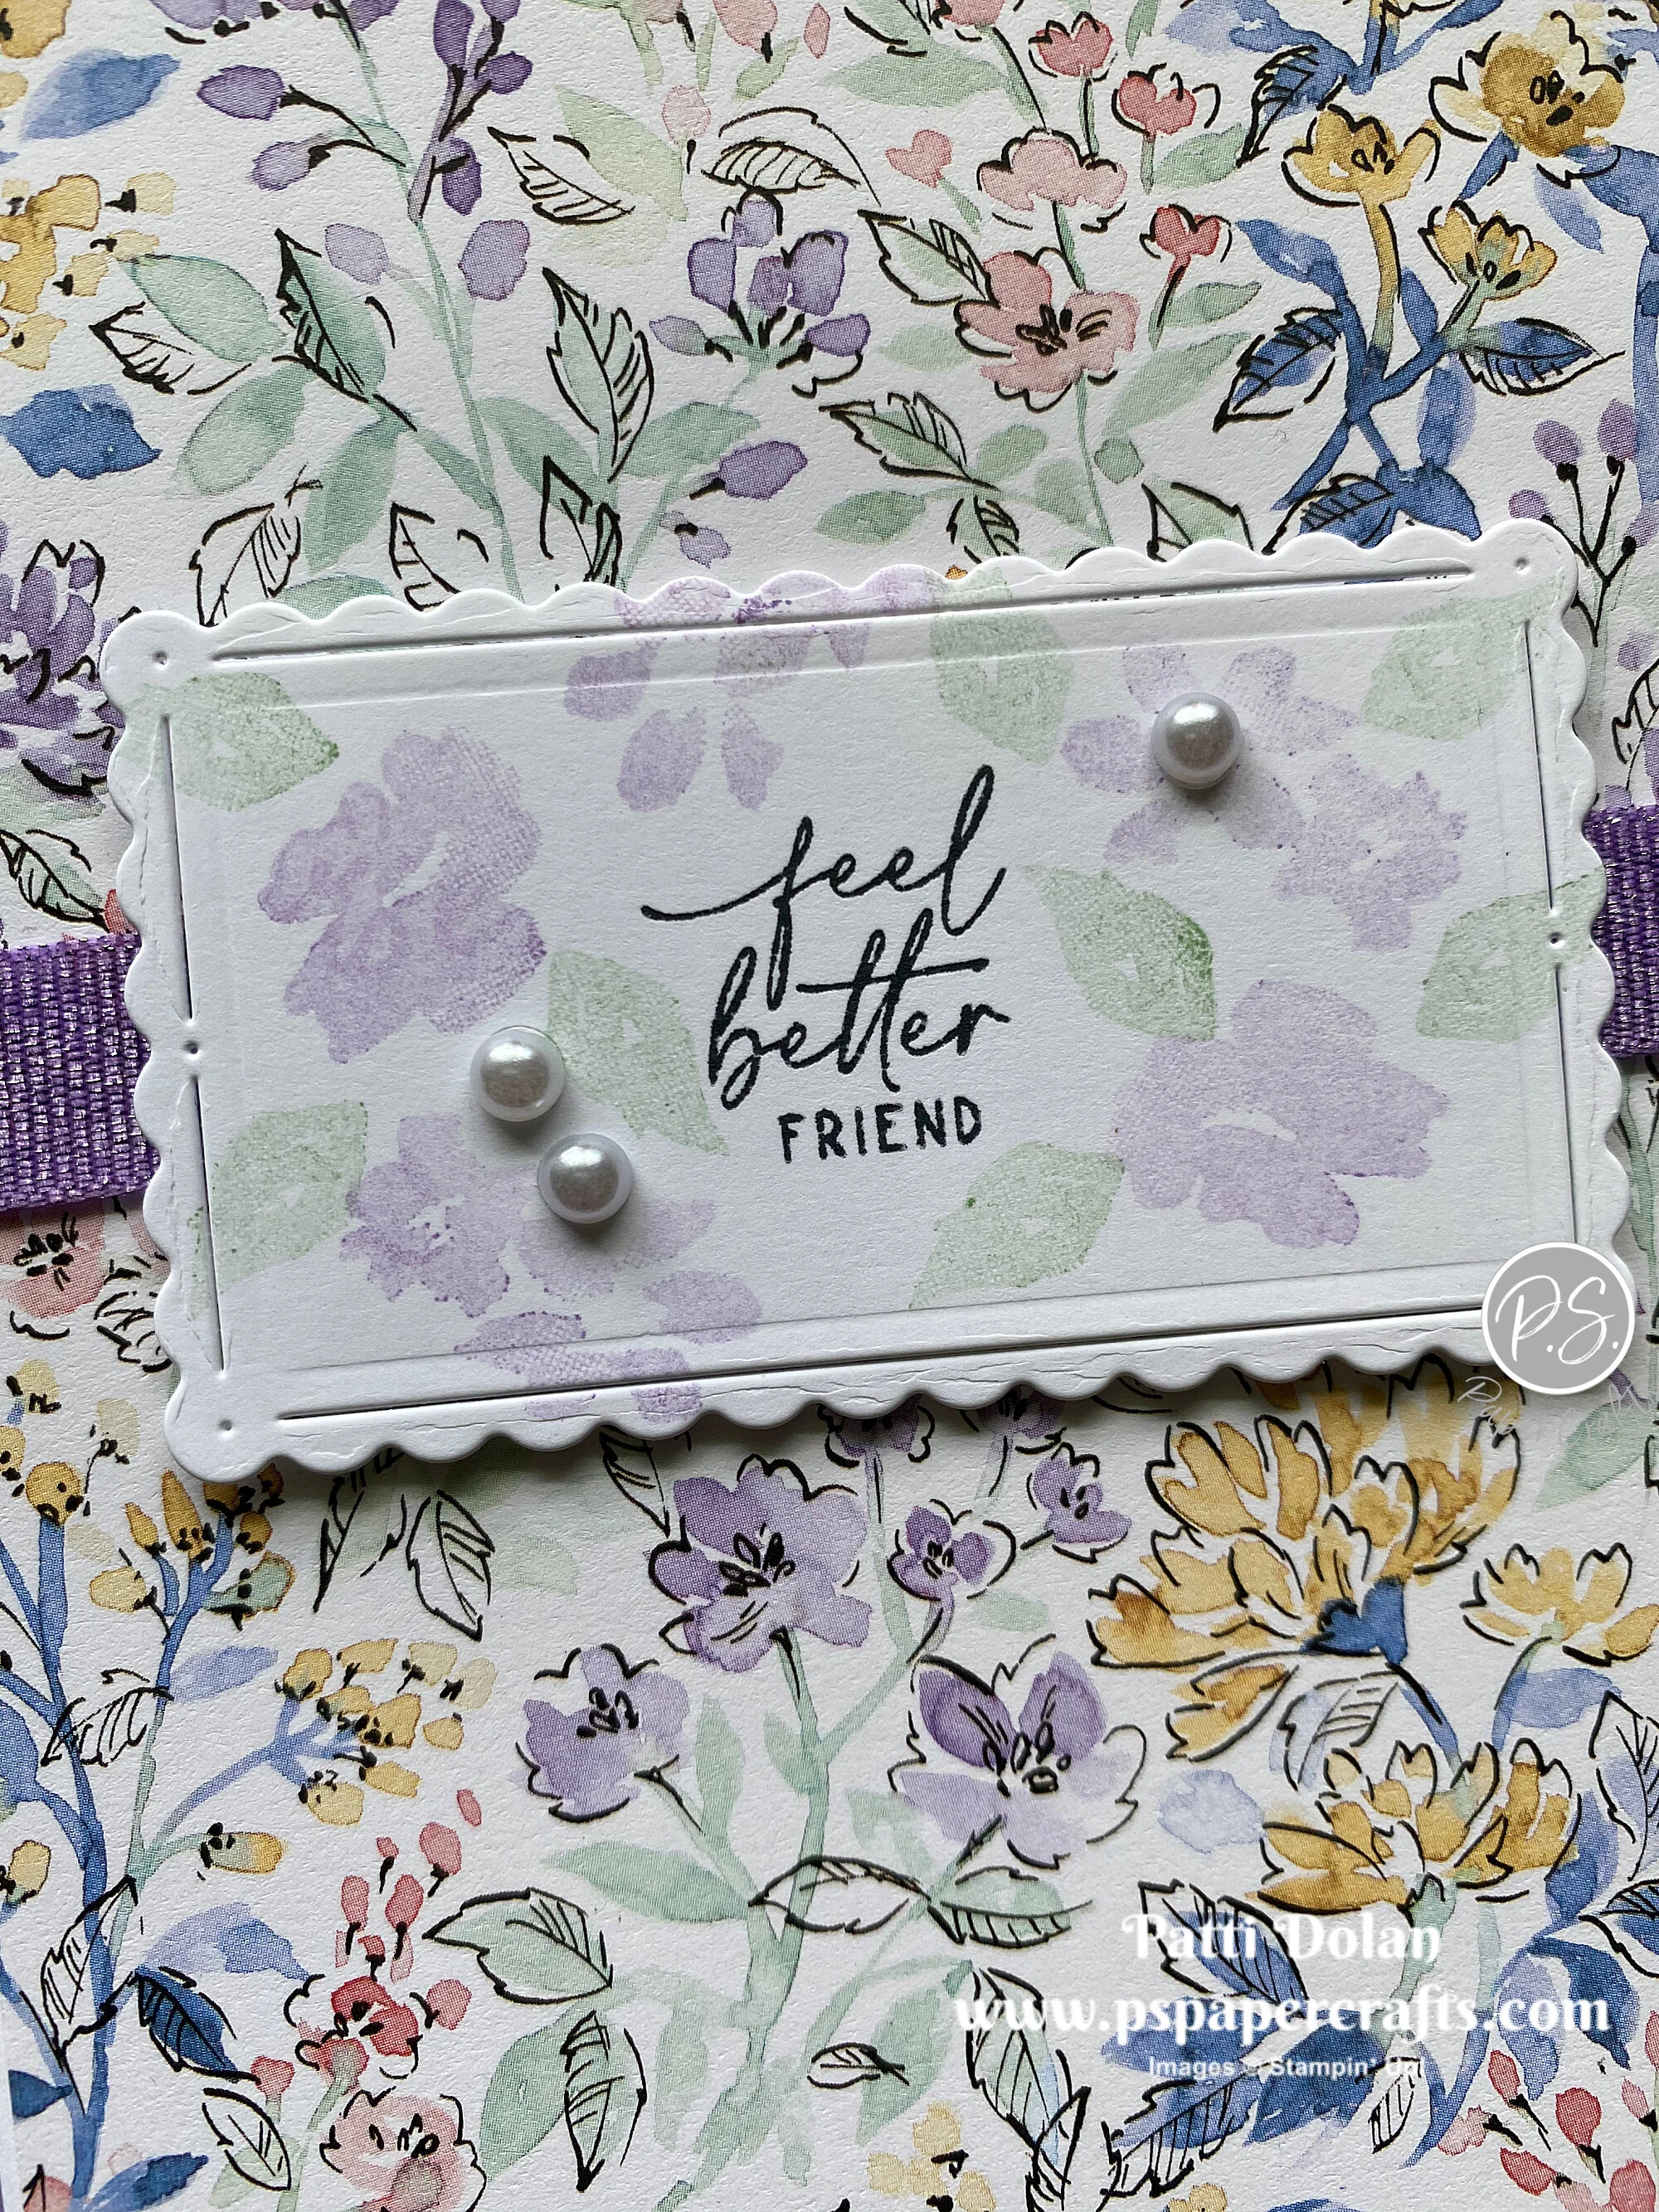
  • Basic White Layer to be stamped - 5 x 3 3/4

  • Ink up the entire stamp. I used the Stamparatus to make it easy to manage. Using a Sponge Dauber to add Melon Mambo Ink to the centers of each flower.

  • Stamp on the 5 x 3 3/4 layer and adhere to white layer.

  • Melon Mambo Strip - 4 x 3/4, adhere to layers.

  • Wrap White Ribbon around layers and strip and adhere to back. Adhere layers to card base.

  • Stamp sentiment on scrap of Basic White with Mango Melody Ink and punch with the Rectangular Postage Stamp. Adhere over ribbon using Dimensionals.

  • Add two Playing with Patterns Resin Dots.

 
Sunny Sentiments Hello Card1.jpeg
 

Follow the same steps using Blackberry Bliss Cardstock and Daffodil Delight and Blackberry Bliss Ink.

 
Sunny Sentiments Hello Card2.jpeg
 

On the inside stamp sentiment with coordinating ink.

 
Sunny Sentiments Hello inside.jpeg
 

Supply List

Daisy Garden Sympathy Card

Don’t you just love background stamps. I used the new Daisy Garden Stamp for this card. I embossed it with White Embossing Powder and then colored with Watercolor Pencils to give it a soft look.

 
Daisy Garden Sympathy Card2.jpeg
 

The Daisy Garden Stamp will cover your entire card front. I used my Stamparatus so I could stamp it twice with Versamark to be sure I had good coverage.

 
Daisy Garden Sympathy Card stamp.jpeg
 

Once I heat embossed it, I colored the leaves and flower centers with Watercolor Pencils and then used a Blender Pen to soften it up.

 
Daisy Garden Sympathy Card pencils.jpeg
 

Tips & Instructions

  • Old Olive Card Base - 5 1/2 x 8 1/2, score at 4 1/4

  • Crumb Cake Layer - 5 3/8 x 4 1/8, stamp the daisy image with Versamark Ink. This is where the Stamparatus came in handy. I was able to stamp the image twice to get good coverage and it is also helpful to manage such a large stamp.

  • Pour White Embossing Powder over the image, shake off the excess and heat with your Heat Tool.

  • Color the flower centers with a Early Espresso and the leaves with Old Olive Watercolor Pencils. Blend with a Blender Pen.

  • Wrap Linen Thread around the layer 3 times and adhere to the back. Adhere layer to card base.

  • Stamp sentiment (from Inspired Thoughts) on Basic White scrap with Old Olive Ink and punch with the Label Me Fancy Punch. Adhere to card using Dimensionals.

  • Tie bow with Linen Thread and adhere with Glue Dot.

 
Daisy Garden Sympathy Card1.jpeg
 

On the inside stamp portion of the daisy with Old Olive Ink and color with Watercolor Pencils. I used Early Espresso for the flower centers, Daffodil Delight for the flowers and Old Olive for the leaves and stems. Blend with a Blender Pen making sure you clean it often when coloring the yellow because it will pick up the green from the stamped image. Stamp the sentiment with Old Olive Ink.

 
Daisy Garden Sympathy Card inside.jpeg
 

Supply List

Pretty Sending Hugs Cards

I made these 3 pretty cards using the Sending Hugs Bundle. There is so much you can do with this bundle.

 
Whatever it is, the way you tell your story online can make all the difference.
 

In the video I’ll show you the bundle and the different ways to use it. I’ll make the purple card and walk you through the steps.


This bundle jumped out at me the very first time I looked through the catalog. I love that you can layer the “HUGS” on the stamped image or die cut image!

 
Whatever it is, the way you tell your story online can make all the difference.
 

Tips & Instructions

  • Gorgeous Grape Card Base - 5 1/2 x 8 1/2, score at 4 1/4

  • Basic White Layer - 5 1/4 x 4, cut with the Stitched Greenery Die and adhere to card base.

  • Cut floral piece from Gorgeous Grape Cardstock using the large floral die from the Layering Hugs Dies.

  • Cut the HUGS letters from the light side of the Gorgeous Grape Ombre Specialty Paper and adhere to the floral piece. Adhere piece to card.

  • Stamp the “Sending You” and “& Kisses” on Basic White scrap with Gorgeous Grape Ink and cut with the small label die. Adhere using Dimensionals.

  • Add some Pastel Pearls.

 
Whatever it is, the way you tell your story online can make all the difference.
 

Follow the same steps as above using Evening Evergreen for the card base and floral piece and Soft Succulent for the stitched layer. I added a layer of Basic White behind the stitched layer (5 3/8 x 4 1/8). The “HUGS” was cut from a piece of the Mango Melody Ombre Specialty Paper.

 
Whatever it is, the way you tell your story online can make all the difference.
 
  • The card base for this card is Fresh Freesia and the stitched layer is Soft Succulent.

  • I stamped the large floral piece with Black Memento Ink on a piece of Basic White Cardstock and then cut it to size.

  • Color the flowers and leaves with Stampin’ Blends (Polished Pink, Pale Papaya, Soft Succulent, Fresh Freesia, Granny Apple Green, Evening Evergreen)

  • Adhere ribbon around stitched layer add stamped layer using Dimensionals.

  • Tie bow and adhere with Glue Dot. Add some In Color Jewels.

 
Whatever it is, the way you tell your story online can make all the difference.
 

Supply List

Cute Party Puffins Birthday Card

These puffins are so cute. I made this card using the Party Puffins Stamp Set. I also used the Stitched With Whimsy Dies just to make it fun!

 
Party Puffins Birthday Card2.jpeg
 

The images and sentiments in this stamp set are perfect for a kid’s card.

 
Party Puffins Birthday Card stamp.jpeg
 

This was the first time that I used the Stitched With Whimsy Dies and I didn’t realize that they add the embossed stitching but don’t actually cut them out. I fussy cut them which was so easy to do.

 
Whatever it is, the way you tell your story online can make all the difference.
 

Tips & Instructions

  • Thick Basic White Card Base - 5 1/2 x 8 1/2, score at 4 1/4

  • 2021-2023 In Color Designer Series Paper (Pale Papaya) - 5 1/4 x 4, emboss using the largest Stitched With Whimsy Die. Adhere to card base.

  • Basic White Cardstock - stamp the puffin image with Black Memento Ink. I used the Stamparatus so I could stamp it twice to get a nice, dark shade.

  • Using the largest square Stitched With Whimsey Die, emboss around the image and then fussy cut.

  • Color the feet and beak using the Dark Pale Papaya Stampin’ Blends Marker. Color the hat with the Dark and Light Granny Apple Green Stampin’ Blends Markers. Color the pompom with the Dark Daffodil Delight Stampin’ Blends Marker.

  • You should have a 4 1/4 x 3/4 strip of the designer series paper left. Flip it to show the plaid pattern and adhere it to the card. Adhere stamped image using Dimensionals.

  • Stamp sentiment with Granny Apple Green Ink and emboss with the rectangle stitched die. Fussy cut and adhere to card using Dimensionals.

  • Add some Opal Rounds to card and sentiment.

 
Whatever it is, the way you tell your story online can make all the difference.
 

On inside layer, stamp sentiment with Granny Apple Green Ink. Stamp cake with Black Memento Ink and color with Pale Papaya, Granny Apple Green and Daffodil Delight Stampin’ Blends Markers. Add some Wink Of Stella o candles and frosting.

 
Whatever it is, the way you tell your story online can make all the difference.
 

Sketch Saturday - Sweet As A Peach

I’m really happy with how this card turned out. I made it for this week’s Atlantic Hearts Sketch Challenge.

 
Sketch Saturday - Sweet As A Peach card1.jpeg
 

Here’s the sketch. It took me a little time to figure out the measurements but I always practice with scrap paper to get the sizes figured out.

 
Screen Shot 2021-05-07 at 5.32.11 PM.png
 

I used the Stitched Greenery Die to create the background layer. It creates this pretty stitched design for a full card layer. I’m sure going to be using this a lot!

 
Screen Shot 2021-05-07 at 5.42.42 PM.png
 

Tips & Instructions

  • Calypso Coral Card Base - 5 1/2 x 8 1/2, score at 4 1/4

  • Basic White Cardstock - 5 1/4 x 4, cut with the Stitched Greenery Die to get the stitched leaves.

  • You’re A Peach Designer Series Paper (blue polka dot) - 4 x 3, cut banner on one end.

  • You’re A Peach Designer Series Paper (floral) - 3 x 1 1/2, cut banner on one end.

  • Pale Papaya Cardstock - 2 1/2 x 1, emboss with the Dots Embossing Folder and cut banner on one end.

  • Arrange banners on white layer as shown in the picture.

  • Wrap ribbon around the layer and adhere to the back.

  • Basic White Strip - 3/4” stamp sentiment with Calypso Coral Ink and punch both ends using the Banners Pick A Punch. Adhere to card using Dimensionals.

 
Sketch Saturday - Sweet As A Peach card2.jpeg
 

On the inside stamp sentiments with Calypso Coral Ink. Stamp flowers with Pale Papaya Ink. Stamp center with Black Memento Ink and stamp some of the small flowers with Balmy Blue Ink.

 
Sketch Saturday - Sweet As A Peach inside.jpeg
 

Supply List

Sparkly Seahorse Friendship Card

Wouldn’t you love to receive a card like this. The sentiment is so special and would make anyone feel great.

 
Seascape Friendship card2.jpeg
 

In the video I’ll show you how I used the new Ombre Specialty Paper to cut out the seahorse and sea plant. The paper is glimmer and has lots of sparkle to it.


The Sea Life Dies are so cool and the images in the Seascape Stamp Set and really fun.

 
Seascape Friendship supplies.jpeg
 

Tips & Instructions

  • Night of Navy Card Base - 5 1/2 x 8 1/2, score at 4 1/4

  • Basic White Layer - 5 1/4 x 4, stamp sea plants a few times with Crumb Cake Ink, stamping off first to get a lighter shade. Adhere layer to card base.

  • Cut the sea plant and seahorse from the Ombre Specialty Paper. Snip around the sea horse to cut finish cutting it out. Adhere to card using Mini Dimensionals.

  • Stamp sentiment with Night of Navy Ink on Basic White and cut with the Tasteful Labels Dies. Adhere with Dimensionals.

  • Add some Opal Rounds to card front.

 
Seascape Friendship card1.jpeg
 

On the inside stamp the large fish and school of fish with Night of Navy Ink, stamping off first. Stamp the bubbles with Night of Navy Ink, stamping off twice first.

 
Seascape Friendship inside.jpeg
 

Supply List

Inspiring Canopy Healing Thoughts Card

Isn’t this a pretty spring card? With the new Inspiring Canopy Dies you can cut these beautiful trees to fill your card front.

 
Inspiring Canopy Healing Thoughts card2.jpeg
 

There’s such a great variety of sentiments in the Inspired Thoughts Stamp Set. It’s a great set to have in your stash. Bundle together the stamp set and dies an save 10%.


Tips & Instructions:

  • Thick Basic White Card Base - 5 1/2 x 8 1/2, score at 4 1/4

  • Beauty Of The Earth Designer Series Paper - 5 1/4 x 4

  • Soft Suede Cardstock - cut trees and adhere to layer.

 
Inspiring Canopy Healing Thoughts step1.jpeg
 
  • Fresh Freesia Cardstock - cut 3 sets of all the treetop pieces.

 
Inspiring Canopy Healing Thoughts step2.jpeg
 
  • Adhere the treetop pieces to the trees starting at the top and covering all branches.

  • Adhere layer to card base.

  • Basic White Strip - 3/4” wide, stamp sentiment with Black Ink and cut down to size. Punch both ends with the Banners Pick A Punch and adhere to card using Dimensionals.

 
Inspiring Canopy Healing Thoughts card1.jpeg
 

Cut one tree with Soft Suede Cardstock. You’ll have to cut it apart from the other trees. Cut one set of treetops from Fresh Freesia Cardstock Adhere to tree and treetops to inside layer.

 
Inspiring Canopy Healing Thoughts inside.jpeg
 

Supply List

Groovy Tie Dye B-day Card

I made this card for my son’s birthday. He loves tie dye so this new Spiral Dye Stamp is just what I needed to make his card. I think he’s going to love it!

 
Groovy Tie Die Bday Card2.jpeg
 

In the video I’ll show you how I colored the stamp with different colors and then spritzed it to get that tie dye look. This was a fun card to make.


I used Pacific Point, Granny Apple Green and Daffodil Delight to get a nice bright look.

 
Groovy Tie Die Bday Card supplies.jpeg
 

Tips & Instructions

  • Pacific Point Card Base - 5 1/2 x 8 1/2, score at 4 1/4

  • Basic White Layer - 5 1/4 x 4

  • Using the Stamparatus line up the white layer and Spiral Dye Stamp as shown in the video.

  • Color the stamp with Stampin’ Write Markers changing colors as you want. Spritz with water using the Stampin’ Spritz. I used Pacific Point, Granny Apple Green and Daffodil Delight.

  • Stamp the image on the white layer.

  • Wrap 3 White Baker’s Twine around layer and adhere to the back. Adhere layer to card base.

  • Color the Happy B-Day stamp with Pacific Blue and Granny Apple Green Markers, breath on it and stamp on a scrap of Basic White Cardstock. Punch using the Rectangular Postage Stamp Punch and adhere using Dimensionals.

  • Tie bow with strand of Bakers Twine and adhere with Glue Dot.

 
Groovy Tie Die Bday Card1.jpeg
 

For the inside color the sentiment stamp with all three colors starting with the Daffodil Delight, then Granny Apple Green, then Pacific Point. Breath on the stamp and stamp on the inside layer.

 
Groovy Tie Die Bday Card inside.jpeg
 

Supply List

Elegantly Said Anniversary Card

I made this beautiful anniversary card using the Elegantly Said Bundle from the new catalog.

 
Elegantly Said Anniversary Card1.jpeg
 

The sentiments are so pretty and the images are gorgeous. I think my favorite is the flower stamp. The punch is gives your card an elegant look.

 
Screen Shot 2021-05-04 at 12.54.42 PM.png
 

The thing that makes this card is the Simply Elegant Specialty Designer Series Paper. It has gold, copper and silver accents and is just beautiful.

 
Screen Shot 2021-05-04 at 1.13.47 PM.png
 

Tips & Instructions

  • Basic Black Card Base - 4 1/4 x 11, score at 5 1/2 (top folding)

  • Copper Foil Sheet - 5 3/8 x 4 1/8 (Tip - cut out center to save for another project)

  • Simply Elegant Specialty Designer Series Paper - 5 1/4 x 4

  • Copper Foil Strip - 4 x 3/4

  • Adhere layers and strip to card base

  • Stamp sentiment with black ink on Basic White Cardstock and punch with Elegant Tag Punch. Stamp the flower image with Smoky Slate Ink, stamping off twice to get a very light shade.

  • Tie piece of Simply Elegant Trim on top of tag and adhere tag to card using Dimensionals.

 
Elegantly Said Anniversary Card2.jpeg
 

On the inside stamp the sentiment with black ink and stamp the flower image with Smoky Slate Ink, stamping off once to get a lighter image.

 
Elegantly Said Anniversary Card inside.jpeg
 

Supply List

New Catalog Live / Ways To Get FREE Products

The new 2021-2022 Annual Catalog is LIVE!!!
You can start ordering today!

Click the catalog image to go to see an online copy.


Before you shop, check out two ways you can get FREE products!

 
May Specials.png
 

First, when you purchase the Starter Kit between May 4 and May 31, Stampin' Up! is giving you an extra $30 in products on top of their already great deal.

You spend $99 (plus Tax) and get:

  • $155 worth of products (your choice)

  • FREE Shipping on this order

  • 20% Discount on future orders (with the opportunity to get 25%)

  • Join a fantastic group of Stampers (Facebook, challenges, prize patrol, sharing ideas, etc.)
    This is my favorite part of being a demonstrator, my tribe!!!

You don't have to do this as a business, just enjoy the discount like so many Demonstrators!

The other deal is when you place an order of $250 or more and you'll get $25 extra in free product.

 
Screen Shot 2021-05-03 at 4.19.49 PM.png
 
Screen Shot 2021-05-03 at 4.20.06 PM.png

Sketch Saturday - Pansy Patch

I was so happy to see the Pansy Patch Stamp Bundle in the new catalog. Pansies are my favorite flowers! They just make me happy!

 
Sketch Saturday - Pansy Patch card1.jpeg
 

I made this card for the weekly Atlantic Hearts Sketch Challenge. This was a great sketch for my style.

 
Screen Shot 2021-04-30 at 3.54.09 PM.png
 

The Pansy Patch Stamp Set has beautiful sentiments. I love the font. There are lots of layers for your pansies. Just play with them to see how they work.

 
Sketch Saturday - Pansy Patch stamp.jpeg
 

Steps & Instructions

  • Gorgeous Grape Card Base - 5 1/2 x 8 1/2, score at 4 1/4

  • Pansy Petals Designer Series Paper - 5 1/4 x 4

  • Wrap a piece of Highland Heather Grosgrain Ribbon around the layer and adhere to the back and then adhere to the card base.

  • Stamp sentiment with black ink on Basic White Cardstock and cut with the second from largest stitched label from the Hippo & Friends Dies. Cut the larger label from a piece of Gorgeous Grape Cardstock and adhere layers together, then adhere to card.

  • Create the pansy by doing the following steps:

    • Stamp the large detailed pansy with Gorgeous Grape Ink.

    • Stamp the large plain pansy with Gorgeous Grape Ink, stamping off first to get a lighter shade.

    • Stamp the inside with Daffodil Delight Ink, stamping off twice to get a light shade.

    • Stamp the detail inside with Black Ink.

    • Stamp the dot in the center with Daffodil Delight Ink.

  • Stamp the 3 leaves with Pear Pizzazz Ink. Stamp the detailed image straight on and then the background with Pear Pizzazz Ink, stamping off first.

  • Cut the pansy and the leaves with coordinating dies and adhere to the label using Dimensionals for the pansy.

 
Sketch Saturday - Pansy Patch card2.jpeg
 

On the inside, stamp the sentiment with black ink. Stamp the stem and leaves with Pear Pizzazz Ink. Stamp the smaller pansy with Gorgeous Grape Ink, stamping the detailed image directly and the background image by stamping off first. Stamp detailed inside with black ink and the center with Daffodil Delight Ink.

 
Sketch Saturday - Pansy Patch inside.jpeg
 

Supply List

Band Together Birthday Card

Isn’t this a pretty card? I used retiring products to make it. These dies are such a steal right now; you won’t believe how much they’ve been discounted.

 
Band Together Birthday Card2.jpeg
 

Watch the video to see how to make this card and some of the products that are on the retiring list.


Tips & Instructions

  • Bermuda Bay Card Base - 5 1/2 x 8 1/2, score at 4 1/4

  • Basic White Layer - 5 1/4 x 4, emboss with Dainty Diamonds Embossing Folder and adhere to card base.

  • Cut band from Bermuda Bay Cardstock using the Detailed Bands Die. Cut a second band from Basic White Cardstock so you can get the center label piece.

  • Stamp 3 flowers tops on Basic White Cardstock with Black Memento Ink. Color with So Saffron and Flirty Flamingo Stampin’ Blends and cut with coordinating die.

  • Adhere the Bermuda Bay band to card and cut off ends that hang over (cut from behind).

  • Stamp the sentiment on the white label piece with Black Memento Ink and adhere to center of band using Dimensionals.

  • Cut 3 branches from Coastal Cabana Cardstock.

  • Lay out the flowers to determine placement and adhere the leaves using Liquid Glue. Adhere the flowers over the leaves using Dimensionals on the top flower.

  • Add Opal Round to sentiment.

 
Band Together Birthday Card1.jpeg
 

On the inside stamp flower top with Black Memento Ink. Color stem with Old Olive and flower with Flirty Flamingo and So Saffron Stampin’ Blends. Stamp sentiment with Black Memento Ink.

 
Band Together Birthday Card inside.jpeg
 

Supply List

Flowering Blooms Thank You Card

I wanted to show you some of my favorite products that will be retiring when the new catalog comes out next week. I love the Scripty 3D Embossing Folder and the Flowering Blooms Stamp Set and coordinating Flowering Dies.

 
Flowering Blooms Thank You Card2.jpeg
 

The images in this stamp set are so pretty. I colored with Stampin’ Write Markers right on the stamp to get the pink and green colors.

 
Flowering Blooms Thank You Card stamp.jpeg
 

The Flowering Dies are deeply discounted because they are retiring. They coordinate with the stamps and have some extra dies like the intricate die I used on this card.

 
Screen Shot 2021-04-28 at 9.07.06 PM.png
 

The Scripty 3D Embossing Folder creates such an elegant background to any card. This is also on the retiring list and discounted.

 
Screen Shot 2021-04-28 at 9.07.23 PM.png
 

Tips & Instructions

  • Just Jade Card Base - 5 1/2 x 8 1/2, score at 4 1/4.

  • Basic White Layer - 5 1/4 x 4, emboss with the Scripty 3D Embossing Folder and adhere to card base.

  • Cut intricate piece from Just Jade using the Flowering Dies and adhere to embossed layer.

  • Basic White Layer 3 3/4 x 2 3/4, stamp sentiment on bottom corner with Magenta Madness Ink. Color the flower with a Magenta Madness Stampin’ Write Marker and the stem and leaves with a Just Jade Stampin’ Write Marker. Breath on the stamp and then stamp on layer.

  • Adhere stamped layer to card using Dimensionals.

  • Add 3 Magenta Madness Dots.

 
Flowering Blooms Thank You Card1.jpeg
 

On the inside stamp the sentiment with Just Jade Ink. I colored the sentiments on the card front and inside using Stampin’ Write Markers but you can use the ink pads if you have them.

Color the flower image with the Magenta Madness and Just Jade Stampin’ Write Markers, breath on it and stamp on inside layer.

 
Flowering Blooms Thank You Card inside.jpeg
 

Supply List

New In Colors and Color & Contour

I used some of the new In Colors to make these pretty cards. The stamp set and dies are from the Color & Contour Bundle. These are all from the new 2021-2022 Annual Catalog which launches on May 4!

 
New In Colors and Color & Contour both.jpeg
 

In the video you’ll see all the new In Colors and hear about my In Color Club. I’ll show you how to make these cards using the Color & Contour Bundle.


Here are the details on my In Color Club. Each month you’ll get the products for one color and at the end of five months, you’ll have them all.

Email me if you want to join or have any questions: patti@pspapercrafts.com

 
Screen Shot 2021-04-27 at 9.25.26 PM.png
 

Tips & Instructions

  • Thick Basic White Card Base - 5 1/2 x 8 1/2, score at 4 1/4

  • Pale Papaya Cardstock - cut with the open scalloped rectangle die using the Color & Contour DIes.

  • Basic White Cardstock - cut with the stitched scalloped rectangle die using the Color & Contour Dies.

  • Stamp the floral image with Black Memento Ink and color with the Dark Pale Papaya and Dark Soft Succulent Stampin’ Blends Markers. Stamp sentiment with Soft Succulent Ink.

  • Wrap a piece of the Pale Papaya Open Weave Ribbon around the large scalloped layer adhering it to the back and adhere rectangle to card base.

  • Adhere stamped rectangle using Dimensionals.

  • Tie bow with ribbon and adhere to card using a Glue Dot.

  • Add some Color Jewels near the sentiment.

 
New In Colors and Color & Contour papaya.jpeg
 

This card uses the Fresh Freesia color which is so soft and pretty.

 
New In Colors and Color & Contour freesia.jpeg
 

I added a layer on the inside even though the card base is white because using the Stampin’ Blends will bleed through to the back. Stamp the flower with Black Memento and color the same way you colored the front.

 
New In Colors and Color & Contour inside.jpeg
 

The new products will be available to order beginning May 4, 2021.

Forever Fern Hello Card

I was going through the Designer Series Papers that are retiring and decided to make a card using the Forever Greenery papers and the Forever Fern Stamp Set.

 
Forever Fern Hello Card2.jpeg
 

These papers were one of my favorites from last year’s catalog and they are on sale now since they are retiring. Get a pack before they’re gone!

 
Screen Shot 2021-04-26 at 10.14.06 PM.png
 

The images in the Forever Fern Stamp Set are beautiful. It’s a Distinktive stamp set; it has a special texture that gives added depth and dimension in a single step, creating photo-realistic images.

 
Forever Fern Hello Card stamp.jpeg
 

Tips & Instructions

  • Garden Green Card Base - 5 1/2 x 8 1/2, score at 4 1/4

  • Basic White Layer - emboss using the Subtle Embossing Folder and adhere to the card base.

  • Garden Green Background Layers - one at 4 7/8 x 1 5/8 and one at 3 1/8 x 3 1/8

  • Forever Greenery Designer Series Paper - 4 3/4 x 1 1/2, adhere to Garden Green background Layer.

  • Basic White Square - 3 x 3, stamp image using Merry Merlot Ink, stamping off first. Stamp 4 times towards each corner. Stamp small leaves image with Garden Green Ink, stamping off first to fill in the spaces between the Merry Merlot Image. Adhere to Garden Green square.

  • Adhere the rectangle to card base and then the square using Dimensionals.

  • Stamp sentiment with Garden Green Ink on Basic White scrap and punch with Dual Oval Punch. Punch the scalloped oval using the scalloped oval from the punch. Adhere label to center of square.

  • Add a Gilded Gem to sentiment.

 
Forever Fern Hello Card1.jpeg
 

On the inside stamp images with Merry Merlot and Garden Green Inks, stamping off first to get a lighter image.

 
Forever Fern Hello Card inside.jpeg
 

Supply List

New Catalog / Paper Share / In Color Club

May 2021-April 2022 Annual Catalog!!!

 
Screen Shot 2021-04-26 at 1.12.00 PM.png
 

I'm so excited that the new Annual Catalog is here and you can start shopping from it beginning May 4. It’s chock full of beautiful products.

Email me for a catalog -
patti@pspapercrafts.com


Patti’s Designer Series Paper Share

Sample all the new Designer Series Paper from the catalog by joining my Paper Share. You'll get to see all the designs and decide which ones you want more of. I'm always surprised at which papers I use that I didn't think I would. Join by May 3rd to get in on this offer.

Email me to join -
patti@pspapercrafts.com

 
2021-2022 Annual Catalog Paper Share.png
 

Patti’s In Color Club!!!

Want to get all the new In Colors without breaking the bank?  Join my In Color Club and get the products for one color per month.  After 5 months, you'll have them all!  Payment will be due the 5th of each month for 5 months. 

You pay $45.00 per month for local pickup or $50 per month if shipped. Each month you will receive the following for one color:

  • Full Package of Cardstock

  • Classic Ink Pad

  • Ink Refill

  • Full Roll Open Weave Ribbon

  • In Color 6" x 6" Designer Series Paper (8 sheets per color)

  • Stampin' Write Marker

  • In Color Jewels (20 pieces each color)

Add Stampin Blends Combo Pack for $54 per month local pickup or $59 if shipped.

Email me to join -  patti@pspapercrafts.com

 
2021-2023 In Color Club Image.png
 

Sketch Saturday - Prized Peony

Today I used the Prized Peony Stamp Set and Peony Garden Designer Series Paper for the weekly sketch challenge. These are great products for a Sympathy Card.

 
Sketch Saturday - Prized Peony.jpeg
 

To be honest, I had a hard time with this sketch because I thought it was too busy for me so I toned it down a bit by using just one patterned paper. I like how it turned out. The sketch is from the Atlantic Hearts Sketch Challenge. I love doing these challenges.

 
Screen Shot 2021-04-24 at 11.51.30 AM.png
 

The Peony Garden Designer Series Paper is on the retiring list and you can get it at a discount. The patterns are so subtle and pretty.

 
Screen Shot 2021-04-24 at 12.14.55 PM.png
 

Tip & Instructions

  • Gray Granite Card Base - 4 1/4 x 11, score at 5 1/2 (top folding card)

  • Peony Garden Designer Series Paper - cut 3 pieces at 4 x 1 3/4 and adhere pieces to card base spacing them out a tiny bit. (Lay them out first to get placement before adhering them.)

  • Basic White Cardstock - 1 3/4 x 3 1/2, stamp flower with Petal Pink Ink and sentiment with Gray Granite Ink. Cut bottom using the Triple Banner Punch.

  • Gray Granite Cardstock - 1 7/8 x 3 1 2, cut bottom with Triple Banner Punch.

  • Adhere banner layers together and then adhere to card using Dimensionals.

 
Sketch Saturday - Prized Peony2.jpeg
 

On the inside stamp sentiment with Gray Granite Ink and flower with Pink Petal Ink.

 
Sketch Saturday - Prized Peony inside.jpeg
 

Supply List

Note: the Triple Banner Punch is on the retiring list and you can purchase it at a discount. It’s one of my favorite punches and I’ll be sad to see it go.

Hand-Penned Get Well Card

I wanted to share some new products from the upcoming Annual Catalog. The Hand-Penned Designer Series Paper is so pretty. I love flowers so this was a must for me.

 
Hand-Penned Get Well Card2.jpeg
 

The stamp set has gorgeous flower images and the sentiment I used for this card is perfect for a friend who isn’t feeling well. There are coordinating dies that you can save 10% on if you purchase the bundle. I didn’t use it on this card but they have some really beautiful dies.

 
Hand-Penned Get Well Card stamp.jpeg
 

Tips & Instructions

  • Highland Heather Card Base - 5 1/2 x 8 1/2, score at 4 1/4

  • Basic White Layer - 5 3/8 x 4 1/8

  • Hand-Penned Designer Series Paper Layer - 5 1/4 x 4, adhere to white layer.

  • Wrap a piece of the new Highland Heather Grosgrain Ribbon around the layers and adhere in the back. Adhere the layer to the card.

  • Cut Basic White Cardstock using the 2nd from smallest new Scalloped Contours Dies.

  • Stamp sentiment on the scalloped rectangle using Black Memento Ink. Stamp some small flowers with Highland Heather Ink and the leaves with Mint Macaron Ink, stamping off on scrap first to get a lighter shade.

  • Adhere to card using Dimensionals and add some Pastel Pearls.

 
Hand-Penned Get Well Card1.jpeg
 

This designer series paper is gorgeous and its one of the packs of paper you will get in my Paper Share.

Want more info - email me at patti@pspapercrafts.com

 
Hand-Penned Get Well Card3.jpeg
 

On the inside stamp flower image with Black Memento Ink. Color flowers and leaves with Highland Heather and Mint Macaron Stampin’ Blends.

 
Hand-Penned Get Well Card inside.jpeg
 

The new products will be available for ordering beginning May 4, 2021.

Need a catalog? Email me patti@pspapercrafts.com

Double Gate Fun Fold Birthday Card

The True Love Designer Series Paper is one of my favorites. It’s all black and white and is so classy. I made these Double Gate Fun Fold cards using it.

 
Double Gate Fun Fold Birthday Card both.jpeg
 

I’ll show you how to make these cards in the video and will have all the measurements documented in this blog so don’t worry about writing them down.


There’s a belly-band to close the card and add the sentiment. I added a butterfly that I had leftover from another card. You can put anything you have on hand there.

 
Double Gate Fun Fold Birthday Card2.jpeg
 

I used two different patterns for the background layers. There are so many choices in this paper pack.

 
Double Gate Fun Fold Birthday Card3.jpeg
 

Tips & Instructions

  • Basic Black Cardstock - 11 x 5 1/2, score at 1 1/4 & 3 3/8 then flip and score the other end at 1 1/4 & 3 3/8.

  • Basic White Cardstock - 2 pieces at 5 3/8 x 1 7/8 and 2 pieces at 5 3/8 x 1 1/8.

  • True Love Designer Series Paper - 2 pieces of one design at 5 1/4 x 1 3/4 and 2 pieces of a different design at 5 1/4 x 1.

  • Belly Band - 11 x 1 piece of Basic Black and 11 x 7/8 piece of True Love Designer Series Paper.

  • Stamp Happy Birthday sentiment on Basic White with Black Memento and punch out using the Postage Stamp Punch. Punch so the sentiment is to the left so there’s room for the butterfly.

  • Stamp, cut and color butterfly and add to corner of the sentiment label. I used Light Highland Heather, Pool Party and Smoky Slate Stampin’ Blends.

  • Wrap Belly Band around card and adhere. Adhere sentiment label with butterfly to band making sure the butterfly doesn’t hang over the card.

  • Add Pastel Pearl.

 
Double Gate Fun Fold Birthday Card1.jpeg
 

On the inside stamp sentiment with Black Memento Ink. Cut intricate butterfly from a piece of Highland Heather Cardstock and adhere to inside.

 
Double Gate Fun Fold Birthday Card inside.jpeg
 

Supply List

Always & Forever Wedding Card

My son asked me to make a wedding card for him for a wedding he’s attending. I knew I wanted to use the Forever and Always Bundle with the True Love Designer Series Paper.

 
Always & Forever Wedding Card2.jpeg
 

Once I got my supplies together, I decided to use some Vellum Cardstock to soften up the look. Vellum is so classy and perfect for a wedding card.

 
Always & Forever Wedding Card3.jpeg
 

Tips & Instructions

  • Basic Black Card Base - 5 1/2 x 8 1/2, score at 4 1/4

  • True Love Designer Series Paper Layer - 5 1/4 x 4

  • Vellum Cardstock Layer - 5 1/4 x 4

  • Stamp the Always sentiment with Blushing Bride Ink on a scrap of Basic White Cardstock and cut with coordinating die.

  • I changed up the “FOREVER &” sentiment to make it “& FOREVER” by covering the “FOREVER” with a piece of Post-It Note and inking up the &. Remove the Post-It Note before you stamp it and stamp on a 1/2” strip of Basic White Cardstock. Do the reverse so you get only the FOREVER sentiment. Cut with rectangle die.

  • Lay Vellum over the Designer Series Paper to determine placement of sentiment. Adhere sentiments to Vellum using Dimensionals. Add some Elegant Faceted Gems to the Vellum. Add Liquid Glue behind the sentiments and gems and adhere to Designer Series Paper and then to card base.

 
Always & Forever Wedding Card1.jpeg
 

On the inside stamp the sentiment from the Dandelion Wishes Stamp Set with Black Memento Ink. Stamp two flowers from Forever and Always Stamp Set on top and bottom corner with the black ink.

 
Always & Forever Wedding inside.jpeg
 

Supply List