4 Easy Background Layers using Dahlia Days

I made these 4 cards pretty quickly using the Dahlia Days Stamp Set to create a beautiful background layer. They were easy to make and are bright and cheerful.


Watch the video to see how I stamped the background on a blank piece of 8 1/2 x 11 Basic White Cardstock, cut it down to 4 layers and then embossed 3 of them.


Basic Measurements & Tips

  • Card Bases - 5 1/2 x 8 1/2, scored at 4 1/4 unless otherwise noted.

  • Basic White Cardstock - 8 1/2 x 11

  • Stamp flower and leaf images randomly on the cardstock. I used the Dahlia Days Stamp Set. Start with the largest image and then fill in with the smaller ones. I used the following colors:

    • Flowers - Sweet Sorbet, Daffodil Delight, Flirty Flamingo, Melon Mambo

    • Leaves - Parakeet Party, Evening Evergreen, Soft Succulent.

  • Cut 4 pieces each at 5 1/4 x 4.

  • Emboss the layers if you want.

  • Cut sentiment label from Basic White Cardstock using the Stylish Shapes Dies.

  • Sentiments are from the Dahlia Days and Peaceful Moments Stamp Set.

The first card uses Parakeet Party for the card base and the ink for the sentiment. I embossed the layer using the Tasteful Textiles 3D Embossing Folder. Add the new Parakeet Party Metallic Woven Ribbon and an Iridescent Rhinestone.


On the inside stamp the dahlia with Sweet Sorbet Ink and the sentiment and leaves with Parakeet Party Ink


This card is a top folding card which means it was cut at 4 1/4 x 11 and scored at 5 1/2. The card base and ink are Evening Evergreen. The layer was embossed using the Painted Texture 3D Embossing Folder. I added a new In Color Opal Round.


I didn’t put a sentiment on the inside layer. Stamp the dahlia with Sweet Sorbet Ink and the greenery with Evening Evergreen Ink.


This card is made using Sweet Sorbet for the card base and the sentiment. I added an Iridescent Rhinestone and a bow tied with a piece of Sweet Sorbet Metallic Woven Ribbon.


Stamp the sentiment and dahlia with Sweet Sorbet Ink on the inside layer. Add Parakeet Party leaves.


The last card is another with Sweet Sorbet for the card base, sentiment background layer and sentiment ink. It was embossed using the Timeworn Type 3D Embossing Folder. I colored 3 Iridescent Rhinestones using a Dark Sweet Sorbet Stampin’ Blends Marker.


On the inside layer stamp the sentiment and flower with Sweet Sorbet Ink and the small grouping of flowers with Melon Mambo Ink.


Supply List

You can click on the item to purchase it from my Online Store.

Note: the new products will be available starting May 3, 2022.

Annual Catalog Paper Share / In Color Club

The new 2022-2023 Annual Catalog launches on May 3, 2022. With the new catalog comes new In Colors and new Designer Series Paper.

I’m excited to announce I will be doing an In Color Club again this year. This is an easy way to get all the products for each color spread out over 5 months. Each month receive products for one new color and after 5 months, you'll have them all.  Below are the details. 


Email patti@pspapercrafts.com to join


I also have a Paper Share that you can join to get a sample of the new Designer Series Papers. It's a great way to see all the papers and decide which ones you like. Stampin' Up!'s Designer Series Paper is one of my favorite products and I'm always surprised at the patterns I like that I would never have thought to purchase.


Option 1:

Pay $50.00 Local or $58.00 if shipped

Get 1/4 pack of Designer Series Papers listed below, 142 pieces & some He’s the Man Die Cuts.

  • Abigail Rose

  • Awash in Beauty

  • Butterfly Kisses

  • Happy Forest Friends

  • He’s the Man Specialty (includes assorted die-cuts)

  • Hues of Happiness

  • Lovely in Linen

  • Perfectly Penciled

  • Pretty Prints

  • Sun Prints

  • Tea Bouquet

  • Textured Chic Specialty Paper

Option 2:

Pay $65.00 Local or $73.00 if shipped

Get 142 pieces of Designer Series Paper & Die Cuts PLUS Specialty Paper listed below.

  • 2022-2024 In Color 6×6 Glimmer (2 sheets of each New In Color)

  • Brushstroke Specialty (1 each 3 colors)

  • Distressed Specialty (2 single sided sheets)

  • Lovely Layers Vellum 3 3/4 x 5 (30 sheets 10 printed designs plus 20 plain sheets)

Sign Up by April 30, Pay by May 2

Email patti@pspapercrafts.com to sign up.

Simple, Yet Beautiful Nature's Prints Card

The star of this card is the pretty layer that was embossed using the new Fern 3D Embossing Folder. I showed this layer on my YouTube Live yesterday and decided to make a simple card using it.


The Nature’s Print Stamp Set has wonderful sentiments and beautiful images. There are coordinating dies to cut out the stamped images and one for the sentiment label I used. I absolutely love the Fern 3D Embossing Folder.


Tips & Instructions

  • Pear Pizzazz Card Base - 5 1/2 x 8 1/2, score at 4 1/4

  • Basic White Layer - 5 1/4 x 4, emboss using the 3D Embossing Folder and adhere to card base.

  • Flowering Fields Designer Series Paper Strip - 4 1/4 x 7/8, adhere to card.

  • Stamp sentiment with Pear Pizzazz Ink and cut using the coordinating die. Adhere to card using Dimensionals.

  • Add an Iridescent Rhinestones Basic Jewel.


On the inside layer stamp the fern with Pear Pizzazz Ink, stamping two more times without re-inking.


Supply List

You can click on the item to purchase it from my Online Store.

Note: the new products (Nature’s Prints Bundle & Fern 3D Embossing Folder will be available starting May 3, 2022.

3 Simple Fun Fold Cards Using the Sun Prints Suite

These Fun Fold Cards are so easy to make. I used products from the Sun Prints Suite in the new Annual Catalog. The Designer Series Paper is so beautiful. Each card uses both sides of a sheet; they coordinate so well!


In my video I’ll show you all the products in this suite and will make one of the cards. You can find the measurements below.


The first card is a thank you card and uses Night Of Navy for the card base and sentiment. I stamped the fern image with Gray Granite but stamped off twice on scrap paper before stamping on the circle.


Measurements:

  • Card Base - 9 1/4 x 5 1/2, score at 4 1/4 & 7 1/4

  • Sun Prints Designer Series Paper:

    • Front Focal Panel - 5 1/4 x 1 3/4

    • 2 pieces - 5 1/4 x 2 3/4

    • Piece for the inside layer - 5 1/4 x 1 1/4

  • Stylish Shapes Dies for sentiment


This card uses Pacific Point for the card base as well as the sentiment. I stamped the splatter image twice on scrap and then stamped around the image.


This card has a Starry Sky Card Base and sentiment. I stamped the fern with Gray Granite Ink, stamping off twice on scrap paper before stamping on the circle.


These products will be available starting May 3, 2022 when the new Annual Catalog launches.

Sketch Saturday - Hello Ladybug

This is the card that I made for this week’s sketch challenge. I love the black and white with the pop of red.


The sketch is from the Atlantic Hearts Sketch Challenge. I love when they have a slim line card as their sketch.


The Hello Ladybug Stamp set has such cute images and sentiments. I used my Stamparatus to get the solid black image so I could repeat and get really good coverage. There’s a coordinating punch that punches the ladybug and wings.


Tips & Instructions

  • Basic Black Card Base - 8 1/2 x 7, score at 3 1/2

  • Pattern Party Host Designer Series Paper Layer - 8 1/4 x 3 1/4

  • Cut 3 hexagons from Basic Black Cardstock using the second from largest Beautiful Shapes Dies and 3 hexagons from Basic White Cardstock using the third from largest die.

  • Stamp 2 ladybugs with Black Memento Ink on scraps of Basic White Cardstock. I used my Stamparatus to make sure I got good, solid coverage. Stamp 2 sets of wings with Poppy Parade Ink on scraps of Basic White Cardstock. Punch ladybugs and wings using the Ladybug Builder Punch. Adhere wings to body.

  • Stamp sentiment on one of the white hexagons with Poppy Parade Ink.

  • Adhere the white hexagons to black hexagons and arrange on card. Adhere the sentiment hexagon in center using Dimensionals. Adhere the other two hexagons above and below, then add ladybugs to hexagons using Dimensionals.

  • Color some white Classic Matte Dots with a Dark Poppy Parade Stampin’ Blends Marker and adhere to card.


On the inside stamp sentiment (from A Grand Kid Stamp Set) with Black Memento Ink. Stamp flowers with Poppy Parade Ink and stamp center of large flower using Black Memento Ink.


Supply List

You can click on the item to purchase it from my Online Store.

5 Simple Cards, 5 New In Colors!

I am so excited about our new 2022-2024 In Colors. They are gorgeous!

Every year Stampin’ Up! comes out with 5 new In Colors that are available for 2 years.


In my video I’ll introduce you to the new colors: Parakeet Party, Starry Sky, Tahitian Tide, Sweet Sorbet and Orchid Oasis. Watch to see how to make these cards and find out about my In Color Club where you can purchase the products for these new colors over a period of 5 months.


I used the Good Feelings Stamp Set for all these cards. It has such big, bold sentiments. The layers were all cut using the Scalloped Contours Dies. This first card uses the Orchid Oasis color.


I colored the stamp with all 5 of the new colors using the Stampin’ Write Markers to get this rainbow look. The background layer and ribbon are Starry Sky.


This card was done using Tahitian Tide. It’s a very pretty color.


The polka dot pattern on the Designer Series Paper is so fun. This card was made with Parakeet Party.


The last card was done using Sweet Sorbet. I love this floral pattern on the Designer Series Paper.


Do you want all the products that I demonstrated in the video but don’t want to lay out the money at one time? Join my In Color Club and get a color a month. See details below.


Email me if you would like to join the In Color Club and I will send you a PayPal Invoice each month for that month’s color. The first invoice will be sent May 2 and I will place that order on May 3 when the catalog launches.

Email me: patti@pspapercrafts.com

Sweet I miss your face Card

I just received this Hello Beautiful Bundle as a Prize Patrol for participating in a team challenge. I love getting free products! The hexagon pieces were cut from the Heart & Home Designer Series Paper using the dies from this bundle.


The stamp set includes a variety of abstract images that are designed to be stamped in groups, collaged, or repeated to make patterns and designs. The basic shapes included in the Beautiful Shapes Dies can be used to cut out circles, hexagons, parallelograms, and triangles images.

You can save 10% by bundling the stamp set and dies together. They will not be bundled in the new catalog.


Tips & Instructions

  • Garden Green Card Base - 5 1/2 x 8 1/2, score at 4 1/4

  • Heart & Home Designer Series Paper Layer - 5 1/4 x 4, wrap piece of Fresh Freesia Open Weave Ribbon around layer and adhere in the back and adhere to card base.

  • Cut piece of green patterned paper using the largest Hexagon. Cut 2 sets of hexagons from the Garden Green and Fresh Freesia patterned paper using the small, double hexagon die.

  • Cut Basic White hexagon from the 3rd from largest hexagon die. Stamp sentiment with Garden Green Ink masking to break up the words. Stamp the small patterned image around the sentiment with Fresh Freesia Ink. Adhere to large green patterned Hexagon.

  • Adhere the hexagons to card using Dimensionals. I trimmed about 1/8” off the small hexagon the sits at the bottom of the layer.

  • Tie bow with ribbon and adhere to card using a Glue Dot.


On the inside cut and adhere hexagons as shown below.


Supply List

You can click on the item to purchase it from my Online Store.

Sketch Saturday - Seas The Day

For this week’s sketch I used the Seas The Day Bundle along with Waves Of The Ocean Designer Series Paper and a layer embossed with the Splatter Embossing Folder. Lots of layers and textures.


The sketch is one I found on Pinterest from the Mojo Monday Sketch Challenge from a few years ago. There are so many great sketches out there on Pinterest. It’s a great way to get ideas for cards.


The Seas The Day Bundle has wonderful images of sea creatures along with coordinating dies. The large die can be used to create a cool ocean scene.


Tips & Instructions

  • Night Of Navy Card Base - 4 1/4 x 11, score at 5 1/2 (top folding)

  • Basic White Layer - 5 1/2 x 3 1/4

  • Waves Of The Ocean Designer Series Paper Layer - 4 1/2 x 2, adhere to the white layer.

  • Balmy Blue Layer - 3 1/2 x 1 3/4, emboss using the Splatters Embossing Folder, adhere to layers.

  • Color piece of White Frayed Ribbon with a Dark Balmy Blue Stampin’ Blends Marker and wrap around the layers, adhering to the back. Adhere layers to card base.

  • Basic White Square - 2 x 2, stamp sentiment with Night Of Navy Ink. Stamp bubbles, stamping off first to get a lighter shade. Adhere layer to card with Dimensionals - put Dimensionals across the top and bottom so they don’t sit on the ribbon.

  • Stamp jellyfish on scrap of Basic White Cardstock with Calypso Coral Ink and cut with coordinating die. Adhere to card with a Dimensional on the edge that doesn’t sit on the sentiment.

  • Add some Clear Epoxy Droplets.


On the inside layer stamp the sea plant using Pear Pizzazz Ink, stamping a second time without re-inking. Stamp fish with Calypso Coral Ink and some bubbles with Night Of Navy Ink.


Supply List

You can click on the item to purchase it from my Online Store.

Share Hope Paper Pumpkin - Half Price

The Share Hope Paper Pumpkin Kit is on sale for just $9.50(US) and is available to anyone.  You don't have to be a Paper Pumpkin Subscriber. 


This special edition Paper Pumpkin kit was inspired by Stampin’ Up! cofounder, Shelli Gardner. Enjoy the contemporary design and bright color palette; the butterfly imagery and lovely sentiments are sure to be the inspirational gift your loved ones will appreciate. This kit contains enough supplies to create nine cards and coordinating envelopes plus extra components to turn the box into a Hope Box!

Offer available while supplies last between April 12 and June 14, 2022.


Your kit includes:

  • Hope Box Photopolymer Stamp Set

  • Blackberry Bliss Classic Stampin’ Spot

  • Printed card bases

  • Printed envelopes

  • Die-cut labels

  • Printed die cuts

  • Adhesive-backed sequins

  • Ribbon

  • Adhesive dots

  • Dimensionals

Note: It does not include a clear block


This is the stamp set that's included. The images and sentiments are so sweet.


You can also order the Refill Kit for just $5.00(US).
It contains supplies to create nine cards and coordinating envelopes and comes in a special box


Your refill includes:

  • Printed card bases

  • Printed envelopes

  • Die-cut labels

  • Printed die cuts

  • Adhesive-backed sequins

  • Adhesive dots

  • Dimensionals


Place a $50 Product Order from My Online Store during the month of April, 2022 and I will send you a free pack of Classic Matte Dots.


You can click on the item to purchase it from my Online Store.

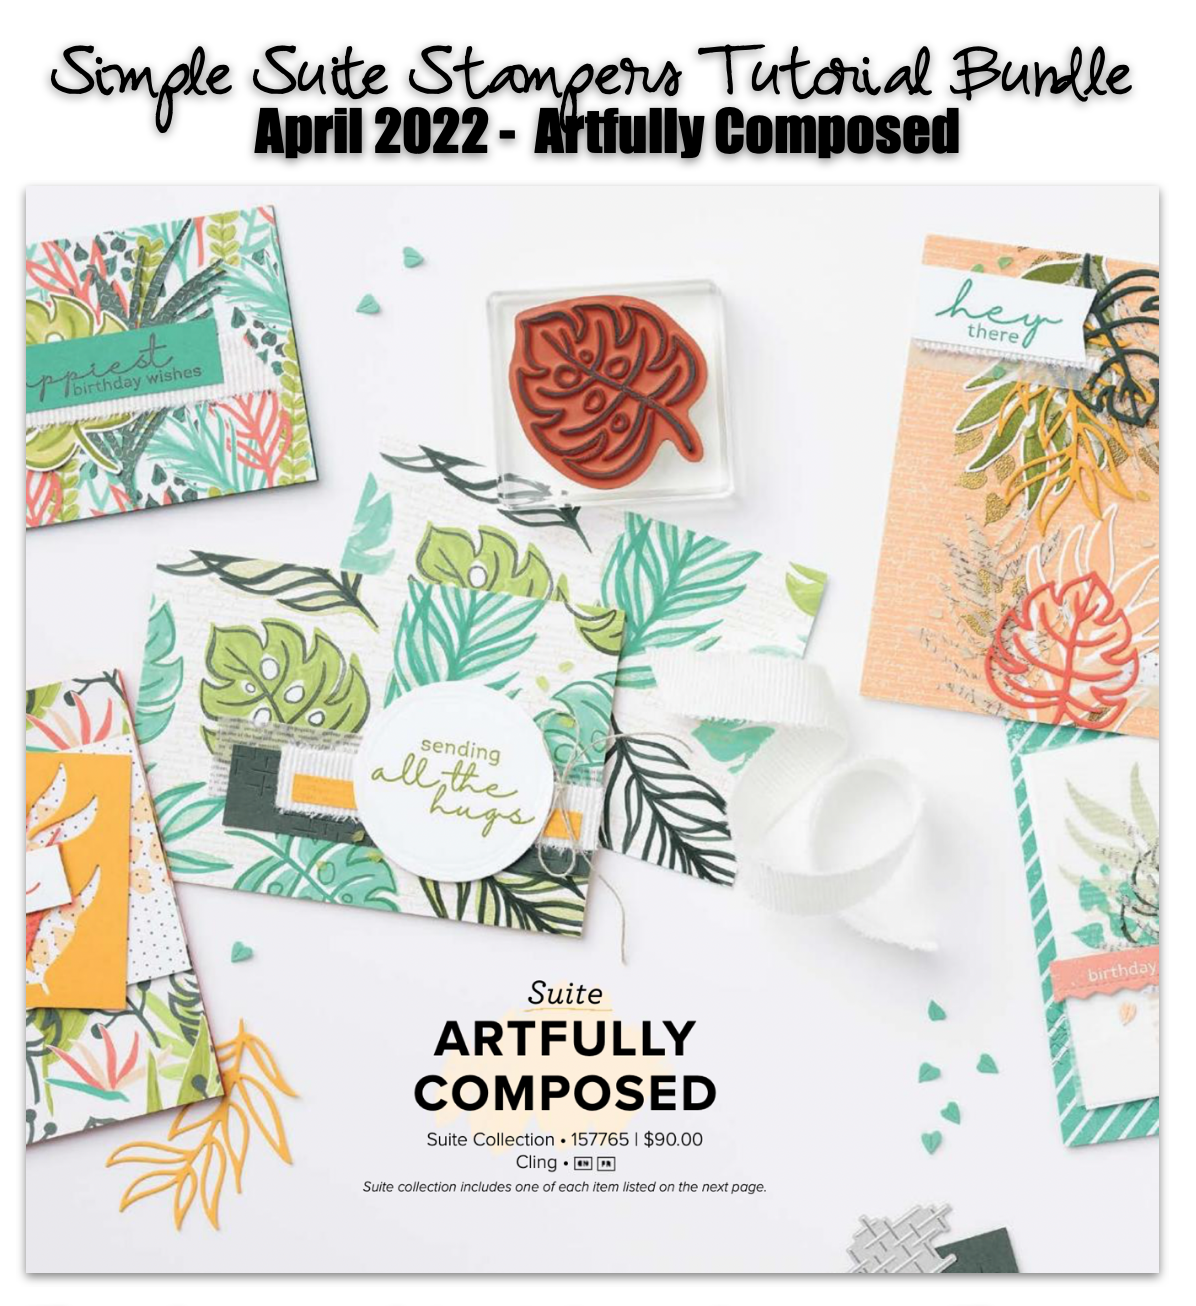
Simple Suite Stampers Tutorial Bundle - Artfully Composed

This month’s Simple Stampers Suite Tutorial features the Artfully Composed Suite from Stampin’ Up! Each month I collaborate with other Demonstrators to create a tutorial bundle with 12 different projects.


Watch the video to find out more about the tutorial bundle and to see how to make these two cards.


The first card is my design using the Artfully Composed Designer Series Paper for the die cut the greenery pieces. To add some interest I embossed the top corner of the layer.


On the inside layer, I added another die cut leaf from the Designer Series Paper and stamped some Calypso Coral leaves.


This card was designed by my friend Melissa Kerman. She used the Seas The Day Stamp Set which has such fun images. I love how she stamped off to get different shades of the colors.


I stamped some greenery and a couple of fish to the inside along with bubbles.


Customers who order from me during the month of April, 2022 will receive this Tutorial Bundle for free. It includes 12 projects with pictures, measurements and directions.

You can also purchase this by clicking the Tutorials Button at the top of my Blog.


Sketch Saturday - Pierced Blooms

This is the card I made for this week’s sketch challenge. Those pretty flowers were cut using the Pierced Blooms Dies. I love how they turned out.


The sketch I used is from the Atlantic Hearts Weekly Sketch Challenge. I really like this sketch!


The Pierced Blooms Dies are on the retiring list and are on sale for a great price. They were $37(US) and are marked down to $18.50(US) but they are only available while supplies last, once they’re gone, they are gone!


Tips & Instructions

  • Old Olive Card Base - 5 1/2 x 8 1/2, score at 4 1/4

  • Basic White Layer - 5 3/8 x 4 1/8, adhere to card base.

  • Artfully Composed Designer Series Paper - 5 1/4 x 4, adhere to card.

  • Basic White Strip - 4 1/8 x 1 1/2, emboss with the Stripes 3D Embossing Folder, adhere to card.

  • Old Olive Cardstock - cut using the 4th from smallest Rectangle Stitched Dies.

  • Basic White Cardstock - cut using the 3rd from smallest Rectangle Stitched Dies, stamp sentiment using Old Olive Ink. Adhere the rectangles together and adhere to card using Dimensionals. Note, put the Dimensionals at the top and bottom of the rectangles so they don’t sit on the embossed strip.

  • Using the Pierced Blooms Dies cut flowers from Melon Mambo, Highland Heather and Flirty Flamingo Cardstock. Cut flower centers from Basic White Cardstock and leaves from Pear Pizzazz Cardstock. Arrange flowers and leaves and adhere to rectangles. I popped up the center flower with Dimensionals.

  • Add some Brushed Brass Butterflies.


On the inside stamp sentiment and add another flower and leaves that were cut using the Pierced Blooms Dies.


I love these flowers and leaves and will be sorry to see them go!


Supply List

You can click on the item to purchase it from my Online Store.

Quick & Cute Easter Cards

The Easter Friends Stamp Set has the cutest images. I paired it up with the Pansy Petals Designer Series Paper which worked so well for these cards.


In the video below I’ll show you how to make each of these easy cards and you can find printable Project Sheets for each card below.


The first card has this sweet little chick on it. I used the Scalloped Contours Dies and Bumblebee Gingham Ribbon.


I think this bunny is so adorable on the gingham patterned paper. I added some Fresh Freesia Jewels to dress it up.


This duckling just makes me happy. I used Soft Succulent for this card, one of my favorites.


This slimline card fits the duckling and 4 chicks. I embossed the bottom using the Stripes Embossing Folder to make it look like grass.


Supply List

You can click on the item to purchase it from my Online Store.

Card #1

Card #2

Card #3

Card #4

3 Fun Fold Peekaboo Cards

On today’s YouTube Live I showed 3 Fun Fold Peekaboo Cards. They are easy to make and can be recreated using different papers and stamps for any occasion.


Watch the replay to see how to make these cards. I have Project Sheets with instructions that you can print for each card below.


The first project is the one I demonstrated on the video. I used the Flowering Rain Boots Bundle and two of my favorite colors - Evening Evergreen and Soft Succulent.


This beautiful Easter Card was made using the Daffodil Daydream Bundle along with Calypso Coral and Pale Papaya for the colors.


The last one was made with the Party Puffin Stamp Set and I used Polished Pink for a bright and fun card.


Supply List

You can click on the item to purchase it from my Online Store.

Card #1

Card #2

Card #3

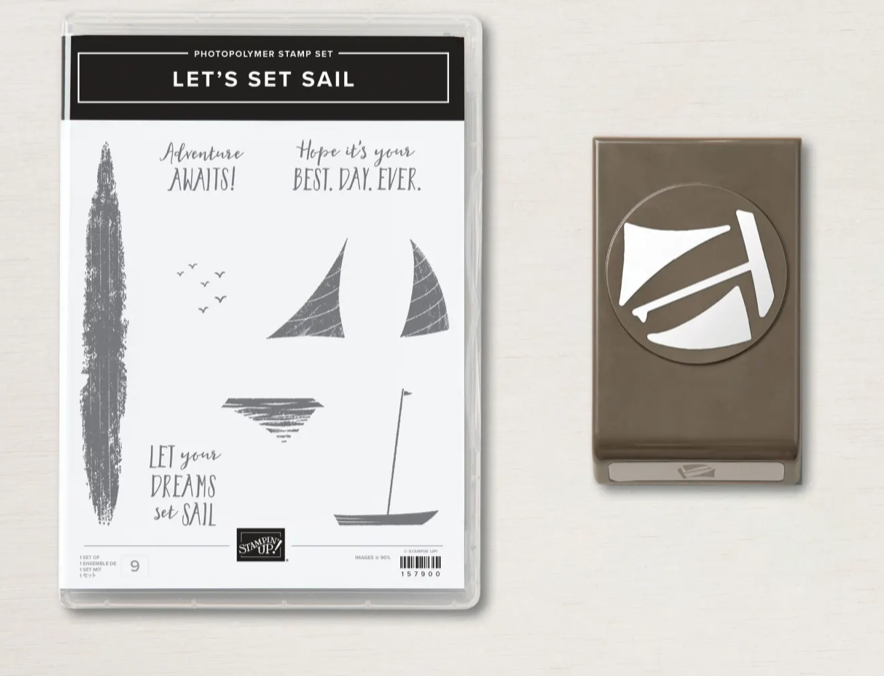
Let's Set Sail Birthday Card!

I was surprised at how much I like this bundle. It wasn’t at the top of my list and it sat in my craft room for quite a while but I really love the images and the coordinating punch. What a fun bundle, especially for masculine cards.


The stamp set and punch can stand along but you can save 10% when you purchase this as a bundle.


Tips & Instructions

  • Thick Basic White Card Base - 5 1/2 x 8 1/2, score at 4 1/4

  • Basic White Layer - 5 1/4 x 4, stamp the large water image a few times across the bottom with Pacific Point Ink. Fill in as needed. I used the Stamparatus since the stamp is so large.

  • Use Blending Brushes to blend Pacific Point and then Daffodil Delight Ink to create a pretty background.

  • Stamp sailboat with Soft Suede Ink and sails with Poppy Parade Ink. Punch with Sailboat Builder Punch. Pay attention to how the punch will work with these pieces so you stamp on the cardstock where it will be easy to feed into the punch.

  • Stamp sentiment on 1” strip of Basic White Cardstock with Pacific Point Ink and trim down cutting the edges at angles.

  • Adhere the boat, sails and sentiment with Dimensionals. I cut narrow strips from the Dimensionals to fit behind the boat.

  • Stamp some birds with Pacific Point Ink.


On the inside layer stamp the water with Pacific Point Ink across the bottom like you did on the card front. Stamp boat with Soft Suede and sails with Poppy Parade Inks. Stamp sentiment from A Grandkid Stamp Set.


Supply List

You can click on the item to purchase it from my Online Store.

Sketch Saturday - Cactus Cuties

I made this fun card for this week’s sketch challenge using the Cactus Cuties Bundle. I love cactuses and succulents so this bundle is right up my alley.


The sketch is from the weekly Atlantic Hearts Sketch Challenge.


The Cactus Cuties Bundle has great images and some of them can be punched using the Cactus Builder Punch. Save 10% when purchasing this as a bundle.


Tips & Instructions

  • Thick Basic White Cardstock - 5 1/2 x 8 1/2, score at 4 1/4

  • Flowering Fields Designer Series Paper (orange polka dot pattern) - 5 1/2 x 2 1/2, adhere to card base.

  • Ombre Specialty Paper (dark end of Poppy Parade) - 5 1/2 x 3/4, adhere to 5 1/2 x 1 strip of Basic White Cardstock and adhere to card.

  • Basic White Cardstock - cut largest circle from the Layering Circles Dies.

  • Basic White scraps - stamp pot with Crushed Curry Ink, stamping off first. Stamp cactus pieces with Soft Succulent Ink. Punch with coordinating punch.

  • Punch flowers from the Ombre Specialty Paper.

  • Adhere the pot, cactus and flowers to circle and then adhere circle to card using Dimensionals.

  • Add some Pale Papaya Basic Jewels.


On the inside stamp pot with Crushed Curry Ink, stamping off first. Stamp cactus with Soft Succulent Ink.


Supply List

You can click on the item to purchase it from my Online Store.

Make 5 Simple Cards with a Card Holder Box

I made this beautiful gift box which holds 5 simple cards and envelopes using the Flowering Fields Designer Series Paper and Flowering Tulips Stamp Set.


I used one of the Acetate Card Boxes for the card holder. These are retiring with the new catalog coming out and they are a great deal. You get 10 for $7.00(US).

Watch the video to see how to make all the cards and the belly band for the card holder.


Each card has a coordinating decorated envelope. This is an easy way to dress up your card. This designer series paper works perfectly for a nice set of cards with envelopes.


Measurements for Card #1

  • Thick Basic White Card Base (5 1/2 x 8 1/2, score at 4 1/4)

  • Basic White Layer 5 1/4 x 4

  • Designer Series Paper - cut 5 1/4 x 4 then cut across at 2 1/2 to get the two pieces. Flip bottom piece over and adhere both to the white layer.

  • Wrap ribbon around the seam and adhere to back.

  • Basic White Label - die cut using the Scalloped Contours Dies and stamp sentiment with Poppy Parade Ink.

  • Add Brushed Brass Butterfly.


On the inside stamp flowers and leaves. I used Poppy Parade and Pear Pizzazz.


I love the colors on this card. It’s actually a landscape card but I took a picture of it this way with the envelope.


Measurements for Card #2

  • Blackberry Bliss Card Base - 5 1/2 x 8 1/2, score 4 1/4

  • Basic White Layer- 5 1/4 x 4

  • Designer Series Paper - 4 x 4, cut diagonally (be sure to pay attention to the direction of the pattern). Lay on Basic White Layer and spread apart. Stamp sentiment with Blackberry Bliss Ink. Stamp the small design on each side of the sentiment.

  • Adhere the designer series paper to the white layer and then adhere to the card.


On the inside Layer adhere a piece of the Designer Series Paper. I cut it at 5 1/4 x 1 1/2 but I think it should be only 1”.


Measurements for Card #3

  • Blackberry Bliss Card Base - 5 1/2 x 8 1/2, score at 4 1/4

  • Basic White Layer - 5 1/4 x 4

  • Designer Series Paper Layer 5 x 3 3/4

  • Basic White Label - die cut using the Scalloped Contours Dies and stamp sentiment and flower with Blackberry Bliss Ink.

  • Tie bow with 2 strands of Baker’s Twine and adhere to card with Glue Dot.

  • Add a Brushed Brass Butterfly.


On the inside layer stamp flower and leaves with Blackberry Bliss and Pear Pizzazz Inks.


Measurements for Card #4

  • Calypso Coral Card Base - 5 1/2 x 8 1/2, score at 4 1/4

  • Basic White Layer - 5 1/4 x 4, emboss using the Timeworn Type 3D Embossing Folder and adhere to card base.

  • Calypso Coral Square - 3 1/2 x 3 1/2

  • Designer Series Paper Square - 3 1/4 x 3 1/4

  • Adhere squares and adhere to card using Foam Adhesive Sheet cut to size or Dimensionals.

  • Stamp sentiment with Evening Evergreen Ink on 1/2” strip of Basic White. Punch both ends with Banners Pick A Punch (or hand cut banner). Adhere to card with Foam Adhesive or Dimensionals.


On the inside stamp sentiment and flower with Calypso Coral Ink and center with Black Memento Ink. Stamp leaves and stem with Pear Pizzazz Ink.


Measurements for Card #5

  • Poppy Parade Card Base - 5 1/2 x 8 1/2, score at 4 1/4

  • Basic White Layer - 5 3/8 x 4 1/8

  • Designer Series Paper Layer - 5 1/4 x 4

  • Adhere layers to card base. Adhere piece of Ribbon to card.

  • Poppy Parade Cardstock cut with scalloped using the Layering Circle Dies.

  • Stamp sentiment on Basic White Cardstock with Poppy Parade Ink and cut with Layering Circle Dies. Adhere circles together and then adhere using Dimensionals.

  • Add Brushed Brass Butterflies.


On the inside stamp flower with Poppy Parade Ink and leaves with Pear Pizzazz Ink.


Measurements for Belly Band

  • Designer Series Paper - 12 x 2, score at 3 1/8, 3 3/4, 8 3/8 and 9

  • Wrap Belly Band around box and adhere ends.

  • Cut Scalloped Circle from Poppy Parade Cardstock using Layering Circles Dies.

  • Cut smaller circle from Designer Series Paper using Layering Circles Dies.

  • Adhere circles together and adhere to belly band using Dimensionals.

  • Add some Brushed Brass Butterflies.


Add your cards and you’re all set with a beautiful gift.


Supply List

You can click on the item to purchase it from my Online Store.

Super Simple Sunny Sentiments Card

This was such an easy card to make. The background layer was embossed with the Macrame 3D Embossing Folder. Embossing really adds so much to a card to take it from simple to beautiful.


The Sunny Sentiments Stamp Set has great, large sentiments. This is on the retiring list, so sad.


The Tasteful Labels Dies are a favorite of mine. I use these dies all the time. I’m so sad to see that they are on the retiring list, BUT the good thing is they are marked down. These are sure to go quickly.


The Macrame 3D Embossing Folder is also retiring and on sale. Get one while before it’s gone.


Tips & Instructions

  • Polished Pink Card Base - 5 1/2 x 8 1/2, score at 4 1/4

  • Basic White Layer - 5 1/4 x 4, emboss using the Macrame 3D Embossing Folder and adhere to card base.

  • Polished Pink Cardstock, cut using the Tasteful Labels Dies. Stamp the sentiment with Versarmark Ink and heat emboss with White Embossing Powder.

  • Lay out ribbon to sit behind your label. I taped the ribbon down once I had it in place.

  • Adhere the label using Dimensionals.

  • Add some Pearls.


Stamp sentiment on inside layer using Polished Pink Ink. Emboss a 4 x 1 strip of Basic White Cardstock and add to the bottom of the layer.


Supply List

You can click on the item to purchase it from my Online Store.

Card Making Ideas - Die Cut your Patterned Paper

I love how these hydrangeas turned out. I cut them from the New Horizons Designer Series Paper using the Hydrangea Dies. It’s always a surprise how patterned paper will look when you die cut it.


Watch the video to see more on the papers I used and how to back the leaves with Adhesive Sheets before cutting to make it easy to adhere.


The Hydrangea Haven Bundle is on sale for 20% off during the month of March, 2022 with the Savings Are In Bloom Promotion


Each flower will turn out differently depending on the pattern you use. Play around with it and have fun! I used one of the meadow scenes for the background layer on this one.

Measurements:

  • Misty Moonlight Card Base - 5 1/2 x 8 1/2, score at 4 1/4

  • Basic White Layer - 5 3/8 x 4 1/8

  • Designer Series Paper Layer - 5 1/4 x 4

  • Cut flowers and leaves from the New Horizons Designer Series Paper. I backed the leaves with Adhesive sheets before cutting.

  • Cut tag from scrap of Basic White Cardstock.


I like all the pinks in this one, the background and the flowers, so pretty!


I’m not sure who I will give this to and for what occasion so I didn’t add a sentiment yet. Adhere some of those small flowers to the inside.


Supply List

You can click on the item to purchase it from my Online Store.

Quiet Moments Thinking Of You Card

I just love our Designer Series Paper!!! I think it’s my favorite Stampin’ Up! product.

The background, flowers and butterflies were all cut from the New Horizons Designer Series Paper pack. There are pretty scenes from hand-painted designs on one side and then gorgeous watercolor washes on the other.


I used the Quiet Meadow Bundle for the sentiment and images for this card. The dies work with the Mini Stampin’ Cut & Emboss Machine. This bundle is included in the Savings Are In Bloom Promotion where you can save 20% on this Bundle. This promotion ends March 31, 2022 so if you want it at a discount, you only have a few days left.


The Mini Stampin’ Cut & Emboss Machine is also on sale during March, 2022 where you can save 20% when you purchase it. This is a great deal. It will increase in price in May when the new catalog launches.


Tips & Instructions

  • Evening Evergreen Card Base - 5 1/2 x 8 1/2, score at 4 1/4

  • Basic White Layer - 5 3/8 x 4 1/8, adhere to card base.

  • New Horizons Designer Series Paper Layer - 5 1/4 x 4

  • Cut 2 long greenery pieces from Evening Evergreen Cardstock.

  • Cut the floral piece with stems from Pear Pizzazz Cardstock. Cut the flowers using the same die from the back side of the left over Designer Series Paper that you used for the background scene. Cut off the stems from the flowers and adhere over the flowers that you cut from Pear Pizzazz Cardstock so you only see the stems in the green.

  • Cut the butterflies from the back side of the New Horizons Designer Series Paper. Play around with the different colors and patterns.

  • Stamp sentiment on scrap of white and cut using the label die from the die set.

  • Feed 3 strands of Baker’s Twine through the back of the label. Using Dimensionals adhere the label to the layer and then wrap the twine around and secure on the back.

  • Arrange and adhere the floral pieces. Tie bow with 3 strands of twine and adhere using Glue Dot.

  • Adhere butterfly to label and then the larger butterfly to layer using Dimensionals.

  • Adhere layer to card.

  • Add some Rhinestones to flower centers.


These butterflies and flowers are so pretty cut from this paper.


On the inside layer stamp sentiment with Evening Evergreen Ink. Cut another butterfly from the Designer Series Paper and adhere to layer.


Supply List

You can click on the item to purchase it from my Online Store.

Annual Catalog Retirement List Walk-Thru

The new Annual Catalog launches May 3, 2022 and Stampin’ Up! is clearing out to make room for the new products.

Grab your catalog and favorite beverage and walk through the Last Chance Products with me.


I've done the work for you. I highlighted what's retiring, what's on sale and what's being unbundled. These are while supplies last so if you want anything, head over to my Online Store and start shopping.


The Savings Are In Bloom Promotion that I mentions goes through the end of March, 2022. You can save 20% on the Mini Stampin’ Cut & Emboss Machine and select compatible dies. Click on the link below to see the brochure.

If you have any questions at all, please leave me a comment or email me.

patti@pspapercrafts.com