Cute Birthday Card using Turtle Friends!

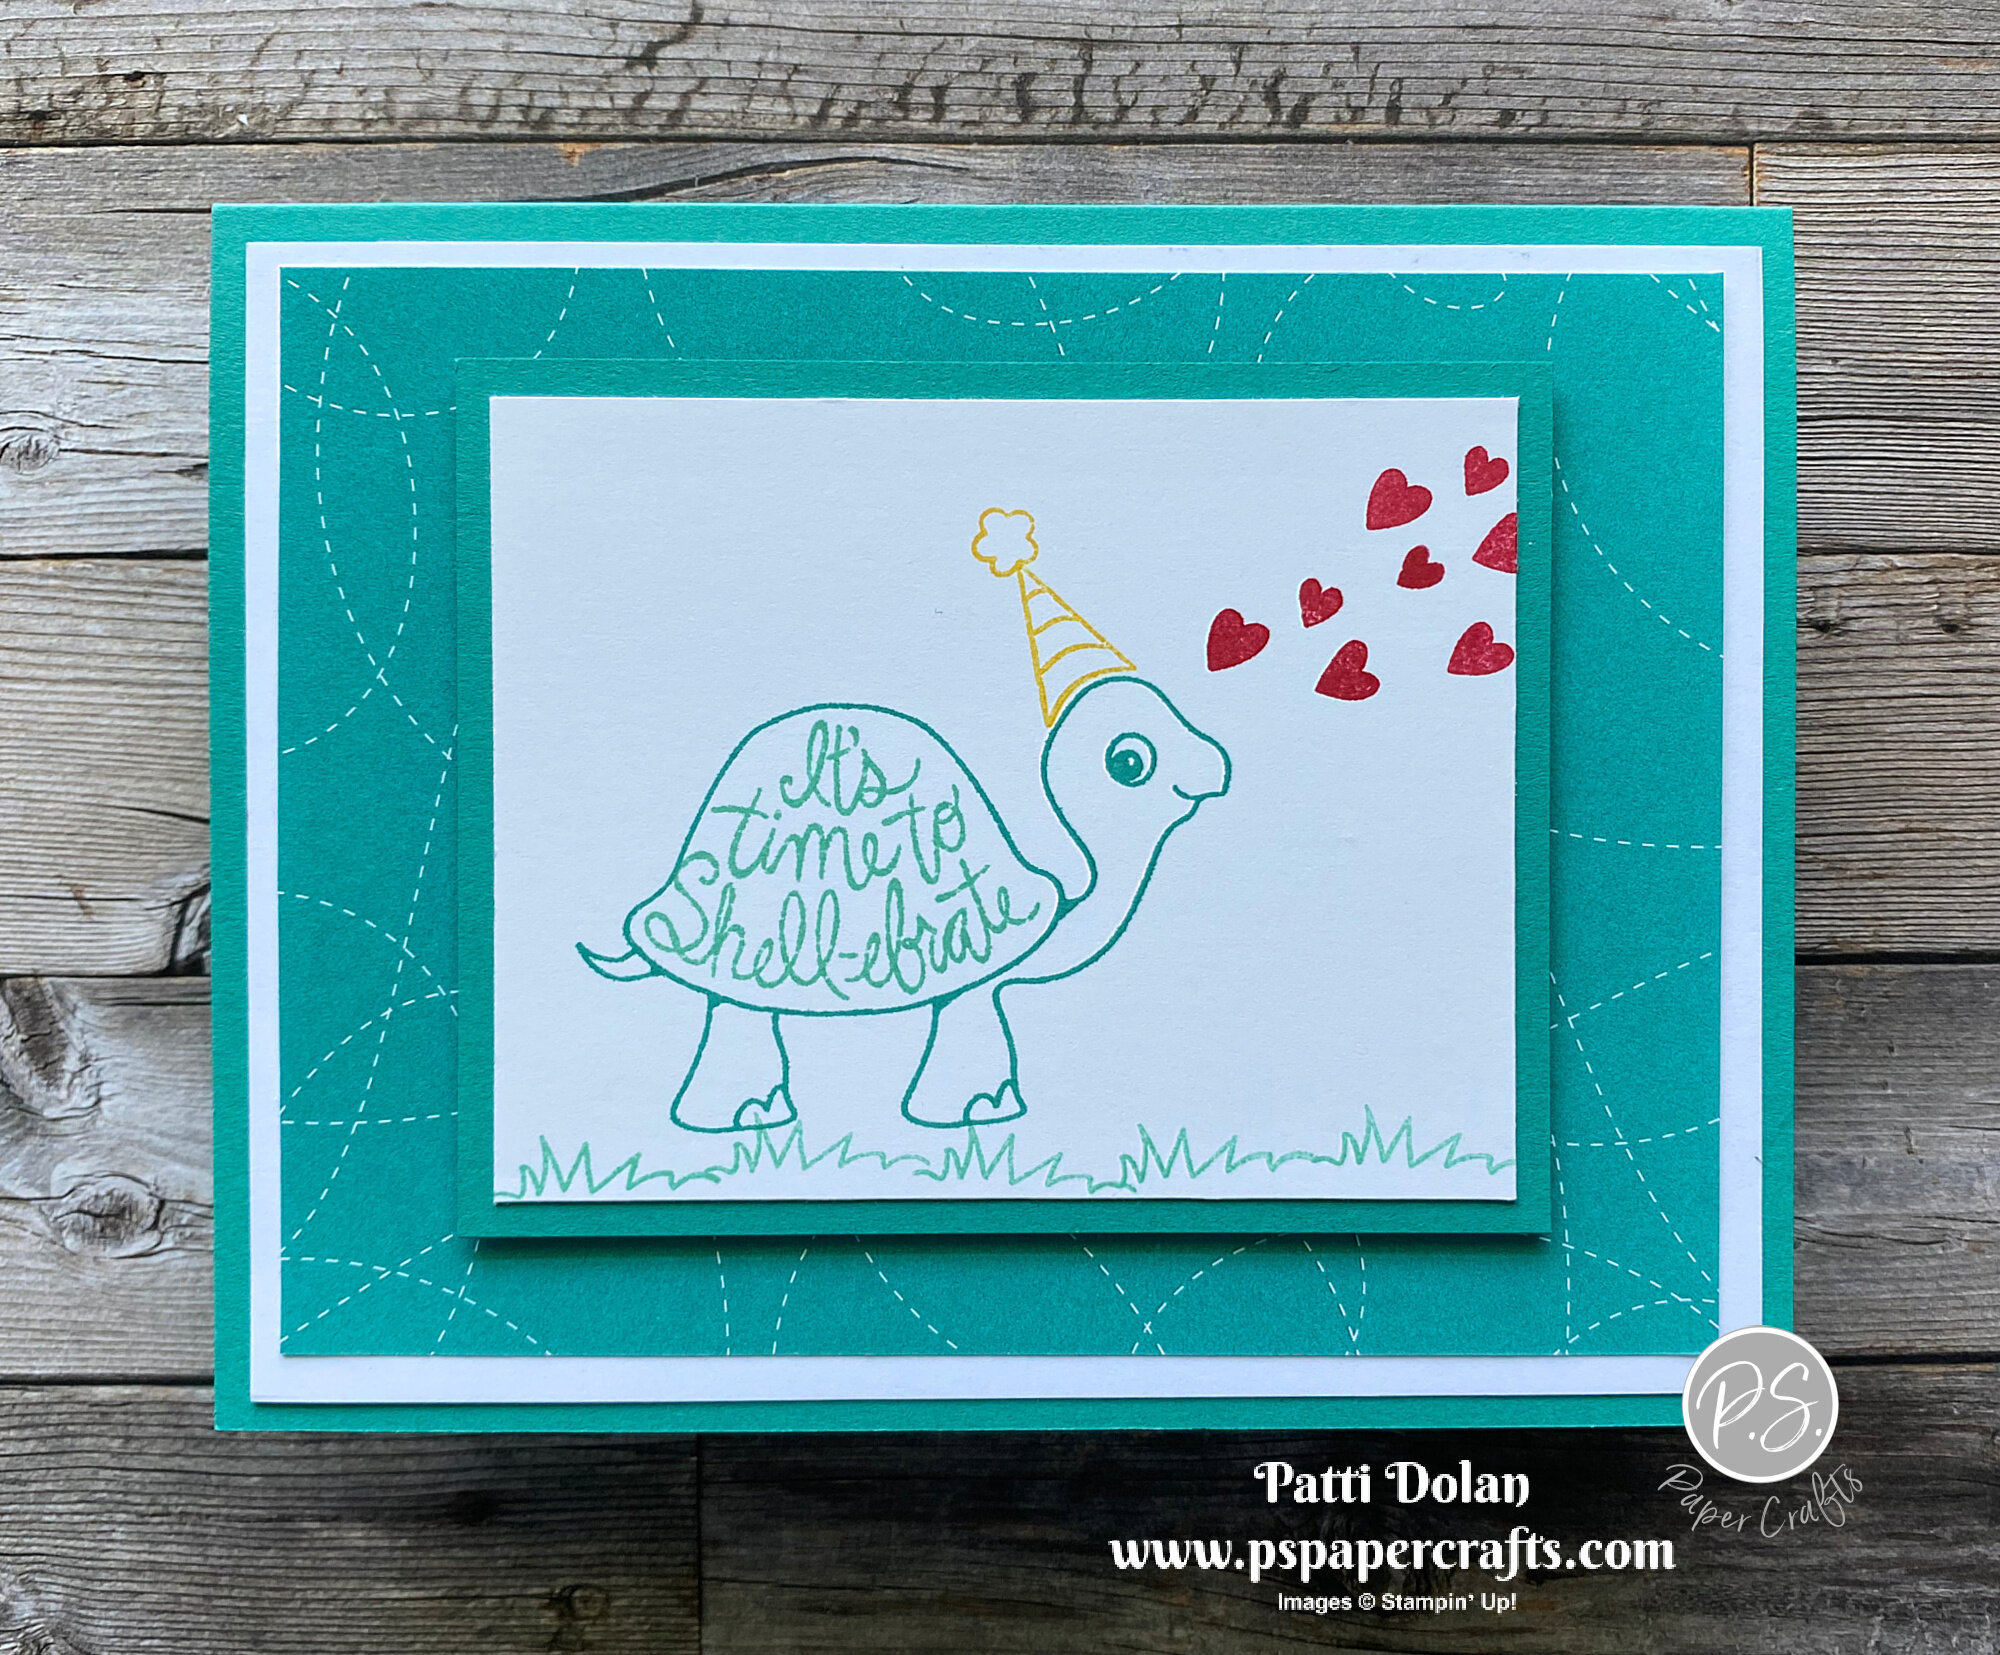
I made this fun birthday card for my grandson using the Turtle Friends Stamp Set. He loves nature and I think he will love this card.

 
Turtle Friends Birthday Card2.jpeg
 

Aren’t these images and sentiments so fun! I love that there is a belated birthday sentiment. There’s a punch that coordinates with the turtle and if you purchase them together as a bundle, you’ll save 10%. I’ve listed both in the Supply List so you can either purchase just the stamp set or the bundle.

 
Screen Shot 2021-06-10 at 12.01.50 PM.png
 

The Snail Mail Designer Series Paper is what I used for the background layer and is on the retiring list. Products from the Mini Catalog will retire June 30, 2021.

 
Screen Shot 2021-06-10 at 12.02.38 PM.png
 

Tips & Instructions

  • Bermuda Bay Card Base - 5 1/2 x 8 1/2, score at 4 1/4.

  • Basic White Layer - 5 1/4 x 4, adhere to card base.

  • Snail Mail Designer Series Paper - 5 x 3 3/4, adhere to card.

  • Bermuda Bay Layer - 3 3/4 x 3

  • Basic White Layer - 3 1/2 x 2 3/4

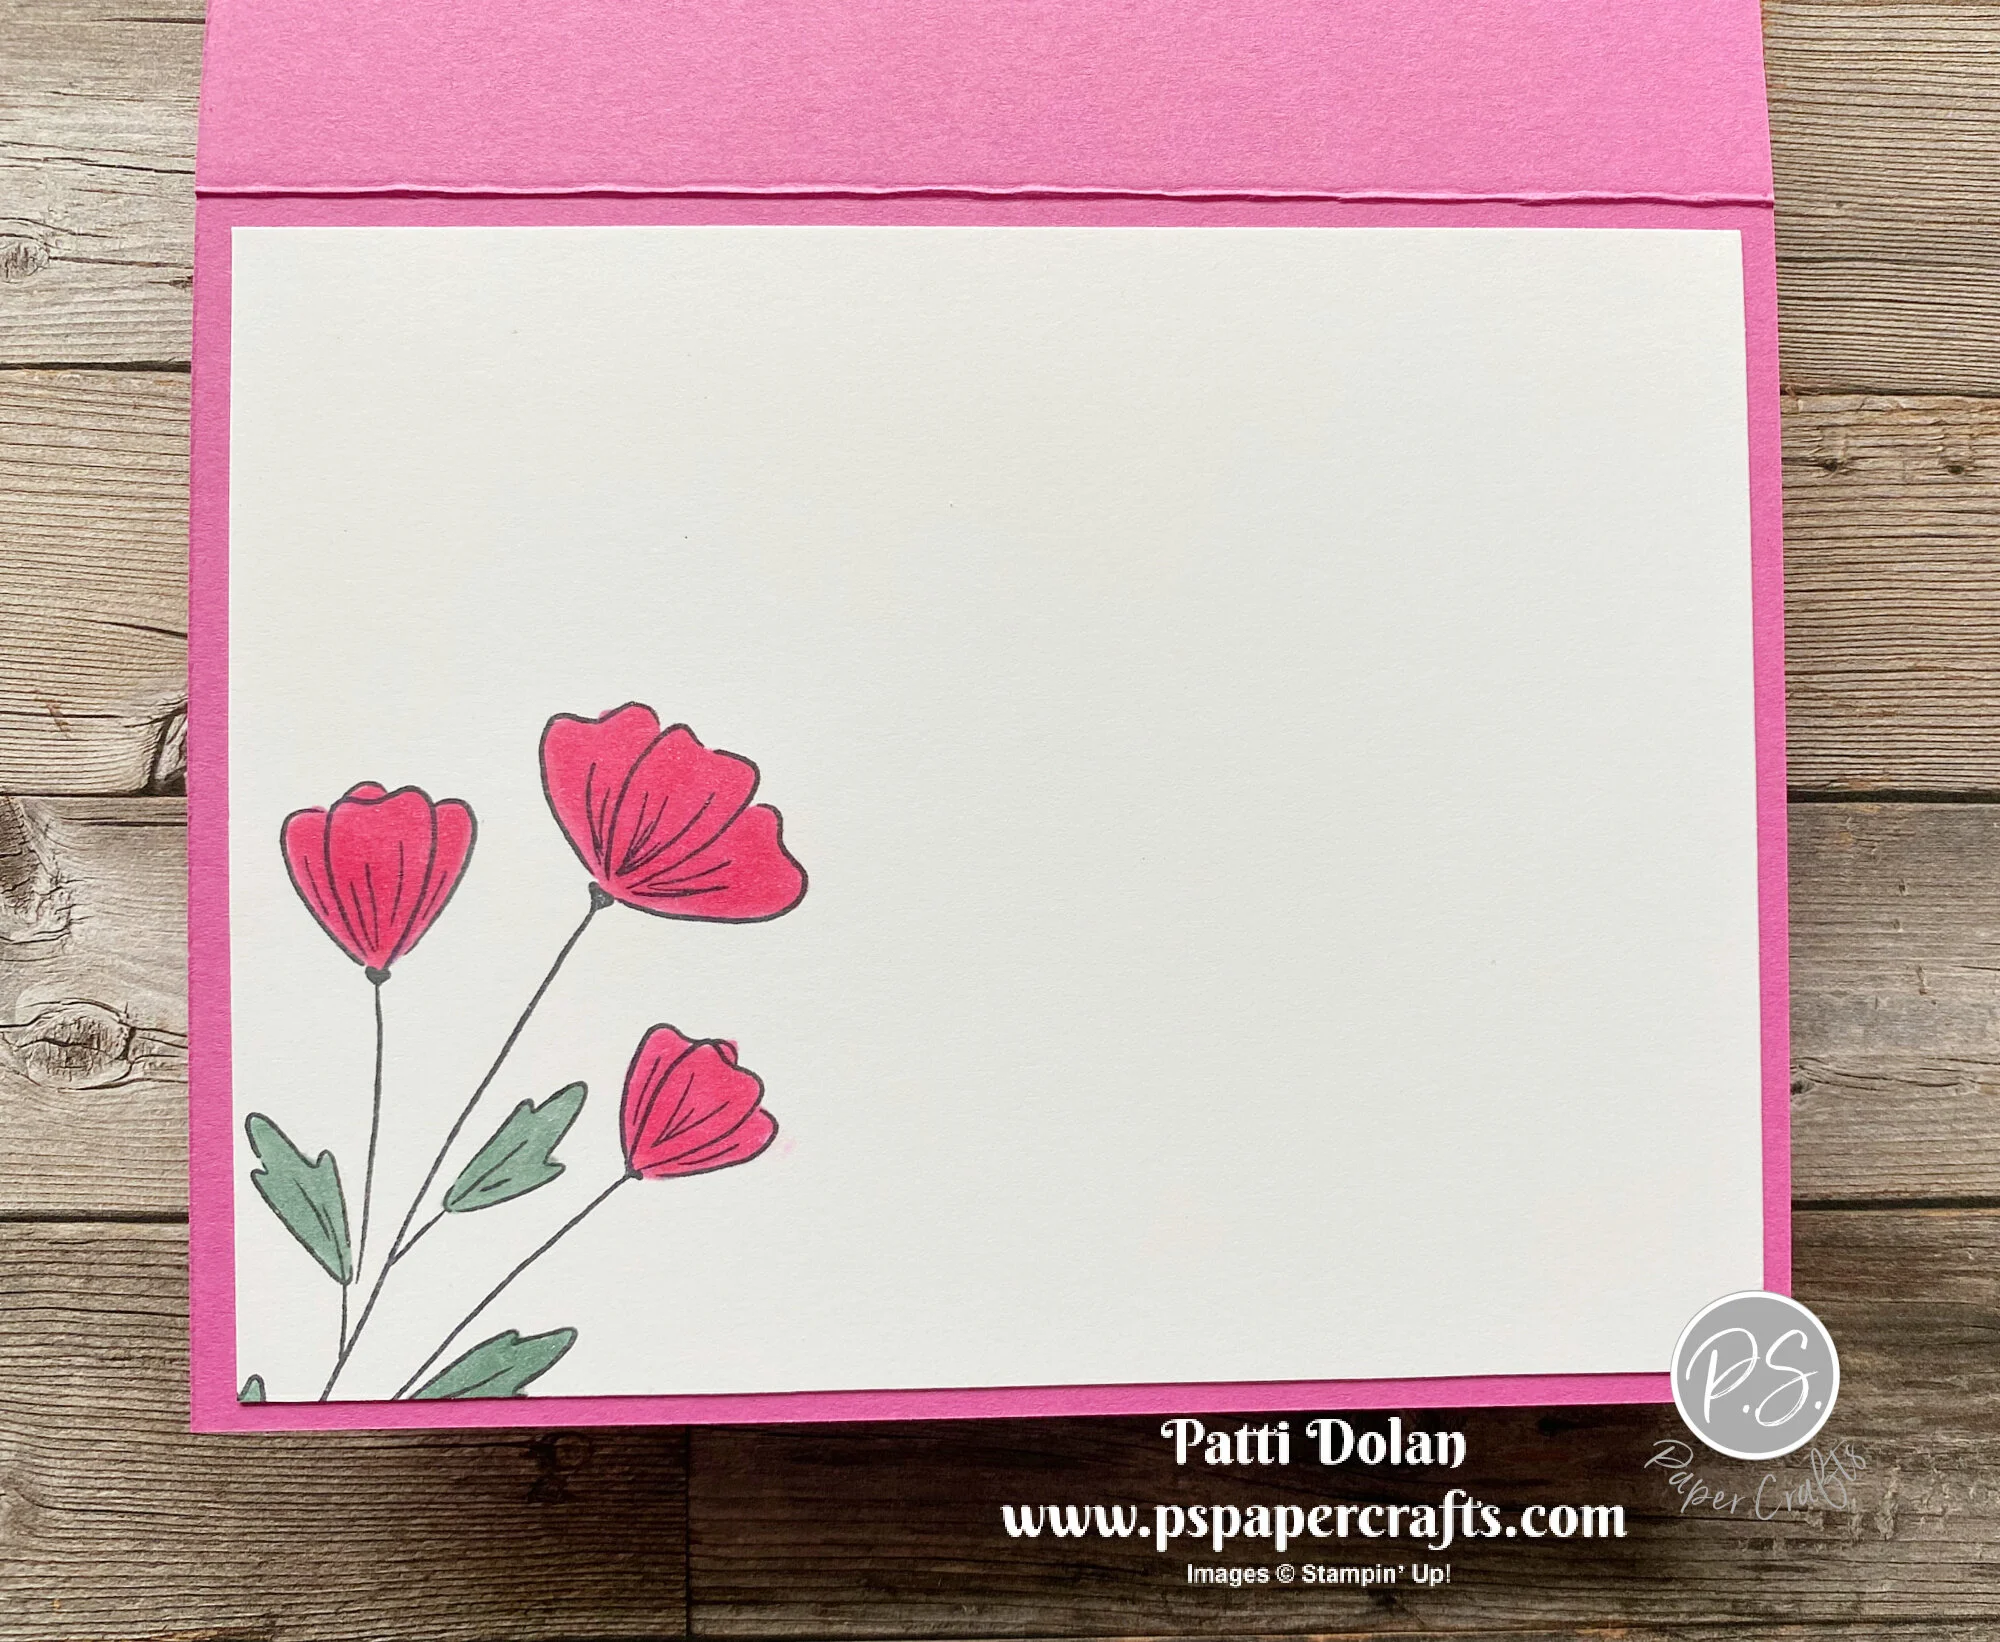
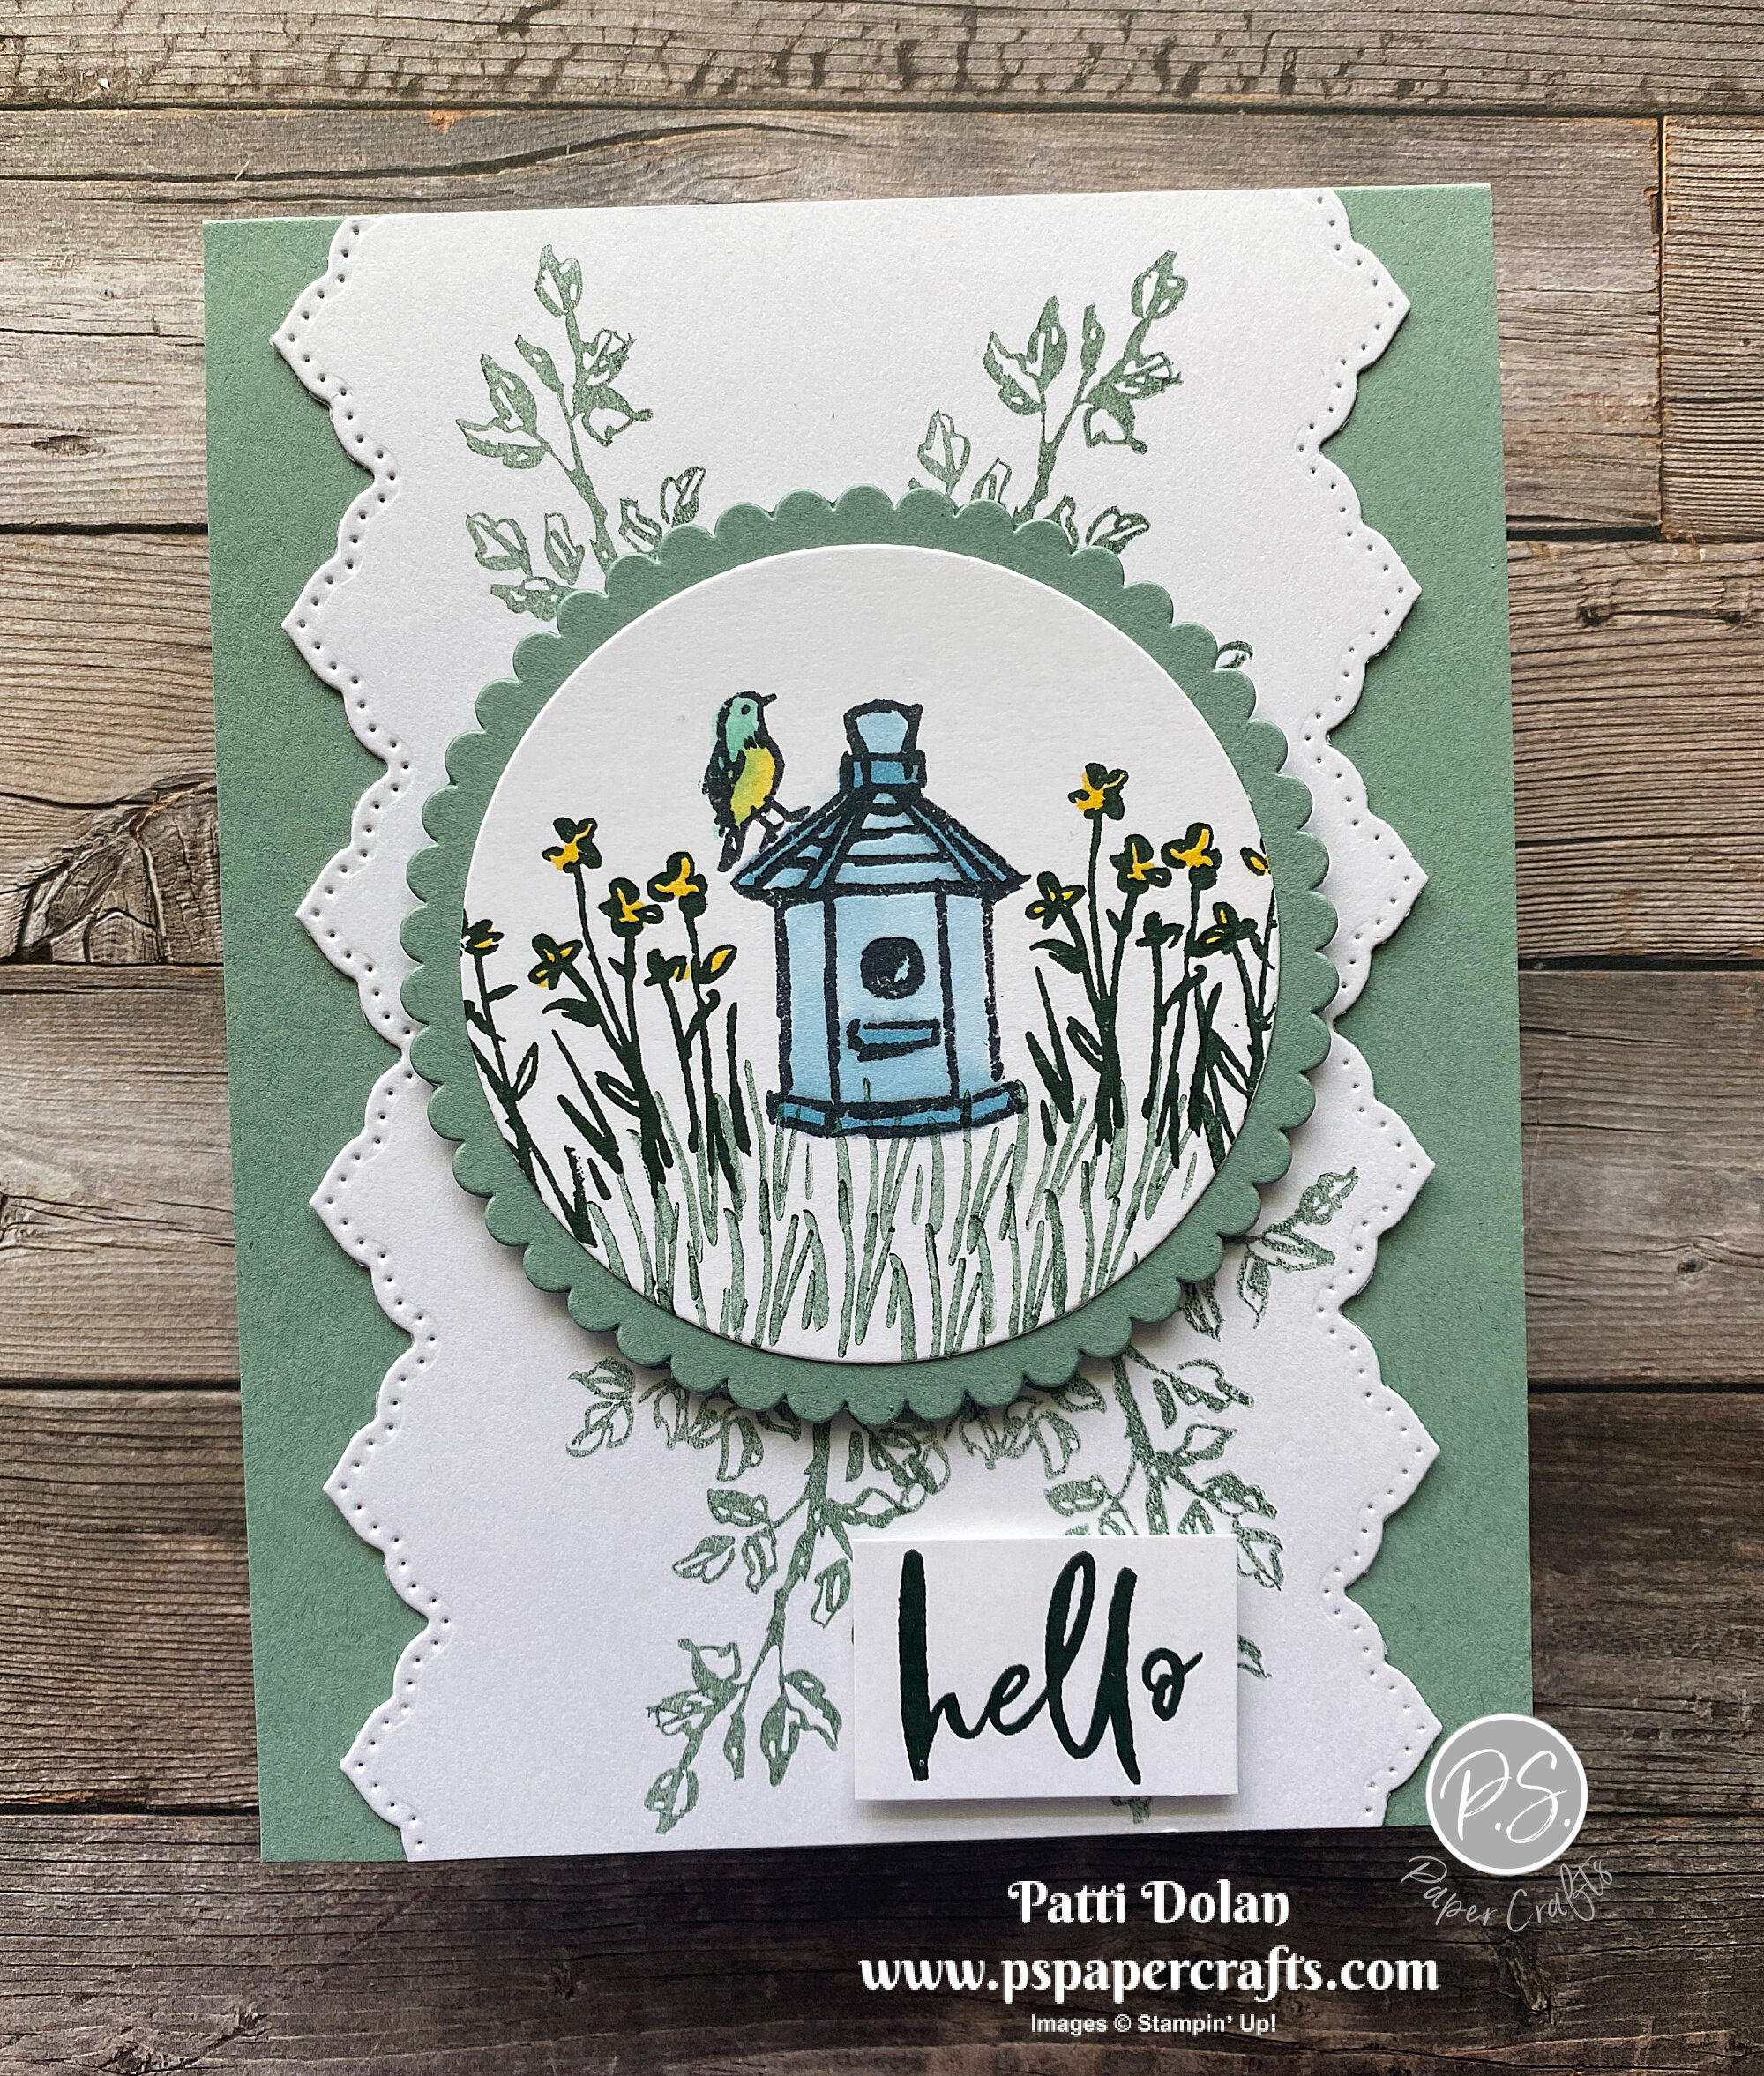
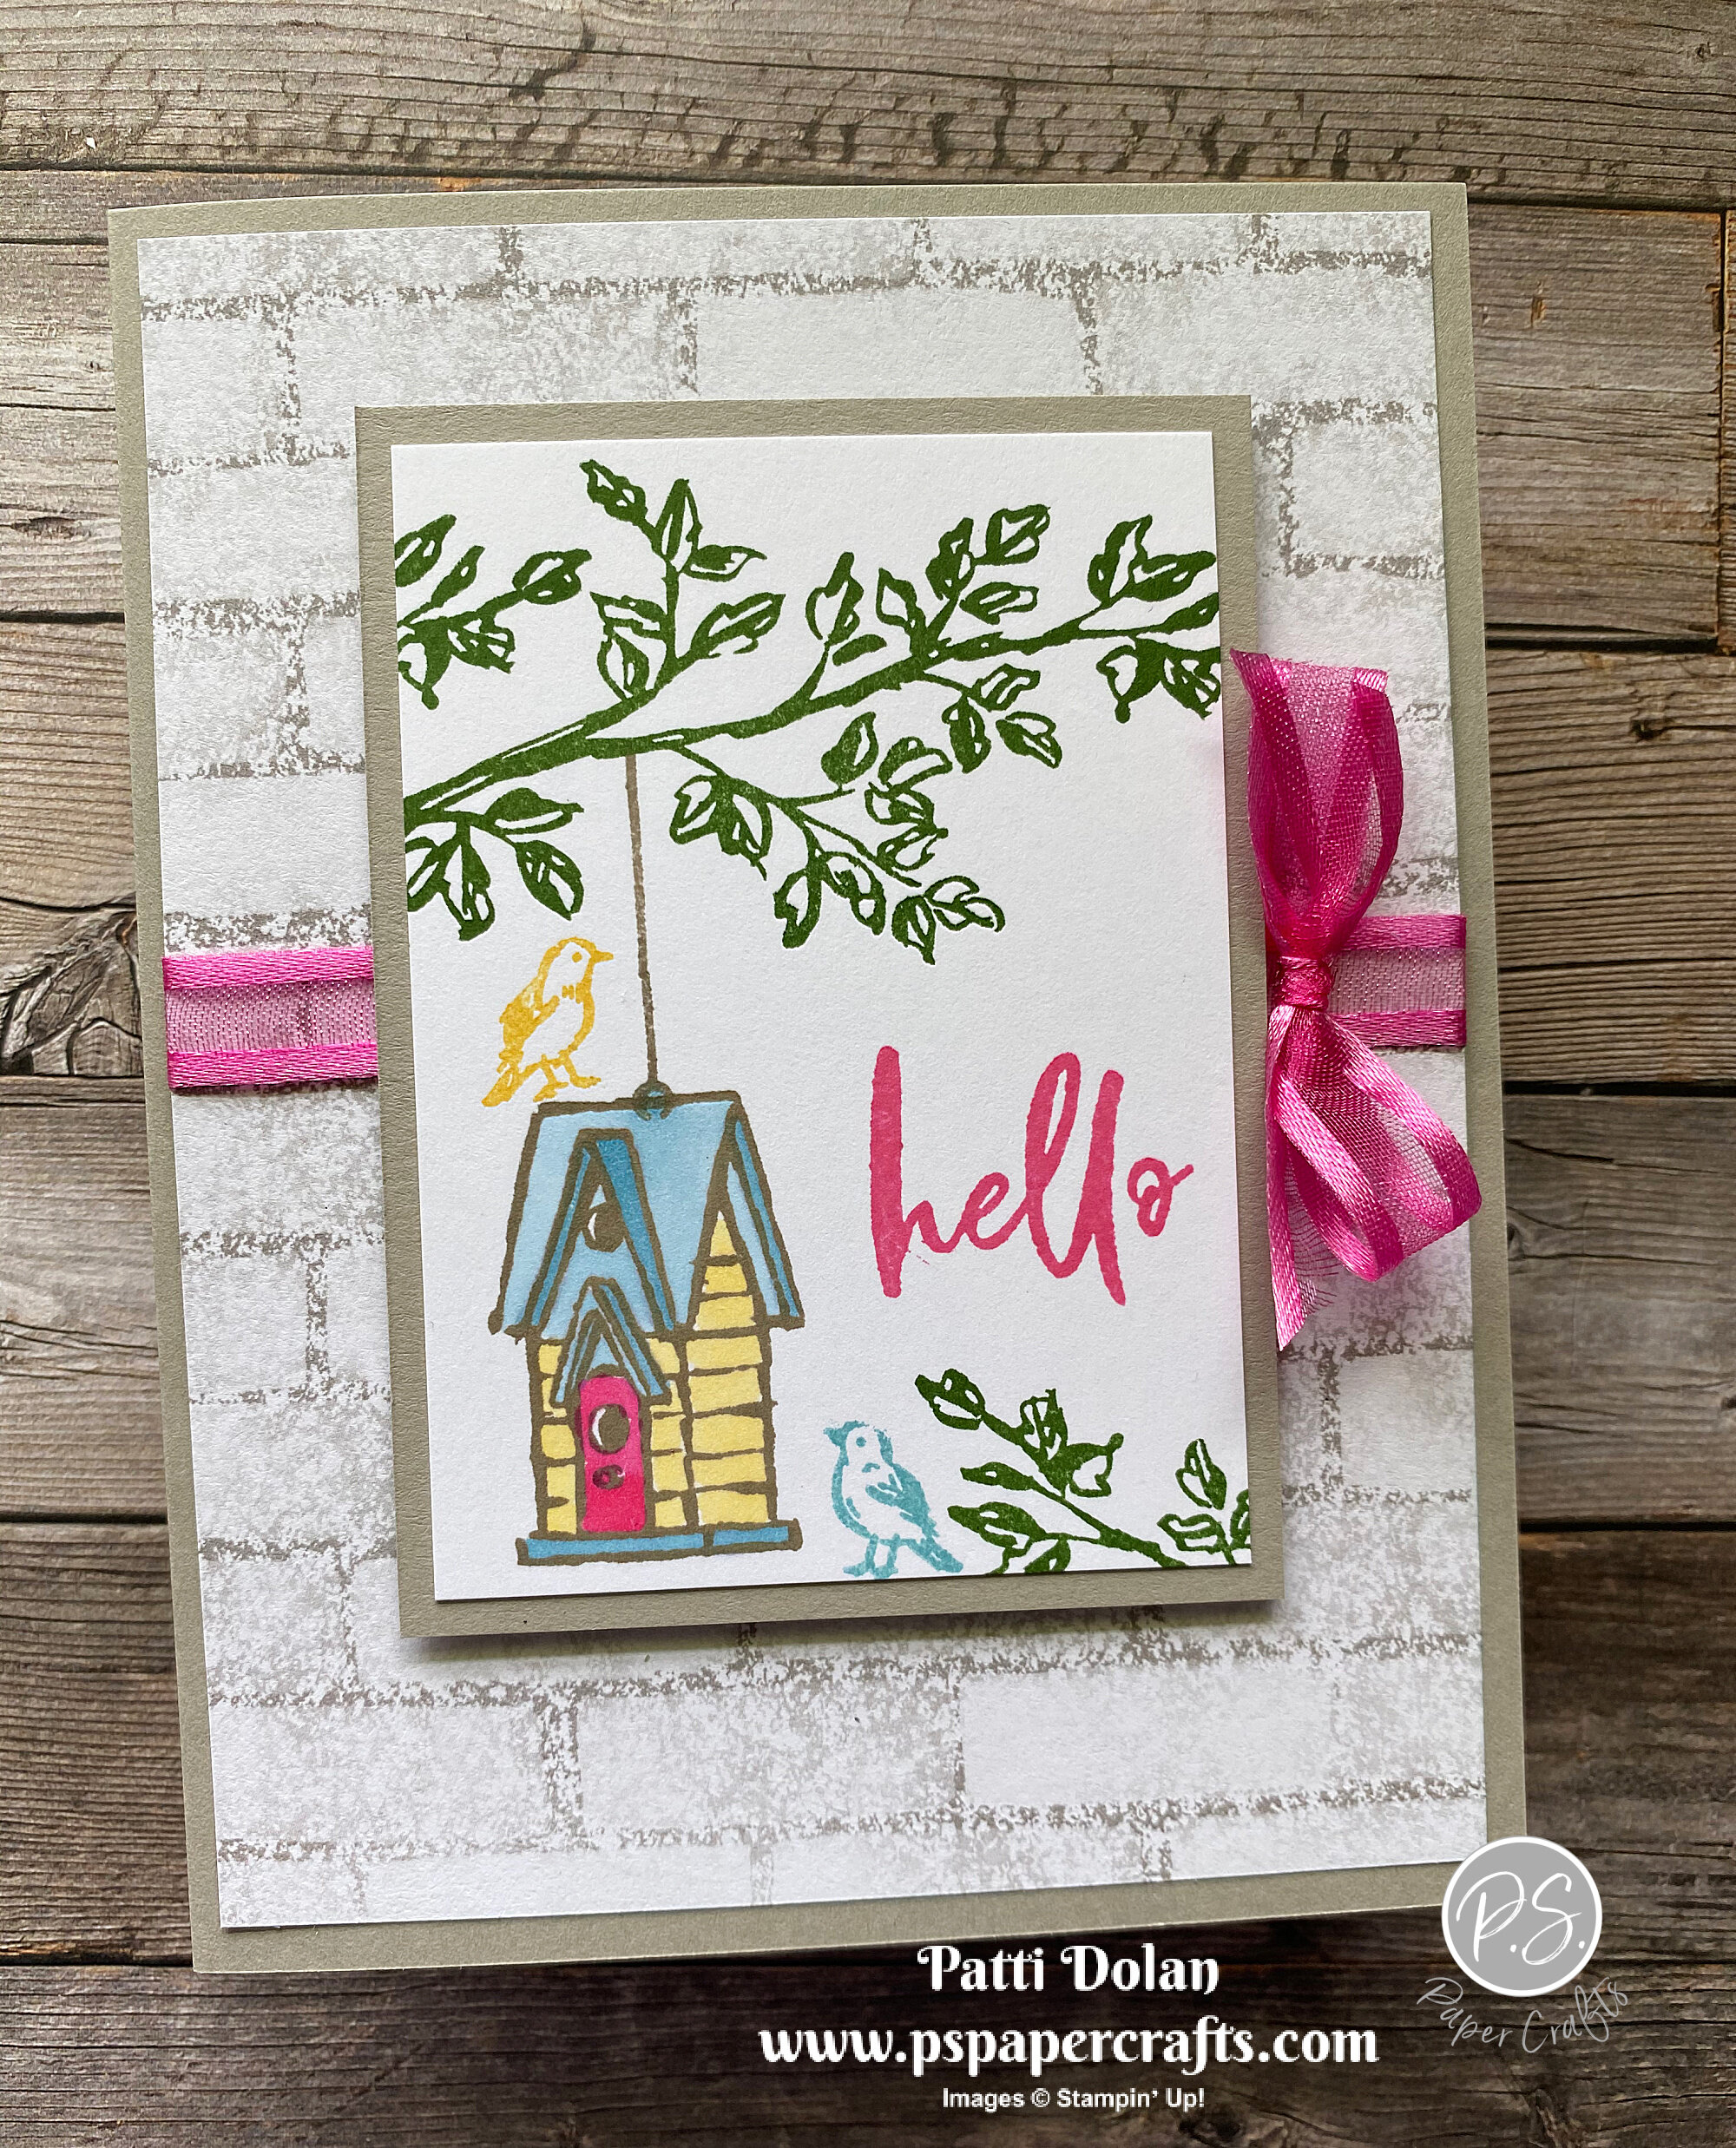
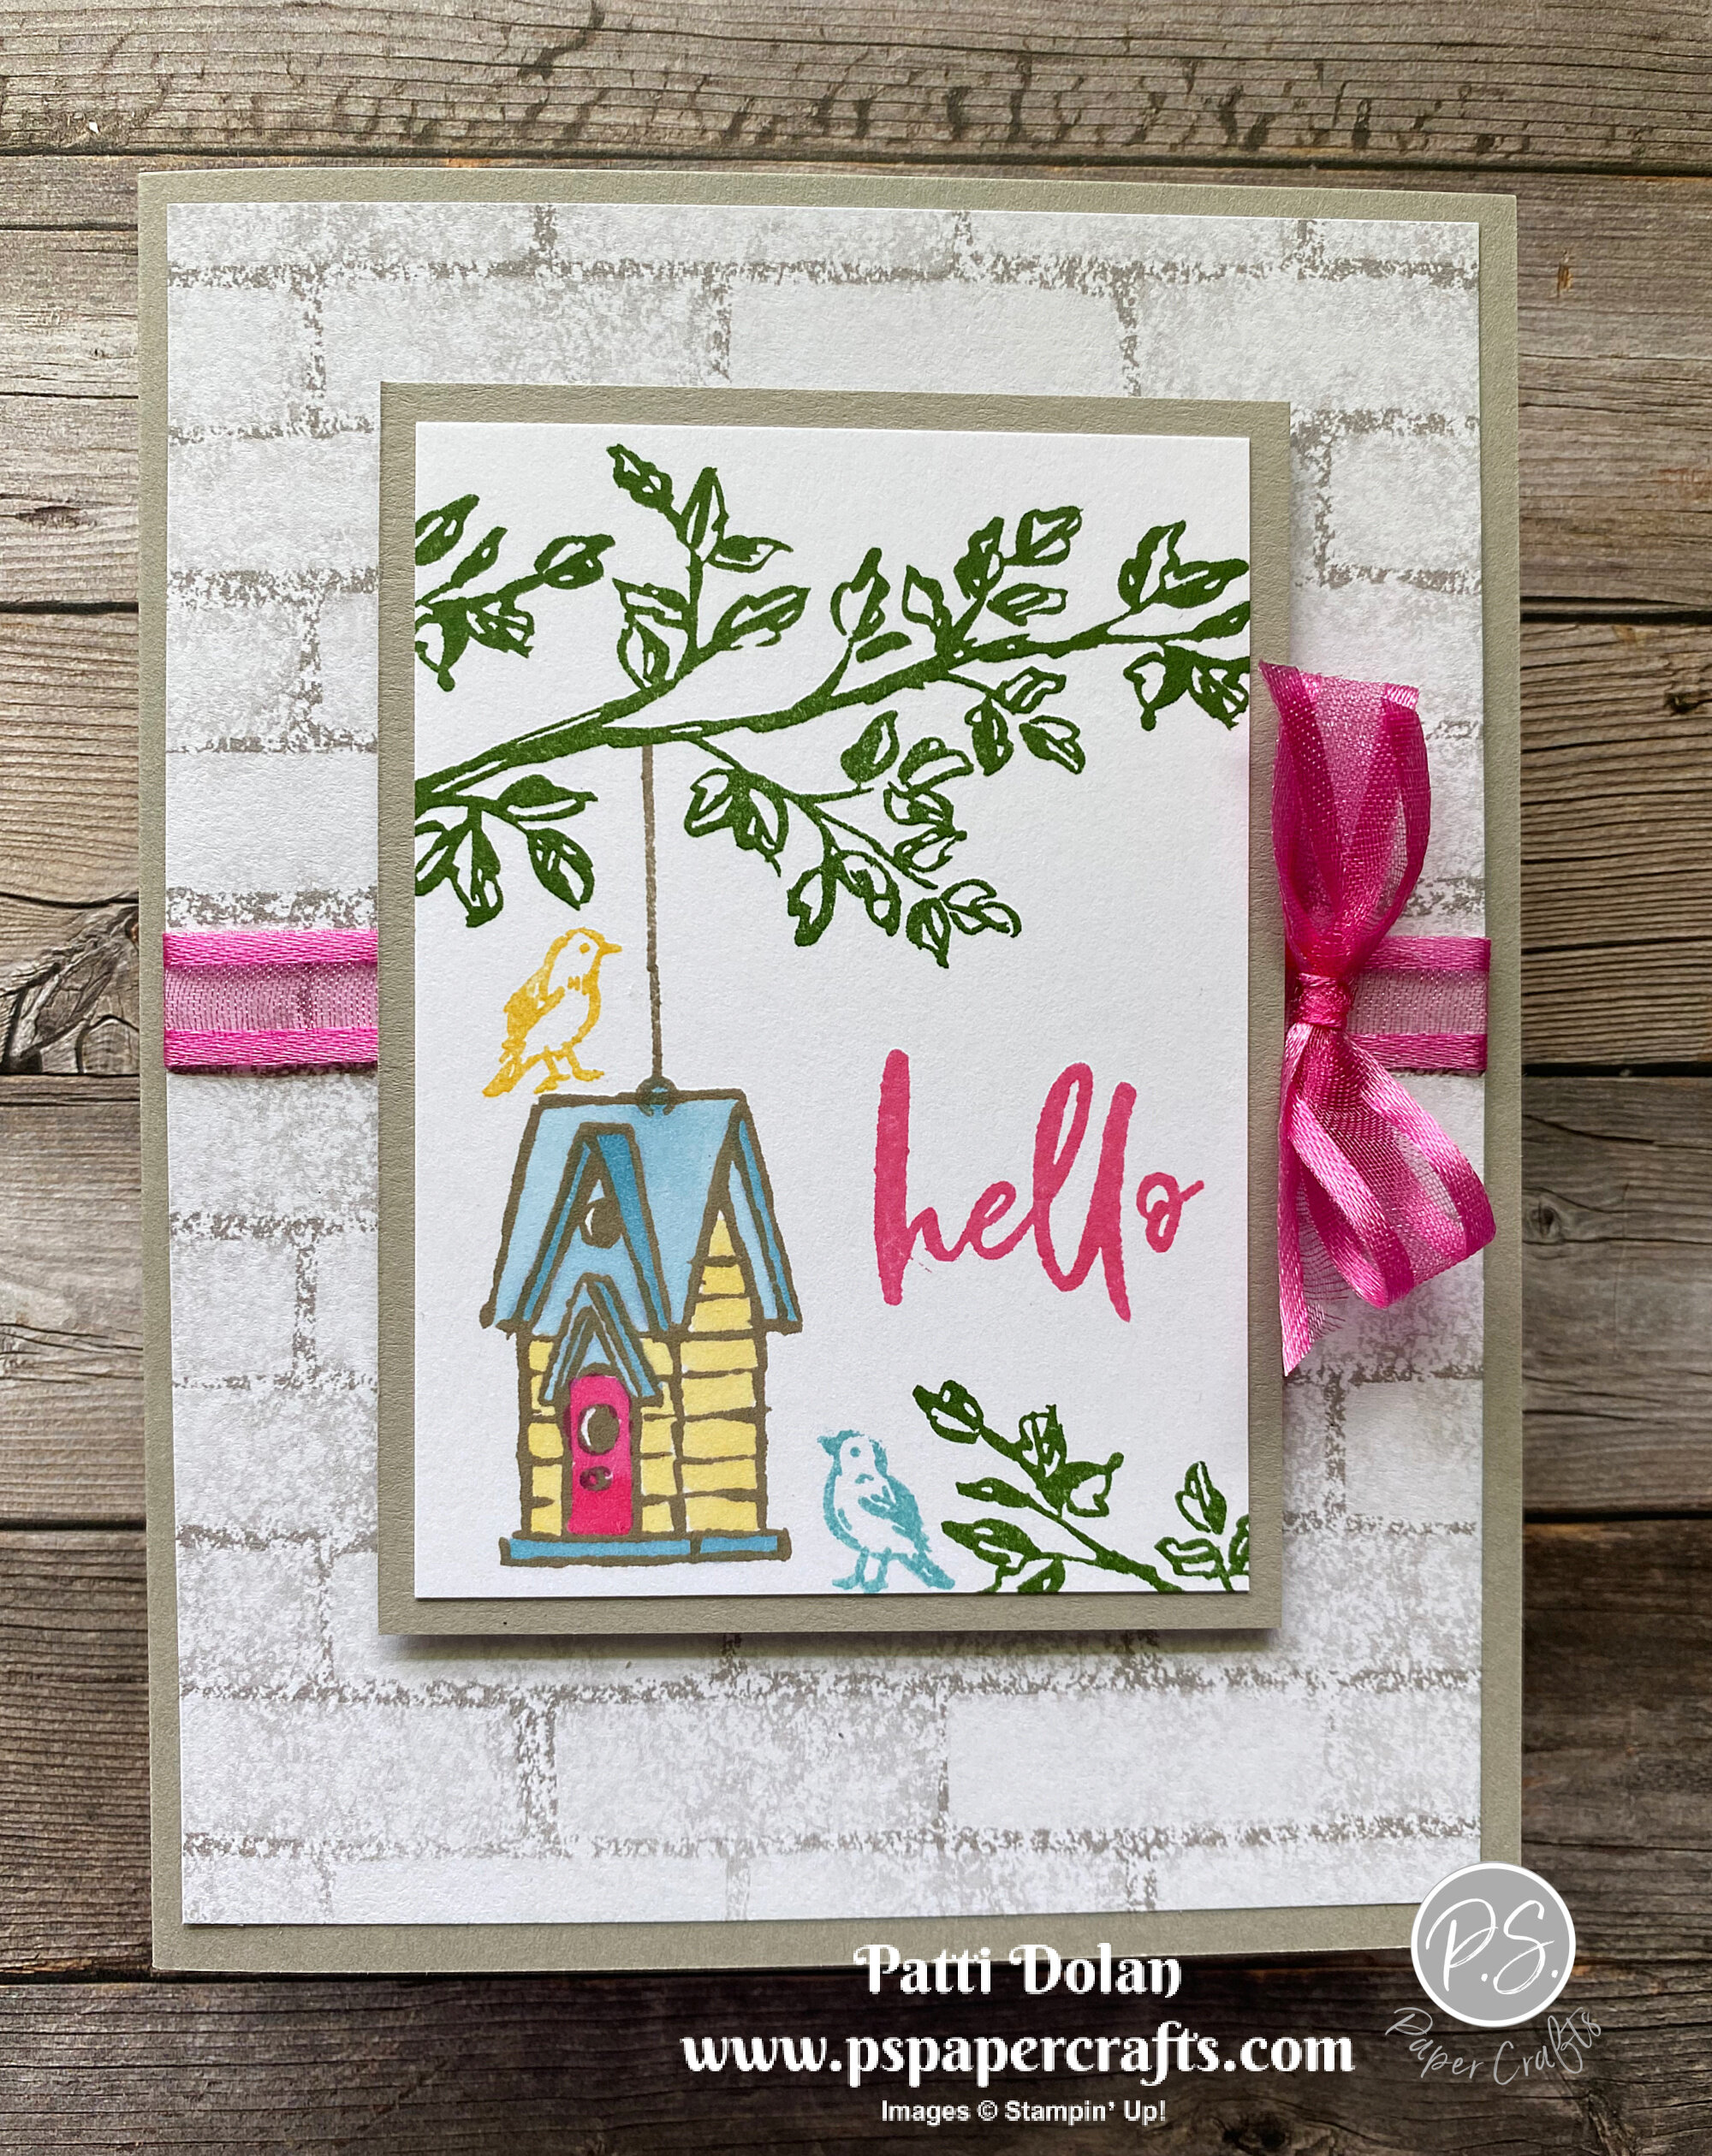
  • Stamp images on the Basic White layer. I stamped the turtle with Bermuda Bay, the sentiment and grass with Coastal Cabana, the hat with Daffodil Delight and the hearts with Real Red Inks.

  • Adhere stamped layer to Bermuda Bay Layer and then adhere the layers to card using Dimensionals.

 
Turtle Friends Birthday Card1.jpeg
 

On the inside stamp sentiments and turtle with Bermuda Bay, grass and turtle shell with Coastal Cabana and hearts with Real Red Inks. I think this sentiment is so fun.

 
Turtle Friends Birthday Card inside.jpeg
 

Supply List

Elegantly Said Birthday Card

I made this beautiful Birthday Card using the Elegantly Said Bundle. Elegant is a perfect description for this bundle.

 
Elegantly Said Birthday Card2.jpeg
 

In the video I’ll show you how to make this card and a tip to create a longer label using the punch.


This images are gorgeous and I love the sentiments with the mix of script and type fonts. The punch makes it easy to quickly punch out a pretty label.


Tips & Instructions

  • Basic Gray Card Base - 4 1/4 x 11, score at 5 1/2

  • Basic Gray Layer - 5 x 3 3/4

  • Stamp the large flourish image at the top and bottom corners on the layer using Versamark Ink. Heat emboss using White Embossing Powder.

  • Basic White Strip - slightly under 1 3/4”, feed in back of the punch and punch the top. Stamp the sentiment with Basic Gray Ink. Stamp the flower with Polished Pink Ink, stamping off first to get a lighter shade. Trim the bottom of the strip if necessary and feed in the back of the punch and punch the bottom. (See video for a demonstration.)

  • Adhere label to layer and then adhere layer to card base using Dimensionals.

  • Tie Bow and adhere using Glue Dots. You can add some Glue Dots to the tails if you want to secure them in place.

  • Add some Elegantly Faceted Gems.

 
Elegantly Said Birthday Card1.jpeg
 

On the inside stamp flower with Polished Pink Ink, stamping off first. Stamp border image with Basic Gray Ink, stamping off first. Stamp sentiment with Basic Gray Ink, sentiment is from the Sunny Sentiments Stamp Set.

 
Elegantly Said Birthday inside.jpeg
 

Supply List

Simple Flowers Of Friendship Hello Card

This was a very easy card to make but I think it turned out really pretty. Sometimes simple is just what you need.

 
Flowers Of Friendship Hello Card2.jpeg
 

I used the Flowers of Friendship Stamp Set (on the left) for the floral image. Aren’t the sentiments in the Sunny Sentiments Stamp Set (on the right) great? I will definitely be using it a lot!

 
Screen Shot 2021-06-07 at 10.40.42 PM.png
 
Screen Shot 2021-06-07 at 10.41.08 PM.png
 

I simply stamped the floral images and colored them with some of the new In Color Stampin’ Blends - Polished Pink and Soft Succulent.

 
Flowers Of Friendship Hello Card blends.jpeg
 

Tips & Instructions

  • Polished Pink Card Base - 5 1/2 x 8 1/2, score at 4 1/4

  • Basic White Cardstock - cut using the largest Scalloped Contour Dies.

  • Stamp the sentiment at the top corner using Black Memento Ink.

  • Stamp flowers twice using Black Memento Ink. Color with Dark Polished Pink and Soft Succulent Stampin’ Blends.

  • Add some Wink Of Stella to the flowers and leaves.

  • Adhere to card base using Dimensionals.

  • Add Polished Pink Jewels to top corner.

 
Flowers Of Friendship Hello Card1.jpeg
 

On the inside stamp the floral image and color like you did the front and adding Wink Of Stella to finish them off.

 
Flowers Of Friendship Hello inside.jpeg
 

Supply List

Sketch Saturday - Hand-Penned Petals

I made a birthday card for this week’s sketch challenge using the Hand-Penned Stamp Set and Designer Series Paper.

 
Sketch Saturday - Hand-Penned Card1.jpeg
 

This is the sketch I used from the Atlantic Hearts weekly challenge. I had a bit of a struggle with this one but that’s what I like about these sketch challenges; they push me to make something a little different than I normally would make.

 
Screen Shot 2021-06-04 at 4.32.43 PM.png
 

The images in the Hand-Penned Petals Stamp Set look like they were water-colored and they match so well with the paper.

 
Sketch Saturday - Hand-Penned stamp.jpeg
 

Tips & Instructions

  • Garden Green Card Base - 5 1/2 x 8 1/2, score at 4 1/4.

  • Hand-Penned Designer Series Paper - large floral piece 4 x 3 1/4 and polka dot square 2 x 2

  • Basic White Cardstock - 2 x 2, emboss with Tasteful Textile 3D Embossing Folder.

  • Lay the pieces on the card base and adhere.

  • Basic White Layer 2 3/4 x 2 1/4, stamp floral image with Black Memento Ink. Stamp filler images with Misty Moonlight, Garden Green and Pale Papaya Inks stamping off first to get a lighter shade.

  • Garden Green Cardstock - 3 x 2 1/2, adhere to stamped layer and adhere to card using Dimensionals.

  • Stamp sentiment (from Sweet As A Peach Stamp Set) with Black Memento Ink on 1/2” strip of Basic White Cardstock. Punch both ends using the Banners Pick A Punch. Adhere using Dimensionals.

  • Add some In Color Jewels to card. I used the Evening Evergreen Jewels.

 
Sketch Saturday - Hand-Penned Card2.jpeg
 

Stamp sentiment (from Sweet As A Peach) with Black Memento Ink. Stamp flower and filler like you did on the front panel.

 
Sketch Saturday - Hand-Penned Inside.jpeg
 

Supply List

Sweet As A Peach Birthday Card

I made this “sweet” Birthday Card using the Sweet As A Peach Stamp Set and the You’re A Peach Designer Series Paper!

 
Sweet As A Peach Birthday card2.jpg
 

In the video I’ll show you how to add some darker color to the peach and flower stamps with a dauber to get a natural look.


The You’re A Peach Designer Series Paper has great images of peaches and flowers. I love the orange and blue colors in the patterns.

 
Screen Shot 2021-06-03 at 10.43.50 PM.png
 

The sentiments in this stamp set are so prett. I love the Happy Birthday sentiment and will be using that lots. You can stamp and cut the flower or peach grouping with the leaves.

 
Screen Shot 2021-06-03 at 10.35.02 PM.png
 

Tips & Instructions

  • Calypso Coral Card Base - 5 1/2 x 8 1/2, score at 4 1/4

  • You’re A Peach Designer Series Paper Layer - 5 1/4 x 4

  • Basic White Layer 5 1/4 x 4, cut edge using the Basic Border Dies.

  • Stamp branches multiple times on white layer with Granny Apple Green Ink.

  • Stamp the flower groupings to fit in with the leaves. I inked the stamp with Pale Papaya Ink and then added a touch of Calypso Coral Ink to the flower centers with a Sponge Dauber. Stamp flower centers with Calypso Coral Ink.

  • Adhere layer to Designer Series Paper and then adhere to card base.

  • On a scrap of Basic White Cardstock stamp two large peaches. I inked the stamp with Mango Melody Ink and added some Calypso Coral with a Sponge Dauber before I stamped them. Cut with coordinating die.

  • On a scrap of Basic White Cardstock stamp two sets of leaves with Granny Apple Green and cut with coordinating die.

  • Adhere the peaches and leaves with Dimensionals.

  • On a 3/4” strip of Basic White stamp sentiment with Black Memento Ink and punch both ends using the Banners Pick A Punch. Adhere to card using Dimensionals.

 
Sweet As A Peach Birthday card3.jpeg
 

On the inside stamp leaves and peach using the same technique as you used on the front layer. Stamp sentiments with Black Memento and Calypso Coral Inks.

 
Sweet As A Peach Birthday inside.jpeg
 

Supply List

Garden Birdhouses Hello Card

I made this card using the Garden Birdhouses Stamp Set and the Basic Border Dies. It’s a simple Hello card that you can send to anyone for any reason!

 
Garden Birdhouses Hello Card2.jpeg
 

This stamp set is in my top 10 from the new Annual Catalog. I love birdhouses and it’s so nice that you have choices on the birdhouse images and you can hang them or put them on a pole. I chose to just let mine sit in the garden.

 
Garden Birdhouses Hello stamp.jpeg
 

These are the Basic Border Dies. They are create for creating a pretty edge to a card or you can even use them for mountains.

 
Screen Shot 2021-06-03 at 11.23.47 AM.png
 

Tips & Instructions

  • Soft Succulent Card Base - 4 1/4 x 11, score at 5 1/2 (top folding)

  • Basic White - 5 1/2 x 4 1/4, cut both sides with one of the Basic Border Dies. Mine is 3 3/4 from point to point. I just eyeballed it and that’s how it came out.

  • Stamp the branch image 4 times with Evening Evergreen Ink, stamping off first to get a lighter shade. Adhere layer to card base.

  • Basic White - cut with Layering Circle Die and stamp images. I stamped the birdhouse and bird with Black Memento Ink. I stamped the flowers with Evening Evergreen Ink and then filled in with the grass using Evening Evergreen Ink but stamping off first to get a lighter shade.

  • Color with Stampin’ Blends. I used Dark Daffodil Delight for the flowers, Light & Dark Balmy Blue for the bird house and Dark Pool Party and Light Daffodil Delight for the bird.

  • Cut scalloped circle from Soft Succulent Cardstock using the Layering Circle Dies and adhere behind the stamped image. Adhere to card using Dimensionals.

  • Stamp sentiment on 7/8 strip of Basic White Cardstock using Evening Evergreen Ink, cut to size you want and adhere with Dimensionals.

 
Garden Birdhouses Hello Card.jpeg
 

My inside layer is 5 3/8 x 3 3/4. Stamp branches with Evening Evergreen, stamping off first. Stamp birds with Black Memento Ink and color with Dark Pool Party and Light Daffodil Delight Stampin’ Blends.

 
Garden Birdhouses Hello inside.jpeg
 

I made a card with the same design using the Etched In Nature Stamp Set. I didn’t realize the stamp set was no longer available but wanted to show it so you can see that you can change up the stamp set and colors and use the same design for different cards.

 
Etched In Nature Thank You Card1.jpeg
 

Supply List

Flowers Of Friendship Thank You Card

Aren’t these flowers so pretty. I punched them from a piece of Shimmer Vellum; yes, that’s right, we have Shimmer Vellum now and it’s gorgeous!

 
Flowers Of Friendship Thank You Card2.jpeg
 

In the video below I’ll show you how to make this card and some tips on using the punch.


There are some great Thank You sentiments in this stamp set. You can stamp those flowers and leaves and punch them with the coordinating Flowers & Leaves Punch. Purchase as a bundle and save 10%.

 
Screen Shot 2021-06-01 at 8.56.05 PM.png
 

The Shimmer Vellum comes in the new 2021-2023 In Colors which are beautiful - Evening Evergreen, Fresh Freesia, Pale Papaya, Polished Pink and Soft Succulent.

 
Screen Shot 2021-06-01 at 8.57.15 PM.png
 

Tips & Instructions

  • Evening Evergreen Card Base - 5 1/2 x 8 1/2, score at 4 1/4.

  • Basic White Layer - 5 3/8 x 4 1/8, stamp sentiment at bottom right corner using Evening Evergreen Ink.

  • Basic White Cardstock - cut 3 rectangles using the 3rd from smallest die from the Stitched So Sweetly Dies.

  • Draw stem on each rectangle using a Evening Evergreen Stampin’ Write Marker.

  • Stamp 3 large flowers on strip of Polished Pink Shimmer Vellum using Black Stazon Ink. Punch using the Flowers & Leaves Punch. I stamped and punched one at a time. See the video for a tip for lining it up.

  • Stamp and punch 3 small leaves and 3 large leaves using Soft Succulent Shimmer Vellum and Black Stazon Ink. Watch video for tips on how to line the leaves up.

  • Adhere flowers and leaves to stems with a tiny bit of Liquid Glue.

  • Wrap Evening Evergreen Ribbon around White Layer and adhere to back. Adhere layer to card.

  • Adhere the 3 rectangles using Dimensionals.

  • Add Polished Pink Jewels to flower centers.

 
Flowers Of Friendship Thank You Card1.jpeg
 

On the inside stamp sentiment with Evening Evergreen Ink. Stamp large floral image with Evening Evergreen Ink and color with Dark Polished Pink and Light Soft Succulent Stampin’ Blends Markers.

 
Flowers Of Friendship Thank You inside.jpeg
 

Supply List

A Good Man - Simple Father's Day Card

I made this Father’s Day Card for my Son-In-Law. It’s his first Father’s Day and I wanted to make a sweet card for him.

 
A Good Man Father's Day Card2.jpeg
 

I used the A Good Man Stamp Set to make this card. It has great images for Father’s Day or Birthday or even Retirement Cards.

 
A Good Man Father's Day Card stamp.jpeg
 

Tips & Instructions

  • Misty Moonlight Card Base - 5 1/2 x 8 1/2, score at 4 1/4.

  • Basic White Layer - 5 1/4 x 4, adhere to the card base.

  • Misty Moonlight Strip - 4 x 1 1/4, emboss with the dots folder from the Checks & Dots Embossing Folders and adhere to card.

  • Basic White Layer - 3 3/4 x 2 1/2. Stamp image with Black Memento Ink and color with Stampin’ Blends. I used Misty Moonlight, Just Jade, Soft Suede, Petal Pink and Pool Party. Stamp sentiment with Black Memento Ink.

  • Misty Moonlight - 4 x 2 3/4, adhere to stamped layer and adhere to card using Dimensionals.

 
A Good Man Father's Day Card1.jpeg
 

On the inside stamp sentiment with Black Memento Ink. Emboss 5 1/4 x 5/8 strip of Misty Moonlight Cardstock with Dots Embossing Folder and adhere with the debossed side showing.

 
A Good Man Father's Day Card inside.jpeg
 

Supply List

Sketch Saturday - In Bloom

I don’t know why I haven’t used these Pierced Bloom Dies before. They cut beautiful, stitched flowers and leaves. I love them!!! I made this card for a sketch challenge.

 
Sketch Saturday - In Bloom Card1.jpeg
 

Here’s the sketch from the weekly Atlantic Hearts Sketch Challenge. You should play along. It’s so fun to do these sketches!

 
Screen Shot 2021-05-29 at 3.06.34 PM.png
 

Tips & Instructions

  • Thick Basic White Card Base - 5 1/2 x 8 1/2, score at 4 1/4.

  • Sweet Symmetry Designer Series Paper Layer - 5 1/2 x 4 1/4, cut out center using the 4th from largest Stitched Rectangle Die to create a frame.

  • Lay the frame over the card base and stamp sentiment using Magenta Madness Ink.

  • Adhere the frame to card base using Dimensionals.

  • Cut flowers from Bumblebee, Basic White and Magenta Madness Cardstock. Cut flower centers from Early Espresso, Basic White and Magenta Madness Cardstock and adhere to flowers. Cut leaves from Just Jade Cardstock.

  • Arrange flowers on frame and adhere. You may need to add a Dimensional under the parts of the flowers that hang over the inside of the frame.

 
Sketch Saturday - In Bloom Card2.jpeg
 

On the inside stamp the sentiment. This one is from the Happy Thoughts Stamp Set. Stamp some flowers with Bumblebee and Magenta Madness Inks. I stamped off the small flowers first to get a light shade and then stamped directly on for the centers. Stamp the center of the Bumblebee flower with Early Espresso Ink.

 
Sketch Saturday - In Bloom inside.jpeg
 

Supply List

Catalog Card CASE using the Seascape Bundle

I CASEd (Copy And Share Everything) this card from the Annual Catalog using the Seascape Bundle. When I saw this card in the catalog, I knew I had to make it.

 
Seascape Card CASE card2.jpeg
 

In the video I’ll show you how the goldfish die will cut out the fish but not completely so you can lift the tail and fins. It’s so fun how it looks.


You can save 10% when you purchase the stamp set with the dies as a bundle. Both the seahorse and the fish die cut into the layer without cutting out the image. You can easily snip them apart if you want to separate them from the layer.

 
Screen Shot 2021-05-28 at 3.54.18 PM.png
 

Tips & Instructions

  • Pool Party Card Base - 5 1/2 x 8 1/2, score at 4 1/4

  • Basic White Layer - 5 x 4, cut the fish using the Sea Life Dies.

  • Lift the tail and stamp the seaweed with Granny Apple Green Ink.

  • Stamp some bubbles above the fish’s head using Pool Party Ink.

  • Tear along the top of a 5” strip of Crumb Cake Cardstock. Stamp the sand image using Crumb Cake Ink to cover the strip. Trim to get the size that will fit below the fish and adhere to white layer.

  • Stamp the sentiment with Black Memento Ink on a 1/2” strip of Calypso Coral and trim. Adhere to white layer.

  • Mango Melody Layer - 4 7/8 x 3 7/8, adhere to back of white layer.

  • Adhere layer to card base using a Foam Adhesive Sheet or Dimensionals. Make sure the bottom is at the bottom of the card base and there is a border only on the sides and top.

 
Seascape Card CASE card1.jpeg
 

On the inside stamp the seaweed with Granny Apple Ink, stamping off first to get a lighter shade. Stamp sand with Crumb Cake Ink and fish with Mango Melody Ink.

 
Seascape Card CASE inside.jpeg
 

Supply List

Wildflowers In A Field!

I wanted to try paper-piecing these flowers and love how it turned out. This is the third card I made with the Quiet Meadows products this week. If you missed my video, check my Blog Post from yesterday.

 
Wild Flowers Friend Card2.jpeg
 

These are the Meadow Dies. I cut the flowers once from green cardstock and then a second time from other colors for the flowers. I cut apart the flowers and adhered them to the green pieces. It was simple to do!

 
Screen Shot 2021-05-26 at 2.21.46 PM.png
 

Tips & Instructions

  • Old Olive Card Base - 5 1/2 x 8 1/2, score at 4 1/4

  • Basic White Layer - 5 1/4 x 4

  • Using Blender Brushes lightly brush Balmy Blue Ink at the top of the white layer and Pear Pizzazz Ink at the bottom.

  • Cut flowers with Old Olive and Pear Pizzazz Cardstock.

  • Cut a second set of flowers from Mango Melody, Highland Heather, Polished Pink and Crushed Curry Cardstock. Cut flower center from Early Espresso Cardstock.

  • Cut apart the flowers from stems and leaves and then glue them to the green die cuts. Adhere the Early Espresso center piece to yellow flower.

  • Adhere the flowers to layer.

  • Wrap Linen Thread around layer 3 times and adhere to back of layer. Adhere layer to card base.

  • Add Matte Black Dots to Polished Pink flower centers.

  • Stamp sentiment (from Plentiful Plants Stamp Set) with Old Olive Ink on Basic White Cardstock and cut with label die. Adhere to card with Dimensionals.

  • Tie bow with 3 strands of Linen Thread and adhere to card using Glue Dot.

 
Wild Flowers Friend Card1.jpeg
 

For the inside layer cut a flower from Old Olive Cardstock and a second from Highland Heather Cardstock to create the flower for the inside.

 
Wild Flowers Friend inside.jpeg
 

Supply List

Quiet Meadow Birthday Card

What a beautiful bouquet of flowers you can make using the Meadow Dies. I cut them out from white cardstock and colored them with Stampin’ Blends!

 
Quiet Meadow Birthday Card2.jpeg
 

In the video I’ll show you how to make this card as well as how you can paper-piece the flowers instead of coloring them.


The Meadow Dies create such pretty, delicate flower and there’s a couple of butterflies and labels as well.

 
Screen Shot 2021-05-26 at 2.21.46 PM.png
 

Tips & Instructions

  • Evening Evergreen Card Base - 5 1/2 x 8 1/2, score at 4 1/4

  • Basic White Layer - 5 1/4 x 4

  • Cut flowers, flower center and label from Basic White Cardstock using the Meadow Dies.

  • Color using Stampin’ Blends. I used Dark Granny Apple Green, Light Old Olive and Light Soft Succulent for the stems and leaves. For the flowers I used Dark Pale Papaya, Light Fresh Freesia and Dark So Saffron. The center of the So Saffron flower was colored with Light Soft Suede.

  • Cut two greenery pieces from Evening Evergreen Cardstock.

  • Adhere all the pieces to the white layer using Liquid Glue.

  • Stamp sentiment with Evening Evergreen Ink and cut with the label die. The sentiment is from the Sweet As A Peach Stamp Set.

  • Feed a piece of Evening Evergreen Ribbon through the back of the label. Add some Dimensionals to the back of the label making sure you adhere to the ribbon as well. Adhere the label to card and then wrap the ribbon around and adhere it to the back. Adhere layer to card.

  • Tie bow and adhere with Glue Dot.

  • Add small pearls to the center of the flowers.

 
Quiet Meadow Birthday Card1.jpeg
 

On the inside stamp the sentiments with Evening Evergreen Ink. Cut and color the flower like you did on the card front and adhere to inside layer, snipping off the excess stem and leaves. Color the flower centers using the Soft Suede Stampin’ Blends Marker.

 
Quiet Meadow Birthday Inside.jpeg
 

Shop Here

Quiet Meadow Thinking of You

I love this style of card; simple, rustic, natural! I used the Quiet Meadow Bundle to make it.

 
Quiet Meadow Thinking of You card2.jpeg
 

The stamp set in this bundle has some great images to get creative with.

 
Quiet Meadow Thinking of You stamp.jpeg
 

Tips & Instructions

  • Early Espresso Card Base - 5 1/2 x 8 1/2, score at 4 1/4.

  • Crumb Cake Layer - 5 1/4 x 4, emboss with Brick & Mortar 3D Embossing Folder.

  • Very Vanilla Layer - 4 4 1/4 x 1 3/4, stamp floral image with Early Espresso Ink and adhere to embossed layer.

  • Stamp sentiment on scrap of Very Vanilla Cardstock and cut with label die.

  • Feed piece of Crumb Cake Baker’s Twine through label, add Dimensionals to back of label and adhere to card, adhering the Baker’s Twine to the back of the embossed layer. Adhere layer to card.

  • Add Champagne Rhinestones to flower centers and one to the sentiment label.

 
Quiet Meadow Thinking of You Card1.jpeg
 

On the inside stamp the floral image on Very Vanilla (5 1/4 x 4) layer using Early Espresso Ink.

 
Quiet Meadow Thinking of You inside.jpeg
 

Supply List

Sketch Saturday - Color & Contour

When I saw the scalloped strip on the sketch, I knew I wanted to use the Color & Contour Bundle. This is such a simple card but I’m happy with how it turned out.

 
Sketch Saturday - Color & Contour Card1.jpeg
 

Here’s the sketch from the Atlantic Hearts Sketch Challenge. Their sketch challenges are so fun to do.

 
Screen Shot 2021-05-21 at 5.45.38 PM.png
 

The Color & Contour Stamp Set has great images and I love the scalloped rectangles in the Scalloped Contour Dies. Bundle them together to save 10%.

 
Screen Shot 2021-05-21 at 6.04.48 PM.png
 

Tips & Instructions

  • Melon Mambo Card Base - 5 1/2 x 8 1/2, score at 4 1/4

  • Basic White Layer - 5 x 4 7/8 (I used this width so I could get the scalloped strip to fit.)

  • Melon Mambo Strip - 4 1/2 x about 1 1/2, cut with edge of the largest scalloped rectangle.

 
Sketh Saturday - Color & Contour scallop.jpeg
 
  • Cut down to about 5/8 wide and 4 7/8 long making sure you have complete scallops end-to-end.

  • Stamp sentiment with Melon Mambo Ink. The sentiment is from the Pansy Patch Stamp Set.

  • Stamp the splatter image with Flirty Flamingo Ink a few times.

  • Adhere layer and the scalloped strip to card.

  • Stamp flower on scrap of Basic White Cardstock, stamping the outline with Melon Mambo Ink and filler with Flirty Flamingo Ink. Color the flower center with Dark Daffodil Delight Stampin’ Blends Marker and cut with coordinating die.
    To help figure out how to line up the stamp, my friend Cheryl Becker showed me how to lay the stamps on the stamp case with the back of the stamp facing up. You can put a mark on the stamp at the bottom with a permanent marker.

 
Sketch Saturday - Color & Contour stamp.jpeg
 
  • Stamp the flower with the stem on Basic White Scrap using Pear Pizzazz Ink and cut with coordinating die. Cut off flower top.

  • Adhere stem with leaves to card and then add the flower with a Dimensional.

 
Sketch Saturday - Color & Contour Card2.jpeg
 

Cut the inside layer the same size as the card front layer (5 x 4 7/8). Stamp sentiment (from Color & Contour) and stamp the flower like you did on the card front.

 
Sketch Saturday - Color & Contour inside.jpeg
 

Supply List

Bloom Where You're Planted - Love You Card

I am loving the products from the Bloom Where You’re Planted Suite. The Paper Lattice give you a perfect background to hang your plants on!

 
Bloom Where You're Planted Love You card2.jpeg
 

In the video, I’ll walk you through the products in this suite and show you how to make this card. I have a few tips as well.


The Plentiful Plants stamps create such great images. The pots look so earthy. You can mix up the plants and pots. Just have fun with it. You can save 10% if you bundle the stamp set and dies. There is a great macrame hanger in the Perfect Plants Dies.

 
Bloom Where You're Planted Love You stamp.jpeg
 

Tips & Instructions

  • Misty Moonlight Card Base - 5 1/2 x 8 1/2, score at 4 1/4.

  • Bloom Where You’re Planted Designer Series Paper Layer - 5 1/4 x 4, adhere to card base.

  • Adhere Paper Lattice to card using tiny drops of glue.

  • Cut 2 macrame hangers from Basic White Cardstock. Cut off outer pieces on one to make it smaller (as shown in the video).

  • Stamp and cut pots, one with Misty Moonlight Ink and one with Cinnamon Cider Ink. Trim the bottom of the Cinnamon Cider pot.

  • Stamp large leafy plant with Garden Green Ink on Garden Green Cardstock and cut with coordinating Die.

  • Stamp snake plant with Just Jade Ink on Soft Sea Foam Cardstock and cut with coordinating die.

  • Cut small pot from Early Espresso Cardstock and small plant from Soft Sea Foam Cardstock.

  • Assemble plants, pots and hangers using Liquid Glue.

  • Stamp sentiment on 1/2” strip of Basic White and punch both ends with Banners Pick A Punch. Punch 3/4 strip of Misty Moonlight and punch both ends. Adhere together.

  • Adhere planters and sentiment using Dimensionals.

 
Bloom Where You're Planted Love You card1.jpeg
 

On the inside layer stamp large pot with Misty Moonlight Ink. Stamp smaller bunch of the big leafy plant with Garden Green Ink. Stamp smaller pot with Cinnamon Cider Ink and stamp snake plant with Just Jade Ink.

 
Bloom Where You're Planted Love You inside.jpeg
 

Supply List

Sweet Garden Birdhouses Hello Card

Isn’t this card sweet? I used the Garden Birdhouses Stamp Set to create it. I love birdhouses. I had them when I lived in NY and had birds feeding all the time. I miss them; I don’t seem to have the same kinds of birds here in Florida.

 
Sweet Garden Birdhouses Hello Card2.jpeg
 

You can create all kinds of bird feeders with this stamp set. You can have them hanging from a branch or sitting on a stand.

 
Sweet Garden Birdhouses Hello Card - Stamp.jpeg
 

The background layer is from the Bloom Where You’re Planted Designer Series Paper. There are lots of great patterns for backgrounds.

 
Screen Shot 2021-05-19 at 9.18.24 PM.png
 

Tips & Instructions

  • Gray Granite Card Base - 5 1/2 x 8 1/2, score at 4 1/4

  • Bloom Where You’re Planted Layer - 5 1/4 x 4, wrap piece of Polished Pink Ribbon around adhering it to the back and then adhere layer to card base.

  • Basic White Layer - 3 1/2 x 2 1/2. Stamp branches with Garden Green Ink. Stamp hanger and birdhouse with Gray Granite Ink. I made the hanger a little longer by stamping it twice masking the circle at the bottom on the first stamp.

  • Color the birdhouse with Stampin’ Blends. I used Balmy Blue, So Saffron and Dark Polished Pink.

  • Stamp the sentiment with Polished Pink and the birds with So Saffron and Balmy Blue Ink.

  • Adhere stamped layer to a piece of Gray Granite Cardstock cut at 3 3/4 x 2 3/4 and then adhere to card using Dimensionals.

  • Tie bow and adhere with Glue Dot.

 
Sweet Garden Birdhouses Hello Card1.jpeg
 

On the inside stamp pole and birdhouse with Gray Granite Ink. Color with Balmy Blue and So Saffron Stampin’ Blends. Stamp sentiment with Polished Pink Ink and add a couple of birds; one with So Saffron and one with Balmy Blue Inks.

 
Sweet Garden Birdhouses Hello Card inside.jpeg
 

Supply List

Woodsy Father's Day Card!

I Believe In You! That says it all. I made this card for my son for Father’s Day. He is an amazing Dad and I am so proud of him. He loves to hike so I wanted to make a card with nature!

 
Father's Day Card2.jpeg
 

I’ll show you how amazing the products from the Beauty Of The Earth Suite are. The Designer Series Paper is so pretty.


The trees in this stamp set are two-step stamping so you can stamp a light and dark color to give them some texture.

 
Father's Day Card stamp.jpeg
 

Tips & Instructions

  • Old Olive Card Base - 5 1/2 x 8 1/2, score at 4 1/4

  • Basic White Layer - 5 1/4 x 4, adhere to card base.

  • Beauty Of The Earth Designer Series Paper - 5 1/4 x 1 3/4, adhere to card.

  • Stamp 3 trees on Basic White with Early Espresso Ink and cut with coordinating Die.

  • Stamp 3 treetops with Old Olive Ink. Stamp the detailed image straight on and the background image by stamping off first and then stamp over the detailed image. Cut with coordinating die.

  • Adhere the trees to card. Adhere the treetops using Dimensionals.

  • Stamp sentiment on Basic White with Early Espresso Ink and cut with rectangle die. Adhere to card with Dimensionals.

  • Cut 2 birds from the blue sheet of the Designer Series Paper and adhere to card as shown.

 
Father's Day Card1.jpeg
 

On the inside, stamp tree by just inking the trunk with Early Espresso Ink. Stamp the tree top the same way you stamped the ones on the front. Stamp sentiment with Early Espresso Ink. The sentiment is from the Handsomely-Suited Stamp Set.

 
Father's Day inside.jpeg
 

Supply List

Register For My June Retreat!

My friend Vicki and I are holding a retreat that you can do in the comfort of your own home. We’re featuring Hand-Penned Bundle and Flowers of Friendship Bundle.

Here’s a sneak peek of the projects you’ll make.

 
Screen Shot 2021-05-19 at 8.11.54 AM.png
 

12 Projects - 6 Designs, 2 of each

Over $20 in Products

Giveaways

Video’s & PDFs

Exclusive Facebook Group

LOTS OF FUN!!!

Email patti@pspapercrafts.com to sign up!!!
Deadline June 7, 2021


Cost of Retreat: $35 local pickup or $42 if shipped

The kits include:

  • 12 Card Bases & Envelopes

  • Layers and Die Cuts

  • 1/2 pack of Hand-Penned Designer Series Paper (24 pieces 6x6)

  • 1/2 pack of White Crinkled Ribbon (5 yards)

  • 1/2 pack of Soft Succulent Ribbon (5 yards)

  • 1/2 pack of Genial Gems (50 pieces)

  • 1/2 pack of Black Matt Dots (80 pieces)

  • 16" Linen Thread

  • Multiple Prizes – given throughout the day

  • PDF complete with pictures, measurements and step-by-step instructions

  • Exclusive Facebook Group and access to videos demonstrating how to make each card

Note: You will require stamps, ink and adhesive to complete the cards. 


Choose your package - No Shipping or Taxes on add-ons

Payment due by June 7, 2021

  • Basic Card Kits - $35 local pickup or $42 if shipped
    (Includes 1 Entry for Giveaways)

  • Card Kits plus Hand-Penned Bundle - add $46.75
    (Includes 3 Entries for Giveaways)

 
Screen Shot 2021-05-15 at 8.45.03 PM.png
 
  • Card Kits plus Flowers Of Friendship Bundle - add $35.00
    (Includes 3 Entries for Giveaways)

 
Screen Shot 2021-05-15 at 8.48.42 PM.png
 
  • I Want It All Option for $116.75 Local Pickup or $123.75 if shipped

  • Card Kits

  • Hand-Penned Bundle

  • Flowers Of Friendship Bundle
    (Includes 5 Entries for Giveaways)


Email patti@pspapercrafts.com to sign up!!!

Deadline June 7, 2021

Peaceful Father's Day Card

This was a very easy card to make and I love how peaceful this beach scene is for a Father’s Day card.

 
Peaceful Father's Day Card2.jpeg
 

The background layer is from the Beauty Of The Earth Designer Series Paper. This blue pattern is perfect to use for a sky.

 
Screen Shot 2021-05-17 at 9.54.47 PM.png
 

I pulled out the Timeless Tropical Stamp Set for this card. It has great sentiments for masculine cards and I love these palm trees. You can use the coordinating In The Tropics Dies to cut the palm trees out or fussy cut them.

 
Screen Shot 2021-05-17 at 9.55.23 PM.png
 

Tips & Instructions

  • Night of Navy Card Base - 5 1/2 x 8 1/2, score at 4 1/4

  • Basic White Layer - 5 1/4 x 4, adhere to card base.

  • Beauty Of The Earth Designer Series Paper Layer - 5 x 3 3/4, adhere to card.

  • Sahara Sand Strip 5 x 1 1/2. Rub Sahara Sand Ink lightly over the Tasteful Textile 3D Embossing Folder before embossing the strip. Tear the strip to get a rough top edge.

  • Color palm tree stamp with Stampin’ Write Markers (NOT Stampin’ Blends). I used Soft Suede on the trunks and Pear Pizzazz on the leaves. Breathe on the stamp to moisten and stamp on Basic White Cardstock. Cut with coordinating die.

  • Lay out the embossed piece and palm trees and adhere. I have the palm trees just a little bit behind the embossed piece.

  • Stamp sentiment with Night of Navy Ink on Basic White Cardstock and cut with Tasteful Labels Die. Adhere to card using Dimensionals.

  • Add a Night of Navy Holiday Rhinestone to the label.

 
Peaceful Father's Day Card1.jpeg
 

On the inside stamp sentiment from the Handsomely Suited Stamp Set. I didn’t want the word “Handsome” so I covered the bottom of the stamp with a Post-It Note when I inked it and then removed it before I stamped it.

Color the palm trees stamp with Stampin’ Write Markers and stamp like you did on the card front.

 
Peaceful Father's Day Card inside.jpeg
 

Supply List

Sketch Saturday - Count On Me

I think this card is so cute! I made it for this week’s sketch challenge using the Count On Me Stamp Set and Pansy Petals Designer Series Paper.

 
Sketch Saturday - Count On Me.jpeg
 

This is the sketch I used from the weekly Atlantic Hearts Sketch Challenge. I love doing their sketch challenges!

 
Screen Shot 2021-05-14 at 5.22.58 PM.png
 

These sweet images are adorable. The kangaroo reminds me of the one from Winnie The Pooh!

 
Sketch Saturday - Count On Me stamp.jpeg
 

Tips & Instructions

  • Soft Succulent Card Base - 5 1/2 x 8 1/2, score at 4 1/4

  • Basic White Layer - 5 3/8 x 4 1/8, adhere to card base.

  • Pansy Petals Designer Series Paper - 5 1/4 x 4, adhere to card

  • Basic White Strip - 4 x 3/4, emboss with Tasteful Textile 3D Embossing Folder and adhere to card.

  • Stamp kangaroo with Black Memento Ink on Basic White. Color with Stampin’ Blends. I used Crumb Cake, Petal Pink, Smoky Slate and Daffodil Delight. Cut with the smallest Hippo & Friends Die.

  • Cut Soft Succulent Cardstock using the second largest stitched die from the Hippo & Friends Dies. Adhere behind the stamped piece and adhere to card using Dimensionals.

  • Stamp sentiment on 5/8 strip of Basic White with Black Memento Ink and punch one end with the Banners Pick A Punch. Adhere to card with Dimensionals.

  • Add a jewel to the center of the flower.

 
Sketch Saturday - Count On Me2.jpeg
 

On the inside stamp sentiment with Black Memento Ink. Adhere 5 1/4 x 3/4 strip of the Designer Series Paper.

 
Sketch Saturday - Count On Me inside.jpeg
 

Supply List