Super Simple Friendship Card

I made this card to send to a good friend. It was so easy to make!

 
Friendship Poppy Card3.jpg
 

I used the Peaceful Poppies Designer Series Paper and the Peaceful Poppies Elements. The So Sentimental Bundle has great sentiments and coordinating dies.

 
Friendship Poppy Card.jpg
 

Tips & Techniques

  • Basic Black Card Base - 5 1/2 x 8 1/2, score at 4 1/4

  • Whisper White Layer - 5 3/8 x 4 1/8

  • Peaceful Poppies Designer Series Paper Layer - 5 1/4 x 4

  • Stamp sentiment with Black Memento Ink on Whisper White and cut with large label - So Sentimental Bundle

  • Adhere flowers from the Peaceful Poppies Elements to label and adhere using Dimensionals

  • Add some Peaceful Poppies Sequins

 
Friendship Poppy Card2.jpg
 

On the inside, adhere Peaceful Poppies Element.

 
Friendship Poppy Card Inside.jpg
 

Supply List

Gorgeous Happy Birthday Card

I am loving that there are coordinating dies with the Happy Birthday To You Stamp Set. Look at all the layers on this cake!

 
Happy Birthday To You Both.jpg
 

Wouldn’t you love to give or receive such a pretty card for a birthday celebration? A beautiful cake sitting on a silver stand!

 
Happy Birthday To You Card3.jpg
 

I’ll show you all the steps to make this card with the die cutting, heat embossing and coloring. I love how it turned out!

Tips & Instructions

  • Seaside Spray Card Base - 5 1/2 x 8 1/2, score at 4 1/4

  • Silver Foil layer - 5 1/4 x 4

  • Whisper White Layer - 5 x 3 3/4

  • Stamp cake image two times on Whisper White Cardstock

  • Color just the cake with Seaside Spray Ink and cut with coordinating die

  • Color just the flowers on second image of the cake and cut flowers with coordinating die

  • Cut cake stand from center of the Silver Foil Layer (tip - cover the layer with piece of copy paper to protect it while running through your die cutting machine

  • Cut off cake stand from cake image and adhere the silver cake stand

  • Adhere flowers to cake using Dimensionals

  • Stamp sentiment with Versamark and heat emboss with Silver Embossing Powder

  • Place cake image on white layer and stamp the dot images with Versamark and emboss with Silver Embossing Powder

  • Adhere cake to card using Dimensionals

 
Happy Birthday To You Card2.jpg
 

Supply List

Rise & Shine - Let's Hang Out Together

This is such a fun stamp set. It’s one of the reversible sets so you can stamp the cup with the handles on each side. It’s Free March 3-31, 2020 during Sale-A-Bration with a $50 order.

 
Rise & Shine Coffee & Tea.jpg
 

I’m a tea drinker and many of my friends are coffee drinkers so I thought this would be a great card to send to a friend to invite them to go out for coffee and tea. Isn’t it cute? I love the sentiment!

 
Rise & Shine Coffee & Tea card2.jpg
 

Tips & Instructions

  • Coastal Cabana Card Base - 4 1/4 x 11, score at 5 1/2 (side folding, horizontal card)

  • Flirty Flamingo Layer - 5 1/4 x 4

  • Whisper White Layer - 5 1/8 x 3 7/8

  • Stamp mug with handle on the left with Flirty Flamingo Ink, stamping off first to get a lighter color.

  • Stamp the sunburst image and coffee sentiment with Flirty Flamingo Ink directly

  • Repeat these steps with Coastal Cabana Ink but flipping the stamp over to get the handle on the left.

  • Stamp steam on both mugs using Smoky Slate Ink

  • Stamp sentiment on bottom using Smoky Slate Ink

  • Adhere layers to card

 
Rise & Shine Coffee & Tea Card.jpg
 

On the inside, stamp sunburst with Coastal Cabana Ink and sentiment with Flirty Flamingo Ink.

 
Rise & Shine Coffee & Tea Inside.jpg
 

Supply List

Sketch Saturday - Dandelion Wishes

Today I made this card using the Dandelion Wishes Stamp Set from the Annual Catalog. I sponged the background with Soft Sea Foam Ink and love how subtle it is.

 
Sketch Saturday - Dandelion Wishes.jpg
 

The sketch that I used is another CAS(E) This Sketch Challenge from Splitcoaststampers. I love using their sketches.

 
Screen Shot 2020-02-22 at 11.37.31 AM.png
 

Tips & Instructions

  • Soft Seafoam Card Base - 5 1/2 x 8 1/2, score at 4 1/4

  • Basic Black Layer- 5 3/8 x 4 1/8, adhere to card base

  • Whisper White Layer 5 1/4 x 4, lightly sponge with Soft Sea Foam Ink and a Sponge Brayer (starting off the layer, lightly sponge across and continue adding layers until you get the color you want, don’t press too hard or you will get lines)

  • Stamp dandelion image with Black Memento Ink and add some of the seeds, adhere layer to card

  • Stamp sentiment (from Timeless Tulips) on 1/2” strip of Soft Sea Foam Cardstock

  • Using Banner Triple Punch, punch each end of the sentiment strip and each end of a 9/16” strip of Basic Black and adhere together

  • Adhere sentiment label to card using Dimensionals

  • Add Rhinestone to center of dandelion

 
Sketch Saturday - Dandelion Wishes2.jpg
 

On the inside, stamp sentiment and seeds with Black Memento Ink.

 
Sketch Saturday - Dandelion Wishes Inside.jpg
 

Supply List

Daisy Cards using the Flowering Foils Designer Series Paper

Today I want to show you the new Flowering Foils Specialty Designer Series Paper. This pattern reminded me of daisies so I went with a daisy card.

 
Daisy Cards both.jpg
 

In the video I’ll show you all the different designs of this paper and then we’ll make a birthday card. The sentiment was embossed in silver and I added some silver edging around the label.


Tips and Instructions

  • Early Espresso Card Base - 5 1/2 x 8 1/2, score at 4 1/4

  • Daffodil Delight Layer - 5 1/4 x 4

  • Flowering Foils Specialty Designer Series Paper - 5 x 3 3/4, adhere to Daffodil Delight Layer

  • Add Daffodil Delight Ruched Ribbon and tie a bow

  • Stamp sentiment with Versamark on Early Espresso Cardstock, heat emboss with Silver Embossing Powder and punch with Timeless Label Punch

  • Stamp 2 daisies on Whisper White Cardstock with Daffodil Delight Ink and punch with Medium Daisy Punch

  • Adhere daisies together, offsetting a little

  • Adhere label to card with Dimensionals and adhere daisy

  • Add Perennial Essence Floral Center to daisy

 
Daisy Cards Happy Birthday.jpg
 

The Happy Birthday sentiment is from the Peaceful Moments Stamp Set and the Friends sentiment is from the Daisy Lane Stamp Set. Use whatever sentiment you want.

 
Daisy Cards - Friend.jpg
 

Supply List

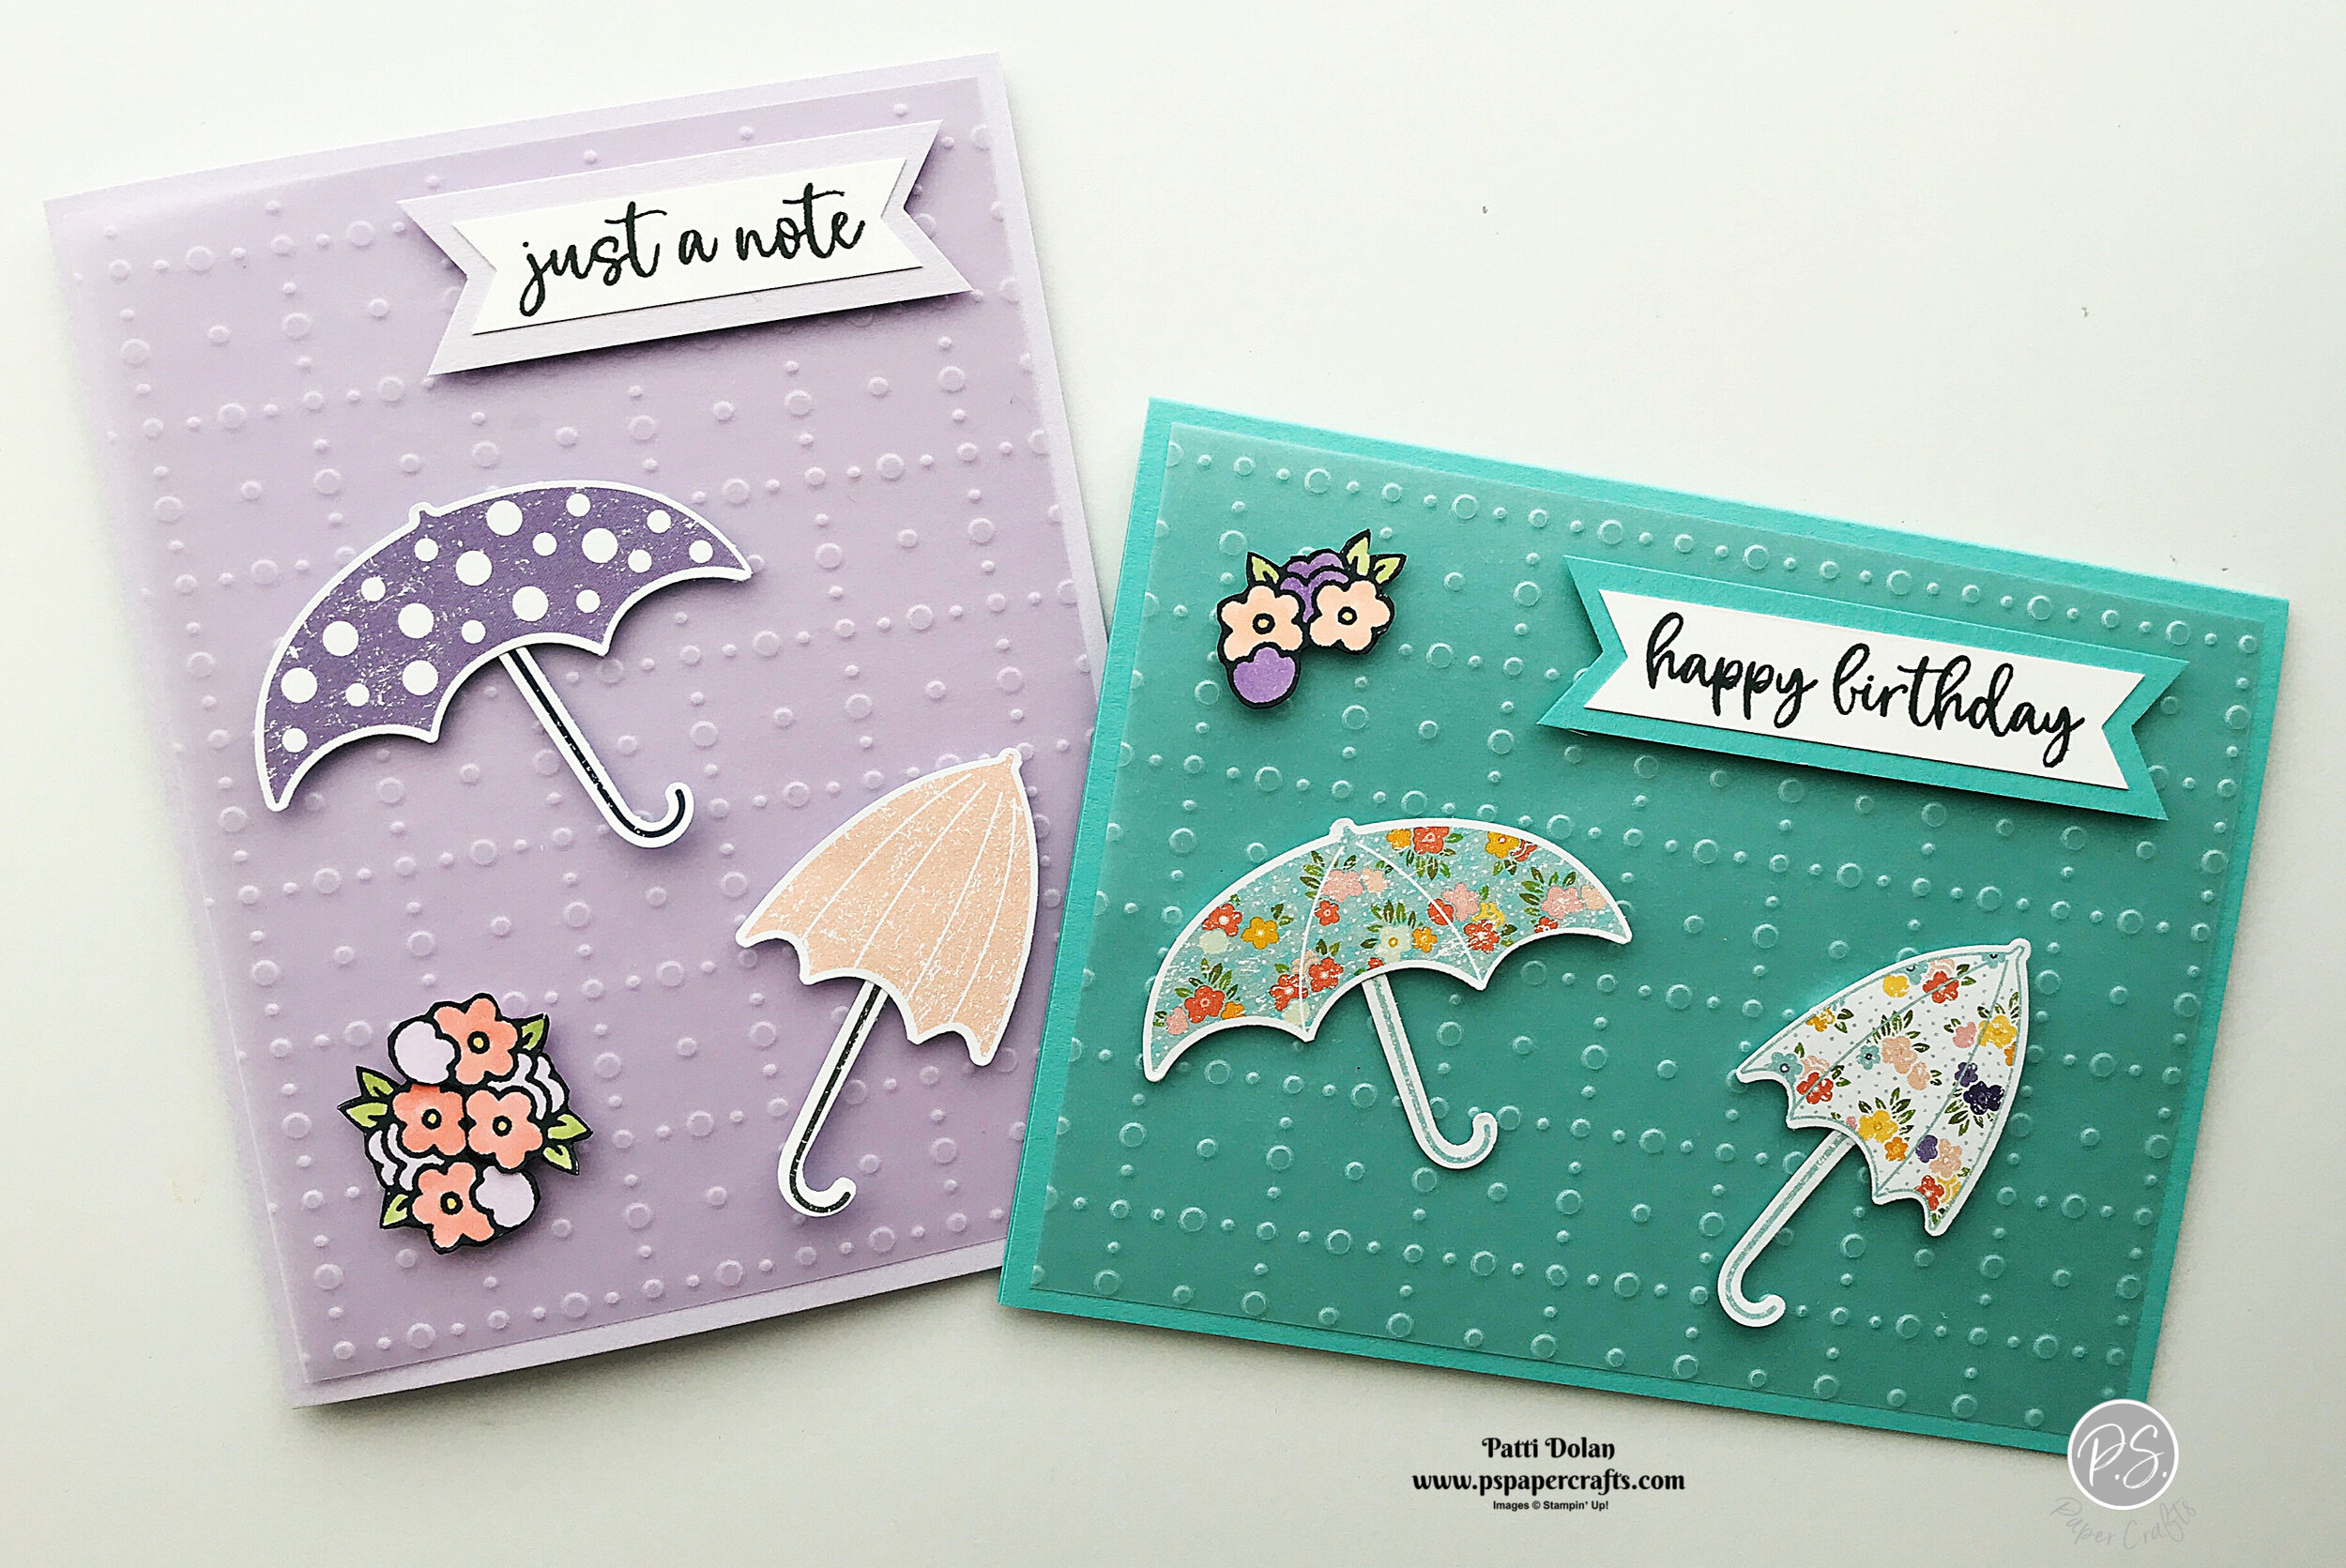
Under My Umbrella Cards

I have two cards to show you today using the Under My Umbrella Bundle with the new coordinating paper and pretty Specialty Vellum paper.

 
Under My Umbrella Cards Both.jpg
 

I’ll show you how easy it is to punch out these umbrellas from the Pleased As Punch Paper and will show you all the papers included. The Vellum is new and free during Sale-A-Bration with a $50 order.


Tips & Instructions

  • Purple Posey or Bermuda Bay Card Base - 5 1/2 x 8 1/2, score at 4 1/4

  • Purple Posey or Pool Party So Very Vellum Specialty Designer Series Paper - 5 1/4 x 4

  • Cut around the umbrellas and handles that you want from the Pleased As Punch Designer series Paper and then punch with coordinating punch. Use a Post-It Note to help hold the paper in the punch.

  • Stamp sentiment (from Music From The Heart Stamp Set) with Black Memento Ink on a 1/2” strip of Whisper White and punch each end with Banner Triple Punch

  • Adhere sentiment strip to 3/4” Bermuda Bay strip and punch ends with Banner Triple Punch

  • Stamp flowers and fussy cut, color with Stampin’ Blends Markers

  • Adhere pieces to vellum using Dimensionals and then adhere vellum to card base

 
Under My Umbrella Card4.jpg
 

On the birthday card, I used the inside sentiment from the Bonanza Buddies Stamp Set.

 
Under My Umbrella Card1.jpg
 

Supply List


Timeless Tulips Birthday Card

This card is so bright and cheerful. Spring is right around the corner and this card is perfect for a Birthday or Mother’s Day card.

 
Timeless Tulips Birthday Card2.jpg
 

I love that Stampin’ Up! came out with the Pleased As Punch Designer Series Paper that coordinates with some of the other products in the Spring Mini Catalog. The Tulip Builder Punch will punch out the tulips and leaves from the paper. Brilliant!!!

 
Timeless Tulips Bundle.jpg
 

Tips & Instructions

  • Granny Apple Green Card Base - 5 1/2 x 8 1/2, score at 4 1/4

  • Whisper White Layer - 5 1/8 x 3 7/8, adhere to card base

  • Pleased As Punch Designer Series Paper - 5 x 3 3/4, adhere to card

  • Punch 3 tulips from the Pleased As Punch Designer Series Paper

  • Stamp stems and leaves with Granny Apple Green

  • Stamp leaves on Whisper White Cardstock and punch with Tulip Builder Punch

  • Adhere tulips and leaves to card using Dimensionals

  • Stamp sentiment with Gorgeous Grape Ink on Whisper White and punch with Classic Label Punch and adhere using Dimensionals

 
Timeless Tulips Birthday Card.jpg
 

On the inside, stamp sentiment (from Birthday Buddies) with Gorgeous Grape Ink. Stamp medium and small tulip with Gorgeous Grape Ink. and stems and leaves with Granny Apple Green Ink.

 
Timeless Tulips Birthday Card inside.jpg
 

Supply List

Sketch Saturday - Lovely Lily Pad

Here’s my take the the latest sketch from the Splitcoaststampers CAS(E) This Sketch Challenge.

My first step was to look at my supplies to find what I wanted to use for the trim running down the side focal piece. I found it in the Lily Pad Dies.

 
Sketch Saturday - Lovely Lily Pad.jpg
 

This is the sketch for the challenge.

 
Screen Shot 2020-02-14 at 10.11.19 PM.png
 

Tips & Instructions

  • Bermuda Bay Card Base - 5 1/2 x 8 1/2, score at 4 1/4

  • Vellum Layer - 5 1/4 x 4

  • Lily Impressions Designer Series Paper Layer - 2 x 3 3/4

  • Whisper White Strip for sentiment - 2 x 1/2, stamp with sentiment (I used the sentiment from Music From The Heart but you can use whatever you want)

  • Bermuda Bay Strip - 2 x 3/4, adhere sentiment to strip and then adhere to Designer Series Paper Layer

  • Flirty Flamingo - cut trim piece and then cut off to have 5 ovals and adhere behind Designer Series Paper Layer to have pointy edge showing

  • Flirty Flamingo - cut large and small flower and then back with Vellum and cut off excess

  • Adhere flowers to Designer Series Paper Layer (be careful not to put adhesive on the vellum as it will show through)

  • Adhere Designer Series Layer to Vellum and then adhere layer to card base (be sure to put adhesive only behind the Designer Series Layer to hide the adhesive

 
Sketch Saturday - Lovely Lily Pad2.jpg
 

On the inside, stamp large and small flower images with Flirty Flamingo Ink.

 
Sketch Saturday - Lovely Lily Pad Inside.jpg
 

Supply List

Forever Blossom Wedding Card

This beautiful wedding card is perfect for a spring wedding.

 
Forever Blossom Wedding Card2.jpg
 

The Forever Blossoms Stamp set has such pretty images and sentiments. There are coordinating dies and you can save 10% when purchasing them as a bundle.

 
Forever Blossom Wedding Card Stamp Set.jpg
 

The Parisian Blossoms Specialty Designer Series Paper is gorgeous. Some of the sheets have champagne foil accents and the Petal Pink and Pool Party colors are so soft and subtle.

 
Screen Shot 2020-02-13 at 4.20.31 PM.png
 

Tips & Instructions

  • Pool Party Card Base - 5 1/2 x 8 1/2, score at 4 1/4

  • Basic Black Layer - 5 1/8 x 3 7/8

  • Parisian Blossoms Specialty Designer Series Paper - top piece 5 x 2 3/4 and bottom piece 5 x 1 1/4, adhere pieces to Basic Black Layer leaving a small black border

  • Wrap ribbon around seam and adhere in the back and adhere layers to card base

  • Stamp sentiment on scrap of Whisper White Cardstock and punch with Timeless Label Punch (don’t center the sentiment, leave room on the left for the flowers)

  • Punch piece of Basic Black Cardstock with Timeless Label Punch and cut in half. Separate the two piece and adhere behind the white label so there’s a small black border

  • Stamp 3 flowers with Black Memento Ink and 2 leaves with Old Olive Ink and cut with coordinating dies

  • Color flowers with Petal Pink and leaves with Light Old Olive Stampin’ Blends Markers

  • Adhere flowers and leaves to label and adhere label to card using Dimensionals

  • Add Champagne Rhinestones to center of the 3 flowers

 
Forever Blossom Wedding Card.jpg
 

On the inside, stamp sentiment and floral images with Black Memento Ink. Color flowers with Light Petal Pink and Light Old Olive Stampin’ Blends Markers.

 
Forever Blossom Wedding Card Inside.jpg
 

Supply List

Power Of Hope Sympathy Card

I love the bonsai tree in the Power Of Hope Stamp Set and wanted to make it a focal on a card but it was so small. I decided to layer it up and add some textured background.

 
Power Of Hope Sympathy Card2.jpg
 

The Power Of Hope Stamp Set and Stone 3D Embossing Folder are free with a $100 purchase during Sale-A-Bration. I’ll show you how I made this in the video below.


Tips & Instructions

  • Garden Green Card Base - 5 1/2 x 8 1/2, score at 4 1/4

  • Whisper White Layer - 5 1/4 x 4

  • Garden Green Layer - 5 x 3 3/4, emboss with the Stone 3D Embossing Folder (use the 3D Embossing Folder Plate when embossing)

  • Color tree stamp with Garden Green and Early Espresso Stampin’ Write Markers and breath on the stamp before stamping on scrap of Whisper White Cardstock, punch with 2” Circle Punch

  • Punch Garden Green circle with 2 1/4” Circle Punch and another Whisper White circle with 2 1/2” Circle Punch

  • Layer circles together

  • Adhere embossed layer to white layer and wrap Whisper White Baker’s Twine around layers 3 times and adhere in the back, then adhere to card base

  • Adhere circles to card using Dimensionals

  • Take 3 strands of the Baker’s Twine and tie a bow and adhere with Mini Blue Dot

  • Stamp sentiment (from Peaceful Moments) with Early Espresso Ink and punch with Label Me Fancy Punch and adhere to card with Dimensionals

 
Power Of Hope Sympathy Card Inside.jpg
 

Supply List

Beautiful Lily Impressions Birthday Card

The Lily Impressions Designer Series Paper is just gorgeous! You don’t need to do much to make a beautiful card, just add a little trim and a sentiment. The best thing about it is it’s FREE during Sale-A-Bration with a $50 order.

 
Lily Impressions Birthday Card Both.png
 

I used Melon Mambo on one card and Gorgeous Grape on the other for the card bases and they match perfectly with the Designer Series Paper. I love how everything coordinates with Stampin’ Up! products.

 
Lily Impressions Birthday Card2.jpg
 

Tips & Instructions

  • Melon Mambo or Gorgeous Grape Card Base - 5 1/2 x 8 1/2, score at 4 1/4

  • Whisper White Layer - 5 1/8 x 3 7/8

  • Lily Pad Impressions Layer - 5 x 3 3/4

  • Cut trim piece from Whisper White Cardstock using Lily Pad Dies and cut to fit 5 x 3 3/4 layer

  • Adhere layers and trim

  • Stamp sentiment from Layered With Kindness Stamp Set with either Melon Mambo or Gorgeous Grape Ink

  • Punch Sentiment with Label Me Lovely Punch

  • Adhere to card using Dimensionals

  • Add Nobel Peacock Rhinestones

 
Lily Impressions Melon Mambo Birthday Card.jpg
 

Stamp the large lily and small lily with either Melon Mambo or Gorgeous Grape Ink.

 
Lily Impressions Gorgeous Grape Birthday Inside.jpg
 

Supply List

Sketch Saturday - Timeless Tropical

I’m so excited! I am the Guest Designer for this week’s CAS(E) This Sketch Challenge from Splitcoaststampers. Here’s the card that I made.

 
Sketch Saturday - Timeless Tropical.jpg
 

This week’s sketch was pretty simple and I used different papers to add texture. The background layer has a textured look from the Tropical Oasis Designer Series Paper and then I added a strip of Soft Suede that I embossed with the Coastal Weave 3D Embossing Folder.

 
Screen Shot 2020-02-07 at 10.45.06 PM.png
 

Tips & Instructions

  • Old Olive Card Base - 5 1/2 x 8 1/2, score at 4 1/4

  • Tropical Oasis Designer Series Paper - 5 1/4 x 4, adhere to card base

  • Soft Suede Strip - 1 1/2 x 4 1/2, emboss with Coastal Weave 3D Embossing Folder (make sure you use the 3D Embossing Folder Plate) and adhere to card

  • Old Olive Layer - 3 1/8 x 2 5/8

  • Whisper White Layer - 3 x 2 1/2, stamp sentiment with Soft Suede Ink and adhere to Old Olive Layer, then adhere to card

  • Scrap of Whisper White, Stamp with Hibiscus Image and color with Watercolor Pencils (Daffodil Delight, Calypso Coral, Pumpkin Pie, Rich Razzleberry) and blend with Blender Pens. Cut with coordinating die.

  • Scrap of Pear Pizzaz, stamp 3 leaf images with Old Olive Ink and cut with coordinating die.

  • Adhere leaves behind flower, then adhere to card using Dimensionals

  • Add Wink Of Stella to flower.

 
Sketch Saturday - Timeless Tropical2.jpg
 

On the inside, stamp smaller flower images with Flirty Flamingo Ink. Color with Daffodil Delight Watercolor Pencil and blend with Blender Pen.

 
Sketch Saturday - Timeless Tropical Inside.jpg
 

Supply List

Lovely Lily Pad Cards

Aren’t these cards beautiful? I love how vibrant the Designer Series Paper is.

 
Lovely Lily Pads both.jpg
 

The Lovely Lily Pad Stamp Set, Lily Pad Dies and Lily Impressions Designer Series Paper are each FREE items during Sale-A-Bration with a qualifying purchase.

In the video, I’ll show you the steps to make these cards and I’ll show you a closer look at the products.


The sentiments are from the Peaceful Moments Stamp Set. It has some great sentiments. One is a Birthday Card and one is a Sympathy Card.

 
Lovely Lily Pads Birthday Card.jpg
 

Tips & Instructions

  • Garden Green Card Base - 5 1/2 x 8 1/2, score at 4 1/4

  • Whisper White Layer - 5 1/8 x 3 7/8

  • Lily Impressions Designer Series Paper Layer - 5 x 3 3/4

  • Scrap of Melon Mambo - stamp large and medium lily images with Melon Mambo Ink and cut with coordinating dies

  • Scrap of Whisper White - stamp detailed large and small lily pad images with Garden Green Ink, then clean stamp, flip and stamp over each image, stamping off first and cut with coordinating dies

  • Scrap of Whisper White - cut trim piece with die and cut to 5 x 3 3/4

  • Stamp sentiment (from Peaceful Moments) with Melon Mambo Ink and punch with the Label Me Fancy Punch

  • Adhere layers and pieces, using Dimensionals on the sentiment label

  • Add some Rhinestones

 
Lovely Lily Pads Sympathy Card.jpg
 

Supply List

Clean and Simple Thank You Card

Are you a music lover? This stamp set is just what you need. I had to make a “just a note of thanks” card with it.

 
Just a note Thank You stamp set.jpg
 

There are so many ways you can use this set. Birds on a wire, notes, a piano, a guitar (see my post on Tuesday). The sentiments are clean and simple.

 
Just a note Thank You2.jpg
 

Tips & Instructions

  • Basic Gray Card Base - 4 1/4 x 11, score at 5 1/2 (side folding, horizontal)

  • Rococo Rose Layer - 5 1/2 x 3 1/4

  • Whisper White Layer - 5 1/2 x 3

  • Stamp the staff image across the Whisper White Layer with Smoky Slate Ink (you’ll have to stamp it twice to get across the layer)

  • Stamp notes with Basic Gray Ink

  • Stamp sentiment with Rococo Rose Ink

  • Color heart with Dark Rococo Rose Stampin’ Blends Marker

  • Adhere layers to card base

 
Just a note Thank You.jpg
 

On the inside stamp 3 notes and color the heart with a Dark Rococo Rose Stampin Blends Marker

 
Just a note Thank You inside.jpg
 

Supply List

Tropical Oasis Memories & More Cards

The Tropical Oasis Memories & More Card Pack is chock full of goodness. You can quickly create some beautiful tropical cards with it.

 
Tropical Oasis Thumbnail.jpg
 

Watch the video to see how I made these 5 cards using the Memories & More Cards and the coordinating products in the Tropical Oasis Suite.


Card 1 Measurements:

  • Early Espresso Card Base - 5 1/2 x 8 1/2, score at 4 1/4

  • Tropical Oasis Designer Series Paper Layer - 5 1/2 x 4 1/4

  • Terracotta Tile Layer - 3 1/4 x 4 1/4

  • Let’s Go To The Beach Memories & More Card

  • Piece of Braided Burlap Trim

 
Tropical Oasis Car Card.jpg
 

Card 2 Measurements:

  • Terracotta Tile Card Base - 5 1/2 x 8 1/2, score at 4 1/4

  • Memories & More Card - cut to 5 1/4 x 4

  • Whisper White - cut with Layering Oval Dies

  • Stamp sentiment from the So Sentimental Stamp Set with Pretty Peacock Ink

  • Old Olive & Pretty Peacock scraps to cut leaves

  • Rhinestones for flower centers

 
Tropical Oasis Friendship Card.jpg
 

Card 3 Measurements:

  • Real Red Card Base - 5 1/2 x 8 1/2, score at 4 1/4

  • Memories & More Card - cut to 5 1/2 x 4

  • Real Red Layer - 4 1/8 x 3 1/8

  • Memories & More Card - stamp sentiment with Real Red Ink

  • Add Pearls to flower centers

 
Tropical Oasis - Flowery Birthday.jpg
 

Card 4 Measurements:

  • Old Olive Card Base - 5 1/2 x 8 1/2, score at 4 1/4

  • Mango Melody Layer - 4 1/4 x 3 1/4

  • Memories & More Card

  • Add Thinking Of You Today & Always Sticker

  • Add Pineapple Trinket using Mini Glue Dots

 
Tropical Oasis Pineapple Card.jpg
 

Card 5 Measurements:

  • Early Espresso Card Base - 5 1/2 x 8 1/2, score at 4 1/4

  • Mango Melody Layer - 5 1/4 x 4

  • Early Espresso Layer - 4 1/8 x 3 1/8

  • Memories & More Card

  • Using 2 strands of Linen Thread, make bow and adhere with Mini Glue Dot

  • Add Ukulele using Mini Glue Dots

 
Tropical Oasis - aloha Card2.jpg
 

Supply List

Music From The Heart

The Music From The Heart is a great stamp set, especially if you love music. The images are fantastic!

 
Music From The Heart.jpg
 

I made the guitar image by combining the Treble Clef image and the guitar neck image. Pretty cool!

 
Music From The Heart Card2.jpg
 

Tips & Instructions

  • Real Red Card Base - 5 1/2 x 8 1/2, score at 4 1/4

  • Whisper White Layer - Emboss with Scripty 3D Embossing Folder (Use the 3D Embossing Folder Plate when embossing)

  • From My Heart Designer Series Paper - cut using the largest rectangle from the Stitched So Sweetly Dies

  • Whisper White - cut using the 2nd largest rectangle from the Stitched So Sweetly Dies

  • Stamp Treble Clef Image and Guitar Neck using Tuxedo Black Memento Ink on white layer (practice on scrap to get it in the right place and the angle you want)

  • Stamp sentiment with Black Ink and hearts with Real Red Ink. Color heart in center of Guitar with Dark Real Red Stampin’ Blends Marker

  • Wrap piece of ribbon around embossed layer and adhere to the back, then adhere layer to card

  • Adhere stamped layer to Designer Series Paper layer and adhere over ribbon using Dimensionals

  • Make bow with ribbon and adhere

 
Music From The Heart Card.jpg
 

Stamp sentiment on the inside with Black Ink. Stamp music notes at the bottom with Black Ink and color heart with Dark Real Red Stampin’ Blends Marker.

 
Music From The Heart Inside.jpg
 

Supply List

Sketch Saturday - Enjoy Life

For today’s sketch challenge I went back to the Annual Catalog and used the Enjoy Life Stamp Set.

 
Sketch Saturday - Enjoy Life Stamp Set.jpg
 

Using a Sponge Brayer, I sponged the three colors across the layer with Pacific Point, Seaside Spray and Balmy Blue Ink.

 
Sketch Saturday - Enjoy Life.jpg
 

The sketch is a CAS(E) This Sketch challenge from Splitcoaststampers. I really had to think about this one to come up with an idea.

 
Screen Shot 2020-02-01 at 12.17.47 PM.png
 

Tips & Instructions

  • Balmy Blue Card Base - 5 1/2 x 8 1/2, score at 4 1/4

  • Whisper White Layer - 4 3/4 x 4 1/4, using Sponge Brayer, sponge across bottom with Balmy Blue Ink, then move to the middle and sponge with Seaside Spray Ink, then move to the top and sponge with Pacific Point Ink. Sponge lightly starting off the layer and just go over and over until you get the color you like. Be sure to blend well where the colors meet.

  • Punch 2 1/4 circle with Circle Punch

  • Stamp images from Enjoy Life with Tuxedo Black Memento Ink

  • Lightly sponge circle with Daffodil Delight Ink

  • Stamp sentiment on 1 x 1 1/2 strip of Whisper White Cardstock with Black Ink and cut point.

  • Adhere sentiment and then adhere circle using Dimensionals

 
Sketch Saturday - Enjoy Life2.jpg
 

Stamp sentiment and image with Black Ink on the inside.

 
Sketch Saturday - Enjoy Life Inside.jpg
 

Supply List

Tropical Masculine Birthday Card

I CASEd (Copy And Share Everything) this card from the 2020 Mini Catalog and just changed up the sentiment label a little. This is a great card for a guy, don’t you think?

 
Masculine Tropical Birthday Card2.jpg
 

The Timeless Tropical Stamp Set has some beautiful images and sentiments and you can bundle it with coordinating dies.

 
Tropical Oasis Bundle.jpg
 

Tips & Instructions

  • Crumb Cake Card Base - 5 1/2 x 8 1/2, score at 4 1/4

  • Crumb Cake Layer - 5 1/2 x 4 1/4

  • Tropical Oasis Designer Series Paper Layer - 5 1/2 x 3, adhere to top portion of the Crumb Cake Layer

  • Wrap a piece of Braided Burlap Trim around layer at the seam and adhere to back

  • Wrap a piece of Linen Thread around layer below the burlap trim and tie bow

  • Adhere Layer to card base

  • Stamp palm trees with Early Espresso Ink on scrap of Crumb Cake Cardstock and cut with coordinating die. Adhere to card with Dimensionals

  • Stamp sentiment on scrap with Whisper White Cardstock with Pretty Peacock Ink and punch with Story Label Punch

  • Punch scrap of Terracotta Tile with Story Label Punch, cut in half and adhere behind white label, separating to create small boarder around the label. Adhere over trim using Dimensionals

 
Masculine Tropical Birthday Card.jpg
 

On the inside, stamp palm trees with Old Olive Ink. Stamp sentiment with Pretty Peacock Ink.

 
Masculine Tropical Birthday Inside.jpg
 

Supply List

Thoughtful Blooms Birthday Card

Here’s a fun card using the Thoughtful Blooms Stamp Set and coordinating Small Bloom Punch, both FREE products during Sale-A-Bration.

 
Thoughtful Blooms Birthday Card both.jpg
 

Wouldn’t you love to receive a card like this? I love the embossed background from the Coastal Weave 3D Embossing Folder.

 
Thoughtful Blooms Birthday Card3.jpg
 

In my video, I’ll show you how to create this weaved planter for these pretty flowers. Don’t you just love the little scalloped border in Coastal Cabana?


Tips & Instructions

  • Soft Suede Card Base - 5 1/2 x 8 1/2, score at 4 1/4

  • Soft Suede Layer - 5 1/2 x 4 1/4, emboss with Coastal Weave 3D Embossing Folder (use the Embossing Plate) and adhere to card base

  • Coastal Cabana Layer - 4 1/8 x 3 1/8

  • Whisper White - 4 x 3

  • Cut planter piece using the label from the Painted Labels Dies from a scrap of Soft Suede Cardstock and emboss it with the Coastal Weave folder. Trim off the top.

  • Cut scalloped trim using the Painted Label Dies from a scrap of Coastal Cabana Cardstock

  • Lay the planter piece over the Whisper White Layer and lightly trace around the top with a pencil to help with placement of the flowers

  • Stamp stems and leaves with Old Olive Ink, branches with Crumb Cake Ink and berries with Coastal Cabana Ink

  • Adhere planter in place

  • On scrap of Whisper White, stamp 3 detailed flower images with Daffodil Delight. Using the solid stamp, stamp off on scrap and then stamp over the flower and punch with Small Bloom Punch

  • Adhere flowers with Mini Glue Dots and add Pearl to center of each flower

  • Adhere stamped layer to Coastal Cabana layer and then add to card using Dimensionals

  • Adhere scalloped trim piece to planter

  • Stamp Sentiment from Itty Bitty Birthdays on 3/4 strip of Whisper White with Coastal Cabana and punch to create banner using the Banner Triple Punch. Adhere to card using Dimensionals

 
Thoughtful Blooms Birthday Card4.jpg
 

Supply List

Pretty Birthday Card using Thoughtful Blooms

This is such a bright and cheery Birthday Card and I made it with FREE Sale-A-Bration products.

 
Birthday Card using Thoughtful Blooms3.jpg
 

The Thoughtful Blooms Stamp Set has some great images that you can use to build a pretty floral pattern. It’s free with a $50 purchase.

 
Birthday Card using Thoughtful Blooms2.jpg
 

Tips & Instructions

  • Lovely Lipstick Card Base - 5 1/2 x 8 1/2, score at 4 1/4

  • Whisper White Layer 5 1/4 x 4, emboss with Layered Leaves 3D Embossing Folder (use the Embossing Plate with 3D folders) and adhere to card base

  • Lovely Lipstick Layer - 4 1/8 x 3 1/8

  • Whisper White Layer 4 x 3

  • Stamp the leaf image with Granny Apple Green Ink leaving some space between the images.

  • Stamp the large flower in the center of each of the leaf images with Petal Pink Ink, stamping off first (stamp on scrap and then on the layer to get a lighter shade)

  • Stamp the small flower with Lovely Lipstick

  • Stamp the branch image with Crumb Cake Ink and the berries with Petal Pink Ink

  • Adhere stamped layer to Lovely Lipstick Layer

  • Stamp sentiment (from Peaceful Moments Stamp Set) with Lovely Lipstick Ink and punch with Label Me Fancy Punch. Punch slit on each end

  • Color 2 pieces of Crinkled Seam Binding Ribbon with Dark Lovely Lipstick Stampin’ Blend Marker

  • Feed ribbon through slits on sentiment label, add Dimensionals to label and then wrap the ribbon around and adhere to back

  • Adhere focal piece to card using Dimensionals

  • Tie bow and adhere with Mini Glue Dot

  • Add rhinestones to center of each flower

 
Birthday Card using Thoughtful Blooms.jpg
 

On the inside, stamp portion of leaf image with Granny Apple Green and the small flower with Lovely Lipstick Inks. Stamp sentiment with Lovely Lipstick Ink.

 
Birthday Card using Thoughtful Blooms Inside.jpg
 

Supply List