Beautiful Christmas Rose Card

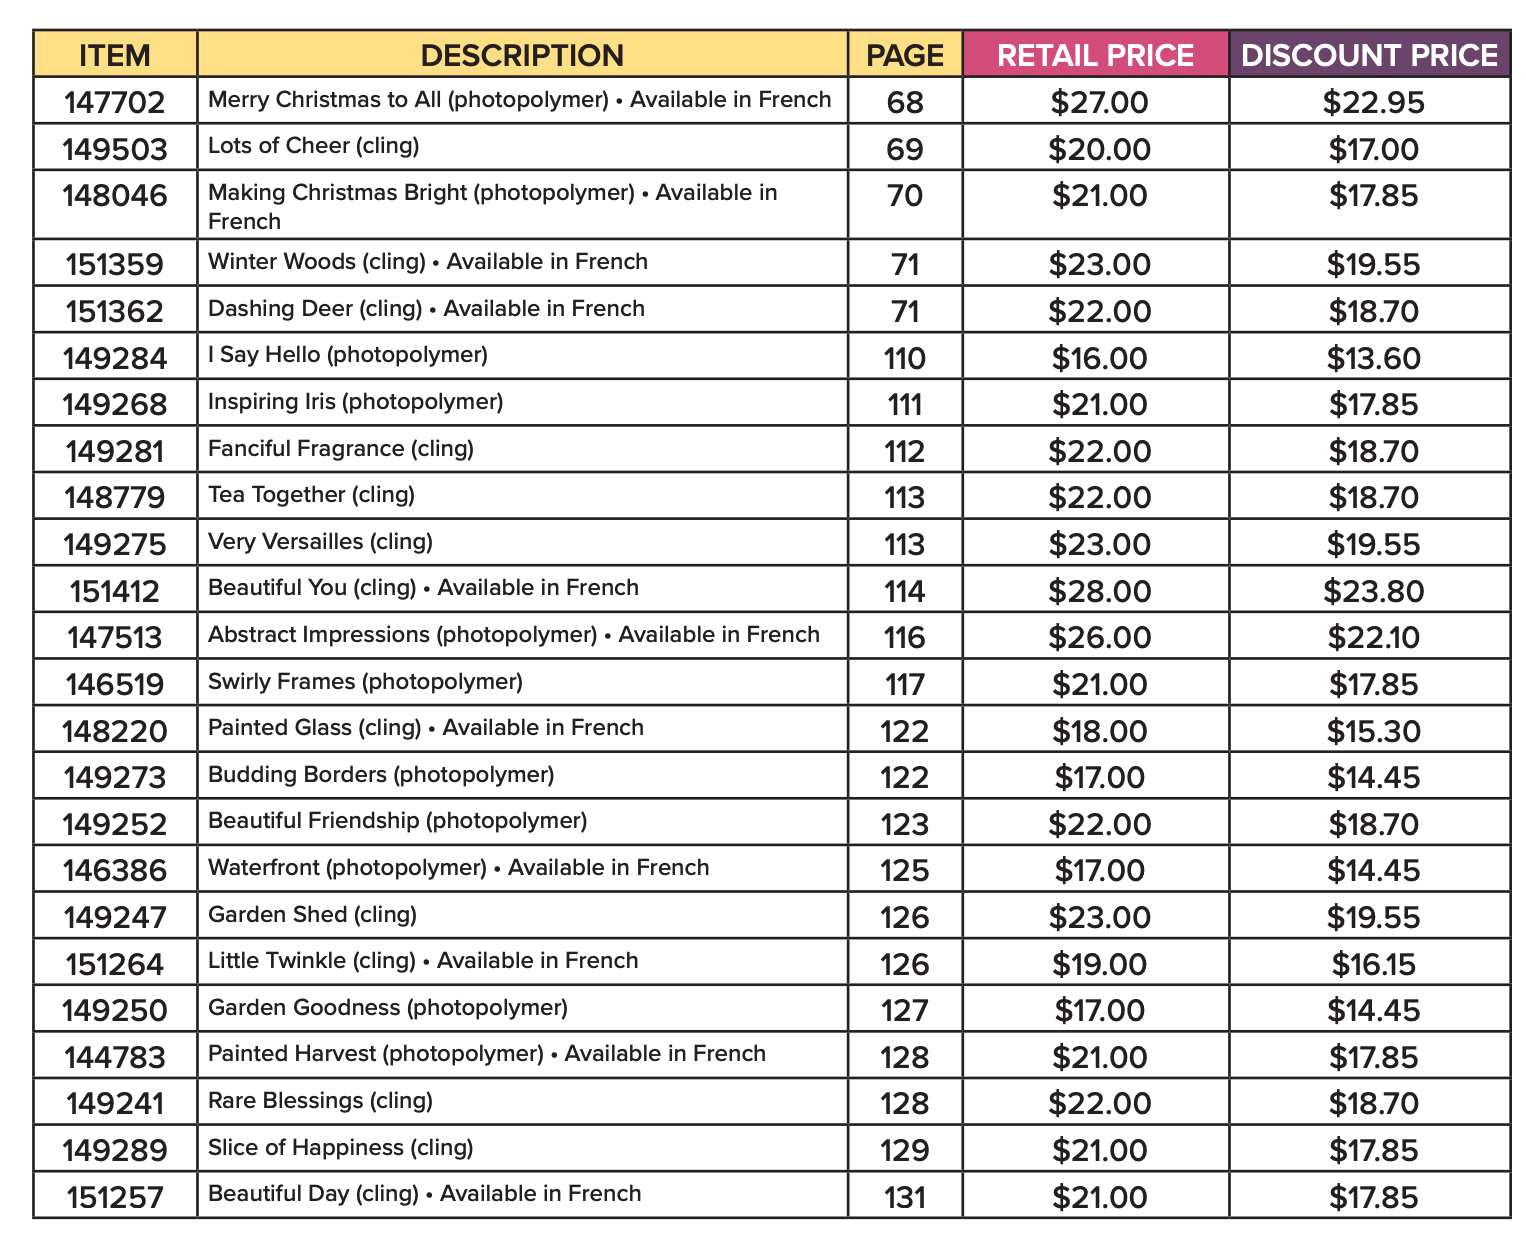
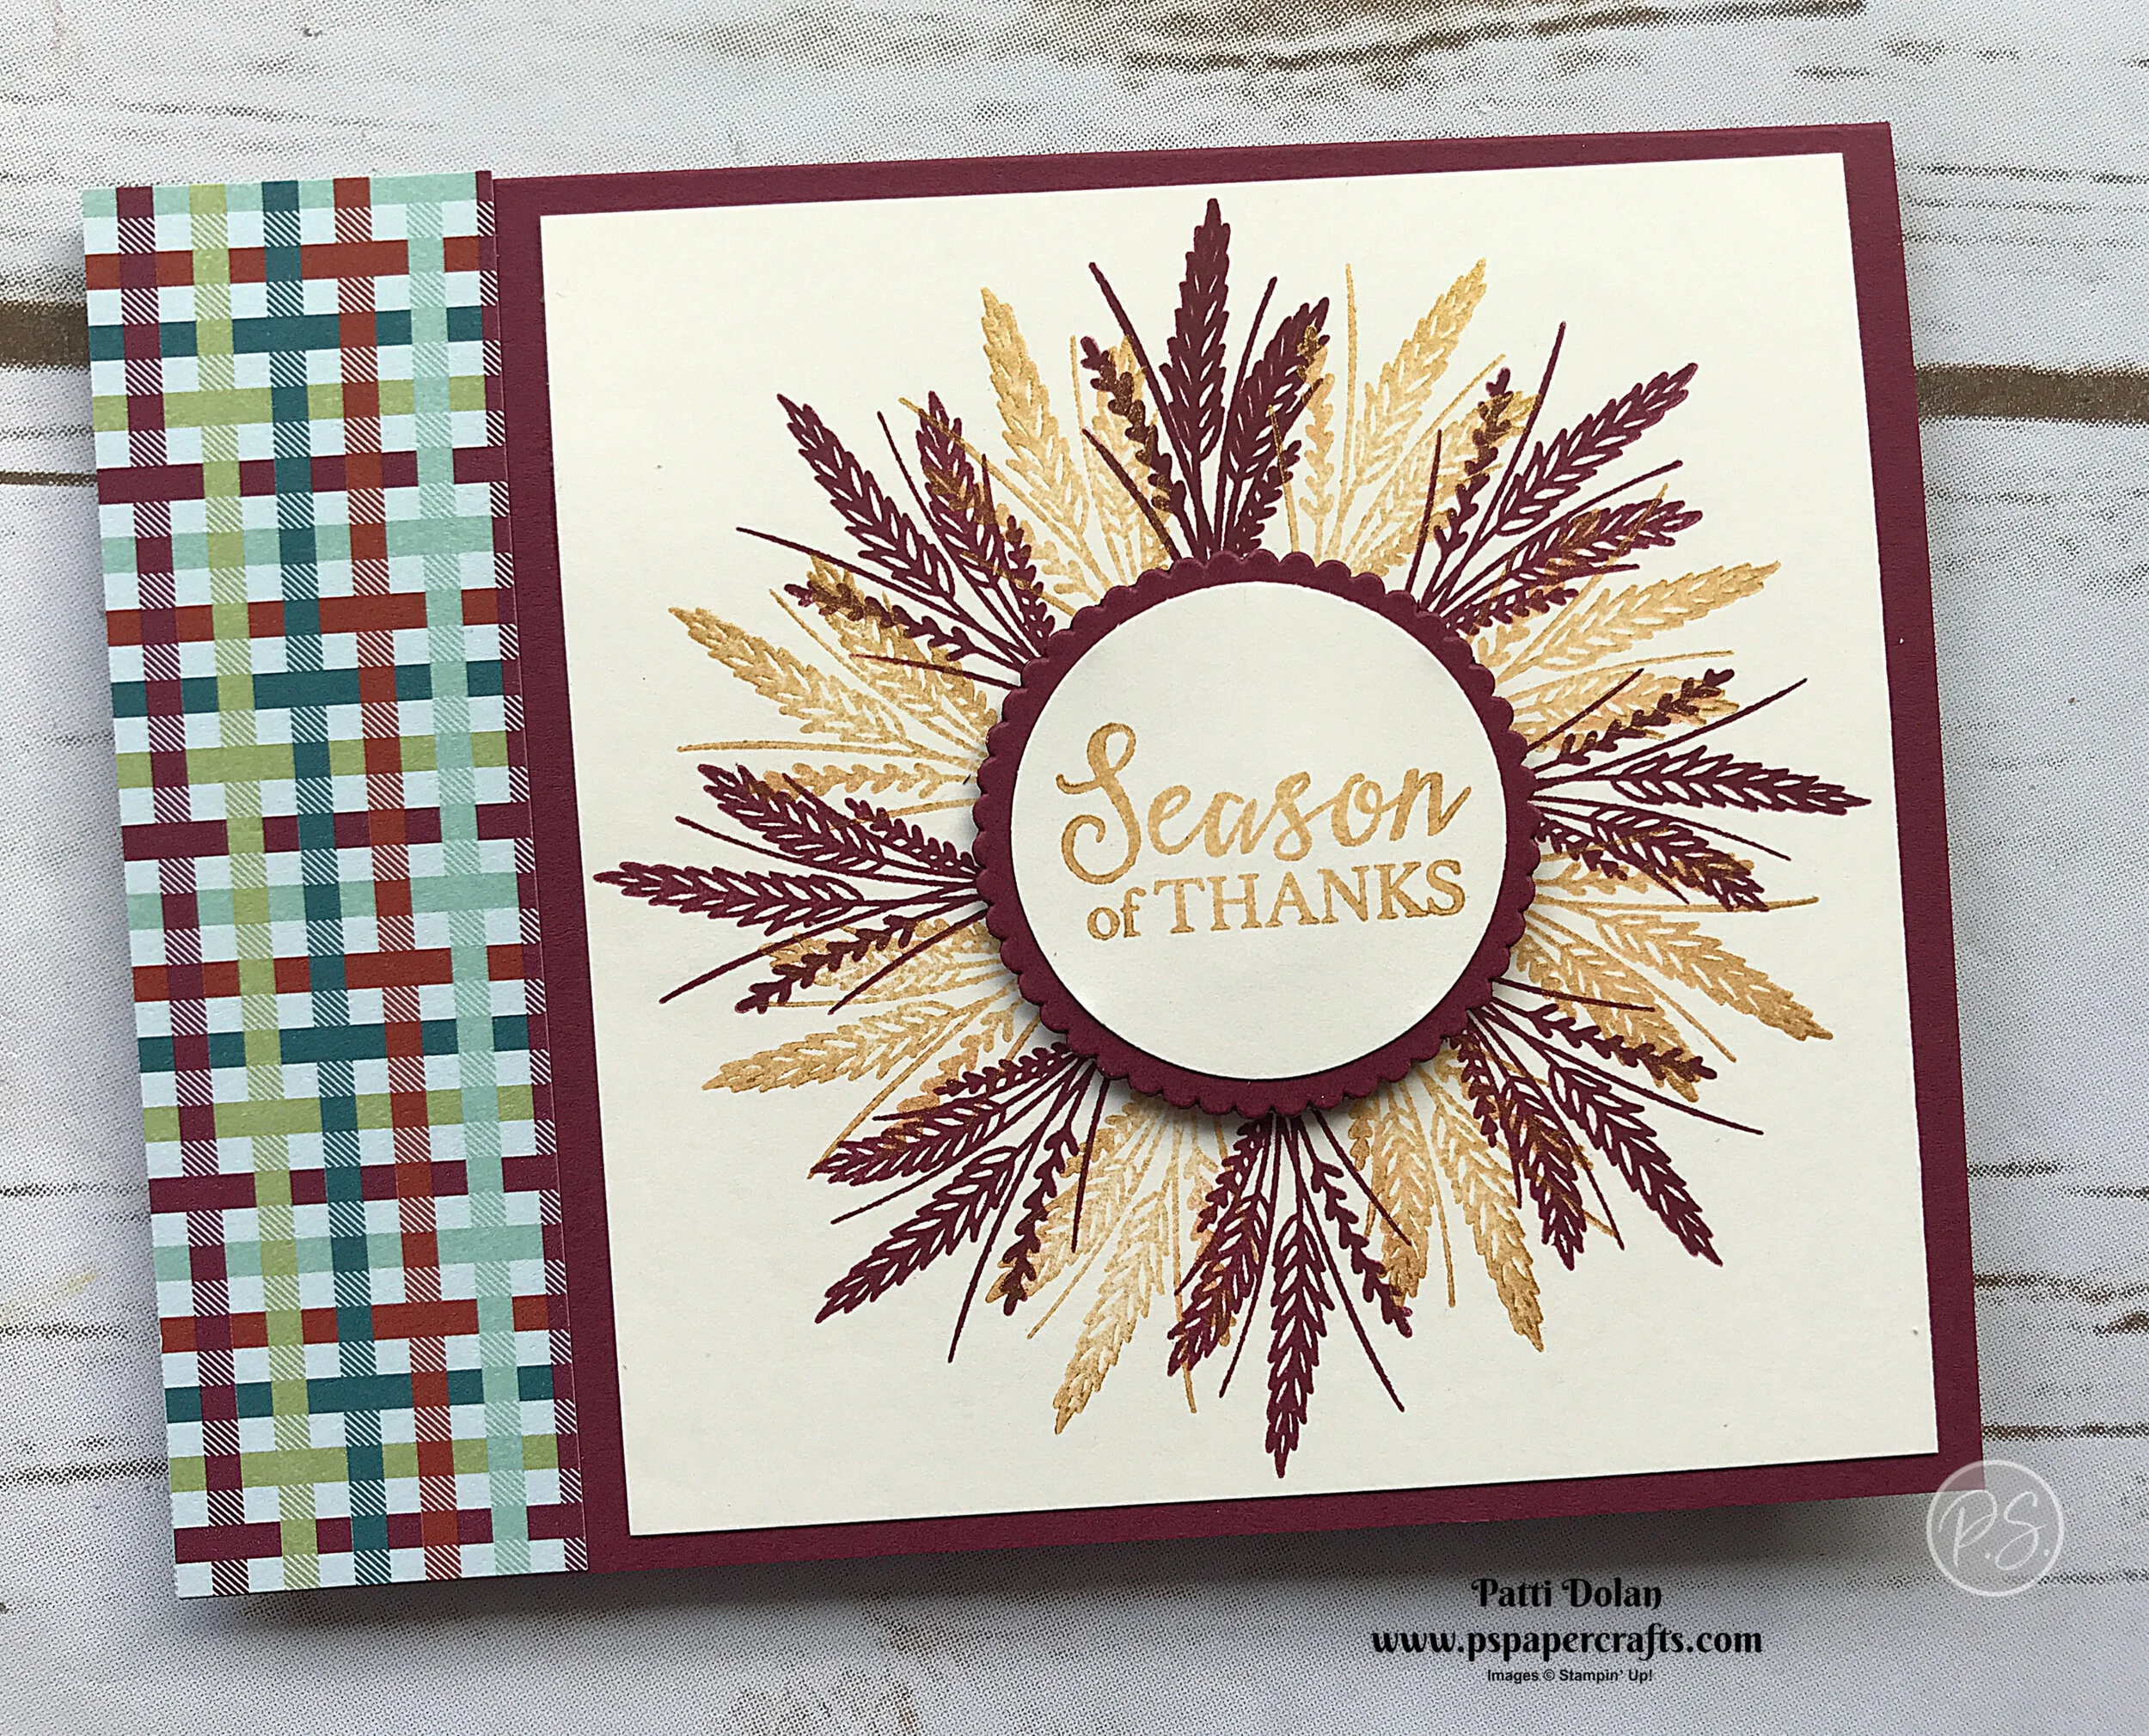
Here’s a card that I made with the new Christmastime Is Here Suite which will be available starting November 1.

 
Christmas Rose Card2.jpg
 

Christmas Roses are just so pretty. I love the greenery with the pinecones that go along with these beautiful roses. You can purchase these products starting Nov. 1 but if you can’t wait, why not use these for your Starter Kit and get them early. Just let me know if you are interested.

 
Screen Shot 2019-10-24 at 3.36.48 PM.png
 

Tips & Instructions

  • Shaded Spruce Card Base - 5 1/2 x 8 1/2, score at 4 1/4

  • Whisper White Layer - 5 1/4 x 4

  • Stamp rose images with Poppy Parade Ink

  • Stamp Greenery with Shaded Spruce Ink. I did some masking to get the look I wanted

  • Stamp pine cones with Early Espresso Ink

  • Stamp sentiment with Versamark, pour Gold Embossing Powder and then heat with Heat Tool

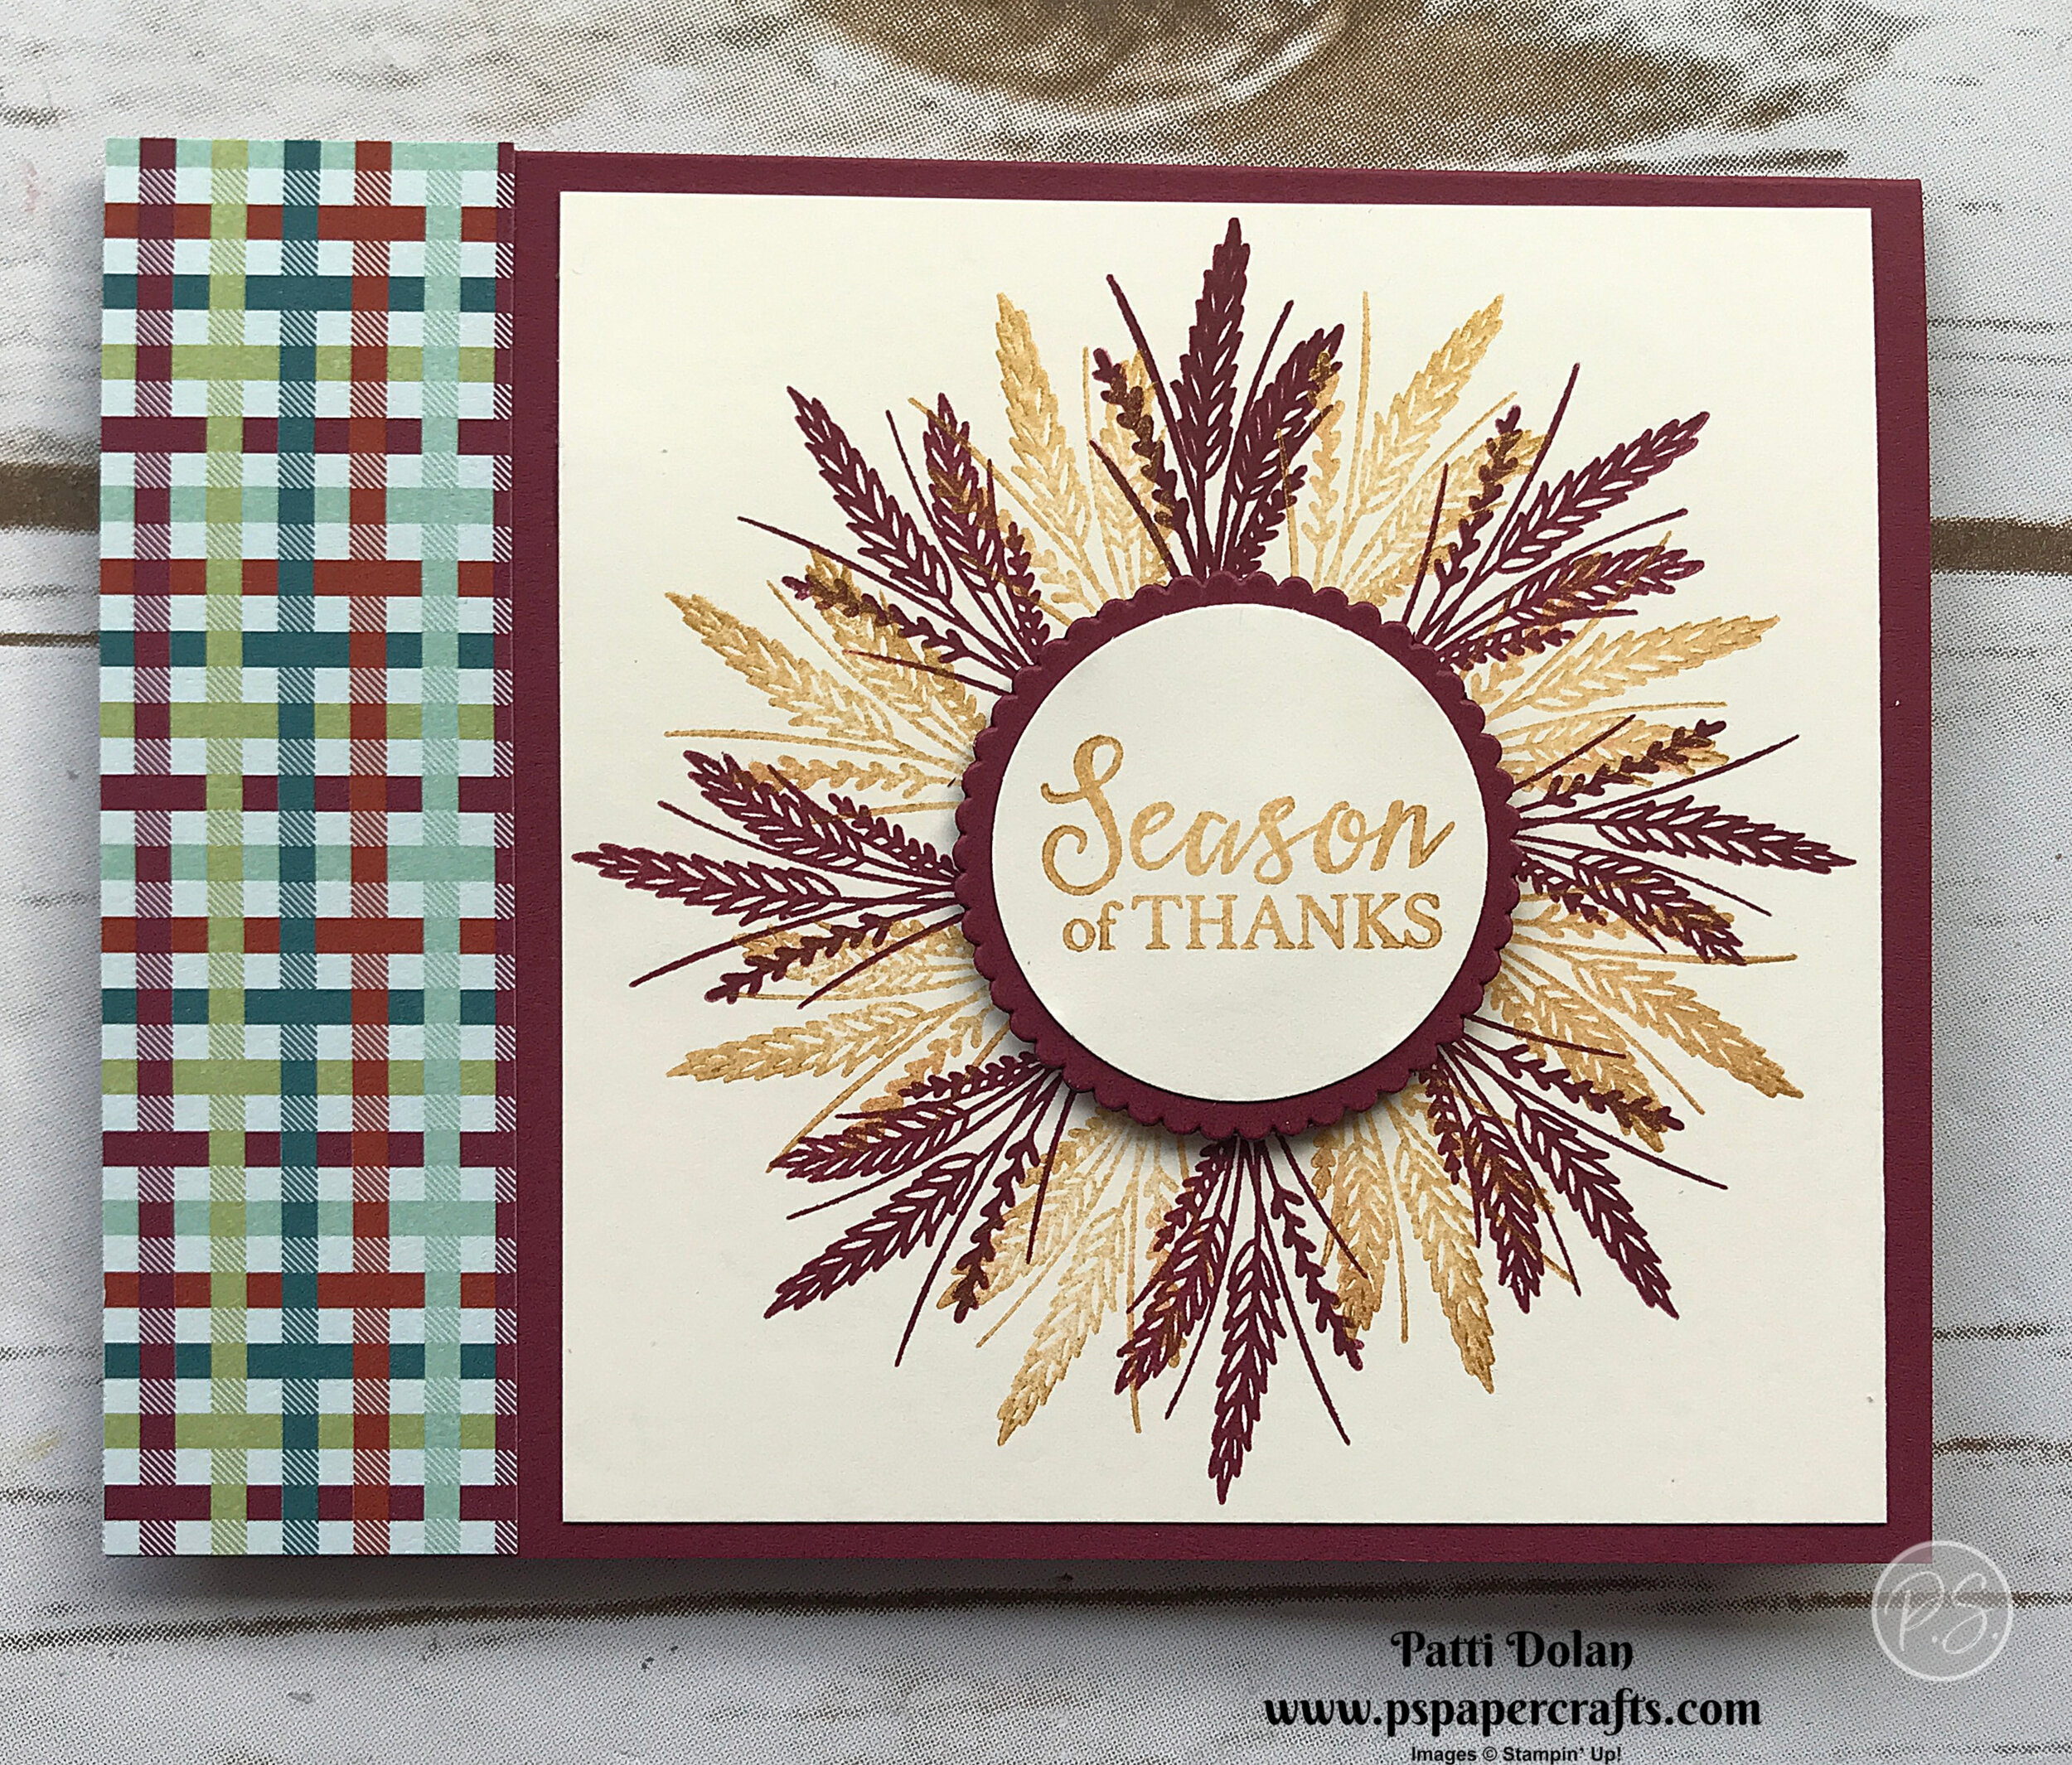
  • Wrap Gold Shimmer Ribbon around Whisper White Layer and adhere to back. Tie bow and adhere with Mini Glue Dot

  • Adhere layer to Card Base

  • Add Gold Glimmer Enamel Dot to “i” in Christmas

 
Christmas Rose Card.jpg
 

On the inside stamp sentiment with Versamark and heat emboss with Gold Embossing Powder. Stamp greenery with Shaded Spruce Ink and pine cones with Early Espresso Ink.

 
Christmas Rose Card Inside.jpg
 

If you want any of the products I used on this project, just click on the item below or the Shop Now button and it will bring you to my Online Store. Please use the current Host Code when you go to checkout your order. You can also click directly on an item to order. 
(Note: The Christmastime Is Here Suite is available starting Nov. 1, 2019 while supplies last.)

Fun Snowman Season Card

The snowman in the Snowman Season Stamp Set is so cute. I used the Feels Like Frost Specialty Designer Series Paper to create a blizzard!

 
Snowman Season Snowy Card2.jpg
 

Watch the video to see all the steps to make a card like this.


Tips & Instructions

  • Seaside Spray Card Base - 5 1/2 x 8 1/2, score at 4 1/4

  • Whisper White Layer - 5 1/4 x 4

  • Feels Like Frost Specialty Designer Series Paper - 5 1/8 x 3 7/8

  • Cut 2nd Largest and 2nd Smallest Scalloped Oval with Seaside Spray Cardstock using Layer Ovals Dies

  • Cut 3rd Largest and 2nd Smallest Oval with Whisper White Cardstock using Layering Oval Dies

  • Stamp snowflakes on large white oval with Seaside Spray Ink

  • Stamp Snowman and Hat with Black Memento Ink on Whisper White Cardstock and punch with Snowman Punch. Punch 2 arms with Early Espresso Cardstock

  • Color Snowman and Hat with Stampin’ Blends (Dark Pumpkin Pie, Dark Real Red, Dark Seaside Spray, Dark Shaded Spruce and Dark Smokey Slate). Adhere hat and arms to Snowman.

  • Stamp sentiment with Silvery Shimmer Metallic Ink on small white oval (heat to dry)

  • Adhere Designer Series Paper to Whisper White Layer and wrap ribbon around, adhering in back. Adhere layers to card base

  • Adhere ovals to scalloped Ovals and then adhere to card using Dimensionals

  • Adhere snowman to larger oval with Dimensionals

  • Make bow and adhere to ribbon using Mini Glue Dot

  • Add some Faceted Dots and Rhinestones

 
Snowman Season Snowy Card Inside.jpg
 

If you want any of the products I used on this project, just click on the item below or the Shop Now button and it will bring you to my Online Store. Please use the current Host Code when you go to checkout your order. You can also click directly on an item to order. 

24 Hour Stamp Sale!!!

10.14.19_SHAREABLE_24HRSTAMPSALE_NA.jpg

24-HOUR STAMP SALE!

October 23 is the big day! For 24-HOURS ONLY, you can save 15% on select stamp sets. This sale will be over at midnight (MT), so reach out to your customers now and invite them to save!

PROMOTION DETAILS:

Order Deadlines

  • Phone: October 23, 2019; 6:50 pm (MT)

  • OEX/Online: October 23, 2019; 11:50 pm (MT)

  • Get select sets at a 15% discount.

  • Discount applies to select stamp sets only when purchased individually during the 24-hour promotion period.

  • Bundles featuring stamp sets from the promotion will not be discounted.

  • If you purchased a stamp set prior to the sale, we will not be offering exchanges or credits.

  • In the event that we run out of any item offered, promotional pricing will be honored on items backordered, up to the point it reaches the backorder limit. Once an item reaches the backorder limit and is not orderable, it will no longer be available during the promotion and will not be available to order until additional inventory arrives in your market.

Some of my favorite sets are on the sale list below:

Beautiful You, Waterfront, Painted Harvest, Beautiful Day and Rooted In Nature.

There are some great background stamps on the list as well. You won't want to miss this. Look through the list and then click the Shop button below to be taken to my online store.

Screen Shot 2019-10-21 at 10.26.37 AM.png
Screen Shot 2019-10-21 at 10.26.54 AM.png
Screen Shot 2019-10-21 at 10.27.04 AM.png

Cup of Christmas!!!

This is such a cool stamp set. You can stamp on both sides of the stamp so you can reverse the image!!!

 
Screen Shot 2019-10-16 at 12.17.02 PM.png
 

Watch the video from Stampin’ Up! to see how this works!


This is such a fun and versatile stamp set. You can purchase it by clicking on the item below or the Shop Now button and it will bring you to my Online Store. You can purchase as a bundle and save 10% or purchase just the stamp set or just the dies.

Still Scenes Bundle

This is such a great bundle. Look at the beautiful shaker card you can make with it.

 
Screen Shot 2019-10-13 at 10.05.53 PM.png


If you want any of these products, just click on the item below or the Shop Now button and it will bring you to my Online Store. Please use the current Host Code when you go to checkout your order. You can also click directly on an item to order. 

Sketch Saturday - Gather Together Harvest Card

Time for another sketch! I used the wheat image from the Gather Together Stamp set along with the sentiment from Country Home. I love these fall colors.

 
Sketch Saturday - Gather Together 2.jpg
 

The sketch is another challenge from Splitcoaststampers CAS(E) This Sketch Challenge. Here’s the link. CAS(E) this Sketch #343

 
Screen Shot 2019-10-12 at 1.51.40 PM.png
 

Tips & Instructions

  • Rich Razzleberry Card Base - 5 1/2 x 8 1/2, score at 4 1/4

  • Very Vanilla Layer - 5 1/4 x 4

  • Stamp wheat image from the Gather Together Stamp Set starting in the middle with Rich Razzleberry Ink. Stamp 2 wheat images upside down with Crushed Curry Ink and then 2 more with Terracotta Tile Ink right-side up.

  • Stamp sentiment (from Country Home Stamp Set) with Rich Razzleberry Ink on 3 1/4 x 1/2 strip of Very Vanilla and cut banner on one end with Banner Triple Punch

  • Adhere banner over wheat and add copper Designer Element

 
Sketch Saturday - Gather Together2 2.jpg
 

On the inside stamp the sentiment with Rich Razzleberry Ink and the wheat image with Terracotta Tile and Crushed Curry Ink.

 
Sketch Saturday - Gather Together Inside (1).jpg
 

If you want any of the products I used on this project, just click on the item below or the Shop Now button and it will bring you to my Online Store. Please use the current Host Code when you go to checkout your order. You can also click directly on an item to order. 

Gather Together Beautiful Wheat Wreath

I love how this wreath turned out. I used the wheat stamp from the Gather Together Stamp Set and the Stamparatus to make it.

 
Gather Together - Wheat Wreath Card2.jpg
 

Watch the video below and I’ll walk you through the steps. I used the Golden Glitz Metallic Ink which gives the wreath a nice shimmer.


Tips & Instructions

  • Merry Merlot Card Base - 5 1/2 x 8 1/2, score at 4 1/4

  • Very Vanilla Layer - 4 x 4

  • Come To Gather Designer Series Paper Strip - 4 1/4 x 1 1/4

  • Stamp wheat image with Merry Merlot Ink using the Stamparatus as shown in the video

  • Note: After you stamp with the Golden Glitz Metallic Ink, dry with the Heat Tool

  • Clean stamp and stamp wheat image with Golden Glitz Metallic Ink in the space between the Merry Merlot wheat images

  • Stamp sentiment with the Golden Glitz Metallic on Very Vanilla scrap and punch with 2 1/2” circle punch

  • Cut scalloped circle with Layering Circle and adhere to sentiment circle

  • Adhere layers to card base

  • Adhere sentiment using Dimensionals

 
Gather Together - Wheat Wreath Card.jpg
 

If you want any of the products I used on this project, just click on the item below or the Shop Now button and it will bring you to my Online Store. Please use the current Host Code when you go to checkout your order. You can also click directly on an item to order. 

Snow Front - Peace & Happiness

I love how you can make a pretty scene with the Snow Front Stamp Set. I framed it with the Frosted Frames Die to make it look like a picture.

 
Snow Front - Peace & Happiness.jpg
 

A cabin in the woods is such a peaceful scene for a Christmas or Winter card.

 
Snow Front - Peace & Happiness Card2.jpg
 

Tips & Instructions

  • Pretty Peacock Card Base - 5 1/2 x 8 1/2, score at 4 1/4

  • Seaside Spray Layer - 5 1/4 x 4

  • Cut Frosted Frame from Pretty Peacock Cardstock

  • Cut Frame Center from Whisper White Cardstock

  • Stamp scene on the white center (water with Seaside Spray Ink, stamping off first to get lighter color, cabin with Early Espresso Ink, trees with Pretty Peacock Ink, stamping direct, then off to get different shades and the sentiment (from Itty Bitty Christmas) with Seaside Spray Ink.

  • Lay piece of ribbon over Pretty Peacock Frame and cut small slit to pull it through the leaves on one side.

 
Snow Front - Peace & Happiness Ribbon.jpg
 
  • Lay Ribbon across Pretty Peacock Frame, leaving enough to wrap behind Seaside Spray Layer. Adhere Pretty Peacock Frame to Seaside Spray Layer and adhere ribbon in back

  • Adhere White layer over frame with Dimensionals

  • Add 3 Holiday Rhinestone Basic Jewels

 
Snow Front - Peace & Happiness Card.jpg
 

On the inside stamp sentiment with Seaside Spray Ink and trees with Pretty Peacock Ink, re-stamping without re-inking to get various shades.

 
Snow Front - Peace & Happiness Inside.jpg
 

If you want any of the products I used on this project, just click on the item below or the Shop Now button and it will bring you to my Online Store. Please use the current Host Code when you go to checkout your order. You can also click directly on an item to order. 

Merry Moose Christmas Card

Don’t you just love a moose wearing a scarf? The Merry Moose Bundle is so fun!

 
Merry Moose Stillness of the Season Both.jpg
 

Take a look at the video to see how I made these cards.


Merry Moose Stillness of the Season Card2.jpg
 

Tips & Instructions

  • Shaded Spruce Card Base - 4 1/4 x 11, score at 5 1/2 (side folding)

  • Whisper White Layer - 5 1/4 x 4

  • Whisper White Layer - 5 1/4 x 1 1/2, emboss with Hammered Metal 3D Embossing Folder (use with the 3D Embossing Plate)

  • Lay embossed layer over white layer and mark lightly with a pencil to determine placement for trees

  • Stamp evergreen trees, stamping 2nd and 3rd times without re-inking

  • Adhere embossed layer to white layer and adhere to card base

  • Stamp 2 moose outline images with black ink and then stamp to fill in with Crumb Cake Ink (Tip, use blender pen to fill in any white space if image doesn’t line up as shown in video)

  • Stamp scarf image with Real Red Ink and Shaded Spruce Ink and fussy cut

  • Stamp sentiment and punch with Timeless Label Punch (leaving bottom curve off)

  • Adhere moose and sentiment tag with Dimensionals and add Toile Tidings Glitter Enamel Dot to top of tag

 
Merry Moose Stillness of the Season Card.jpg
 

If you want any of the products I used on this project, just click on the item below or the Shop Now button and it will bring you to my Online Store. Please use the current Host Code when you go to checkout your order. You can also click directly on an item to order. 

Simple Merry Christmas Card

I love challenges! This card was made for a challenge called Build A Card Challenge. We had to make a card using an Embossing Folder, Real Red, Whisper White, Three Layers and Twine. Here’s what I made!

 
Merry Christmas Build A Card2.jpg
 

Challenges are a great way to get started with creating. They give you something specific to aim for.

Tips & Instructions

  • Real Red Card Base - 5 1/2 x 8 1/2, score at 4 1/4

  • Toile Tidings Designer Series Paper Layer (red stripes) 5 1/4 x 2

  • Whisper White Layer - 5 1/4 x 2 1/4, emboss with Hammered Metal 3D Embossing Folder (use 3D Embossing Plate)

  • Adhere striped layer to embossed layer (make sure it ends up at 5 1/4 x 4 so it fits nicely on the card base) and wrap red ribbon around the seam, then adhere to card base.

  • Whisper White scrap - cut with Stitched Rectangle Die & stamp sentiment with Shaded Spruce Ink

  • Punch Christmas Tree from Perfectly Plaid Designer Series Paper and adhere to sentiment label, then adhere label over ribbon using Dimensionals

  • Add Red Rhinestones to tree

  • Tie 2 pieces of White Twine into a bow and add with a Mini Glue Dot

 
Merry Christmas Build A Card3.jpg
 

On the inside stamp sentiment with Real Red Ink and a tree with Shaded Spruce Ink.

 
Merry Christmas Build A Card inside.jpg
 

If you want any of the products I used on this project, just click on the item below or the Shop Now button and it will bring you to my Online Store. Please use the current Host Code when you go to checkout your order. You can also click directly on an item to order. 

Sketch Saturday - Pressed Petals & Daisy Punch

Today’s sketch is from the Splitcoaststampers CAS(E) This Sketch Challenge.

 
Sketch Saturday - Pressed Petals & Daisy Punch.jpg
 

Here’s the sketch. You can see other cards and play along at this link. CAS(E) this Sketch #342

 
Screen Shot 2019-10-04 at 10.55.27 PM.png
 

I used a variety of products: Pressed Petals Designer Series Paper, the Daisy Punch, Varied Vases Stamp Set and In The Woods Dies.

Tips & Instructions

  • Crumb Cake Card Base - 4 1/4 x 11, score at 5 1/2 (Top Folding)

  • Pressed Petals Designer Series Paper (Wood Grain) 4 1/4 x 3 1/2 (Be sure to have the wood grain going the right way)

  • Pressed Petals Strip (flowers) 4 1/4 x 1

  • Adhere wood grain layer to card base and adhere flower strip over top seam

  • Stamp sentiment with Versamark above flower strip, pour white embossing powder and heat

  • Punch 2 daisies with Whisper White Cardstock and adhere in center, offsetting a little

  • Cut 2 leaf branches with In The Woods Dies and adhere over flower strip

  • Adhere daisy over leaves

  • Add Floral Center

 
Sketch Saturday - Pressed Petals & Daisy Punch2.jpg
 

On the inside, stamp sentiment with Rococo Rose Ink (Varied Vases Stamp Set). Stamp stem with Pear Pizzazz and daisy image with Rococo Rose Ink (Daisy Lane Stamp Set)

 
Sketch Saturday - Pressed Petals & Daisy Punch Inside.jpg
 

If you want any of the products I used on this project, just click on the item below or the Shop Now button and it will bring you to my Online Store. Please use the current Host Code when you go to checkout your order. You can also click directly on an item to order. 

Snowman Card with a Gift Card Pocket

This is a fun Christmas Card with a pocket on the outside and a pocket on the inside for a Gift Card.

 
Snowman Pocket Card Both.jpg
 

These snowmen are just so cute. This is a great card to give with some money or a gift card to your favorite child, grandchild, niece or nephew. Watch the video to see how easy it is to make.

 
Snowman Pocket Card.jpg
 

Tips & Instructions

  • Real Red Card Base - 5 1/2 x 8 1/2, score at 4 1/4

  • Coastal Cabana Layer - 5 1/4 x 4

  • Whisper White Layer - 5 x 3 3/4

  • Let It Snow Designer Series Paper - cut pocket with Pocket Die

  • Fold pocket on score lines and lay over white layer to determine placement. Lightly mark top of pocket with pencil

  • Stamp snowman image on white layer so top of snowman is above pencil line

  • Color snowman’s had and nose with Stampin’ Blends (Dark Real Red, Dark Pumpkin Pie)

  • Stamp snowflakes around snowman with Coastal Cabana Ink - stamp off first to get lighter shade

  • Adhere pocket over snowman

  • Real Red Glimmer Strip - 3/8 x 2 9/16 (size of pocket width) & scrap to punch heart

  • Adhere glimmer strip to top of pocket and heart as shown

 
Snowman Pocket Card2.jpg
 

Cut another pocket and adhere on the inside to hold a gift card. Stamp snowman with Black Ink and color it’s nose with a Pumpkin Pie Dark Stampin’ Blends Marker. Stamp sentiment with Real Red Ink and snowflakes with Coastal Cabana, stamping off first.

 
Snowman Pocket Card Inside.jpg
 

If you want any of the products I used on this project, just click on the item below or the Shop Now button and it will bring you to my Online Store. Please use the current Host Code when you go to checkout your order. You can also click directly on an item to order. 

Beautiful Embossed Magnolia Card

The embossed magnolia is so big and beautiful. You really don’t need to add much more!!!

 
Beautiful Embossed Magnolia card2.jpg
 

This is one of my favorite suites in the Annual Catalog. Everything coordinates so well and I love Mossy Meadow and Petal Pink together.

 
Beautiful Embossed Magnolia.jpg
 

Tips & Instructions

  • Mossy Meadow Card Base - 4 1/4 x 11, score at 5 1/2

  • Petal Pink Layer - 5 1/4 x 4, emboss with Magnolia 3D Embossing Folder (use with the 3D Embossing Plate)

  • Mossy Meadow Strip - 4 1/4 x 5/8

  • Magnolia Lane Designer Series Paper Strip - cut stripes (about 3/8)

  • Whisper White Scrap - stamp sentiment with Mossy Meadow Ink and punch with Timeless Label Punch

  • Whisper White Scrap - Stamp flower image with Tuxedo Black Memento Ink and color with Mossy Meadow and Petal Pink Stampin’ Blends and cut with coordinating die

  • Adhere all layers and strips, adhere label and flower using Dimensionals

  • Add Pearls under sentiment

 
Beautiful Embossed Magnolia Card.jpg
 

If you want any of the products I used on this project, just click on the item below or the Shop Now button and it will bring you to my Online Store. Please use the current Host Code when you go to checkout your order. You can also click directly on an item to order. 

Colorful Seasons - Baby Wipe Technique

Fall cards are perfect for the Baby Wipe Technique. I love that you can create colorful leaves with such an easy technique.

 
Colorful Seasons - Baby Wipe Technique (1).jpg
 

You need a baby wipe and a bunch of re-inkers.

 
Colorful Seasons - Baby Wipe Technique card.jpg
 

Watch the video below to see how to do this technique.


Tips & Techniques

  • Old Olive Card Base - 5 1/2 x 8 1/2, score at 4 1/4

  • Crushed Curry Layer - 5 1/8 x 3 7/8

  • Whisper White Layer - 5 x 3 3/4

  • Create your “ink pad” using a baby wipe that’s folded a couple of times. Add drops of colors (I used Pear Pizzazz, So Saffron, Old Olive, Crushed Curry, Calypso Coral, Crumb Cake, Pool Party)

  • Stamp branch with Early Espresso Ink

  • Stamp leaves randomly using the baby wipe as your ink pad

  • Adhere layers to card base

  • Whisper White Strip 1 x 3 7/8, stamp sentiment with Early Espresso Ink and a few leaves

  • Crushed Curry Strip 1 1/4 x 3 78, adhere to white strip

  • Adhere strip to card using Dimensionals

  • Add 3 rhinestones to top as shown

 
Colorful Seasons - Baby Wipe Technique card2.jpg
 

Don’t forget to stamp your envelope before you throw away the baby wipe.

If you want any of the products I used on this project, just click on the item below or the Shop Now button and it will bring you to my Online Store. Please use the current Host Code when you go to checkout your order. You can also click directly on an item to order. 

Painted Harvest Sunflower Card

Sunflowers are so beautiful and really bring in the Fall Season. With the Painted Harvest Stamp Set, you can make a pretty background full of sunflowers!

 
Painted Harvest Sunflower Card.jpg
 

To make a sunflower, I like to stamp a darker color with the smaller image and then use a lighter color to stamp the larger image using the opening in the center to help line it up. To get even more dimension, you can stamp each image and rotate just a little bit and then stamp again without re-inking.

 
Painted Harvest Sunflower Card3.jpg
 

Tips & Techniques

  • Pear Pizzazz Card Base - 5 1/2 x 8 1/2, score at 4 1/4

  • Whisper White Layer - 5 1/4 x 4

  • Stamp larger flower image with Daffodil Delight 3 times as shown

  • Stamp smaller flower image with Mango Melody using the open center to help line up the image

  • Stamp center with Crumb Cake Ink and then stamp the small dots with Crumb Cake Ink as well

  • Stamp detailed leaf images with Pear Pizzazz and then stamp over them with the solid image but stamp off first (stamp on scrap paper first to remove the first layer of ink)

  • Wrap ribbon around front, adhering to back of Whisper White layer and then adhere layer to card base

  • Stamp sentiment (I used one from the Good Morning Magnolia Stamp Set) with Early Espresso Ink and punch with Pretty Label Punch

  • Adhere sentiment over ribbon using Dimensionals

  • Tie 2 strands of Linen Thread into a bow and adhere with Mini Glue Dot

 
Painted Harvest Sunflower Card2.jpg
 

On the inside stamp leaf image at top and bottom corner.

 
Painted Harvest Sunflower Card Inside.jpg
 

If you want any of the products I used on this project, just click on the item below or the Shop Now button and it will bring you to my Online Store. Please use the current Host Code when you go to checkout your order. You can also click directly on an item to order. 

Sketch Saturday - Butterfly Gala

I used the Butterfly Gala Stamp Set and coordinating punch to make today’s card. I really had to think about this one, what to put in all those little boxes.

 
Sketch Saturday - Butterfly Gala.jpg
 

The sketch I’m using today is from a team challenge that I’m participating in with my Stampin’ Up! Demonstrator’s Team. We have so much fun together!

 
Screen Shot 2019-09-28 at 12.34.00 PM.png
 

Tips & Instructions

  • Lovely Lipstick Card Base - 5 1/2 x 8 1/2, score at 4 1/4

  • Pineapple Punch Layer - 5 1/8 x 3 7/8

  • Whisper White Layer - 5 x 3 3/4, emboss with Subtle 3D Embossing Folder (use the 3D Embossing Plate)

  • Pineapple Punch - 6 squares - 1 x 1

  • Whisper White - 6 squares - 7/8 x 7/8

  • Whisper White strip - stamp 6 small butterflies with their bodies with Black Memento Ink, color with Stampin’ Blends (Dark Pineapple Punch, Light Lovely Lipstick, Dark Pool Party) and punch with coordinating punch. (Note, if you use a strip about an inch, you can just ink the small butterfly and don’t worry about the large butterfly on the stamp, you will punch it away)

  • Adhere Layers and squares and then butterflies just putting adhesive (I used Multi-purpose Liquid Glue) on the butterfly body, not the wings)

  • Whisper White Strip - 1/2 x 2 1/2, stamp sentiment with black ink and punch banner on one end (I like to use the Banner Triple Punch for this)

  • Pineapple Punch Strip - 5/8 x 2 1/2, punch banner on one end and adhere to sentiment strip then adhere to card using Dimensionals

  • Add Rhinestones to butterflies and side of sentiment strip

 
Sketch Saturday - Butterfly Gala2.jpg
 

On the inside, I stamped 2 butterflies and colored them the same way I did the butterflies on the front. To be sure I only stamped the small butterfly, I covered the larger one with pieces of Post-It Note and inked up the stamp and the REMOVE the Post-It Note before stamping. I stamped their body and the antennae as well.

 
Sketch Saturday - Butterfly Gala Inside.jpg
 

The sketch I’m using today is from a team challenge that I’m participating in with my Stampin’ Up! Demonstrator’s Team. We have so much fun together!

Christmas Countdown Project Kit

The Christmas Countdown Project Kit is so amazing! It’s better in person than what the catalog shows.

Christmas Countdown Project Kit.jpg

You can use it as designed to count down to Christmas, as an Advent Calendar or turn the boxes around and store embellishments. It’s very sturdy and will last a long time.

This is a project you can do with your kids or grandkids. Get a few crafters together and share the stamp set and ink pads and have a fun time putting your kits together.

If you want to make it as shown on the video and in the catalog, you will need to order the Christmas Countdown Stamp Set, a Cherry Cobbler Ink Pad, an Early Espresso Ink Pad, a Mossy Meadow Ink Pad, some blocks as well as adhesives. Just click on the products below to be brought to my online store to shop.

Winter Woods Snowy Christmas Card

I used the Snowfall Accents Puff Paint to add snow to the tree and hill on this card. It was fun to use…just heat it with your Heat Tool and watch it puff up.

 
Winter Woods Snowy Christmas Card2.jpg
 

Winter Woods is a great stamp set from the Annual Catalog for a peaceful winter scene. I love the coordinating die, especially the one to create a hill.

 
Winter Woods Snowy Christmas Set.jpg
 

Tips & Instructions

  • Shaded Spruce Card Base - 5 1/2 x 8 1/2, score at 4 1/4

  • Whisper White Layer - 5 1/4 x 4

  • Whisper White hill - 4 x 2, cut hill using die and stamp sentiment using Shaded Spruce Ink

  • Shaded Spruce scrap - cut with tree die

  • Stamp trees across card (above where hill will be) using Crumb Cake Ink

  • Add puff paint to hill and tree and then heat with heat tool until is puffs

  • Adhere layers to card base and adhere tree using Dimensionals

 
Winter Woods Snowy Christmas Card.jpg
 

On the inside, stamp top of tree image and sentiment with Shaded Spruce Ink. I used the Merry Christmas sentiment from the Perfectly Plaid Stamp Set.

 
Winter Woods Snowy Christmas inside.jpg
 

If you want any of the products I used on this project, just click on the item below or the Shop Now button and it will bring you to my Online Store. Please use the current Host Code when you go to checkout your order. You can also click directly on an item to order. 

Fun Halloween Black Cat Card

This Cat Punch is just perfect to make a Halloween Card. Pair it with the cute Monster Bash Designer Series Paper and you’ve got a spooky card!

 
Monster Bash Halloween Card2.jpg
 

I’ll show you all the steps to make this easy card….and I didn’t even use a stamp!


Tips & Instructions

  • Basic Black Card Base - 5 1/2 x 8 1/2, score at 4 1/4

  • Monster Bash Designer Series Paper Layer - 4 x 3, adhere to card base

  • Whisper White Layer - 4 x 2, emboss with Brick & Mortar 3D Embossing Folder (be sure to use the 3D Embossing Plate)

  • Sponge brick wall lightly with Gray Granite Ink and then adhere to card base

  • Whisper White - punch with 2 1/2” Circle Punch and sponge lightly with Calypso Coral and Daffodil Delight Ink

  • Basic Black - punch cat and cat head

  • Adhere moon to card and then cat as shown

  • Adhere 4 1/4 x 1/2 Basic Black strip across card

  • Basic Black - cut letters to spell boo! and adhere along with cat head over brick wall

 
Monster Bash Halloween Card.jpg
 

Here’s a picture of Bailey peaking over the back of the couch. Doesn’t he look like the head of the cat peaking up in the bottom corner of the card?

 
IMG_8457.jpg
 

If you want any of the products I used on this project, just click on the item below or the Shop Now button and it will bring you to my Online Store. Please use the current Host Code when you go to checkout your order. You can also click directly on an item to order. 

Brightly Gleaming New Year's Card

I made this New Year’s Card without having a New Year’s sentiment :)

 
Brightly Gleaming New Year's Card2.jpg
 

This Brightly Gleaming Designer Series Paper is so rich with the copper stars on Night Of Navy, it’s so classy!

Tips & Instructions

  • Night Of Navy Card Base - 5 1/2 x 8 1/2, score at 4 1/4

  • Copper Foil Layer - 5 3/8 x 4 1/8

  • Brightly Gleaming Designer Series Layer - 5 1/4 x 4

  • Cut largest Stitched Star with Copper Foil

  • Cut 2nd largest Stitched Star with Night Of Navy

  • Adhere card layers and stars and then pop up stars using Dimensionals

  • Whisper White Scrap - stamp sentiment with Versamark, cover with Copper Embossing Powder and melt with Heat Tool

  • Punch sentiment using Classic Label Punch and adhere over star.

 
Brightly Gleaming New Year's Card.jpg
 

On the inside stamp sentiment using Versamark and heat emboss with Copper Embossing powder.

 
Brightly Gleaming New Year's Inside.jpg
 

If you want any of the products I used on this project, just click on the item below or the Shop Now button and it will bring you to my Online Store. Please use the current Host Code when you go to checkout your order. You can also click directly on an item to order.