Sketch Saturday - Gather Together

Today’s card is another one using the Gather Together Bundle. I just love this bundle and the coordinating Designer Series Paper.

 
Sketch Saturday - Gather Together Card2.jpg
 

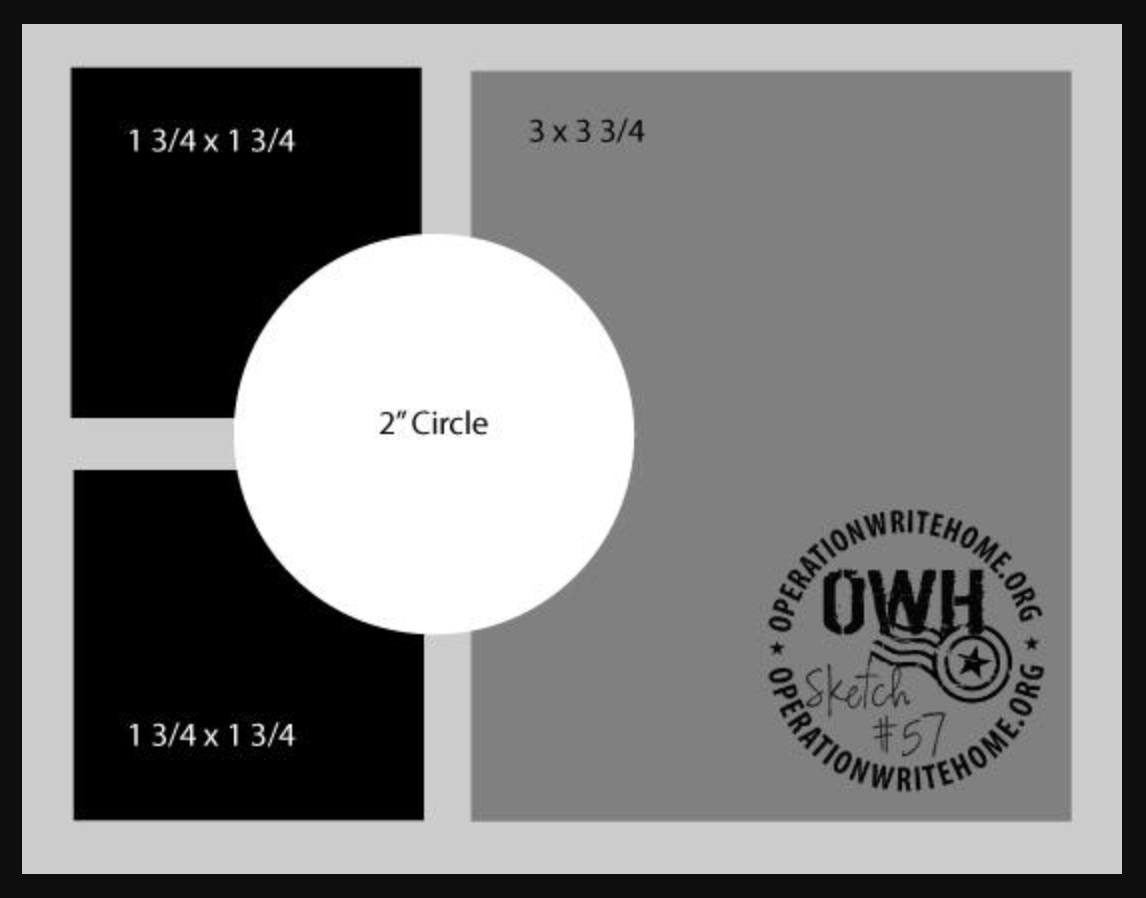
The sketch is one I found on Pinterest. It’s an OWH (Operation Write Home) sketch. I changed up the sizes a little bit, making the layers a little larger.

 
Screen Shot 2019-09-21 at 10.06.42 AM.png
 

Tips & Instructions

  • Pretty Peacock Card Base - 5 1/2 x 8 1/2, score at 4 1/4

  • Come To Gather Designer Series Paper (pumpkins) - 3 1/4 x 4

  • Come To Gather Designer Series Paper (gingham) - 2 pieces - 1 7/8 x 1 7/8

  • Scrap of Pretty Peacock - cut 1 leaf with dies

  • Scrap of Mint Macaron - cut 2 leaves with dies

  • Scrap of Whisper White - Stamp with Pumpkin Pie Ink and cut with coordinating dies

  • Color pumpkins with Light Pumpkin Pie Blends and stems with Dark Crumb Cake Blends

  • Add some Wink of Stella to the pumpkins

  • Adhere all layers as shown on card, popping up the pumpkins with Dimensionals

 
Sketch Saturday - Gather Together Card3.jpg
 

On the inside, stamp pumpkins with Pumpkin Pie Ink. I didn’t put in a sentiment because I want to write a note.

 
Sketch Saturday - Gather Together Card inside.jpg
 

If you want any of the products I used on this project, just click on the item below or the Shop Now button and it will bring you to my Online Store. Please use the current Host Code when you go to checkout your order. You can also click directly on an item to order. 

Tidings All Around Fall Wreath

I love Cajun Craze and Crushed Curry together, especially for an Autumn card!

 
Tidings All Around Fall Wreath Both.jpg
 

The wreaths were cut from the All-Around Wreath Dies and they are so pretty together against the woodgrain layer. Watch the video to see how to make these cards.


Tidings All Around Fall Wreath Card2.jpg
 

Tips & Instructions

  • Cajun Craze Card Base - 5 1/2 x 8 1/2, score at 4 1/4

  • Very Vanilla Layer - 5 1/2 x 3 3/4

  • Come To Gather Designer Series Paper (woodgrain) - 5 1/2 x 3 1/2

  • Very Vanilla - punch with 2” Circle Punch and stamp sentiment using Cajun Craze Ink

  • Adhere circle to woodgrain layer making sure the wreath will fit well around it

  • Adhere all layers to card base

  • Cut 2 wreaths (one with Crushed Curry and one with Cajun Craze) with the All-Around Wreath Dies and adhere one over the other, offsetting a little bit

  • Adhere wreaths together and then pop wreath up using Dimensionals

  • Tie bow and adhere with Mini Glue Dots

 
Tidings All Around Fall Wreath Card.jpg
 

If you want any of the products I used on this project, just click on the item below or the Shop Now button and it will bring you to my Online Store. Please use the current Host Code when you go to checkout your order. You can also click directly on an item to order. 

Perfectly Plaid Winter Knit Card

The Wrapped In Plaid Designer Series Paper along with the Perfectly Plaid Bundle are so great for Christmas cards.

 
Perfectly Plaid Winter Knit Card.jpg
 

I used the Winter Knit Embossing Folder for a nice border on top.

 
Perfectly Plaid Winter Knit Card2.jpg
 

Tips & Instructions

  • Cherry Cobbler Card Base - 5 1/2 x 8 1/2, score at 4 1/4

  • Cherry Cobbler Layer - 5 1/2 x 4 1/4, emboss top part with Winter Knit 3D Embossing Folder

  • Very Vanilla Layer 5 1/2 x 2 1/4, stamp sentiment with Cherry Cobbler Ink and adhere to Cherry Cobbler Layer

  • Gold Foil Strip 5 1/2 x 3/8 adhere across seam

  • Punch 3 Christmas Trees from the Wrapped In Plaid Designer Series Paper with the Tree Punch and adhere 2 flat and the 3rd pop up with Dimensionals

  • Add Cherry Cobbler Rhinestones (you can use the Holiday Rhinestone Basic Jewels or you can color the clear ones with a Dark Cherry Cobble Stampin’ Blends Marker

 
Perfectly Plaid Winter Knit Card1.jpg
 

On the inside, stamp sentiment with Cherry Cobbler Ink and tree with Shaded Spruce Ink.

 
Perfectly Plaid Winter Knit inside.jpg
 

If you want any of the products I used on this project, just click on the item below or the Shop Now button and it will bring you to my Online Store. Please use the current Host Code when you go to checkout your order. You can also click directly on an item to order. 

Brightly Gleaming Toile Christmas

The Brightly Gleaming Specialty Designer Series Paper is just gorgeous! One side of each sheet has copper foil which really makes it so rich and pretty.

 
Brightly Gleaming Christmas Both.jpg
 

In the video I’ll show you how to color on your stamps with Stampin’ Write Markers to get the different colors on the floral images.


Brightly Gleaming Christmas Card2.jpg
 

Tips & Instructions

  • Mossy Meadow Card Base - 5 1/2 x 11 1/2, score at 4 1/4

  • Copper Foil Layer - 5 1/4 x 4

  • Whisper White Layer - 5 x 3 3/4

  • Brightly Gleaming Designer Series Layer - 2 x 3 3/4

  • Whisper White Scraps - on large floral stamp, using Stampin’ Write Markers, color berries with Real Red, leaves with Mossy Meadow and stems with Early Espresso. Breath on the stamp before stamping on your cardstock. Repeat to get a second image.

  • Stamp sentiment on another Whisper White Scrap with Mossy Meadow Ink

  • Cut floral images and sentiment with coordinating die

  • Adhere layers and floral images and then adhere the sentiment using Dimensionals

 
Brightly Gleaming Christmas Card.jpg
 

If you want any of the products I used on this project, just click on the item below or the Shop Now button and it will bring you to my Online Store. Please use the current Host Code when you go to checkout your order. You can also click directly on an item to order. 

Fun Snowman Punch Card!

I finally decided to try this type of card. It’s easy to do, you just punch out the pieces and adhere them leaving a little space as a border around each piece.

 
Snowman Season Card2.jpg
 

These snowmen are just adorable. I wanted to highlight the one wrapped up in the scarf and it fit perfectly within this punch.

Tips & Instructions

  • Shaded Spruce Card Base - 5 1/2 x 8 1/2, score at 4 1/4

  • Shaded Spruce Layer - 5 1/4 x 4

  • Let It Snow Designer Series Paper - punch larger snowman with Tailored TagPunch

  • Let It Snow Designer Series Paper - punch a bunch of the smaller snowmen with Tailored Tag Punch

  • Adhere the larger snowman as the focal using Dimensionals on the 5 1/4 x 4 layer

  • Adhere the rest of the pieces as shown on the card, fitting them in the spaces with a small border around each. It’s ok for them to hang over the layer. Once they are all adhered, cut the excess (cut from the back).

  • Adhere layer to card base

  • Stamp sentiment on Stitched Rectangle with Real Red Ink and adhere with Dimensionals

  • Add red Noble Peacock Rhinestones

 
Snowman Season Punch Card.jpg
 

On the inside stamp sentiment with Real Red Ink and the snowman with black ink.

 
Snowman Season Card Inside.jpg
 

If you want any of the products I used on this project, just click on the item below or the Shop Now button and it will bring you to my Online Store. Please use the current Host Code when you go to checkout your order. You can also click directly on an item to order. 

Clearance Rack Refresh

Screen Shot 2019-09-17 at 9.49.23 AM.png

Clearance Rack Refresh

New items have been added to the Clearance Rack in my online store! Supplies are limited, and with discounts up to 60%, products will go quickly. Shop now and stock up. Click the Shop Button at the stop of my Blog to get to my Online Store.

 
Loyalty Rewards.jpg
 

Loyalty Rewards Program

When you shop my Online Store you can earn points that can be redeemed for a FREE stamp set of your choice! This is a way for me to thank you for shopping with me. I do appreciate your business. Click the Loyalty Rewards Button at the top of my Blog to get details.

Sketch Saturday - Merry Moose

The Merry Moose Stamp Set has some fun images and sentiments and has a coordinating punch for the moose. I used it for the CAS(E) This Sketch Challenge from Splitcoaststampers.

 
Merry Christmoose Card.jpg
 

Here’s the sketch and if you click on the link you can see other cards made from this sketch. CAS(E) this Sketch #339

 
Screen Shot 2019-09-13 at 1.36.21 PM.png
 

Isn’t this a great bundle? If you buy as a bundle, you save 10%

 
Merry Christmoose.jpg
 

Tips & Instructions

  • Night Of Navy Card Base - 5 1/2 x 8 1/2, score at 4 1/4

  • Wrapped In Plaid Designer Series Paper Layer - 5 1/4 x 4 and adhere to card base

  • Night Of Navy - cut with largest scalloped Layering Squares Die

  • Whisper White - cut with 2nd largest scalloped Layering Squares Die and adhere to navy square

  • Scrap of Whisper White - stamp moose outline with Early Espresso Ink and inside with Crumb Cake Ink and punch with Moose Punch

  • Using moose as a guide, determine placement for sentiment and stamp with Real Red Ink

  • Adhere square to card using Dimensionals

  • Adhere moose to card using Dimensionals

 
Merry Christmoose Card2.jpg
 

On the inside stamp sentiment with Night Of Navy (or Real Red) Ink and stamp cute little raccoon with Early Espresso Ink.

 
Merry Christmoose Inside.jpg
 

If you want any of the products I used on this project, just click on the item below or the Shop Now button and it will bring you to my Online Store. Please use the current Host Code when you go to checkout your order. You can also click directly on an item to order. 

Merry Christmas Tree Card

What a great color combination for Christmas cards - Coastal Cabana and Real Red!

 
Merry Christmas Tree Card2.jpg
 

The Let It Snow Specialty Designer Series Paper is so fun for this type of card. Take a look at the video and I’ll show you all the papers as well as the steps to make this card.


Merry Christmas Tree Bundle.jpg
 

Tips & Instructions

  • Coastal Cabana Card Base - 5 1/2 x 8 1/2, score at 4 1/4

  • Real Red Layer - 5 3/8 x 4 1/8

  • Let It Snow Specialty Designer Series Paper - 5 1/4 x 4

  • Whisper White - cut 4th from smallest Rectangle Stitched Die

  • Whisper White - cut smallest Rectangle Stitched Die

  • Stamp trees on larger rectangle by stamping off (stamp on scrap before rectangle) across layer with Coastal Cabana Ink

  • Stamp sentiment on smaller rectangle with Real Red Ink

  • Scrap of Costal Cabana - wipe with embossing buddy, stamp tree with Versamark, pour embossing powder and then heat with heat tool

  • Punch tree with coordinating Tree Punch

  • Adhere layers to card base and adhere tree and sentiment layer with Dimensionals

  • Add Toile Tidings Glimmer Dots

 
Merry Christmas Tree Card.jpg
 

If you want any of the products I used on this project, just click on the item below or the Shop Now button and it will bring you to my Online Store. Please use the current Host Code when you go to checkout your order. You can also click directly on an item to order. 

Painted Harvest - Thankful For You

The Painted Harvest Stamp Set is one of my favorites and I’m so glad that it was carried over in the Annual Catalog!

 
Painted Harvest - Thankful For You.jpg
 

The Designer Series Paper is from the Come To Gather pack and it coordinates so well with the Pretty Peacock Ribbon.

 
Painted Harvest - Thankful For You Card2.jpg
 

Tips & Instructions

  • Crumb Cake Card Base - 5 1/2 x 8 1/2, score at 4 1/4

  • Whisper White Layer - 5 1/4 x 4, stamp sentiment with Pretty Peacock Ink

  • Come Gather Together Layer - 2 x 4, adhere to Whisper White Layer

  • Wrap ribbon around at the seam and adhere to back. Adhere layer to card base

  • Stamp large flower image with Crushed Curry - Stamp off first to get a lighter color and then rotate a little and stamp again without re-inking

  • Stamp smaller flower image with Crushed Curry (direct) using the center as a guide

  • Fussy cut flower

  • Stamp leaf images on Pretty Peacock and on Whisper White and punch with coordinating Leaf Punch

  • Adhere leaves behind flower and adhere flower over ribbon using Dimensionals

  • Adhere Pretty Peacock Faceted Gems and Pearls

 
Painted Harvest - Thankful For You Card.jpg
 

On the inside stamp sentiment and leaf images with Pretty Peacock.

 
Painted Harvest - Thankful For You Inside.jpg
 

If you want any of the products I used on this project, just click on the item below or the Shop Now button and it will bring you to my Online Store. Please use the current Host Code when you go to checkout your order. You can also click directly on an item to order. 

Nature's Beauty - Framed Deer

Isn’t this a great masculine card? I copied the idea from my friend Vicki Parsons from The Paper Connection. I changed it up a little.

 
Nature's Beauty Deer Both.jpg
 

Watch the video to see how I create this beautiful Crackle Frame for the deer. It’s easy to do!


This is a great masculine birthday card using the sentiment from Itty Bitty Birthdays.

 
Nature's Beauty Deer Birthday Card.jpg
 

Tips & Instructions

  • Crumb Cake Card Cake - 5 1/2 x 8 1/2, score at 4 1/4

  • Whisper White Layer - 5 1/4 x 4, using Stamparatus stamp the Crackle Background using Crumb Cake Ink

  • Cut center using the second largest Stitched Nested Labels Die

  • Flip the center piece that was cut out and stamp the deer using Early Espresso Ink and grass using Mossy Meadow Ink

  • Attach crackle layer to card base using Foam Strips

  • Adhere inside stamped layer, fitting it inside the crackle layer

  • Stamp sentiment on Whisper White strip (size according to size of sentiment)

  • Create a banner end using the Banner Triple Punch

  • Adhere sentiment as shown using a small piece of Foam Strip in the middle and a little bit of adhesive on both ends

  • Add Designer Element on sentiment strip

The Thinking of You sentiment is from the Woven Heirlooms Stamp Set.

 
Nature's Beauty Thinking of you2.jpg
 

If you want any of the products I used on this project, just click on the item below or the Shop Now button and it will bring you to my Online Store. Please use the current Host Code when you go to checkout your order. You can also click directly on an item to order. 

Cute Little Piggy Card

I just love the This Little Piggy Stamp Set. I think spending time on my sister’s farm last week prompted me to make a card with this set.

 
This Little Piggy2.jpg
 

This is a fun card to send to just about anyone to brighten their day. I used the Brick & Mortar 3D Embossing Folder for the background and some Granny Apple Green Ribbon. This card just makes me happy!

These are my sister’s piggies….they were my inspiration!

 
Pork Chop & Bacon.jpg
 
 
This Little Piggy3.jpg
 

Tips & Instructions

  • Granny Apple Green Card Base - 5 1/2 x 8 1/2, score at 4 1/4

  • Whisper White Layer - 5 1/4 x 4, emboss with Brick & Mortar 3D Embossing Folder (Use 3D Embossing Folder Plate)

  • Wrap piece of Granny Apple Green Textured Weave Ribbon around embossed layer and adhere to card base

  • Whisper White - cut with Largest Layering Rectangle - stamp pig image and color with Stampin’ Blends (Petal Pink Light & Dark, Light Granny Apple Green, Dark Lovely Lipstick, Dark Pineapple Punch, Light Smoky Slate)

  • Granny Apple Green - cut with largest scalloped Layering Rectangle Die and adhere to white square.

  • Adhere squares layer over ribbon using Dimensionals

 
This Little Piggy.jpg
 

On the inside stamp some flowers with Lovely Lipstick Ink. I used the flower from the Perennial Birthday Stamp Set.

 
This Little Piggy Inside.jpg
 

If you want any of the products I used on this project, just click on the item below or the Shop Now button and it will bring you to my Online Store. Please use the current Host Code when you go to checkout your order. You can also click directly on an item to order. 

Sketch Saturday - Perfectly Plaid

Today’s sketch is another from a CAS(E) this Sketch Challenge from Splitcoaststampers. I love playing along with their challenges. You can click on this link to get see other cards using this sketch. CAS(E) this Sketch #338

 
Screen Shot 2019-09-07 at 3.00.12 PM.png
 

I used the Perfectly Plaid Bundle and made it a horizontal card. That’s what’s fun about it; you get the idea from the sketch and then you make it your own.

 
Sketch Saturday - Perfectly Plaid Card3.jpg
 

Tips & Instructions

  • Cherry Cobbler Card Base - 5 1/2 x 8 1/2, scored at 4 1/4

  • Gold Foil Layer - 4 5/8 x 3 5/8

  • Whisper White Layer - 4 1/2 x 3 1/2

  • Cut Tree from Wrapped In Plaid Scrap

  • Stamp sentiment using Cherry Cobbler Ink on bottom right corner of Whisper White Layer

  • Adhere Tree using Dimensionals

  • Adhere Whisper White Layer to Gold Foil Layer and then adhere to card base with Dimensionals

 
Sketch Saturday - Perfectly Plaid Card4.jpg
 

On the inside stamp sentiment with Cherry Cobbler Ink and tree image with Shaded Spruce Ink.

 
Sketch Saturday - Perfectly Plaid Inside.jpg
 

If you want any of the products I used on this project, just click on the item below or the Shop Now button and it will bring you to my Online Store. Please use the current Host Code when you go to checkout your order. You can also click directly on an item to order. 

Fun Snowman Card

Isn’t this the cutest snowman? The felt hat, mittens and scarf along with the coal buttons from the Let It Snow Embellishment Kit are just adorable.

 
Snowman Season Both.jpg
 

Watch the video below to see all the products that I used from the Let It Snow Suite.


Snowman Season green hat2.jpg
 

Tips & Instructions

  • Coastal Cabana Card Base - 4 1/4 x 11 1/2, score at 5 1/2

  • Coastal Cabana Card Base - 5 1/2 x 4, emboss with Winter Knit 3D Embossing Folder (use 3D Embossing Folder Plate)

  • Flirty Flamingo Layer - cut with 2nd largest scalloped Layering Squares Dies

  • Whisper White Layers - cut one with 3rd largest and one with 4th smallest scalloped Layering Squares Dies

  • Whisper White Scrap - stamp and punch out snowman

  • Stamp snowman with black ink on large scalloped square as shown

  • Stamp arms with Early Espresso Ink

  • Adhere punched snowman over snowman on layer using Dimensionals

  • Color carrot nose with Dark Pumpkin Pie Blends Marker, adhere coal buttons and adhere hat, mittens and scarf using Dimensionals

  • Add Washi Tape around center of embossed layer

  • Adhere squares to card base

  • Stamp sentiment with black ink on smaller scalloped square and adhere using Dimensionals

 
Snowman Season Pink Hat.jpg
 

If you want any of the products I used on this project, just click on the item below or the Shop Now button and it will bring you to my Online Store. Please use the current Host Code when you go to checkout your order. You can also click directly on an item to order. 

Tiny Keepsakes - Cute Curvy Boxes

These fun little curvy boxes would be great for favors at a Halloween or Thanksgiving dinner.

 
Tiny Keepsakes - Cute Curvy Boxes.jpg
 

The Die does all the work; you just have to fold at the score lines and fit the handle through the slots. Watch the video below to see how to make them.


You can use whatever Designer Series Paper or Cardstock you want. It works with 6x6 sheets of paper if you lay it on a diagonal. I chose some fall colors for these.

 
Tiny Keepsakes - Cute Curvy Boxes2.jpg
 

I used the 2019-2021 In Color Designer Series Paper for this one, choosing the Terracotta Tile gingham paper. The sentiment was stamped with Terracotta Tile Ink on the stitched oval that comes in the Mini Curvy Keepsakes Box Dies. Tie it on with a piece of Terracotta Tile Bakers Twine and you’re all set.

 
Tiny Keepsakes - Cute Curvy Boxes4.jpg
 

For this one, I used the Come To Gather Designer Series Paper, cutting a 6x6 sheet. The sentiment was stamped also with Terracotta Tile Ink on the stitched square. Cut 2 sprigs with Die using Pretty Peacock Cardstock and adhere to back of label. Attach with Linen Thread or White Bakers Twine.

 
Tiny Keepsakes - Cute Curvy Boxes 3.jpg
 

If you want any of the products I used on this project, just click on the item below or the Shop Now button and it will bring you to my Online Store. Please use the current Host Code when you go to checkout your order. You can also click directly on an item to order. 

2019 Holiday Catalog & Designer Series Paper Sale

 
Screen Shot 2019-07-23 at 3.09.35 PM.png
 

The 2019 Holiday Catalog is now available to order from. Just click on the picture of the catalog over on the right to see an online version. Below are a few videos to show off some of the new products.


Stampin’ Up! is doing their Designer Series Paper Sale once again. If you buy 3 of Select Designer Series Paper, you get 1 FREE through September 30.

 
09.19_SHAREABLE_DSP_NAUKSP.jpg
 

These are the papers that are included.

 
Screen Shot 2019-09-04 at 8.35.12 AM.png
 

Click the SHOP NOW button on the right to start shopping!

Daisy Lane Fall Card

Sometimes you don’t need a sentiment! I thought this card was just a perfect card for the Fall and didn’t need a sentiment.

 
Daisy Lane Fall Card.jpg
 

The Daisy Lane Stamp Set has great images and has a coordinating punch so you can quickly stamp a couple of daisies and punch them out. The colors for this card a Terracotta Tile and Old Olive.

 
Daisy Lane Fall Card3.jpg
 

Tips & Instructions

  • Terracotta Tile Card Base - 5 1/2 x 8 1/2, score at 4 1/4

  • Very Vanilla Layer - 5 1/4 x 4

  • Pressed Petal Specialty Designer Series Paper Layer - 1 1/2 x 4

  • Lay the Designer Series Paper (DSP) across middle of Very Vanilla Layer and lightly place a mark at the top and bottom to help with placement of the ferns. Remove the DSP layer and stamp the ferns with Old Olive Ink over the top and bottom pencil mark. Stamp multiple times without re-inking to get variations on the shading.

  • Adhere DSP layer to Very Vanilla layer

  • Wrap piece of Scalloped Linen Ribbon around center and adhere to back. (I used Tear and Tape as my adhesive for this to keep the ribbon secure and straight.) Adhere layer to card base.

  • Stamp 2 daisy images on Very Vanilla scrap with Terracotta Tile Ink and punch with Medium Daisy Punch

  • Adhere daises together by putting adhesive in the center of the bottom daisy and offsetting the petals.

  • Color center of daisy with Daffodil Delight and paint with Wink of Stella

  • Adhere Daisy to card over ribbon

  • Using 2 strands of Linen Thread make bow and adhere with Mini Glue Dot

 
Daisy Lane Fall Card2.jpg
 

On the inside layer, stamp fern with Old Olive Ink multiple times without re-inking.

 
Daisy Lane Fall Card Inside.jpg
 

If you want any of the products I used on this project, just click on the item below or the Shop Now button and it will bring you to my Online Store. Please use the current Host Code when you go to checkout your order. You can also click directly on an item to order. 

Sketch Saturday - Gather Together

Today’s sketch is a challenge from the team I’m on. We do sketch and color challenges to win Prize Patrol. I won the last one…Yay!

I’m really happy with how this came out. The embossed layer and the beautiful Designer Series Paper with a pop of Copper Foil create a beautiful fall card.

 
Sketch Saturday - Gather Together.jpg
 

Here’s the sketch from the challenge.

 
Screen Shot 2019-08-29 at 10.38.14 PM.png
 

Tips & Instructions

  • Cajun Craze Card Base - 5 1/2 x 8 1/2, score at 4 1/4

  • Very Vanilla Layer - 5 1/4 x 4 - Emboss with Scripty 3D Embossing Folder (be sure you use the new Embossing Plate with 3D Embossing Folders)

  • Come To Gather Designer Series Paper Layer - 1 3/4 x 4

  • Copper Foil Strip - 3/8 x 4

  • Copper Foil scrap - cut large leaf using Gathered Leaves Dies

  • Very Vanilla scrap - stamp large leaf from the Gather Together Stamp Set with Merry Merlot Ink and adhere to copper leaf, offsetting a little bit

  • Very Vanilla Strip - 3/4 x 3, stamp sentiment with Merry Merlot Ink and punch banner at each end with the Banner Triple Punch

  • Adhere embossed layer to card base and the Designer Series paper and copper strip as shown in picture

  • Adhere leaves and sentiment using Dimensionals

 
Sketch Saturday - Gather Together2.jpg
 

On the inside, stamp the wheat image with Cajun Craze Ink and stamp again without re-inking to get lighter shades.

 
Sketch Saturday - Gather Together inside.jpg
 

If you want any of the products I used on this project, just click on the item below or the Shop Now button and it will bring you to my Online Store. Please use the current Host Code when you go to checkout your order. You can also click directly on an item to order. 

Nature's Beauty - Stamp on your Embossing Folder!!!

This was a fun card to make using the Nature’s Beauty Stamp Set. Stampin’ Up! will donate $3.00 to Mental Health Organizations for ever set they sell. Isn’t that wonderful?

 
Nature's Beauty - Stamping On Embossing Folder card.jpg
 

There were a few techniques involved in creating these cards; dry embossing, heat embossing, sponging and stamping on the embossing folder. Follow along to see how to do these techniques.


Tips & Instructions

  • Early Espresso Card Base - 5 1/2 x 8 1/2, score at 4 1/4

  • Sahara Sand Layer - 5 1/4 x 4

  • Whisper White snowy hill 4 x 2 (at the highest part) cut hill with die from In The Woods

  • Early Espresso Scalloped Oval - cut with 2nd from smallest Layering Oval

  • Whisper White Oval - cut with 2nd from smallest Layering Oval and stamp sentiment (from Gather Together) using Early Espresso Ink. Adhere Ovals together.

  • Stamp deer and wolf images on Woodland Textured Embossing Folder as shown in video. Be sure to stamp on the side that has the word Sizzix and also make sure the trees are not upside down. Carefully place Sahara Sand layer in folder and run through embossing machine.

  • Lightly wipe VersaMark on trees, pour White Embossing Powder and heat to melt powder. Be sure to use your Embossing Buddy, especially between the trees and use a paintbrush to remove embossing powder you don’t want.

  • Stamp Bunny on snowy hill

  • Attach layers to card base and attach sentiment using Dimensionals

  • For the sun/moon, sponge Calypso Coral over small piece of Daffodil Delight Cardstock and then punch with 1” punch. Adhere to card using Dimensionals

 
Nature's Beauty - Stamping On Embossing Folder card2.jpg
 

If you want any of the products I used on this project, just click on the item below or the Shop Now button and it will bring you to my Online Store. Note, the Nature’s Beauty Stamp Set is available for purchase starting September 4, 2019. Please use the current Host Code when you go to checkout your order. You can also click directly on an item to order. 

Beautiful Frosted Foliage

You’re going to love this Feels Like Frost Specialty Designer Series Paper. It is absolutely gorgeous!

 
Wishing You A Lovely Day - Frosted Foliage.jpg
 

The beautiful foliage frame was cut from Highland Heather Cardstock with the Frosted Frames Dies and then a few sprigs were added in Night Of Navy. These colors coordinate so well with the Designer Series Paper.

 
Wishing You A Lovely Day - Frosted Foliage3.jpg
 

Tips & Instructions

  • Night Of Navy Card Base - 5 1/2 x 8 1/2, score at 4 1/4

  • Feels Like Frost Specialty Designer Series Paper - 5 1/4 x 4 (make sure you cut so the design is horizontal) and adhere to card base

  • Highland Heather Frame - cut with the Frosted Frames Dies

  • Whisper White sentiment layer - cut with Frosted Frames Dies, stamp sentiment (from Forever Lovely) with Night Of Navy Ink

  • Night Of Navy - cut sprigs with Frosted Frames Dies

  • Adhere sentiment layer to frame layer and lay over card front to determine placement for the sprigs. Adhere sprigs.

  • Adhere Frame using Dimensionals

  • Add Noble Peacock Rhinestones and Clear Rhinestones

 
Wishing You A Lovely Day - Frosted Foliage2.jpg
 

Stamp floral image with Highland Heather on the inside and stamp sentiment if wanted. I left mine without so I can write what I want when I decide who I will send the card to.

 
Wishing You A Lovely Day - Frosted Foliage inside.jpg
 

If you want any of the products I used on this project, just click on the item below or the Shop Now button and it will bring you to my Online Store. (Note, some of these products will be available beginning Sept. 4, 2019 when the 2019 Holiday Catalog launches.) Please use the current Host Code when you go to checkout your order. You can also click directly on an item to order.