Simple Stamping - You Are Amazing
Stampin’ Up! is asking demonstrators to make simple cards to show how easy it is to create a beautiful card. This month it’s stamps, ink, cardstock and Designer Series Paper. I made the one on the left for this challenge and then the one on the right is stepped up a little but still very easy.
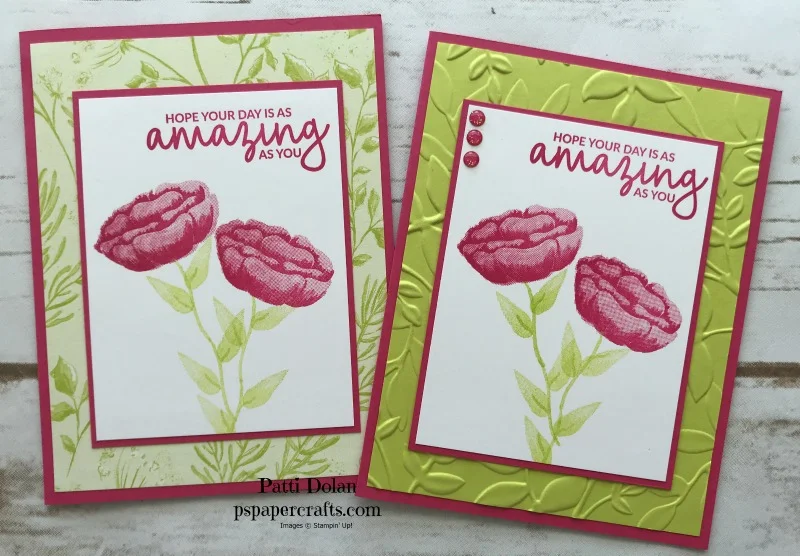
This stamp set is so pretty. Its called Incredible Like You and the flower images are two-step stamping which give such a gorgeous image with varied shading. I just love it!
The cardstock is Melon Mambo and the ink is Lemon Lime Twist. The Botanical Butterfly Designer Series Paper (DSP) is free during Sale-A-Bration

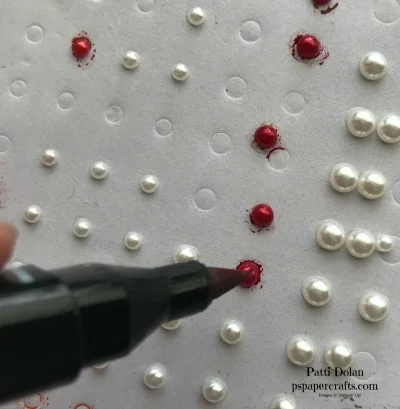
To step it up a little I used the Layered Leaves Embossing Folder and added some Glitter Dots. Which do you like better?

The Dimensions are:
Melon Mambo Card Base - 5 1/2 x 11 1/2, scored at 4 1/4
Botanical Butterfly DSP or Embossed Lemon Lime Twist Layer - 5 1/4 x 4
Melon Mambo Layer - 4 1/8 x 3 1/8
Whisper White Layer 4 x 3
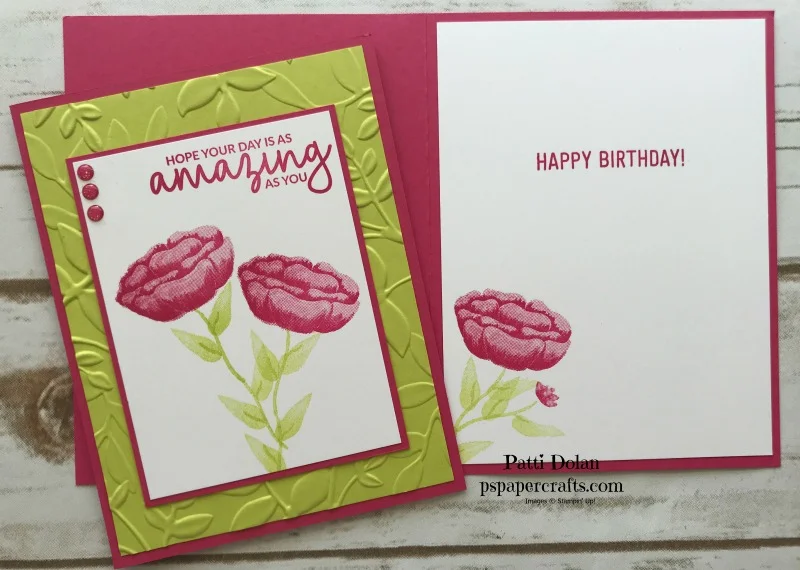
Here’s a look at the inside. I took the Happy Birthday sentiment from the Amazing Life Stamp Set.
If you want any of the products I used on this project, just click on the item below or the Shop Now button and it will bring you to my Online Store. Please use the current Host Code when you go to checkout your order. You can also click directly on an item to order.
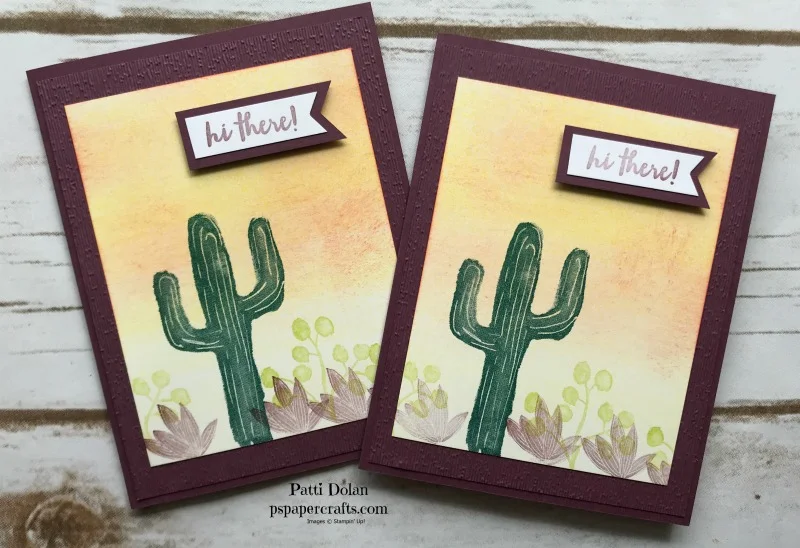
Pretty Flowering Desert
I really love this Flowering Desert Stamp Set. You can use the cactus image or make your own cactus with the pieces. Add some flowers and you have a beautiful scene. Have you ever been in a desert to see flowering cactuses? It is just amazing!

The card base is Poppy Parade (5 1/2 x 8 1/2, scored at 4 1/4) and then just a layer of Whisper White (5 1/4 x 4) The rest is stamps and inks; oh and some Wink of Stella.

The cactus pieces were stamped in Pear Pizzaz and Old Olive. Just stamp the big one and add some of the smaller right on top. The flowers were stamped in Poppy Parade and then I added some Wink Of Stella to give them some shine. I love that color, so bright and fun. The other plants were stamped in Granny Apple Green, So Saffron and Old Olive.

I wanted to make this a birthday card so I used the inside sentiment from the Hello Cupcake Stamp Set (Free during Sale-A-Bration). I added some of the plants and flowers to the bottom. The plants were stamped in Granny Apple Green and the flowers and sentiment in Poppy Parade.

If you want any of the products I used on this project, just click on the item below or the Shop Now button and it will bring you to my Online Store. Please use the current Host Code when you go to checkout your order. You can also click directly on an item to order.
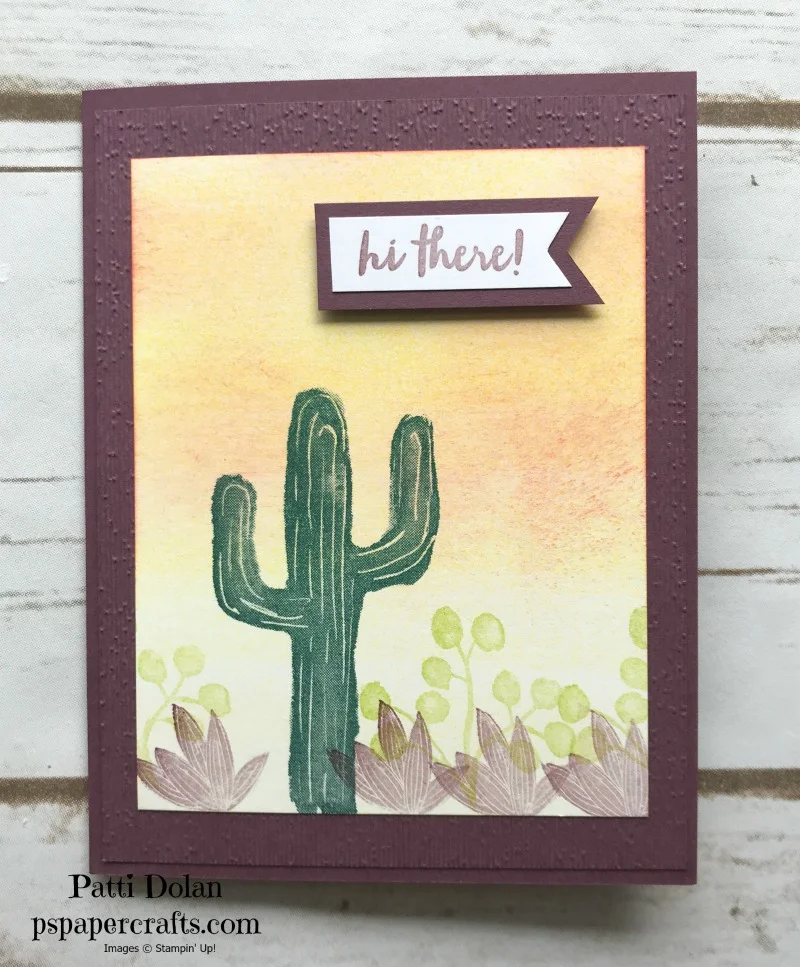
Sunset In The Desert
Today’s card has a beautiful desert scene using the Flowering Desert Stamp Set from the 2019 Occasions Catalog.
I created the sunset by sponging the Whisper White layer with Pineapple Punch Ink using a Sponge Brayer. I then took a sponge and added some Calypso Coral. I am happy with how it came out. The Fresh Fig layer behind the scene was embossed using the Subtle Embossing Folder. Check out the video to see how I did this.
The sentiment was stamped on a piece of Whisper white and then cut using the Banner Triple Punch. It was adhered using Dimensionals to give it a little dimension.
Here are the dimensions:
Fresh Fig card base - 5 1/2 x 8 1/2, scored at 4 1/4
Fresh Fig Layer - 5 1/4 x 4, embossed with Subtle Embossing Folder
Whisper White Layer - 4 1/2 x 3 1/2
Strip of Whisper White - 1/2 wide
Strip of Fresh Fig - 3/4 wide
If you want any of the products I used on this project, just click on the item below or the Shop Now button and it will bring you to my Online Store. Please use the current Host Code when you go to checkout your order. You can also click directly on an item to order.
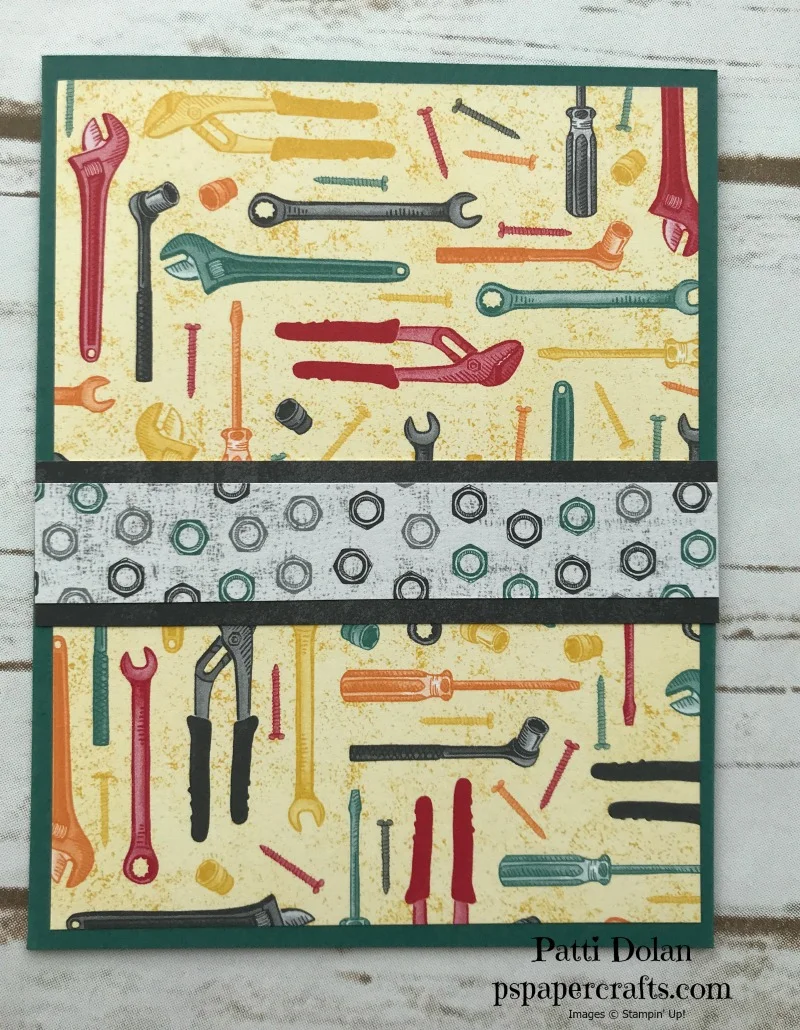
Great Masculine Thank You Card
Today I made a masculine Thank You card for some men at my church who help out with small projects for my widow’s group. They are an awesome group of men and have really come through for some of the women. I used products from the Classic Garage Suite in the Occasions Catalog.

This is a great stamp set for masculine cards. It’s perfect for Father’s Day, Birthdays and of course Thank You cards. There is a coordinating 6x6 Designer Series Paper pack with images relating to cars, tool, tire tracks and most have a grungey look….is that a word?

Here’s the dimensions:
Tranquil Tide Card Base - 5 1/2 x 8 1/2, scored at 4 1/4
Classic Garage DSP Layer - 5 1/4 x 4
Strips of Classic Garage DSP - one at 4 1/4 x 1 and one at 4 1/4 x 3/4
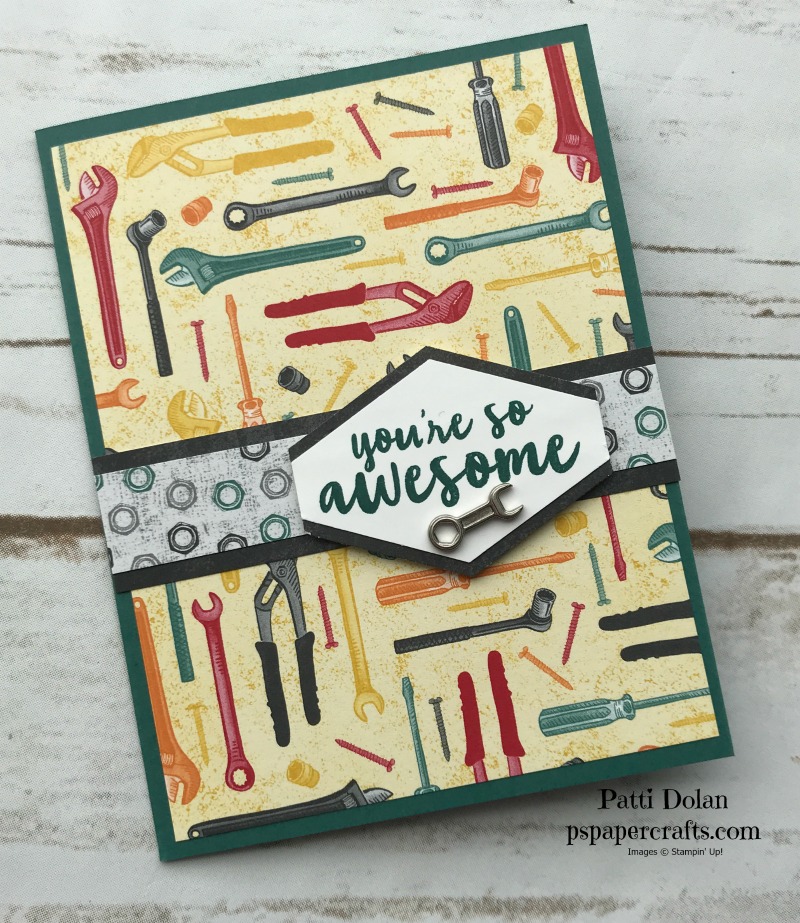
Whisper White for sentiment punched with Tailored Tag Punch
Classic Garage DSP punched with Tailored Tag Punch and then cut in half.

Layer the DSP on the card base the the two strips of DSP together and adhere to card base.
Stamp your sentiment on the Whisper White tag with Tranquil Tide Ink. I used the sentiment from the Flowering Desert Stamp Set. You can use whatever fits the tag. Cut the Classic Garage DSP label in half and then adhere to the back side of the label leaving a space so that it gives you a nice boarder. I used Multi-Purpose Liquid Glue so I can adjust it a little before the glue dries.

Look at these Classic Garage Metal Elements! They are just perfect for a guy card. Some are keys and some are wrenches. I used a very small piece of Tear & Tape Adhesive to make sure it sticks good; it has some weight to it.

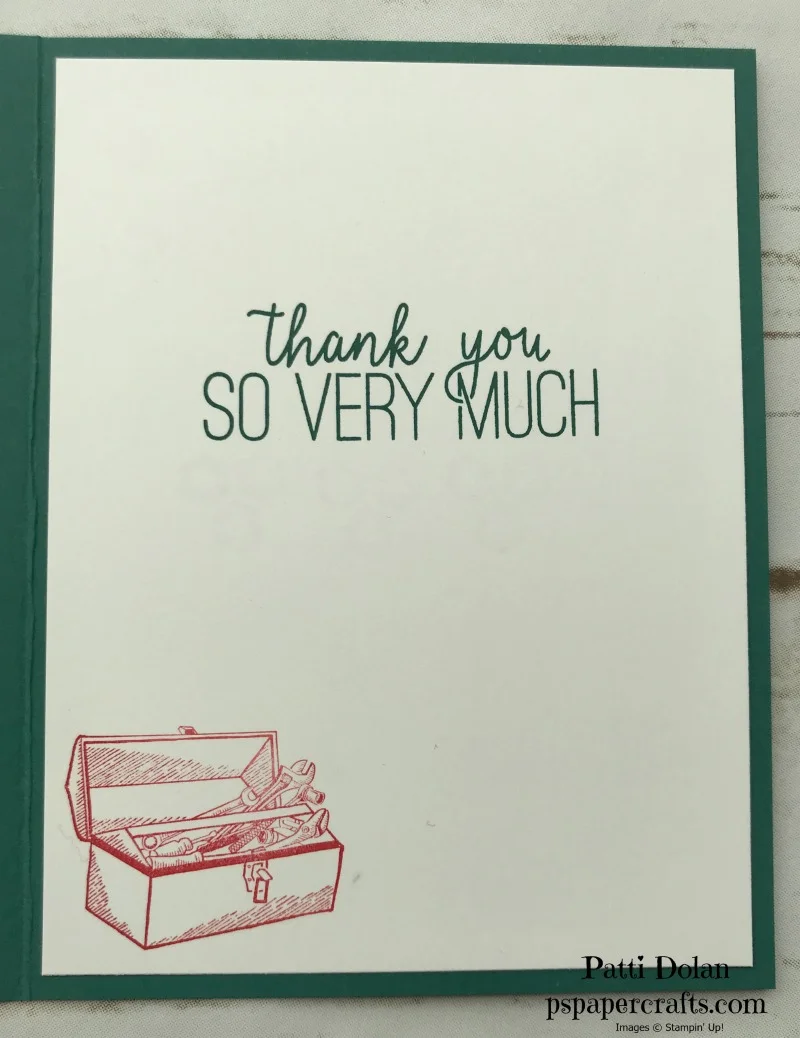
For the inside I used the sentiment from the Butterfly Gala Stamp Set. The tool box was stamped in Real Red with a stamp from the Geared Up Garage Stamp Set.
I’m happy with the way the card turned out and think the men will like it too!
If you want any of the products I used on this project, just click on the item below or the Shop Now button and it will bring you to my Online Store. Please use the current Host Code when you go to checkout your order. You can also click directly on an item to order.
Gorgeous Lily Sympathy Card
Today I made some beautiful sympathy cards using the FREE Lasting Lily Stamp Set. Yes, it’s FREE during Sale-A-Bration with a $100 order. Aren’t they just gorgeous?

Watch the video below to see how I made these cards.
For this card, I used Gorgeous Grape Cardstock and Ink for the Lilies. The stems and leaves were stamped in Granny Apple Green. I just love this color combination. The Whisper White Layer was cut using the second largest rectangle from the new Stitched Rectangle Framelits. The sentiment was stamped and then cut using the Tailored Tag Punch. A few Glitter Enamel Dots and some Mini Striped Ribbon put the finishing touches on this card.

This card was stamped in Calypso Coral and Pear Pizzaz and has a Calypso Coral card base. The sentiment was stamped on a smaller stitched rectangle and a pretty butterfly from the Beauty Abounds Stamp Set was added.

Below is the supply list used for these card. You can order these products by clicking the Order Now button and using the current Host Code
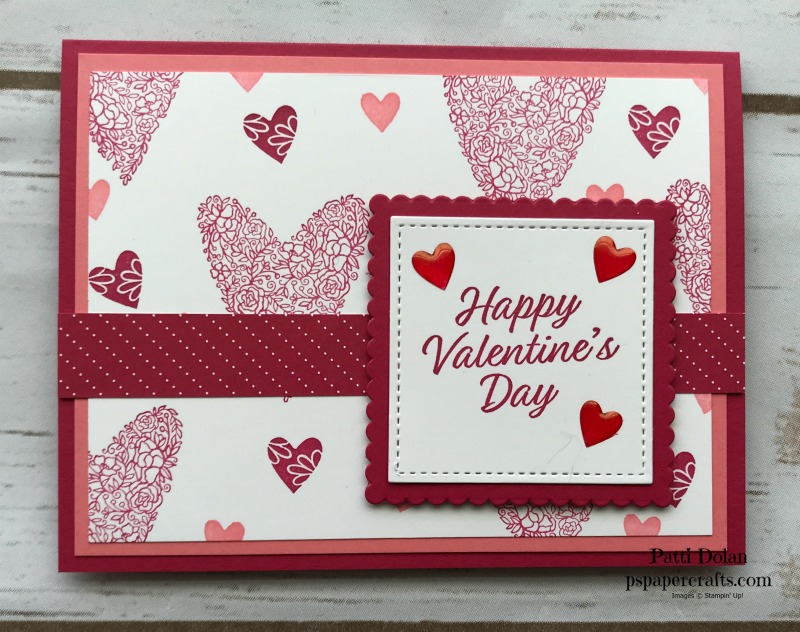
Sweet and Simple Valentine's Day Card
Ready to make a quick Valentine’s Card? I used the Meant To Be Stamp set to make my own background paper. Aren’t they pretty?

Starting with the largest heart image, I inked it with Lovely Lipstick Ink and then stamped off (stamp on scrap first) and then stamped on the cardstock layer. I stamped randomly and made sure I went off the paper. Next, I inked the smaller heart with Lovely Lipstick and stamped directly onto the cardstock layer. Last was the smallest heart which I stamped in Flirty Flamingo ink.

The first one has a piece of Lovely Lipstick ribbon wrapped around it and this one below has a strip of All My Love Designer Series Paper adhered to the base. Which do you like better? The Hearty Epoxy Droplets were colored with my Dark Real Red Stampin’ Blends and then adhered around the sentiment.
Dimensions:
Lovely Lipstick Card Base - 5 1/2 x 8 1/2, scored at 4 1/4
Flirty Flamingo Layer - 5 1/4 x 4
Whisper White Layer - 5 x 3 3/4
Card #2 - 5 1/2 x 3/4 strip of All My Love DSP
Whisper White - Second Largest Stitched Shape Square
Lovely Lipstick - Third Largest Scalloped Square
If you want any of the products I used on this project, just click on the item below or the Shop Now button and it will bring you to my Online Store. Please use the current Host Code when you go to checkout your order. You can also click directly on an item to order.
Butterfly Gala - Thank You & Get Well Cards
The butterfly images in the Butterfly Gala Stamp set are so pretty. There’s a coordinating punch so you can stamp and punch two butterflies at one time. The coordinating Botanical Butterfly Designer Series Paper is FREE with a purchase of $50 during Sale-A-Bration!

I stamped the butterfly images and then used a sponge dauber to ink the middle with Lemon Lime Twist ink and the edges with Melon Mambo or Blueberry Bushel. I got this idea from Patty Bennett and I love it. Which color combo do you like better?


The dimensions are:
Basic Black Card Base - 5 1/2 x 8 1/2, scored at 4 1/4
Whisper White Layer - 5 3/8 x 4 1/8
Lemon Lime Twist Layer - 5 1/4 x 4
Botanical Butterfly DSP Layer - 4 x 2 1/2
Botanical Butterfly DSP Strip - 4 1/4 x 3/4
Stitched Rectangle - 4th Largest
These are the insides of each card. I didn’t put a sentiment in but added butterflies at the top and bottom corners. They were colored in using the coordinating stamps.

If you want any of the products I used on this project, just click on the item below or the Shop Now button and it will bring you to my Online Store. Please use the current Host Code when you go to checkout your order. You can also click directly on an item to order.
New Cling Stamps from Stampin' Up!
Stampin’ Up! has come out with Cling Stamps. They are red rubber stamps that get mounted on a clear block but boy do they stick. If you’ve followed me for a while, you know that I don’t usually put the labels on the stamps because they never seemed to stick to the block. BUT, now they stick so great, you need to put the labels on!
Watch this informative video to learn more about using the Cling Stamps!
Occasions & Sale-A-Bration Starts Jan. 3
What a great way to start off the new year. Stampin’ Up! is kicking off its Occasions Catalog and Sale-A-Bration tomorrow!

If you’re new to Sale-A-Bration, its a way to earn free products. For every $50 or $100 you spend, you can get a FREE product from the Sale-A-Bration brochure.

SHOP
Customers and/or demonstrators earn a FREE product every time they reach a threshold. For example, if a customer spends $150 USD, they can then choose 3 level 1’s or 1 level 1 and 1 level 2. This gives customers more flexibility to choose what they want. Below are the markets and their qualifying levels.

HOST
Starting January 3, hosts with qualifying orders can receive additional Stampin’ Rewards. Below are the markets, qualifying amounts, and additional Stampin’ Rewards they can receive.

JOIN
Starting January 3, recruits who join Stampin’ Up! as an independent Stampin’ Up! demonstrator during Sale-A-Bration can choose from two offers. These offers are IN ADDITION to the regular Starter Kit offering.

You can start shopping Jan. 3 from the new Occasions Catalog from my online store by clicking the Shop Now button. Let me know if you need a catalog and I’d be happy to send you one.
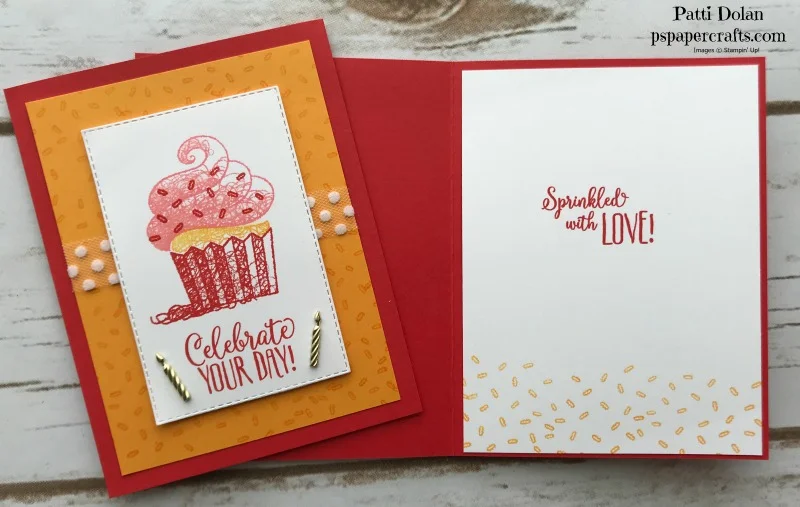
Hello Cupcake - Fun Birthday Card
The Hello Cupcake Stamp Set is FREE during Sale-A-Bration when you spend $50 on Stampin’ Up! products. This is a great set; I love the sentiments!

The cupcake holder was stamped in Poppy Parade and then a layer of Mango Melody filling and the frosting is Flirty Flamingo. I added some Clear Wink Of Stella to the filling and frosting to give it some glimmer.
The Polka Dot Tulle Ribbon and the Candle Embellishments finish off this card perfectly! The background layer was just simply stamped randomly with sprinkles with Mango Melody Ink on Mango Melody Cardstock. This is a great way to just add a little interest to your card

You can see all the steps by watching the video below. Check out the Rectangle Stitched Framelits Dies, these may be my favorite new product in the Occasions Catalog. This is a MUST HAVE set of dies!
Here’s a peek at the inside of the card. Isn’t it sweet?
These new products are available beginning January 3, 2019 from the Occasions Catalog and Sale-A-Bration Brochure. Let me know if you need a catalog and I’d be happy to send one to you.
Happy Tails - Loss of Pet Card
I’m so happy that Stampin’ Up! came out with stamp sets for dog and cat lovers. We love our furry friends and sometimes we need to send cards to friends who’ve lost their pet or just a card to let them know you’re thinking of them. There are some options where you can change the spots on your dog and stripes on your cat.

The card base is Early Espresso with a 5 1/4 x 4 layer of Real Red and then a 5 x 3 3/4 layer of Very Vanilla that I stamped a background of paws and bones with Crumb Cake Ink. The dog and heart were punched with the coordinating punch.

You can watch the video to get all the details and steps and to also see the Cat Stamp set called Nine Lives which coordinates with the Cat Punch.
This is the same card only the dog has different spots and I stamped the paw prints in Early Espresso on the So Sorry For Your Loss sentiment.

What a great sentiment for the inside of the card. I know my little Boston Terrier, Bailey has his paw prints all over my heart.

Here’s a picture of Bailey. He’s a year and a half and is so sweet. I just love him!

These products are available beginning January 3, 2019 from the Occasions Catalog. Let me know if you need a catalog.
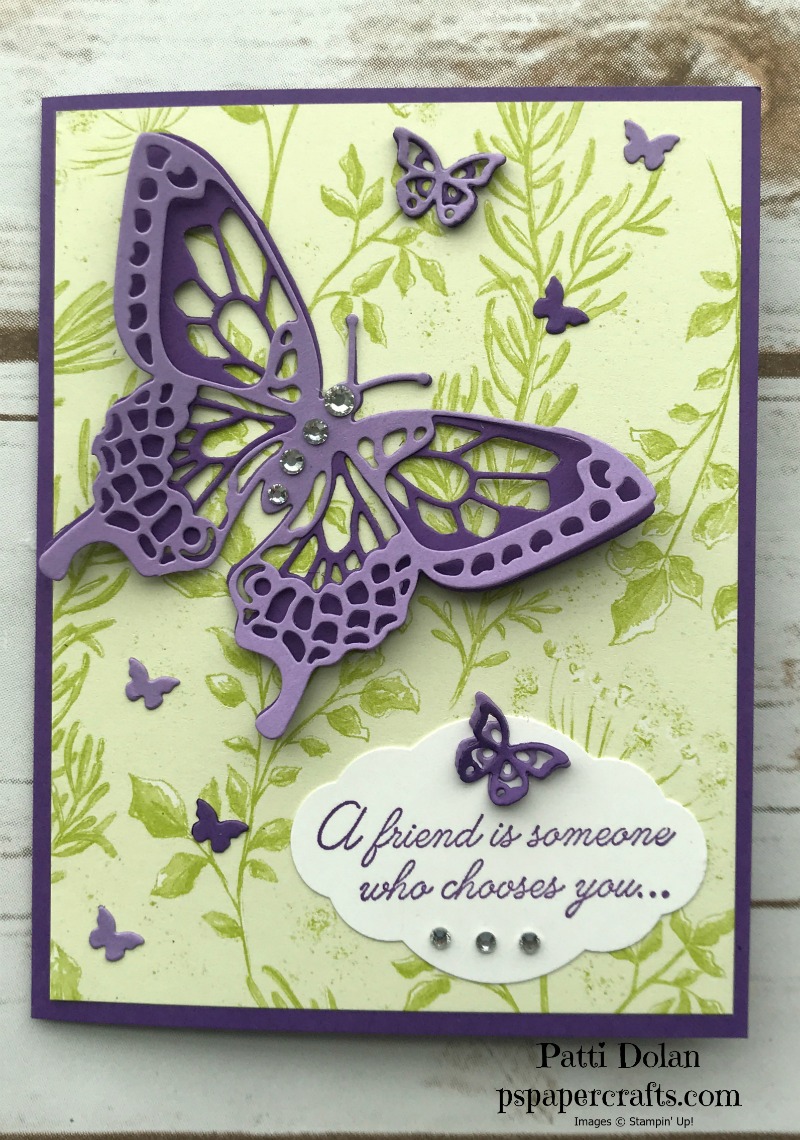
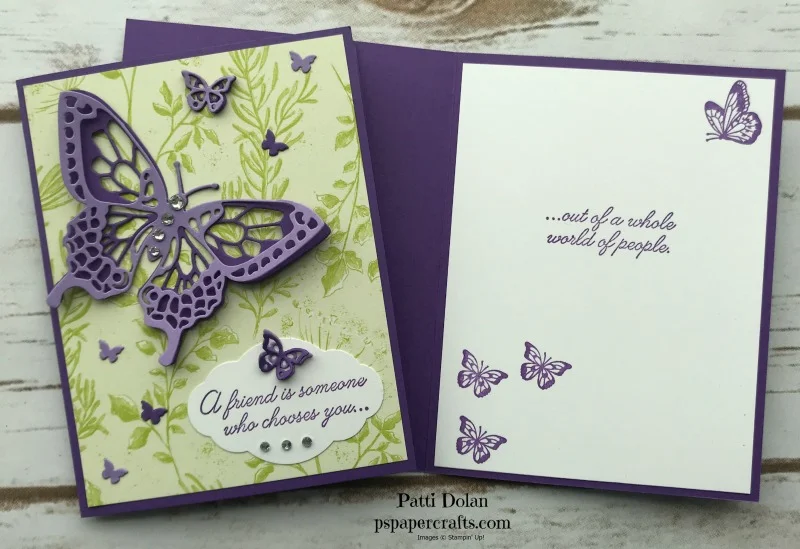
Beauty Abounds Butterfly Card
Wow, the 2019 Occasions Catalog has lots of butterflies, and I love butterflies! This Beauty Abounds Bundle gives you so many options to stamp and cut out all kinds of butterflies.
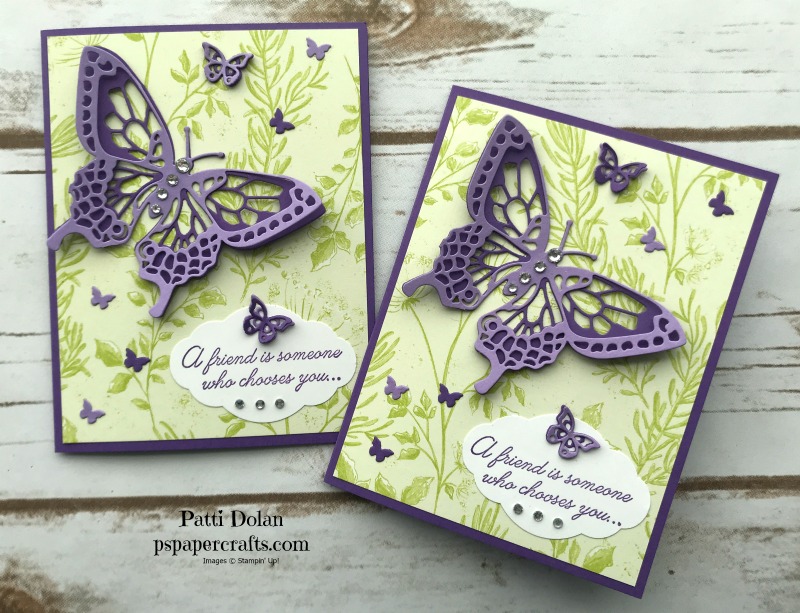
You get a ton of Thinlits in this Bundle that coordinate so you can use different colors for the background and the intricate top of the butterfly. There are all different sizes. I used Gorgeous Grape and Highland Heather for these butterflies. The Botanical Butterfly Designer Series Paper is FREE during Sale-A-Bration beginning January 3rd.
Make sure you watch the video to get all the details on how I made these cards. Oh, and the stamp set is the one of the new Cling Stamps and they are fantastic. I talk about that in the video as well.
This is a great card to give to a close friend. The outside and inside sentiments are really so heartfelt.
These products are available beginning January 3, 2019 from the Occasions Catalog. Let me know if you need a catalog.
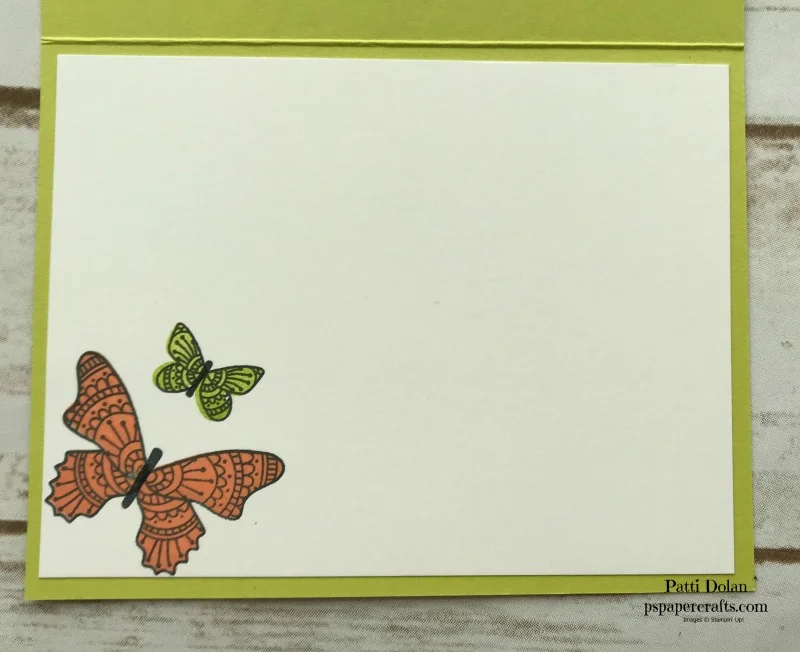
Beautiful Butterfly Gala
The new Occasions Catalog is chock full of some beautiful stamp sets. The Butterfly Gala has gorgeous butterfly images that you can easily stamp two sizes of butterflies and then add color with a coordinating stamp. AND, there’s a coordinating punch which punches both butterflies in on shot. How smart is that!

These are the products I used. Do you see the butterfly images and the punch. Both butterflies stamp together and then punch together. It’s so easy! The Botanical Butterflies Designer Series Paper is FREE during Sale-A-Bration with a $50 purchase.
The dimensions are:
Lemon Lime Twist Card Base - 5 1/2 x 8 1/2, scored at 4 1/4
Basic Black Layer - 5 1/4 x 4
Botanical Butterfly DSP (Butterflies) - 5 x 2 1/2
Botanical Butterfly DSP (Stripes) - 5 x 1 1/4
Whisper White Strip - 3 x 1

See how the punch works? It lines up so well and you get the 2 sizes of butterflies in one punch.

Here’s a peek at the inside. I didn’t put in a sentiment because I like to write my own note in a Thank You card.
These products are available beginning January 3, 2019. If you want to get them now, you can join Stampin’ Up! and order before they are available to our customers and then enjoy a 20% discount on future orders.
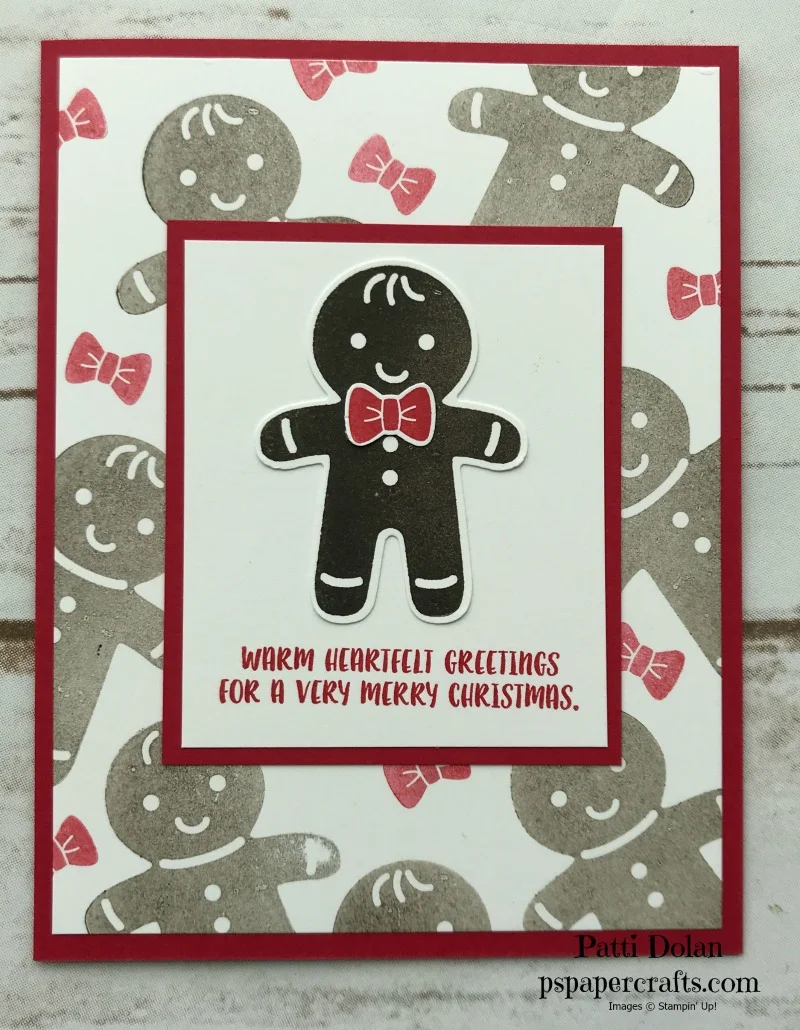
Quick & Easy Gingerbread Kid Christmas Card
This card was so easy to make. I used the Cookie Cutter Christmas Stamp Set to create my own background. This is a sweet little gingerbread girl with the bow on her head!

I only used 2 ink pads, Early Espresso and Real Red. I stamped the gingerbread man on scrap paper twice before stamping on my cardstock. The bow was stamped on scrap only once before stamping on my cardstock.

Using a piece of scrap paper, I stamped full strength this time to get a dark image. Then I punched it using the coordinating Cookie Cutter Builder Punch.

Stamp the bow full strength on a small scrap and just punch that part out.

Moving the bow from the head to make a bow-tie, changes it into a gingerbread boy. How cute is he?
The card base is an A2 size with a background Layer of 5 1/4 x 4 and the smaller layers are Whisper White at 3 x 2 1/2 and Real Red at 3 1/4 x 2 3/4.
If you want any of the products I used on this project, just click on the item below or the Shop Now button and it will bring you to my Online Store. Please use the current Host Code when you go to checkout your order. You can also click directly on an item to order.
Christmas Present Card!
This card looks like a Christmas present, don’t ya think…tag and all! When I looked at the Dashing Along Designer Series Paper, I thought it looked like wrapping paper.

Watch the video below to see the steps to make this card and then scroll down for more details and to shop for the products.
The card base is Garden Green and has a 5 1/4 x 4 piece of Dashing Along DSP. Add some Real Red Mixed Satin Ribbon to make it look like a gift.
The Santa stamp is from the Cookie Cutter Christmas Stamp Set and has a coordinating punch that cuts out the images perfectly. I punched a 2 x 3 piece of Real Red Cardstock with the Scalloped Tag Topper Punch to get the tag and then adhered Santa to it.

The inside has a simple sentiment from the set.

If you want any of the products I used on this project, just click on the item below or the Shop Now button and it will bring you to my Online Store. Please use the current Host Code when you go to checkout your order. You can also click directly on an item to order.
Cute Beary Merry Christmas Card
I just love this sweet bear from the Cookie Cutter Christmas Stamp Set. When you look at the stamp itself, it doesn’t really give you an idea of how cute he is. Add the eyes, nose, mouth and ears and he’s just adorable.
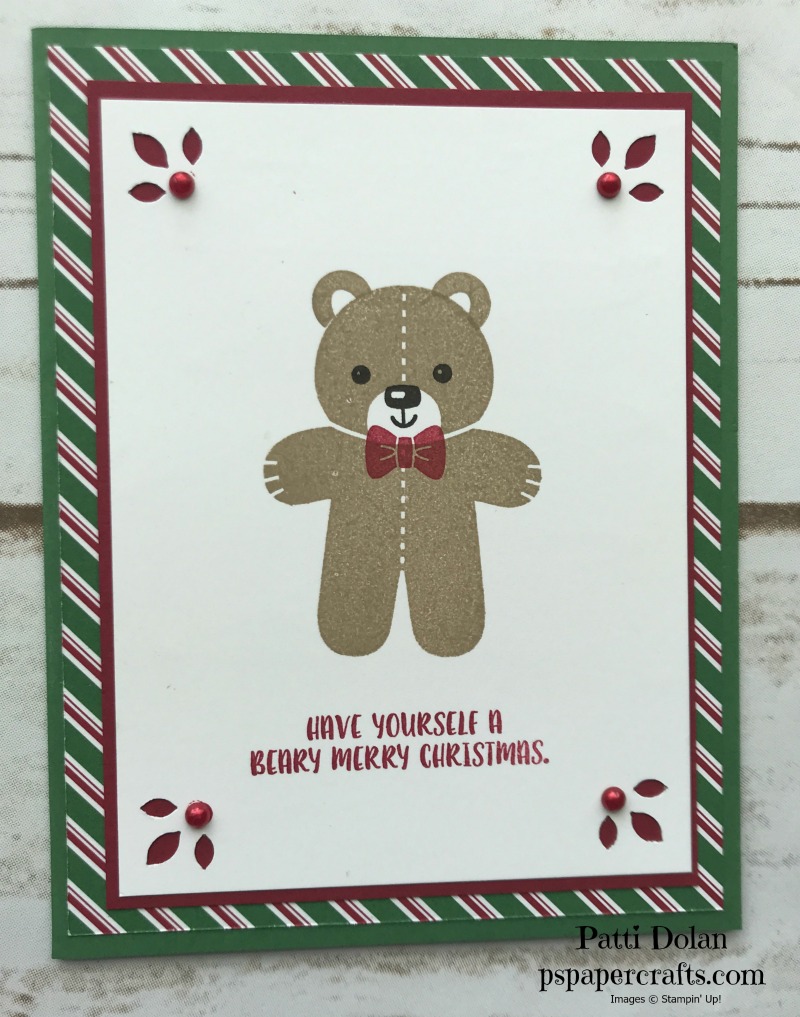
These are the supplies and dimensions:

Garden Green Card Base - 5 1/2 x 8 1/2, scored at 4 1/4
Dashing Along DSP - 5 1/4 x 4
Cherry Cobbler - 4 7/8 x 3 5/8
Whisper White - 4 3/4 x 3 1/2