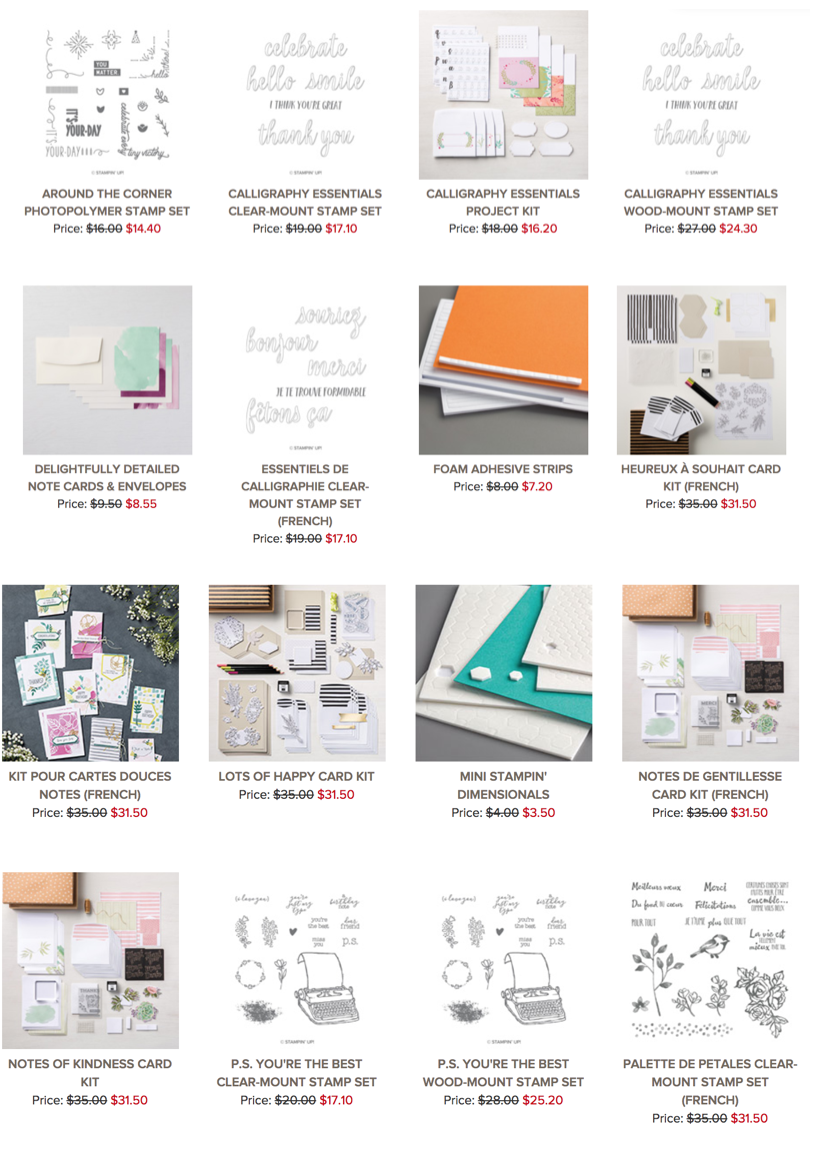
Put on your party hats, and get ready to save. It’s time for It’s Our Birthday Stamp Sale! For 24 HOURS ONLY, you can save 15% on select stamp sets. This sale will be gone in a flash, come along and celebrate with us!
On October 23, 2018, you’ll be able to save 15% on select stamp sets! Choose your favorite stamp sets from the list below—and let’s get this party started!
Holly, Jolly & Bright Christmas!
May your Christmas be Holly, Jolly & Bright! What a fun sentiment for a Christmas card. The Joyous Noel Specialty Designer Series Paper has the copper foil designs which gives it a little sparkle. There’s a piece of Merry Merlot Glimmer Paper peaking out behind it; gotta love the glimmer and shine!

The Sahara Sand card base coordinates perfectly with the DSP. I used the sentiment from the Peaceful Noel Stamp Set and stamped it in Merry Merlot on a Stitched Shapes Circle. That is layered on top of a larger Scalloped Circle that was cut from the Glimmer Paper.
Paper saving tip - Cut the scalloped circle from the Glimmer Paper where the hole can be covered by the DSP Layer.
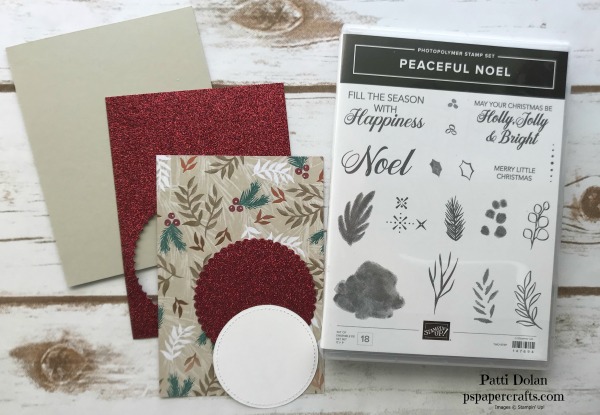
For the berries, I colored some Clear Faceted Gems with a Dark Cherry Cobbler Stampin’ Blend Marker. It matches the Cherry Cobbler nicely.

Here’s another look….

If you want any of the products I used on this project, just click on the item below or the Shop Now button and it will bring you to my Online Store. Please use the current Host Code when you go to checkout your order. You can also click directly on an item to order.
Joyous Noel Meets Dashing Deer
Are you loving this Joyous Noel Designer Series Paper yet? This pattern on the card I made today is my favorite in the package. The copper design is just so rich and gorgeous.
The Deer was cut with the Detailed Deer Thinlits from the Copper Glimmer Paper. This paper is really strong and holds the glitter so it doesn’t come off.
The snowy piece was embossed with the Softly Falling Embossing Folder. I used the Framelits from In The Woods to get the hill shape. You can probably just cut it out freehand if you don’t have those Framelits.
I stamped the sentiment with Versamark and then heat embossed it with Copper Embossing Powder. There’s lots of sparkle on this card.
On the inside, I stamped the sentiment in Merry Merlot and then the floral image in Mossy Meadow. These are both from the Dashing Deer Stamp Set.

If you want any of the products I used on this project, just click on the item below or the Shop Now button and it will bring you to my Online Store. Please use the current Host Code when you go to checkout your order. You can also click directly on an item to order.
Tip of the Week Coordinating Colors with DSP
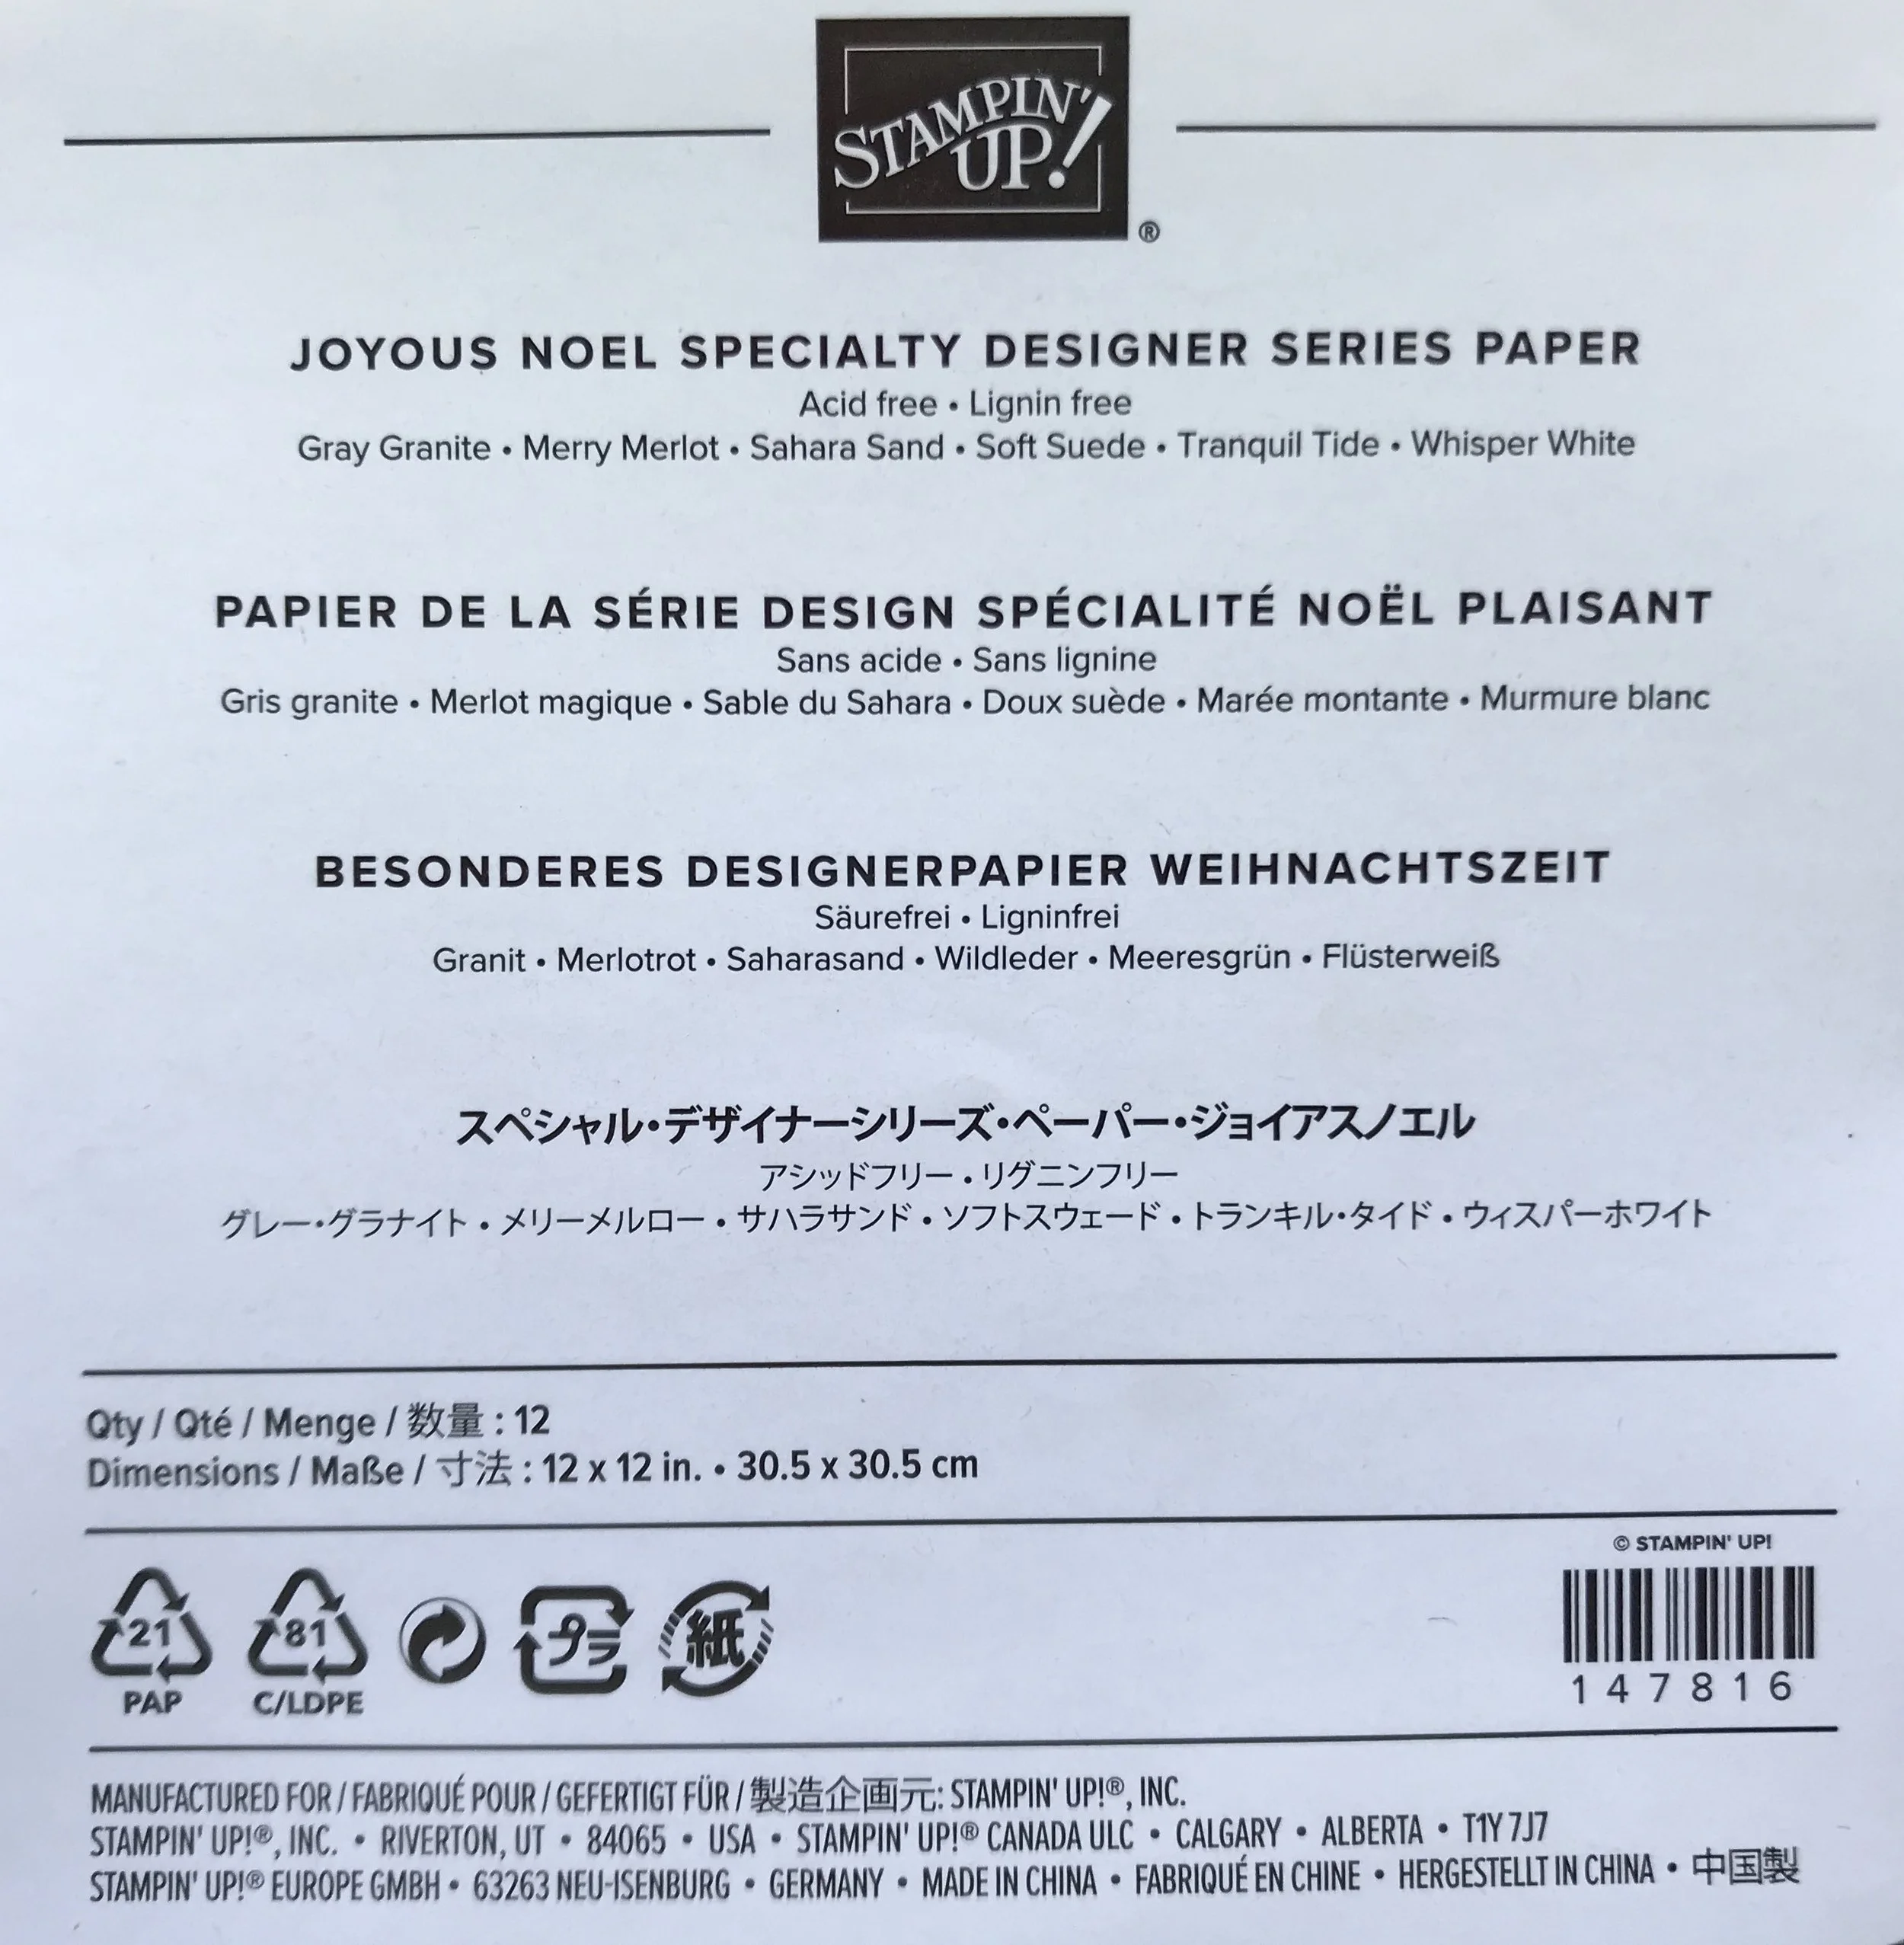
Did you know that the label on the back of the Designer Series Paper package lists the colors that coordinate with the DSP? There’s usually a coordinating Cardstock pack but you can just look at the label to see what colors to use.
For the Joyous Noel Specialty DSP, you’ll see that it coordinates with Gray Granite, Merry Merlot, Sahara Sand, Soft Suede, Tranquil Tide and Whisper White. Stampin’ Up! took the guesswork out of it for us.
One the the best things about Stampin’ Up! is that everything coordinates; cardstock, DSP, ribbon, ink, markers, etc.
Here’s a simple card that I made using the Joyous Noel Specialty DSP. The DSP really makes the card. A piece of the Glimmer Paper, ribbon and sentiment and its a beautiful card.

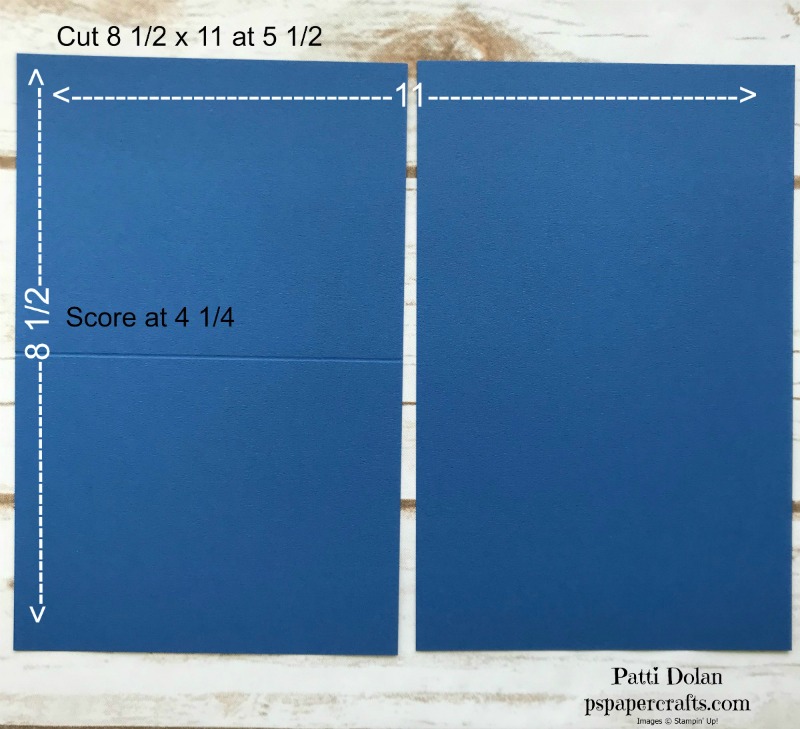
These are the pieces along with the dimensions:
Tranquil Tide Card Base - 5 1/2 x 8 1/2, scored at 4 1/4
Joyous Noel DSP Layer - 5 1/4 x 4
Shaded Spruce Glimmer Layer - largest Scalloped Layering Square
Whisper White Sentiment Layer - 2nd to largest Layering Square
Piece of Tranquil Tide Velvet Ribbon
If you want any of the products I used on this project, just click on the item below or the Shop Now button and it will bring you to my Online Store. Please use the current Host Code when you go to checkout your order. You can also click directly on an item to order.
Product of the Week Joyous Noel Specialty DSP
This week I’m featuring this gorgeous Joyous Noel Specialty Designer Series Paper. It is so rich and elegant and has designs with copper foil accents.
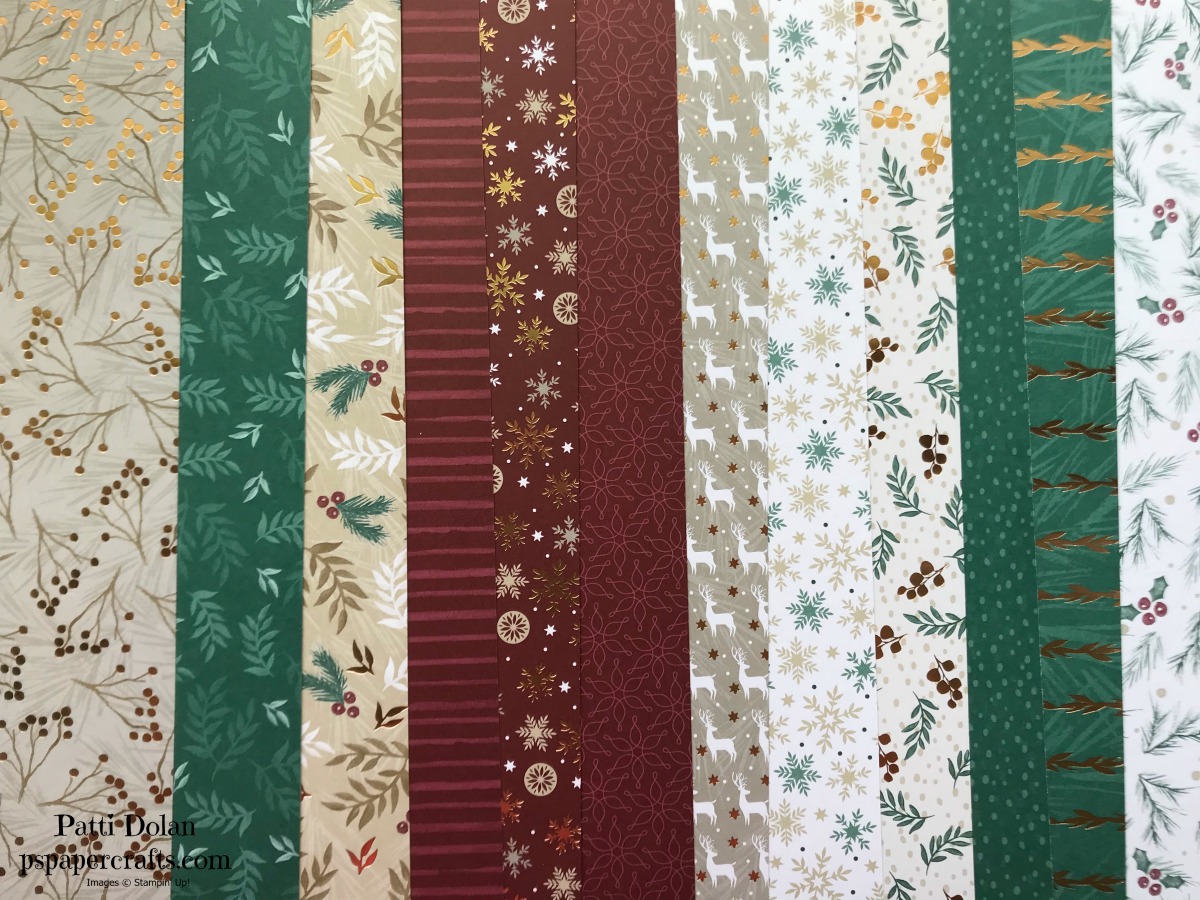
Below are some samples from the 2018 Holiday Catalog on page 28. I’ll be making some cards and sharing this week here on my blog.

You have to see it close up to really appreciate it but I took pictures of each showing the front and back. You get 12 sheets 2 of each design. Take a closer look.

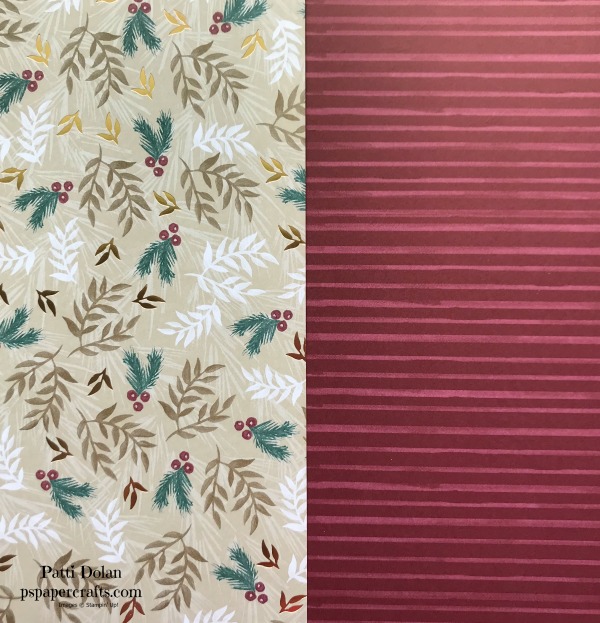


Along with this beautiful paper, you can get coordinating Glimmer Paper which comes in Coppy, Merry Merlot and Tranquil Tide.

If you want any of the products I used on this project, just click on the item below or the Shop Now button and it will bring you to my Online Store. Please use the current Host Code when you go to checkout your order. You can also click directly on an item to order.
Thankful Card
Here’s another easy card I made with the Falling For Leaves Bundle. The colors are Grapefruit Grove, Tranquil Tide and Mint Macaron. I love the Tranquil Tide and Mint Macaron combo.

I used the edge die to cut about a quarter inch off the side of the card. I had to do this twice to get across the length of the card. The second time, I fit the die in the grooves and then put a piece of Post-It Note to hold it in place.

I added a 1/2 x 5 1/2 strip of the striped DSP from Nature’s Poem on the inside edge so it would show up when the card is closed.

Next I stamped the leaf image randomly on the card front in Grapefruit Grove. I cut out the other leaf images in Mint Macaron and Tranquil Tide. The sentiment was stamped on a large Whisper White circle in Tranquil Tide and layered on a Tranquil Tide scalloped circle. I adhered the leaf images behind the circle and then adhered that using Dimensionals to the card front.

Here’s a look at the inside. The Whisper White piece is cut at 3 3/4 x 5 1/2 to fit along the striped piece.

If you want any of the products I used on this project, just click on the item below or the Shop Now button and it will bring you to my Online Store. Please use the current Host Code when you go to checkout your order. You can also click directly on an item to order.
Home Decor Project Falling For Leaves Candle
Today’s project is a little bit different. The only paper I’m using is a piece of tissue paper. I’ll show you how you can stamp on the tissue paper and then melt it onto a plain candle.
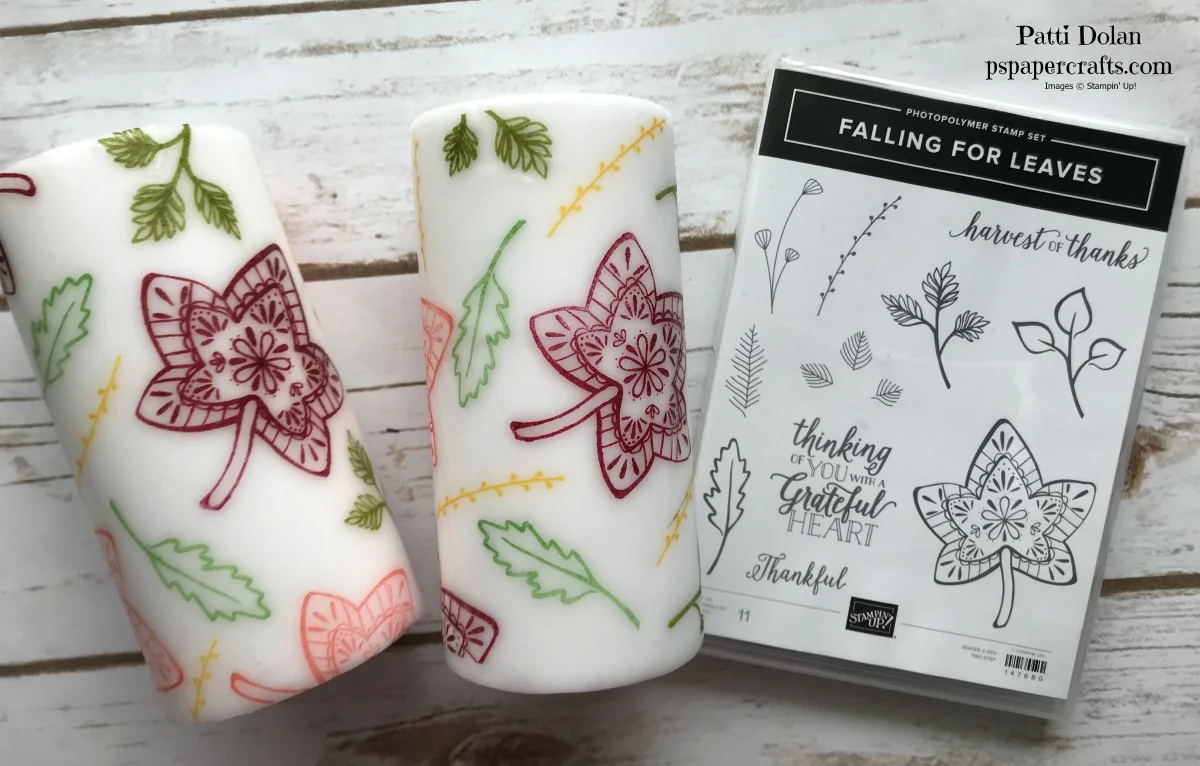
I used the Falling For Leaves Stamp set and the Ink Pads are Merry Merlot, Calypso Coral, Old Olive, Garden Green and Crushed Curry. Perfect for fall!
First cut a piece of white tissue paper just a little shorter than the height of the candle and wrap it around to just barely have the ends meet.
Then Stamp all over the tissue paper with a random pattern starting with your largest images first and filling in with your smaller images.
Next wrap the tissue paper around the candle and heat it on the LOW setting of your heat tool. You’ll see the wax start to melt and the tissue paper adhere to the candle.
Work your way around the candle and then go back and melt any air bubbles.
Easy right! Look how beautiful the candle is. I plan on making some smaller with Christmas stamps next month. Watch the video to see how I did it.
If you want any of the products I used on this project, just click on the item below or the Shop Now button and it will bring you to my Online Store. Please use the current Host Code when you go to checkout your order. You can also click directly on an item to order.
Tip of the Week - Extending a Die Cutout
Did you ever have a die that was too short for your card? I wanted to use the lacy piece on a card and it needed to be 5 1/2 inches but the die was too short. What to do, what to do??? I decided to cut 2 pieces and hide where they met behind an embellishment.
See how short it is?

Cut a second one and place them with the seam where you can place an embellishment over it. Cut the excess pieces off and save them for another project.

Adhere an embellishment over the seam and no one will ever know it’s not one long piece.

If you want any of the products I used on this project, just click on the item below or the Shop Now button and it will bring you to my Online Store. Please use the current Host Code when you go to checkout your order. You can also click directly on an item to order.
Product of the Week - Falling For Leaves Bundle
Autumn is in full swing but here in Florida, it still feels like summer. It seems to me that its been getting hotter as the days go on. I love all things Fall though, especially the colors of the leaves back in New York. This was my favorite time of year.
The Falling For Leaves Bundle has some great images and thinlits. If you bundle it, you can save 10%

Here are some samples from the Holiday Catalog on page 45. Aren’t they beautiful?

I’ll be featuring this set this week so stay tuned! You can click on the product below to purchase it from my Online Store.
To Thank You For All You Do
Here’s another card using the Corrugated Embossing Folder. Adding an embossed layer gives the card some texture. The stamp set is one of my favorites, Rooted In Nature.

Make sure you start with a piece of cardstock a little longer than needed. When you emboss it with this folder, you lose about a quarter inch.

For the tree image I colored the trunk with Early Espresso Stampin’ Write Marker and the leaves with Old Olive. You can use whatever brown and green water-based markers you have on hand. Breath on the stamp to moisten it and stamp on your cardstock.

I didn’t have any Cherry Cobbler pearls so I colored them with my Dark Cherry Cobbler Stampin’ Blends. These are alcohol markers which dry really fast.

I wrapped a piece of Striped Burlap Trim around the layers and then attached the banner with the sentiment to it.

Here’s a look at the inside.

The Dimensions for this card are:
Early Espresso Card Base - 5 1/2 x 8 1/2, scored at 4 1/4
Cherry Cobbler Layer - 5 1/8 x 3 7/8
Crumb Cake Layer (after embossed - 5 x 3 3/4
Banner Strip - 1/2 x 3 1/4