Sketch Saturday - Happiest Day

I made this card for the Atlantic Hearts Weekly Sketch Challenge using the Happiest Day Stamp Set and Country Lace Designer Series Paper.


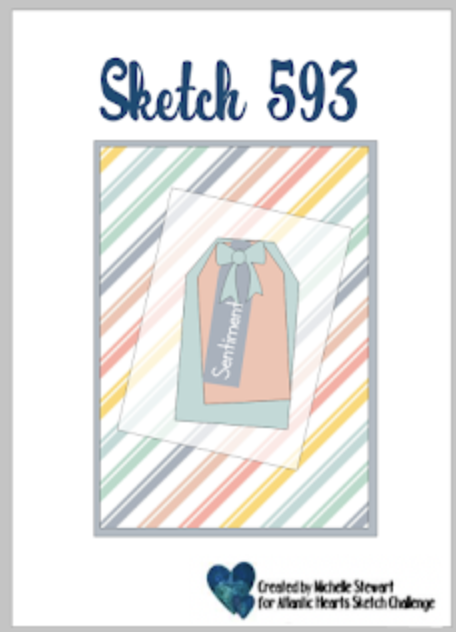
Here’s the sketch I used. I love all the layers in this sketch.


Tips & Instructions

  • Misty Moonlight Card Base - 5 1/2 x 8 1/2, score at 4 1/4

  • Country Lace Left & Right Panels - 1 7/8 x 5 1/4 (2 pieces) using 2 different patterns, adhere to the card front.

  • Misty Moonlight Mat - 3 x 4

  • Basic White Mat - 2 7/8 x 3 7/8, adhere to the mat

  • Country Lace Front Layer (blue) - 2 3/4 x 3 3/4, adhere to white mat and then to the card front.

  • Basic White Circle, cut using the Round We Go Dies.

  • Stamp the dragonfly in Black Memento ink and then the filler areas with Fresh Freesia and Misty Moonlight ink. I stamped off the Misty Moonlight first on a piece of scrap to get a lighter shade.

  • Stamp the sprinkes in Fresh Freesia below the dragonfly. Adhere the circle to the card with Dimensionals.

  • Stamp sentiment on a 1/2” strip of Basic White in Misty Moonlight ink and banner the end. Adhere to a 5/8” strip of Fresh Freesia and banner the end. Adhere to the circle using Dimensionals.

  • Add some Misty Moonlight Tinsel Gems.


On the inside layer (4 x 5 1/4), two dragonflies in Black Memento ink. Stamp the fillers in Fresh Freesia and Misty Moonlight inks.


This dragonfly is so cute!


Supply List

You can click on the item to purchase it from my Online Store.

Pretty Autumn Sampler

This week I made something a little different on my YouTube Channel. Instead of a fun fold card I made a sampler. This is a great home decor piece to display in your home or give as a gift.


Watch the video to see step by step instructions to make this Autumn Sampler.

Click on the button below to get a printable pdf with measurements and instructions.


I used quite a few products to create this sampler but you can look through your stash to see what you have. The squares are only 1 7/8 x 1 7/8 so you have to find small images. You can see the products I used below in the supply list or on the Project Sheet.

Supply List

You can click on the item to purchase it from my Online Store.

Autumn Expressions - Color Combo

This week’s Color Combo is perfect for an Autumn card. I used the Autumn Expressions Bundle and I love the wheat stamp in it.


The color combo is from my October Inspiration Calendar - Calypso Coral, Cajun Craze and Night of Navy.


You can get my Inspiration Calendar each month when you subscribe to my email list.

Tips & Instructions

  • Cajun Craze Card Base - 5 1/2 x 8 1/2, score at 4 1/4

  • Basic White Layer - 4 x 5 1/4

  • Calypso Coral Layer - 3 3/4 x 5. Stamp the wheat image from the Autumn Expressions Stamp Set in Cajun Craze ink to create the pattern shown in the card.

  • Adhere the stamped layer to the white layer and wrap a piece of Night of Navy & Gold Glittered Ribbon around the layers. Adhere the ribbon to the back and then adhere the layers to the card base.

  • Die cut a piece of Basic White Cardstock from just one half of the frame die. Stamp the sentiment in Night of Navy ink and adhere to the card with Dimensionals.

  • Tie a bow and adhere using a Glue Dot.


On the inside layer (4 x 5 1/4), some wheat images in Cajun Craze ink stamping a second time without re-inking. Stamp the sentiment in Calypso Coral ink.


I love the large script font on this sentiment!


Supply List

You can click on the item to purchase it from my Online Store.

Sketch Challenge - Full Of Life

This is a fun card that I made for the weekly Splitcoaststampers Sketch Challenge using the Full of Life Designer Series Paper.


Here’s the sketch I used. You can click on the sketch to see other projects posted for this week’s challenge.


Tips & Instructions

  • Azure Afternoon Card Base - 5 1/2 x 8 1/2, score at 4 1/4

  • Basic White Layer - 4 x 5 1/4, adhere to the card base.

  • Full of Life Designer Series Paper Layer - 3 3/4 x 5, adhere to the card.

  • Use the scalloped edged die from the Wildflower Designs Dies to cut a piece of Basic White and the patterned piece of Full of Life Designer Series Paper. You will end up with 2 pieces from each cut.

  • Lay the white scalloped edged frame around the patterned piece and cut across the top to get the pocket shape.

  • Adhere the pieces to the card.

  • Stamp sentiment on 1/2” strip of Basic White in Azure Afternoon. Trim both ends at an angle and adhere to the card with Dimensionals.

  • Add some clear Opal Rounds.


On the inside layer (4 x 5 1/4), stamp sentiment in Azure Afternoon ink and add a 3/4 x 4 strip of the Designer Series Paper.


I love how bright and bold this card is.


Supply List

You can click on the item to purchase it from my Online Store.

Sketch Saturday - Regal Flora Sympathy Card

I made this card for the Atlantic Hearts Weekly Sketch Challenge using the Regal Flora Bundle and Regal Winter Designer Series Paper.


Here’s the sketch I used. There are lots of pieces and I looked through my stash to find patterns that would coordinate nicely, Winter Regal to the rescue!


Tips & Instructions

  • Wild Wheat Card Base - 5 1/2 x 8 1/2, score at 4 1/4

  • Basic White Layer - 4 x 5 1/2, emboss using the Cute Crochet 3D Embossing Folder.

  • Winter Regal Designer Series Paper (floral) - 2 x 4 1/2

  • Winter Regal Designer Series Paper (gingham) - 1 3/4 x 4

  • Crushed Curry Cardstock - 1 1/2 x 4

  • Arrange and adhere the layers on the card as shown.

  • Basic White Cardstock - 1 x 2 1/2, stamp sentiment in Old Olive ink. The sentiment is from the Hope You Know Stamp Set. Adhere to the card.

  • Basic White Cardstock - stamp floral image in Crushed Curry ink, stamping off first on a piece of scrap paper to get a lighter shade. Die cut with coordinating die.

  • Basic White Cardstock - stamp 2 branches in Old Olive ink and die cut with coordinating dies.

  • Adhere the leaves behind the floral image and then adhere to the card with Dimensionals.

  • Add some Daffodil Delight Opal Rounds.


On the inside layer (4 x 5 1/4), stamp sentiment in Old Olive ink. Stamp branches at the top and bottom corner stamping direct, then a second time. Stamp again on scrap paper and then on the inside layer to get another lighter shaded branch.


These colors are great for the fall.


Supply List

You can click on the item to purchase it from my Online Store.

Corner Tuck Fold Cards

Today I have a video to demonstrate how to create these beautiful Corner Tuck Fold Cards. I love how they turned out.


Watch the video to see step by step instructions to make this design.

Click on the button below to get a printable pdf with measurements and instructions.


I used the To Market Designer Series Paper to make this card. I love the “thanks a bunch” sentiment which works so well with the images in this paper - a bunch of veggies or a bunch of flowers.


The Splendid Autumn Designer Series Paper I used for this card has gorgeous designs. You don’t need to add much beyond the paper to create a beautiful card.


Supply List

You can click on the item to purchase it from my Online Store.

Encircled In Nature - Color Combo

I love a card with a wreath and this delicate wreath from the Encircled In Nature is so simple and pretty.


The color combo is from my September Inspiration Calendar - Blackberry Bliss, Peach Pie and Pebbled Path.


You can get my Inspiration Calendar each month when you subscribe to my email list.

Tips & Instructions

  • Blackberry Bliss Card Base - 5 1/2 x 8 1/2, score at 4 1/4

  • Basic White Layer - 4 x 5 1/4, adhere to the card base.

  • Blackberry Bliss - die cut the wreath using the Encircled In Nature Dies and lay on the card.

  • Stamp the sentiment in Pebbled Path ink. The sentiment is from the Hooray For Surprises Stamp Set. Once stamped, adhere the wreath.

  • Pebbled Path - die cut 4 pine branches. The die will cut 2 at a time so you only need to run it through twice. Adhere to the bottom of the wreath.

  • Peach Pie - die cut 4 of the floral images. There are 2 different dies that curve for both sides of the wreath so cut 2 of each. Adhere to the bottom of the wreath.

  • Color a piece of Iridescent Striped Trim and color using a Dark Pebbled Path Stampin’ Blends Marker. Tie a bow and adhere to the bottom of the wreath with a Glue Dot.

  • Add some Peach Pie Shimmer Gems.


On the inside layer (4 x 5 1/4), stamp 2 flowers from the Hooray For Surprises Stamp Set. I stamped off first to get a lighter shade.


These are great colors for a fall wreath!


Supply List

You can click on the item to purchase it from my Online Store.

Sketch Challenge - Irresistible Blooms

I love layering a piece of vellum over a patterned paper. The vellum is from the Graceful Greenery Vellum pack which has a textured look to it.


I made this card for the weekly Splitcoaststampers Sketch Challenge. Here’s the sketch I used. You can click on the sketch to see other projects posted for this week’s challenge.


Tips & Instructions

  • Pretty Peacock Card Base - 5 1/2 x 8 1/2, score at 4 1/4

  • Frames & Flowers Specialty Designer Series Paper - 4 x 5-1/4

  • Graceful Greenery Vellum - 4 x 5 1/4

  • Die cut the circle and long swirly piece from Pretty Peacock using the Irresistible Blooms Dies. You’ll have to cut the circle out with snips and cut the long swirly piece in half. Just snip around the circles to detach them. Adhere to the vellum layer.

  • Stamp the small flower on Basic White in Pumpkin Pie ink. Die cut with the coordinating die.

  • Die cut 2 leaves from Lost Lagoon Cardstock.

  • Stamp the sentiment on a scrap of Basic White in Pretty Peacock ink. Fussy cut around the sentiment.

  • Adhere the leaves behind the flower and then adhere it to the vellum layer with Dimensionals. Adhere the sentiment with Dimensionals.

  • Adhere the vellum layer to the Designer Series Paper layer putting adhesive behind the die cuts so it doesn’t show through the vellum. You can add a tiny bit of glue behind each corner, spreading it thinly.

  • Adhere the layer to the card base.

  • Add 3 small Peach Pie Shimmer Gems to the center of the flower.


On the inside layer (4 x 5 1/4), stamp flower in Pumpkin Pie ink and the leaves in Pretty Peacock ink.


The textured vellum adds such a nice look to this card and I love the pop of Pumpkin Pie from the flower.


Supply List

You can click on the item to purchase it from my Online Store.

Slide & Lock Fun Fold Cards

These Slide & Lock cards are so fun to open. You slide up the focal piece and take it off to open the card!


Watch the video to see step by step instructions to make this design.

Click on the button below to get a printable pdf with measurements and instructions.


This card was made using the Reindeer Days Designer Series Paper. The reindeer pieces were cut using the Reindeer Fun Dies. You just layer the pieces together to get this adorable deer. I used the Greetings of the Season products for the label and sentiment.


This fun Birthday Card was made using the Bright & Beautiful Designer Series Paper. I made the pinwheel using the Round We Go Bundle.


Supply List

You can click on the item to purchase it from my Online Store.

Magnolia Mood - Color Combo

I wasn’t sure about using Coastal Cabana for the leaves on this image but love how they turned out. I colored directly on the stamp with Stampin’ Write Markers to get the two different colors on the images.


The color combo is from my September Inspiration Calendar - Coastal Cabana, Pebbled Path and Copper Clay.


You can get my Inspiration Calendar each month when you subscribe to my email list.

Tips & Instructions

  • Pebbled Path Card Base - 5 1/2 x 8 1/2, score at 4 1/4

  • Basic White Layer - 4 x 5-1/4, splatter some Copper Clay ink on it using a Stampin’ Write Marker. Adhere the layer to the card base.

  • Nature’s Sweetness Designer Series Paper - 2 x 5 1/4, adhere to the bottom of the white layer.

  • Pebbled Path Strip - 3/4 x 5 1/4, emboss using the Cane Weave 3D Embossing Folder. Adhere to the card.

  • Stamp 3 of the floral images on Basic White and cut using the coordinating die. I colored directly on the stamp with Coastal Cabana and Copper Clay Stampin’ Write Markers. These are water-based and you can color right on your stamp. DO NOT use Stampin’ Blends or any other alcohol based marker. Once you color the stamp, breath on it to moisten and then stamp on the cardstock.

  • Stamp the sentiment in Copper Clay on Basic White and die cut using the Something Fancy Dies. Adhere to the card with Dimensionals.
    TIP - put Dimensionals on the center of the label so you can easily slip the floral images behind it. If they don’t fit, just cut off some of the the bottom of the floral piece.

  • Adhere the floral images behind the sentiment label.

  • Add 3 Drusy Adhesive-Backed Embellishments.


On the inside layer (4 x 5 1/4), color and stamp the floral images with Coastal Cabana and Copper Clay Stampin’ Write Markers.


I love the elegant look of this card.


Supply List

You can click on the item to purchase it from my Online Store.

Sketch Challenge - Shepherd's Care

This is a simple scene but so beautiful. I used the Shepherd’s Care Stamp Set and embossed the stars with Gold Embossing Powder. Just a very light amount of ink was added to the layer with a blending brush.


I made this card for the weekly Splitcoaststampers Sketch Challenge. Here’s the sketch I used. You can click on the sketch to see other projects posted for this week’s challenge.


Tips & Instructions

  • Night of Navy Card Base - 5 1/2 x 8 1/2, score at 4 1/4

  • Basic White - 3 3/4 x 5, lightly blend Azure Afternoon ink across the entire layer. Round the corners with a corner rounder.

  • Stamp the shepherd image in Black Memento ink.

  • Stamp the large star in Versamark ink and heat emboss with Gold Embossing Powder.

  • Stamp some small stars in Versamark ink and heat emboss with Gold Embossing Powder.

  • Stamp the sentiment in Black Memento ink.

  • Adhere the layer to the card base.


On the inside layer (4 x 5 1/4), stamp the sentiment in Black Memento ink. Stamp the small star in Azure Afternoon ink.


I had a happy little accident which I think added to the scene. I must have gotten some embossing powder on the shepherd’s head so it has a little gold tinge to it. I like how it turned out.


Supply List

You can click on the item to purchase it from my Online Store.

Sketch Saturday - Sweetly Scripted

I love the combination of the Sweetly Scripted sentiment against the script pattern in the background layer from the Nature’s Sweetness Designer Series Paper. It makes for an elegant Anniversary Card.


Here’s the sketch I used. It’s from the weekly Atlantic Hearts Sketch challenge. This is an easy sketch and I was able to pull it together quickly.


Tips & Instructions

  • Pebbled Path Card Base - 4 1/4 x 11, score at 5 1/2 (top folding)

  • Basic White Layer - 3 x 5 1/2

  • Nature’s Sweetness Designer Series Paper Layer - 2 3/4 x 5 1/2, adhere to the white layer and then adhere to the card base.

  • Basic White Strip - 5/8 x 5, stamp sentiment in Versamark ink and heat emboss with Gold Embossing Powder.

  • Pebbled Path Strip - 1 x 5, adhere behind the white sentiment strip and adhere to the card at an angle. Cut off any overhang.


On the inside layer (4 x 5 1/4), stamp sentiment in Versamark ink and heat emboss with Gold Embossing Powder. The sentiment is from the Lovely & Sweet Stamp Set.


I love all the gold on this card, so pretty!


Supply List

You can click on the item to purchase it from my Online Store.
Bookbinding Z Fold Cards

Here’s a twist on the Bookbinding Fun Fold Card….it has a Z Fold added to the front. These are easy to make and so fun!


Watch the video to see step by step instructions to make this design.

Click on the button below to get a printable pdf with measurements and instructions.


This card was made using the Wildly Flowering Designer Series Paper. The sentiment is from the Simply Said Stamp Set and the Something Fancy Dies. I colored the Iridescent Striped Trim with a Stampin’ Blends Marker to coordinate with the colors of the card.


This fun Halloween Card was made using the Halloween Spells Designer Series Paper and Potions & Spells Bundle.


Supply List

You can click on the item to purchase it from my Online Store.

Changing Leaves - Color Combo

The Changing Leaves Hybrid Embossing Folder is amazing. You can emboss and die cut with one pass through your machine and it even gets better when you use a patterned paper with it. I used the Splendid Autumn Designer Series Paper for these pretty leaves.


The color combo is from my September Inspiration Calendar - Crushed Curry, Moody Mauve and Shy Shamrock. These are great fall colors.


You can get my Inspiration Calendar each month when you subscribe to my email list.

Tips & Instructions

  • Thick Basic White Card Base - 5 1/2 x 8 1/2, score at 4 1/4

  • Shy Shamrock Layer - 4 x 5 1/2, emboss using the Leaf Fall Embossing Folder. I ran it through twice to get full coverage. Adhere to the card base.

  • Using the backside of the Splendid Autumn Designer Series Paper cut and emboss 2 small leaves from the Crushed Curry pattern and one large leaf from the Moody Mauve pattern. Adhere to the card.

  • Basic White Strip - 3/4 x 2 1/2, stamp sentiment in Moody Mauve ink.

  • Splendid Autumn Designer Series Paper (Moody Mauve pattern) - 3/8 x 3 1/2, banner both ends and adhere behind the sentiment strip. Adhere to the card with Dimensionals.

  • Add some Crushed Curry Adhesive-Backed Dots for Days.


On the inside layer (4 x 5 1/4), stamp the leaf image in Shy Shamrock and stamp a second time without re-inking.


I love all the texture with the embossed background and embossed leaves.


Supply List

You can click on the item to purchase it from my Online Store.

Sketch Challenge - Sweetest Star

This is such a fun card with the snowflake background and that cute little Santa Claus. I made this for the weekly Splitcoaststampers Sketch Challenge. I used the Sweetest Star Stamp Set and Peaceful Evergreens Bundle.


Here’s the sketch I used. You can click on the sketch to see other projects posted for this week’s challenge.


Tips & Instructions

  • Boho Blue Card Base - 5 1/2 x 8 1/2, score at 4 1/4

  • Basic White - 3 3/4 x 5, use the die from the Peaceful Evergreens Die to create the snowy background. I ran the layer through twice to get 2/3 of the layer die cut. Adhere the layer to the card base.

  • Basic White - 2 x 4, tear in half and adhere the 2 pieces to the bottom area of the die cut layer to create the snowy bottom.

  • Stamp the largest tree from the Peaceful Evergreens Stamp Set on Basic White in Shaded Spruce ink. Die cut with the coordinating die. Adhere to the card.

  • Stamp the Santa image on basic white in Black Memento ink. There’s a coordinating punch but I fussy cut it. Color with Stampin’ Blends. I used Dark Real Red, Dark Basic Black, Dark Wild Wheat and Light Color Combo.

  • Add Wink of Stella to the beard and white trim on the coat and hat.

  • Basic White - 1 3/4 x 1 3/4, stamp sentiment in Real Red. Adhere to a 1 7/8 x 1 7/8 piece of Boho Blue. Adhere to the card with Dimensionals.

  • Adhere the Santa with Dimensionals.


On the inside layer (4 x 5 1/4), stamp the medium size tree in Shaded Spruce direct and then a second time without re-inking. Stamp again on scrap and then on the layer to get another light image. Stamp the sentiment in Real Red ink. I masked the sentiment to get it in two lines.


The snowy background layer is so fun.


Supply List

You can click on the item to purchase it from my Online Store.

Sketch Saturday - Courage & Faith

The Regal Winter Designer Series Paper has rich, gorgeous floral patterns. I used it for this week’s sketch challenge and was happy that the Blackberry Bliss & Gold Textured Ribbon coordinates so well with it.


Here’s the sketch I used. It’s from the weekly Atlantic Hearts Sketch challenge. I love a card with a tag!


Tips & Instructions

  • Blackberry Bliss Card Base - 5 1/2 x 8 1/2, score at 4 1/4

  • Regal Winter Designer Series Paper Layer - 4 x 5 1/4, adhere to the card base.

  • Graceful Greenery Vellum (white) - 3 x 4

  • Die cut the tag die from the Greetings of the Season Dies from Basic White and another from Blackberry Bliss.

  • Stamp sentiment on the white label in Blackberry Bliss ink. The sentiment is from the Courage & Faith Stamp Set. Adhere the tags together offsetting a little bit.

  • Adhere the label to the vellum layer with Dimensionals. The vellum should be a little crooked.

  • Adhere the layer to the card putting adhesive only behind the label so it doesn’t show through the vellum.

  • Tie a bow with a piece of Blackberry Bliss & Gold Textured Ribbon and adhere to the top of the tag with a Glue Dot.


On the inside layer (4 x 5 1/4), add a 3/4 x 4 strip of the Designer Series Paper.


I love this ribbon with the gold edges, so classy!


Supply List

You can click on the item to purchase it from my Online Store.

Offset Gatefold Cards

The Offset Gatefold Cards are beautiful and very simple to make. You can make them in a portrait or landscape style.


Watch the video to see step by step instructions to make this design.

Click on the button below to get a printable pdf with measurements and instructions.


This card was made using new products from the Mini Catalog. I used the Nests of Winter Designer Series Paper and Winterly Tree Tops Bundle.


This card is so fun with the cute reindeer that I made using the Reindeer Fun Dies. The patterned paper is a piece of the Reindeer Fun Designer Series Paper.


Supply List

You can click on the item to purchase it from my Online Store.

Sketched Butterflies - Color Combo

I finally got to use the Sketched Butterflies Bundle. It has beautiful butterfly images and dies. The background was embossed using the Painted Texture 3D Embossing Folder.


The color combo is from my September Inspiration Calendar - Pumpkin Pie, Summer Splash and Pool Party. I love the pop of orange on the card.


You can get my Inspiration Calendar each month when you subscribe to my email list.

Tips & Instructions

  • Pumpkin Pie Card Base - 5 1/2 x 8 1/2, score at 4 1/4

  • Summer Splash Glimmer Paper - 4 1/8 x 5 3/8, adhere to the card base.
    TIP - die cut the butterflies from the center before you adhere the glimmer paper.

  • Pool Party Layer - 4 x 5 1/4, emboss using the Painted Texture 3D Embossing Folder and adhere to the card.

  • Using the Spotlight On Nature Dies die cut a circle from Basic White and the next larger circle from Pumpkin Pie.

  • Stamp sentiment on white circle in Black Memento ink. Adhere to the orange circle and then adhere to the card.

  • Die cut butterflies from Summer Splash Glimmer Paper, Pumpkin Pie and Pool Party. I used the small butterflies that have coordinating basic image and detailed image. Layer together and add to the card. The top left butterfly is from the grouping of 3 butterflies that I cut apart. I used the other 2 butterflies on the inside layer.

  • Add some Summer Splash Shimmer Gems.


On the inside layer (4 x 5 1/4), stamp sentiment in Black Memento ink. The sentiment is from the So Sincere Stamp Set. Add the 2 butterflies that you cut apart from the grouping of butterflies.


The glimmer paper adds a nice sparkle to the card.


Supply List

You can click on the item to purchase it from my Online Store.

Sketch Challenge - Autumn Expressions

I made this beautiful fall card for this week’s sketch challenge. The paper is from the Splendid Autumn Designer Series Paper and it is so pretty. The patterns were hand-painted in an impressionist art style.


Here’s the sketch I used. It’s from the weekly Splitcoaststampers Sketch Challenge. Click on the sketch to see other projects posted for this challenge.


Tips & Instructions

  • Cajun Craze Card Base - 5 1/2 x 8 1/2, score at 4 1/4

  • Crushed Curry Layer - 4 x 5 1/4, adhere to the card base.

  • Splendid Autumn Designer Series Paper - 3 3/4 x 5, cut into a diamond. Adhere to the card.

  • Cajun Craze Strip 3/4 x 5 1/4, adhere to the card.

  • Die cut 3 leaves from Crushed Curry using the Autumn Expressions Dies. Adhere to the strip with Dimensionals.

  • Die cut the sentiment label from a scrap of Very Vanilla using the large frame die and cutting just the small center. See the area I circled in the picture below.


  • Stamp sentiment on the label in Cajun Craze and adhere it to the card with Mini Dimensionals.


On the inside layer (4 x 5 1/4), stamp sentiment in Cajun Craze ink. Stamp some leaves in Crushed Curry ink.


The fall colors in the patterned paper are so rich and pretty.


Supply List

You can click on the item to purchase it from my Online Store.

Sketch Saturday - More Than Autumn

I made this fun card for this week’s sketch challenge using the More Than Autumn Bundle from the new Mini Catalog. Autumn is my favorite season and I love those apple cider doughnuts from local farms. They smell so good you can’t pass them by.


Here’s the sketch I used. It’s from the weekly Atlantic Hearts Sketch Challenge.


Tips & Instructions

  • Blackberry Bliss Card Base - 5 1/2 x 8 1/2, score at 4 1/4

  • Nets of Winter Designer Series Paper - 4 x 5 1/4

  • Pumpkin Pie Strip - 1 1/4 x 6, emboss on an angle using the Forever Plaid 3D Embossing Folder. Adhere to the Designer Series Paper Layer and trim off any overhang.

  • Crumb Cake Strip - 3/4 x 6, stamp sentiment on the right side in Blackberry Bliss ink. Adhere to the layer, just above the embossed strip and trim off any overhang.

  • Adhere layer to the card base.

  • Stamp 3 doughnuts on Basic White in Black Memento ink and die cut using the coordinating dies. Color them with Stampin’ Blends Markers. I used Light Copper Clay for the doughnuts and Light Pumpkin Pie, Light Blackberry Bliss and Light Crumb Cake for the frosting. Add some Wink Of Stella to the frosting.

  • Die cut 3 leaves from scraps of Blackberry Bliss, Pumpkin Pie and Copper Clay. Keep both the outline and inside piece.

  • Adhere the doughnuts to the card with Dimensionals. Adhere the leaves to the card.F


On the inside layer (4 x 5 1/4), stamp sentiment in Blackberry Bliss. Die cut some leaves and adhere.


The Wink of Stella makes those doughnuts looks delicious in person!


Supply List

You can click on the item to purchase it from my Online Store.

Note: The new products I used, the More Than Autumn Bundle, the Forever Plaid 3D Embossing Folder and the Nests of Winter Designer Series Paper will be available for purchase starting September 4, 2024.