Pop Up Block Cards

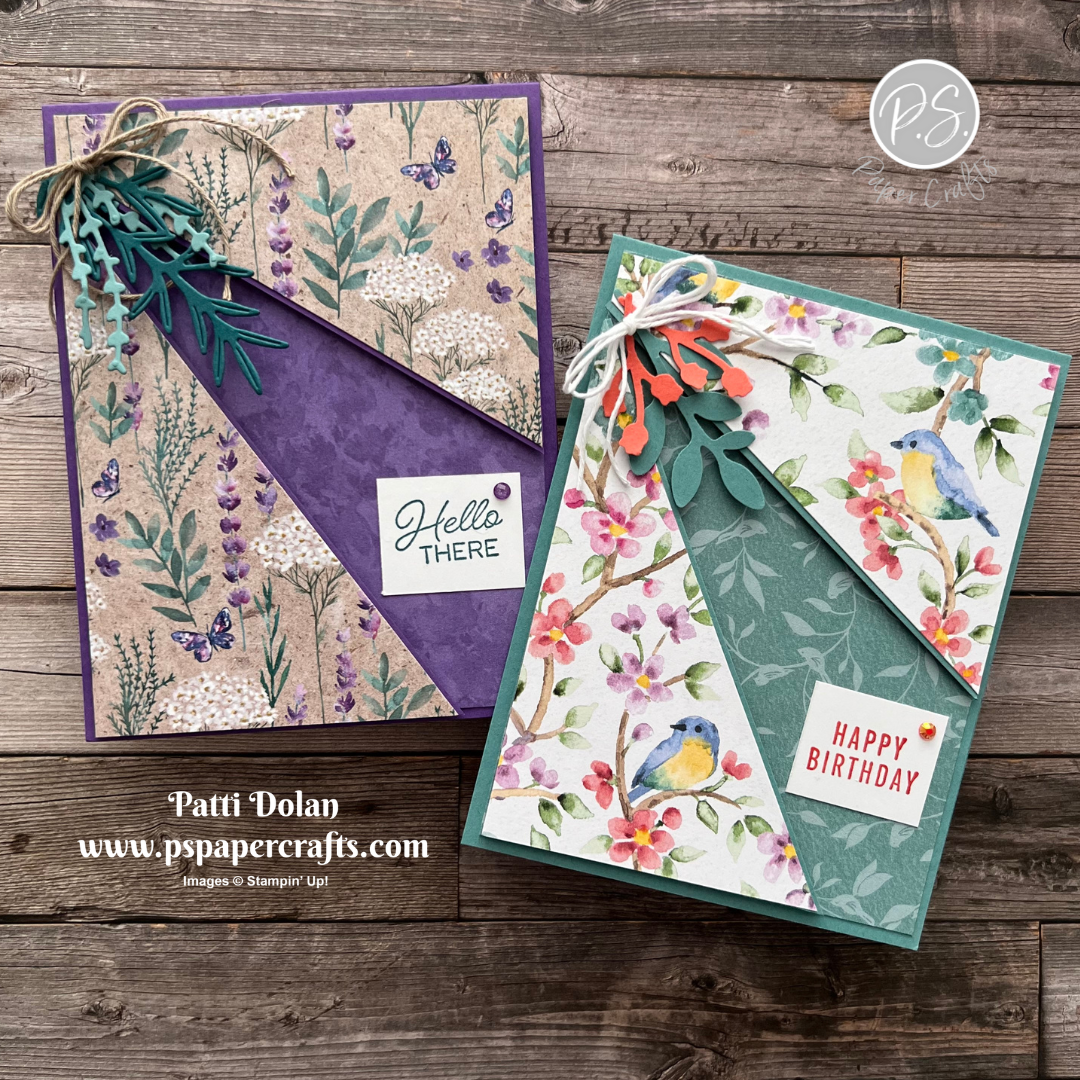
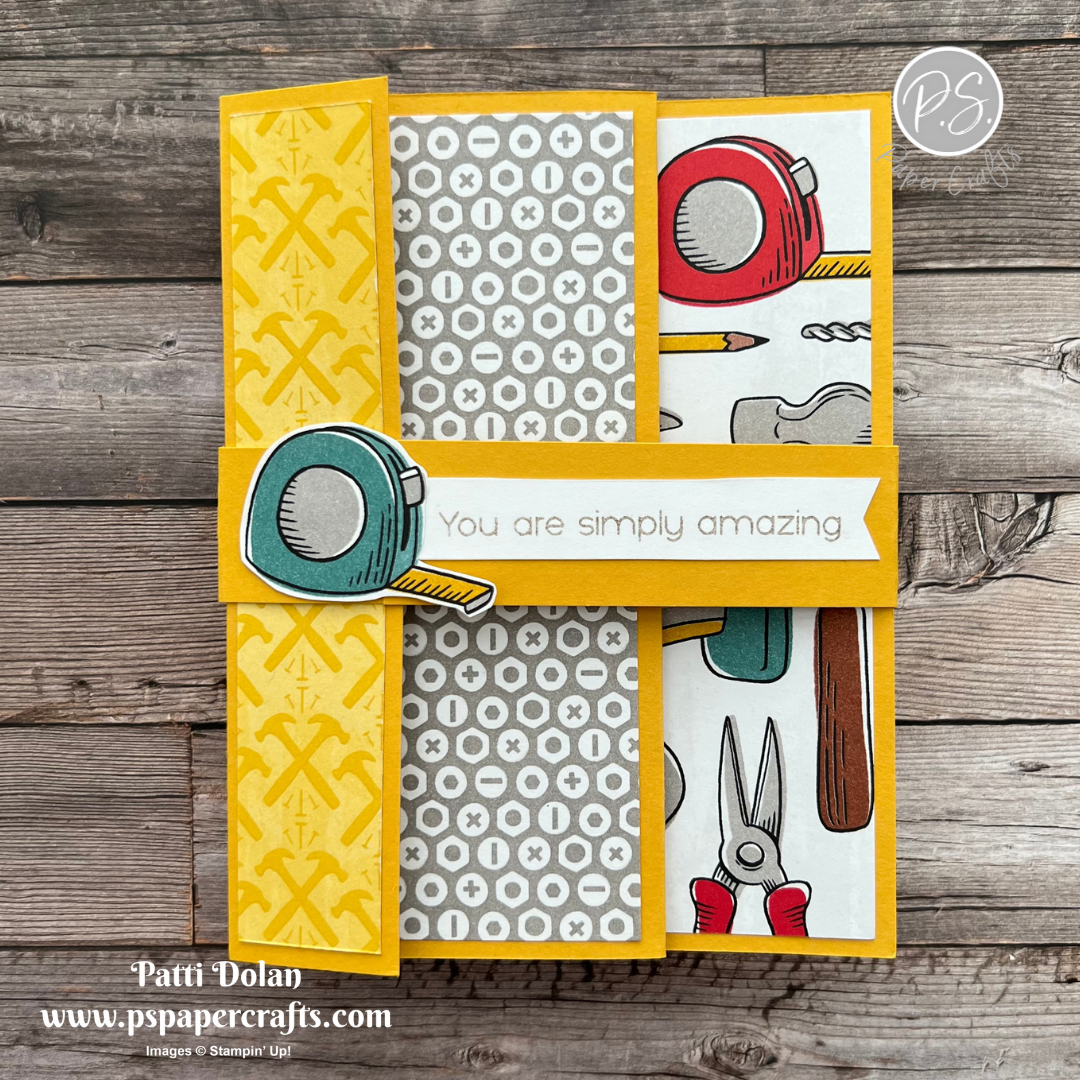
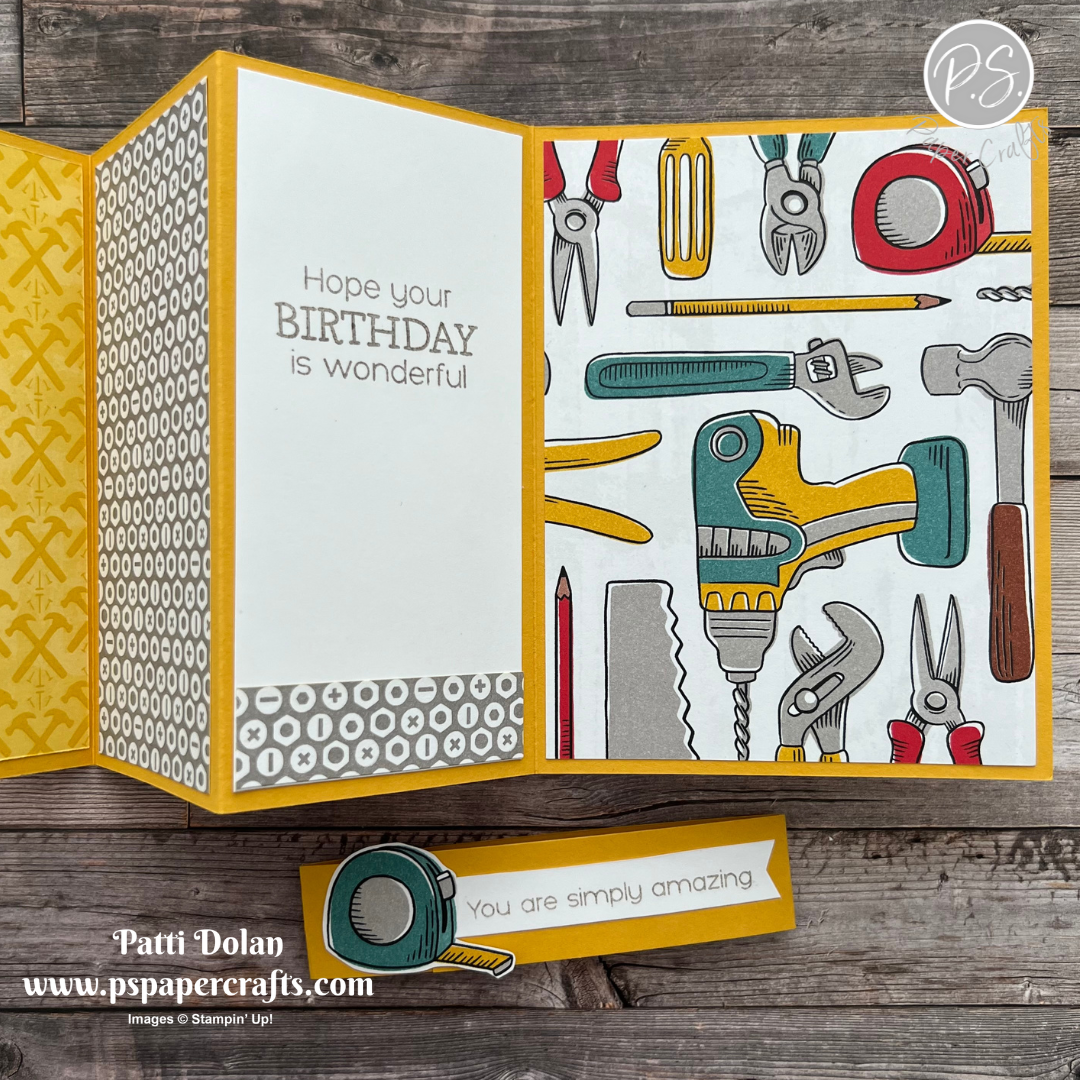
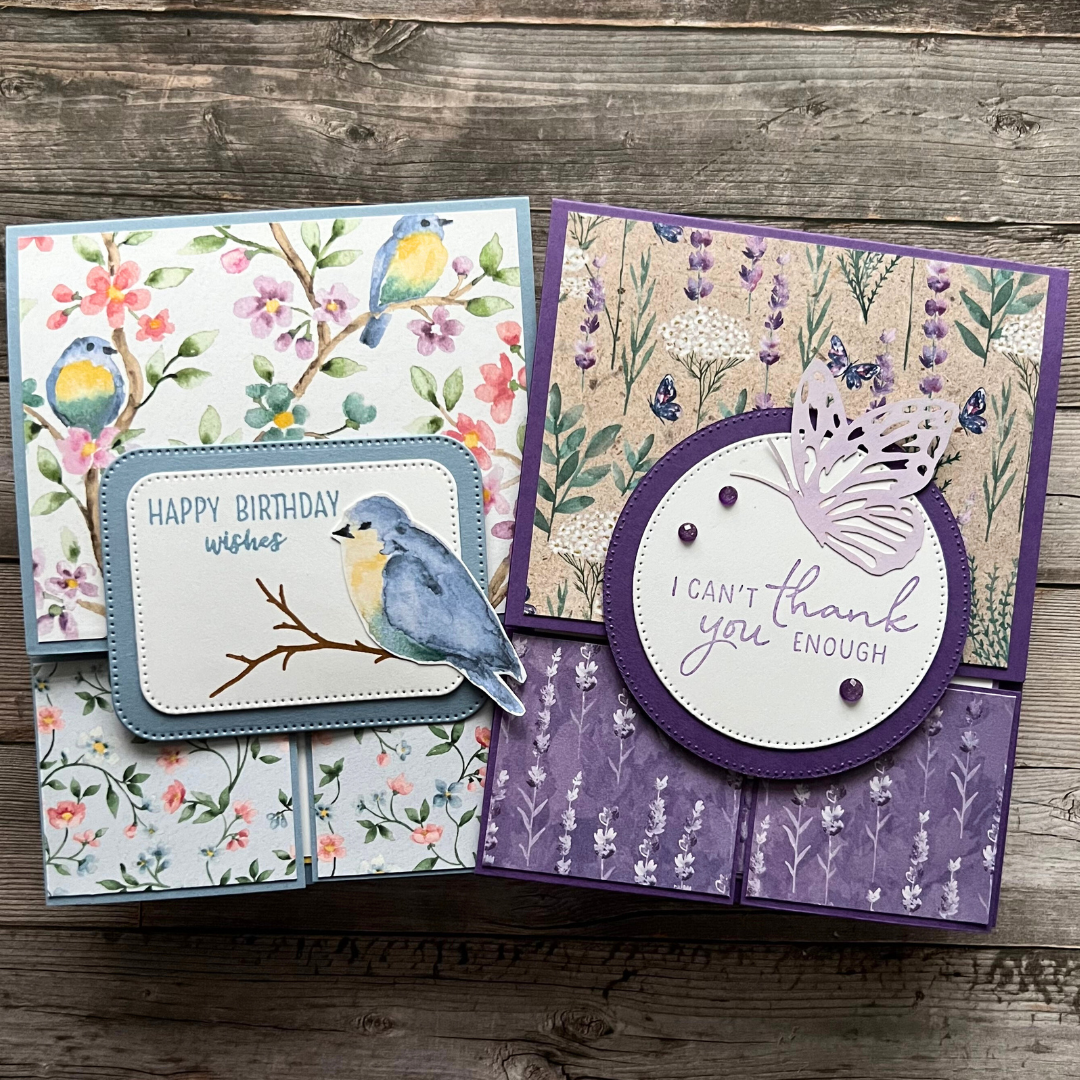
The Pop Up Block Fun Fold Card design is so cool. It looks complicated but once you break down the steps, you just repeat them for each block.


Watch the video to see step-by-step instructions to make these cards. Below is a link to a Project Sheet that you can print out and save for reference.


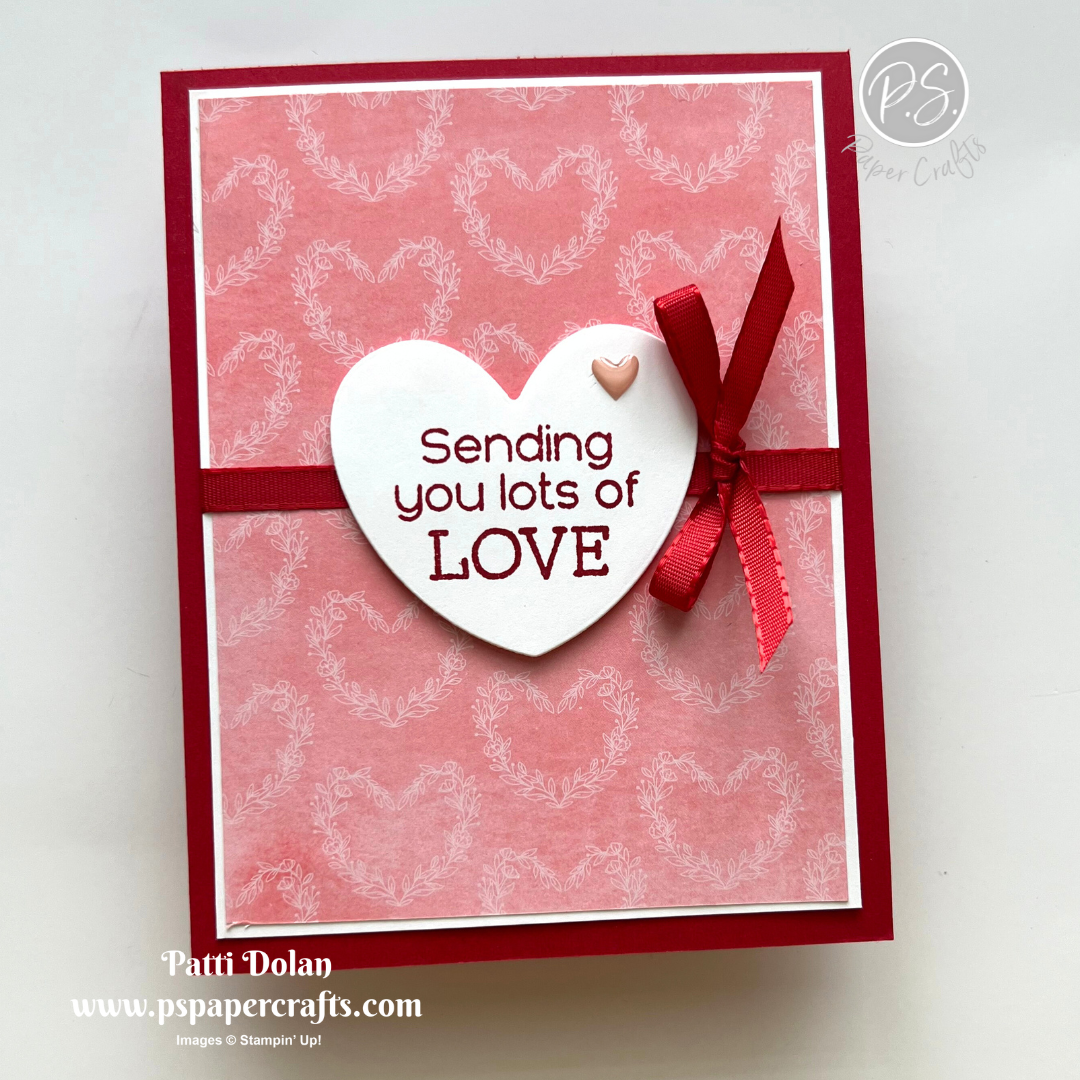
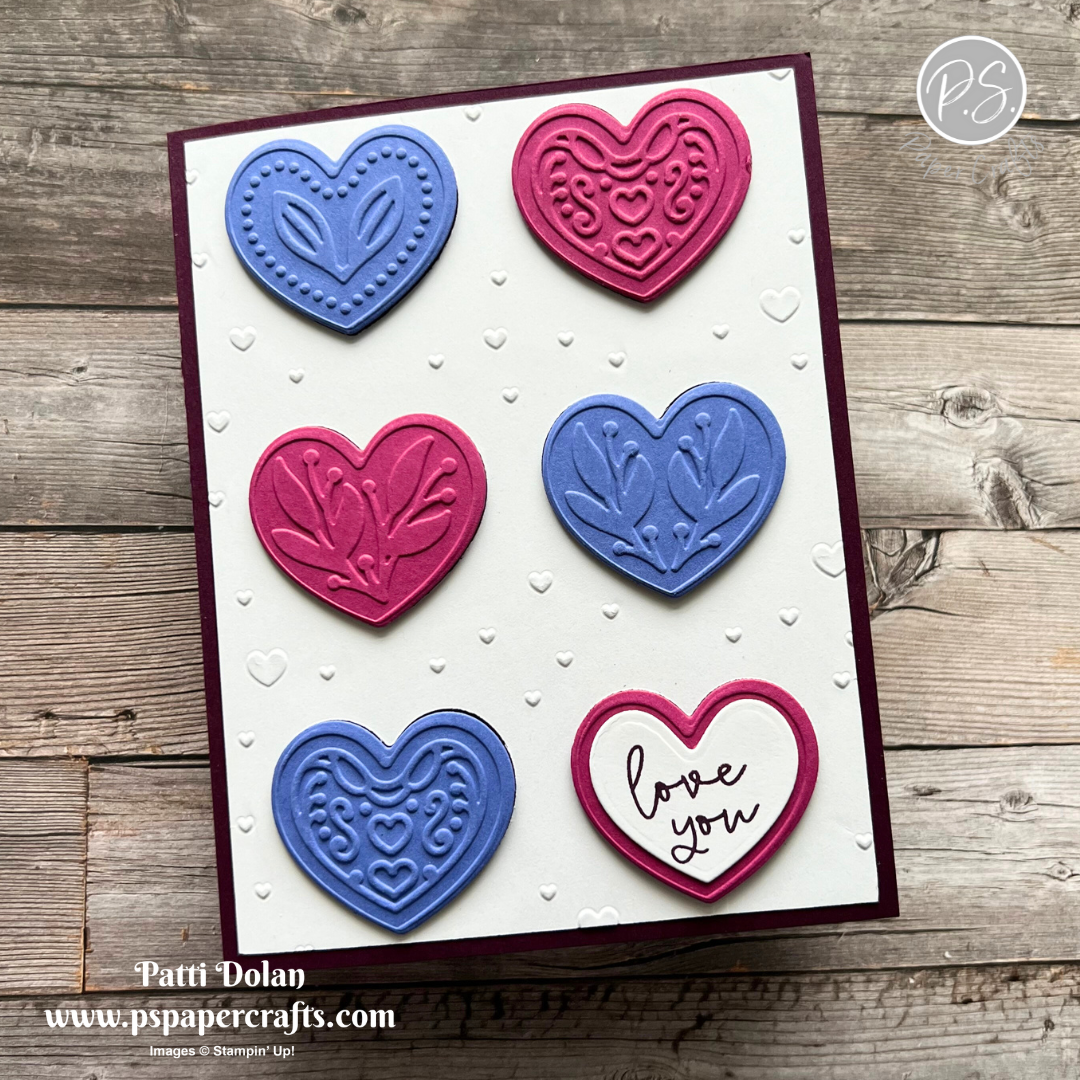
This pretty Valentine’s Day card was made using the Most Adored Designer Series Paper and Adoring Hearts Bundle. The bundle includes dies with a coordinating embossing folder that work together with one pass through your die-cutting machine.


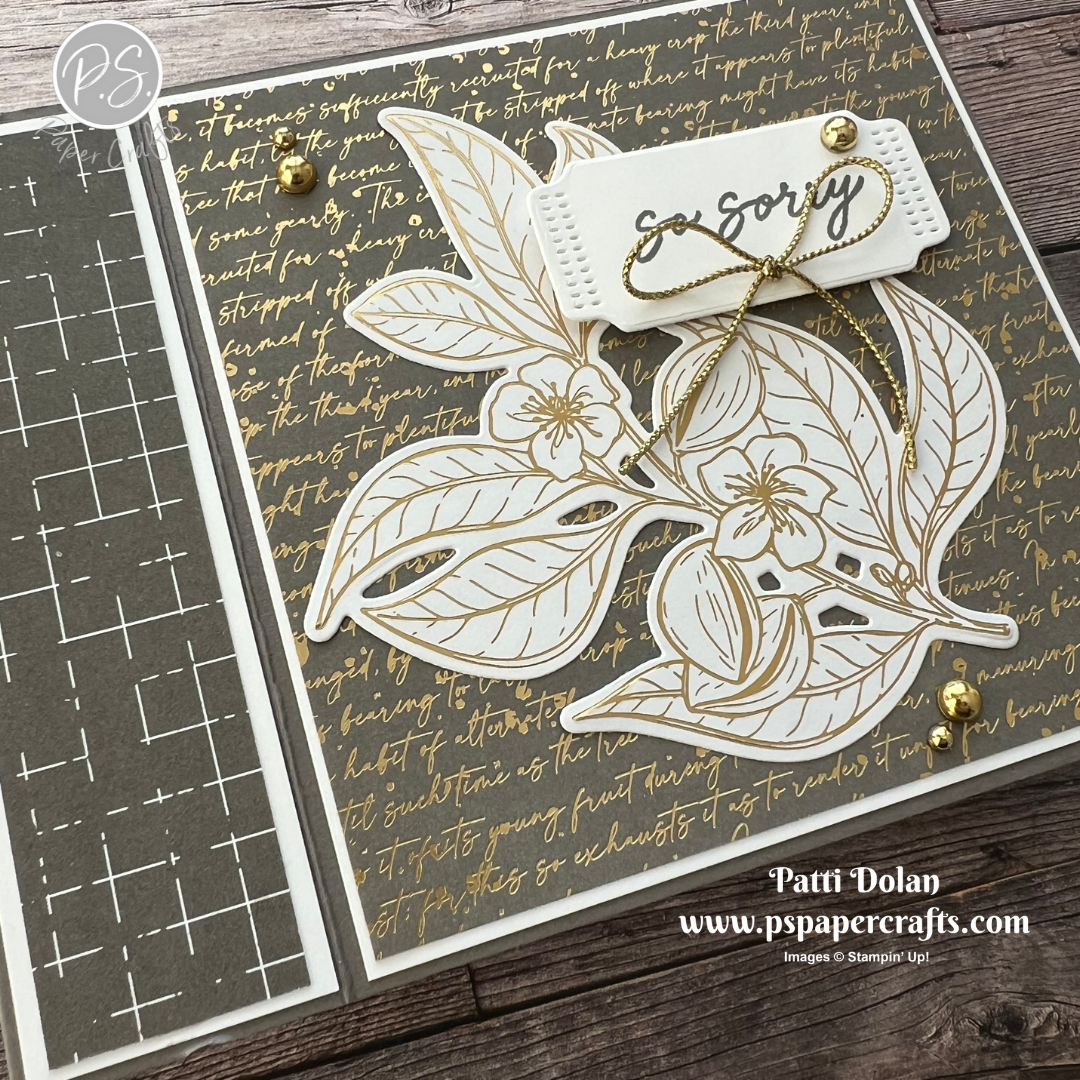
The Forever Love Specialty Designer Series Paper is just gorgeous. This card could be used for a wedding or anniversary!


Supply List

You can click on the item to purchase it from my Online Store.

Hot Air Balloon Birthday Card

Here’s a fun birthday card I made using the Hot Air Balloon Bundle. For the heart shaped balloons I colored a piece of Basic White Cardstock with Stampin’ Blends, cut them with the die and then cut with the overlaying die using the same color cardstock.


The color combo I used to make this card is from my Inspiration Calendar - Fresh Freesia, Gorgeous Grape and Lemon Lolly. You can get this calendar each month when you subscribe to my email list.


Tips & Instructions

  • Gorgeous Grape Card Base - 4 1/4 x 11, score at 5 1/2 (top folding)

  • Basic White Layer - 5 1/4 x 4, emboss using the Painted Texture 3D Embossing Folder. Adhere to card base.

  • Stamp the large balloon and sentiment in Gorgeous Grape ink on scraps of Basic White. Die cut with the coordinating dies. Adhere sentiment to balloon.

  • Color scraps of Basic White using Light Fresh Freesia and Light Lemon Lolly Stampin’ Blends. Die cut using the heart die from set. Die cut a scrap of Fresh Freesia and Lemon Lolly using the heart layering die. Adhere the layering heart to matching plain heart.

  • Die cut the basket for the large balloon from Gorgeous Grape.

  • Adhere the heart shaped balloons to the white layer. Adhere the large balloon with Dimensionals. Adhere the basket below the large balloon.

  • Add some Rainbow Adhesive-Backed Dots.


On the inside layer (5 1/4 x 4) stamp sentiment in Gorgeous Grape ink. Stamp the balloon in Fresh Freesia ink. Stamp the 4 striped image direct and then the 3 striped image but stamping off first to get the lighter shade. Stamp basket in Fresh Freesia ink.


Supply List

You can click on the item to purchase it from my Online Store.

Sketch Challenge - Garden Meadow

Here’s my card for this weeks sketch challenge. I love the Blackberry Bliss and Fresh Freesia colors together with the embossed white triangles at the top and bottom.


The sketch I used is from the weekly Splitcoaststampers Sketch Challenge. You can click on the sketch to see the other cards posted for this week’s challenge.


Tips & Instructions

  • Blackberry Bliss Card Base - 5 1/2 x 8 1/2, score at 4 1/4

  • Flight & Airy Designer Series Paper - 5 1/4 x 4, adhere to the card base.

  • Basic White Layer - 5 1/4 x 4, emboss using the crosshatch folder from the Basics 3D Embossing Folder. Cut the middle out at a diagonal to create 2 triangles. You can do this with scrap paper to get the size and angles you want and then use them as a template to cut your embossed layer. Adhere to the top and bottom of the card.

  • Blackberry Bliss - 4 x 3/4, emboss with the dots folder from the Basics 3D Embossing Folder. Adhere to card.

  • Using the Stylish Shapes Dies cut the bird on the branch from the Designer Series Paper. I used the second from largest circle die. Cut the largest circle from Blackberry Bliss and adhere to create a mat. Adhere to card with Dimensionals.

  • Stamp sentiment on scrap of Basic White in Blackberry Bliss ink and fussy cut. Adhere to the card with Dimensionals.

  • Add some Fresh Freesia Tinsel Gems.


I used another 5 1/4 x 4 piece of the designer series paper for the inside layer. Cut a piece of Basic White at 4 3/4 x 3 1/4 and stamp the sentiment in Blackberry Bliss Ink. Adhere layers.


Supply List

You can click on the item to purchase it from my Online Store.

Hooray For Surprises - Sending Love Card

This card can be used for Valentine’s Day of course, but it can be a birthday or just a card to brighten someone’s day, sending love to them.


The paper I used for the background layer is from the Sale-a-bration Most Adored Designer Series Paper. It has beautiful gold foiled patterns on one side and reds, pinks and white on the other.

You can get this for FREE during Sale-a-bration with a $50 (USD) purchase.


Tips & Instructions

  • Real Red Card Base - 5 1/2 x 8 1/2, score at 4 1/4

  • Basic White Layer - 5 1/8 x 3 7/8

  • Most Adored Designer Series Paper Layer - 5 x 3 3/4, adhere to the white layer. Wrap a piece of Real Red Ribbon around and adhere to the back of the layers. Adhere layers to card base.

  • Stamp sentiment in Real Red ink on a scrap of Basic White and cut using the heart from the Hooray For Surprises Dies. Adhere to the card with Dimensionals.

  • Tie a bow with the ribbon and adhere to the card with Glue Dot.

  • Add an Adhesive-Backed Heart. It’s Petal Pink but I think it works.


On the inside layer (5 1/4 x 4) stamp the sentiment in Real Red ink and the small hearts in Flirty Flamingo ink.


Supply List

You can click on the item to purchase it from my Online Store.

Sketch Saturday - Bee My Valentine

Here’s my card for this week’s sketch challenge using products from the Bee Mine Suite.


The sketch I used is from the Atlantic Hearts Sketch Challenge.


Tips & Instructions

  • Sweet Sorbet Card Base - 5 1/2 x 8 1/2, score at 4 1/4

  • Basic White Layer - 5 1/4 x 4

  • Cut 2 diamonds from the Bee Mine Designer Series Paper using the 3rd from largest diamond shape from the Stylish Shapes Dies. (They measure 1 7/8 x 1 7/8 if you don’t have the dies.)

  • Cut a Basic White diamond using the 4th using the 2nd from largest diamond shape. (It measures 2 3/8 x 2 3/8)

  • Cut a 2 1/2 x 2 1/2 diamond from Sweet Sorbet.

  • Stamp the bee and wings on scraps of Basic White and punch with the coordinating punch. I used Daffodil Delight on the body and Black Memento on the stripes and face. For the wings I stamped the outline in Sweet Sorbet ink and then for the filler, I used Sweet Sorbet ink but stamped off on a piece of scrape to get a lighter shade.

  • Stamp the sentiment and dashed line with Sweet Sorbet on the white square but position it as a diamond first. .Adhere the wings to the bee and then the bee to the diamond.

  • Adhere the white diamond to the Sweet Sorbet diamond.

  • Adhere the smaller diamonds to the white layer. Adhere the large diamond to the middle with Dimensionals.

  • Add some hears from the Adhesive-Backed Hearts & Flowers pack.


On the inside layer (5 1/4 x 4) stamp the bee, dashed line, wings and face using the same colors you used on the card front. Stamp sentiment with Sweet Sorbet ink.


Supply List

You can click on the item to purchase it from my Online Store.

Pretty Split Front Cards

These Split Front card is a great design to highlight your favorite patterned paper. I used the Perennial Lavender Designer Series Paper on one and the Flight & Airy Paper on the other.


Watch the video to learn how to make a template that you can use to created these cards. Once you have the template you can use it with different patterned papers, cardstock or embossed papers.

You can click on the button to get a printable Project Sheet with instructions to make these cards.


For this card I used the Flight & Airy Designer Series Paper. The stamp for the sentiment is from the Translucent Florals Stamp Set. The greenery was punched from Calypso Coral and Lost Lagoon using the Bough Punch.


This card was made with the Perennial Lavender Designer Series Paper. I cut the greenery using the Painted Lavender Dies and the sentiment is from the Blueberry Bunches Stamp Set.


Supply List

You can click on the item to purchase it from my Online Store.

Painted Lavender Birthday Card

You can use any colors with the Painted Lavender Stamps, they don’t have to be lavender!


The color combo I used is from my Inspiration Calendar - Granny Apple Green, Blueberry Bushel and Starry Sky. You can get my Inspiration Calendar each month when you subscribe to my email list.


Tips & Instructions

  • Starry Sky Card Base - 5 1/2 x 8 1/2, score at 4 1/4

  • Basic White Layer - 5 1/2 x 4

  • Stamp floral images on the top and bottom corners.

    • Start by stamping the large group of flowers in Blueberry Bushel ink stamping off first to get a lighter shade.

    • Stamp the branches with the leaves in Granny Apple Green ink.

    • Stamp the narrow branch with flowers in Starry Sky ink.

  • Stamp the butterflies in Blueberry Bushel ink. Adhere layer to card base.

  • Stamp sentiment in Blueberry Bushel ink on Basic White and die cut using the Nested Essentials Dies. Die cut the next size up label and adhere behind the stamped label. Adhere label to card with Dimensionals.

  • Tie bow with a piece of Starry Sky Metallic Woven Ribbon and adhere to the label using a Glue Dot.


On the inside layer (5 1/4 x 4) stamp the floral images at the bottom corner. Stamp the sentiment in Blueberry Bushel Ink.


Supply List

You can click on the item to purchase it from my Online Store.

Sketch Challenge - Hot Air Balloon

Here’s my card for this week’s sketch challenge using the Lighter Than Air Suite of products.


The sketch is from the weekly Splitcoaststampers Sketch Challenge. It’s so fun doing their sketch challenges. You can click on the sketch to see the other projects posted.


Tips & Instructions

  • Azure Afternoon Card Base - 5 1/2 x 8 1/2, score at 4 1/4

  • Basic White Layer - 5 1/4 x 4, adhere to the card base.

  • Die cut heart shaped balloon from the Lighter Than Air Designer Series Paper with the coordinating Hot Air Balloon Die.

  • Stamp the larger balloon in Azure Afternoon ink. Stamp the design in the middle area in Azure Afternoon ink stamping off first on scrap to get a lighter shade. Die cut using the coordinating die.

  • Stamp the small basket in Azure Afternoon ink and the large basket in Fresh Freesia ink. Die cut with coordinating dies.

  • Die cut the cloud from the designer series paper. I was able to fit it some blue that was near the heart shaped balloon. You can also cut it from Azure Afternoon or another scrap of blue cardstock.

  • Adhere the balloons and baskets to the card. Adhere the cloud using Dimensionals.

  • Die cut the banner piece and stamp the sentiment in Azure Afternoon ink. Adhere to the card with Dimensionals.


On the inside layer (5 1/4 x 4) stamp the balloon in Azure Afternoon ink and sentiment in Fresh Freesia ink.


Supply List

You can click on the item to purchase it from my Online Store.

Cute Bee Mine Valentine's Day Card from the Simple Suite Stampers Tutorial

Here’s my card for this month’s Simple Suite Stampers Tutorial Bundle. We featured the Bee Mine Suite of products. These bees are so sweet.


The tutorial bundle includes 12 projects using products from this suite. The projects were made by Stampin’ Up! Demonstrators and includes pictures, measurements and instructions for each project.

You can get the tutorial bundle for FREE when you make a purchase of $35 or more from my Online Store. It is also available for purchase from my website. Click the button to purchase the tutorial.


The Bee Mine Designer Series Paper has lots of fun, bright patterns and the Bee My Valentine Bundle has a stamp set and coordinating punch to create happy little bees.


Here’s a look at the inside of the card I made.


Supply List

You can click on the item to purchase it from my Online Store.

Sketch Saturday - Blueberry Bunches

This week’s card was made for the Atlantic Hearts Sketch Challenge. I used the Blueberry Bunches Stamp Set which has such pretty images, I love blueberries!


Here’s the sketch. It’s a simple one but clean and simple is my style.


Tips & Instructions

  • Blueberry Bushel Card Base - 5 1/2 x 8 1/2, score at 4 1/4

  • Basic White Layer - 5 1/4 x 4, emboss using the Softly Sophisticated 3D Embossing Folder

  • Blueberry Bushel Layer - 4 x 2, adhere to the card.

  • Basic White Strip - 4 x 1/2, adhere to the center of the blue layer.

  • Using the Scalloped Contour Dies, die cut a scalloped rectangle from Basic White.

  • Stamp the sentiment and large blueberry image with Black Memento Ink on the rectangle.

  • Color the blueberries with Blueberry Bushel Stampin’ Blends Markers.

  • Color the leaves with a Dark Granny Apple Green Stampin’ Blends Marker.

  • Adhere the stamped piece with Dimensionals.

  • Add some Blueberry Bushel Tinsel Gems.


On the inside layer (5 1/4 x 4) stamp the smaller blueberry image with Black Memento Ink. Color with the Stampin’ Blends Markers.


Supply List

You can click on the item to purchase it from my Online Store.

Triple Fold Cards

These Triple Fold Fun Fold Cards are so simple to make and highlight your favorite patterned papers.

I made the Valentine’s Day Card with the Bee Mine Designer Series Paper and the masculine Birthday Card with the Trusty Toolbox Designer Series Paper.


Watch the video below for step-by-step instructions to make these fun fold cards and click the Project Sheet below for printable instructions.


This masculine card was made using the Trusty Toolbox Designer Series Paper. The sentiment is from the Hooray for Surprises Stamp Set.


This fun Valentine’s Day Card was made using the Bee Mine Designer Series Paper and Bee My Valentine Bundle.


Supply List

You can click on the item to purchase it from my Online Store.

Stippled Rose - Sending Thanks Card

I love cards with wreaths. I used the branch from the Stippled Rose Bundle to create it and then added some pretty flowers.


The color combo is from my Inspiration Calendar - Lost Lagoon, Pumpkin Pie and Daffodil Delight. You can get my calendar each month when you subscribe to my email list.


Tips & Instructions

  • Lost Lagoon Card Base - 5 1/2 x 8 1/2, score at 4 1/4

  • Basic White - 5 1/4 x 4, adhere to the card base.

  • Using the Stippled Rose Stamp Set stamp 3 branches on Basic White in Lost Lagoon Ink and cut with coordinating die. Adhere the branches in a circle to create the wreath.

  • Die cut some of the leaves from Lost Lagoon and cut apart. Die cut flowers from Pumpkin Pie and Daffodil Delight. Adhere the flowers to the leaves and adhere to the wreath.

  • Stamp sentiment on Basic White in Pumpkin Pie Ink. Die cut using the second from smallest rectangle from the Perennial Postage Dies. Adhere to the wreath with Dimensionals.

  • Add some Iridescent Pastel Gems to the center of the flowers.


On the inside layer (5 1/4 x 4) stamp the leaves in Lost Lagoon Ink.


Supply List

You can click on the item to purchase it from my Online Store.

Rock & Roll Birthday Card

The new Rock & Roll Suite has great products for masculine cards or anyone who is a Rock & Roll fan. This is the card I made for this week’s sketch challenge.


The sketch is from the weekly Splitcoaststampers Sketch Challenge. You can see all the projects posted for this week’s challenge by clicking the sketch.


Tips & Instructions

  • Basic Black Card Base - 5 1/2 x 8 1/2, score at 4 1/4

  • Basic White Layer - 5 1/4 x 4, adhere to card base.

  • Rock & Roll Designer Series Paper Layer - 5 x 3 3/4, adhere to card.

  • Cut 3 strips at 1/2” wide. I used Basic Black, Basic White and a piece of the Designer Series Paper. Banner one end using the Banners Pick A Punch. Vary the length and adhere to card.

  • Basic White - 2 1/2 x 2 1/2, stamp sentiment with Black Memento. Splatter some ink with a black marker. Adhere to a Basic Black 2 3/4 x 2 3/4 square and adhere to card with Dimensionals.

  • Die cut lightning bolt from Basic Black and adhere to card with Dimensionals.

  • Add some Adhesive-Backed Sparkle Gems.


On the inside layer (5 1/4 x 4) stamp guitar and sentiment with Black Memento Ink.


Supply List

You can click on the item to purchase it from my Online Store.

Nature's Sweetness Book Binding Card

This pretty Sympathy Card was made using products from the Nature’s Sweetness Suite of products. The Designer Series Paper is gorgeous.

It’s a Book Binding Fun Fold which is so easy to make.


Tips & Instructions

  • Pebble Path Card Base - 4-1/4 x 11, score at 4-1/4 and 5-1/2

  • Fold and burnish card base folding at the 5-1/2 and then fold back on the 4-1/4 score line. Using Tear & Tape, adhere the book binding part together.

  • Basic White - cut front layer at 4-1/8 x 4-1/8 and front strip at 4-1/8 x 1-1/8

  • Nature’s Sweetness Designer Series Paper - cut front layer at 4 x 4 and front strip at 4 x 1.

  • Adhere the Designer Series pieces to the white pieces and then to the card.

  • Die cut the large floral piece from the Designer Series Paper and adhere to the card front.

  • Stamp sentiment on scrap of Basic White and die cut with the label die from the Lovely & Sweet Dies. Adhere to card with Dimensionals.

  • Tie a bow with gold trim and adhere to the label with a Glue Dot.

  • Add some gold Blooming Pearls.


This paper is so pretty. Look at the script writing in gold against the Pebble Path background. You can die cut the gorgeous images from the paper like I did with the focal piece.


On the inside layer (4 x 4) stamp part of the large floral image with Pebbled Path Ink.


Supply List

You can click on the item to purchase it from my Online Store.

Sketch Saturday - Notes of Nature

Here’s my card for this week’s sketch challenge using the pretty Softly Stippled Designer Series Paper and Notes of Nature Bundle.


The sketch is from the Atlantic Hearts Sketch Challenge. I love the torn paper look!


The Softly Stipled Designer Series Paper is beautiful and you can get it for free during Sale-a-bration with a qualifying order.


Tips & Instructions

  • Lost Lagoon Card Base - 5 1/2 x 8 1/2, score at 4 1/4

  • Softly Stippled Designer Series Paper - 3 different patterns cut to 5 1/4 x 4. Tear the top of 2 of the sheets at the desired height.
    Tip - when you tear the paper, tear it pulling forward if you want if you want the white show along the ridge.

  • Adhere the papers to the card base starting with the paper that was not torn and then the other papers to get the look you want.

  • Stamp sentiment in Lost Lagoon ink on a 1 1/2 x 2 1/4 piece of Basic White and cut a banner at the bottom.

  • Cut a piece of Lost Lagoon to 1 3/4 x 2 1/2 and cut a banner at the bottom. Adhere behind white banner and adhere to the card with Dimensionals.

  • Die cut the greenery piece from Lost Lagoon using the Notes Of Nature Dies and adhere to the sentiment banner.

  • Using 2 strands of Linen Thread tie a bow and adhere with a Glue Dot.

  • Add some Wild Wheat Dots.


On the inside layer (5 1/4 x 4) add a 4 x 3/4 strip of Designer Series Paper. Stamp the leaf image at the top in Lost Lagoon ink.


Supply List

You can click on the item to purchase it from my Online Store.

Cute Peekaboo Cards using Fluffiest Friends

The Fluffiest Friends Bundle is perfect for these fun Peekaboo Birthday Cards. There are such cute chubby critters in the set.


Watch the video to see step-by-step instructions to make these cards and click on the Project Sheet Button to download a printable instruction sheet to save for reference.


I used Azure Afternoon Cardstock for this one and blended Parakeet Party Ink on the inside layer. The sentiments are from the Hooray For Suprised Stamp Set.


For this card I switched up the colors using Parakeet Party for the card base and Azure Afternoon for the Ink Blending.


Supply List

You can click on the item to purchase it from my Online Store.

Adoring Hearts Valentine's Day Card

Here’s a fun Valentine’s Day Card that I made using the Adoring Hearts Hybrid Embossing Folder. It was so easy to make!


The color combo that I used is from my monthly Inspiration Calendar - Orchid Oasis, Berry Burst and Blackberry Bliss. You can receive my calendar each month when you subscribe to my email list.


Check out the Adoring Hearts Hybrid Embossing Folder. It comes with dies and the folder so you can cut and emboss the hearts with one pass.


Tips & Instructions

  • Blackberry Bliss Card Base - 5 1/2 x 8 1/2, score at 4 1/4

  • Basic White Layer - 5 1/4 x 4, emboss and cut using the Adoring Hearts Hybrid Embossing Folder. Lay your cardstock on the folder making sure it covers 2 rows of the hearts. Put the die on the other of the folder, close it up and run it through your embossing machine.

  • Pop out the cut hearts and adhere the white layer to the card base. Save the hearts for another project.

  • Cut a piece Orchid Oasis and Berry Burst to 5 1/4 x 2. Place the pieces in the Embossing Folder, place the die in the Embossing Folder and run it through your machine. You will get 6 hearts, 3 of each color.

  • Adhere the hearts to the card with Dimensionals.

  • Using a single heart die, cut a heart from Basic White. Stamp sentiment with Blackberry Bliss Ink and adhere to the bottom, right heart. The sentiment is from the Bee My Valentine Stamp Set.


I love all the embossing on this card; the small hearts on the white layer and the different patterns on the larger hearts.


On the inside layer (5 1/4 x 4) stamp the sentiment with Blackberry Bliss and the small hearts with Orchid Oasis Inks. Stamp the outline for the large heart with Berry Burst Ink and the filler image with Berry Burst Ink stamping off on scrap first to get a lighter image.


Supply List

You can click on the item to purchase it from my Online Store.

Sketch Challenge - Flight & Airy

I made this sweet card for this week’s sketch challenge using a variety of products. My idea was to use a wreath and bird so I looked through my stash to find just the right products.


Here’s the sketch I followed. It’s from the weekly Splitcoaststampers Sketch Challenge. Click on it to see the other projects posted for the challenge.


Tips & Instructions

  • Pecan Pie Card Base - 5 1/2 x 8 1/2, score at 4 1/4

  • Basic White - 5 1/4 x 4, adhere to the card base.

  • Fight & Airy Designer Series Paper - 5 1/8 x 3 7/8, cut off the top right corner and adhere to the card.

  • Cut a wreath from Pretty Peacock using the Natural Prints Dies and adhere to the card.

  • Fussy cut a bird from the Flight & Airy Designer Series Paper and adhere to the wreath with Dimensionals.

  • Stamp sentiment with Black Memento Ink on a 1/2 strip of Basic White. I used the sentiment from the Notes of Nature Stamp Set. To get just the Happy Birthday part of the sentiment, I colored just those words on the stamp using a Basic Black Stampin’ Write Marker and stamped on the strip.

  • Punch both ends of the sentiment strip using the Happy Labels Pick A Punch and adhere to the card with Dimensionals.


On the inside layer (5 1/4 x 4) stamp the rest of that sentiment by coloring just those words on the stamp with a Basic Black Stampin’ Write Marker and stamping it on the layer. Stamp the floral image with Pretty Peacock Ink stamping multiple times without re-inking.


Supply List

You can click on the item to purchase it from my Online Store.

Note: the new Flight & Airy Designer Series Paper and Notes of Nature Stamp Set will be available from the Mini Catalog & Sale-a-bration Brochure starting January 4, 2024.

Fun Watercolor Melon Card

This cute Hello Card features three of the products from the upcoming Sale-a-bration Brochure. I’m so excited about all the new products that will be available starting January 4, 2024.


You can get the Watercolor Melon and Heartfelt Hello Stamp Sets for FREE during Sale-a-bration with a qualifying order.


The Softly Sophisticated Bundle comes with a Stamp Set and 3D Embossing Folder and is also FREE with a qualifying order.


Tips & Instructions

  • Sweet Sorbet Card Base - 5 1/2 x 8 1/2, score at 4 1/4

  • Basic White Layer - 5 x 3 3/4, emboss using the Softly Sophisticated 3D Embossing Folder and adhere to the card base.

  • Stamp the watermelon with Garden Green Ink on a scrap of Basic White and fussy cut.

  • Stamp the rind with Garden Green and the melon with Sweet Sorbet Inks on scrap of white. Add some seeds with Black Memento Ink and fussy cut.

  • Stamp the sentiment on a 2 x 1 1/4 piece of Basic White with Garden Green Ink. Adhere to a piece of Sweet Sorbet Cardstock cut to 2 1/4 x 1 1/2.

  • Adhere the sentiment, watermelon and slice of watermelon to the card using Dimensionals.


On the inside layer (5 1/4 x 4) stamp the 3 rinds with Garden Green. Stamp the 3 pieces of melon with Sweet Sorbet Ink and add some seeds with Black Memento Ink. Stamp the sentiment with Garden Green Ink.


Supply List

You can click on the item to purchase it from my Online Store.

Note: the new Sale-a-bration products will be available from the starting January 4, 2024 and are FREE with qualifying orders..

Swinging Door/Double Dutch Door Cards

I broke out some new Designer Series Papers to make these Swinging Door Cards a.k.a. Double Dutch Door Cards. Aren’t they pretty?

I love these papers so much. They are in the upcoming Mini Catalog which launches January 4, 2024. The bird pattern is from the Flight & Airy Designer Series Paper which is a Sale-a-bration product. The other is from the Perennial Lavender Designer Series Paper.


Watch the video below to learn how to make these cards. I have a Project Sheet below that you can print out and use for a reference.


This card features the Flight & Airy Designer Series Paper along with the Seasonal Branches Stamp Set. The bird on the card front was fussy cut from the Designer Series Paper. The sentiment is from the Charming Sentiments Stamp Set.


This card features the Perennial Lavender Designer Series Paper. The sentiment is from the Painted Lavender Stamp Set and I blended some ink on one of the Paper Butterfly Accents.


The new products that I used on these cards will be available for purchase starting January 4, 2024. The Flight & Airy Designer Series Paper is a free Sale-a-bration product when you spend $50 in product.