Hooray For Surprises Birthday Card

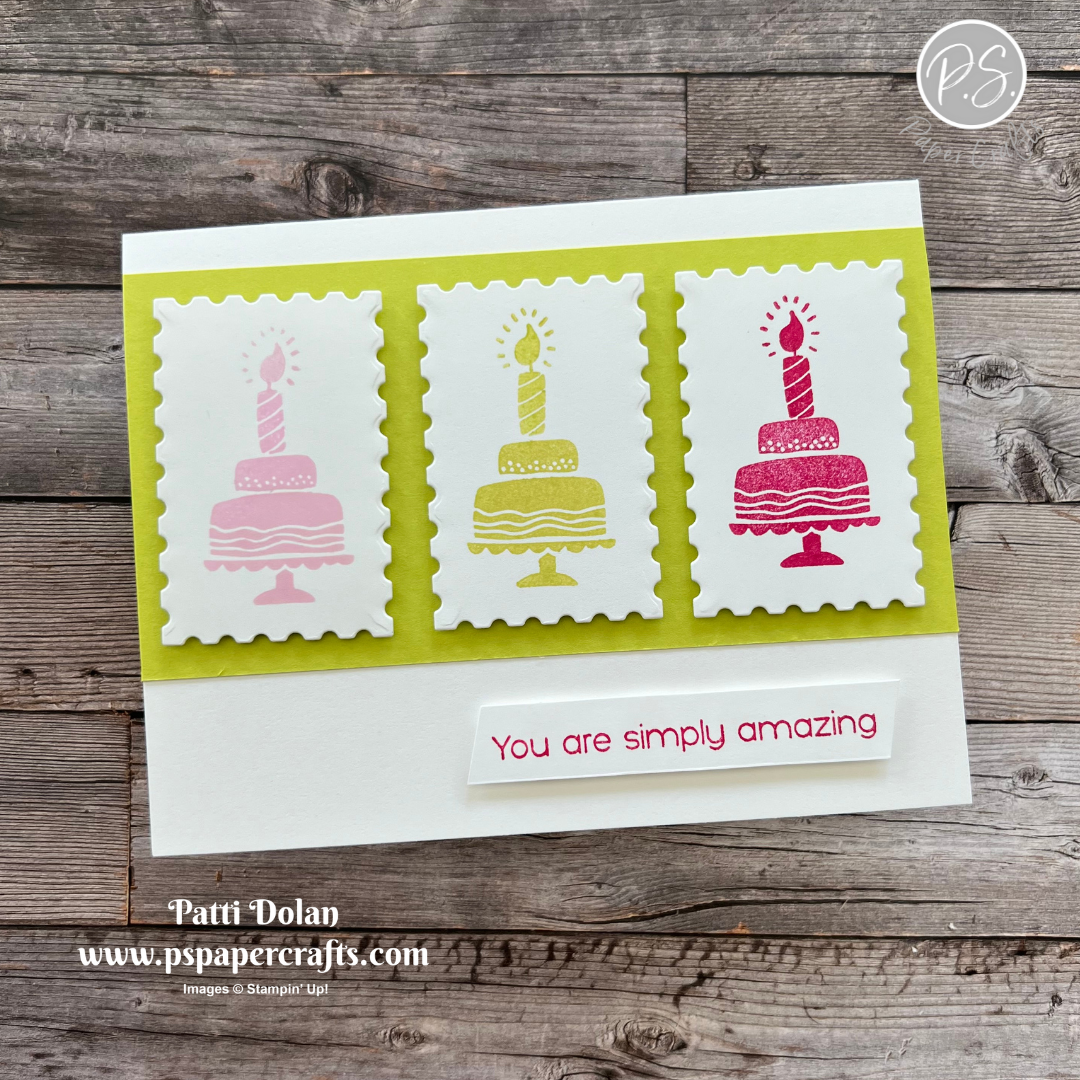
This is a fun Birthday Card using the Hooray For Surprises Stamp Set. Those cute birthday cakes were stamped on pieces cut with the Perennial Postage Dies.


The Color Combo is from my Inspiration Calendar - Bubble Bath, Lemon Lime Twist and Melon Mambo. You can get my calendar each month when you subscribe to my email list.


Tips & Instructions

  • Thick Basic White Card Base - 5 1/2 x 8 1/2, score at 4 1/4

  • Lemon Lime Twist Layer - 5 1/2 x 2 3/4, adhere to card base.

  • Die Cut 3 rectangles from Basic White using the Perennial Postage Dies.

  • Stamp the cake, candle and flame on each rectangle with Bubble Bath, Lemon Lime Twist and Melon Mambo inks.

  • Adhere the rectangles to the card with Dimensionals.

  • Stamp sentiment on a 1/2 strip of Basic White with Melon Mambo ink. Cut each end at an angle and adhere to card with Dimensionals.


On the inside layer (5 1/4 x 4) stamp the sentiment with Melon Mambo ink. Stamp the cake, candle and flame with Lemon Lime Twist ink.


Supply List

You can click on the item to purchase it from my Online Store.

Note: the new Hooray For Happiness Stamp Set and Perennial Postage Dies will be available from the Mini Catalog starting January 4, 2024.

Sketch Challenge - So Very Merry

For this week’s sketch challenge, I used the pretty Winter Meadow Designer Series Paper and the So Very Merry Stamp Set.


The sketch is from the weekly Splitcoaststampers Sketch Challenge. You can click on it to see the other cards posted for the challenge.


Tips & Instructions

  • Blueberry Bushel Card Base - 5 1/2 x 8 1/2, score at 4 1/4

  • Basic White Layer - 5 3/8 x 4 1/8

  • Winter Meadow Designer Series Paper (tree pattern) - 5 1/4 x 4

  • Winter Meadow Designer Series Paper (blue pattern) - 4 x 1 1/2, emboss with the Snowflake Sky 3D Embossing Folder

  • Basic White - 3 3/4 x 2, emboss with the Snowflake Sky 3D Embossing Folder

  • Lost Lagoon Cardstock - cut using the large evergreen die from the Forever Forest Dies.

  • Basic White - punch with 2 3/8 Circle Punch and cut in half. Stamp sentiment with Lost Lagoon Ink.

  • Assemble the card

    • Adhere the white layer to the card base.

    • Adhere the Designer Series Paper with the tree pattern to the card.

    • Adhere the white embossed piece to the card.

    • Adhere the blue embossed piece to the card.

    • Adhere the half circle to the blue layer

    • Adhere the tree to the white embossed layer.


On the inside layer (5 1/4 x 4) stamp group of trees across the bottom with Lost Lagoon Ink.


Supply List

You can click on the item to purchase it from my Online Store.

Easy Pinwheel Cards

Have you ever made a Pinwheel Card? They are simple to make and really look so pretty.


Watch the video below to see step-by-step instructions to make these cards. I used new products from the upcoming Mini Catalog on some of the cards. These products will be available starting January 4, 2024.

You can click on the Project Sheet Button to get printable instructions for reference.


This card was made using the new Lighter Than Air Designer Series Paper and Azure Afternoon Cardstock. The sentiment is from the Hot Air Balloons Stamp Set.


I love the Softly Stippled Designer Series Paper that I used for this card. It’s a free Sale-a-bration product with a qualifying order. The sentiment is from the Something Fancy Stamp Set.


This last one was made with the Countryside Inn Designer Series Paper from the Annual Catalog. I embossed both the pinwheel and white layer with the Countryside Blossoms Embossing Folder. It gives the card a pretty quilted look.


Supply List

You can click on the item to purchase it from my Online Store.

Note: the new products will be available from the Mini Catalog starting January 4, 2024.

Filled With Happiness

This card is a nice change from the winter holiday cards. It has a fresh, bright feel to it. I used the new Filled With Happiness Stamp Set which coordinates with the Modern Oval Punch.


The color combo is from my Inspiration Calendar - Old Olive, Coastal Cabana and Calypso Coral. You can get my calendar each month when you subscribe to my email list.


Tips & Instructions

  • Coastal Cabana Card Base - 5 1/2 x 8 1/2, score at 4 1/4

  • Basic White Layer - 5 x 3 3/4

  • Stamp the image on white layer in Old Olive ink.

  • Stamp the image again on a scrap with Black Memento ink and punch the center using the Modern Oval Punch.

  • Color the oranges with a Dark Calypso Coral Stampin’ Blends Marker. Color the leaves with a Light Old Olive Stampin’ Blends Marker and the small flowers with a Coastal Cabana Stampin’ Write Marker.

  • Wrap a piece of Calypso Coral Braided Linen Trim around the white layer and adhere it to the back. Adhere layer to card base.

  • Adhere the oval piece to the card using Dimensionals.

  • Tie bow with the trim and adhere with a Glue Dot.

  • Add some Calypso Coral Iridescent Pastel Gems.


On the inside layer (5 1/2 x 4) stamp just the fruit image at the bottom corner. I inked up this image by coloring just the outline with a Black Stampin’ Write Marker and stamped it on the layer. Then I colored it with the markers that I used on the card front.


Supply List

You can click on the item to purchase it from my Online Store.

Note: the new Filled With Happiness Stamp Set will be available from the Mini Catalog starting January 4, 2024.

Sketch Challenge - Hope You Know

I made this pretty Miss You Card for this week’s Splitcoaststampers Sketch Challenge using the Masterfully Made Designer Series Paper and Hope You Know Stamp Set. I love the vibrant florals in this paper!


Here’s the sketch for this week’s challenge. You can click on it to see other cards posted for this week.


Tips & Instructions

  • Crushed Curry Card Base - 5 1/2 x 8 1/2, score at 4 1/4

  • Masterfully Made Designer Series Paper - 5 1/2 x 4 1/4, die cut using the largest frame from the Radiating Dies. Die cut the center using the smallest rectangle from the dies. This will be covered up by the layers.

  • Crushed Curry Frame - Die cut using the second from largest rectangle from the dies.

  • Adhere the largest frame to the card base, then the Crushed Curry frame, then the smallest piece of the Designer Series Paper.

  • Stamp sentiment on scrap of Basic White with Berry Burst Ink and punch using the Essential Tag Punch. Note - this punch is no longer available so you can use whatever tag you want. Adhere to card using Dimensionals.

  • Die cut the heart from Berry Burst and adhere with a Dimensional. Make sure you don’t put the Dimensionals on the part of the heart that will sit on the tag.

  • Tie 3 strands of white Baker’s Twine into a bow and adhere with a Glue Dot.

  • Add some Berry Burst Tinsel Gems.


On the inside layer (5 1/4 x 4) add a 4 x 3/4 strip of the Designer Series Paper.


Supply List

You can click on the item to purchase it from my Online Store.

2024 Spring Catalog Paper Share

Reservations are now open for my Designer Series Paper Share.  It's a great way to see all the papers from the upcoming 2024 Mini Catalog and decide which ones you like. 

Stampin' Up!'s Designer Series Paper is one of my favorite products and I'm always surprised at the patterns I like that I would never have thought to purchase.


What is a Paper Share you may ask? 
 

You get a taste of all the Designer Series Papers that are in the new 2024 Mini Catalog.  This is a great way to see and feel these new products without purchasing them all in full packages.  


Paper Share $35 plus $9.00 for shipping 


Your Paper Share includes 96 pieces of 6x6 Designer Series Papers:

  • Bee Mine – 12 pieces

  • Forever Love Specialty Paper– 12 pieces

  • Just Kiddin’ – 12 pieces

  • Lighter Than Air– 12 pieces

  • Nature’s Sweetness Specialty Paper – 12 pieces

  • Perennial Lavender – 12 pieces

  • Poetic Expressions  – 12 pieces

  • Rock & Roll  – 12 pieces

Plus a gift from me - a variety pack of the Sale-a-bration Designer Series Papers cut to 5 1/4 x 4.


Schedule:

  • January 3: deadline to pay (I will send you a PayPal Invoice to be paid by January 3)

  • January 4: I will order all the paper

  • January 13-20: I will cut, label and package all paper shares

  • January 20 (or earlier): I will start shipping paper shares (assuming there are no backorders)

Email me at  patti@pspapercrafts.com to reserve your spot. 

Center Step Fun Fold Cards

These Center Step Fun Fold Cards are so cool. They may look difficult to make but once you understand the cuts and scoring, they are pretty easy.


Watch the video to get step-by-step instructions and then click the Project Sheet button to get a printable instruction sheet.


This card was made using the adorable Beary Christmas Designer Series Paper and Beary Cute Bundle.


This card was made with the beautiful Winter Meadow Designer Series Paper and Christmas Classics Stamp Set.


Supply List

You can click on the item to purchase it from my Online Store.

Bird's Eye View Hello Card

I made this sweet hello card using the Bird’s Eye View Stamp Set. It has such cute bird images.


The color combo is from my Inspiration Calendar - Daffodil Delight, Pool Party and Smoky Slate. These colors work well together for a bird image.

You can get my Inspiration Calendar each month when you subscribe to my email list.


Tips & Instructions

  • Thick Basic White Card Base - 5 1/2 x 8 1/2, score at 4 1/4

  • Delightful Floral Designer Series Paper - 5 1/4 x 4, adhere to the card base.

  • Cut Basic White using the largest die from the Nested Essentials Dies.

  • Stamp bird and branch on white die cut piece with Black Memento Ink.

  • Color the images with Stampin’ Blends. I used Dark Smoky Slate for the branch, Light Daffodil Delight for the bird and Dark Pool Party for the wing and tail. I used Dark Daffodil Delight for the beak.

  • Stamp the sentiment (from the Wonderful Thoughts Stamp Set) with Smoky Slate Ink.

  • Adhere the stamped piece to the card with Dimensionals.

  • Add some Smoky Slate Faceted Gems.


On the inside layer (5 1/4 x 4) stamp the sentiment with Smoky Slate Ink and the bird with Black Memento Ink. Color the bird with Daffodil Delight and Pool Party Stampin’ Blends.


Supply List

You can click on the item to purchase it from my Online Store.

Sketch Challenge - Hot Air Balloon

This week’s sketch challenge was an easy one for me. I used products from the new Lighter Than Air Suite from the upcoming spring Mini Catalog.


Here’s the sketch from the weekly Splitcoaststampers Sketch Challenge. You can click on the sketch to see the other projects posted for this week’s challenge.


The Hot Air Balloon Bundle has fun images and coordinating dies. For this card I cut a piece of the Lighter Than Air Designer Series Paper in strips to create the background.


Tips & Instructions

  • Thick Basic White Card Base - 5 1/2 x 8 1/2, score at 4 1/4

  • Lighter Than Air Designer Series Paper - cut four strips 5 3/8 x 1 7/8 (keep them in order). Adhere the strips to the card base.

  • Stamp balloon with Azure Afternoon Ink and cut with coordinating Hot Air Balloon dies.

  • Stamp sentiment on the banner with Azure Afternoon Ink and cut with coordinating die. Adhere to balloon. Adhere the balloon to the card using Dimensionals.

  • Die cut basket from a scrap of Azure Afternoon and adhere below the balloon with a Mini Dimensional.

  • Add some Rainbow Adhesive-Backed Dots.


On the inside layer (5 1/4 x 4) stamp the balloon with Flirty Flamingo Ink. I stamped direct with one set of stripes and stamped off for the other set of stripes. Stamp the basket and sentiment with Azure Afternoon Ink.


Supply List

You can click on the item to purchase it from my Online Store.

Note: the new products from the Lighter Than Aire Suite will be available from the Mini Catalog starting January 4, 2024.

Free Shipping

Have something on your wish list? Thinking about stocking up on crafting essentials? Got the urge to splurge? Shop on 14 December and get all the products you love while saving on shipping costs!

This incredible deal only lasts for 24 hours on orders of $75 or more, so miss out!


My December Ordering Special is a pack of Foam Adhesive Sheets. These can be cut to the size you want with paper snips or use when die cutting.   I'll send you a pack for FREE when you place a $50 order (before shipping & tax) from my Online Store during the month of December.


Host Code for orders under $150 - HV4VNDGP

If your order is $150 or more, please enjoy the Host Rewards, you get 10% of free product of your total order (before shipping & tax)

Sketch Saturday - Bee My Valentine

I made this cute Slim Line Card using products from the Bee Mine Suite which is in the upcoming Mini Catalog. This is my card for the Atlantic Hearts Sketch Challenge.


Here’s the sketch for this week’s challenge.

Tips & Instructions

  • Sweet Sorbet Card Base - 8 1/2 x 7, score at 3 1/2

  • Bee Mine Designer Series Paper Layer - 3 1/4 x 6, adhere to bottom area of the card front leaving a border around it.

  • Basic White Layer - 3 1/4 x 2 1/4, emboss using the crosshatch folder from the Basics 3D Embossing Folders. Adhere to the top area of the card front to meet with the Designer Series Paper Layer.

  • Sweet Sorbet Strip - 3 1/4 x 1

  • Basic White Strip - 3 1/4 x 3/4, stamp sentiment with Black Memento Ink. Adhere to the Sweet Sorbet Strip and adhere to the card.

  • On a scrap of Basic White, stamp the bee. I found it was easier to line up if I stamped the body first and then added the stripes and tail. Stamp the body with Daffodil Delight Ink and the stripes with Black Memento Ink.. (Tip - Use a stamp positioning tool so you can stamp the black stripes multiple times to get a good solid image.)

  • Pick a face and stamp with Black Memento Ink.

  • Stamp the wings on a scrap of Basic White.

  • Punch the and the wings using the coordinating Bee Builder Punch. Adhere wings to the bee and then adhere the bee to the card with Dimensionals.

  • Add some Adhesive-Backed Hearts.


On the inside layer (8 1/4 x 3 1/4) stamp the sentiment with Black Memento Ink. Stamp the 3 hearts with Sweet Sorbet Ink. Stamp the bee with Daffodil Delight and Black Memento Ink. Add the wings and the dotted line with Black Memento Ink.

(Tip - just ink up a portion of the dotted line. I covered part of it with a Post-It Note, pressed it in the ink pad, removed the Post-It Note and then stamped. It’s photopolymer so you can get a good idea of what part you want to ink up and what part you want to cover.


Supply List

You can click on the item to purchase it from my Online Store.

Note: the new products from the Bee Mine Suite will be available from the Mini Catalog starting January 4, 2024.

Angled Tri-Fold Cards

The Angled Tri-Fold is a great design and easy to make once you have the instructions. I used the Garden Walk Designer Series Paper to make all these cards. Aren’t they pretty?


Watch the video to get step-by-step instructions and then click the Project Sheet Button below to get a printable document with measurements and instructions.


This card was created using the Garden Walk Designer Series Paper and Pretty Peacock Cardstock and Ink. I embossed the belly band using the Cane Weave 3D Embossing Folder.


I love this pattern in the Garden Walk Designer Series Paper. The Poppy Parade and Wild Wheat colors are so pretty together.


This card was made using Calypso Coral and I embossed one of the front panels with the Basics 3D Embossing Folder.


Supply List

You can click on the item to purchase it from my Online Store.

So Refreshing Birthday Card

This is such a fun and happy card. I used the So Refreshing Bundle to stamp and die cut the pieces.


The color combo is from my Inspiration Calendar - Flirty Flamingo, Tahitian Tide and Crushed Curry. I had a hard time fitting the Crushed Curry into this card and decided to use a piece of the Inked Botanicals Designer Series Paper for the background layer. I think it works well.

If you want to get my Inspiration Calendar each month, subscribe to my email list and I’ll send it to you.


Tips & Instructions

  • Thick Basic White Card Base - 5 1/2 x 8 1/2, score at 4 1/4

  • Inked Botanicals Designer Series Paper - 5 1/4 x 4, adhere to the card base.

  • Die cut a circle from Basic White using the 7th from smallest Deckled Circle Dies. You’ll have to cut off the bottom of the circle to fit behind the tablecloth so it doesn’t show through. Stamp sentiment with Tahitian Tide Ink and adhere to the card.

  • Die cut the tablecloth from Tahitian Tide. I love that the die also embosses the pattern on the tablecloth. Adhere to the circle.

  • Stamp the pitcher and 2 glasses on Basic White with Black Memento Ink. Stamp the pink lemonade in the pitcher and glasses with Flirty Flamingo Ink. Die cut the pitcher and glasses and adhere them to the card with Dimensionals.

  • Add some Flirty Flamingo Loose Frosted Dots using tiny dots of Liquid Glue.


On the inside layer (5 1/4 x 4) stamp sentiment with Tahitian Tide Ink. Stamp 2 glasses with Black Memento Ink and pink lemonade with Flirty Flamingo Ink.


Supply List

You can click on the item to purchase it from my Online Store.

Sketch Saturday - Stars At Night

I made this card for this week’s Splitcoaststampers Sketch Challenge using the Stars At Night Bundle. Night of Navy and White are such great colors for Christmas Cards.


Here’s the sketch I worked from. You can click on the sketch to see the other cards posted for this week’s challenge.


Tips & Instructions

  • Night of Navy Card Base - 5 1/2 x 8 1/2, score at 4 1/4

  • Basic White Layer - 5 1/4 x 4, adhere to the card base.

  • O Holy Night Designer Series Paper Strip - 4 1/2 x 2, cut top and bottom at an angle and adhere to the card.

  • Die cut banner from Basic White using the largest die from the Nested Essentials Dies. Stamp sentiment with Night of Navy Ink and adhere to the card.

  • Die cut star from Night of Navy and adhere to card with Dimensionals.

  • Tie bow with Night of Navy & Gold Ribbon and adhere with a Mini Glue Dot.

  • Add some Adhesive-Backed Star Trinkets.


On the inside layer (5 1/4 x 4) stamp sentiment and stars with Night of Navy Ink.


Supply List

You can click on the item to purchase it from my Online Store.

Forever Forest Christmas Card

Create a warm and inviting scene with mountains and evergreens with the Forever Forest Bundle. I used Lost Lagoon Ink and Blending Brushes to create the mountains and added some Shaded Spruce stamped and die cut trees.


Tips & Instructions

  • Lost Lagoon Card Base - 5 1/2 x 8 1/2, score at 4 1/4

  • Basic White Layer - 5 1/4 x 4

  • Stamp sentiment with Lost Lagoon Ink at the top right corner of the white layer.

  • Using the mountain die create the mountains in the distance. Lay the die n the middle of the layer and lightly add Lost Lagoon Ink with a Blending Brush. Move the die around to create multiple mountains.

  • Stamp the group of evergreen trees with Shaded Spruce Ink along the mountains.

  • Die Cut 2 sets mountains from Basic White and add Lost Lagoon Ink with a Blending Brush. Adhere one set of mountains along the bottom of the stamped trees. Adhere the second set with Dimensionals. Trim off any excess that hangs over the side of the layer.

  • Die cut 3 evergreen trees from Shaded Spruce and adhere them to the card just behind the second set of mountains.

  • Die cut 3 clouds from Boho Blue and adhere to the top of the card.

  • Adhere layer to card base.


On the inside layer (5 1/4 x 4) use Shaded Spruce Ink to stamp evergreen trees along the bottom lifting and stamping a second time without re-inking. Repeat to cover the bottom of the layer. Stamp sentiment with Lost Lagoon Ink.


Supply List

You can click on the item to purchase it from my Online Store.

Sketch Saturday - Magical Meadow

The Magical Meadow Bundle has beautiful images and dies. I used it to make a card for this week’s Atlantic Hearts Sketch Challenge.


This is the sketch I used. I love doing these sketch challenges.


Tips & Instructions

  • Lost Lagoon Card Base - 5 1/2 x 8 1/2, score at 4 1/4

  • Winter Meadow Designer Series Paper - 5 1/4 x 4, adhere to the card base.

  • Pretty Peacock - Die cut 3rd from smallest frame

  • Basic White - Die cut 2nd from smallest frame and stamp sentiment with Blackberry Bliss Ink.

  • Die Cut floral pieces from Pretty Peacock, Lost Lagoon and Basic White

  • Stamp berries with Blackberry Bliss Ink on Basic White and die cut with coordinating die.

  • Arrange and adhere the die cut greenery pieces to the back of the white sentiment label. You may need to trim the bottoms first. Adhere to the Pretty Peacock layer with Dimensionals. Make sure you put the Dimensionals on the areas that won’t sit on the greenery. Adhere to the card.

  • Adhere the berries to the front of the sentiment label.

  • Add some Lost Lagoon Faceted Gems.


On the inside layer (5 1/4 x 4) stamp the sentiment with Blackberry Bliss Ink. Stamp the greenery with Lost Lagoon Ink, lifting and stamping a second and third time without re-inking.


Supply List

You can click on the item to purchase it from my Online Store.

Pocket Gift Card Holders

These Pocket Gift Card Holders are so pretty! When you pull up the layer with the ribbon, there’s a pocket for a gift card or money or a check. So fun!


Watch the video to see step-by-step instructions to make these cards and then click on the button below to get a printable document with the measurements, instructions and pictures.


This card was made using the A Walk In The Forest Designer Series Paper. The sentiment is from the Beary Cute Stamp Set.


This card was made using the Traditions of St. Nick Designer Series Paper and Christmas Classics Stamp Set.


Supply List

You can click on the item to purchase it from my Online Store.

Sweetest Cherries Birthday Card

This is a real switch from the holiday season. It feels like summer with this card. I made it with the Sweetest Cherries Stamp Set and coordinating punch. It’s bright, bold and fun!


The color combo is from my Inspiration Calendar - Real Red, Granny Apple Green and Blueberry Bushel. You can get my calendar each month when you subscribe to my email list.


Tips & Instructions

  • Blueberry Bushel Card Base - 5 1/2 x 8 1/2, score at 4 1/4

  • Glorious Gingham Designer Series Paper - 5 1/2 x 4 1/4, adhere to card base.

  • Basic White - die cut using the Scalloped Contour Dies.

  • Stamp sentiment with Granny Apple Green and Real Red inks on white rectangle.

  • On scrap of Basic White stamp 2 cherries with Real Red Ink and punch using the Cherry Builder Punch.

  • On scrap of Basic White stamp 2 leaves and 2 stems with Granny Apple Green Ink and punch with the Cherry Builder Punch.

  • Adhere the stems, cherries and leaves to the white rectangle and then adhere the rectangle to the card with Dimensionals.

  • Add some blue Tinsel Gems.


On the inside layer (5 1/4 x 4) stamp sentiment with Blueberry Bushel ink and adhere a 4 x 3/4 strip of the Designer Series Paper.


Supply List

You can click on the item to purchase it from my Online Store.

Sketch Challenge - Joy To You

Here’s the card I made for this week’s Splitcoaststampers Sketch Challenge. I wanted to use trees in the squares but they are so small I had to look through my stamps and dies to find just the right ones. These trees came from the Zany Zoo Dies; can you believe it?


You can click on it to see the other projects posted for this week’s challenge.


Tips & Instructions

  • Pretty Peacock Card Base - 5 1/2 x 8 1/2, score at 4 1/4

  • Basic White Layer - 5 1/4 x 4 and stamp sentiment from the Joy To You Stamp Set in Pretty Peacock Ink.

  • Color a piece of White Iridescent Ribbon with a Dark Pretty Peacock Stampin’ Blends Marker and wrap it around the white layer adhering the ribbon to the back. Adhere layer to card base.

  • Use the “B” side of the Delightful Floral Designer Series Paper

    • Cut 3 squares from the light green piece - 1 1/2 x 1 1/2 and round the corners.

    • Die cut 3 of the larger trees from the Pretty Peacock (the dark green piece) using the Zany Zoo Dies.

    • Die cut 4 of the smaller trees from the Parakeet Party (the medium green piece)

  • Adhere the trees to the squares.

  • Adhere squares to the card with Dimensionals over the ribbon.

  • Add some green Adhesive-Backed Glitter Sequins.


On the inside layer stamp sentiment with Pretty Peacock Ink. Stamp the pine branch with Pretty Peacock, stamping a second time without re-inking. Stamp third time by re-inking and stamping off on scrap and then onto the layer.


Supply List

You can click on the item to purchase it from my Online Store.

Simple Winter Meadow Christmas Card

I love letting our Designer Series Paper do the work when making a card. This was so easy to make, just a piece of patterned paper, a sentiment and some pearls.


The Winter Meadow Designer Series Paper has beautiful patterns that can be used for Christmas or winter cards.


Tips & Instructions

  • Misty Moonlight Card Base - 5 1/2 x 8 1/2, score at 4 1/4

  • Winter Meadow Designer Series Paper - 5 1/4 x 4 (I cut the sheet to 6 x 6 and then cut it down to get the pattern I wanted for the card.

  • Cut the label from Basic White using the largest banner from the Nested Essentials Dies. Stamp sentiment from the Christmas Classics Stamp Set with Shaded Spruce Ink. I stamped it at the bottom and trimmed off the top part of the label. Stamp the small corner design with Misty Moonlight Ink.

  • Adhere label to Designer Series Paper layer with Dimensionals. Adhere layer to card base.

  • Add some Iridescent Pearl Basic Jewels.


On the inside layer (5 1/4 x 4) stamp sentiment with Misty Moonlight Ink. Stamp pine branch with Shaded Spruce Ink on each corner, stamping multiple times without re-inking.


Supply List

You can click on the item to purchase it from my Online Store.