Sketch Challenge - Fresh As A Daisy Hello Card

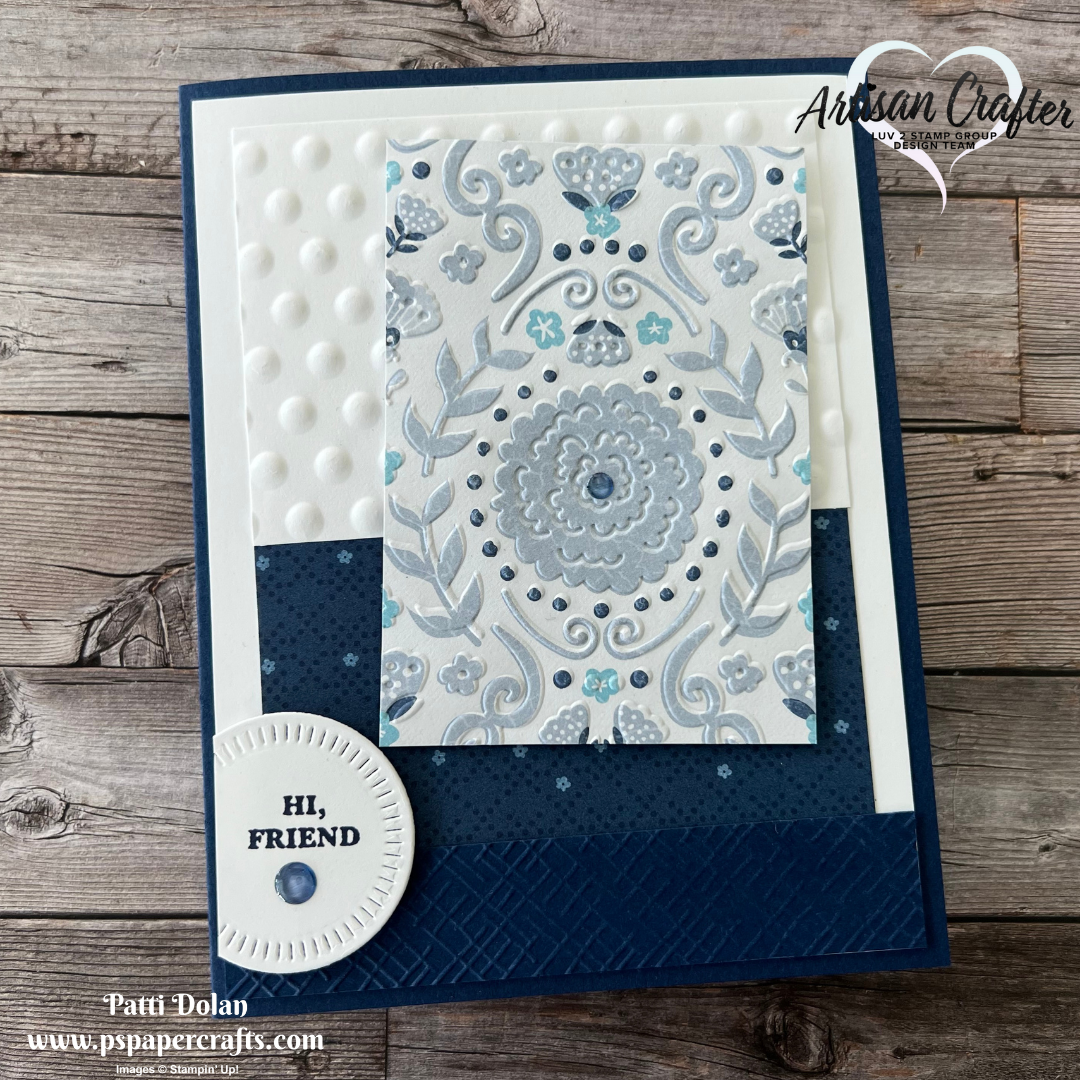
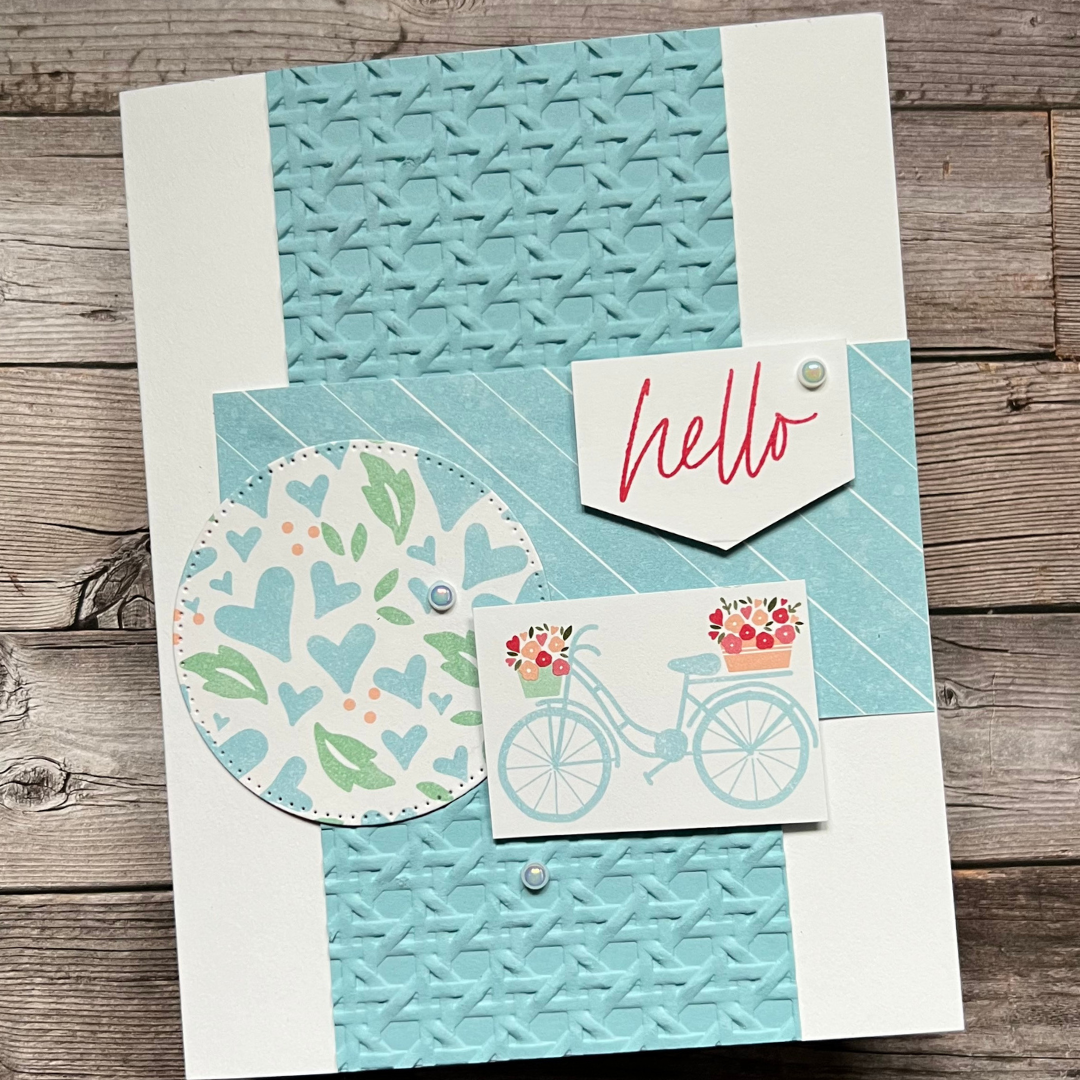
Here’s my card for this week’s Splitcoaststampers Sketch Challenge using the Fresh As A Daisy Designer Series Paper.


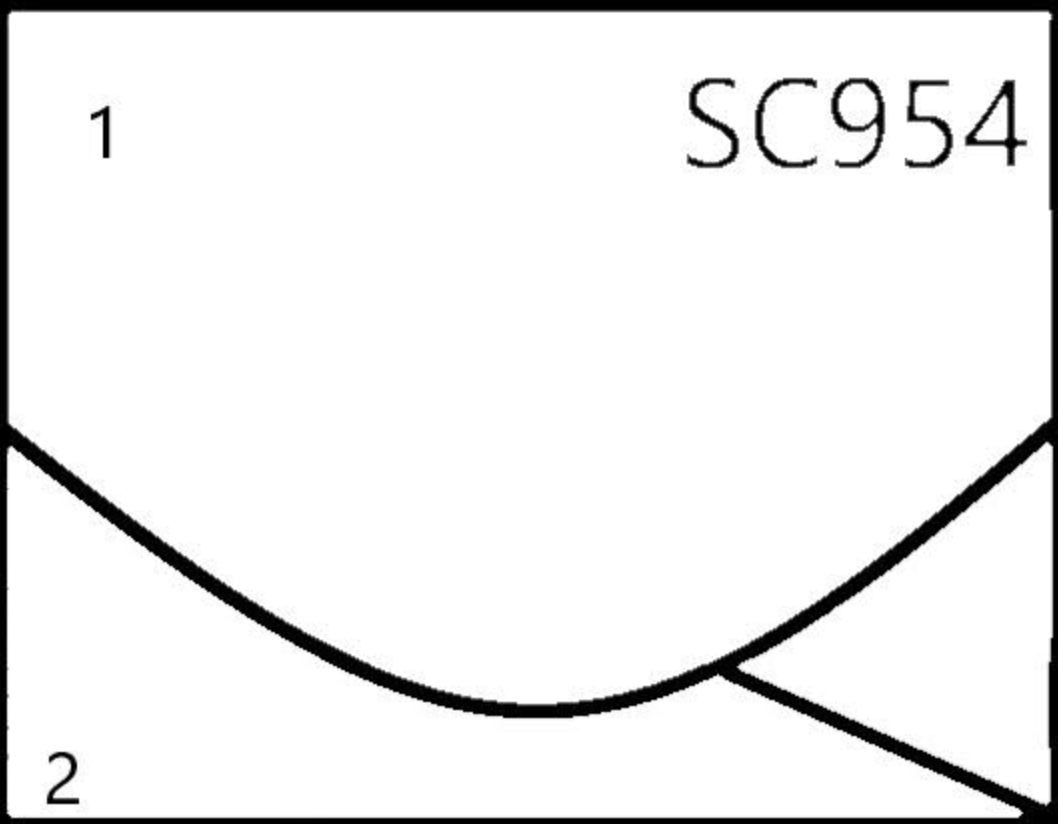
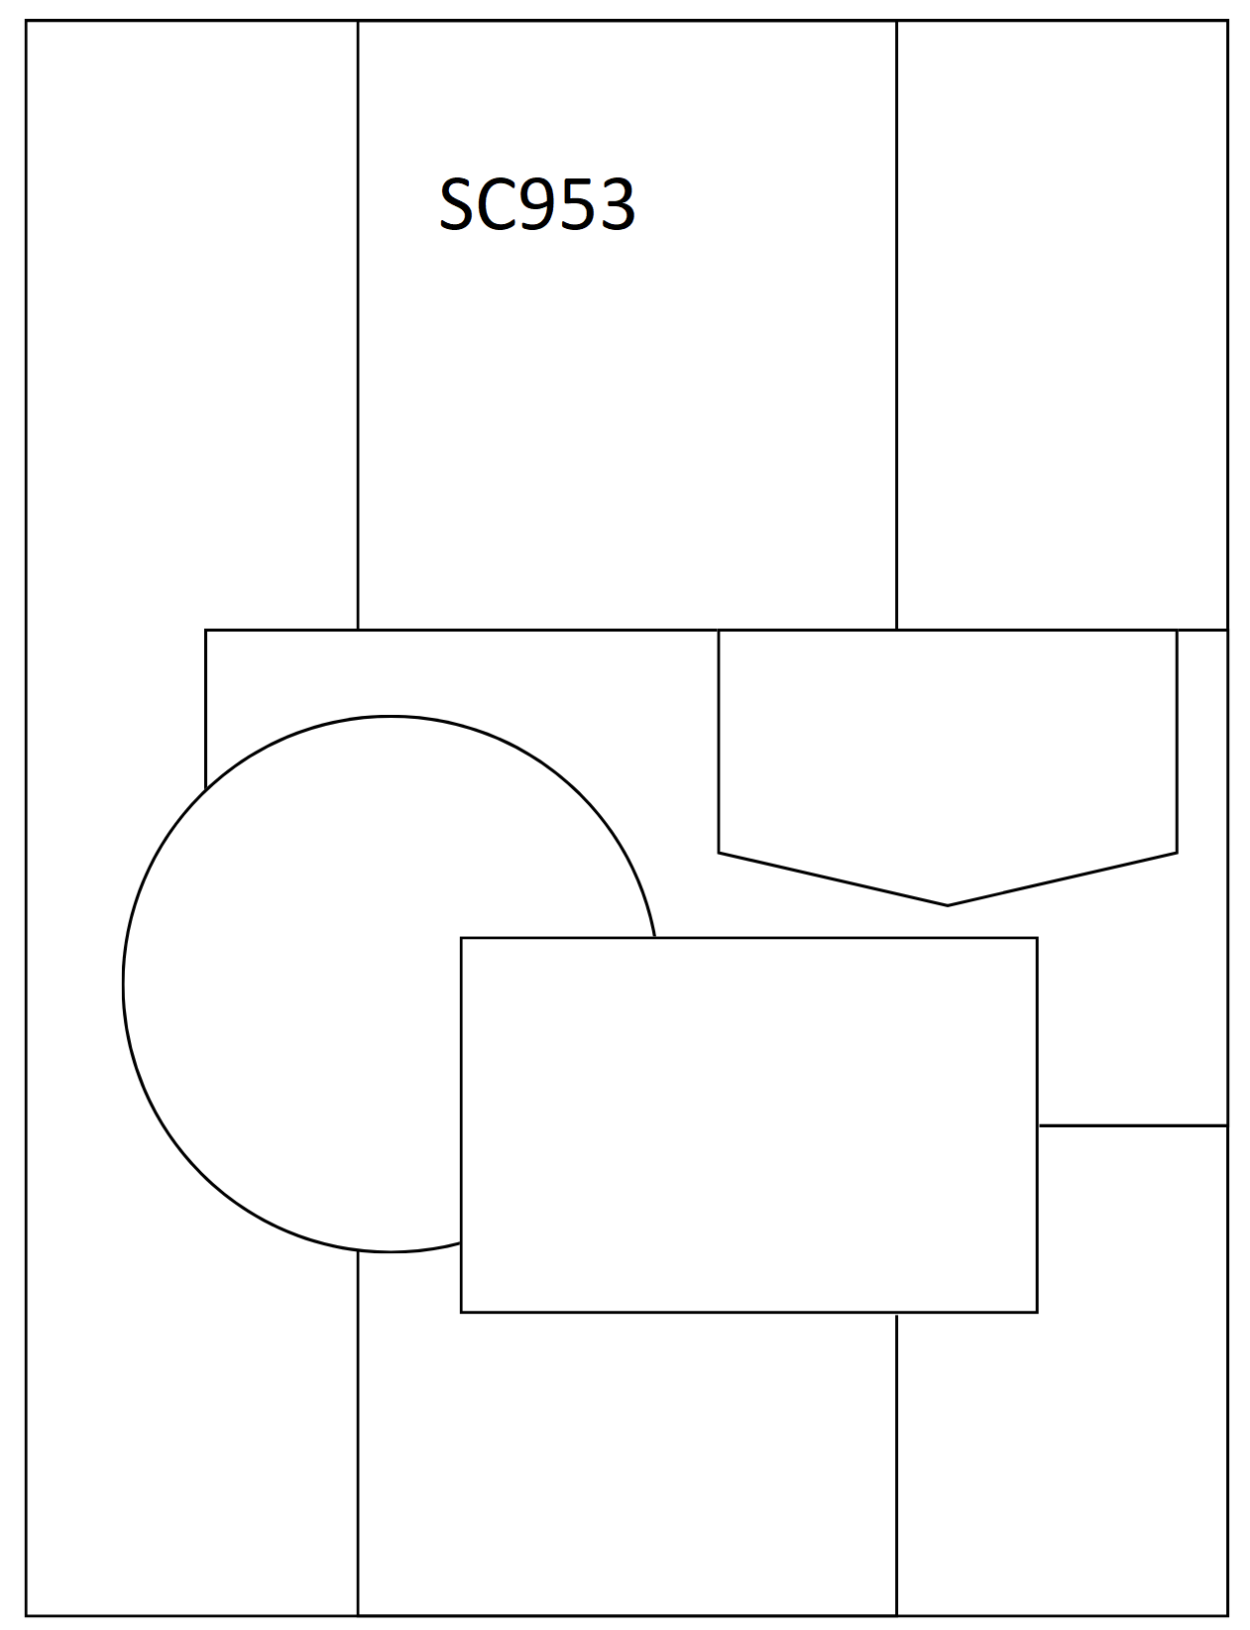
Here’s the sketch I followed. You can click on it to see the other projects submitted for this challenge.


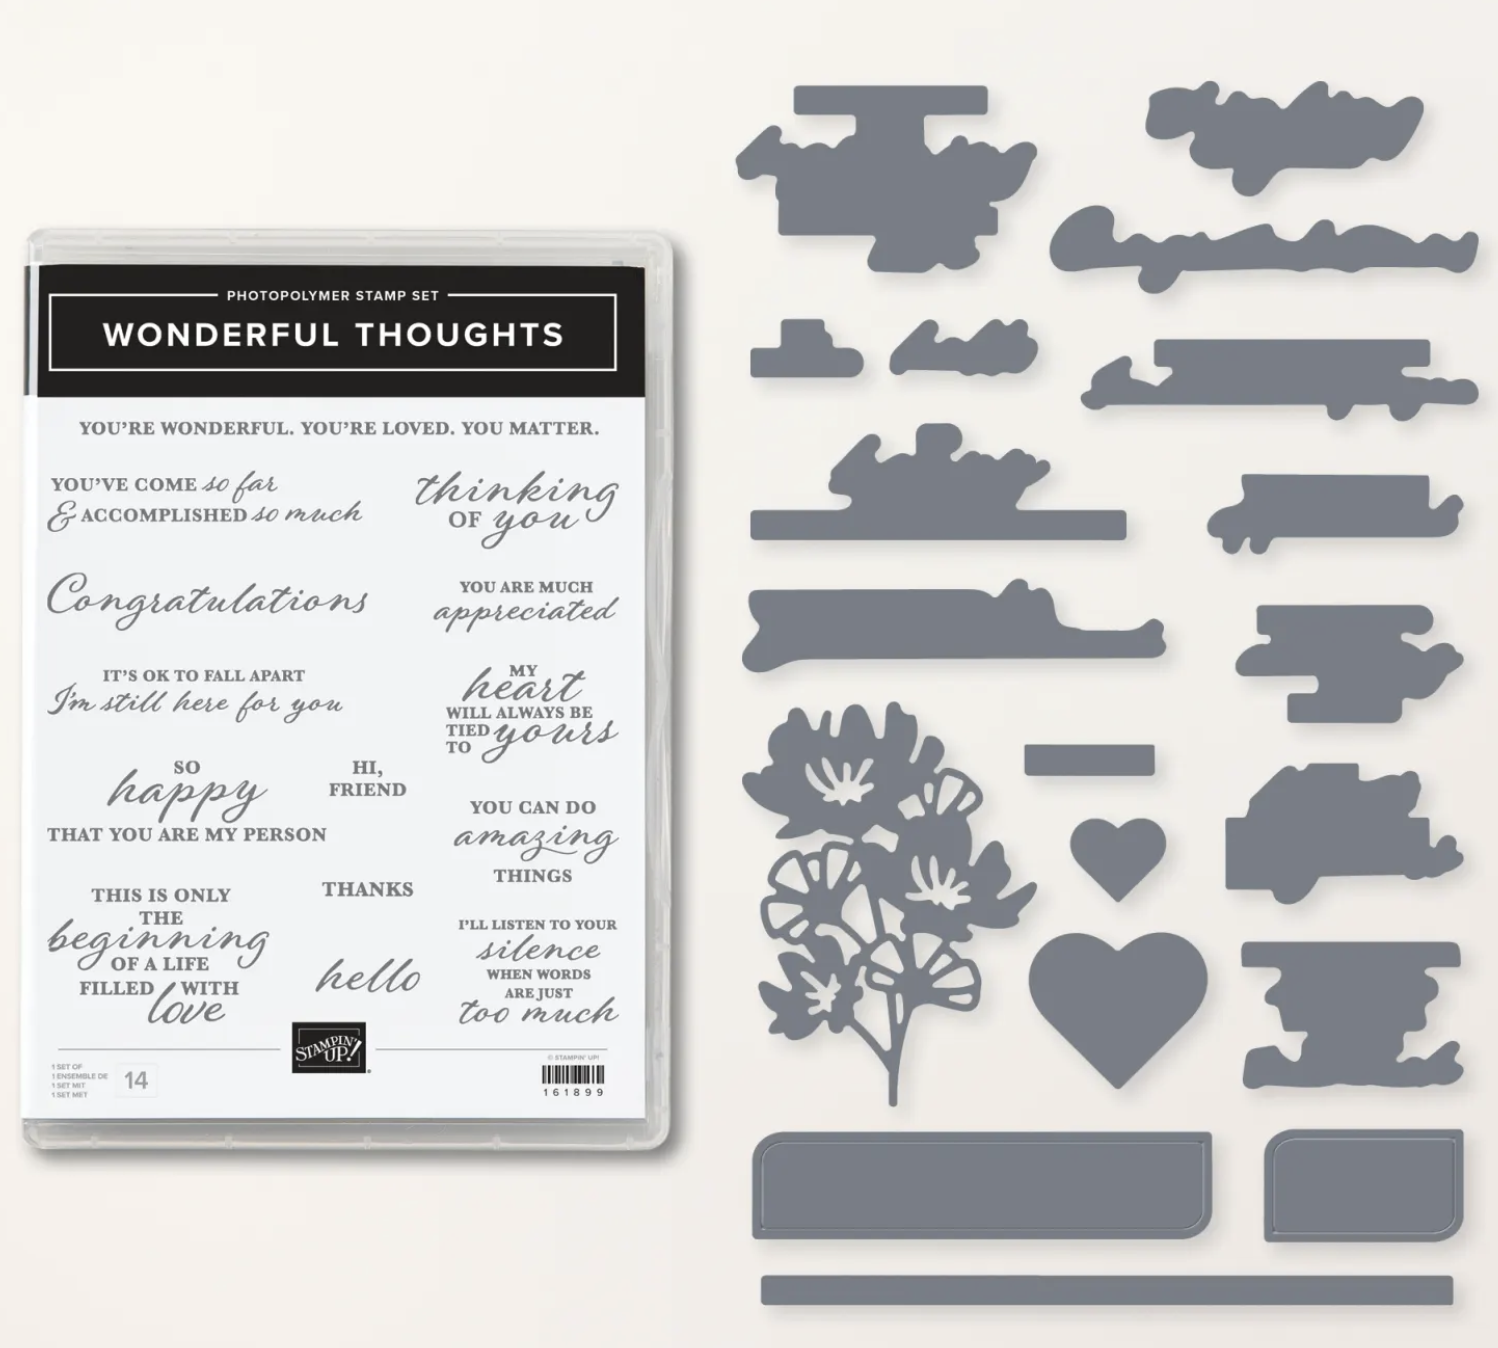
The sentiment is from the Wonderful Thoughts Bundle and it’s so cool how there are dies to cut out the sentiments.


Tips & Instructions

  • Thick Basic White Card Base - 5 1/2 x 8 1/2, score at 4 1/4

  • Basic White Layer - 5 1/4 x 4, emboss using the dots Basics 3D Embossing Folder and adhere to the card base.

  • Fresh As A Daisy Designer Series Paper (Copper Clay) - 4 x 3, round all 4 corners. Adhere to the card.

  • Fresh As A Daisy Designer Series Paper (daisy pattern) - 4 3/4 x 1 1/2, adhere to card.

  • Stamp the sentiment with Copper Clay Ink and cut with coordinating die. Adhere to card.

  • Add some Boho Blue Adhesive-Backed Solid Gems.


On the inside layer adhere a 3 x 2 1/2 piece of the daisy patterned Designer Series Paper. This pattern is so pretty that I had to use it on the inside too!


Supply List

You can click on the item to purchase it from my Online Store.

Countryside Inn Cards

If you love blues, you’ll want to get your hands on the Countryside Inn Designer Series Paper. It has pretty patterns and lots of shades of blue.


In the video below you’ll see the products in the Countryside Inn Suite and I’ll show you how to make these cards. This is a great suite of products that I know you’ll love.


Tips & Instructions

  • Night Of Navy Card Base - 4 1/4 x 11, score at 5 1/2 (top folding).

  • Basic White Layer - 5 1/4 x 4, emboss using the Countryside Blossoms Embossing Folder and adhere to card base.

  • Cut the Designer Series Paper using the 4th from largest Countryside Corners Dies laying it over the pattern to get the one you want.

  • Cut Basic White from the 3rd from largest die and Night of Navy from the 2nd from largest die.

  • Adhere the pieces together and adhere to the card.

  • Stamp the large outline images with Night Of Navy Ink on Basic White.

  • Stamp the sentiment inside the smallest outline and cut using the coordinating die. The sentiment is from the Sending Smiles Stamp Set. Adhere to the card with Dimensionals.

  • Add some Iridescent Pearls.


I used a different pattern for this card but followed the same steps. The sentiment is from the Happy Labels Stamp Set.


Add a 4 x 3/4 strip of the Designer Series Paper to the inside layer.


Supply List

You can click on the item to purchase it from my Online Store.

Sketch Challenge - Seasonal Branches

I’m so excited to be using products from the new Annual Catalog on the card I made for this week’s Splitcoaststampers Sketch Challenge. This is a fun peekaboo card!


Here’s the sketch I used. I put those doo-dads on the left because it worked better for my scene. You can click on it to see all the other projects made for this week’s challenge.


The Seasonal Branches Bundle has great images and sentiments and the dies coordinate so well to create branches for all the seasons. I love that sweet little bird!


Tips & Instructions

  • Bubble Bath Card Base - 5 1/2 x 8 1/2, score at 4 1/4

  • Cut the center of the card front using the square Stylish Shapes Dies to create the peekaboo hole.

  • Using the same die and one die larger, cut the square frame from Berry Burst and adhere it to the opening of the card front.

  • Lay your 5 1/4 x 4 inside layer inside the card and lightly draw around the opening with a pencil to help with positioning your images.

  • Stamp the bird with Memento Black Ink and the branch with Early Espresso Ink. Erase the pencil marks.

  • Color the bird with Light Crumb Cake and Light Balmy Blue Stampin’ Blends Markers. Color the beak with a Light Pumpkin Pie Stampin’ Blends Marker.

  • Stamp 7 flowers with Berry Burst Ink and cut with coordinating dies. Adhere the flowers to the branch and 2 to the frame. Adhere the inside layer to the card.

  • Stamp sentiment with Black Memento Ink on a 1/2 strip of Basic White. Punch both ends using the Banners Pick A Punch and adhere to the card with Dimensionals.

  • Add some Iridescent Pearls to the flower centers and the sentiment label.


Here’s what the inside looks like opened up. It’s already done for you.


Supply List

You can click on the item to purchase it from my Online Store.

New Catalog Now Live!

Today’s the day!!! The Stampin’ Up! 2023-2024 Annual Catalog is now live and you can start ordering from it.

Click on the catalog picture below to view an online version.


Check out this video to see the Fresh As A Daisy Suite Collection. I’m using these products in my May Card Class To Go. You can get details on this class by clicking on CLASSES at the top of this page.


Let me know if you have any questions or need help placing an order. My May Ordering Special is a pack of Tinsel Gems and you can get them for FREE when you place a $50 order (before shipping and tax) from my Online Store.


Use Host Code for orders under $150 - PR9HK667

Circle Sayings Barn Door Cards

The Circle Sayings Bundle works so well with these Barn Door Fun Fold Cards. The images fit into the circles that work with the coordinating punch!


Watch the video to see these new products and learn how to make these cards. Click the button to get a printable Project Sheet with the measurements and instructions.


I love the Wild Wheat color for this card (cardstock, ink and Designer Series Paper). Since I didn’t have the new Lemon Lolly and Azure Afternoon Stampin’ Blends yet, I decided to color them with ink from the ink pads and a Wink Of Stella Brush.

Just press a clear block into the ink pad and pick up the ink with the brush and color. You’ll get a nice glimmer to your image.


For this card I used the Bright & Beautiful Designer Series Paper along with Azure Afternoon Cardstock and Ink. The cupcake was colored the same way with the ink and Wink of Stella Brush and I used Azure Afternoon and Bubble Bath.


These new products will be available for purchase when the new 2023-2024 Annual Catalog launches on May 2, 2023.

Irresistible Blooms Mother's Day Cards

The Hello, Irresistible Suite of products is perfect to use for Mother’s Day Cards. I love the Designer Series Paper and the Irresistible Blooms Bundle. I had to look for a nice “Happy Mother’s Day” sentiment and found it in the Marigold Moments Stamp set which sadly is no longer available.


To make this card I used Flirty Flamingo for the card base and Ink. I cut the circle from the center of the Hello, Irresistible Designer Series Paper using the swirly circle die from the set, and cut a flower and leaves from the paper as well.

Lay the paper over a piece of Basic White to determine where to stamp and then mask the sentiment with Post-It Notes to break it down to 3 lines. I flicked some ink from a Light Flirty Flamingo Stampin’ Blends Marker to add some interest.

Add the flower with Dimensionals and the leaves behind it. Add some Loose Frosted Dots with Liquid Glue.


On the inside, stamp the sentiment (from the Charming Sentiments Stamp Set) and a small flower with Flirty Flamingo Ink. Stamp leaves with Pretty Peacock or Lost Lagoon Ink.


This card has a Pretty Peacock card base, Basic White 5 1/4 x 4 layer and a Designer Series Paper 5 x 3 3/4 layer. Cut a stitched square from the Stylish Shapes Dies and the flower and leaves from the Designer Series Paper. Stamp the sentiment with Flirty Flamingo on Basic White and cut with the Stylish Shapes Dies. Add some Loose Frosted Dots.


On the inside stamp the sentiment with Pretty Peacock Ink and the flower with Flirty Flamingo Ink and the leaves with Pretty Peacock Ink, stamping off first to get a lighter shade.


I used the Contoured Scalloped Dies to cut the Basic White and Designer Series Paper layers and adhered them to a Flirty Flamingo Card Base. Stamp the sentiment on a strip of Basic White with Flirty Flamingo Ink and cut to fit just around the sentiment and add with Dimensionals. Add some Loose Frosted Dots.


Supply List

You can click on the item to purchase it from my Online Store.

Note: The Pretty Peacock and Lost Lagoon products will be available for purchase starting May 2, 2023.

Sketch Challenge - Countryside Inn

Here’s the card I made for this week’s Splitcoaststampers Challenge. This was a tough one for me. I’m not crazy about putting a layer at an angle and as I look at it, I want to straighten it out LOL!


This is the sketch I followed. You can click on it to see other cards made for this challenge.


Tips & Instructions

  • Night Of Navy Card Base - 5 1/2 x 8 1/2, score at 4 1/4

  • Basic White Layer - 5 1/4 x 4

  • Basic White - 3 1/2 x 2 1/2, emboss using the dots Basics 3D Embossing Folder.

  • Countryside Inn Designer Series Paper (Night of Navy) - 3 1/2 x 1 3/4

  • Night of Navy - 4 x 3/4, emboss using the crosshatch Basics 3D Embossing Folder

  • Arrange the layers as shown in the picture but don’t adhere to the card base yet.

  • Countryside Inn Designer Series Paper (floral) - 3 x 2 1/2, emboss using the Countryside Blossoms Embossing Folder, lining up the design to on the paper with the folder. Adhere to card at an angle.

  • Stamp sentiment with Night of Navy Ink on a scrap of Basic White and cut using the circle from the Radiating Stitched Dies. Adhere to the card layers letting some of it hang over the edge and then trim off the overhang.

  • Adhere the layers to card base.

  • Add some Boho Blue Dots.


On the inside layer add a 4 x 3/4 strip of Designer Series Paper.


Note: The new products that I used will be available for purchase starting May 2, 2023.

With every new Annual Catalog Stampin' Up! releases 5 new In Colors.  This year's colors are beautiful, and very calming to me, I love them all. 

An easy way to get all the products for each color is to join my In Color Club.  Each month receive products for one new color and after 5 months, you'll have them all.  Below are the details.  


Email patti@pspapercrafts.com to join


Reservations are now open for my Designer Series Paper Share.  It's a great way to see all the papers and decide which ones you like.  Stampin' Up!'s Designer Series Paper is one of my favorite products and I'm always surprised at the patterns I like that I would never have thought to purchase.


Pay $54.00 Local or $64.00 if shipped

You will receive 154 pieces of 6×6 Designer Papers listed below:

  • Bright & Beautiful – 12 sheets 

  • Countryside Inn – 12 sheets  

  • Delightfully Eclectic – 24 sheets    

  • Earthen Elegance – 12 sheets     

  • Fresh as a Daisy – 12 sheets       

  • Glorious Gingham – 10 sheets    

  • Inked Botanicals – 12 sheets   

  • Let’s Go Fishing – 12 sheets     

  • Les Shoppes – 12 sheets           

  • Masterfully Made – 12 sheets       

  • Stargazing – 12 sheets         

  • Zoo Crew – 12 sheets     

I will include a card base in each of the new In Colors and new Core Colors as a thank you gift.  That’s 16 card bases in the following colors: Boho Blue, Copper Clay, Moody Mauve, Pebbled Path, Wild Wheat, Azure Afternoon, Berry Burst, Blueberry Bushel, Bubble Bath, Fresh Freesia, Lemon Lime Twist, Lemon Lolly, Lost Lagoon, Misty Moonlight, Pecan Pie, Pretty Peacock

Email patti@pspapercrafts.com to reserve your spot

Sketch Saturday - Circle Sayings

Here’s the card I made for this week’s Atlantic Hearts Sketch Challenge using some new products!!! This Bright & Beautiful Designer Series Paper is so fun and has great colors and patterns.


This is the sketch for this week’s challenge.


The Circle Sayings has great images that you cut using the coordinating Circle Punch. I love that you can combine the sentiment with an image and then punch it out if you want.


Tips & Instructions

  • Thick Basic White Card Base - 5 1/2 x 8 1/2, score at 4 1/4

  • Bright & Beautiful Designer Series Paper - 5 1/4 x 4, adhere to the card base.

  • Basic White Layer - 4 x 1 3/4, stamp sentiment and cupcake with Berry Burst Ink. Stamp the burst images with Azure Afternoon Ink.

  • Color the cupcake with Berry Burst and Bubble Bath. I don’t have the Stampin’ Blends in these colors yet so I pressed a clear block into the ink pad and then colored the cupcake holder by picking up the ink with a Blender Pen and coloring the image. I used a Wink Of Stella Brush instead of the Blender Pen to color the icing. Adhere layer to card using Dimensionals.

  • Add some Adhesive-Backed Solid Gems


On the inside layer stamp sentiment with Berry Burst Ink and the Celebrate circle with Azure Afternoon Ink. Adhere a 4 x 3/4 strip of the Designer Series Paper.


Supply List

You can click on the item to purchase it from my Online Store.

Note: The new products that I used will be available for purchase starting May 2, 2023.

Fun Fold Box Top Cards

The Box Top Fun Fold Card is a new fold for me but it was so easy to make. You close the flaps just like you would a box. You can use different patterned papers and embellishments to decorate it.


I’ll take you through all the steps to make this card and you can get the measurements and products I used in the Project Sheet by clicking the button below.


I used the Tea Boutique Designer Series Paper for this card. The sentiment is from the Cup Of Tea Stamp Set and was stamped with Fresh Freesia Ink. The Ribbon is Fresh Freesia Open Weave Ribbon and I added some Fun Flowers Resin Shapes to finish it off.


This card was made using the By The Bay Designer Series Paper and Seaside Bay Bundle. I cut the pearl and shells from a piece of Tahitian Tide Glimmer Paper.


Supply List

You can click on the item to purchase it from my Online Store.

Enchanting Details Thanks Card

As I put away my retired products, I’m coming across some products that I never really used. One of them is the Enchanting Details Dies. I love this floral corner piece.


Take a look at the dies in this set. It’s retiring and marked down from $33 to $13.20, amazing!


Tips & Instructions

  • Blackberry Bliss Card Base - 5 1/2 x 8 1/2, score at 4 1/4

  • Basic White Layer - 5 1/4 x 4

  • Fine Shimmer Paper - cut the floral corner piece using the Enchanting Details Dies and adhere to the corner of the white layer. Adhere layer to card base.

  • Stamp sentiment with Blackberry Bliss on scrap of Basic White and cut using the Rectangle Stitched Dies.

  • Cut rectangle from a piece of Fine Shimmer Paper using the Rectangle Stitched Dies and adhere behind the sentiment label. Adhere to card using Dimensionals.

  • Add some Fresh Freesia Opal Rounds to the flower centers and one to the sentiment label.


I don’t think the picture does justice to the Fine Shimmer Paper. It’s so pretty!


Cut some small flowers from the Shimmer Paper and adhere to the inside layer.


Supply List

You can click on the item to purchase it from my Online Store.

Sketch Challenge - On The Farm

Here’s the card I made for this week’s Splitcoaststampers Sketch Challenge using the On The Farm Bundle.


When I saw the sketch, I thought about making an ocean scene with waves and then my friend Hannah suggested I use the On The Farm and make hills for the bottom area.

Click the sketch to see the other cards made for this challenge.


Tips & Instructions

  • Balmy Blue Card Base - 5 1/2 x 8 1/2, score at 4 1/4

  • Basic White - 5 1/4 x 4

  • Stamp the hills with Shaded Spruce Ink along the bottom to create the shape for the sketch.

  • Mask the hills and lightly blend Balmy Blue Ink using a blending brush. I used Post-It Notes to mask the hills by laying it over and tracing the hills and then cutting and using that to cover the hills while I blended the ink.

  • Stamp some clouds with Balmy Blue Ink and adhere the layer to the card base.

  • Stamp 3 hay rolls with Crumb Cake and cut with coordinating die. Color using a Light Crumb Cake Stampin’ Blends Marker. Adhere the hay rolls to the card using Dimensionals on the top one.

  • Stamp sentiment on 1” strip of Basic White with Balmy Blue Ink, cut down and banner one end. I used the Banners Pick A Punch. Adhere with Dimensionals.


On the inside layer stamp some hills with Shaded Spruce Ink and stamp again without re-inking to fill in with some lighter shades. Stamp a cloud using Balmy Blue Ink.


Supply List

You can click on the item to purchase it from my Online Store.

Black & White Cards - Birthday Series Class 6

Today was the last of my Birthday Series and I made these 3 Black & White Cards on my YouTube Live.


Watch the video to see how to make these cards and learn how you can get the kits and the stamp set for free.


MAKE AND TAKES: 

Get 6 Card Kits, 2 each of 3 designs for today’s cards by placing a $35 order in my online store using host code RWZDN9FS from April 17 - April 23.

Place a $50 Order and get the Card Kits plus a FREE Beautifully Happy Stamp Set (limited number of stamp sets so while supplies last)

I’ll also send you a project sheet with pictures, measurements and instructions.

Note: If products are no longer available, I will substitute another product.

These are the cards that I made using the Beautifully Happy Stamp Set and Perfectly Penciled Designer Series Paper.


Supply List

You can click on the item to purchase it from my Online Store.

Eden's Garden - Sending Hugs Card

A Score Tool, a Stylus and a Post-It Note is all you need to create a simple, elegant look on your card. I used the Eden’s Garden Stamp Set to stamp around the embossed label, so easy!


Watch the video to see how I made this card and then give it a try.


Tips & Instructions

  • Pretty Peacock Card Base - 5-1/2 x 8-1/2, score at 4-1/4

  • Basic White 5 x 3-3/4

  • Place a 2-1/8 x 2-1/8 Post-It Note on the white layer and score around it on the Simply Scored Scoring Tool.

  • Flip the white layer over and place a 1-7/8 x 1-7/8 Post-It Note and score around it.

  • Decide which side you want to have on your card front and place the 2-1/8 square Post-It Note over the embossed square.

  • Stamp the foliage images with Pretty Peacock and Lost Lagoon Ink, stamping direct with some and stamping off with others.

  • Remove the Post-It Note and stamp the sentiment with Pretty Peacock Ink.

  • Adhere layer to card base.

  • Add some Iridescent Pastel Gems.


I love the elegant look the embossing adds to the card.


On the inside layer, stamp some of the foliage with Pretty Peacock and Lost Lagoon Inks.


Supply List

You can click on the item to purchase it from my Online Store.

Note: Pretty Peacock and Lost Lagoon are available for purchase starting May 2, 2023 with the launch of the new Annual Catalog.

Textured Chic Thank You Card

I made this pretty card using the Textured Chic Specialty Designer Series Paper and the Dainty Delight Bundle. This paper is so pretty and I can’t believe I didn’t use it more.


Tips & Instructions

  • Soft Suede Card Base - 5 1/2 x 8 1/2, score at 4 1/4

  • Basic White Layer - 5 1/4 x 4

  • Textured Chic Specialty Designer Series Paper - 5 1/8 x 3 7/8, adhere to the white layer.

  • Wrap a piece of Soft Suede Baker’s Twine around the layers 3 times and adhere to the back of the layer. Adhere layer to the card.

  • Stamp sentiment on Basic White with Soft Suede Ink and cu using the Stylish Shapes Dies.

  • Cut the large branch from Soft Succulent using the Dainty Delight Dies. Cut this piece apart .

  • Cut two of the floral pieces from Vellum and one from Basic White.

  • Stamp floral image with Soft Suede Ink on a scrap of Basic White. Color the berries with a Dark Petal Pink Stampin’ Blends Marker.

  • Adhere the floral pieces to the card. You may have to trim off the bottoms. Lay the sentiment label over to see if you need to trim them down.

  • Adhere the sentiment label to card using Dimensionals.

  • Tie bow with Baker’s Twine and adhere with Glue Dot.

  • Add a Brushed Brass Butterfly.


The colors in this Designer Series Paper are so pretty, I love when the paper makes the card for you! I used Soft Suede and a pop of white to bring it all together. Soft Suede is one of the retiring colors.


On the inside layer stamp floral image with Soft Suede Ink and color with Dark Petal Pink and Light Soft Succulent Stampin’ Blends Markers.


Supply List

You can click on the item to purchase it from my Online Store.

Sketch Challenge - Country Floral Lane

I made this card for this week’s Splitcoaststampers Sketch Challenge. The pretty patterned paper is from the Country Floral Lane Designer Series Paper pack which is retiring. I love all the Balmy Blues on this card.


Here’s the sketch. I had a hard time with this one, so many different pieces but once I got started it all came together.

Click on the sketch to see the projects made by other crafters.


Tips & Instructions

  • Thick Basic White Card Base - 5 1/2 x 8 1/2, score at 4 1/4

  • Balmy Blue Layer - 5 1/2 x 2 1/2, emboss using the Gingham Embossing Folder and adhere to card base.

  • Country Floral Lane Layer (striped pattern) - 3 3/4 x 2, adhere to card.

  • Cut circle from the floral piece of Designer Series Paper using the 3rd from largest Stylish Shapes Dies. Adhere to striped layer.

  • Cut the bicycle from the Designer Series Paper and adhere using Dimensionals.

  • Cut a banner from a 1 1/2” piece Basic White. I just cut the point using a pair of snips. Stamp the sentiment with Sweet Sorbet Ink. I used the sentiment from the Tropical Leaf Stamp Set. Adhere to card using Dimensionals.

  • Add some Iridescent Pearls.


On the inside layer add a strip of the Designer Series Paper. I cut it to 4” long, cutting to keep the pattern.


Supply List

You can click on the item to purchase it from my Online Store.

Simple Amazing Thanks Card

I made this pretty card using the Amazing Thanks Dies and a piece of Fancy Flora Designer Series Paper. It was so easy to make, the paper does all the work.


The Amazing Thanks Dies are retiring and marked down. You can layer the sentiments or use them like I did. If you want them, get them soon as they are only available while supplies last.


The Fancy Flora Designer Series Paper is beautiful and is also retiring and available while supplies last.


Tips & Instructions

  • Early Espresso Card Base - 5 1/2 x 8 1/2, score at 4 1/4

  • Fancy Flora Designer Series Paper - 5 1/4 x 4 (I cut it down to get the pattern I wanted, cutting some from the top and some from the bottom, some from each side.)

  • Adhere the patterned paper to the card base.

  • Cut the sentiment using the Amazing Thanks Dies from a scrap of Early Espresso and adhere to the card using small amounts of Liquid Glue.

  • Add some Iridescent Pastel Gems.


The Calypso Coral Iridescent Pastel Gems finish this card off nicely.


On the inside layer stamp a flower from the Two-Tone Flora Stamp Set. I stamped the outline directly with Calypso Coral Ink and then the filler I stamped off first on a piece of scrap to get the lighter shade of Calypso Coral Ink.


Supply List

You can click on the item to purchase it from my Online Store.

Fun Fold Cards - Birthday Series Class 5

These are the cards I made on my YouTube Live for Class 5 of the Birthday Series with the theme of Fun Fold Cards.


Watch the video to see how to make these cards and learn how you can get the kits for free.


MAKE AND TAKES: 

Get 6 Card Kits, 2 each of 3 designs for today’s cards by placing a $35 order in my online store using host code RWZDN9FS from April 10 - April 16.

Place a $50 Order and get the Card Kits plus a FREE package of Fun Flowers Resin Shapes.

I’ll also send you a project sheet with pictures, measurements and instructions.

Note: If products are no longer available, I will substitute another product.


Below is the schedule for my Birthday Card Series.


These are the cards for this class. I used the Framed Florets Stamp Set and Butterfly Kisses Designer Series Paper.


Supply List

You can click on the item to purchase it from my Online Store.

Sketch Saturday - Rhino Ready Step Card

I made this fun Step Card for this week’s Atlantic Hearts Sketch Challenge using the Rhino Ready Bundle. This little rhino is so cute and I love how the dies cut those trees.


Here’s the sketch that I followed. I didn’t realize it was a Fun Fold at first and then looked on Pinterest to see how to make a Step Card.


Tips & Instructions

  • Granny Apple Green Card Base - 4 1/4 x 9, scored at 1 1/4, 2 1/2 and 5 3/4. Fold and burnish base

  • Granny Apple Green outside piece 9 x 2 1/2, score at 5 1/2 and fold & burnish.

  • Cut a piece of Hues Of Happiness Designer Series Paper with the green and blue colors to 3 x 4 and adhere to the front area of the card base.

  • Cut the green part of a piece of the Hues Of Happiness Designer Series Paper to 4 x 1 and adhere across the bottom of the front fold.

  • Cut 2 trees from Early Espresso and 2 treetops from Granny Apple Green. Adhere the treetops to the trees and then the trees to the front area making sure to only put adhesive on the tree trunks that will be touching the card, there will be some that overhang and you don’t want glue on it.

  • Adhere the 9 x 2 piece of Granny Apple Green Cardstock to the back and front areas of the card base making sure that you only put adhesive on the areas that will attach to the card base. The back piece should be adhere all the way down the back so it’s flush along the bottom.


Here’s a side view so you can see how it should look when you adhere the outside piece to the card base.


  • Basic White Front Layer - 5 1/4 x 2 1/4

  • Balmy Blue Front Layer - 5 x 2

  • Cut 3 clouds from Basic White using the Rhino Ready Dies. I think the die I used is for treetops but works for clouds.

  • Stamp rhino on scrap of Basic White with Black Memento Ink and cut using the coordinating die. Color with Smoky Slate Stamping Blends.

  • Stamp 2 of the grassy images with Granny Apple Green Ink and cut with coordinating die. Adhere the clouds and grass to the Balmy Blue Layer and cut any overhang off. Adhere the rhino with Dimensionals.

  • Adhere the blue layer to the white layer and then the white layer to the outside piece.

  • Stamp the sentiment with Black Memento Ink on 1/4 strip of Basic White and adhere just below the rhino.


Cut a piece of Basic White at 3 x 4 for the inside layer and stamp the sentiment with Black Memento Ink. I added some party blowers with Granny Apple Green Ink.


Supply List

You can click on the item to purchase it from my Online Store.

Irresistible Blooms - Partial Embossing Technique

The Partial Embossing Technique is easy to do and creates a very elegant card. I used two embossing folders on each card along with the Irresistible Blooms Bundle.


Watch the video to see how to emboss part of your layer. I chose 2 different folders and left a gap between for my sentiment.


Tips & Instructions

  • Sweet Sorbet Card Base - 5 1/2 x 8 1/2, score at 4 1/4

  • Basic White Layer - 5 1/4 x 4

  • Emboss the top portion of the white layer using the Pretty Flowers Embossing Folder and the bottom portion using the dots from the Basics 3D Embossing Folders.

  • Using your Simply Scored Scoring Tool, score a line from the back at the edge of each embossed area. (TIP: if you have some of the embossing that goes past the scored line, use your Bone Folder to flatten it out.)

  • Stamp the sentiment with Sweet Sorbet Ink on the non-embossed area.

  • Stamp the large flower with Sweet Sorbet Ink and both sets of leaves with Parakeet Party Ink and cut with coordinating dies.

  • Adhere the flower using Dimensionals and the leaves behind it.

  • Add layer to the card base.

  • Add some Sweet Sorbet Matte Decorative Dots


On the inside layer stamp the sentiment with Sweet Sorbet Ink. The sentiment is from the Charming Sentiments Stamp Set. Stamp the small flower with Sweet Sorbet Ink and the leaves with Parakeet Party Ink.


I made this card with Gorgeous Grape and Granny Apple Green and used the Gingham Embossing Folder for the bottom portion. I used the Pastel Pearls for the embellishment.


The inside sentiment is also from the Charming Sentiments Stamp Set.


Supply List

You can click on the item to purchase it from my Online Store.