Sketch Saturday - Peace & Joy

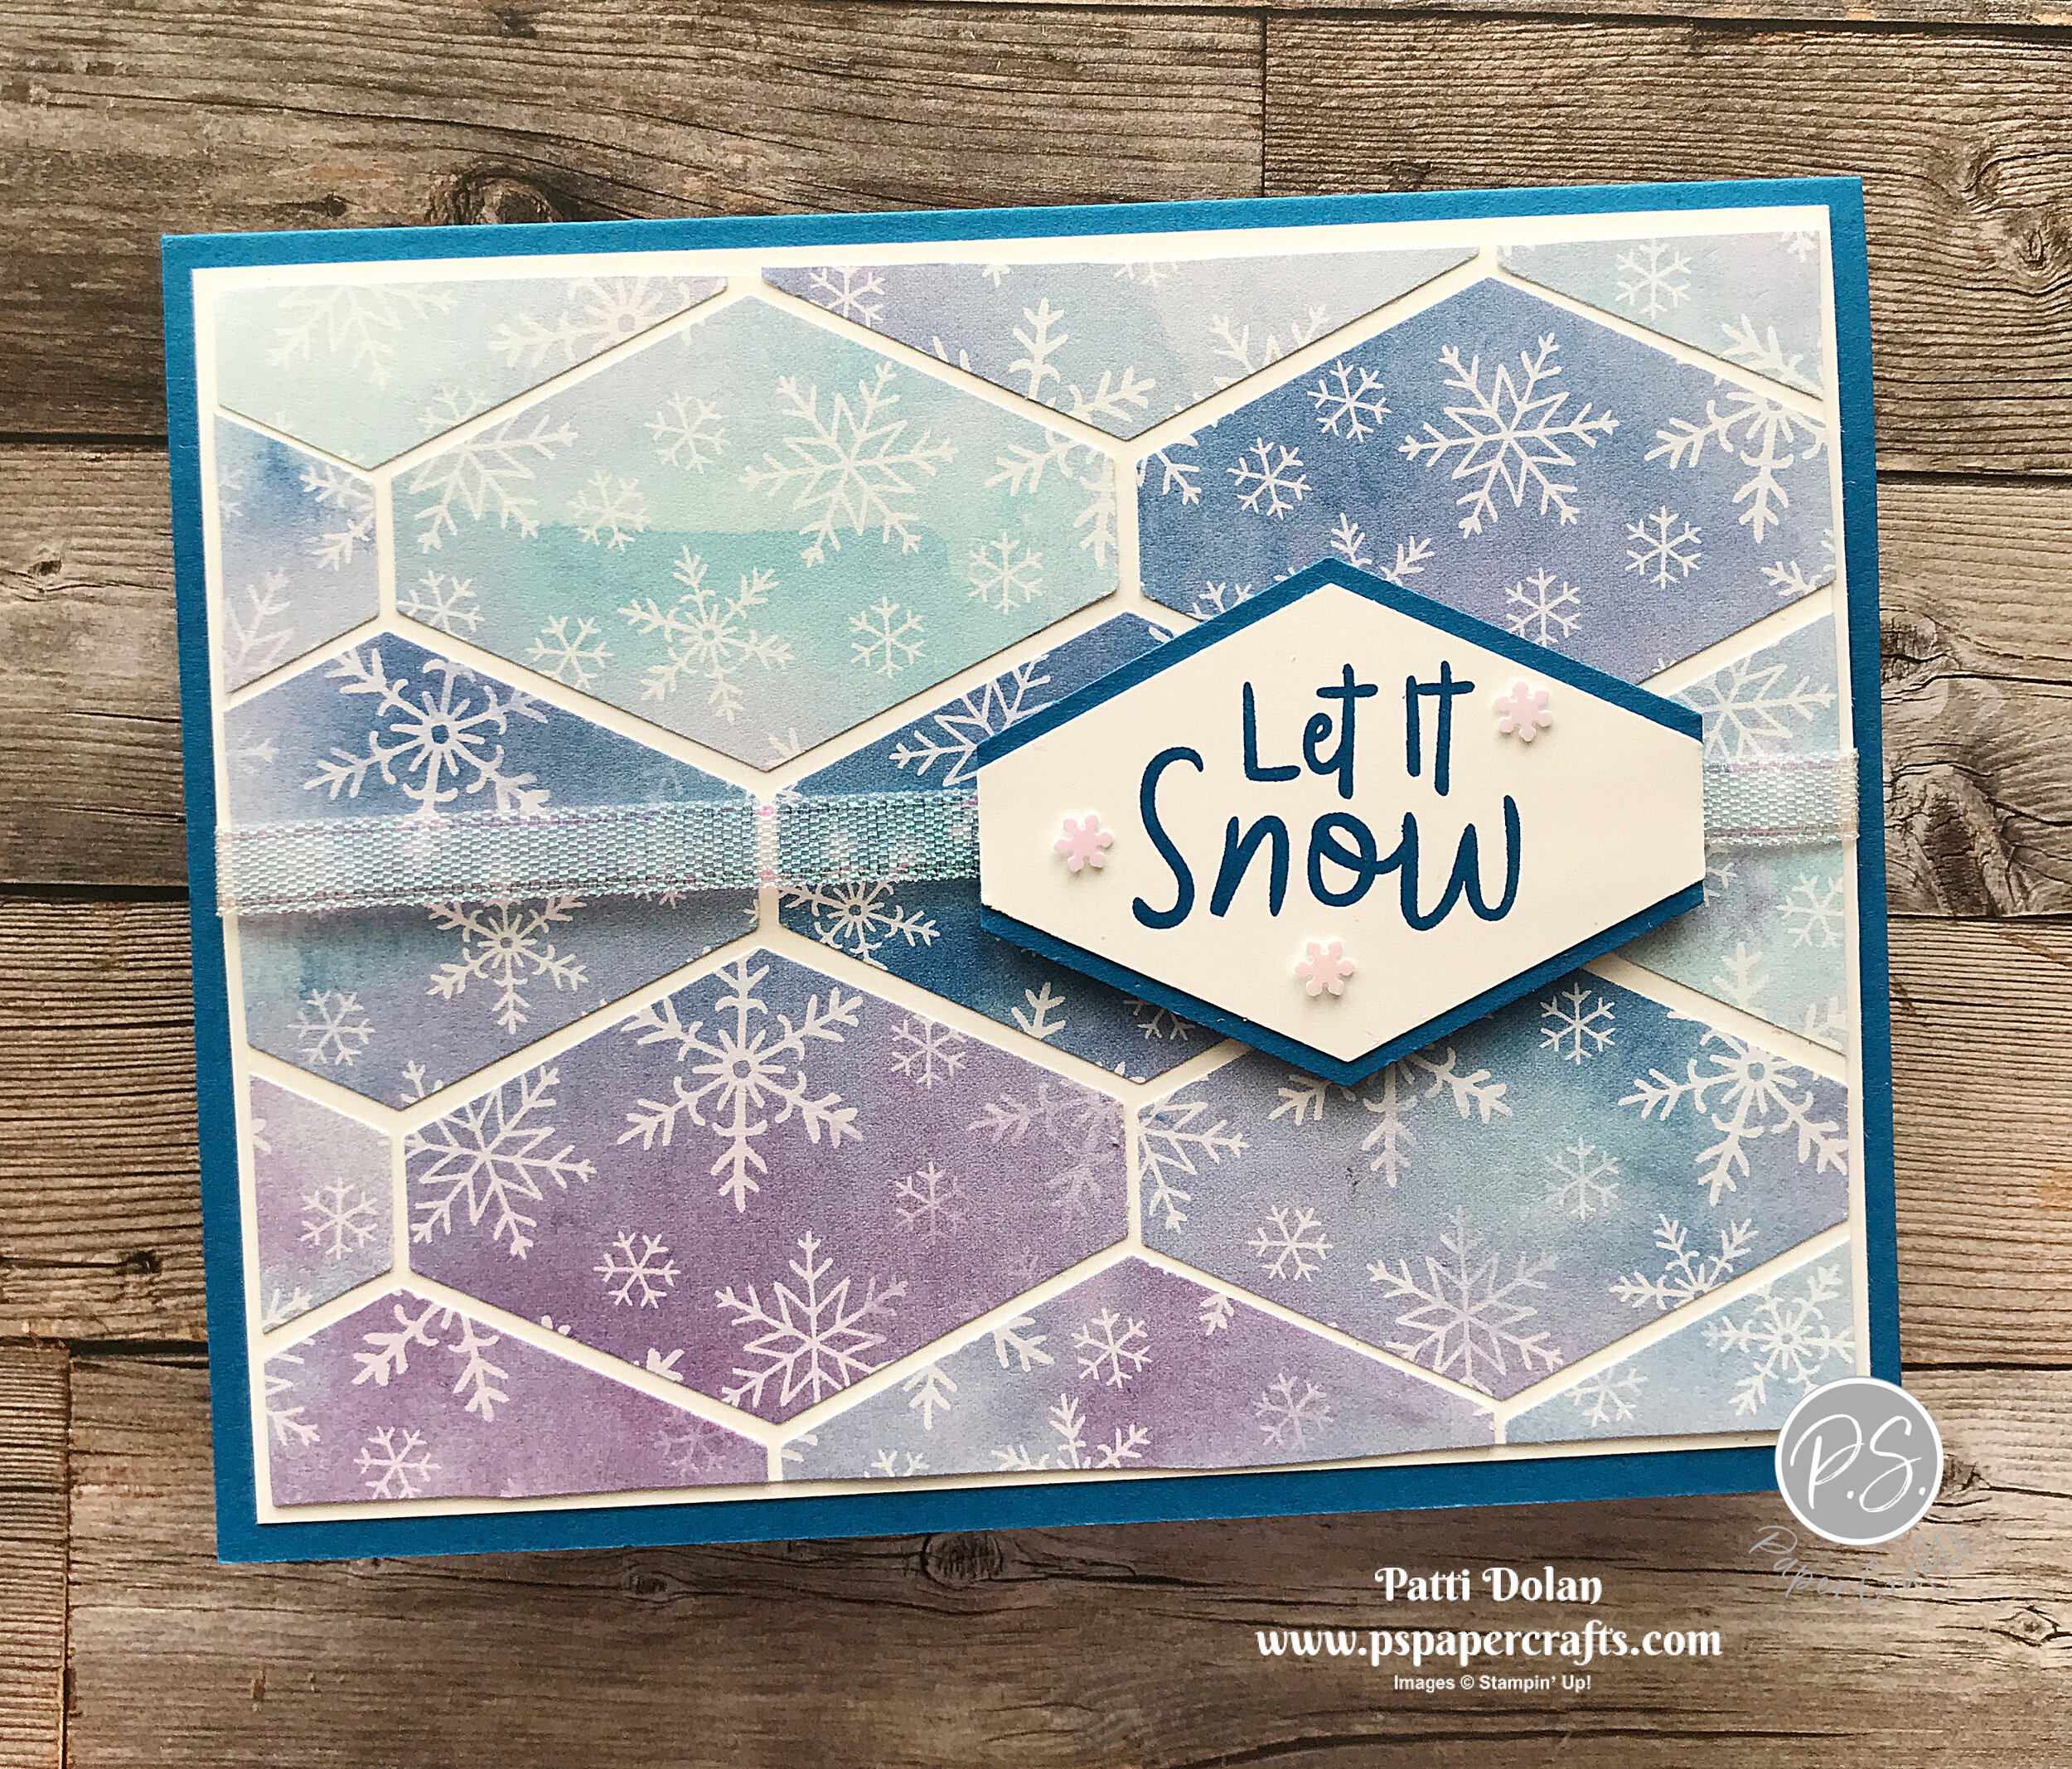
I made another card using the Snowflake Splendor Designer Series Paper. I just love this paper! This is the card that I made for this week’s sketch challenge.

 
Sketch Saturday - Peace & Joy card1.jpg
 

The sketch challenge is the CAS(E) This Sketch from Splitcoaststampers. Here’s the sketch.

 
Screen Shot 2020-10-31 at 11.36.45 AM.png
 

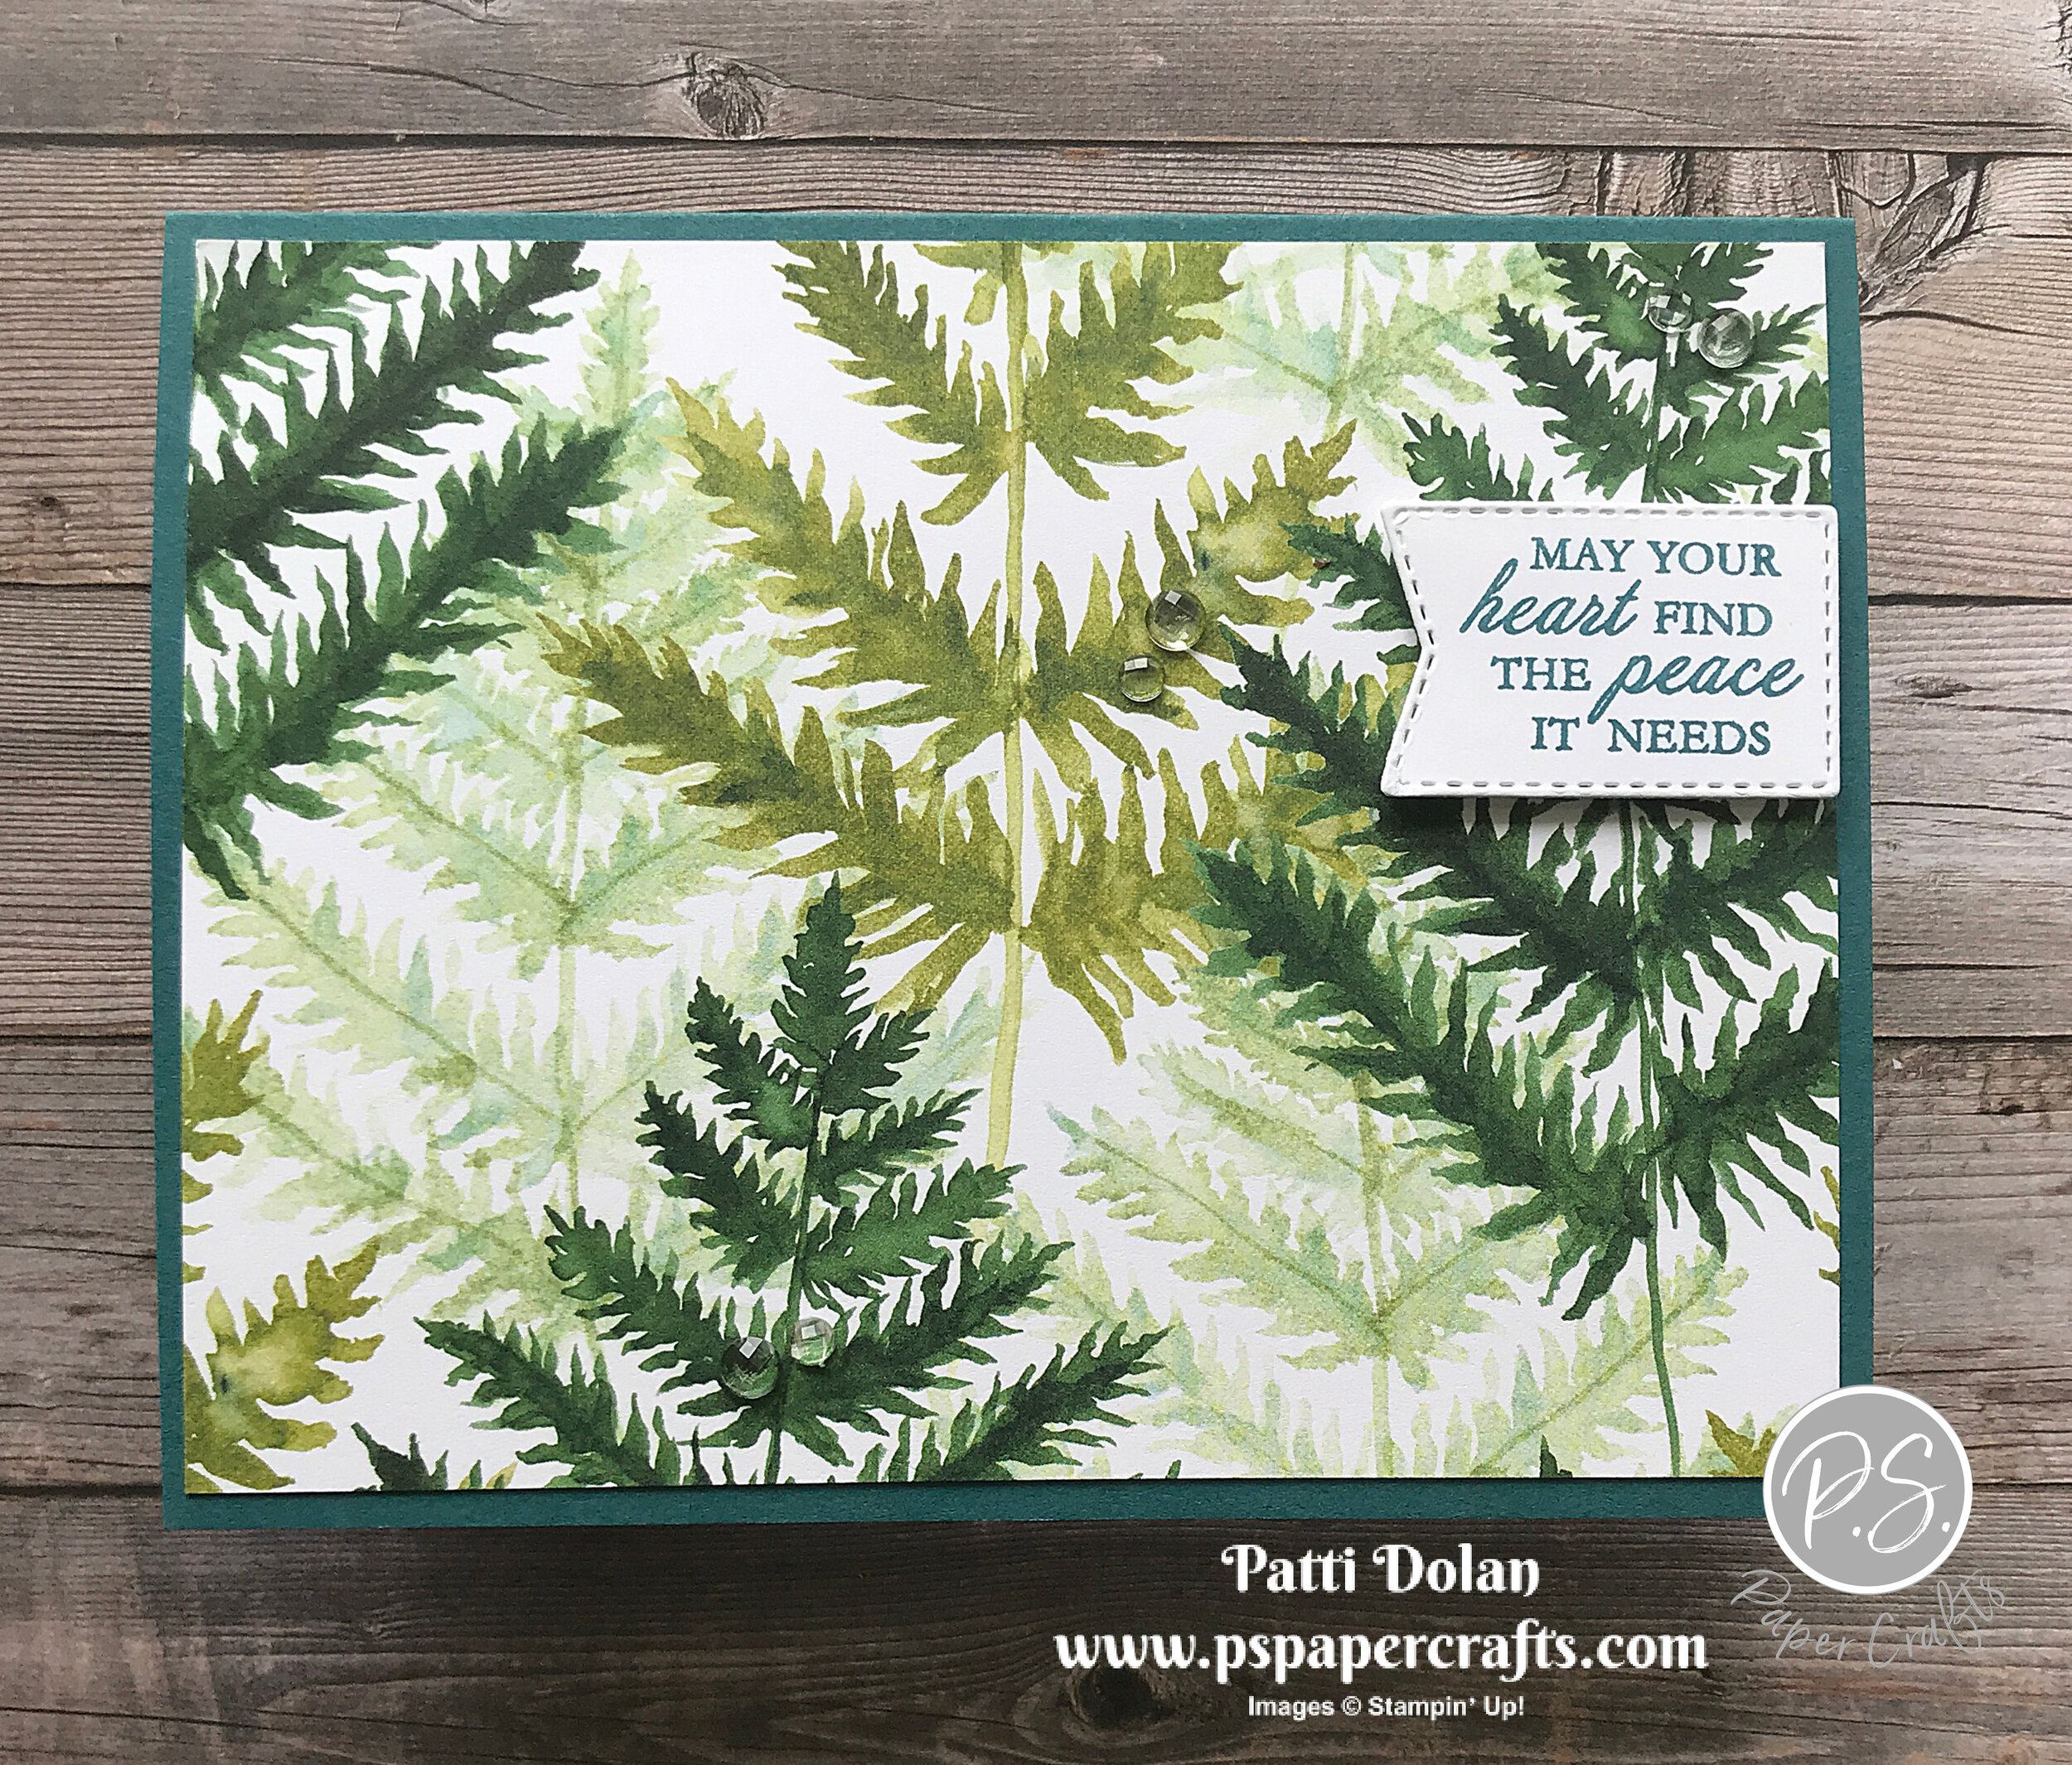
I used the Peace & Joy Bundle to make this card. The Joy Dies can cut out 3 layers of the words Peace, Joy and Bright. There are coordinating sentiments in the stamp set to go with each.

 
Sketch Saturday - Peace & Joy stamp.jpg
 

Tips & Instructions

  • Pacific Point Card Base - 4 1/4 x 11, score at 5 1/2 (top folding)

  • Whisper White Layer - 5 1/4 x 4

  • Snowflake Splendor Layer - 5 1/8 x 3 7/8

  • Cut a piece of Pacific Point Cardstock about 3 x 1 1/2 and back with Adhesive Sheet. Cut the thinest “peace” word using the Joy Dies. Using the Adhesive Sheet really helps since it’s so thin.

  • Cut the next size “peace” word from Whisper White Cardstock. Remove backing from thin “peace” and adhere to white “peace”.

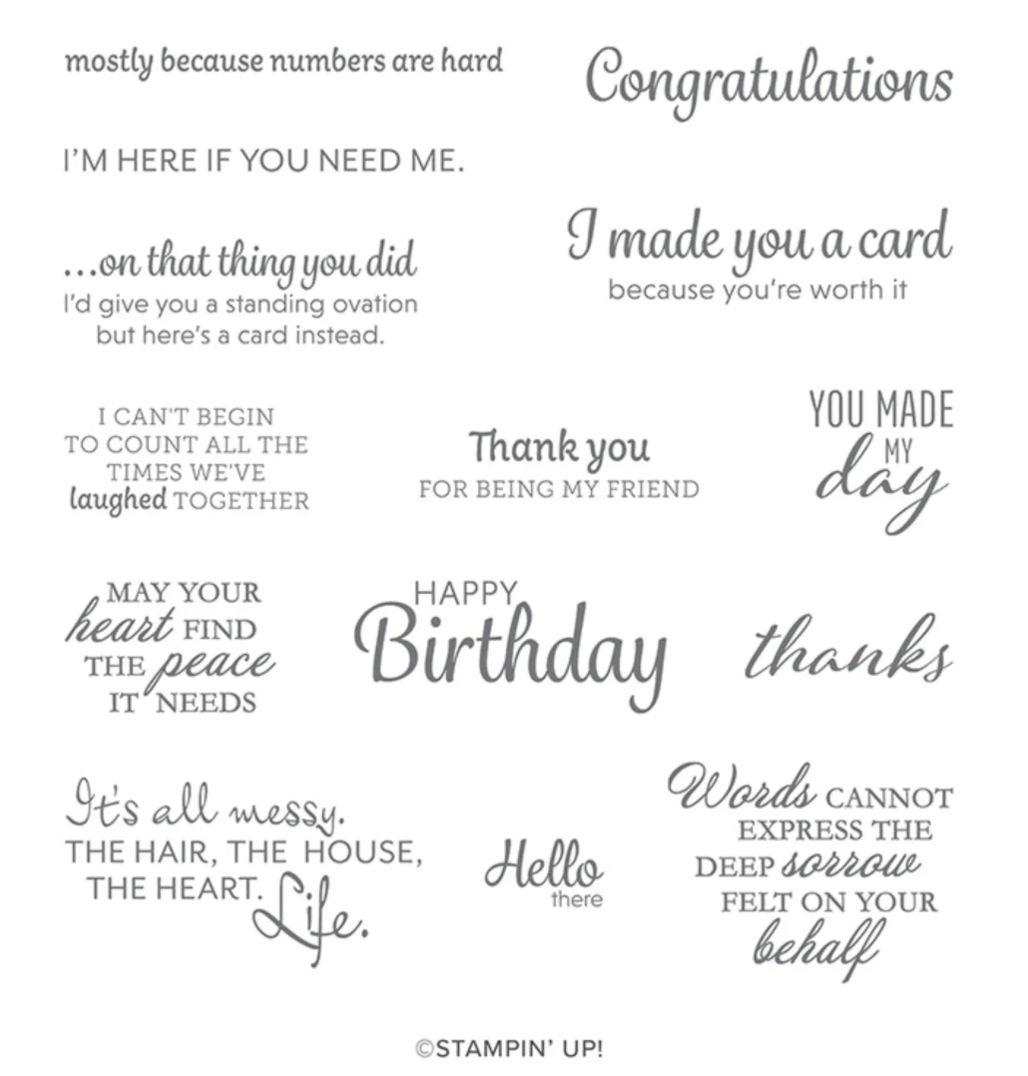
  • Stamp “on earth” sentiment using Pacific Point Ink on scrap of Whisper White Cardstock. Fussy cut leaving a small rim of white around it.

  • Adhere layers to card base and adhere sentiment to card.

 
Sketch Saturday - Peace & Joy card2.jpg
 

On the inside stamp sentiment and star using Pacific Point Ink. I stamped off first (stamp on scrap to remove layer of ink) to get a lighter shade for the star. Stamp large star and then smaller one offsetting a little.

 
Sketch Saturday - Peace & Joy inside.jpg
 

Supply List

Tailored Tag Snowflake Card

This was a fun card to make. Using the Tailored Tag Punch, I punched pieces of Snowflake Splendor Designer Series Paper and then pieced them together.

 
Tailored Tag Snowflake Card4.jpg
 

I’ll take you through all the steps on the video below. It was easy to do!


The Snowflake Splendor Designer Series Paper has great snowflake patterns and this paper is on sale during the month of October, 2020. You can save 15%.

 
Screen Shot 2020-10-29 at 5.40.34 PM.png
 

Tips & Instructions

  • Pacific Point Card Base - 5 1/2 x 8 1/2, score at 4 1/4

  • Whisper White Layer - 5 1/4 x 4

  • Whisper White Layer (pieces will be adhered to this layer) 5 1/8 x 3 7/8

  • Punch a bunch of pieces of Snowflake Splendor Designer Series Paper using the Tailored Tag Punch.

  • Adhere pieces to the smaller of the Whisper White Layers, leaving a narrow gap between each. I used Multipurpose Liquid Glue and a Silicone Craft Sheet for this. Cut pieces that hang over, cutting from the back.

  • Adhere layer to larger Whisper White Layer.

  • Stamp sentiment on scrap of Whisper White using Pacific Point Ink. The “Let It Snow” sentiment is from the Snowman Season" Stamp Set and the “It’s The Most Wonderful Time Of The Year” sentiment is from the Wrapped In Christmas Stamp Set.

  • Punch sentiment with Tailored Tag Punch.

  • Punch a piece of Pacific Point Cardstock using the Tailored Tag Punch. Cut tag in half and adhere each half behind the sentiment tag to give it a border.

  • Wrap piece of Snowflake Splendor Ribbon around layers and adhere to the back.

  • Adhere sentiment label over ribbon using Dimensionals.

  • Adhere layer to card base.

  • Add some Adhesive-Backed Snowflakes.


On the inside, stamp sentiment and some snowflakes using Pacific Point Ink.

 
Tailored Tag Snowflake inside2.jpg
 

Supply List

Magic In This Night Anniversary Card

The Magic In This Night Designer Series Paper isn’t just for Halloween! I love these black flowers, they look classy to me so I made an Anniversary Card using it.

 
Magic In This Night Anniversary Card2.jpg
 

During the month of October, Stampin’ Up! is having a Designer Series Paper sale. You can save 15% on select designs. The Magic In This Night Designer Series Paper is one of the papers on sale.

 
Screen Shot 2020-10-28 at 8.53.50 PM.png
 

Tips & Instructions

  • Basic Black Card Base - 5 1/2 x 8 1/2, score at 4 1/4

  • Silver Foil Layer - 5 1/4 x 4

  • Magic In This Night Designer Series Paper - 5 1/8 x 3 7/8

  • Basic Black Cardstock, cut using Detailed Bands Die

  • Whisper White scrap, wipe with Embossing Buddy, then stamp sentiment (from Many Mates Stamp Set) using Versamark Ink. Pour Silver Embossing Powder on and heat with Heat Tool

  • Cut sentiment with oval from Detailed Bands Die and adhere to the black band.

  • Adhere layers and band to card base.

  • Add some Rhinestones to sentiment label and center of flowers.

 
Magic In This Night Anniversary Card1.jpg
 

Wipe inside layer with Embossing Buddy. Stamp sentiment (from Many Mates) and flower from (Band Together) using Versamark Ink. You can use any flower stamp that you have. Pour Silver Embossing Powder on and heat with Heat Tool.

 
Magic In This Night Anniversary inside.jpg
 

Supply List

Curvy Celebrations Christmas Card

Stampin’ Up! has some new products coming out November 3 called Curvy Celebrations. The stamps and dies are so fun and I love the Christmas Papers.

 
Curvy Celebrations Christmas Card2.jpg
 

Watch the video below to see all the new products and when they will be available for purchase. I’ll show you how I made this card as well.


Tips & Instructions

  • Cherry Cobbler Card Base - 5 1/2 x 8 1/2, score at 4 1/4

  • Whisper White Layer - 5 1/4 x 4

  • Whisper White Curvy Layer - 5 1/4 x 4, cut with Curvy Die as shown in video (you can use a piece that’s shorter than 5 1/4 because you will cut most away).

  • Stamp trees along the curve using Shaded Spruce Ink. You can shape the stamp around the curve and then pick it up with the clear block.

  • Classic Christmas Designer Series Paper - 4 x 3, cut with Curvy Die as shown in video

  • Lay curvy pieces on Whisper White Layer leaving a gap between for the sentiment. You can draw a light pencil mark to help with placement. Curve the sentiment stamp along the curve of the paper and mount it. Move the layers away and stamp sentiment using Cherry Cobbler Ink.

  • Adhere layers above and below sentiment. You may need to trim after adhering.

  • Stamp stars using Daffodil Delight Ink.

  • Adhere to card base.

 
Curvy Celebrations Christmas Card3.jpg
 

On the inside, stamp a portion of the trees at bottom corner with Shaded Spruce Ink. Stamp sentiment with Cherry Cobbler Ink. Stamp greenery at top corner with Shaded Spruce Ink, stamping a second and third time without re-inking.

 
Curvy Celebrations Christmas Card inside.jpg
 

Supply List - Come Back November 3rd to shop for these products!

Merry Moose Christmas Card

I was so happy that the Merry Moose Bundle came back in the Winter Mini Catalog. I made this rustic Christmas Card for my brother and I know he will love it.

 
Merry Moose Christmas Card2.jpg
 

The stamp set can be bundled with a punch that cuts out both the moose images. The sentiments are so fun and the tree images stamp beautifully.

 
Screen Shot 2020-10-26 at 5.27.19 PM.png
 

Tips & Instructions

  • Early Espresso Card Base - 5 1/2 x 8 1/2, score at 4 1/4

  • Whisper White Layer - 5 1/4 x 4, emboss with Hammered Metal 3D Embossing Folder

  • Early Espresso Layer - 3 7/8 x 3 3/8

  • Crumb Cake Layer - 3 3/4 x 3 1/4, stamp large trees across using Shaded Spruce Ink.

  • Adhere all layers to card base.

  • Stamp moose image on scrap of Whisper White with Early Espresso Ink and punch with Moose Punch.

  • Stamp sentiment on scrap of Whisper White with Early Espresso Ink and cut with Tasteful Labels Dies.

  • Adhere moose and sentiment using Dimensionals.

 
Merry Moose Christmas Card1.jpg
 

On the inside stamp moose and sentiment with Early Espresso Ink. Stamp large and small tree with Shaded Spruce Ink.

 
Merry Moose Christmas Card - Inside.jpg
 

Supply List

Sketch Saturday - Wreath Thanks

I’ve been making a lot of wreath cards lately so when I saw the sketch for today’s challenge from Splitcoaststampers, I had to smile!

 
Sketch Saturday - Wreath Thanks Card1.jpg
 

Here’s the sketch I used. It’s rotated on it’s side to make it a horizontal card but with these sketch challenges, you can make your card vertical or horizontal.

 
Screen Shot 2020-10-24 at 12.12.29 PM.png
 

Tips & Instructions

  • Early Espresso Card Base - 5 1/2 x 8 1/2, score at 4 1/4

  • Very Vanilla Layer - 5 3/8 x 4 1/8, adhere to card base.

  • In Good Taste Designer Series Paper Strip - 4 1/8 x 2 1/4, adhere to card.

  • Cut wreath from Early Espresso Cardstock using the Painted Labels Dies. Cut center out using the 4th from smallest circle from the Layering Circles Dies. Adhere wreath to woodgrain layer.

  • Punch 3 flowers from Bumblebee Cardstock using the small Blooms Punch.

  • Punch 2 sprigs from Just Jade Cardstock using the Sprig Punch.

  • Arrange and adhere the sprigs and flowers on wreath. I used a Dimensional to add the 3rd flower.

  • Add large Gilded Gem to center of each flower.

  • Stamp sentiment on 1/2 strip of Very Vanilla Cardstock using Early Espresso Ink. The sentiment I used is from the Beauty Abounds Stamp Set.

 
Sketch Saturday - Wreath Thanks card2.jpg
 

On the inside, stamp sentiment (if you want) using Early Espresso Ink. Stamp butterfly using Bumblebee Ink. I used the stamps from the Beauty Abounds Stamp Set.

 
Sketch Saturday - Wreath Thanks inside.jpg
 

Supply List

Happy Haunting Wreath Card - FaceBook Live

I made another card using the Build A Wreath Dies. This is one of my favorites in the Annual Catalog.

 
Happy Haunting Wreath Card2.jpg
 

I did a FaceBook Live to show how to make this card. This is something new to me so it may be a little rough but you’ll get the idea of how to make this card.


I made this card for the Simple Suite Stampers Tutorial Bundle. Each month I collaborate with 11 Demonstrators to create this Tutorial Bundle with measurements, pictures and instructions for 12 beautiful projects. You can get this for free when you order from my Online Store.

 
Screen Shot 2020-10-23 at 6.12.12 PM.png
 

Tips & Instructions

  • Cajun Craze Card Base - 5 1/2 x 8 1/2, score at 4 1/4

  • Magic In This Night Designer Series Paper - 5 1/4 x 4, adhere to card base.

  • Whisper White Layer - 4 1/2 x 3 1/4, stamp sentiment with Cajun Craze Ink and sponge edges with Cajun Craze Ink.

  • Cut wreaths from Magic In This Night Designer Series Paper using the Build A Wreath Dies and adhere together using a little Multipurpose Liquid Glue. Adhere wreath to sponged layer.

  • Adhere layer to card using Dimensionals.

  • Tie bow with Metallic Mesh Ribbon and adhere using a Glue Dot.

  • Add some Iridescent Pearls.

 
Happy Haunting Wreath Card1.jpg
 

On the Inside, stamp sentiment with Cajun Craze Ink. I used the A Wish For Everything Stamp Set for the inside sentiment. Stamp 2 spiders with Black Memento Ink.

 
Happy Haunting Wreath Card inside.jpg
 

Supply List

Need a Quick Card - Designer Series Paper to the Rescue!

I needed to make a quick Sympathy Card and decided to use this pretty paper and a sweet sentiment.

 
Quick Sympathy Card2.jpg
 

One of my favorite products from Stampin’ Up! is their Designer Series Paper. The paper can be the star of the project so you don’t need to add much more.

The Forever Greenery paper is on sale during the month of October; you save 15%!

 
Screen Shot 2020-10-21 at 9.07.23 PM.png
 

Tips & Instructions

  • Pretty Peacock Card Base - 5 1/2 x 8 1/2, score at 4 1/4

  • Forever Greenery Designer Series Paper Layer - 5 1/4 x 4, adhere to card base.

  • Stamp sentiment with Pretty Peacock Ink on Whisper White Cardstock and cut with Tasteful Labels Dies. I used the sentiment from the Here’s A Card Stamp Set. It has some great sentiments.

 
Screen Shot 2020-10-21 at 9.06.53 PM.png
 
  • Adhere sentiment to card with Dimensionals.

  • Add some Elegant Faceted Gems. I place 3 groups of the large and small clear gems randomly on the card.

 
Quick Sympathy Card gems.jpg
 

I’m happy with how this card turned out. It was simple but pretty!

 
Quick Sympathy Card1.jpg
 

On the inside stamp sentiment using Pretty Peacock Ink. Stamp some greenery (from the Forever Fern Stamp Set) using Pretty Peacock Ink.

 
Quick Sympathy Card inside.jpg
 

Supply List

Rustic Hand Drawn Blooms Thank You Card

I colored this beautiful bouquet of flowers using Watercolor Pencils and Blender Pens. I love how it turned out!

 
Hand Drawn Blooms Thank You Card2.jpg
 

In the video, I’ll show you all the steps to create this soft, pretty look using the Blender Pens.


The Hand-Drawn Blooms Stamp Set is so delicate and has wonderful sentiments. The curvy sentiments work really well with the coordinating Banner Bloom Dies.

 
Hand Drawn Blooms Thank You Card stamp.jpg
 

Tips & Instructions

  • Merry Merlot Card Base - 5 1/2 x 8 1/2, score at 4 1/4

  • Very Vanilla Layer - 5 1/8 x 3 7/8

  • Crumb Cake Layer - 5 x 3 3/4

  • Stamp bouquet (top and bottom) using Merry Merlot Ink on the Crumb Cake Layer

  • Color flowers and leaves using Watercolor Pencils. I used Assortment 2 to color the card on the video and the original Assortment to color the other card.

  • Blend with Blender Pens as shown in the video.

  • Stamp sentiment on strip of Very Vanilla Cardstock using Merry Merlot Ink and cut with stitched banner from Tasteful Labels Dies.

  • Adhere layers to card and sentiment using Dimensionals.

  • Add some Champagne Rhinestones to center of flowers.

  • Tie bow with the Vanilla Open Weave Ribbon and adhere using Glue Dot.

 
Hand Drawn Blooms Thank You Card1.jpg
 

On the inside, stamp sentiment (if you want) using Merry Merlot Ink. Stamp flowers with Merry Merlot Ink and color with Watercolor Pencils. Blend with Blender Pen.

 
Hand Drawn Blooms Thank You Card inside.jpg
 

Supply List

Simple Comfort and Hope Card

This was a very easy card to make. I used one stamp set, some ink and ribbon; oh, and I added some rhinestones too.

 
Comfort and Hope card2.jpg
 

The Comfort & Home Stamp Set has some great sentiments and I love the images. To add some texture, I used the basketweave image to stamp around the card base, Rich Razzleberry Ink on Rich Razzleberry Cardstock.

 
Comfort and Hope stamp.jpg
 

Tips & Instructions

  • Rich Razzleberry Card Base - 5 1/2 x 8 1/2, score at 4 1/4, stamp basketweave image using Rich Razzleberry Ink around all the edges.

  • Very Vanilla Layer - 4 1/2 x 3 1/2

  • Stamp wreath image using Early Espresso Ink.

  • Stamp greenery using Garden Green Ink. I didn’t ink the stems so they wouldn’t stick out. Stamp on the bottom of the wreath lifting and stamping again without re-inking. Do this on both sides of bottom of the wreath.

  • Stamp sentiment with Rich Razzleberry Ink.

  • Stamp the dots around the wreath with Rich Razzleberry Ink.

  • Adhere layer to card base.

  • Tie bow with Embroidered Ribbon and adhere with Glue Dot.

  • Add some Champagne Rhinestones around wreath.

 
Comfort and Hope Card1.jpg
 

On the inside, stamp sentiment with Rich Razzleberry Ink. Stamp greenery with Garden Green Ink at top and bottom corner. Lift and stamp multiple times without re-inking on the bottom corner.

 
Comfort and Hope inside.jpg
 

Supply List

Sketch Saturday - Beauty Abounds

I made this card for this week’s Sketch Challenge using the Beauty Abounds Stamp Set. I love the simplicity of these Clean And Simple sketches.

 
Sketch Saturday - Beauty Abounds card1.jpg
 

This is the sketch that I used for this card. It’s for the Clean And Simple (CAS)E This Sketch Challenge from Splitcoaststampers.

 
Screen Shot 2020-10-16 at 8.33.24 PM.png
 

Tips & Instructions

  • Pumpkin Pie Card Base - 5 1/2 x 8 1/2, score at 4 1/4

  • Basic Black Layer - 5 1/8 x 3 7/8

  • Whisper White Layer 5 x 3 3/4

  • Stamp 3 butterflies with Black Memento Ink at top corner and color with Dark Pumpkin and Dark Daffodil Delight Stampin’ Blends.

  • Whisper White Strip - 2 1/4 x 3/4, stamp sentiment with Black Memento Ink.

  • Basic Black Strip - 3 3/4 x 7/8, adhere to Whisper White Layer and wrap Linen Thread around twice and adhere to back.

  • Adhere sentiment to strip aligned to right edge of white layer using Dimensionals.

  • Adhere layers to card base.

  • Add small Rhinestone to each butterfly.

 
Sketch Saturday - Beauty Abounds Card2.jpg
 

Stamp sentiment on the inside with Black Memento Ink. Stamp butterflies as shown and color with Dark Pumpkin and Dark Daffodil Delight Stampin’ Blends.

 
Sketch Saturday - Beauty Abounds inside.jpg
 

Supply List

Home Together Congratulations Card

The Coming Home Bundle is not just for winter and Christmas scenes. I used the Home Together Dies to create this cute Congratulations card that could be used to celebrate a new home.

 
Home Together Congratulations card2.jpg
 

Watch the video below to see how to make the card.


Tips & Instructions

  • Seaside Spray Card Base - 5 1/2 x 8 1/2, score at 4 1/4

  • Basic Black Layer - 5 3/8 x 4 1/8

  • Whisper White Layer - 5 1/4 x 4, lightly sponge with Seaside Spray Ink.

  • Granny Apple Green Layer - 5 1/4, then cut using slope die and adhere to sponged layer.

  • Stamp sentiment (from A Grand Kid Stamp Set) using Black Memento Ink.

  • Cut houses (2 with hearts and 2 with starts) from Whisper White Cardstock. One house is for the inside layer.

  • Color houses with Stampin’ Blends (Highland Heather, Pool Party, Flirty Flamingo), chimney’s with Dark Smoky Slate, hearts with Light Poppy Parade and stars with Light Daffodil Delight.

  • Adhere houses on hill.

  • Adhere layers to card base.

 
Home Together Congratulations card.jpg
 

On the inside adhere house. You can add a sentiment if you wish.

 
Home Together Congratulations inside.jpg
 

Supply List

Life Is Beautiful Meets Coming Home!

Hello Cards are great. They are a little more casual than Thinking Of You and can be sent to anyone for any reason.

 
Life Is Beautiful meets Coming Home card2.jpg
 

I used the Life Is Beautiful and Coming Home Stamp Sets and they really work well together.

 
Life Is Beautiful meets Coming Home - stamps.jpg
 

Tips & Instructions

  • Pool Party Card Base - 5 1/2 x 8 1/2, score 4 1/4

  • Melon Mambo Layer - 5 1/8 x 3 7/8

  • Whisper White Layer - 5 x 3 3/4

  • Stamp scene on the Whisper White Layer using stamps from Life Is Beautiful and Coming Home Stamp Sets.

    • Large trees using Soft Suede Ink (I used the Stamparatus since the stamps are so large. Stamp one on each side.

    • Stamp leaves using Granny Apple Green Ink, stamping a second time without re-inking. Repeat to fill in top of the layer.

    • Stamp grass images at the bottom using Granny Apple Green Ink.

    • Stamp house using Black Memento Ink and color house with Light Pool Party, roof with Light and Dark Smoky Slate, door with Light Crumb Cake and windows with Light So Saffron Stampin’ Blends.

    • Stamp smaller trees using Soft Suede Ink.

    • Stamp the small snowflakes on the trees using Melon Mambo, stamping a second time without re-inking. Repeat to fill in the trees.

    • Stamp sentiment with Soft Suede Ink.

    • Adhere stamped layer to Melon Mambo Layer

    • Adhere layer to card base using Dimensionals.

    • Add some Wink Of Stella to windows and the flowers on the smaller trees.

 
Life Is Beautiful meets Coming Home card.jpg
 

On the inside, stamp some grass with Granny Apple Green, small trees with Soft Suede and flowers (snowflakes) with Melon Mambo Inks.

 
Life Is Beautiful meets Coming Home inside.jpg
 

Supply List

Pampered Pets - Sorry For Your Loss Card

I made this card for a friend whose dog died suddenly. It’s so hard to lose a pet, they are part of your family. I’m hoping this card will bring her a smile.

 
Pampered Pets Sorry For Your Loss card2.jpg
 

In the video I’ll show you how to make this card, cutting the hearts with the Be Mine Stitched Dies.


The Pampered Pets Stamp set has the cutest images of dogs and cats and the sentiments are perfect for a pampered pet.

 
Pampered Pets Sorry For Your Loss stamp.jpg
 

The Playful Pets Designer Series Paper is on sale during the month of October; you can safe 15%. It has such fun and whimsical patterns.

 
Screen Shot 2020-10-13 at 10.45.04 PM.png
 

Tips & Instructions

  • Real Red Card Base - 5 1/2 x 8 1/2, score at 4 1/4

  • Playful Pets Designer Series Paper - 2 layers at 5 1/4 x 4 (one for the inside)

  • Adhere one of the Designer Series Paper layers to card front.

  • Cut through both layers of the card front using the largest heart from the Be Mine Stitched Dies

  • Take the thin scalloped heart frame from and flip it and run it through the die cutting machine again to get the nice stitched look on the red side.

  • Adhere 5 1/4 x 4 Whisper White Layer to the other Designer Series Paper layer and adhere on card inside so the white layer is showing through the card front.

  • Stamp the dog in the heart (I used Black Memento on one card and Smokey Slate on one card).

  • Color the color with Real Red Stampin’ Write Marker and nose with Basic Black Stampin’ Write Marker.

  • Stamp some hearts around the dog with Real Red Ink.

  • Adhere the skinny heart frame on the inside of the heart.

  • Color “Always in your heart….” part of the sentiment with Basic Black Stampin’ Write Marker and stamp on 1/2 strip of Whisper White and cut to size you want. Adhere to card using Dimensionals.

 
Pampered Pets Sorry For Your Loss card3.jpg
 

On the inside, adhere the red heart that was cut from the card front. Color “so sorry for your loss” sentiment with Real Red Stampin’ Write Marker and stamp on inside layer. Stamp some Hearts with Real Red and dog bowl with Black Inks.

 
Pampered Pets Sorry For Your Loss inside.jpg
 

Supply List

Create Your Own Background with Gorgeous Posies

One of my favorite things to do is to create my own pretty background. I used the Gorgeous Posies Stamp Set with the new In Colors to make this cheerful Get Well Soon card.

 
Gorgeous Posies - Create Your Own Background2.jpg
 

This stamp set is one that works with a Card Kit but I love it so much that I wanted to use it outside the kit. I changed up the colors to create this beautiful card. Wouldn’t you love to receive this in the mail when you’re not feeling well?

 
Gorgeous Posies - Create Your Own Background Stamp.jpg
 

Tips & Instructions

  • Magenta Madness Card Base - 5 1/2 x 8 1/2, score at 4 1/4

  • Whisper White Layer - 5 1/4 x 4

  • Stamp images randomly on the Whisper White Layer starting with the largest image.

    • Stamp large posy with Magenta Madness Ink, stamp the dots in center with Magenta Madness Ink.

    • Stamp the branches with Cinnamon Cider Ink and the dots on the branches with Bumblebee Ink.

    • Stamp the group of 3 circles with Just Jade, stamping off first to get a lighter shade.

  • Adhere stamped layer to card base.

  • Stamp sentiment on Whisper White scrap with Magenta Madness Ink and cut with Stitched So Sweetly Die.

  • Cut larger Stitched So Sweetly Die from Magenta Madness Cardstock and adhere behind sentiment label, adhere to card using Dimensionals.

  • Tie bow with Magenta Madness Ribbon and adhere using a Glue Dot.

  • Add 3 Elegant Faceted Gems (1 large and 2 small).

 
Gorgeous Posies - Create Your Own Background1.jpg
 

On the inside stamp flower with Magenta Madness, branch with Cinnamon Cider and dots with Bumblebee Inks. Add a sentiment if you want.

 
Gorgeous Posies - Create Your Own Background inside.jpg
 

Supply List

Sketch Saturday - Celebrate Sunflowers

Here’s the card I made for this week’s sketch challenge from Splitcoaststampers. I used the Celebrate Sunflowers Bundle. The sunflowers in this bundle are beautiful.

 
Sketch Saturday - Celebrate Sunflowers Card1.jpg
 

This sketch had me thinking for a while. I wasn’t sure what to make and then I thought about using a large flower, and decided to go with the sunflower.

 
Screen Shot 2020-10-10 at 3.45.35 PM.png
 

Tips & Instructions

  • Early Espresso Card Base - 5 1/2 x 8 1/2, score at 4 1/4

  • Whisper White Layer - 5 1/4 x 4, sponge the bottom corner using Daffodil Delight Ink.

  • Stamp large sunflower using Early Espresso Ink on piece of Whisper White Cardstock and cut with coordinating die.

  • Color flower using Wink Of Stella and a Mango Melody Ink Pad. I squeezed the ink pad together to get some ink on the top and then dipped the Wink Of Stella in the ink puddle and colored the flower with it. You can also stamp a clear block into the ink pad and pick up the ink from it, if you don’t want to squeeze it.

  • Color the center of the flower with Crumb Cake Ink following the same method as the flower.

  • Stamp 2 large leaves using Old Olive Ink and cut with coordinating die. Color the leaves following the same method as the flower.

  • Stamp sentiment (from the Life Is Beautiful Stamp Set) with Early Espresso Ink.

  • Adhere the leaves and flower to corner of the sponged layer and cut excess so it’s square at the corner.

  • Adhere layer to card base.

 
Sketch Saturday - Celebrate Sunflowers card2.jpg
 

On the inside stamp sentiment with Early Espresso Ink (from the Life Is Beautiful Stamp Set) and small sunflower with Daffodil Delight Ink.

 
Sketch Saturday - Celebrate Sunflowers.jpg
 

Supply List

The November Christmas Card Kits have been designed and I'm ready to take your orders.  This is the 3rd and final month for purchasing my Christmas Card Kits.

 
November Christmas Card Kits Graphic.png
 

I’ll do the cutting, prepping and have everything you need (except stamps, inks and adhesives) to make 16 beautiful Christmas Cards.

Below are the cards you’ll make with November’s Card Kits. You will get kits to make 8 of each design, totaling 16 cards.

November Christmas Card1.jpg
November Christmas Card2.jpg

The November Card Kits include:

  • 16 Card Bases & Envelopes

  • Layers, Embossed Layers & Die Cuts

  • Full Package of Real Red Double-Stitched Satin Ribbon (10 yards)

  • Full Package of Red Rhinestones Basic Jewels (220 pieces)

  • PDF complete with pictures, measurements and step-by-step instructions

  • Exclusive access to video demonstrating how to make each card

Note: You will require stamps, ink and adhesive to complete the cards.


Choose Your Package - payment must be received by November 25th - US Only.  

  • Basic Card Kits - $35
     

  • Add On For Unto Us Cling Stamp Set - $21 (Total with kits $56)

 
Screen Shot 2020-10-09 at 9.06.00 PM.png
 
  • Add On Real Red & Garden Green Ink Pads - $7.50 each (Total with kits $50)

 
Screen Shot 2020-10-09 at 10.22.14 PM.png
 
  • Add On For Unto Us Cling Stamp Set & Ink Pads (Total with kits $71)

 
Screen Shot 2020-10-09 at 10.22.24 PM.png
 

Email me patti@pspapercrafts to reserve your spot.

Snow Front - Masculine Birthday Card

This is a great card for a guy (or a gal)! It reminds me of my home in upstate NY. My husband built a log home and we had deer hanging around all the time. The Fall season was beautiful.

 
Snow Front - Masculine Birthday Card2.jpg
 

Watch the video below to see how to make this card. I’ll talk about the images and all the different ink colors I used.


This stamp set is so versatile. You can make a winter scene with the cute snowman and evergreen trees or a fall card like mine or a summer card with the deer by a lake and the mountains in the distance. Lots of choices.

 
Snow Front - Masculine Birthday Card stamp.jpg
 

The woodgrain background layer is from the Poinsettia Place Designer Series Paper which is on sale during the month of October, 2020. Save 15%.

 
Screen Shot 2020-10-08 at 9.01.10 PM.png
 

Tips & Instructions

  • Blackberry Bliss Card Base - 4 1/4 x 11, score at 5 1/2 (horizontal, side opening)

  • Poinsettia Place Designer Series Paper (woodgrain) - 5 1/4 x 4, adhere to card base.

  • Whisper White - cut with largest Stitched Nested Label Die.

  • Stamp scene:

    • Stamp mountains with Sahara Sand Ink, stamping off twice to get a very light shade. Stamp across overlapping the mountains.

    • Stamp trees with Soft Suede Ink. Stamp just one tree on the right and the set of trees on the left.

    • Stamp grass image with Pear Pizzazz Ink, stamping a few times to cover the bottom.

    • Stamp cabin with Blackberry Bliss Ink.

    • Stamp deer with Sahara Sand Ink.

    • Stamp the leaves on the trees with Mango Melody Ink and then Calypso Coral Ink.

  • Stamp sentiment (from Itty Bitty Birthdays) using Blackberry Bliss ink on a 1/2” strip of Whisper White. Punch each end using the Triple Banner Punch.

  • Adhere stamped scene and sentiment to card using Dimensionals.


On the inside stamp larger tree with Soft Suede Ink and stamp leaves with Mango Melody and Calypso Coral Inks. Stamp grass with Pear Pizzazz Ink and sentiment with Rich Razzleberry Ink. You can stamp the deer if you want with Sahara Sand Ink.

 
Snow Front - Masculine Birthday Card inside.jpg
 

Supply List

Forever Greenery Friendship Card

I made this card for a close friend of mine to let her know how I feel about her. It’s so pretty with the gold laser cut piece.

 
Forever Greenery Friendship Card2.jpg
 

The Forever Greenery Designer Series Paper is one of the papers that’s on sale during the month of October. You can save 15% The colors and images are beautiful. It’s one of my favorites!

 
Screen Shot 2020-10-07 at 9.09.27 PM.png
 

The Forever Gold Laser-Cut Specialty Paper adds such a rich touch to any card. I added my sentiment on a punched circle that I layered on the gold piece.

 
Screen Shot 2020-10-07 at 9.10.13 PM.png
 

Tips & Instructions

  • Pretty Peacock Card Base - 5 1/2 x 8 1/2, score at 4 1/4

  • Forever Greenery Designer Series Paper - 5 1/2 x 3, adhere to card base

  • Whisper White Layer - 3 1/2 x 3 1/2, stamp dots all over with Pretty Peacock Ink and adhere over Designer Series Paper layer.

  • Stamp sentiment with Pretty Peacock Ink on Whisper White Cardstock and punch with 2” Circle Punch.

  • Adhere circle to Gold Laser-Cut piece and adhere to card using Dimensionals

 
Forever Greenery Friendship Card.jpg
 

On the inside, stamp greenery images with Pretty Peacock and Pear Pizzazz.

 
Forever Greenery Friendship Card inside.jpg
 

Supply List

Arrange A Wreath - Give Thanks Card

The Arrange The Wreath Bundle is one of my favorites in the Annual Catalog. I love wreaths so this is a perfect set for me.

 
Arrange A Wreath Pears card2.jpg
 

In my video I’ll show you all the steps to make this card and give you an overview of the stamp set and dies.


Tips & Techniques

  • Garden Green Card Base - 5 1/2 x 8 1/2, score at 4 1/4

  • Whisper White Layer - 5 1/4 x 4, emboss with the Tasteful Textiles 3D Embossing Folder. Adhere to card base.

  • Cut background wreath from Bumblebee Cardstock.

  • Cut leafy wreath from Garden Green Cardstock.

  • Stamp 6 pears with Pear Pizzazz Ink on Whisper White Cardstock and cut with coordinating Die. You only need 5 of them.

  • Stamp sentiment label with Bumblebee Ink on scrap of Whisper White Cardstock. I stamped off first to get a lighter shade. Stamp sentiment with Garden Green Ink. Cut out the label.

  • Fold 3” piece of Bumblebee Gingham Ribbon over Green Wreath and adhere the label to it. I used Scotch Tape to tape the ribbon on the back of the label.

  • Adhere the wreaths using Liquid Glue. Adhere pears to wreath and then adhere wreath to card.

  • Put a Dimensional behind the label to adhere to the card.

 
Arrange A Wreath Pears card1.jpg
 

On the inside stamp sentiment with Garden Green Ink and the wheat using Bumblebee Ink. I stamped the wheat 3 times without re-inking. These stamps are from the Gather Together Stamp Set.

 
Arrange A Wreath Pears inside.jpg
 

For the month of October, you can receive a FREE 3D Tutorial Bundle with a $50 order from my Online Store.

You can also purchase the October 3D Bundle Tutorial -  (6 tutorials) PDF for $15.00
This is a one-time purchase.  Email me patti@pspapercrafts.com and I’ll send you a PayPal Invoice. Once I receive payment I will email you the PDF tutorial.

Join my team! They always get the tutorials for FREE!

Here’s a peek of the projects in the tutorial.

 
October 2020 3D Bundle Sneak Peek.jpg
 

Supply List for Today’s Card