Beautiful Poinsettia Christmas Card

This was a simple card to make using the Poinsettia Dies and Heartwarming Hugs Designer Series Paper. It’s bright and cheerful and I love the sentiment.

 
Beautiful Poinsettia Christmas Card2.jpg
 

These dies are so great. You can cut the image along with a piece that embosses the veins on the leaves and the flowers. I didn’t even need to stamp anything on the Poinsettia. I added a Beaded Pearl to the center and that pulls the whole flower together.

 
Screen Shot 2020-10-06 at 3.04.12 PM.png
 

Tip & Instructions

  • Real Red Card Base - 4 1/4 x 11, score at 5 1/2 (side opening, horizontal)

  • Whisper White Layer - 5 1/8 x 3 7/8

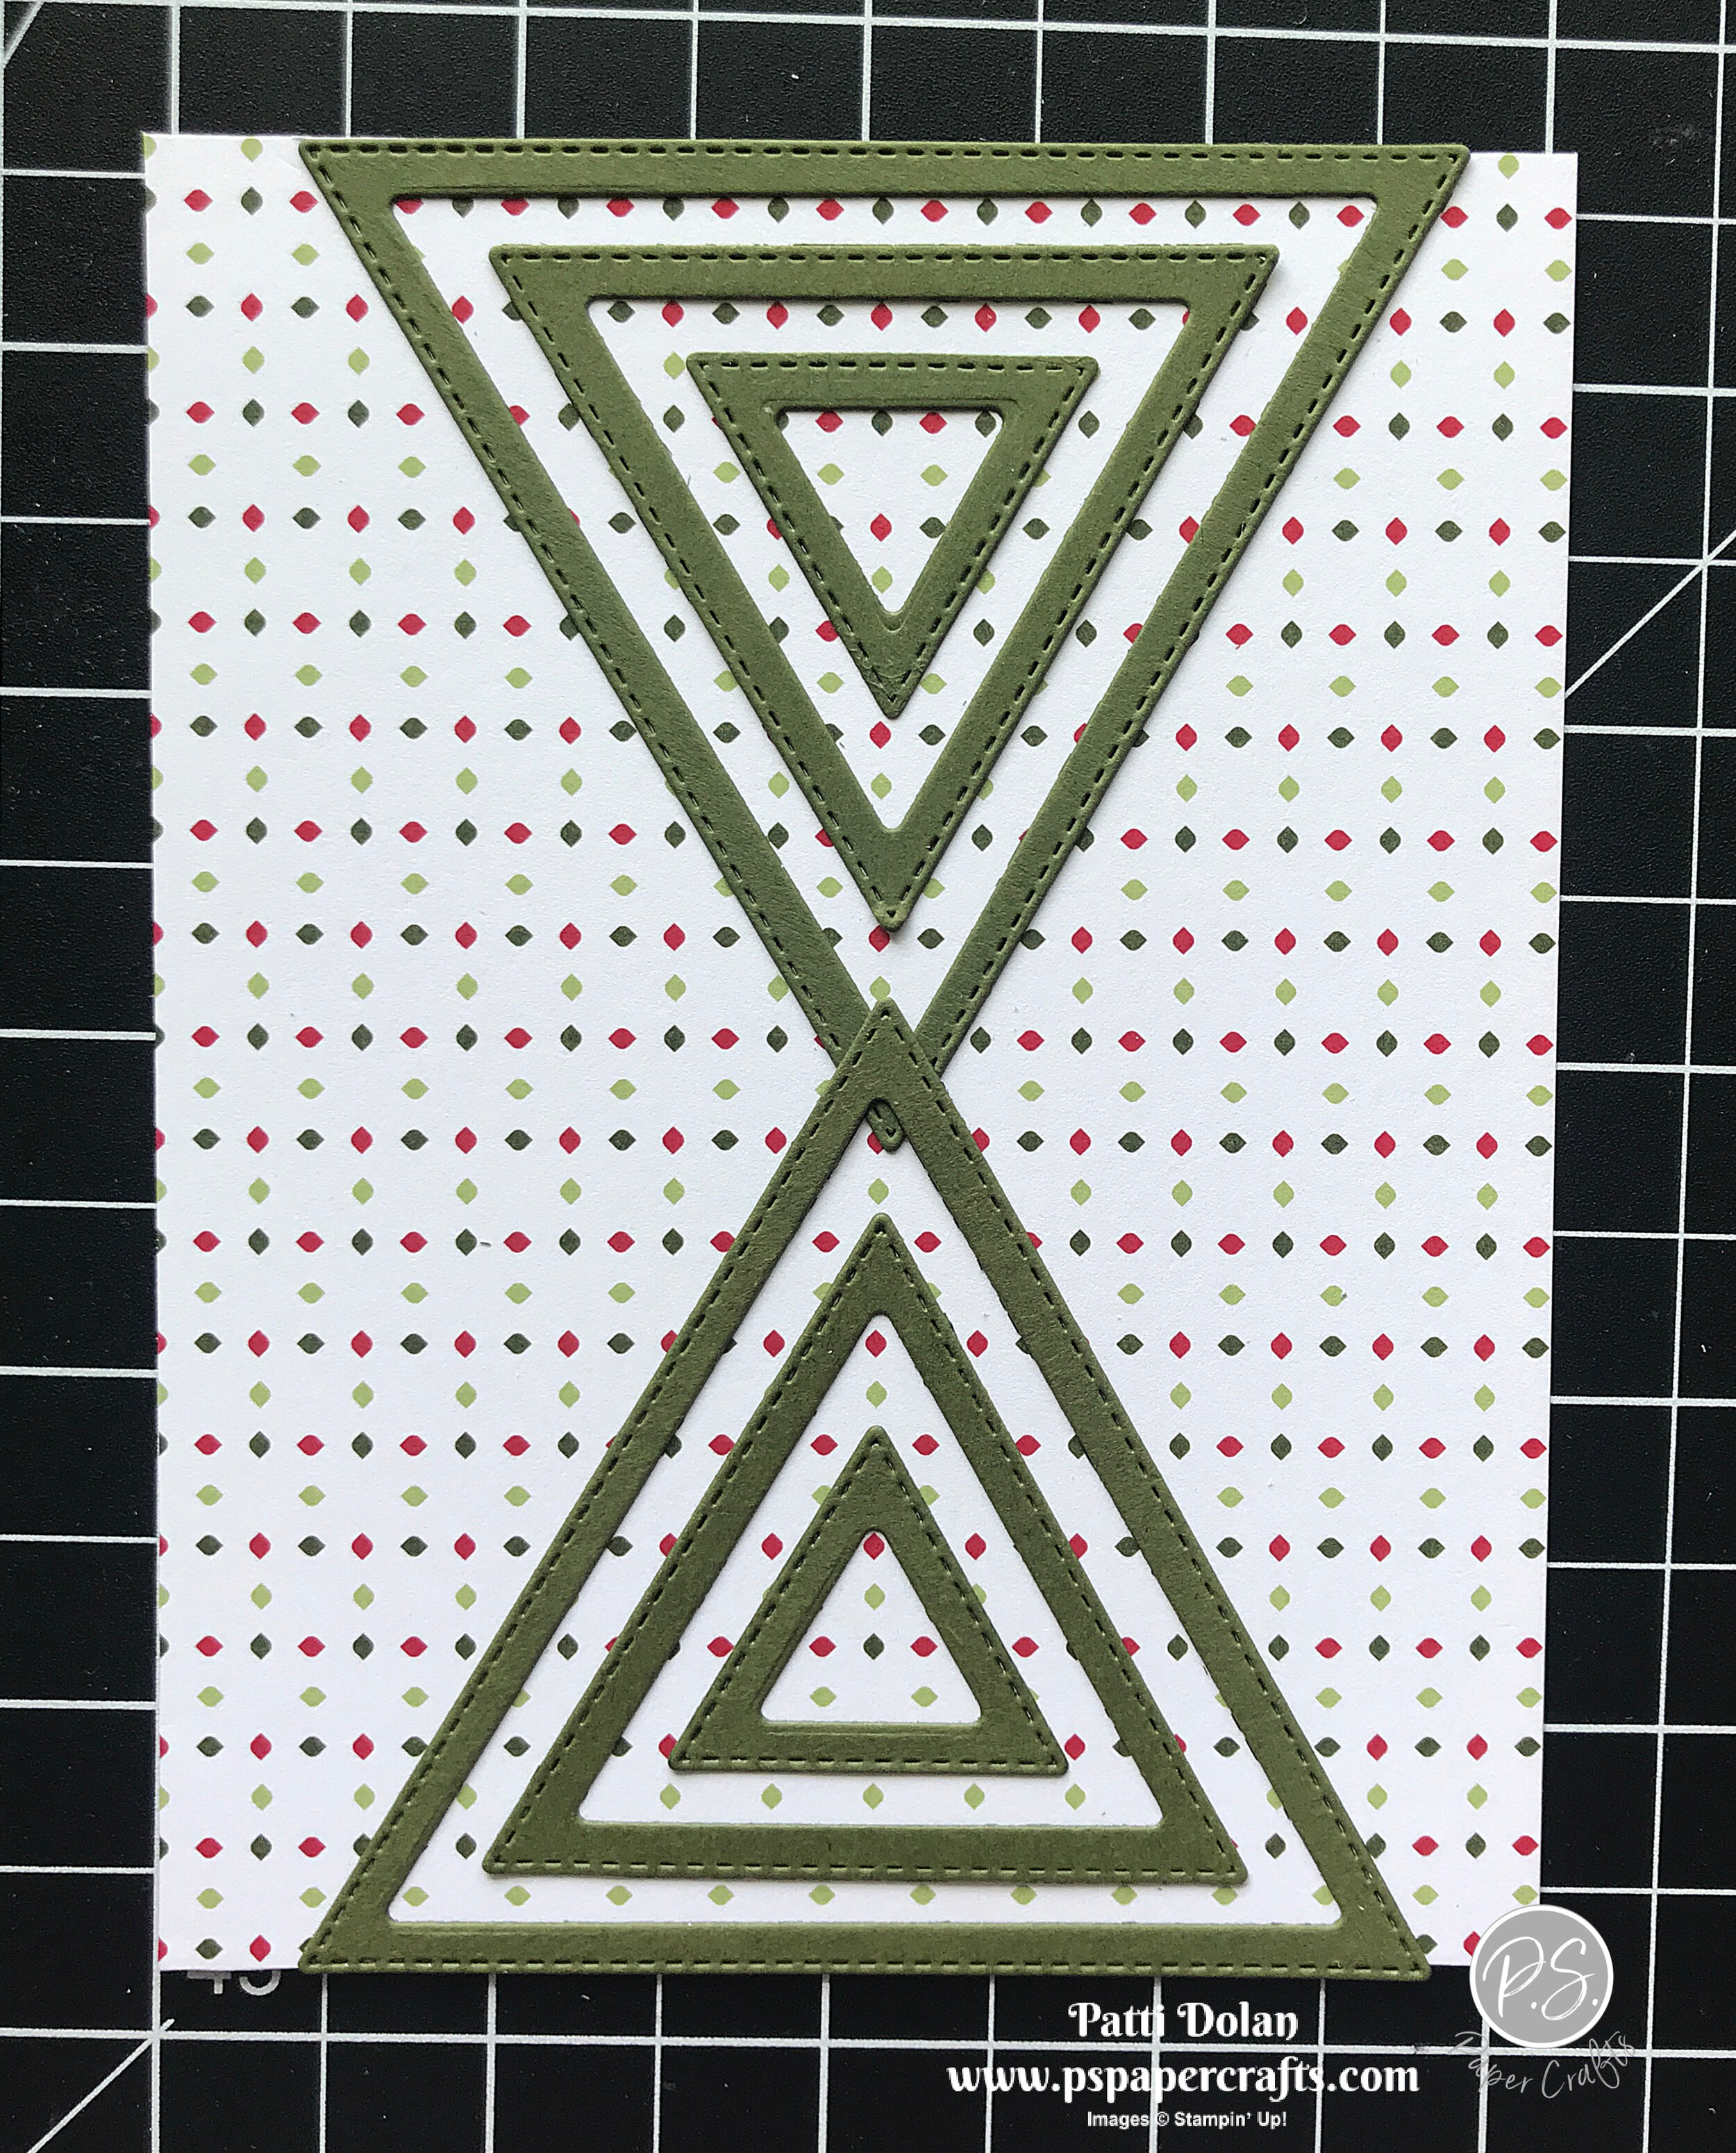
  • Heartwarming Hugs Designer Series Paper - 5 x 3 3/4, adhere to white layer and then adhere to card base.

  • Cut the 3 layers using the poinsettia dies with the pieces that emboss from Real Red Cardstock. Adhere the layers offsetting each one.

  • Add a Beaded Pearl cluster to the center of the poinsettia. I used 3 glue dots, one behind each pearl since it’s a heavy piece.

  • Cut 1 large leaf and 2 smaller leaves using the leaf dies with the pieces that emboss from Pear Pizzazz Cardstock.

  • Adhere poinsettia and leaves to card.

  • Whisper White Strip - 1 1/2 wide, stamp sentiment (from Wrapped In Christmas) with Real Red Ink. Punch bottom using the Triple Banner Punch. The finished piece is about 3 1/8 long. Adhere to card using Dimensionals.

 
Beautiful Poinsettia Christmas Card1.jpg
 

On the inside, stamp sentiment (from Wrapped In Christmas) with Real Red Ink. Cut 3 small poinsettias from Real Red Cardstock and adhere to layer.

 
Beautiful Poinsettia Christmas Card - inside.jpg
 

Supply List

Sketch Saturday - Sailing Home

For today’s sketch challenge from Splitcoaststampers I made a birthday card for my brother who loves to sail.

I used the Sailing Home Stamp Set, Smooth Sailing Dies and Whale Of A Time Designer Series Paper.

 
Sketch Saturday - Sailing Home1.jpg
 

This is the sketch I used. I was going to go with a floral card but decided to do this one instead.

 
Screen Shot 2020-10-03 at 12.29.01 PM.png
 

Winner, Winner, Chicken Dinner!

I won last week’s sketch challenge. Splitcoaststampers chose my card as the winner!!!

 
Sketch Saturday - Joyful Holly Card1.jpg
Screen Shot 2020-09-26 at 1.48.28 PM (1).png
 

Tips & Instructions

  • Pretty Peacock Card Base - 5 1/2 x 8 1/2, score at 4 1/4

  • Whisper White Layer - 5 3/8 x 4 1/8, adhere to card base.

  • Whale Of A Time Designer Series Paper - 5 1/4 x 4, adhere to card.

  • Whisper White Layer - 4 x 2, sponge very lightly with Pool Party Ink. I just dabbed it a little bit to give it some color.

  • Pretty Peacock scraps - cut two pieces of the rope border from the Smooth Sailing Dies and adhere to the top and bottom of the Whisper White layer and adhere to card.

  • Stamp larger sailboat with Black Memento Ink and color with Stampin’ Blends Markers. I colored the sails and water with Light Pool Party. Color the boat with Dark & Light Calypso Coral. Cut sailboat with coordinating die.

  • Stamp sentiment (from Peaceful Moments Stamp Set) with Pretty Peacock Ink and cut with die from Smooth Sailing Dies.

  • Adhere sailboat and sentiment to card using Dimensionals.

 
Sketch Saturday - Sailing Home1 card2.jpg
 

On the inside stamp sentiment (from Peaceful Moments Stamp Set) using Pretty Peacock Ink. Stamp sailboat with Black Memento Ink.

 
Sketch Saturday - Sailing Home1 inside.jpg
 

Supply List

Prized Peony Sympathy Card

I found this card layout in the Annual Catalog and wanted to copy it but change it up a bit. It really love how it turned out.

 
Prized Peony Sympathy Card2.jpg
 

Watch the video to see all the steps to make this card. I used Stampin’ Write Markers to color the stamp and then stamp it. This is a great way to get multiple colors on your image.


This stamp set has beautiful peony images and some very special sentiments.

 
Prized Peony Sympathy Card Stamp.jpg
 

Tips & Instructions

  • Sahara Sand Card Base - 5 1/2 x 8 1/2, score at 4 1/4

  • Whisper White Layer - 4 1/4 x 3 3/4, cut both edges (4 1/4 side) using the scalloped die from the Peony Dies set. I put the die at the very edge on either side to help keep it straight and cut as little off as possible.

 
Prized Peony Sympathy Card Scalloped edge.jpg
 
  • Using Stampin’ Write Markers, color directly on the stamp. I used Magenta Madness and Old Olive. Breath on the stamp and then stamp on the Whisper White layer towards the top.

  • Stamp sentiment using Old Olive Ink.

  • Stamp smallest peony flower on both sides of the card front using a VersaMark Stamp Pad.

  • Adhere layer to card base.

  • Tie bow with 3 strands of Linen Thread and adhere with Glue Dot.

 
Prized Peony Sympathy Card.jpg
 

On the inside stamp sentiment with Old Olive Ink. Stamp smallest peony image at bottom and top corners using Sahara Sand Ink.

 
Prized Peony Sympathy Card inside.jpg
 

Supply List

Designer Series Paper Sale!!!

It’s never been a better time to stock up on Designer Series Paper from Stampin’ Up! For the month of October you can save 15% on select Papers.

 
01-10-20_GIF_DSP_SALE_NA.gif
 

Designer Series Paper is one of my favorite products from Stampin’ Up! Sometimes I just add a sentiment and embellishment to a card that has a layer of Designer Series Paper and I’m done.

 
Screen Shot 2020-10-02 at 11.24.04 AM.png
 
 
Screen Shot 2020-10-02 at 11.24.28 AM.png
 

Some of my Favorites are:

  • Forever Greenery

  • In Good Taste

  • Heartwarming Hugs

  • Whale Of A Time

Head over to my Online Store to see the papers and place your order.


October 2020 - 3D Blog Hop - Autumn Theme

I’m participating again as a Guest Designer for the 3D Tutorial Blog Hop!!! Here’s the creative Design Team!

 
Design Team Picture.jpg
 

Here’s a sneak peek of the projects in the 3D Tutorial Bundle. These projects are exclusive and not available elsewhere online. They include both Imperial and Metric measurements.

 
October 2020 3D Bundle Sneak Peek.jpg
 

Each of us create a coordinating card based on the theme we are featuring. This month our theme is Autumn and this is the card I made.

 
Love Of Leaves Hello Card - Blog Hop card2.jpg
 

I used the Love Of Leaves Stamp Set, the coordinating Stitched Leaves Dies and Gilded Autumn Designer Series Paper. These are some of my favorite products in the Mini Catalog.

 
Love Of Leaves Hello Card - Blog Hop.jpg
 

Tips & Instructions

  • Early Espresso Card Base - 5 1/2 x 8 1/2, score at 4 1/4

  • Very Vanilla Layer - 5 1/4 x 4

  • Gilded Autumn Designer Series Paper - 4 x 2 1/4

  • Stamp leaves on Very Vanilla using Cajun Craze and Mint Macaron Inks being sure they will show above the Designer Series Paper.

  • Adhere the Designer Series Paper Layer to stamped Layer.

  • Cut 2 leaves from Brushed Metallic Cardstock (Copper) and smallest leaf from Mint Macaron Cardstock using Stitched Leaves Dies and adhere to card above seam.

  • Wrap Mint Macaron Basketweave Ribbon around the layers at the seam and adhere to back. I used Tear & Tape.

  • Wrap Copper Ribbon over the Mint Macaron Ribbon using small pieces of Tear & Tape.

  • Adhere layer to card base.

  • Thread piece of Copper Ribbon through an Acorn Trinket and tie a bow, then adhere using Glue Dots. (I put a Glue Dot on the bow and the acorn.)

 
Love Of Leaves Hello Card - Blog Hop Card.jpg
 

On the inside, stamp the sentiment with Early Espresso Ink and some leaves with Cajun Craze and Mint Macaron Inks.

 
Love Of Leaves Hello Card - Blog Hop inside.jpg
 

Are you interested in the Tutorial Bundle?

You have several ways of receiving the 3D Tutorial Bundle:

1) Order $50 from my online store between October 1-31, 2020 get the PDF for FREE.

2) Purchase the October 3D Bundle Tutorial -  (6 tutorials) PDF for $15.00
This is a one-time purchase.  Email me patti@pspapercrafts.com and I’ll send you a PayPal Invoice. Once I receive payment I will email you the PDF tutorial.

3) Join my team! They always get the tutorials for FREE!

Now, let’s get hopping. Click on the links below to see all the different projects for this month.

Supply List for my Project

Coming Home Christmas Card

I made these two cards without stamping….well, except for the inside. The Home Together Dies cut the images from the Trimming The Town Designer Series Paper.

This paper is on sale during the Designer Series Paper Sale for the month of October!

 
Coming Home Christmas Card both.jpg
 

I’ll show you how to make this card and all the papers in this pack in the video below.


Tips & Instructions for Card 1

  • Real Red Card Base - 4 1/4 x 11, score at 5 1/2

  • Whisper White Layer - 5 1/4 x 4

  • Trimming The Town Designer Series Paper Layer - 5 1/8 x 3 7/8

  • Whisper White piece for slope - 5 1/4, cut with Home Together Dies. You can make it as high or low as you want.

  • Cut houses and tree from the Designer Series Paper with the coordinating dies.

  • Adhere layers to card base.

  • Adhere the small house to the larger house using Dimensionals and adhere houses and tree to card using Dimensionals

  • Cut sentiment from Designer Series Paper and adhere to card. I was back and forth on where to place the sentiment and after watching the video, I think I like it better at the top right of the card.

  • Decorate the tree with All The Trimmings Embellishments.

 
Coming Home Christmas Card1.jpg
 

Tips & Instructions for Card 2

  • Real Red Card Base - 5 1/2 x 8 1/2, score at 4 1/4

  • Whisper White Layer - 5 1/4 x 4

  • Trimming The Town Designer Series Paper Layer - 5 1/8 x 3 7/8

  • Whisper White piece for slope - 5 1/4, cut with Home Together Dies. You can make it as high or low as you want.

  • Cut houses and trees and wreath from the Designer Series Paper with the coordinating dies. Adhere wreath to house using Dimensional.

  • Adhere layers to card base (not the slope)

  • Lay slope on card to get placement for houses and adhere the houses to the card

  • Adhere slope using Dimensionals and then adhere the trees with Dimensionals.

  • Cut sentiment from Designer Series Paper and adhere to slope

  • Add a star to the large tree using All The Trimmings Embellishments. You can decorate the tree with them as well.

 
Coming Home Christmas Card2.jpg
 

Supply List

Country Home Harvest Blessings

I couldn’t let the Fall Season go by without making a card using the Country Home Stamp Set. It’s one of my favorites!

 
Country Home Harvest Blessings Card2.jpg
 

The stamp set has some great sentiments for Thanksgiving and I love the rustic look of the images.

 
Country Home Harvest Blessings.jpg
 

Did you know that Stampin’ Up! is having a Designer Series Paper Sale? During the month of October, you can save 15% on select papers. I used In Good Taste for this card. I love this paper and you get a whopping 24 sheets in a package.

 
Screen Shot 2020-09-28 at 4.58.03 PM.png
 

Tips & Instructions

  • Basic Gray Card Base - 5 1/2 x 8 1/2, score at 4 1/4

  • In Good Taste Designer Series Paper - 5 1/4 x 4

  • Stamp the jug and flowers directly on the Designer Series Paper using Black Memento Ink.

  • Color the jug with Light & Dark Smoky Slate Stampin’ Blends Markers.

  • Color flowers and leaves using Light Sea Foam, Dark Rococo Rose, Dark So Saffron, Dark Rich Razzleberry, Pumpkin Pie and Dark Old Olive Stampin’ Blends Markers.

  • Stamp sentiment with Black Memento Ink.

  • Adhere layer to card base.

  • Color 2 strands of Linen Thread using Dark Rococo Rose Stampin’ Blends Marker and tie bow. Adhere to jug using Glue Dot.

  • Add some Elegant Faceted Gems.

 
Country Home Harvest Blessings Card1.jpg
 

On the inside stamp sentiment and images with Black Memento Ink. Color pitcher with Smoky Slate Stampin’ Blends Markers and the flowers and leaves with Dark & Light Rococo Rose, Dark So Saffron, Dark Rich Razzleberry and Dark & Light Old Olive Stampin’ Blends Markers.

 
Country Home Harvest Blessings inside.jpg
 

Supply List

Sketch Saturday - Joyful Holly

I used the Joyful Holly Stamp Set to make this simple card for the Sketch Challenge from Splitcoaststampers.

 
Sketch Saturday - Joyful Holly Card1.jpg
 

Here’s the sketch I for the challenge. I like having the two strips as the focal piece. I stamped my image on the full piece and cut it in half.

 
Screen Shot 2020-09-26 at 1.48.28 PM.png
 

I actually used every stamp in this stamp set. I think this is a first for me. There are outline stamps and then the filler stamps. The berries will stamp the single berry and the group of 3 in one step. So cool!

 
Sketch Saturday - Joyful Holly Stamp.jpg
 

Tips & Instructions

  • Whisper White Card Base - 4 1/4 x 11, score at 5 1/2 (top folding)

  • Real Red Layer - 5 1/4 x 4, emboss with Subtle 3D Embossing Folder and adhere to card base

  • Whisper White Layer - 3 1/2 x 3, stamp the holly images with Garden Green Ink.

  • Ink the leaves (filler) with Garden Green Ink and stamp off onto a piece of scrap to remove a layer of ink. Stamp to fill in the outlined images.

  • Stamp berries with Real Red Ink.

  • Cut stamped layer in half and adhere to card leaving a small space between.

  • Stamp sentiment on scrap of Whisper White Cardstock and cut with small scalloped Layering Circle Dies. Adhere with Dimensionals.

  • Tie bow with Real Red Sheer Ribbon and adhere with Glue Dot.

 
Sketch Saturday - Joyful Holly Card2.jpg
 

I added a Whisper White Layer even though the card base is white so the card is not top heavy. I stamped the holly the same as I did on the card front and stamped the sentiment with Real Red Ink.

 
Sketch Saturday - Joyful Holly inside.jpg
 

Supply List

Slim Line Snowman Card

I tried my first Slim Line Card using the Snowman Season Stamp Set.

 
Slimline Snowman Card2.jpg
 

The size of this card is 8 1/2 x 3 3/4 and it fits in a standard letter size envelope. I’ll show you how to make this card in my video.


Tips & Instructions

  • Night Of Navy Card Base - 7 1/2 x 8 1/2, score at 3 3/4

  • Snowflake Splendor Designer Series Paper Layer - 8 1/4 x 3 1/2, adhere to card base.

  • Night Of Navy Cardstock - cut 3 scalloped circles (2nd largest) from the Layering Circle Dies.

  • Whisper White Cardstock - cut 3 circles (2nd largest) from the Layering Circles Dies.

  • Stamp a snowman on each circle using Black Memento Ink.

  • Color hats, scarves, noses and snow with Stampin’ Blends (Dark Pumpkin Pie, Light & Dark Seaside Spray, Light & Dark Shaded Spruce, Dark Poppy Parade)

  • Adhere white circles to navy scalloped Circles. Adhere the snowmen to card, using Dimensionals on the middle one.

  • Whisper White Strip - 3 3/4 x 3/8, stamp sentiment with Night Of Navy Ink and adhere to card using Dimensionals.

  • Add some Blue Adhesive Backed Gems

 
Slimline Snowman Card3.jpg
 

The inside layer is 8 1/4 x 3 1/2. Stamp sentiment with Night Of Navy Ink. Stamp snowflakes with Night Of Navy Ink but stamp off (stamp on scrap) first to get a lighter layer. Stamp snowman with Black Memento Ink and color nose and snow with Seaside Spray Stampin’ Blends.

 
Slimline Snowman Card inside.jpg
 

Supply List

Simple Hello Card using Love Of Leaves

This is such an easy card to make and I love how it turned out. It’s a card you can send to anyone just to let them know you are thinking of them.

 
Simple Hello Card2.jpg
 

The Love Of Leaves Stamp Set has such beautiful images and pretty sentiments.

 
Simple Hello Card - stamps.jpg
 

Tips & Instructions

  • Just Jade Card Base - 5 1/2 x 8 1/2, score at 4 1/4

  • Whisper White Layer - 5 1/4 x 4, emboss with Scripty 3D Embossing Folder.

  • Whisper White Focal Layer - cut with largest of the rectangles from the Stitched So Sweetly Dies.

  • Stamp leaf image on the stitched rectangle using Bumblebee Ink and sentiment with Just Jade Ink.

  • Wrap piece of Just Jade Ribbon around embossed layer and adhere in back, adhere layer to card base.

  • Adhere stitched rectangle layer to card using Dimensionals.

  • Tie bow with ribbon and adhere with Glue Dot.

  • Add some Elegant Faceted Gems.

 
Simple Hello Card.jpg
 

On the inside, stamp sentiment with Just Jade Ink and leaves with Bumblebee Ink.

 
Simple Hello Card inside.jpg
 

Supply List

Mountain Air Masculine Birthday Card

I used the Mountain Air Bundle to make this great masculine birthday card. I love the mountain images in this stamp set.

 
Mountain Air Masculine Birthday Card2.jpg
 

I’ll show you how the Majestic Mountain dies cut these images. I have a little trick to make the bottom with the trees a little bigger. Watch to see.


Tips & Instructions

  • Blackberry Bliss Card Base - 4 1/4 x 11, score at 5 1/2 (horizontal, side folding)

  • Whisper White Layer - 5 1/4 x 4 - lightly sponge with Balmy Blue Ink.

  • Whisper White Cardstock

    • Stamp tree line with Shaded Spruce Ink along bottom of 5 1/4 wide piece. Leave a little room at the bottom, ink stamp again flip it and stamp more of the grasses under the trees (see video for this step). Cut off excess with Paper Trimmer.

    • Stamp one mountain image with Soft Suede Ink and a second with Blackberry Bliss Ink.

    • Stamp 2 clouds with Balmy Blue Ink.

    • Cut with coordinating dies from the Majestic Mountain Dies.

  • Adhere the mountains and tree line together and then adhere to sponged layer.

  • Stamp sentiment (from Itty Bitty Birthdays) on 1/2” strip of Whisper White and punch one end using the Triple Banner Punch

  • Adhere sentiment and clouds using Dimensionals.

  • Adhere layer to card base.

 
Mountain Air Masculine Birthday Card.jpg
 

I am so happy with how this beautiful mountain scene turned out.

 
Mountain Air Masculine Birthday Card3.jpg
 

Supply List

Gather Together Autumn Card

Well, it’s time for Fall! I love everything about Fall; the colors, the change in temperature, apple picking, I could go on and on.

 
Gather Together Fall Card2.jpg
 

I created a background pattern for this card using the Gather Together Stamp Set and cut the pumpkins with the coordinating Gathered Leaves Dies.

 
Gather Together Fall Card stamp.jpg
 

Tips & Instructions

  • Cinnamon Cider Card Base - 5 1/2 x 8 1/2, score at 4 1/4

  • Whisper White Layer - 5 1/4 x 4

  • Stamp large leaf image randomly on the Whisper White Layer with Cinnamon Cider Ink.

  • Stamp dots between leaves with Bumblebee Ink. I used some scrap paper to cover the leaves when stamping the dots to be sure I didn’t get the dots on the leaves.

  • Bumblebee Strip - 4 x 1 3/4

  • Whisper White Strip - 4 x 1 1/2, stamp sentiment using Cinnamon Cider Ink and stamp dots around with Bumblebee Ink.

  • Stamp pumpkins on scrap of Whisper White Cardstock with Pumpkin Pie Ink and cut with coordinating dies from the Gather Leaves Dies.

  • Squeeze a Pumpkin Pie Ink Pad to get ink on the inside of the top. Using Wink Of Stella Brush pick up some of the ink and color the pumpkins. Before you color, brush a piece of scrap to get some ink off the brush so it’s not too dark. Do the same for the stem using Cinnamon Cider Ink. You’ll get a watercolor look with a little shine to it.

 
Gather Together Fall Card - Coloring.jpg
 
  • Adhere strips together and then adhere to layer and then to card base.

  • Adhere large pumpkin to strip and smaller pumpkins using Dimensionals.

  • Tie bow with Bumblebee Gingham Ribbon and adhere below sentiment with Glue Dots.

 
Gather Together Fall Card.jpg
 

On the inside, stamp sentiment with Cinnamon Cider Ink and pumpkins with Pumpkin Pie Ink.

 
Gather Together Fall Card inside.jpg
 

Supply List

Sketch Saturday - Forever Blossoms

I made this Sympathy card for a sketch challenge from Splitcoaststampers. I love the soft colors on this card.

 
Sketch Saturday - Forever Blossoms card.jpg
 

Here’s the sketch from the challenge. I used a piece of Vellum Cardstock and embossed the top and bottom using the Greenery Embossing Folder.

 
Screen Shot 2020-09-19 at 11.03.39 AM.png
 

Tips & Instructions

  • Basic Black Card Base - 5 1/2 x 8 1/2, score at 4 1/4

  • So Saffron Layer - 5 1/4 x 4

  • Whisper White Layer - 5 1/8 x 3 7/8

  • Stamp floral image from Forever Blossoms using Black Memento Ink and color with Light So Saffron and Light Old Olive Stampin’ Blends.

  • Adhere stamped layer to So Saffron Layer. Adhere layers to card base using Dimensionals.

  • Vellum Cardstock - 3 7/8 x 2

  • Emboss top and bottom edge of the Vellum strip using the Greenery Embossing Folder.

  • Stamp sentiment (from Touched My Heart Stamp Set) using Black Ink on the Vellum strip. I dried it with my Heat Tool.

  • Adhere Vellum to card being careful to “hide” the adhesive. I put very small dots of Multipurpose Liquid Glue along the embossed edge, between the rows of embossed leaves.

 
Sketch Saturday - Forever Blossoms card2.jpg
 

On the inside, stamp floral image on bottom left corner and color with Light So Saffron and Light Old Olive Stampin’ Blends.

 
Sketch Saturday - Forever Blossoms inside.jpg
 

Supply List

Grace's Garden Friendship Card

The Grace’s Garden Stamp Set is so pretty. I’m not sure why I haven’t used it before. There are coordinating dies for pretty much every image in the set.

 
Grace's Garden Friendship Card2.jpg
 

I’ll show you the stamp set and dies and how to stamp, color and cut them out to make a pretty scene. Don’t you just love that little cat looking in?


Tips & Instructions

  • Highland Heather Card Base - 5 1/2 x 8 1/2, score at 4 1/4

  • Whisper White Layer - 5 1/8 x 3 7/8

  • Snowflake Splendor Designer Series Paper Layer - 5 x 3 3/4

  • Whisper White Cardstock - Stamp pieces with Black Memento Ink, color with Stampin’ Blends (I used Light Smoky Slate, Dark Granny Apple Green, Dark Highland Heather, Dark Flirty Flamingo and Dark Daffodil Delight) and cut with Garden Gateway Dies. You will need 4 of the rose vine pieces.

  • Whisper White Cardstock - cut Trellis & Gate piece with Garden Gateway Dies

  • Lay trellis on Designer Series Paper and stamp sentiment with Black Memento Ink

  • Adhere trellis and roses around it, cutting two of the rose pieces so they cover top of trellis

  • Adhere flowers on each side of the trellis using Dimensionals and adhere cat and bird using Dimensionals

  • Adhere layers and adhere to card base

 
Grace's Garden Friendship Card stamp set.jpg
 

I love coloring with Stampin’ Blends. They go on so smoothly. Just dot those small areas to get the color added.

 
Grace's Garden Friendship Card blends.jpg
 

On the inside stamp another flower image and color with Dark Granny Apple Green and Dark Highland Heather Stampin’ Blends.

 
Grace's Garden Friendship Card inside.jpg
 

Supply List

Fun Christmas Card using Stitched Triangles

I used the Stitched Triangle Dies to create this card. It’s a little different from my style but I wanted to use these triangles in a fun way.

 
Fun Christmas Card using Stitched Triangles.jpg
 

Tips & Instructions

  • Mossy Meadow Card Base - 5 1/2 x 8 1/2, score at 4 /4

  • Heartwarming Hugs Designer Series Paper Layer - 5 1/4 x 4 1/8

  • Mossy Meadow Cardstock - lay Stitched Triangle Dies nested together and cut - do this 2 times.

 
Fun Christmas Card using Stitched Triangles Dies.jpg
 
  • Remove every other triangle so you have the space between them and lay them on the Designer Series Paper. Adhere one set on the bottom and one set on the top. The largest ones will overlap but will be hidden behind the label.

 
Fun Christmas Card using Stitched Triangles overlap.jpg
 
  • Using Tailored Tag Punch, punch Whisper White and Mossy Meadow labels.

  • Stamp sentiment on Whisper White label

  • Cut Mossy Meadow label in half, separate halves and adhere behind white label.

 
Fun Christmas Card using Stitched Triangles Dies label.jpg
 
  • Wrap piece of Real Red Braided Linen Trim around layer and adhere to back.

  • Adhere label over trim using Dimensionals.

  • Add red dots from All The Trimmings Embellishments to label.

  • Tie bow and adhere with Glue Dot.

 
Fun Christmas Card using Stitched Triangles.jpg
 

On the inside, stamp greenery to top and bottom corner. Add a sentiment if you want.

 
Fun Christmas Card using Stitched Triangles Dies inside.jpg
 

Supply List

Zoo Globe Baby Birthday Card

This is such a sweet birthday card for a young child.

 
Zoo Globe Baby Birthday Card1.jpg
 

In the video I’ll show you how to create this polka dot background by sponging ink over a Decorative Mask. I love the surprise when you lift the mask!


Tips & Instructions:

  • Soft Sea Foam Card Base - 5 1/2 x 8 1/2, score at 4 1/4

  • Whisper White Layer - 5 1/4 x 4 (you will cut this down after sponging)

  • Cover white layer with mask and tape down with Post-It Tape, Painter’s Tape, Washy Tape or something not too tacky. I only taped one side so I could lift it and see how the sponging looks.

  • Using blending tool (Sponge Dauber or Stampin’ Sponge or Blending Tool) sponge Soft Sea Foam Ink over the mask. Lift to see how dark the dots are and to be sure sponging is complete. Remove mask and then cut piece to 5 x 3 3/4.

  • Wrap piece of Whisper White Polka Dot Tulle Ribbon around sponged layer and adhere to back and then adhere layer to card base.

  • Cut Whisper White Cardstock using second largest Layering Oval Die and Soft Sea Foam Cardstock using largest scalloped Layering Oval Die.

  • Stamp sentiment, elephant and balloons with Black Memento Ink

  • Color elephant and balloons using Stampin’ Blends (elephant with Light Smoky Slate, toenails with Light Flirty Flamingo and balloons with Light Flirty Flamingo, Dark Soft Sea Foam and Light So Saffron Stampin’ Blends). Add Wink Of Stella to elephant and balloons.

  • Adhere ovals together and then adhere to card using Dimensionals.

  • Tie bow with ribbon and adhere using Glue Dot.

 
Zoo Globe Baby Birthday Card2.jpg
 

Isn’t this elephant so adorable? I added some Wink Of Stella to the balloons and elephant to get some shine. The polka dot ribbon pulls everything together on this card.

 
Zoo Globe Baby Birthday Card closeup2.jpg
 

On the inside stamp sentiment, birds, tree and koala bear with Black Memento Ink. Color with Stampin’ Blends (birds with Light Seaside Spray, tree trunk and branches and koala bear with Light Crumb Cake & ears with Dark Crumb Cake and tree leaves with Light Soft Sea Foam).

 
Zoo Globe Baby Birthday Card inside.jpg
 

Supply List

You Are My Sunshine!!!

This floral pattern in the Flowers For Every Season Designer Series Paper is so delicate and pretty. The color is Bumblebee and I added ribbon and dots in the same color.

 
You Are My Sunshine Card2.jpg
 

I love the sentiments in the Ridiculously Awesome Stamp Set; they are just that - awesome! This stamp set was inspired by Ronda Wade when she reached her Million Dollars in Sales.

 
You Are My Sunshine Stamp.jpg
 

Tips & Instructions

  • Bumblebee Card Base - 5 1/2 x 8 1/2, score at 4 1/4

  • Whisper White Layer 5 3/8 x 4 1/8

  • Flowers For Every Season Designer Series Paper Layer - 5 1/4 x 4

  • Adhere floral layer to white layer, wrap Bumblebee Gingham Ribbon around layers and adhere to back, then adhere layers to card base.

  • Whisper White Scrap, stamp sentiment with Cinnamon Cider Ink and cut with second largest scalloped rectangle from the Stitched So Sweetly Dies.

  • Adhere sentiment layer to card using Dimensionals

  • Tie bow with ribbon and adhere with Glue Dot

  • Adhere 3 Bumblebee Enamel Dots

 
You Are My Sunshine Card1.jpg
 

On the inside, adhere 5 1/4 x 1 strip of Flowers For Every Season to bottom of 5 1/4 x 4 inside layer.

 
You Are My Sunshine inside.jpg
 

Supply List

Sketch Saturday - Gilded Autumn

I have a lot of fall birthday cards to make for guys and this one will be perfect for one of them. I made it for this week’s sketch challenge from Splitcoaststampers.

 
Sketch Saturday - Gilded Autumn card1.jpg
 

This is the sketch that I followed. When I saw it, I knew I wanted to spell out the word AUTUMN for the sentiment and then I went through my stash to find the paper to go along with that theme.

 
Screen Shot 2020-09-12 at 11.02.31 AM.png
 

Tips & Instructions

  • Early Espresso Card Base - 5 1/2 x 8 1/2, score at 4 1/4

  • Gilded Autumn Designer Series Paper Layer - 5 3/8 x 4 1/8, adhere to card base

  • Gilded Autumn Designer Series Paper Layer (with leaves & acorn) - 4 1/8 x 2 3/8, adhere to card

  • Gilded Autumn Designer Series Paper strip - cut to get two rows of design, adhere to card

  • Cajun Craze scrap - cut letters using the Playful Alphabet Dies (back scrap with Adhesive Sheet to make it easy to adhere), adhere letters to card

 
Sketch Saturday - Gilded Autumn card2.jpg
 

On the inside, stamp sentiment with Early Espresso Ink. I made this a birthday card and used the Happiest Of Birthdays Stamp Set.

Stamp leaves using Cajun Craze and Mint Macaron Inks. Stamp the detailed outline layer directly and stamp off with the filler to get lighter shade. I stamped off with the Cajun Craze twice to get an even lighter shade.

(Stamping Off means you stamp on a piece of scrap paper to remove a layer of ink, so when you stamp you get a lighter shade of the same color.)

 
Sketch Saturday - Gilded Autumn inside.jpg
 

Supply List

Spooky Halloween Card using Life Is Beautiful

I made this spooky Halloween Card using the Life Is Beautiful Stamp Set and the Playful Alphabet Dies.

 
Spooky Halloween Card2.jpg
 

There’s lots of techniques from sponging to heat embossing and I’ll show you step by step how I made this card in the video below.


Tips & Techniques

  • Night Of Navy Card Base - 5 1/2 x 8 1/2, score at 4 1/4

  • Whisper White Layer - 5 1/4 x 4

  • Using 1 1/2” Circle Punch, punch circle from Post-It Note and stick to top corner of layer to protect it while sponging.

  • Lightly Sponge Layer using Highland Heather and Misty Moonlight Inks. (I used Craft Ink Blending Brushes but you can use a Stampin’ Sponges or Sponge Brayer.)

  • Peel off the Post-It Note and lay the other piece of the Post-It Note paper around the circle to protect the card layer and lightly sponge some Daffodil Delight and Calypso Coral Ink. (See video for these steps.)

  • Use your Stamparatus to stamp tree with Black Memento Ink, stamping two layers. Wipe the tree with your Embossing Buddy.

  • Clean your stamp and stamp two layers of VersaMark Ink.

  • Cover tree with Clear Embossing Powder and Heat Emboss.

  • Cover a scrap of Basic Black Cardstock with VersaMark and then add Clear Embossing Powder and heat with Heat Tool.

  • Add Adhesive Sheet to back of the embossed scrap and cut BOO! with Playful Alphabet Dies.

  • Adhere sentiment letters to card.

  • Stamp birds (from High Tide Stamp Set) with Black Ink at top of layer and adhere layer to card base.

 
Spooky Halloween Card1.jpg
 

On the inside, stamp sentiment with Misty Moonlight Ink and images at top and bottom with Black Memento Ink. The stamps are from the Celebration Tidings Stamp Set.

 
Spooky Halloween Card inside.jpg
 

Supply List