Field Of Flowers & Ornate Layers - Thinking Of You

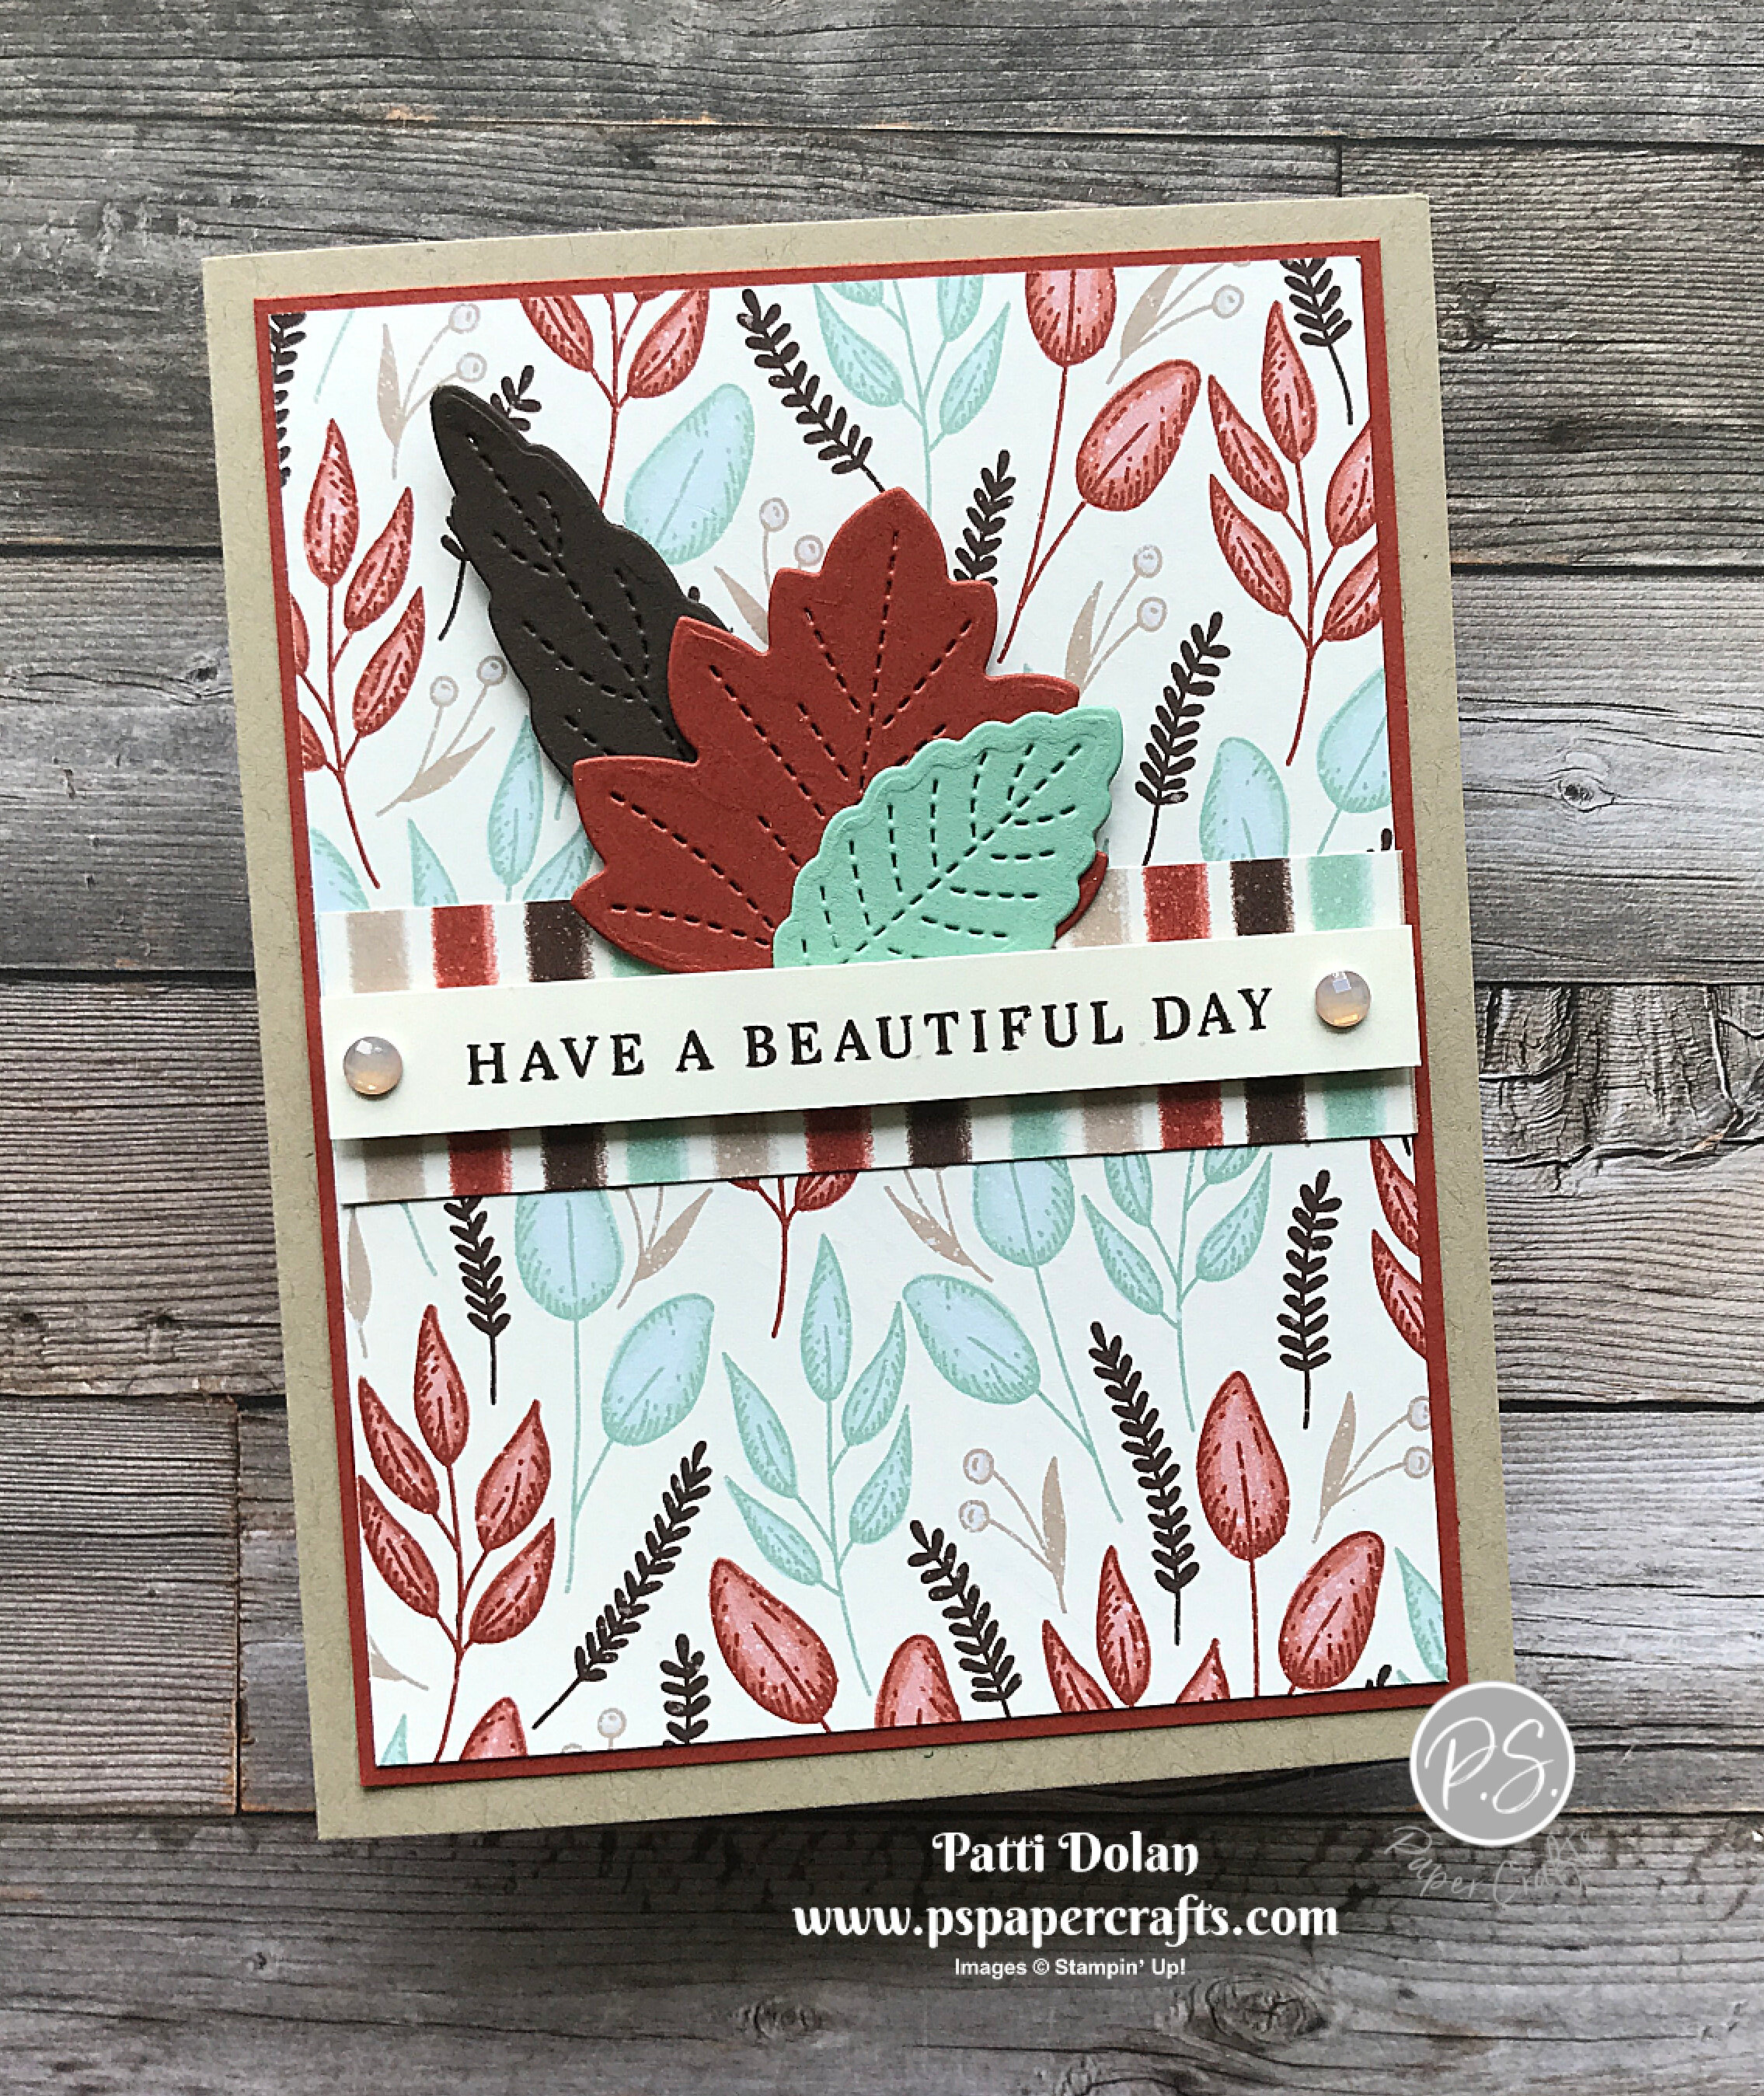
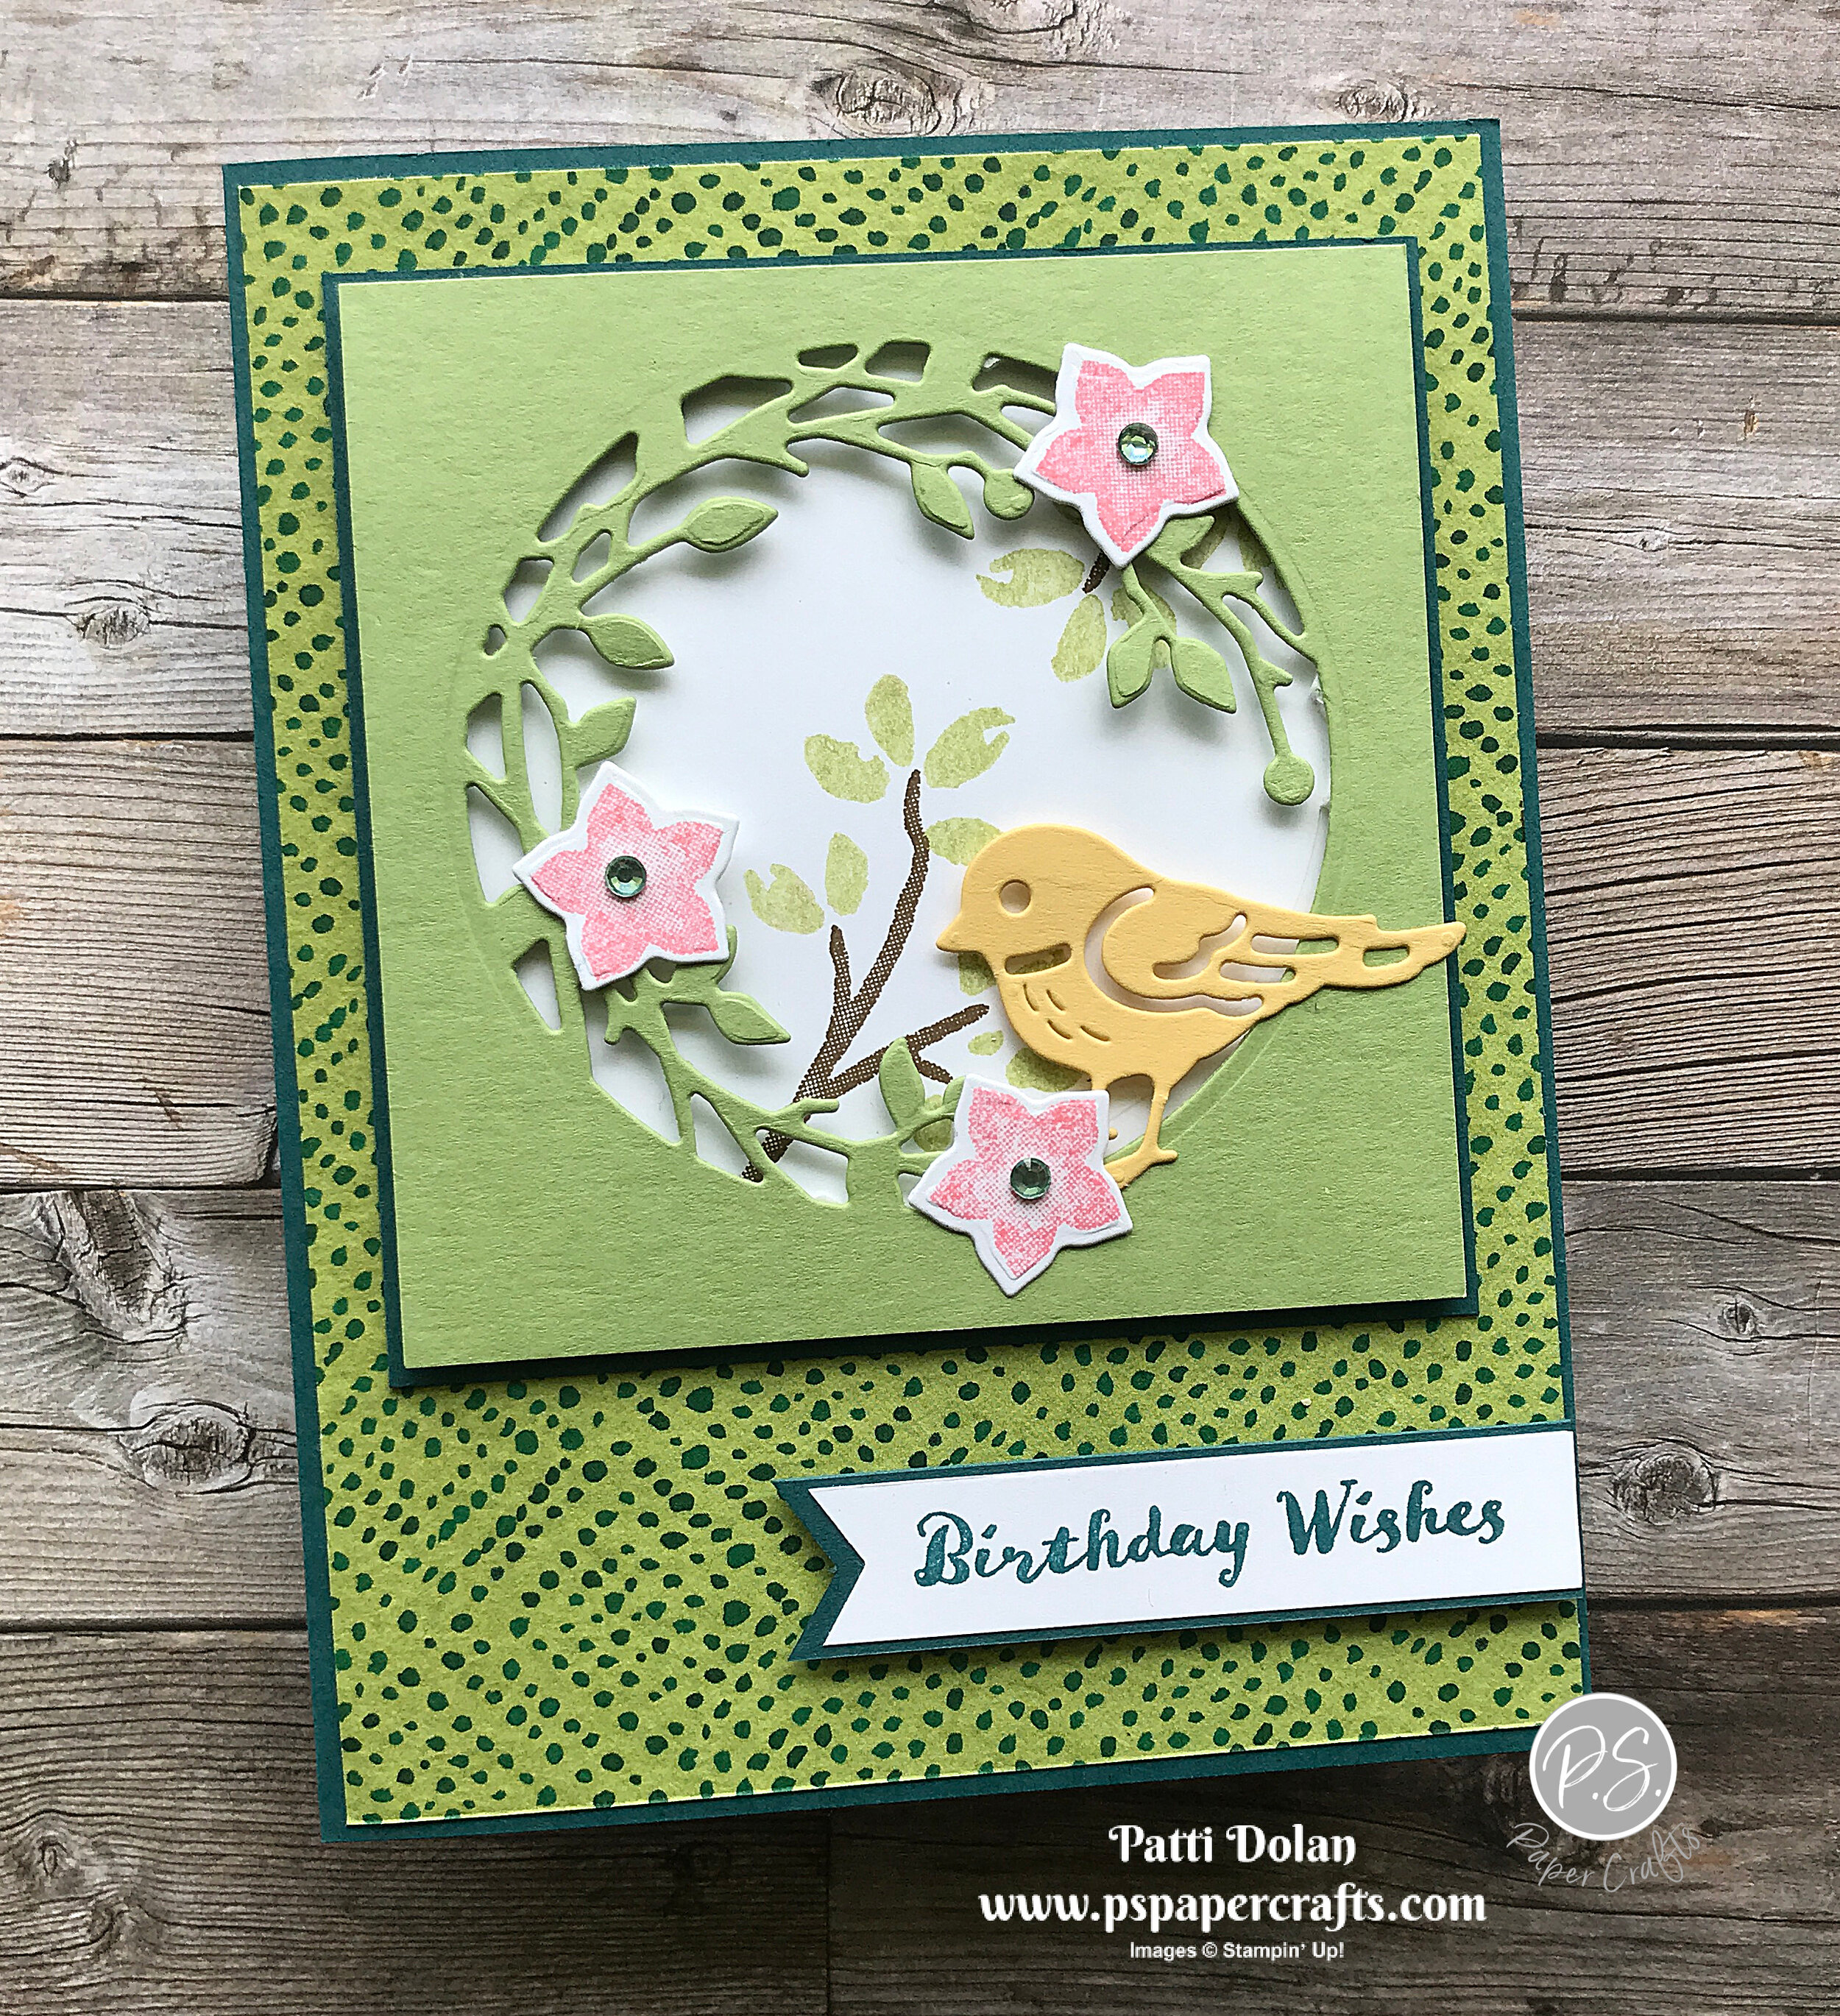
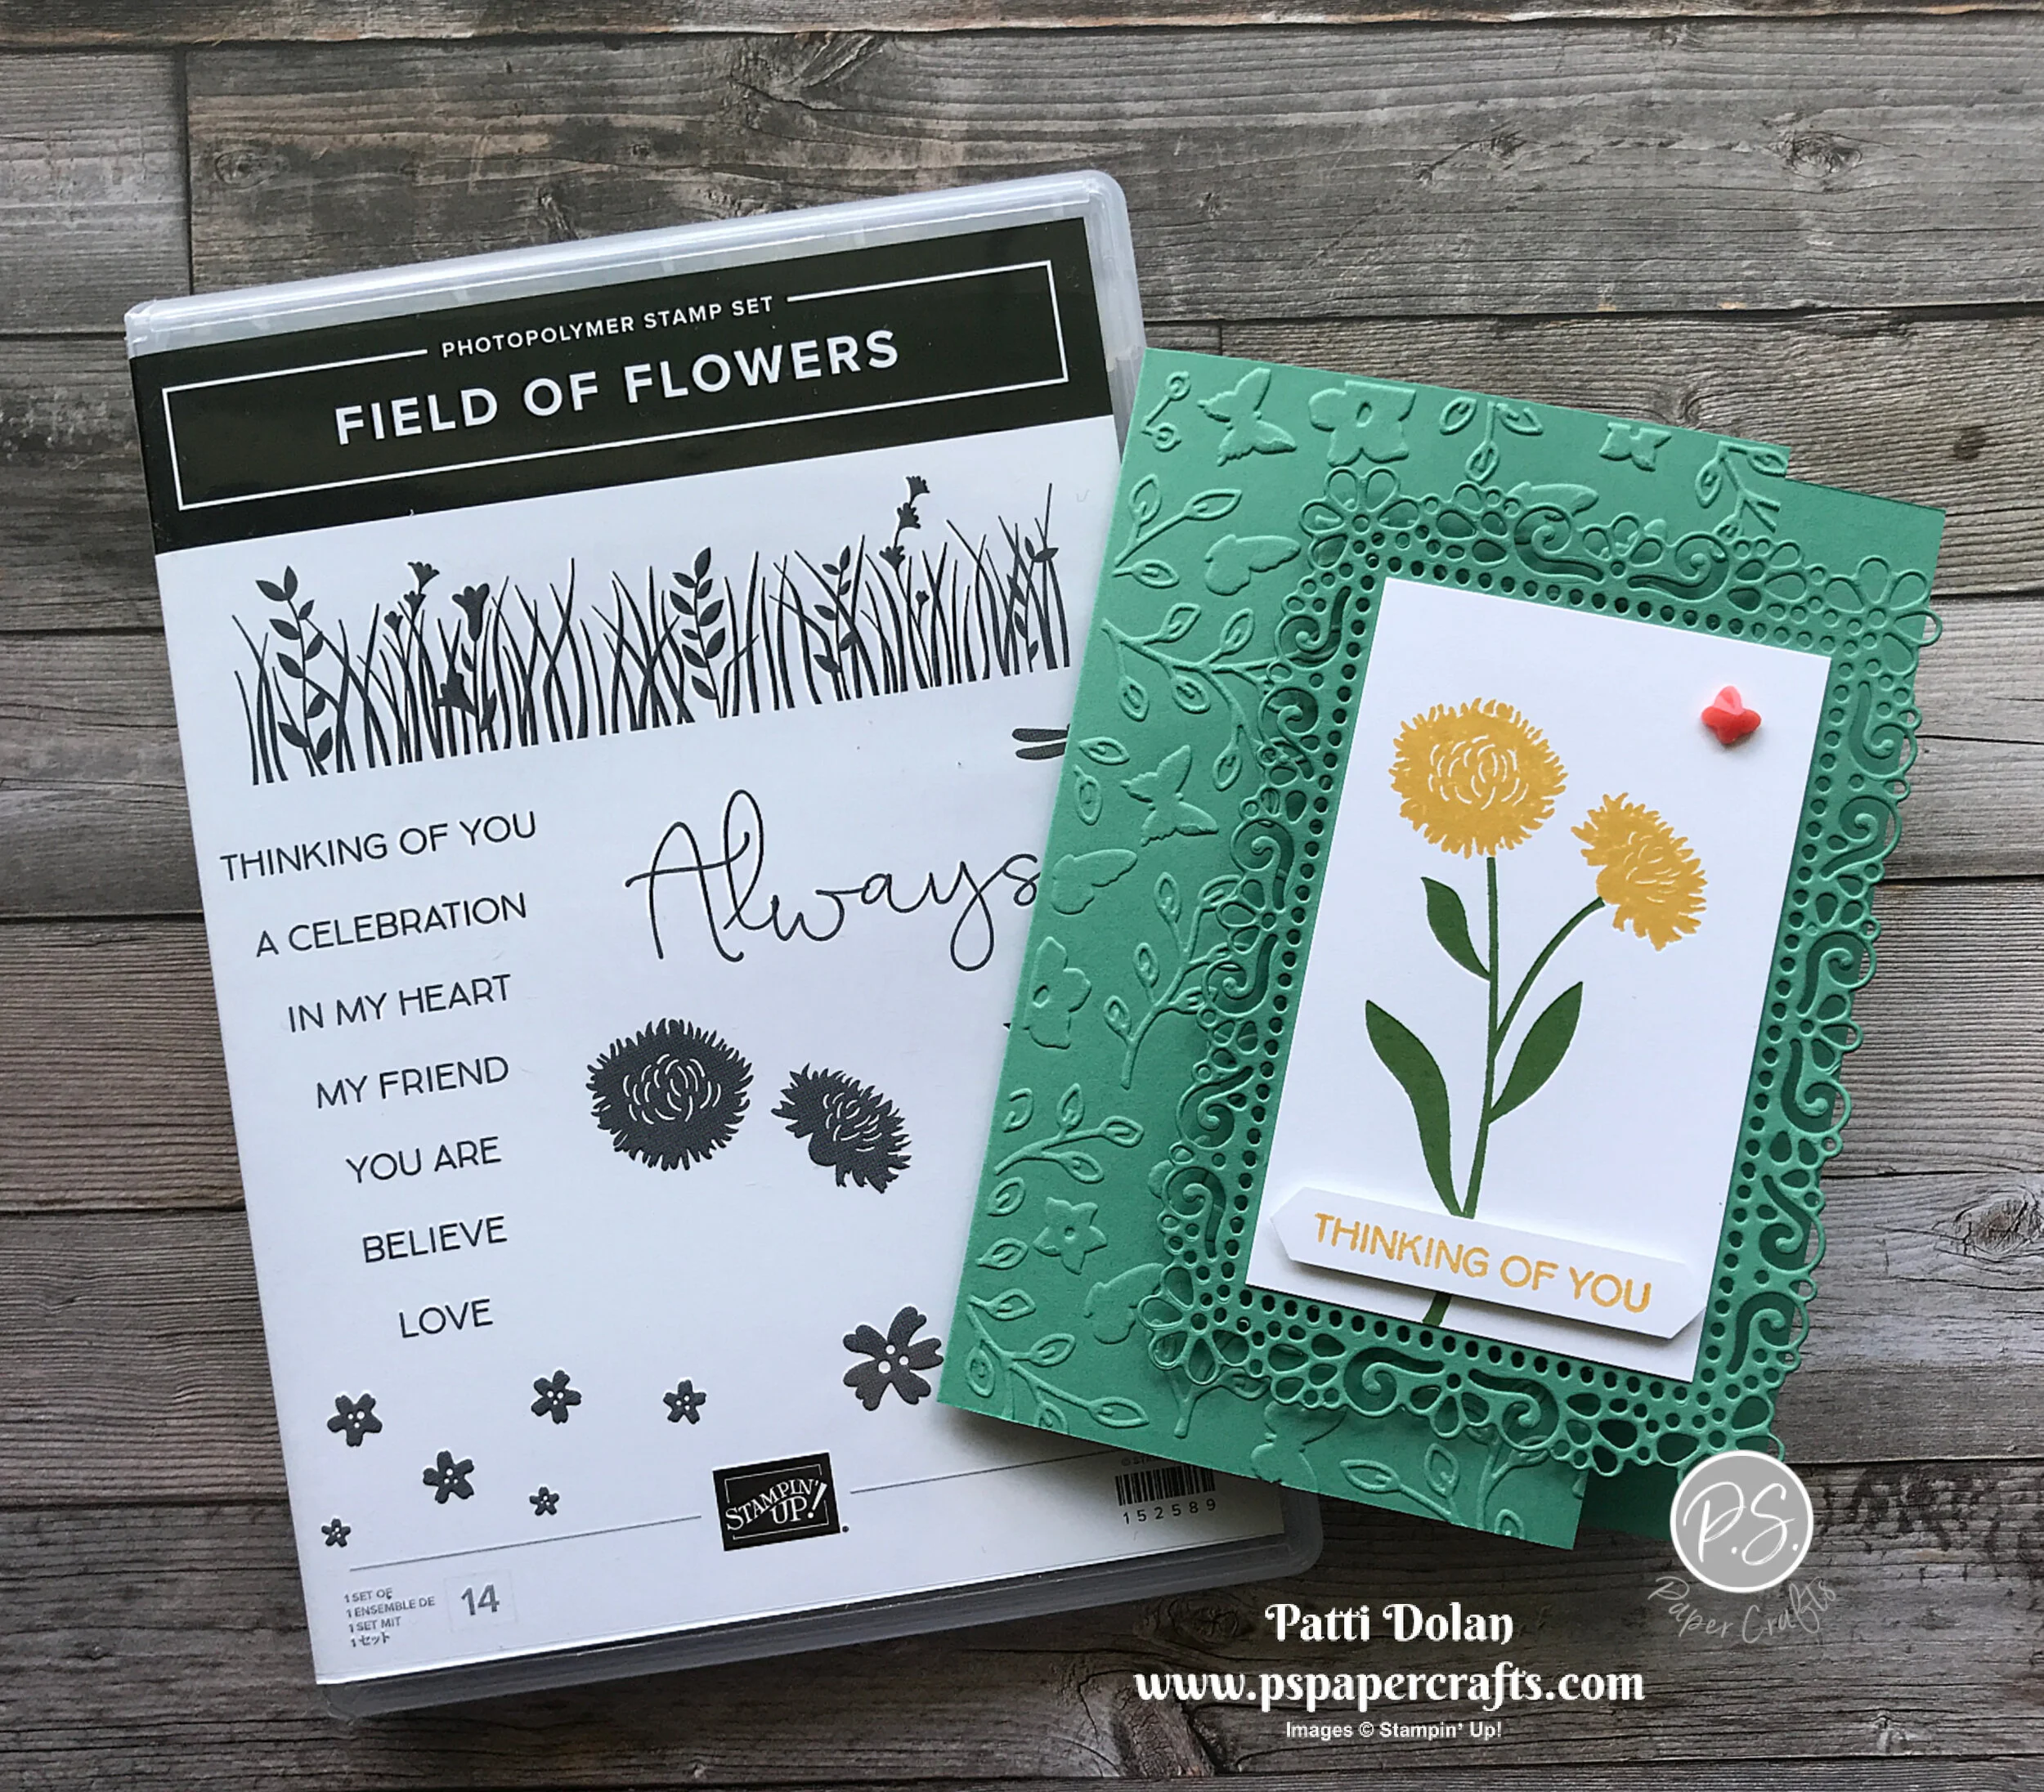
I love how this card turned out. I CASEd (Copy And Share Everything) this card from the Annual Catalog. If you look at the very first page, you’ll see a similar card. I made a few changes but the basic card is the same.

 
Field Of Flowers & Ornate Layers Card1.jpg
 

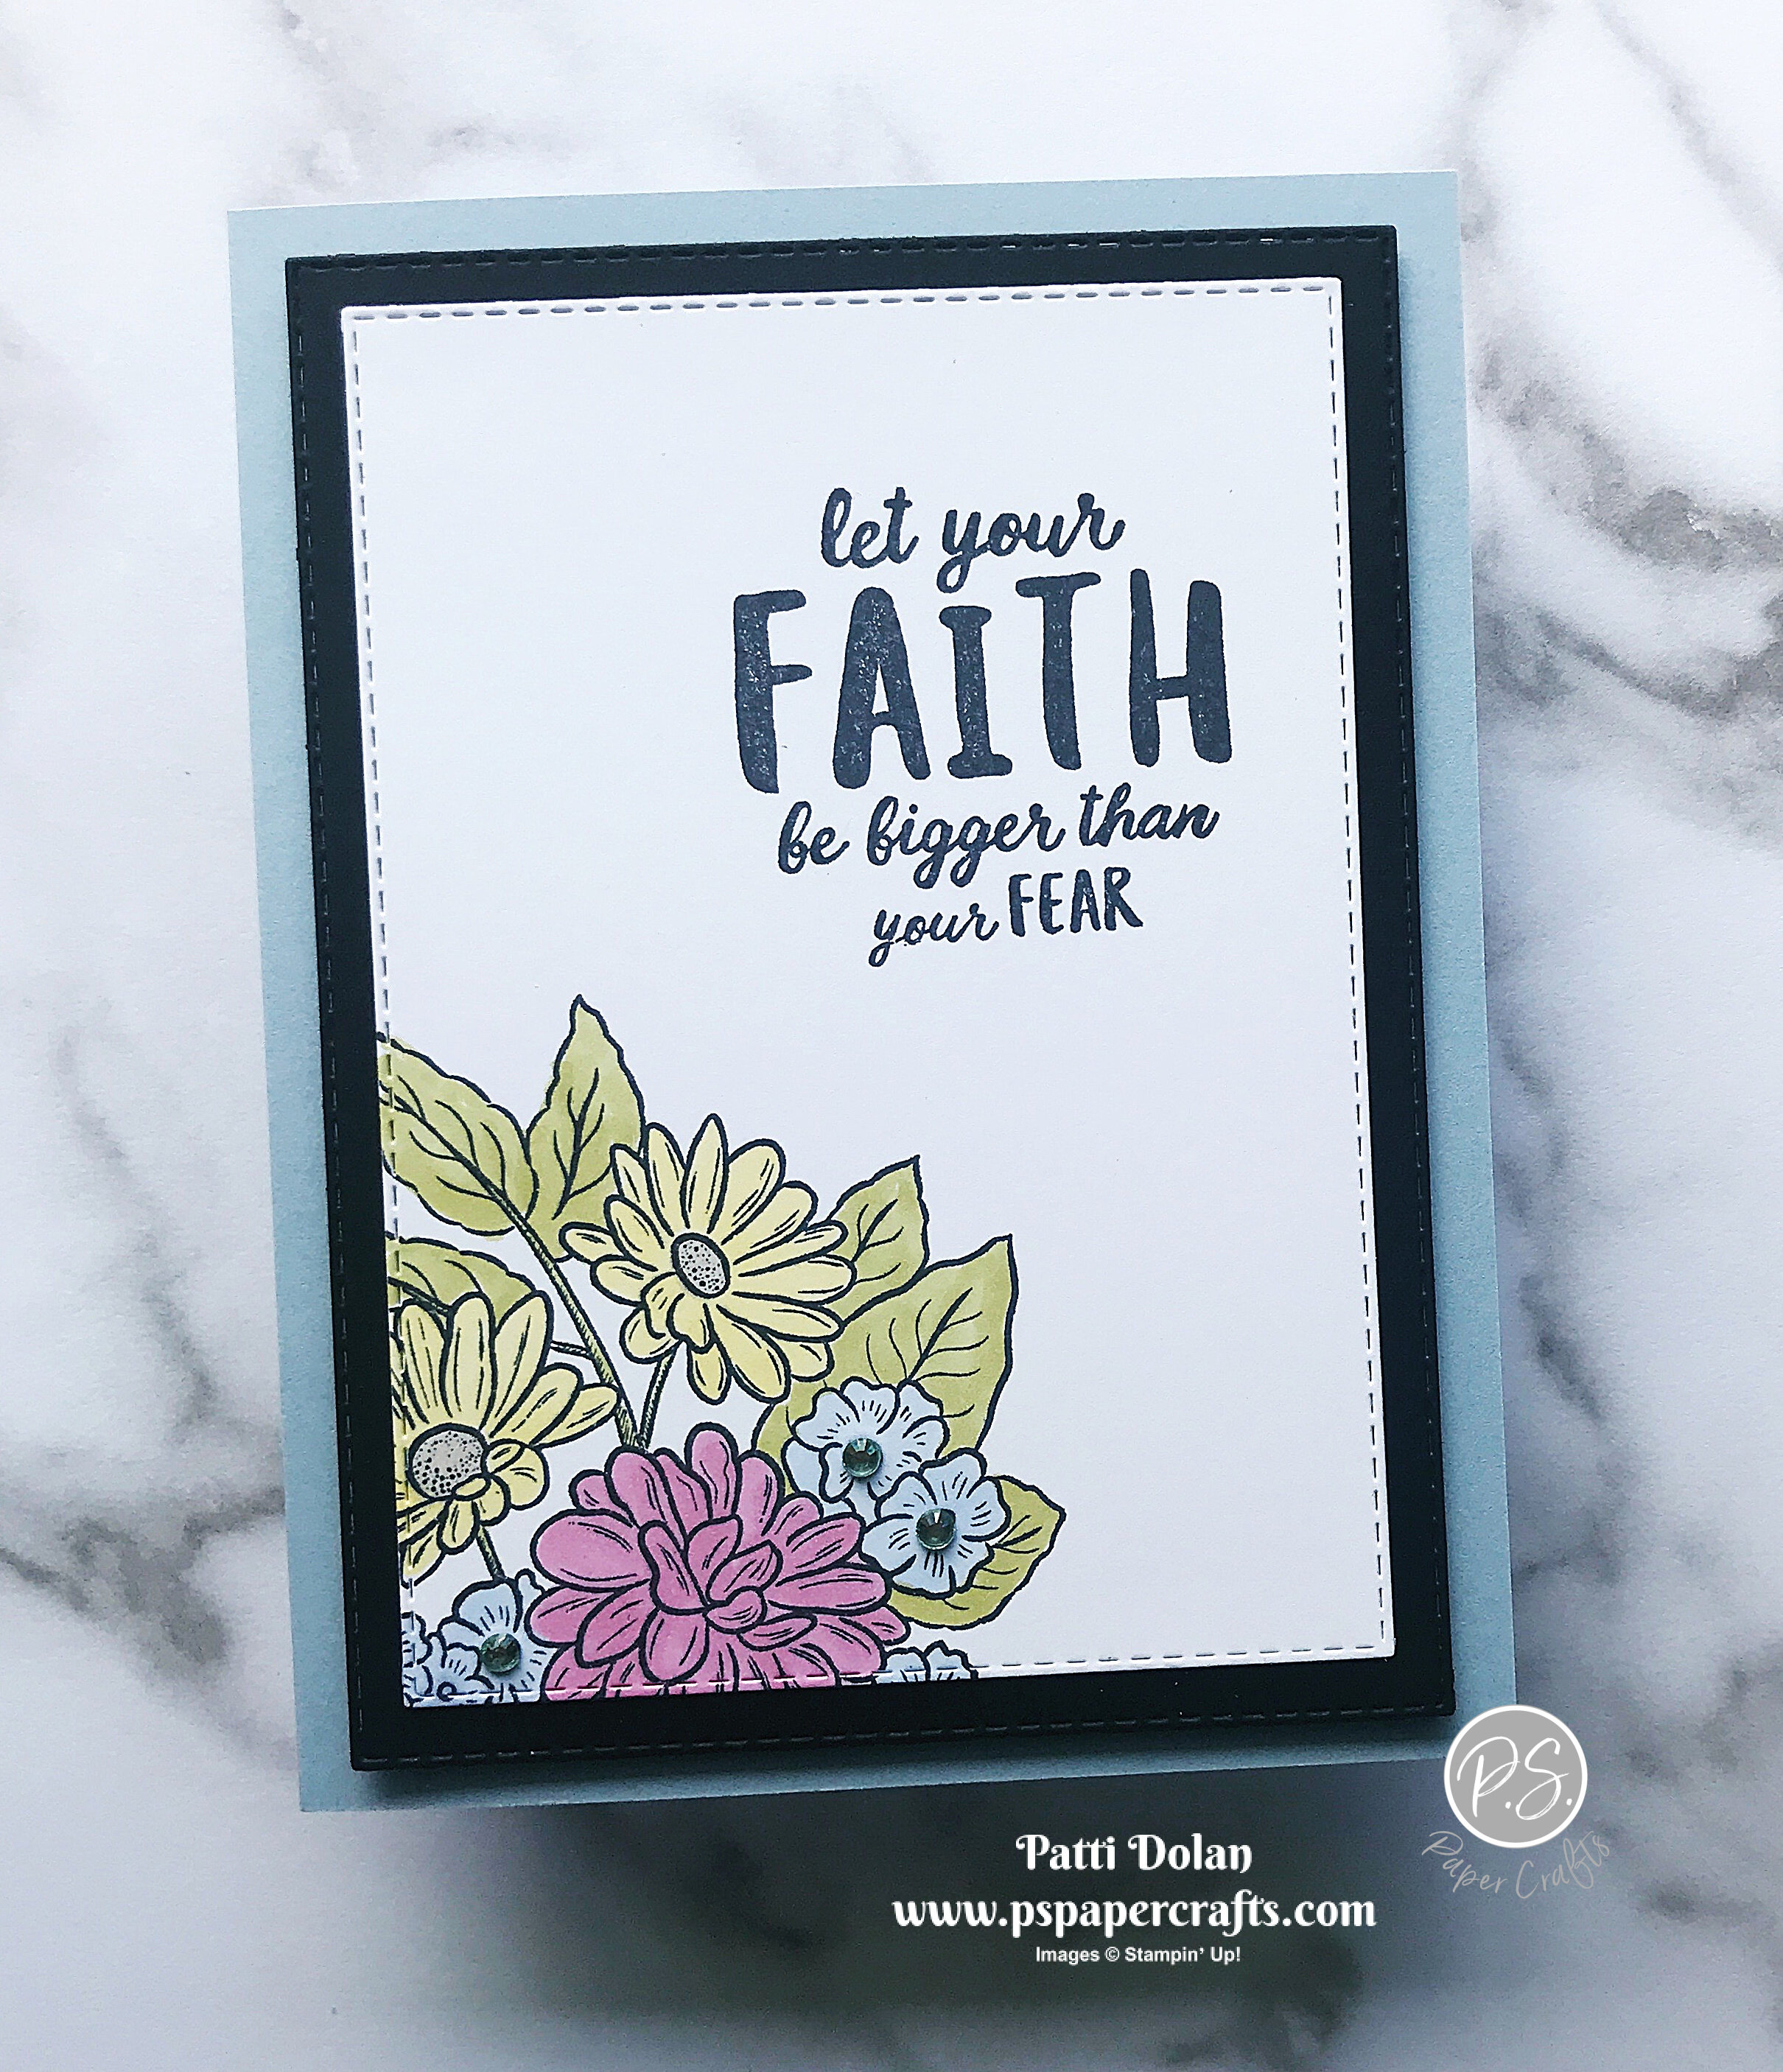
The stamp set I used was the Field Of Flowers and it has some pretty, delicate images. I also used the Ornate Layers Dies and the Meadow Moments Embossing Folder.

 
Field Of Flowers & Ornate Layers -stamp.jpg
 

Tips & Instructions

  • Just Jade Card Base - 5 1/2 x 8 1/2, score at 4 1/4

  • Cut 1 inch from the card front and then emboss the card front using the Meadow Moments Embossing Folder.

  • Cut piece of Just Jade Cardstock using the Ornate Layers Dies.

  • Whisper White Layer - 3 9/16 x 2 3/16, stamp leaves with Garden Green Ink and flower tops with Bumblebee Ink.

  • Adhere stamped layer to ornate layer.

  • Adhere layer to card using Dimensionals, making sure you don’t put Dimensionals on the right side where it hangs over the card base.

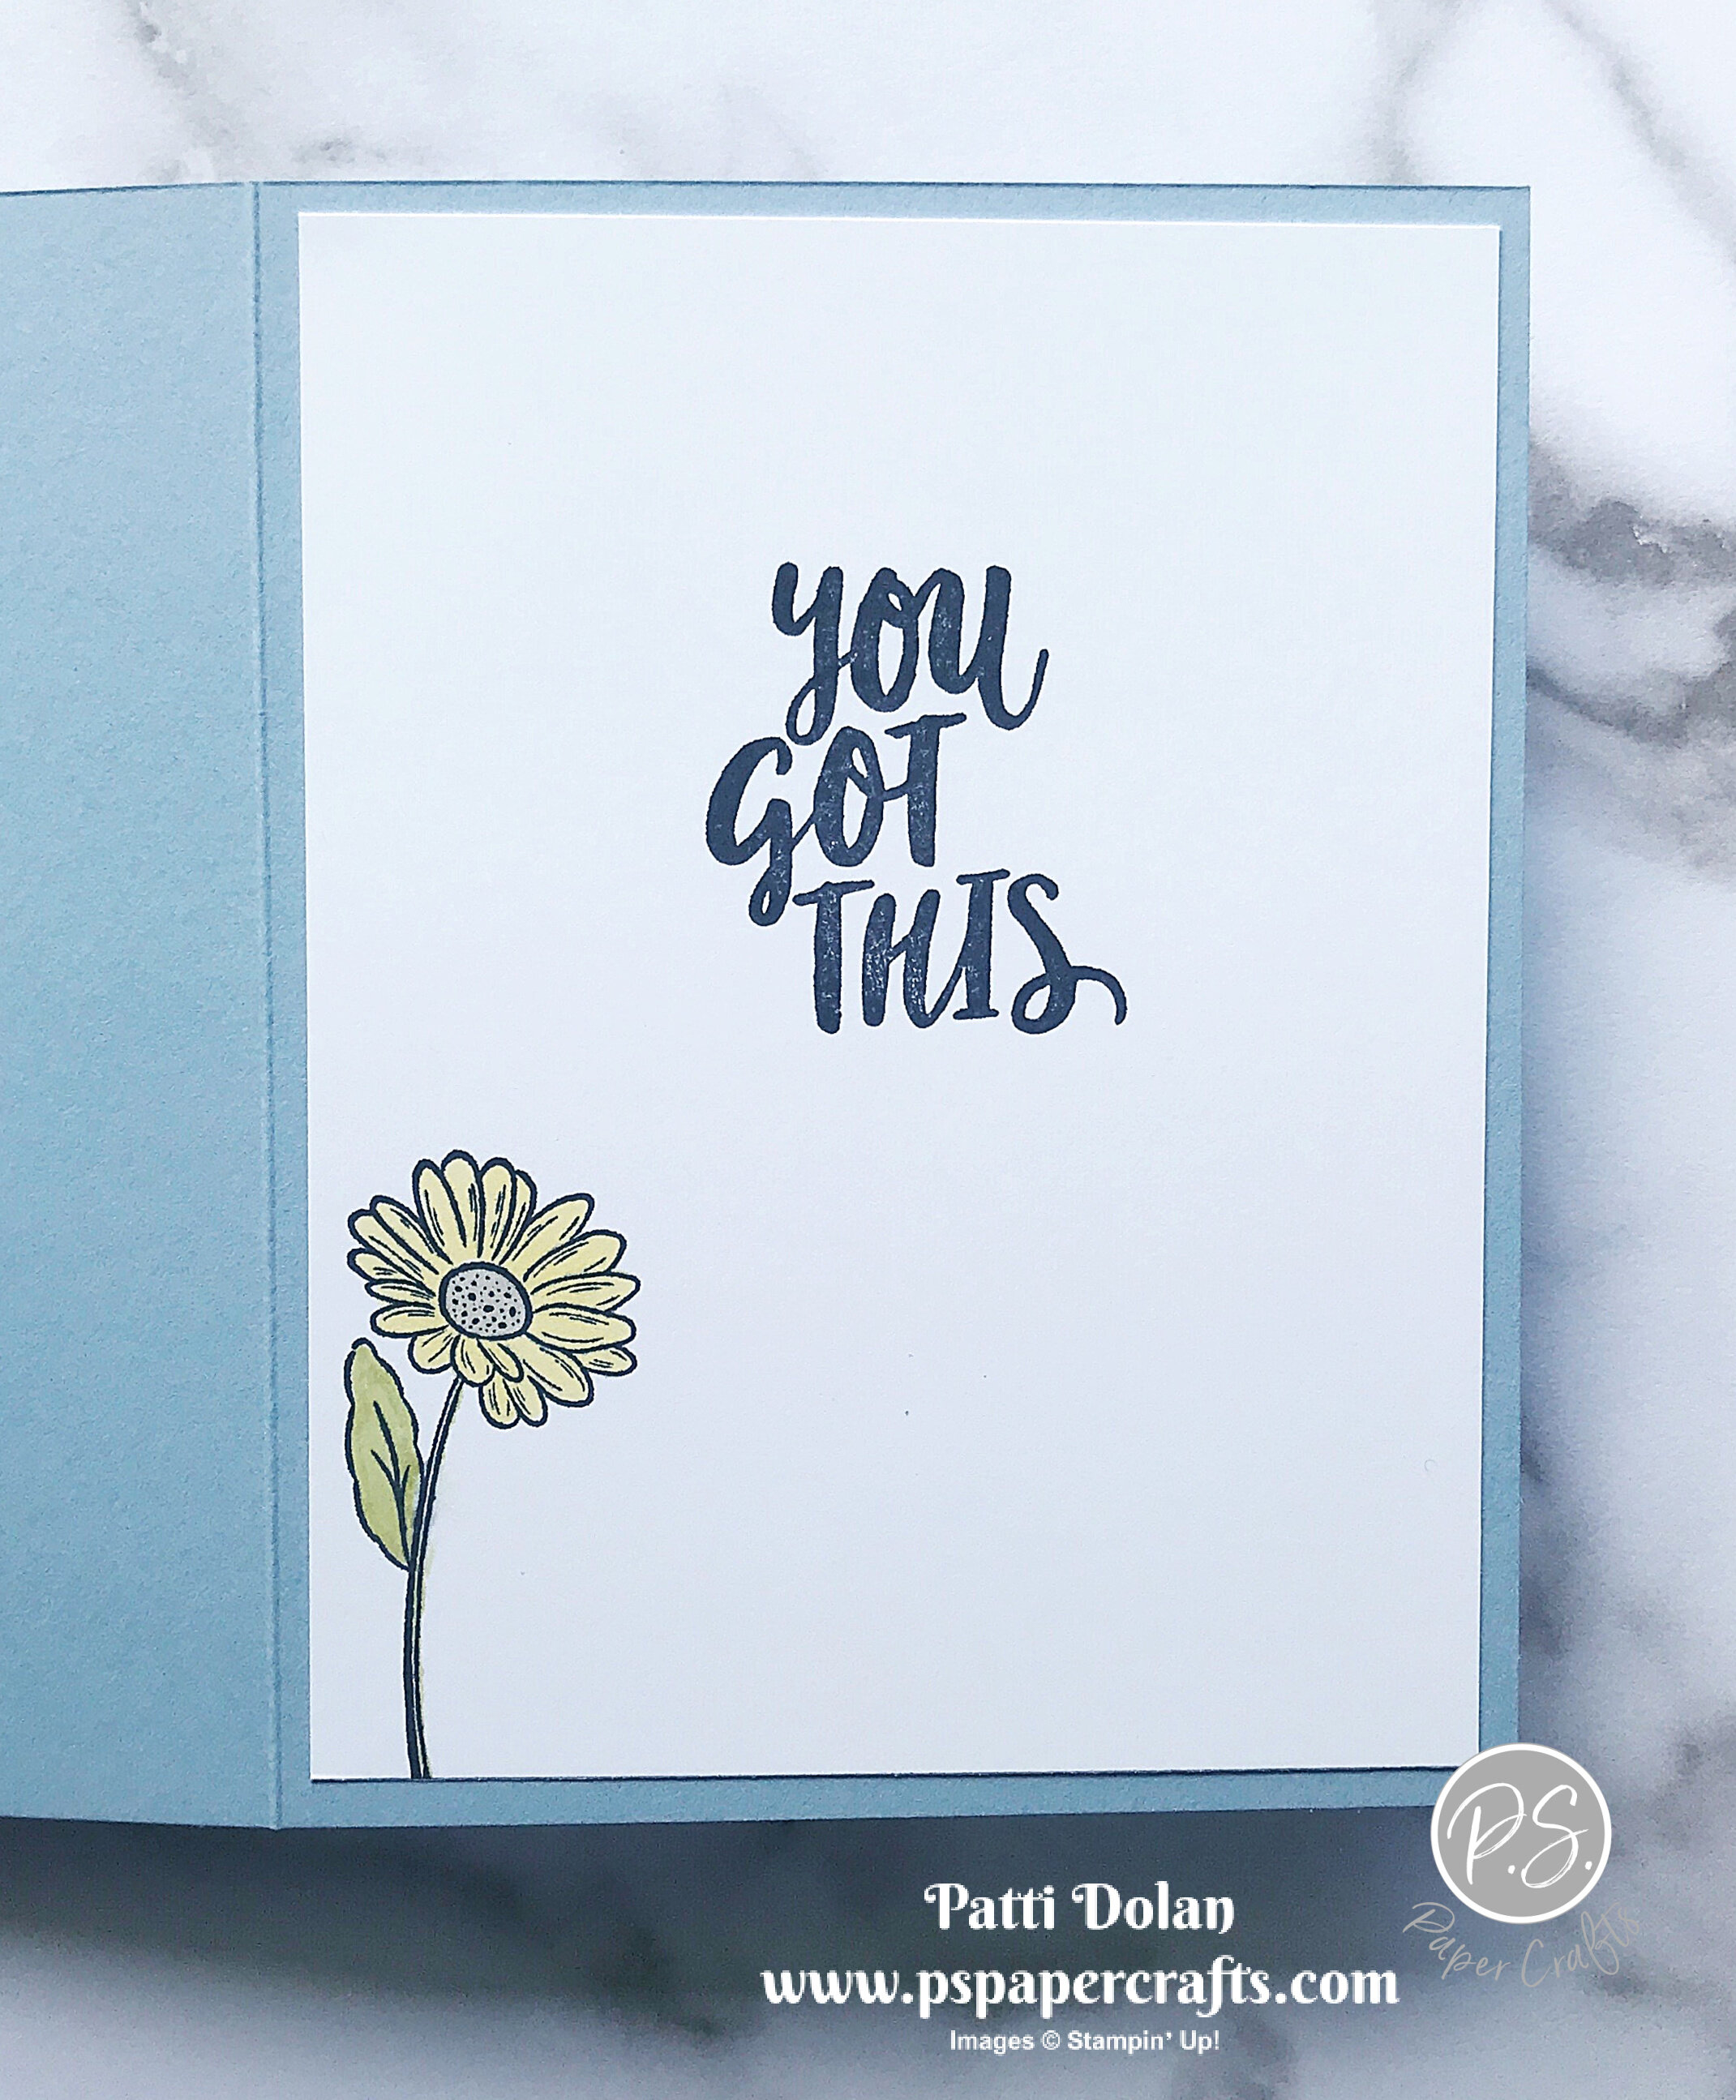
  • Whisper White Scrap - stamp sentiment with Bumblebee Ink and punch using the Classic Label Punch. Adhere to card using Dimensionals.

  • Add Butterfly Gem

 
Field Of Flowers & Ornate Layers card2.jpg
 

The inside layer is 5 1/4 x 3 so it doesn’t show through to the front. Stamp the leaves and grasses across the bottom with Garden Green Ink. Stamp the larger flowers with Bumblebee Ink. Stamp the smaller flowers with Terracotta Tile Ink (matches the butterfly on the front). I just inked one of the small flowers and stamped it where I wanted it instead of the entire group of flowers. It was easy to do because of the way the flowers are laid out on the the stamp.

 
Field Of Flowers & Ornate Layers inside.jpg
 

Supply List

Beautiful Autumn - Have A Beautiful Day

I made today’s card for the Simple Suite Tutorial Bundle. Each month I collaborate with other Stampin’ Up! Demonstrators to create a pdf file with 12 beautiful projects. This month we featured the Gilded Autumn Suite.

 
Beautiful Autumn - Have A Beautiful Day Card2.jpg
 

In the video I’ll show you how to make this card. It’s a very easy card to make. I just love these fall colors!


Tips & Instructions

  • Crumb Cake Card Base - 5 1/2 x 8 1/2, score at 4 1/4

  • Cajun Craze Layer - 5 1/8 x 3 7/8, adhere to card base

  • Gilded Autumn Specialty Designer Series Paper Layer - 5 x 3 3/4, adhere to card

  • Gilded Autumn Specialty Designer Series Paper Strip 1 x 3 3/4 (striped piece), adhere to card

  • Cut leaves using Stitched Leaves Dies from scraps of Early Espresso, Cajun Craze and Mint Macaron

  • Snip off the stems from the leaves and adhere them to the card (make sure you lay them out first to get placement with the sentiment strip

  • Very Vanilla Strip 1/2 x 3 3/4, stamp sentiment using Early Espresso Ink and adhere to card using Dimensionals

  • Add two Elegant Faceted Gems

 
Beautiful Autumn - Have A Beautiful Day Card1.jpg
 

On the inside, stamp sentiment using Early Espresso Ink. Stamp the leaves with Cajun Craze Ink and then stamp the fill in for the leaves with Cajun Craze, stamping off twice first to get a very light shade.

 
Beautiful Autumn - Have A Beautiful Day Inside.jpg
 

You can get the Simple Suite Stampers Tutorial Bundle for free with an order from me on my Online Store or you can purchase it for $12 (US).

 
Screen Shot 2020-09-08 at 9.46.21 PM.png
 

You can also receive an additional FREE Tutorial Bundle with six 3D Projects featuring the Magic In This Night Suite with a $50 order from my Online Store. This 3D Bundle can also be purchased for $15.

 
September Sneak Peak.png
 

Supply List for Today’s Project

Super Simple Hello Card using Tasteful Touches

I whipped this card together in just a few minutes. Having the In Good Taste Designer Series Paper made it so easy.

 
Super Simple Hello Card3.jpg
 

The Tasteful Touches Stamp Set has great sentiments in a pretty script font. Just saying hello….you can send that to anyone!

 
Super Simple Hello Card.jpg
 

Tips & Instructions

  • Night Of Navy Card Base - 5 1/2 x 8 1/2, score at 4 1/4

  • In Good Taste Designer Series Paper Layer - 5 1/4 x 4, adhere to card base

  • In Good Taste Designer Series Paper Strip - 4 x 1 1/2, adhere to card

  • Scrap of Whisper White Cardstock, stamp sentiment with Night Of Navy Ink, cut with Tasteful Labels Dies and adhere to card using Dimensionals

  • Punch scrap of In Good Taste Designer Series Paper using Small Bloom Punch and adhere to sentiment label

  • Add Blue Adhesive-Backed Gems to center of flower on label and on card front

 
Super Simple Hello Card2.jpg
 

On the inside, stamp sentiment using Night Of Navy Ink. Stamp the branches with Night Of Navy Ink, stamping off first and stamp a second time without re-inking.

 
Super Simple Hello Card inside.jpg
 

Supply List

The October Christmas Card Kits are designed!!!

 
October Christmas Card Flyer.jpg
 

Each month I am creating card kits that you can make at home. I’ll do the cutting, prepping and have everything you need (except stamps, inks and adhesives) to make 16 beautiful Christmas Cards.

Below are the cards you will make with October’s Card Kit. You will get kits to make 8 of each design, totaling 16 cards.

 
October Christmas Card Kits - Both.jpg
 

The October Card Kits include:

  • 16 Card Bases & Envelopes

  • Layers, Embossed Layers & Die Cuts

  • Full Package of Whisper White 1/4” Crinkled Seam Binding Ribbon (10 yards)

  • Full Package of All The Trimmings Embellishments (100 pieces)

  • Full Package of Stampin’ Dimensionals

  • PDF complete with pictures, measurements and step-by-step instructions

  • Exclusive access to video demonstrating how to make each card

Note: You will require stamps, ink and adhesive to complete the cards.

The first card has a beautiful winter scene with embossed evergreen trees along with a few tree die cuts. This layer sits on a piece of Brass Foil Paper just to add a little shine to it.

 
October Christmas Card Kits - Card1.jpg
 

The second card has a delicate evergreen tree backed with a Pear Pizzazz scalloped circle. The polka dotted Designer Series Paper ties the Mossy Meadow and Pear Pizzazz colors together. I added some crinkled ribbon and a few red dots to finish it off.

 
October Christmas Card Kits - Card2.jpg
 

Choose You Package - payment must be received by September 25th - US Only.

Basic Card Kits - $35


Add On Wrapped In Christmas Stamp Set - $22 (Total $57)

Screen Shot 2020-09-06 at 5.35.25 PM.png
 

Add On Poppy Parade Ink Pad & Stamp Set - $29.50 (Total $64.50)

October Christmas Card Kits - Ink Pad & Stamp.jpg
 

Add On In The Pines Bundle - $52.25 (total $87.25)

Screen Shot 2020-09-06 at 5.36.26 PM.png

Email me to reserve your spot - patti@pspapercrafts.com

Starter Kit Promotion

If you ever considered purchasing the Starter Kit from Stampin' Up!, now is a great time to do it.  When you join Stampin' Up! as a demonstrator in September, you'll receive some extra goodies. 

 
Screen Shot 2020-09-06 at 3.10.29 PM.png
 

For $99 (US) you will receive (the items in red are the additional products for this special promotion):

  • $125 worth of product (your choice)

  • 2 stamp sets (Queen Anne's Lace & So Much Love)

  • 1 Package of Rhinestone Basic Jewels 

  • Cardstock pieces to create 16 cards, including envelopes 

  • Free Shipping on your initial order

  • 20% discount on future orders while active

  • Joining my team gives you access to multiple FaceBook groups with great tips, training, sharing, encouragement and fun!

 
Screen Shot 2020-09-06 at 3.20.37 PM.png
 

There's no pressure to sell.  You can join and enjoy the 20% discount or you sell to a few friends or you can go full board and do this as a business.  Whatever your interest, there's something for you. 

If you have any questions and want to discuss this with me, please email me and we can set up a call. 

Sketch Saturday - Flowering Blooms

The flower images in the Flowering Blooms Stamp Set are so pretty! I used the Detailed Bands Dies to cut the delicate sentiment band for this week’s sketch challenge.

 
Sketch Saturday - Flowering Blooms.jpg
 

I love this sketch from the CAS(E) This Sketch Challenge from Splitcoaststampers; simple and sweet!

 
Screen Shot 2020-09-04 at 8.49.21 PM.png
 

Tips & Instructions

  • Pear Pizzazz Card Base - 5 1/2 x 8 1/2, score at 4 1/4

  • Whisper White Layer - 5 1/4 x 4

  • Pear Pizzazz Scrap - cut sentiment band using Detailed Bands Dies

  • Lay the band on the Whisper White Layer and lightly trace part of the top and part of the bottom so you can get placement for stamping the flowers. (Don’t forget to erase the pencil marks when you’re done stamping.)

  • Color flower stamp with Melon Mambo and Mossy Meadow Stampin’ Write Markers, breathe on stamp and stamp on layer. Clean stamp and stamp just the stems with Mossy Meadow Ink so they will show below the label.

  • Stamp some of the leaf images with Pear Pizzazz Ink, lifting and stamping a second time without re-inking. Stamp some of the bottoms of the leaf images below the label.

  • Whisper White Scrap - cut another sentiment band so you get the white label piece.

  • Stamp sentiment on label (from Band Together Stamp Set) with Mellon Mambo Ink.

  • Adhere the Pear Pizzazz Label Band over the flowers and cut the ends that hang over.

  • Adhere layer to card

  • Adhere the sentiment piece using Dimensionals

 
Sketch Saturday - Flowering Blooms2.png
 

On the inside, stamp sentiment with Melon Mambo Ink. Color stamp with Melon Mambo and Mossy Meadow Stampin’ Write Markers, breathe on the stamp and stamp in bottom corner.

 
Sketch Saturday - Flowering Blooms inside.jpg
 

Don’t forget I have the 3D Bundle Tutorial available this month in September 2020, here are the details:

  1. Order $50 from my online store between September 1-30, 2020 get the PDF for FREE.

  2. Purchase the September 3d Bundle Tutorial (6 tutorials) PDF for $15.00  Email patti@pspapercrafts.com and I’ll send you a PayPal Invoice. Once I receive payment I will email you the PDF tutorial.

  3. Join my team! They always get the tutorials for FREE and there’s a special this month for joining!

 
Screen Shot 2020-08-31 at 12.28.07 PM.png
 

Supply List for Today’s Card

Touched My Heart Sympathy Card

Today’s card is a simple but elegant Sympathy Card. I used the Touched My Heart Stamp Set along with the Ornate Borders Dies.

 
Touched My Heart Sympathy Card2.jpg
 

The Touched My Heart Stamp Set is a Host Set and can be earned for free with a $150 order. I think the With Sympathy sentiment is a good one to have on hand.

 
Screen Shot 2020-09-03 at 9.31.22 PM.png
 

I have a quick video to show you how easy it is to cut the Ornate Border and put this card together.


Tips & Instructions

  • Gorgeous Grape Card Base - 5 1/2 x 8 1/2, score at 4 1/4

  • Purple Posey Layer - 5 1/2 x 4 1/4, cut with Ornate Border Die

  • Adhere layer to card base

  • Stamp sentiment with Gorgeous Grape Ink on a scrap of Purple Posy Cardstock and cut with Stitched Rectangle Die

  • Cut piece of Gorgeous Grape Cardstock with the next size up Stitched Rectangle Die and adhere to sentiment Label

  • Adhere label to card using Dimensionals

  • Add Elegant Faceted Gems to flowers and sentiment label


On the inside stamp some leaves with Granny Apple Green Ink and butterfly with Gorgeous Grape Ink.

 
Touched My Heart Sympathy Card inside.jpg
 

Supply List

Ridiculously Awesome Faith Card

The Ridiculously Awesome Stamp Set has some amazing sentiments that are large which makes it simple to create a card.

 
RIdiculously Awesome Faith Card2.jpg
 

This stamp set was inspired by Million Sales Achiever Ronda Wade. I love the sentiments and the fonts in this set.

 
Screen Shot 2020-09-03 at 12.50.59 PM.png
 

I stamped a partial image of the flowers from the Ornate Style Stamp Set and then colored them with Stampin’ Blends. Two large stamp images and you have a quick card.

 
RIdiculously Awesome Faith Card Supplies.jpg
 

Tips & Instructions

  • Seaside Spray Card Base - 5 1/2 x 8 1/2, score at 4 1/4

  • Basic Black Layer - cut with largest Stitched Rectangle Die

  • Whisper White Layer - cut with second largest Stitched Rectangle Die

  • Stamp sentiment and partial flower images with Black Memento Ink

  • Color flowers and leaves with Light Stampin’ Blends (Daffodil Delight, Crumb Cake, Rococo Rose, Seaside Spray, Old Olive)

  • Adhere layers together and adhere to card using Dimensionals

  • Add light blue Holiday Rhinestone Gems to center of blue flowers

 
RIdiculously Awesome Faith Card.jpg
 

On the inside, stamp sentiment and flower with Black Memento Ink. Color flower and leaves with Light Stampin’ Blends (Daffodil Delight, Crumb Cake, Old Olive).

 
RIdiculously Awesome Faith Card inside.jpg
 

Supply List

Birds & Branches Birthday Card

When I first saw the Birds & Branches Bundle in the catalog, I wanted to make a card similar to the sample in the catalog.

 
Birds & Branches Birthday Card2.jpg
 

Watch the video to see how to cut the pretty wreath and added the bird and flowers. I layered it on a piece of Forever Greenery Designer Series Paper.


Tips & Instructions

  • Pretty Peacock Card Base - 5 1/2 x 8 1/2, score at 4 1/4

  • Forever Greenery Designer Series Paper - 5 3/8 x 4 1/8, adhere to card base

  • Pretty Peacock Square - 3 5/8 x 3 5/8

  • Whisper White Square - 3 7/16 x 3 7/16 ( just under 3 1/2 so it doesn’t show)

  • Pear Pizzazz Square - 3 1/2 x 3 1/2, cut center with wreath using Birds & More Dies

  • Stamp 2 small branches with Soft Suede Ink and leaves with Pear Pizzazz Ink stamping off first on the Whisper White square, using the wreath layer as a guide for placement.

  • Adhere Whisper White square to Pretty Peacock Square and then adhere Pear Pizzazz layer to squares using Dimensionals.

  • Cut bird from So Saffron Cardstock and adhere to wreath using Dimensionals behind head and glue on tail.

  • Stamp 3 flower images with Flirty Flamingo Ink, cut with coordinating die and adhere to wreath.

  • Add light blue Holiday Rhinestones to centers of flowers.

  • 1/2 “ Whisper White Strip - stamp sentiment (from Itty Bitty Birthdays) using Pretty Peacock Ink, punch one end with Triple Banner Punch.

  • 3/4” Pretty Peacock Strip - punch on end with Triple Banner Punch, adhere to sentiment strip and then adhere to card using Dimensionals.

 
Birds & Branches Birthday Card1.jpg
 

On the inside, stamp sentiment (from Happiest Of Birthdays Stamp Set) with Pretty Peacock Ink. Stamp 2 small branches and leaves with Soft Suede and Pear Pizzazz Inks, stamping off the leaves on scrap first to get a lighter shade.

 
Birds & Branches Birthday inside.jpg
 

Supply List

September 2020 - 3D Blog Hop - Magic In This Night

I’m so excited and honored to be asked to be a Guest Designer for this 3D Blog Hop!!! Here’s the creative Design Team!

 
Design Team Picture.jpg
 

Here’s a sneak peek of the projects in the 3D Tutorial Bundle. These projects are exclusive and not available elsewhere online. They include both Imperial and Metric measurements.

 
Screen Shot 2020-08-31 at 12.28.07 PM.png
 

Each of us create a coordinating card based on the theme we are featuring. This month we used the Magic In This Night Suite. This is the card I made.

 
Magic In The Night Card.jpg
 

Tips & Instructions

  • Blackberry Bliss Card Base - 5 1/2 x 8 1/2, score at 4 1/4

  • Basic Black Layer - 5 1/4 x 4

  • Magic In This Night Designer Series Paper - 5 1/8 x 3 7/8

  • Whisper White Cardstock - stamp sentiment with Blackberry Bliss Ink and image with Black Memento Ink, cut with second largest Stitched Nested Label Die

  • Color Metallic Mesh Ribbon with Dark Black Stampin’ Blends Marker (I love that you can color ribbon, pearls and rhinestones with Stampin’ Blends.)

 
Magic In The Night Card Ribbon.jpg
 
  • Wrap ribbon around layers and adhere to back

  • Adhere sentiment label over ribbon with Dimensionals

  • Tie bow with ribbon and adhere with Glue Dot

  • Add 2 Iridescent Pearls to sentiment label

 
Magic In The Night Card2.jpg
 

On the inside stamp a couple of spiders with Black Memento Ink and the sentiment (from A Wish For Everything Stamp Set) with Blackberry Bliss Ink.

 
Magic In The Night Card inside.jpg
 

Are you interested in the Tutorial Bundle?

You have several ways of receiving the 3D Tutorial Bundle:

1) Order $50 from my online store between September 1-30, 2020 get the PDF for FREE.

2) Purchase the September 3D Bundle Tutorial -  (6 tutorials) PDF for $15.00
This is a one-time purchase.  Email me patti@pspapercrafts.com and I’ll send you a PayPal Invoice. Once I receive payment I will email you the PDF tutorial.

3) Join my team! They always get the tutorials for FREE! The good news is there’s a special during the month of September on the Starter Kit, so it’s a great time to join.

Now, let’s get hopping. Click on the links below to see all the different projects for this month.

Supply List for my Project

Sketch Saturday - Snowflake Wishes

For today’s Sketch Challenge I used the Snowflake Wishes Bundle along with the Winter Snow Embossing Folder. I just love this Embossing Folder!

 
Sketch Saturday - Snowflake Wishes.jpg
 

The Sketch is from the CAS(E) This Sketch Challenge from Splitcoaststampers. Snowflakes popped into my mind when I saw this sketch.

 
Screen Shot 2020-08-29 at 11.18.29 AM.png
 

By the way, last week I was selected as a CTS Favorite for my card. Click the box below to see it.


Tips & Instructions

  • Night Of Navy Card Base - 5 1/2 x 8 1/2, score at 4 1/4

  • Whisper White Layer - 5 1/4 x 4, emboss with Winter Snow Embossing Folder

  • Whisper White Scrap - 2 1/2 x 1 1/2, stamp sentiment with Night Of Navy Ink

  • Night Of Navy Scrap - 2 5/8 x 1 3/4, adhere to Whisper White Label, aligning to the edge on the right side

  • Cut snowflakes from Balmy Blue Glimmer Paper - 1 of the smallest and 2 of the next size up

  • Adhere snowflakes to embossed layer and adhere sentiment label using Dimensionals, aligning to right edge

  • Adhere layer to card base

  • Add Blue Adhesive Back Gems - 1 to sentiment and 1 to each of the larger snowflakes

 
Sketch Saturday - Snowflake Wishes card2.jpg
 

On the inside stamp sentiment with Night Of Navy Ink. Stamp snowflakes in Night Of Navy Ink, stamping off first to get a lighter shade.

 
Sketch Saturday - Snowflake Wishes inside.png
 

Supply List

Poinsettia Petals Christmas Card

I love how soft and natural this card turned out. The poinsettia was sponged very lightly and the textured strip and ribbon create such a pretty card.

 
Poinsettia Petals Christmas Card3.jpg
 

In the video I’ll show you how to make this card and how the Poinsettia Dies cut and emboss in one pass. You’ll get to see the Poinsettia Place Designer Series Paper and the Plush Poinsettia Specialty Paper.


Tips & Instructions

  • Soft Suede Card Base - 5 1/2 x 8 1/2, score 4 1/4

  • Poinsettia Place Designer Series Paper Layer - 5 1/4 x 4

  • Very Vanilla Strip - 5 1/4 x 1 1/2, emboss with Tasteful Textile 3D Embossing Folder

  • Cut and emboss each of the 3 layers of poinsettia petals from Very Vanilla Cardstock using the Poinsettia Dies

  • Lightly sponge the petals and adhere together, offsetting each one

  • Cut flower center from Soft Suede Cardstock and adhere to center of flower

  • Cut and emboss 2 leaves from Garden Green Cardstock

  • Adhere embossed strip to Designer Series Paper and wrap piece of ribbon around it, then adhere to card base

  • Adhere poinsettia to card using Dimensionals and then adhere leaves

  • Very Vanilla Strip - 3/4 x 3 1/4, stamp sentiment with Garden Green Ink and adhere to card using Dimensionals

 
Poinsettia Petals Christmas Card1.jpg
 

On the inside stamp sentiment with Garden Green Ink and stamp poinsettia at bottom and top corner.

 
Poinsettia Petals Christmas Card inside.jpg
 

Supply List

Cute Gnome For The Holidays Card!

This is such a fun and happy card! I love the Gnome For The Holidays Stamp Set.

 
Gnome For The Holidays Card2.jpg
 

The stamp set has 3 adorable gnomes and their little home in the tree. The sentiments are so cute!

 
Gnome For The Holidays Stamp Set.jpg
 

Tips & Instructions

  • Real Red Card Base - 5 1/2 x 8 1/2, score at 4 1/4

  • Whisper White Layer - 5 1/8 x 3 7/8, adhere to card base

  • ‘Tis The Season Designer Series Paper Layer - 5 x 3 3/4, adhere to card

  • Cut triangle from Real Red Cardstock using the Stitched Triangle Dies

  • Stamp gnome on Whisper White Cardstock using Black Memento Ink and cut with triangle using the Stitched Triangle Dies

  • Color gnome with Stampin’ Blends (hat - Light Seaside Spray, socks - Dark Shaded Spruce, beard & mustache - Light Smoky Slate, clothes - Dark Real Red, ornament - Light & Dark Smokey Slate, nose & hands - Light Petal Pink)

  • Adhere triangles together and then adhere to card using Dimensionals

  • Stamp sentiment on scrap of Whisper White using Shaded Spruce Ink and punch with Classic Label Punch, adhere using Dimensionals

  • Adhere Holiday Rhinestone Gems to top of triangle and sentiment label

 
Gnome For The Holidays Card1.jpg
 

On the inside stamp sentiment with Shaded Spruce Ink and gnome with Black Memento Ink. Color gnome with Stampin’ Blends (hat & socks - Dark & Light Shaded Spruce, beard & mustache - Light Smoky Slate, clothes - Dark Real Red, bow - Dark Real Red, holly - Dark Shaded Spruce, ornament - Light & Dark Smokey Slate, nose & hands - Light Petal Pink)

 
Gnome For The Holidays Inside.jpg
 

Supply List

Life Is Beautiful Autumn Card

The Life Is Beautiful is one of my new favorite stamp sets! I love this tree and the way you can add bunches of leaves or snow….and that birdhouse is so sweet!

 
Life Is Beautiful Autumn Card.jpg
 

I’ll walk you through making this card and how I recovered from smudging ink where I didn’t want it. Does that ever happen to you?


Tips & Instructions

  • Calypso Coral Card Base - 5 1/2 x 8 1/2, score at 4 1/4

  • Whisper White - 5 1/4 x 4

  • Stamp tree image on the Whisper White Layer with Soft Suede Ink - I used the Stamparatus since the stamp is so large

  • Stamp the patch of dirt at the base of the tree with Soft Suede Ink, stamping off first to get a lighter shade

  • Stamp leaves on tree and along the bottom with Calypso Coral Ink, stamping a second image without re-inking

  • Stamp leaves on tree and along the bottom with Daffodil Delight Ink

  • Stamp sentiment with Soft Suede Ink

  • Color birdhouse stamp with Stampin’ Write Markers (Basic Black for hanger, Real Red for birdhouse and Pacific Point for the birds), breathe on stamp and then stamp on tree branch

 
Life Is Beautiful Autumn Card supplies.jpg
 

Here’s the card that I accidentally smudged the ink on. I ended up stamping leaves along the side so they look like they are falling off the tree.

 
Life Is Beautiful Autumn Card3.jpg
 

On the inside stamp sentiment with Soft Suede Ink. Stamp the leaves across the bottom with Calypso Coral Ink and Daffodil Delight Ink.

 
Life Is Beautiful Autumn Card inside.jpg
 

Supply List

Hark The Herald Angels Sing - Christmas Card

I love making cards like this one with shades of blue and silver stars. I used a piece of Snowflake Splendor Designer Series Paper for the background layer.

 
For Unto Us Christmas Card2.jpg
 

The For Unto Us Stamp Set has some beautiful Christian sentiments for Christmas cards. I know I will be using this for my cards this year.

 
Screen Shot 2020-08-24 at 9.22.45 PM.png
 

Tips & Instructions

  • Night Of Navy Card Base - 5 1/2 x 8 1/2, score at 4 1/4

  • Silver Foil Sheet - 5 1/2 x 3 7/8

  • Snowflake Splendor Designer Series Paper - 5 x 3 3/4, adhere to Silver Foil Sheet

  • Whisper White scrap - stamp sentiment using Night Of Navy Ink and cut with Stitched So Sweetly Dies

  • Punch slit on both sides of sentiment label using the Label Me Fancy Punch (Be careful not to punch off the end when punching the slit)

  • Feed Metallic Mesh Ribbon through slits on sentiment label, add dimensionals to back of sentiment label, wrap ribbon around layers and adhere in back

  • Adhere layer to card base

  • Tie bow with ribbon and adhere with Glue Dot

  • Cut some stars from the Silver Foil Sheet and adhere to card (I used the Stitched Stars Dies)

 
For Unto Us Christmas Card.jpg
 

On the inside stamp sentiment with Night Of Navy Ink and star with Daffodil Delight Ink.

 
For Unto Us Christmas Card inside.jpg
 

Supply List

Sketch Saturday - Coming Home

Isn’t this a fun card! I made it for this week’s CAS(E) This Sketch Challenge from Splitcoaststampers. I love the little VW Bug….I’ve owned 3 in my lifetime.

 
Sketch Saturday - Coming Home Card1.jpg
 

Here’s the sketch. I switched it up a bit, made it horizontal and put the sentiment under the images; but that’s okay, it generally follows the sketch.

 
Screen Shot 2020-08-22 at 10.26.37 AM.png
 

The Coming Home Bundle has some great images that you can use for the holidays but also for a new home or just a sweet homey card.

 
Screen Shot 2020-08-22 at 10.41.30 AM.png
 

The Trimming The Town Designer Series Paper has some great patterns. I used the snowflakes and I cut the trees using the dies; I love when you can cut the Designer Series Paper with the dies.

 
Screen Shot 2020-08-22 at 10.45.48 AM.png
 

Tips & Instructions

  • Misty Moonlight Card Base - 5 1/2 x 8 1/2, score at 4 1/4

  • Trimming The Town Designer Series Paper - 5 1/2 x3, adhere to card base

  • Whisper White Layer - 5 1/2 x 4 1/4, cut with slope die

  • Stamp sentiment on slope (from Itty Bitty Christmas) with Black Memento Ink and adhere slope piece to card

  • Cut 1 large tree and 2 small trees from the Designer Series Paper with coordinating dies, adhere one large and one small to slope using Dimensionals

  • Stamp car on scrap of Whisper White Cardstock and color with Stampin’ Blends (Light Real Red for Car, Light Smoky Slate for wheels and bumpers)

  • Add Wink Of Stella to Windows

  • Cut car and adhere car and small tree to card using Dimensionals

 
Sketch Saturday - Coming Home Card2.jpg
 

On the inside stamp sentiment with Black Ink and snowflakes with Misty Moonlight Ink. Cut another large tree and adhere to inside bottom corner.

 
Sketch Saturday - Coming Home inside.jpg
 

Supply List

Arrange A Wreath Christmas Card

Today is my last day for my Week of Wreaths. I hope you enjoyed these cards. I made a Christmas Card using the Arrange A Wreath Bundle.

 
Arrange A Wreath Christmas Card2.jpg
 

I’ll show you how easy this was to make in the video below. I’ll also do a recap of the Week Of Wreaths Projects.


This is a beautiful bundle that can be used for lots of holidays.

 
Screen Shot 2020-08-21 at 2.18.35 PM.png
 

Tips & Instructions

  • Real Red Card Base - 5 1/2 x 8 1/2, score at 4 1/4

  • Whisper White Layer - 5 1/2 x 3, emboss with Pinewood Planks 3D Embossing Folder and adhere to card base

  • Brass Foil Sheet - cut wreath from Wreath Builder Dies

  • Shaded Spruce Cardstock - cut wreath from Wreath Builder Dies

  • Adhere wreaths together

  • Whisper White Strip - 1 1/2 x 5/8, stamp sentiment with Shaded Spruce Ink

  • Lay wreath on card to get placement for sentiment and adhere sentiment

  • Adhere wreath

  • Tie bow and adhere with Glue Dot

  • Add some Holiday Rhinestones

 
Arrange A Wreath Christmas Card3.jpg
 

On the inside stamp sentiment with Shaded Spruce Ink. Stamp berries with Real Red Ink and leaves with Shaded Spruce Ink. The sentiments I used are from the For Unto Us and Wrapped In Christmas Stamp Sets.

 
Arrange A Wreath Christmas inside2.jpg
 
Arrange A Wreath Christmas inside1.jpg
 

Below are the wreath cards I featured this week (and one from last year) along with a button to take you to my Blog Post for each card.

Scroll down a little for the products I used on today’s Christmas Card.

Supply List for Today’s Christmas Wreath Card

Beautiful Autumn Wreath - Card CASE

For Day 3 of my Week of Wreaths I decided to CASE (Copy And Share Everything) a card from the Stampin’ Up! Mini Catalog. I loved this card when I first saw it in the catalog. I made a few minor changes but it’s the same as the catalog for the most part.

 
Beautiful Autumn Wreath - Card CASE2.jpg
 

The Beautiful Autumn Bundle has great detailed and background images which are perfect for Fall projects. There are 3 coordinating punches that can also punch some of the images on the Designer Series Paper.

 
Screen Shot 2020-08-20 at 2.40.48 PM.png
 

Tips & Instructions

  • Mint Macaron Card Base - 5 1/2 x 8 1/2, score at 4 1/4, stamp leaves on top and bottom corner with Mint Macaron Ink

  • Gilded Autumn Specialty Designer Series Paper - 3 3/4 x 3 3/4 (the brown speckled piece)

  • Brushed Metallic Cardstock - 3 1/2 x 3 1/2, cut out center with 3rd from largest Layering Circle Die

  • Whisper White Cardstock - 3 x 3, cut circle using the 4th from largest Layering Circle Die

  • Stamp leaves with Cajun Craze and Mint Macaron Ink, stamp the detailed image direct and then stamp off to get a lighter shade for the background

  • Stamp 3 acorns with Crumb Cake Ink and stamp acorn top with Early Espresso, stamping off first to get a lighter shade

  • Punch the leaves and acorns with coordinating Autumn Punch Pack

  • Stamp the wheat image on the Whisper White Layer with Rich Razzleberry Ink

  • Adhere leaves around the circle, alternating the colors

  • Adhere two of the acorns on the bottom left of the circle

  • Tie 2 pieces of Linen Thread into a bow and adhere over acorns with Glue Dot

  • Adhere acorn using a Dimensional

  • Adhere wreath layer to Brushed Metallic Layer and then adhere to card using Dimensionals

  • Brushed Metallic Strip - 3/8 x 3, stamp sentiment with Versamark Ink, Add White Embossing Powder and heat with Heat Tool

  • Adhere sentiment strip to card using Dimensionals (only put them in the middle of the strip)

  • Add some Elegant Faceted Gems

 
Beautiful Autumn Wreath - Card CASE.jpg
 

On the inside, stamp some leaves with Cajun Craze and Mint Macaron Inks and stamp some acorns with Crumb Cake Ink. I only stamped the detailed images.

 
Beautiful Autumn Wreath - Card CASE inside.jpg
 

Supply List

Beautiful Wreath of Stitched Leaves

Todays card uses the Stitched Leaves Dies to cut and emboss these beautiful leaves and make them into an Autumn wreath. Day 2 of my week of wreaths!

 
Love Of Leaves Wreath Card2.jpg
 

In the video I’ll show you how great these leaf dies are and walk you through how I made this card.


The colors are 4 of the 5 new In Colors from Stampin’ Up! Cinnamon Cider, Bumblebee, Just Jade and the pretty pop of bright Magenta Madness.

 
Love Of Leaves Wreath Card.jpg
 

Tips & Instructions

  • Cinnamon Cider Card Base - 5 1/2 x 8 1/2, score at 4 1/4

  • Very Vanilla Layer - 5 1/2 x 4, adhere to card base

  • Cut leaves from Cinnamon Cider, Just Jade, Bumblebee and Magenta Madness Cardstock and snip ends if desired

  • Very Vanilla - cut 3rd largest Layering Circle and arrange and adhere leaves around circle and adhere to card

  • Cut 6th largest Circle from Very Vanilla, stamp sentiment with Cinnamon Cider Ink

  • Cut 5th largest Circle from Cinnamon Cider and adhere to sentiment circle, then adhere to card using Dimensionals

  • Adhere 3 In Color Enamel Dots below sentiment

  • Tie bow with Embroidered Ribbon and adhere with Glue Dot

 
Love Of Leaves Wreath Card3.jpg
 

On the inside, stamp small leaf with Bumblebee Ink and leaves with Just Jade Ink, stamping a second time without re-inking. The inside layer is the same size as the card front layer; Very Vanilla 5 1/2 x 4.

 
Love Of Leaves Wreath Card inside2.jpg
 

Supply List

A Wreath of Feathers

I love wreaths so I decided to dedicate a week to cards with wreaths. Today is a wreath of feathers!

 
A Wreath Of Feathers card2.jpg
 

The feathers were made using the Beautiful World Bundle. I stamped a bunch of them with Rococo Rose and Seaside Spray Inks and then cut them with the coordinating dies.

 
A Wreath Of Feathers card1.png
 

Tips & Instructions

  • Seaside Spray Card Base - 5 1/2 x 8 1/2, score at 4 1/4

  • Whisper White Layer - 5 1/4 x 4, emboss with Scripty 3D Embossing Folder and adhere to card base

  • Stamp 10 feathers with Rococo Rose Ink and 10 feathers with Seaside Spray Ink and cut with coordinating die

  • Punch circle - I used a 1 1/2” Circle Punch

  • Cut the ends of the feathers so there’s not so much bulk when laying them out

  • Adhere the feathers around circle laying one over the next, alternating colors

  • Stamp sentiment on scrap of Whisper White with Seaside Spray Ink and cut with circle die from World Maps Dies

  • Adhere sentiment over the feathers with Dimensionals, putting Dimensionals only on the outer rim of the circle to avoid the bulk that the center of the circle of feathers created

  • Adhere to card

  • Tie bow with ribbon and adhere using Glue Dot

 
A Wreath Of Feathers Card3.jpg
 

On the inside stamp feathers with Rococo Rose. I stamped directly twice and then stamped off on the one in the center.

 
A Wreath Of Feathers inside.jpg
 

Supply List