Box Pleat Fold Cards

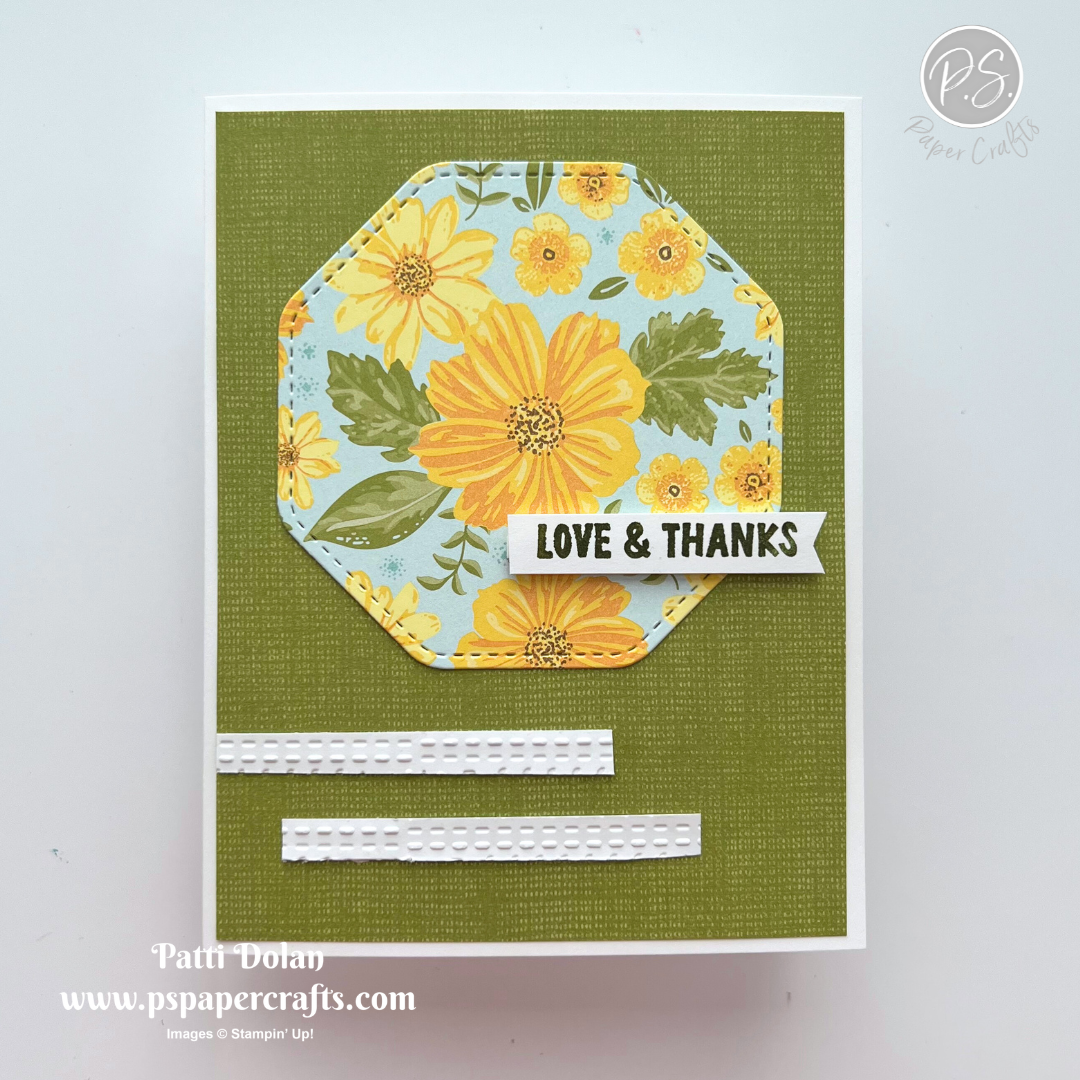
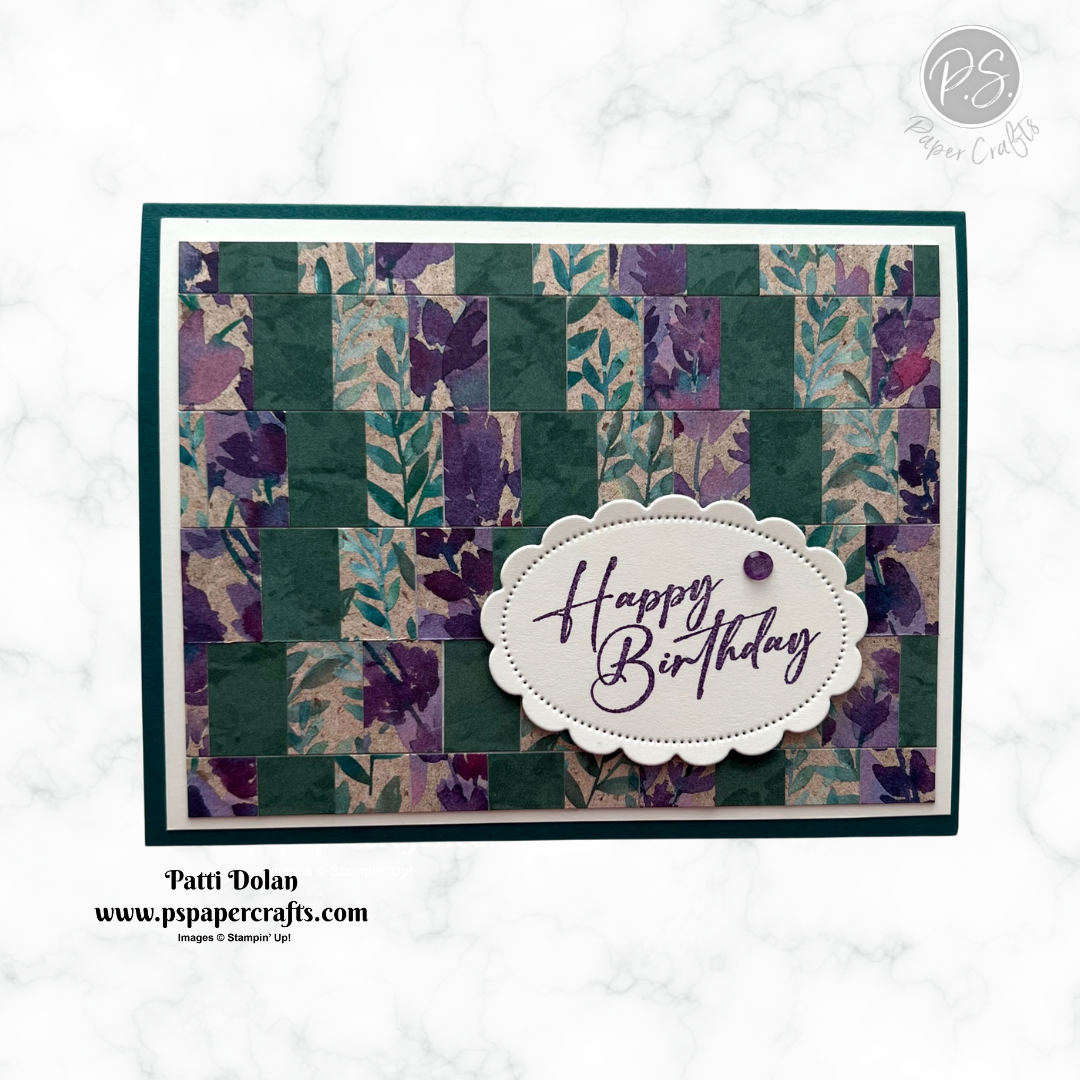
Here are some more Pleat Fold Cards. This week I went with the Box Pleat Fold design. You need a little patience but the result is beautiful. I used products from our Online Exclusives to make these cards. You can find them on my Online Store.


Watch the video to see step by step instructions to make these cards.

Click on the button below to get a printable pdf with measurements and instructions.


This card was made using the Hearts of Elegance Bundle and Marbled Elegance Specialty Designer Series Paper. The gold embossed heart is so pretty along with the gold embossed sentiment.


This card was made using the Mixed Media Designer Series Paper and Mixed Labels Bundle. I love a black and white card.


Supply List

You can click on the item to purchase it from my Online Store.

Corner In Bloom - Color Combo

The new Corner In Bloom Stamp Set has beautiful, floral corner images. You can get it for free with a qualifying order during Sale-A-Bration.


The color combo is from my January Inspiration Calendar - Bubble Bath, Highland Heather and Soft Sea Foam.


You can get my Inspiration Calendar each month when you subscribe to my email list.

Tips & Instructions

  • Soft Sea Foam Card Base - 5 1/2 x 8 1/2, score at 4 1/4

  • Basic Black Layer - 3 7/8 x 5 1/8

  • Basic White Layer - 3 3/4 x 5

  • Stamp the floral corner image twice on the Basic White layer in Black Memento ink.

  • Color the flowers and leaves with Stampin’ Blends. I used Dark Highland Heather and Dark Bubble Bath for the flowers and Dark Soft Sea Foam for the leaves.

  • Stamp the sentiment in Black Memento ink. The sentiment is from the Linked Together Stamp Set.

  • Adhere the stamped layer to the black layer and then to the card base.

  • Add some Iridescent Pearl Basic Jewels to the center of the flowers.


On the inside layer (4 x 5 1/4), stamp the sentiment and floral image in Black Memento ink. Color with Stampin’ Blends.


I love the floral image with the sentiment for a wedding card, so elegant!


Supply List

You can click on the item to purchase it from my Online Store.

Sketch Challenge - Courage & Faith

I made this card for the weekly Splitcoaststampers Sketch Challenge using the Courage & Faith Stamp Set. This is a beautiful set and perfect for a bookmark!


Here’s the sketch. Click on the sketch to see the other projects posted for this week.


Tips & Instructions

  • Fresh Freesia Card Base - 4 1/4 x 11, score at 5 1/2

  • Shades & Hues Designer Series Paper - 4 x 5 1/4 and adhere to the card base.

  • Shades & Hues Designer Series Paper (piece that looks like a paint swatch). Cut the lightest strip of the Fresh Freesia color to 1 1/8 x about 3 3/4. Stamp the sentiment in Fresh Freesia.

  • Fresh Freesia Strip 1 3/8 x 4.

  • Lay the stamped strip on the Fresh Freesia strip keeping the top part even. Die cut using just the top part of the small Mixed Labels Dies to create the pretty topper. Shift the stamped strip down so there’s a nice border around it and adhere together. Trim off the bottom of the Fresh Freesia to keep the border even all around the bookmark.

  • Punch a hole at the top the the bookmark and add a piece of White Frayed Grosgrain Ribbon.

  • Create the pocket by cutting a piece of the Designer Series Paper to 2 x 2 1/2. Use the large label die from the Mixed Labels Dies to die cut just the top portion of the paper to create the fancy top.

  • Put strong adhesive (Seal+ or Tear & Tape) on the 2 sides and bottom of the pocket piece and adhere to the card. Slip the bookmark into the pocket.

  • Add some doves from the Adhesive-Backed Dragonflies & Birds.


On the inside layer (4 x 5 1/4) stamp sentiment in Fresh Freesia ink and the floral images in Soft Sea Foam ink. Add a dove to the top corner.


This is a sweet card to give someone who loves to read!


Supply List

You can click on the item to purchase it from my Online Store.

Sketch Saturday - Fruit Salad

The Fruit Salad Designer Series Paper has such fun patterns. I used the pretty yellow pattern and then fussy cut the pears. This is a Sale-A-Bration product that you can get for free with a $60 purchase starting January 7, 2025.


I made this for the weekly Atlantic Hearts Sketch Challenge. Here’s the sketch I used.


Tips & Instructions

  • Daffodil Delight Card Base - 5 1/2 x 8 1/2, score at 4 1/4

  • Fruit Salad Designer Series Paper (yellow pattern) - 4 x 5 1/4, adhere to the card base.

  • Basic White layer 1 3/4 x 5 1/4, stamp sentiment in Granny Apple Green ink. The sentiment is from the Mixed Labels Stamp Set.

  • Fussy cut the pears from the Fruit Salad Designer Series Paper and adhere to the white layer. I used Dimesionals on the full pear and Liquid Glue on the pear half.

  • Adhere the white layer to a 1 7/8 x 5 1/4 Granny Apple Green Layer and then adhere to the card.

  • Add some Opal Rounds.


On the inside layer (4 x 5 1/4), stamp the sentiment in Granny Apple Green ink. Adhere a 3/4 x 5 1/4 strip of the Designer Series Paper to the bottom of the layer. Fussy cut the pears and adhere to the layer.


The fruit images on the paper are so easy to fussy cut.


Supply List

You can click on the item to purchase it from my Online Store.

Note: The Fruit Salad Designer Series Paper and Mixed Labels Stamp Set will be available starting January 7, 2025 and are not listed in the Supply List below.

Pleated Fold Cards

This month I’m focusing on Pleat Fold cards. This is such a fun way to add a little pizzaz to your card. I used new product from the upcoming Mini Catalog on the Make a Wish card and a remake of some patterned paper on the Friendship card.


Watch the video to see step by step instructions to make these cards.

Click on the button below to get a printable pdf with measurements and instructions.


This card was made using the Friends of the Ocean Designer Series Paper. I fussy cut the cute crab from the paper but there is a coordinating die to cut it out in the Ocean Friends Dies. The sentiment is from the Birthday Celebration Stamp Set.


This card was made using the new Serene Love Designer Series Paper. I love a monochromatic card! This paper is a revamp of the True Love paper, using different colors. The sentiment is from the new Mixed Labels Stamp Set.


Supply List

You can click on the item to purchase it from my Online Store. (Note the new products will be available for purchase starting Jan.  7, 2025.)

Beautiful Butterflies - Color Combo

If you love butterflies, you will want to get the new Beautiful Butterflies Bundle from the upcoming Mini Catalog. The large butterfly background and detailed dies create a beautiful focal for this card.


I used the color combo is from my January Inspiration Calendar - Fresh Freesia, Pool Party and Coastal Cabana.


You can get my Inspiration Calendar each month when you subscribe to my email list.

Tips & Instructions

  • Fresh Freesia Card Base - 5 1/2 x 8 1/2, score at 4 1/4

  • Basic White Layer - 4 x 5 1/4, adhere to the card base.

  • Beautiful Bokeh Designer Series Paper Layer - 3 3/4 x 5, adhere to the card.

  • Die cut the large background butterfly from Pool Party Cardstock using the Beautiful Butterflies Dies. Die cut the detailed butterfly from Coastal Cabana Cardstock and adhere to the background butterfly.

  • Adhere the butterfly to the card with Dimensionals.

  • Die cut the large butterfly body from Basic Black Cardstock and adhere to the center of the butterfly.

  • Stamp sentiment on a 1/2” strip of Basic White in Fresh Freesia ink. Banner both ends and adhere to the card with Dimensionals.

  • Add some Party Dots.


On the inside layer (4 x 5 1/4), stamp the sentiment in Coastal Cabana ink and the butterfly in Fresh Freesia ink.


I love how well the Pool Party and Coastal Cabana colors work together on the butterfly.


The Beautiful Butterflies Bundle, Beautiful Bokeh Designer Series Paper and Party Dots will be available for purchase starting January 7, 2025.

Sketch Challenge - Memorable Blooms

I made this card for the weekly Splitcoaststampers Sketch Challenge using new products from the upcoming Mini Catalog which will be available for purchase starting January 7, 2025.

I used the pretty Floral Delight Designer Series Paper along with the Memorable Blooms Bundle.


Here’s the sketch. Click on the sketch to see the other projects posted for this week.


Tips & Instructions

  • Thick Basic White Card Base - 4 1/4 x 11, score at 5 1/2

  • Floral Delight Designer Series Paper (green) - 4 x 5 1/4 and adhere to the card base.

  • Floral Delight Designer Series Paper (floral) - die cut using the Memorable Blooms Dies and adhere to the card.

  • Stamp sentiment on a 1/2” strip of Basic White in Old Olive ink. Banner one end and adhere to the card with Dimensionals.

  • Emboss 2 strips of basic white that are 1/4 x 2 1/2 using the Dashing Designs 3D Embossing Folder. Adhere to the card.


On the inside layer (4 x 5 1/4) stamp sentiment and greenery image in Old Olive ink.


The large die from the Memorable Blooms dies was perfect for the flowers on this card.


The Memorable Blooms Bundle and Floral Delight Designer Series Paper will be available for purchase starting January 7, 2025.

Sketch Saturday - Terrific Toadstools

The Terrific Toadstools Bundle is so cute. The images a fun and there’s a punch that coordinates with the stamp set. I used the Toadstools Garden Designer Series Paper which is a Sale-A-Bration product you can get for free with a qualifying purchase.


I made this for the weekly Atlantic Hearts Sketch Challenge. Here’s the sketch I used.


Tips & Instructions

  • Poppy Parade Card Base - 5 1/2 x 8 1/2, score at 4 1/4

  • Toadstool Gardens Designer Series Paper - 4 x 5, cut in halve at the 2” mark (on the 4” side). Cut the top half in half at the 2 1/2 mark (on the 5” side). Cut the bottom half into thirds, each one about 1 11/6 each.

  • Adhere the Designer Series Paper Pieces in the order you cut them, leaving a small border around each piece.

  • Die cut a circle from a piece of Basic White using the Spotlight on Nature Dies.

  • Using the Terrific Toadstools Stamp Set stamp the grass in Granny Apple Green, the 3-stem image in Early Espresso ink and the caps in Pumpkin Pie ink. Stamp the larger cap in Poppy Parade and punch with the Builder Punch. Punch the stem from Early Espresso Cardstock. Adhere the punched toadstool pieces to the circle.

  • Adhere the circle to the card with Dimensionals.

  • Stamp the sentiment in Poppy Parade ink on a 1/2” strip of Basic White. Cut to size and adhere to the card with Dimensionals.

  • Add some Sunny Day Iridescent Dots.


On the inside layer (4 x 5 1/4), stamp the stems in Early Espresso ink and the caps in Pumpkin Pie and Poppy Parade ink.


These toadstools stamp so nice and clean. I love how fun they are!


Supply List

You can click on the item to purchase it from my Online Store.

Note: The Terrific Toadstools Bundle, Toadstool Gardens Designer Series Paper and Sunny Day Iridescent Dots will be available starting January 7, 2025 and are not listed in the Supply List below.

Twisted Ribbon Technique

Here’s another card using strips of patterned paper. It’s called the Twisted Ribbon Technique.


Watch the video to see step by step instructions to do this technique.

Click on the button below to get a printable pdf with measurements and instructions.


This card was made using some new products from the upcoming Mini Catalog, Sale-A-Bration and new Online Exclusives. These products will be available for purchase starting January 7. I used the Bloom Impressions Designer Series Paper, Beautiful Butterflies Bundle, Pastel Ombre Specialty Designer Series Paper and Itty Bitty Bokeh Mix.


This card is so pretty with the Winter Regal Designer Series Paper. The sentiment is from the Hooray for Surprises Stamp Set.


Supply List

You can click on the item to purchase it from my Online Store. (Note the new products will be available for purchase starting Jan.  7, 2025.)

Sketch Saturday - Hearts of Elegance

The Marbled Elegance Specialty Designer Series Paper is so pretty with gold accents. I decided to use it with the Hearts of Elegance Bundle for this week’s sketch challenge.


The sketch I used is from the the weekly Atlantic Hearts Sketch Challenge. My squares were a little big so I had to put the sentiment at the bottom and the bow above it.


Tips & Instructions

  • Melon Mambo Card Base - 5 1/2 x 8 1/2, score at 4 1/4

  • Marbled Elegance Specialty Designer Series Paper Layer - 4 x 5 1/4, adhere to the card base.

  • Die cut 4 squares from Basic White using the Perennial Postage Dies.

  • Die cut 4 hearts from Gold Foil using the Hearts of Elegance Dies.

  • Adhere the hearts to the squares using a Dimensional and then adhere the squares to the card.

  • Stamp the sentiment on Basic White in Melon Mambo ink and fussy cut around it. Adhere to the card with Dimensionals.

  • Tie a bow with 2 strands Gold Twisted Thread and adhere to the card with a Glue Dot.


On the inside layer (4 x 5 1/4), stamp the sentiment in Melon Mambo ink. Add a 3/4 x 5 1/4 strip of the Designer Series Paper to the bottom.


I love the gold hearts with the stitching around the edges, so pretty.


Supply List

You can click on the item to purchase it from my Online Store.

Pretty Cards using the Bargello Technique

Are you familiar with the Bargello Technique? It was new to me and I’m loving it. You cut strips of paper and stick them to a layer and then cut that layer into strips and create a pattern. So cool!


Watch the video to see step by step instructions to do this technique.

Click on the button below to get a printable pdf with measurements and instructions.


This card was made using some new Online Exclusive Products that will be available for purchase starting January 7. I used the Mixed Media Florals Designer Series Paper and Mixed Labels Bundle.


This card was made using some Annual Catalog products. The paper is from the Perennial Lavender Designer Series Paper and the sentiment and label are from the Unbounded Love Bundle.


Supply List

You can click on the item to purchase it from my Online Store. (Note the Mixed Media Florals Designer Series Paper,  Mixed Labels Bundle & Low Profile Dots are Online Exclusives and will be available for purchase starting Jan.  7, 2025.)

Happy Hibiscus - Color Combo

The Happy Hibiscus Bundle is so cool! The stamp set coordinates with the dies and there’s a Hybrid Embossing Folder that will let you cut and emboss in one pass.


I used the color combo is from my December Inspiration Calendar - Night of Navy, Pool Party and Melon Mambo. The picture looks like the card base and sentiment are black but they are Night of Navy.


You can get my Inspiration Calendar each month when you subscribe to my email list.

Tips & Instructions

  • Night of Navy Card Base - 5 1/2 x 8 1/2, score at 4 1/4

  • Basic White Layer - 3 3/4 x 5

  • Stamp the hibiscus grouping on Basic White in Melon Mambo ink. Stamp the filler images that coordinate with each flower in Melon Mambo ink. Die cut and emboss using the coordinating dies and Hybrid Embossing Folder.

  • Stamp the leaves on Basic White in Pool Party ink and die cut with coordinating dies.

  • Arrange and adhere the flowers and leaves to the white layer.

  • Stamp sentiment on Basic White in Night of Navy ink and die cut with label die. Adhere to the layer with Dimensionals.

  • Adhere the layer to the card base.

  • Add some Pool Party Rainbow Adhesive-Backed Dots to the centers of the flowers.


On the inside layer (4 x 5 1/4), stamp the sentiment the small flower in Melon Mambo ink and stamp some leaves in Pool Party ink.


I wasn’t sure how Pool Party would work for the leaves but I like how they turned out with the Melon Mambo flowers.


Supply List

You can click on the item to purchase it from my Online Store.

Sketch Challenge - HO HO HO Christmas Card

I made this card for the weekly Splitcoaststampers Sketch Challenge using the Mini Alphabet Dies and Snowy Scenes Designer Series Paper.


Here’s the sketch I used. Click on the sketch to see the other projects posted for this week.


Tips & Instructions

  • Poppy Parade Card Base - 5 1/2 x 8 1/2, score at 4 1/4 and round all four corners.

  • Snowy Scenes Designer Series Paper - 4 x 5 1/4, round all four corners and adhere to the card base.

  • Garden Green Strip - 1 1/2 x 4 1/2, round all four corners.

  • Die cut 3 H’s and 3 O’s from Poppy Parade using the Mini Alphabet Dies.

  • Die cut 3 circles from Basic White using the second from smallest circles from the Stylish Shapes Dies.

  • Adhere the letters to the circles to spell out HO HO HO. Adhere the circles to the Garden Green strip using Dimensionals.

  • Adhere the strip to the card.


Round the four corners on the inside layer (4 x 5 1/4) and stamp sentiment in Garden Green ink. Adhere the sleigh with presents from the A Little Bit Festive Mix & Match Specialty Designer Series Paper.


I love how fun and festive this card turned out.


Supply List

You can click on the item to purchase it from my Online Store.

Sketch Saturday - Golden Greenery Christmas Card

I love all the greenery images in the Seasons of Green & Gold Designer Series Paper pack. You can use the Golden Greenery Dies to die cut those pretty branches from the paper.


I made this card for the weekly Atlantic Hearts Sketch Challenge. Here’s the sketch I used.


Tips & Instructions

  • Mossy Meadow Card Base - 5 1/2 x 8 1/2, score at 4 1/4

  • Gold Foil Layer - 3 7/8 x 5 1/8

  • Basic White Layer - 3 3/4 x 5

  • Season of Green & Gold Designer Series Paper (green floral pattern) - 2 x 3, round the corners.

  • Die cut 2 of each of the 3 branches from the Designer Series Paper using the Golden Greenery Dies.

  • Arrange the branches to the 2 x 3 piece of Designer Series Paper as shown and adhere them. I trimmed off the bottoms of the pieces so it wasn’t so bulky.

  • Adhere the greenery piece to the white layer, then to the gold layer, then to the card base.

  • Basic White Strip - 1 x 4 1/2, stamp sentiment in Versamark ink and heat emboss with Gold Embossing Powder. Banner each end and adhere to the card using Dimensionals. I was careful to put Dimensionals only on the ends and liquid glue in the middle to handle the bulk.


On the inside layer (4 x 5 1/4), stamp the sentiment Versamark ink and emboss using Gold Embossing Powder. Adhere a 3/4 x 4 strip of Designer Series Paper.


I love the gold accents and gold embossed sentiment, so elegant!


Supply List

You can click on the item to purchase it from my Online Store.

Easy Fun Fold Gift Card Holders

These Fun Fold Gift Card Holders are so easy to make. You can change up the patterned paper and sentiment and make them for any occasion.


Watch the video to see step by step instructions to make these gift card holders.

Click on the button below to get a printable pdf with measurements and instructions.


This card was made using the Snowy Scenes Designer Series Paper. The sentiment and label were made using the Christmas Labels Bundle.


This card was made using the Reindeer Days Designer Series Paper. I used the Christmas Labels Bundle for this card as well.


Supply List

You can click on the item to purchase it from my Online Store.

Encircled in Nature - Color Combo

I love a card with a wreath! I used the Encircled in Nature Dies to create this pretty holiday card. The sentiment is from the Greetings of the Season Stamp Set which has been my go to set for Christmas.


The color combo is from my December Inspiration Calendar - Cherry Cobbler, Wild Wheat and Shaded Spruce, great Christmas colors.


You can get my Inspiration Calendar each month when you subscribe to my email list.

Tips & Instructions

  • Cherry Cobbler Card Base - 5 1/2 x 8 1/2, score at 4 1/4

  • Basic White Layer - 4 x 5 1/4

  • Wild Wheat - 4 x 4, die cut with the wreath die using the Encircled in Natures Dies.

  • Shaded Spruce - die cut 3 sets of branches

  • Lay the wreath over the white layer to determine where to stamp the sentiment. Stamp the sentiment in Shaded Spruce ink.

  • Adhere the wreath to the white layer.

  • Adhere the greenery pieces to the bottom of the wreath.

  • Tie a bow with the Cherry Cobbler & Gold Satin Ribbon and adhere to the bottom of the wreath with a Glue Dot.

  • Adhere the layer to the card base.


On the inside layer (4 x 5 1/4), stamp the sentiment in Cherry Cobbler ink. It’s a big enough sentiment where you don’t really need to add anything else.


Wild Wheat almost looks like gold to me and works so well for the wreath.


Supply List

You can click on the item to purchase it from my Online Store.

Sketch Challenge - One of a Kind

I made this card for the weekly Splitcoaststampers Sketch Challenge using the One of a Kind Bundle. I embossed the background layer using the Snowflake Sky 3D Embossing Folder to add a snowy look.


Here’s the sketch I used. Click on the sketch to see the other projects posted for this week.


Tips & Instructions

  • Night of Navy Card Base - 5 1/2 x 8 1/2, score at 4 1/4

  • Gold Foil Layer - 3 7/8 x 5 1/8

  • Boho Blue and Basic White Layers - 2 1/2 x 3 5/8, emboss each piece using the Snowflake Sky 3D Embossing Folder. Adhere to the Gold Foil layer and adhere to the card base.

  • Adhere a 3/16 x 3 7/8 over the seam of the blue and white layers.

  • Stamp the large snowflake on Basic White in Boho Blue ink and die cut with the coordinating die. Die cut the detailed snowflake from Basic White and adhere to the stamped snowflake. Adhere to the card with Dimensionals. Adhere a large Adhesive-Backed Snowflake to the center.

  • Stamp the sentiment on Basic White in Night of Navy ink and fussy cut. Adhere to the card with Dimensionals.

  • Add some small Adhesive-Backed Snowflakes.


On the inside layer (4 x 5 1/4), stamp sentiment in Night of Navy Ink and stamp some snowflakes across the top in Boho Blue ink.


I love the embossed background and the gold accents.


Supply List

You can click on the item to purchase it from my Online Store.

Sketch Saturday - Greetings of the Season

This was a fun card to make and I was able to use up some of my scraps of patterned paper. I used the Take A Bow Designer Series Paper and Greetings of the Season Stamp Set.


I made this card for the weekly Atlantic Hearts Sketch Challenge. Here’s the sketch I used.


Tips & Instructions

  • Garden Green Card Base - 5 1/2 x 8 1/2, score at 4 1/4

  • Basic White Layer - 4 x 5 1/4

  • Take a Bow Designer Series Paper - cut 7 pieces 1/2” wide at varying lengths.

  • Adhere the Designer Series Paper pieces to the white layer. I started with the middle piece and worked my way out on both sides.

  • Basic White - 1 x 3 1/2, stamp sentiment in Real Red ink. The sentiment is from the Greetings of the Season Stamp Set.

  • Adhere white sentiment layer to a piece of Garden Green cut at 1 1/4 x 3 3/4. Adhere to the card with Dimensionals.

  • Add a Real Red & White Adhesive-Backed Peppermint.


On the inside layer (4 x 5 1/4), stamp the sentiment Real Red ink and add a 1/2 x 5 1/4 strip of Designer Series Paper.


I love how bright and cheerful these patterns are for the card.


Supply List

You can click on the item to purchase it from my Online Store.

Christmas Pop Up Gift Card Holders

Do you give lots of gift cards during the holidays? If so, here’s a great holder to put your gift cards in to make them special. You can use this design for any occasion.


Watch the video to see step by step instructions to make this design.

Click on the button below to get a printable pdf with measurements and instructions.


Both gift card holders were made using the Take A Bow Designer Series Paper. The big sentiment is from the Iconic Imagery Bundle and I love it. I used the Greetings of the Season Stamp Set for the inside sentiment.


Supply List

You can click on the item to purchase it from my Online Store.

Golden Greenery - Color Combo

Shy Shamrock isn’t a traditional green for Christmas but I love it on this card. I used the Golden Greenery Stamp Set and Dies to create this pretty Christmas Card.


The color combo is from my December Inspiration Calendar - Real Red, Shy Shamrock and Pecan Pie


You can get my Inspiration Calendar each month when you subscribe to my email list.

Tips & Instructions

  • Shy Shamrock Card Base - 5 1/2 x 8 1/2, score at 4 1/4

  • Festive Glimmer Paper (red) - 3 3/4 x 5

  • Basic White - 3 1/2 x 4 3/4. Stamp the sentiment across the bottom in Real Red ink.

  • Stamp two bells in Pecan Pie ink on Basic White. I stamped the detailed image direct and then stamped off for the filler image. Die cut using the Golden Greenery Dies.

  • Stamp 2 greenery images in Shy Shamrock ink on Basic White. Stamp the detailed image direct and the background image by stamping off first. Die cut using the Golden Greenery Dies.

  • Die cut 3 pine branches from Shy Shamrock Cardstock.

  • Die cut the berries from the red Festive Glimmer Paper.

  • Arrange and adhere the greenery pieces as shown. Adhere the bells on top. Add some of the berries that you die cut from the glimmer paper. I used my Take Your Pick Tool to help place them.

  • Tie a bow with a piece of Iridescent Striped Trim and adhere to the bells with a glue dot.


On the inside layer (4 x 5 1/4), stamp the sentiment in Real Red ink. Stamp the greenery images in Shy Shamrock stamping direct for the detailed image and stamping off first for the background image.


I’m so happy with how this card turned out using Shy Shamrock.


Supply List

You can click on the item to purchase it from my Online Store.