Sketch Saturday - Festive & Fun

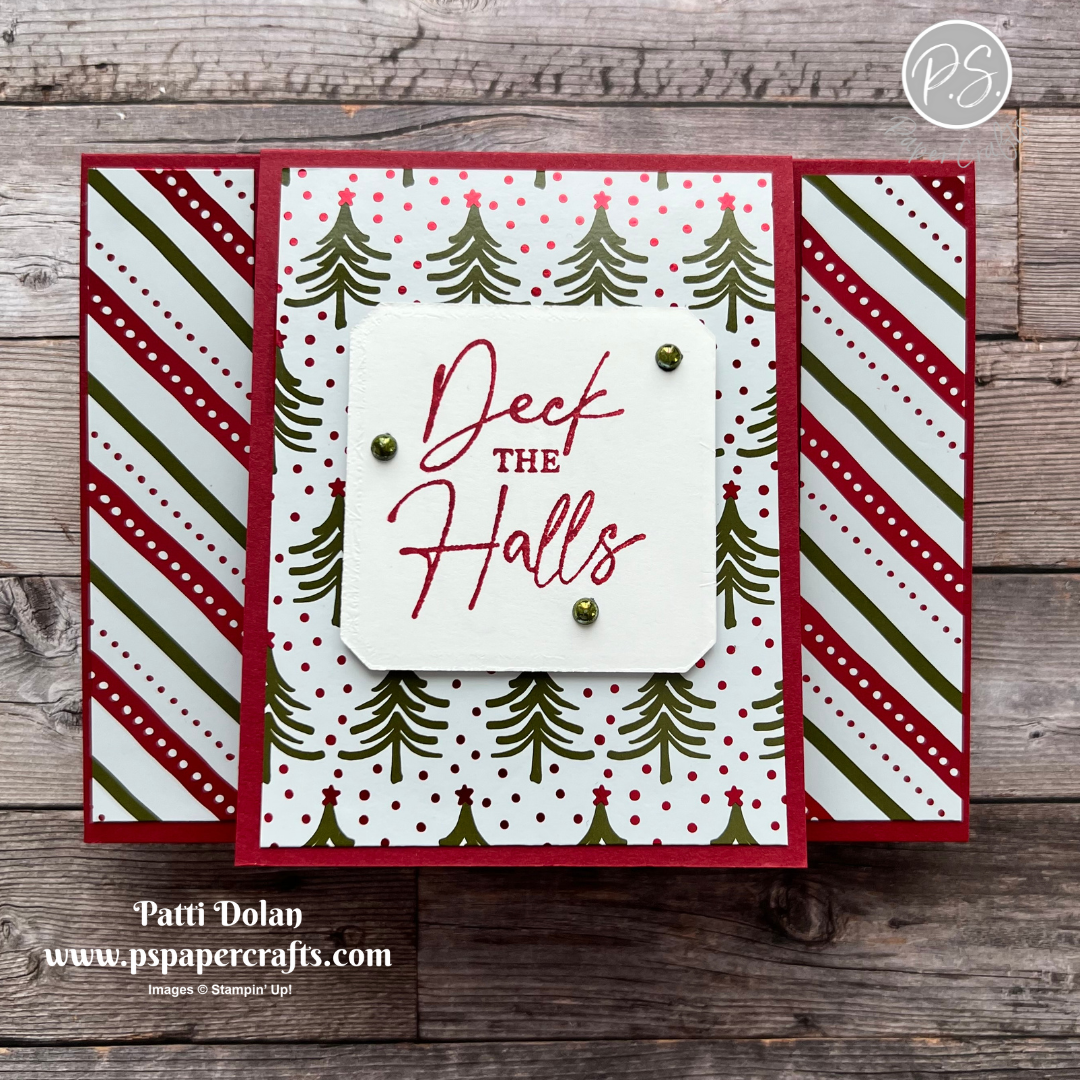
This is the card I made for this week’s Atlantic Hearts Sketch Challenge using the Merry Bold & Bright Designer Series Paper and Festive & Fun Stamp Set. It’s such a bright & fun card.


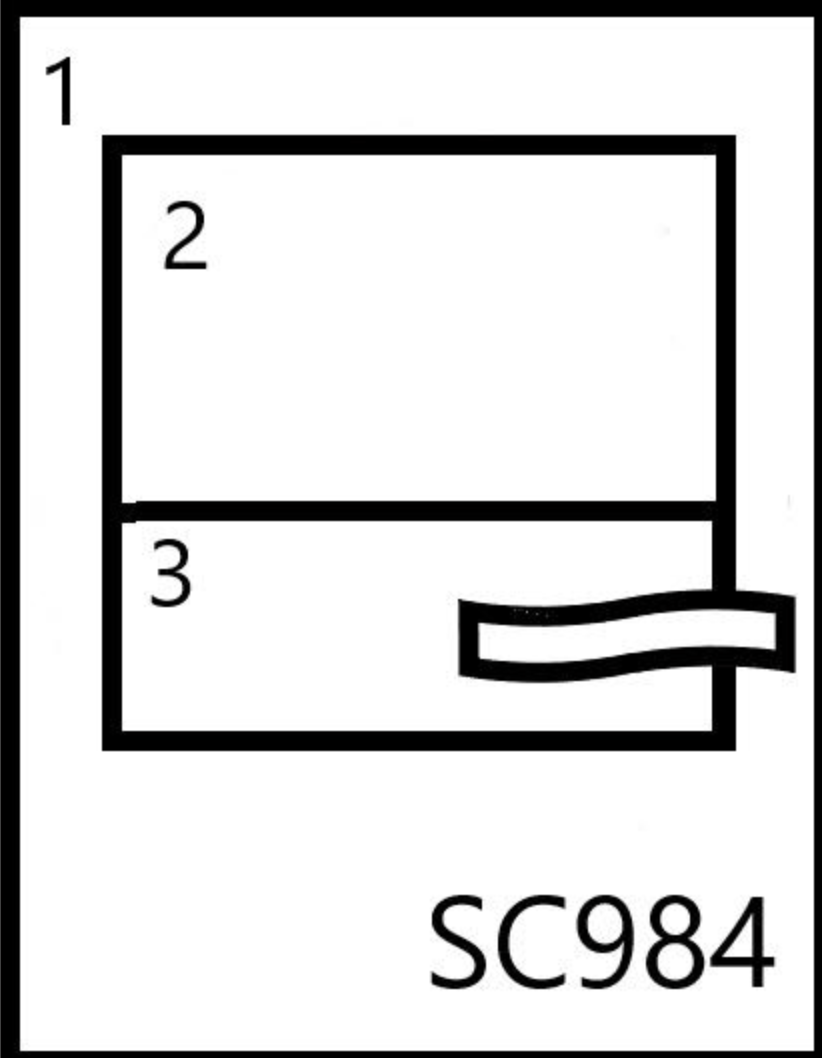
Here’s the sketch that I used. I love that our Designer Series Paper has lots of coordinating patterns for a card design like this.


Tips & Instructions

  • Thick Basic White Card Base - 5 1/2 x 8 1/2, score at 4 1/4

  • Poppy Parade Layer - 5 1/8 x 3 7/8

  • Basic White Layer - 5 x 3 3/4

  • Merry Bold & Bright Designer Series Paper

    • Tree pattern - 1 1/2 x 2 1/2 and 2 x 1 1/4

    • Stripe pattern - 2 x 2 and 1 1/2 x 1

    • Fa La La La La pattern - 1 1/2 x 1 1/4 and 2 x 1 1/4

  • Adhere the Designer Series Paper pieces to white layer leaving a border around each piece.

  • Adhere layer to Poppy Parade layer and adhere to the card base.

  • Stamp sentiment from the Festive & Fun Stamp Set with Poppy Parade Ink on a 1/2” strip of Basic White. Banner each end with a Banners Pick A Punch. Adhere to the card with Dimensionals.

  • Add some Iridescent Adhesive-Backed Discs.


On the inside add a 4 x 3/4 strip of Designer Series Paper and stamp the sentiment with Poppy Parade Ink.


Supply List

You can click on the item to purchase it from my Online Store.

Christmas Gift Card Holders

These are some great gift card holders that you can make with any patterned paper. I made mine for Christmas but they can be used for any occasion. One is a full card with a slot for a gift card behind the front flap and the other is just the gift card holder.


Watch the video to see step-by-step instructions to make these gift card holders and then click on the Project Sheet button to get a printable pdf with measurements, pictures and instructions.


This one is a full card and I used the Shining Christmas Specialty Paper. Unfortunately this is no longer available but it gives you an idea of using different patterns for the card.


This one is not a full card, it just has the flap you can open to see the gift card. I love the One Horse Open Sleigh Designer Series Paper. Isn’t that little Bambi deer so cute?


Supply List

You can click on the item to purchase it from my Online Store.

Sketch Challenge - Celebrate With Tags

Here’s my card for this week’s Splitcoaststampers Sketch Challenge. I used the Celebrate With Tags Stamp Set and Beary Christmas Designers Series Paper. The background layer was embossed using the Snowflake Sky 3D Embossing Folder.


This is the sketch that I used. You can see the other projects for this week’s challenge by clicking on the sketch.


Tips & Instructions

  • Night of Navy Card Base - 4 1/4 x 11, score at 5 1/2 (top folding)

  • Basic White Layer - 5 1/4 x 4, emboss using the Snowflake Sky 3D Embossing Folder, adhere to card base.

  • Beary Christmas Designer Series Paper - 4 x 2, adhere to card.

  • Punch Vellum Cardstock using the 2” Circle Punch.

  • Stamp mitten with Balmy Blue Ink on Basic White. Fussy cut leaving a white border around it.

  • Stamp sentiment with Night of Navy Ink on Basic White and fussy cut.

  • Adhere mitten to vellum circle with Dimensionals. Adhere sentiment to vellum.

  • Add Adhesive-Backed Sparkle Sequins to circle and mitten.

  • Adhere the vellum circle to the card putting adhesive behind the mitten, sentiment and sequins.


I love that the patterned paper looks like a sweater along with the mitten against the snowy background.


On the inside layer (5 1/4 x 4) stamp sentiment with Night of Navy Ink. On the inside layer adhere a 4 x 3/4 strip of the Designer Series Paper.


Supply List

You can click on the item to purchase it from my Online Store.

Sketch Saturday - Taco Fiesta

The Taco Fiesta Stamp Set is so fun. I used it to make my card for this week’s Atlantic Hearts Sketch Challenge and love how it turned out.


Here’s the sketch I used, isn’t it fun?


Tips & Instructions

  • Pumpkin Pie Card Base - 5 1/2 x 8 1/2, score at 4 1/4

  • Basic White Layer - 5 3/8 x 4 1/8

  • Stargazing Designer Series Paper - 5 1/4 x 4

  • Basic White - 3 squares 1 1/2 x 1 1/2

  • Stamp the images on each square with Black Memento Ink.

  • Color the images with Stampin’ Blends. I used Light & Dark Old Olive, Dark Pumpkin Pie, Dark Lemon Lolly, Light Wild Wheat and Smoky Slate.

  • Adhere the squares in the pattern shown to the Designer Series Paper layer.

  • Adhere layer to white layer and then to the card base.

  • Stamp sentiment on a 1 5/8 x 5/8 strip of Basic White with Black Memento Ink. Adhere to a 1 3/4 x 3/4 strip of Pumpkin Pie. Adhere sentiment to card with Dimensionals.

  • Add some Iridescent Pastel Gems.


On the inside layer (5 1/4 x 4) stamp the sentiment and the candy with Black Memento Ink. Color with Pumpkin Pie and Lemon Lolly Stampin’ Blends.


Supply List

You can click on the item to purchase it from my Online Store.

Easy Christmas Gift Card Holders

Here’s another idea for gift card holders. You can make these for any holiday, Christmas, Hanukkah, Birthday, Graduation, etc. They are simple to make and really dress up a gift card.


Watch the video to see the products I used and learn how to make these gift card holders. You can click the button below to get a printable pdf with measurements, pictures and instructions.


I used the fun Walk In The Forest Designer Series Paper with Pretty Peacock Cardstock and Ink for this one. The sentiment is from the Sending Cheer Stamp Set.


This one was made using the Traditions Of St. Nick Designer Series Paper with Cherry Cobbler Cardstock and Ink.


Supply List

You can click on the item to purchase it from my Online Store.

So Very Merry Peace & Joy Card

I love this sweet bird from the So Very Merry Stamp Set. The images look like stained glass. I colored it with ink and Wink Of Stella so it has a pretty shimmer to it.


The colors for this card are from my Inspiration Calendar - Shaded Spruce, Calypso Coral and Crushed Curry. When I first thought about these colors, I was going to make an autumn card but then I saw this bird and decided to make the card with it.

You can get my Inspiration Calendar when you subscribe to my email list.


Tips & Instructions

  • Thick Basic White Card Base - 5 1/2 x 8 1/2, score at 4 1/4

  • Inked Botanicals Designer Series Paper - 5 1/2 x 3 3/4, adhere to the card base.

  • Shaded Spruce - cut doily using the Delightful Doily Dies

  • Basic White, cut the 2nd from largest circle using the Stylish Labels Dies.

  • Stamp the bird with Black Memento Ink and sentiment with Calypso Coral Ink.

  • Color the bird with Calypso Coral and Crushed Curry and the leaves with Shaded Spruce Inks. I pressed clear blocks in the ink pads and then used a Wink of Stella Brush to pick up the ink and color the image. Make sure you clean the brush between colors by brushing it on a piece of scrap until it runs clear. Color the branch with a Light Crumb Cake Stampin’ Blends Marker.


  • Adhere the stamped circle to the doily and then adhere to the card with Dimensionals.

  • Add some Calypso Coral Iridescent Pastel Gems.

  • Tie a bow with a piece of Calypso Coral Braided Linen Trim and adhere with a Glue Dot.


On the inside layer (5 1/4 x 4) stamp the sentiment with Calypso Coral Ink. Stamp the branch with Black Memento Ink and color with Shaded Spruce and Crushed Curry Inks and Wink of Stella.


Supply List

You can click on the item to purchase it from my Online Store.

Sketch Challenge - Sea Turtle

This sweet card is for this week’s Splitcoaststampers Sketch Challenge. It’s simple but I used 3 stamp sets to make it.


Here’s the sketch I used. You can click on it to see the other cards made for this week’s challenge.


Tips & Instructions

  • Azure Afternoon Card Base - 4 1/4 x 11, score at 5 1/2 (top folding)

  • Basic White Layer - 5 x 3 3/4

  • Stamp the large water image from the Oceanfront Stamp Set with Balmy Blue Ink.

  • Ink up halve the next size water image with Azure Afternoon Ink and stamp below the Balmy Blue water.

  • Stamp the small turtle from the Sea Turtle Stamp Set with Garden Green Ink.

  • Stamp sentiment on a 1/2 strip of Basic White with Azure Afternoon Ink. The sentiment is from the Happy Labels Stamp Set. Punch one end using the Banners Pick A Punch and adhere to card with Dimensionals.

  • Add some Iridescent Pearls.


On the inside layer (5 1/4 x 4) stamp sentiment with Azure Afternoon Ink. Stamp the water along the bottom using the smallest water image, stamping and overlapping as you go. Stamp the starfish with Pecan Pie Ink and the school of fish with Azure Afternoon Ink.


Supply List

You can click on the item to purchase it from my Online Store.

Meandering Meadows Sympathy Card

I made this simple Sympathy Card using the Meandering Meadows Designer Series Paper and Seasonal Branches Stamp Set.


The Meandering Meadows paper is gorgeous. Each sheet has a beautiful, impressionistic look on one side and the other side has colorful abstract designs. This is one of the new Online Exclusives.


Tips & Instructions

  • Crushed Curry Card Base - 5 1/2 x 8 1/2, score at 4 1/4

  • Meandering Meadows Designer Series Paper - 5 1/4 x 4
    (Tip - cut a little off each side and the top andbottom to get the scene that you like. I wanted the sky area to be somewhat centered.)

  • Wrap piece of Linen Thread around the layer and adhere to the back of the layer. Adhere layer to card base.

  • Stamp sentiment with Shaded Spruce Ink on a 1/2 strip of Basic White. Punch both ends with the Banners Pick A Punch and adhere to the card with Dimensionals.

  • Tie bow with Linen Thread and adhere with a Glue Dot.


On the inside layer (5 1/4 x 4) stamp sentiment with Shaded Spruce Ink. Stamp branch with Early Espresso Ink and leaves with Shaded Spruce Ink.


Supply List

You can click on the item to purchase it from my Online Store.

Merry & Bright Holly Jolly Christmas Card

The Merry & Bright Bundle is so fun! You can stamp and cut these old fashion lights in any color you want. The tops and filaments were cut from Silver Foil.


The color combo that I used on this card is from my Inspiration Calendar - Blackberry Bliss, Berry Burst and Sweet Sorbet, so bright and cheery. You can get my Inspiration Calendar each month when you subscribe to my email list.


Tips & Instructions

  • Blackberry Bliss Card Base - 5 1/2 x 8 1/2, score at 4 1/4

  • Basic White Layer - 5 1/4 x 4, stamp sentiment at bottom right corner with Blackberry Bliss Ink.

  • Basic Black, cut the string for the lights using the Merry & Bright Dies.

  • Stamp the lights with Blackberry Bliss, Berry Burst and Sweet Sorbet Ink and cut with coordinating die.

  • Cut the tops and filaments from Silver Foil Sheets and adhere to the lights.

  • Feed 3 of the lights onto the string piece. Adhere the lights to the white layer using Dimensionals. I did this before adhering the string to the layer. Then add a tiny bit of glue to each end of the string to adhere it to the layer. Trim off any overhang and adhere the layer to the card base.

  • Adhere 2 more lights to the bottom left corner using Dimensionals on the top one.


On the inside layer (5 1/4 x 4) stamp the tops to the lights with Blackberry Bliss Ink and two lights with Berry Burst and Sweet Sorbet Ink. Stamp sentiment with Blackberry Bliss Ink.


Supply List

You can click on the item to purchase it from my Online Store.

Sketch Challenge - Festive & Fun

This is such a bright and fun card! I made it for this week’s Splitcoaststampers Sketch Challenge using the Festive & Fun Stamp Set. Don’t you just love that giraffe?


Here’s the sketch that I used. You can click on it to see the other cards posted for this week’s challenge.


Tips & Instructions

  • Poppy Parade Card Base - 5 1/2 x 8 1/2, score at 4 1/4

  • Merry Bold & Bright Designer Series Paper (striped pattern) - 4 3/4 x 3 1/2, round all the corners

  • Basic White - 4 1/4 x 3, round all corners. Stamp sentiment with Poppy Parade Ink at bottom right corner. Adhere to striped layer. Adhere layers to card base.

  • Basic White - 4 x 2, stamp image with Black Memento Ink. Color using Stampin’ Blends Markers. I used Poppy Parade, Shaded Spruce, Granny Apple Green, Copper Clay, Lemon Lolly and Crumb Cake.

  • Adhere to card with Dimensionals.

  • Poppy Parade and Basic White - cut 2 strips 3/4” wide and punch one end with the Banners Pick A Punch. Cut down to size and adhere just behind the stamped image.


On the inside layer (5 1/4 x 4) stamp sentiment with Poppy Parade Ink. Stamp the beaver and bird with Black Memento Ink. Color with Stampin’ Blends Markers. I used Crumb Cake, Poppy Parade and Lemon Lolly.


Supply List

You can click on the item to purchase it from my Online Store.

So Very Merry Christmas Card

This is the first time I’m using th So Very Merry Stamp Set and I love the images, they look like stained glass. I stamped the image on Vellum Cardstock and colored with Stampin’ Blends. The yellow really shines nicely with the gold layer behind it.


Tips & Instructions

  • Night of Navy Card Base - 5 1/2 x 8 1/2, score at 4 1/4

  • Shining Brightly Speciality Designer Series Paper - 5 1/4 x 4. Wrap piece of Night of Navy & Gold ribbon around the layer, adhere to the back and adhere layer to card base.

  • Stamp the angel image with Black Stazon Ink on a piece of Vellum Cardstock. Let the ink dry and then color with Stampin’ Blends Markers. I used Dark Night of Navy, Light Boho Blue, Light Lemon Lolly and Dark Crumb Cake.

  • Fussy cut the circle. You can punch it or die cut it but I didn’t have the right size circle so I fussy cut it.

  • Cut the second from largest circle from a piece of Gold Foil Sheet and the largest circle from Night of Navy using the Stylish Shapes Dies. Adhere the stamped vellum circle to the gold circle and then to the navy circle.
    Tip - To adhere the velum to the gold, add a very tiny bit of Liquid Glue to the just the edge of the vellum circle so the glue doesn’t show through.

  • Adhere the circles to the card using Dimensionals.

  • Tie bow with ribbon and adhere with a Glue Dot.

  • Cut sentiment label from Night of Navy using the Stylish Shapes Dies. Stamp sentiment with Versamark Ink and heat emboss with Gold Embossing Powder. Since the sentiment is curved, you can stretch it across my clear block to get it straight. Adhere label to card with Dimensionals.

  • Add a gold Blooming Pearl to the sentiment label.


The gold accents in the paper along with the gold embossing and gold circle really give the card an elegant look.


On the inside layer (Basic White 5 1/4 x 4) stamp the sentiment with Versamark Ink and heat emboss with Gold Embossing Powder. The sentiment is from the Night Divine Stamp Set. Add a 4 x 3/4 strip of the Shining Brightly Specialty Paper.


Supply List

You can click on the item to purchase it from my Online Store.

Sketch Saturday - Garden Meadow

Here’s my card for this week’s Atlantic Hearts Sketch Challenge using new Online Exclusive Products. The Meandering Meadow Suite has gorgeous Designer Series Paper and a great stamp set with coordinating dies.

These products will be available for purchase starting November 7, 2023


This is the sketch I used for this week’s challenge.


Tips & Instructions

  • Night of Navy Card Base - 5 1/2 x 8 1/2, score at 4 1/4

  • Basic White Layer - 5 1/4 x 4, emboss using the crosshatch folder from the Basics 3D Embossing Folders.

  • Wrap a piece of Night of Navy & Gold Ribbon around the layer and adhere to the back. Adhere layer to card base.

  • Cut the scene from the Meandering Meadow Designer Series Paper using the Garden Meadow Dies. Place the die on the area you want to cut so you get the portion of the scene that looks best for the card. Adhere to card using Dimensionals.

  • Stamp sentiment with Night of Navy Ink on scrap of Basic White and punch with the Double Oval Punch.

  • Punch a scrap of Night of Navy with the scalloped oval on the Double Oval Punch.

  • Adhere the stamped label to the navy label and adhere to card. I put one Dimensionals on the end that sits on the white embossed layer and liquid glue on the part that sits on the scene.

  • Add some blue Tinsel Gems to the label.


Isn’t this paper gorgeous. It looks like a watercolor painting.


On the inside layer (5 1/4 x 4) stamp sentiment with Night of Navy Ink and add a 3/4 strip of the Designer Series Paper to the bottom.


Supply List

You can click on the item to purchase it from my Online Store.

NOTE: The new Meandering Meadow products will be available for purchase starting November 7, 2023.

Fun Z-Fold Gift Card Holders

Do you need lots of Gift Card Holders for the holidays? Every Friday in the month of November I’m going to demonstrate how to make a different Gift Card Holder. This one is a Z-Fold Gift Card Holder and they are so easy to make.


Watch the video for step-by-step instructions to make this design. Click the Project Sheet Button to get a printable pdf with the pictures, measurements and instructions.


This card was made with the Winter Meadow Designer Series Paper and Magical Meadow Stamp Set.


This card was made with the Merry Bold & Bright Designer Series Paper and Merry & Bright Stamp Set.


Supply List

You can click on the item to purchase it from my Online Store.

Year To Celebrate

The Year To Celebrate Stamp Set has such fun images. I used it to make this simple Congrats Card with colors from my weekly color combo.


The color combo is from my Inspiration Calendar - Poppy Parade, Lemon Lolly and Lemon Lime Twist. You can get my calendar each month when you subscribe to my email list.


Tips & Instructions

  • Lemon Lime Twist Card Base - 5 1/2 x 8 1/2, score at 4 1/4

  • Poppy Parade Layer - 5 1/8 x 3 7/8

  • Basic White Layer - 5 x 3 3/4

  • Stamp the party blowers on the white layer with Poppy Parade, Lemon Lime Twist and Lemon Lolly Inks leaving a space for the sentiment.

  • Adhere the stamped layer to the Poppy Parade Layer and then to the card base.

  • Cut label using the smallest die from the Nested Essentials Dies from Basic White.

  • Stamp sentiment on the label with Poppy Parade Ink and adhere to the card with Dimensionals.

  • Add some Adhesive-Backed Solid Gems


On the inside layer (5 1/4 x 4) stamp sentiment with Poppy Parade Inkand party blower with Lemon Lime Twist and Lemon Lolly Inks.


Supply List

You can click on the item to purchase it from my Online Store.

Sketch Challenge - Merriest Trees

Here’s my card for the weekly Splitcoaststampers Sketch Challenge. I used the Merriest Christmas Bundle which is really cool. The dies will cut 5 layers of the tree that you can layer on top of each other and add Dimensionals to really give it some fullness.


Here’s the sketch for this week. I’m curious to see how many cards have a Christmas tree as the focal. You can click on the sketch to see the other cards posted for this week’s challenge.


Tips & Instructions

  • Pretty Peacock Card Base - 5 1/2 x 8 1/2, score at 4 1/4

  • Basic White Layer - 5 1/4 x 4, emboss using the Snowflake Sky 3D Embossing Folder and adhere to the card base.

  • Stamp the tree 5 times with Pretty Peacock Ink on Basic White. You don’t have to do the full tree as you go if you don’t want to.

  • Stamp the detailed tree on top of each of the stamped trees with Versamark Ink and emboss with White Embossing Powder.

  • Cut each tree with the 5 dies using the largest to the smallest They will look like this.


  • Layer the trees on top of each other starting with the largest. I put Dimensionals at the bottom edge of each layer and liquid glue on the rest of each layer to just pop up the bottom. For the last little piece I put just Dimensionals.

  • Cut the tree basket from a piece of Pebbled Path and adhere to the bottom of the card.

  • Cut 2 strips of Pretty Peackock to 1/2'“ and stamp the sentiments with Versamark Ink. Heat emboss with White Embossing Powder. Punch one end with the Banners Pick A Punch. Trim down and adhere to the top of the white layer.

  • Adhere the tree on the card so it sits in the basket.


On the inside layer (5 1/2 x 4) stamp the tree-shaped sentiment with Pretty Peacock Ink and stamp some snowflakes across the top with Balmy Blue Ink.


Supply List

You can click on the item to purchase it from my Online Store.

Berry Harvest Sympathy Card

I love how this card turned out. I used the Berry Harvest Background Stamp and embossed the entire image with Black Embossing Powder. Next I colored the berries and leaves with ink and Wink of Stella. So pretty!


Tips & Instructions

  • Crumb Cake Card Base - 5 1/2 x 8 1/2, score at 4 1/4

  • Crumb Cake Layer - 5 1/4 x 4, stamp the Berry Harvest Image with Versamark Ink. (Tip, I used my stamp positioning tool to stamp the image.)

  • Heat emboss with Black Embossing Powder. Make sure the powder is melted on the entire image. Look at it in good light to see that everything is shiny.

  • Color the Berries with Blackberry Bliss Ink and the leaves with Old Olive Ink and Wink of Stella. To do this press a clear block into the ink pad and then pick up ink with the Wink of Stella brush and paint the image. Clean off the ink from the brush by brushing it on scrap paper until it runs clear.


  • Using a Dark Old Olive Stampin’ Blends Marker color the tiny leaves at the top of the berries.

  • Wrap Linen Thread around the layer 3 times and adhere it to the back. Adhere layer to card base.

  • Stamp sentiment with Versamark Ink on scrap of Crumb Cake and heat emboss with Black Embossing Powder. Punch with the Double Oval Punch and adhere to the card with Dimensionals.

  • Tie bow with Linen Thread and adhere with a Glue Dot.

  • Add a black Adhesive-Backed Sparkle Gem to the sentiment label.


I wish you could see this in person. The Wink Of Stella adds so much sparkle to the image. The picture just doesn’t do it justice.


The inside layer is very simple. I cut a 5 1/4 x 4 piece of Crumb Cake and stamped the sentiment with Black Memento Ink. You can emboss it with Black Embossing Powder as an alternative. I wanted room to write a note to my friend who’s husband just passed.


Supply List

You can click on the item to purchase it from my Online Store.

Crossover Gatefold Cards

These Crossover Gatefold cards are so fun! I made one vertical and one horizontal so you can choose which one to make, or make them both!


Watch the video to see step-by-step instructions and then click the Project Sheet to print and save the measurements and instructions.


I made the vertical card using A Walk In The Forest Designer Series Paper and Merriest Trees Bundle. I love how the tree sits above the bottom panel


This cute little bear is from the Beary Cute Designer Series Paper. I cut the bear on the iceberg and some other icebergs to get the bottom panel.


Supply List

You can click on the item to purchase it from my Online Store.

Translucent Florals Birthday Card

The flowers in the Translucent Florals stamp so beautifully. It was easy to make my own background with this set and these beautiful colors.


The colors are from my Inspiration Calendar - Pool Party, Orchid Oasis and Fresh Freesia. Aren’t they pretty together. You can get my Inspiration Calendar each month when you subscribe to my email list.


Tips & Instructions

  • Orchid Oasis Card Base - 5 1/2 x 8 1/2, score at 4 1/4

  • Basic White Layer - 5 1/4 x 4

  • Stamp the floral images to create a background pattern starting with the largest image, then the next size and finally the smallest. I used Orchid Oasis for the large flower, Fresh Freesia for the smaller flower and Pool Party for the leaves. Stamp off the edge to give it a natural look.

  • Wrap White Iridescent Ribbon around the stamped layer adhere it to the back. Adhere layer to the card base.

  • Stamp sentiment on scrap of Basic White with Orchid Oasis Ink and cut with the smallest rectangle Nested Essentials Dies.

  • Cut a scrap of Orchid Oasis using the next size up rectangle and adhere behind the stamped label. Adhere to card with Dimensionals.

  • Tie bow and adhere with a Mini Glue Dot.

  • Add some Fresh Freesia Tinsel Gems.


On the inside layer (5 1/4 x 4) stamp sentiment and large flower with Orchid Oasis Ink and small flower with Fresh Freesia Ink.


Supply List

You can click on the item to purchase it from my Online Store.

Sketch Challenge - So Sincere

I just love the All About Autumn Designer Series Paper and it’s finally back in stock! YAY!!! The pretty leaf focal piece is one side and the strips behind it with the Copper Foil accents is the other side of the paper.


I made the card for this week’s Splitcoaststampers Sketch Challenge. Here’s the sketch I used. Click on it to see other projects posted for this week’s challenge.


Tips & Instructions

  • Copper Clay Card Base - 5 1/2 x 8 1/2, score at 4 1/4

  • Very Vanilla Layer - 5 1/4 x 4

  • All About Autumn Designer Series Paper - 2 strips cut to 4 x 1, adhere to Very Vanilla Layer and adhere layer to card base.

  • All About Autumn Designer Series Paper - leaf picture cut to 4 1/4 x 3, adhere to card at an angle.

  • Cut leave from the Designer Series Paper using Autumn Leaves Dies and adhere with Dimensionals.

  • Cut sentiment label from a scrap of Very Vanilla. Stamp sentiment from the So Sincere Stamp Set with Copper Clay Ink. Adhere to card with Dimensionals.

  • Add some Adhesive-Backed Speckled Dots.


On the inside layer (Very Vanilla 5 1/4 x 4) stamp sentiment with Copper Clay Ink and adhere another leaf cut using the Autumn Leaves Dies.


Supply List

You can click on the item to purchase it from my Online Store.

Sketch Saturday - Pick Of The Patch

This is the card that I made for this week’s Atlantic Hearts Sketch Challenge. I love fall colors and this card really lends itself to showing them off!


Here’s the sketch for the challenge. So simple but by your color choice you can make it for lots of occasions; bright for birthday, reds and greens for Christmas, red white and blue for July 4th, etc.


Tips & Instructions

  • Crushed Curry Card Base - 5 1/2 x 8 1/2, score at 4 1/4

  • Very Vanilla Layer - 5 1/4 x 4

  • Strips of cardstock - 4 x 1/4 (I used Cajun Craze, Crushed Curry, Blackberry Bliss and Pumpkin Pie),

  • Put adhesive on the Very Vanilla Card Base and lay out the strips following a color pattern and shifting the strips up and down.
    (Note: I did it this way and ended up crooked so I cut off the Very Vanilla background layer, cutting around the strips. Then I adhered the piece to another Very Vanilla Layer making sure they looked straight and centered. Soooo, you may want to just adhere the pieces to a small piece of cardstock to get them lined up and then adhere to the Very Vanilla Layer - hope this makes sense.)

  • Blackberry Bliss Strip - 4 1/2 x 1

  • Very Vanilla Strip - 4 1/2 x 1/2. Stamp sentiment with Blackberry Bliss Ink. Adhere to the Blackberry Bliss strip.

  • Adhere the sentiment strip to the layer on an angle and trim off the edges that hang over. (Tip - trim from the back.)

  • Cut leaf from Crushed Curry using the Autumn Leaves Dies and adhere with a Dimensional.

  • Adhere layer to card base.


I love how this turned out, such a pretty Autumn card!


On the inside layer (Very Vanilla — 5 1/4 x 4) adhere 4 x 1 strips of the cardstock at the bottom. Cut another leaf from Cajun Craze and adhere to the top corner.


Supply List

You can click on the item to purchase it from my Online Store.