Cute Baby Card using Happier Than Happy

I made this adorable baby card for an upcoming baby shower using the Happier Than Happy Bundle along with the Happy Forest Friends Designer Series Paper.


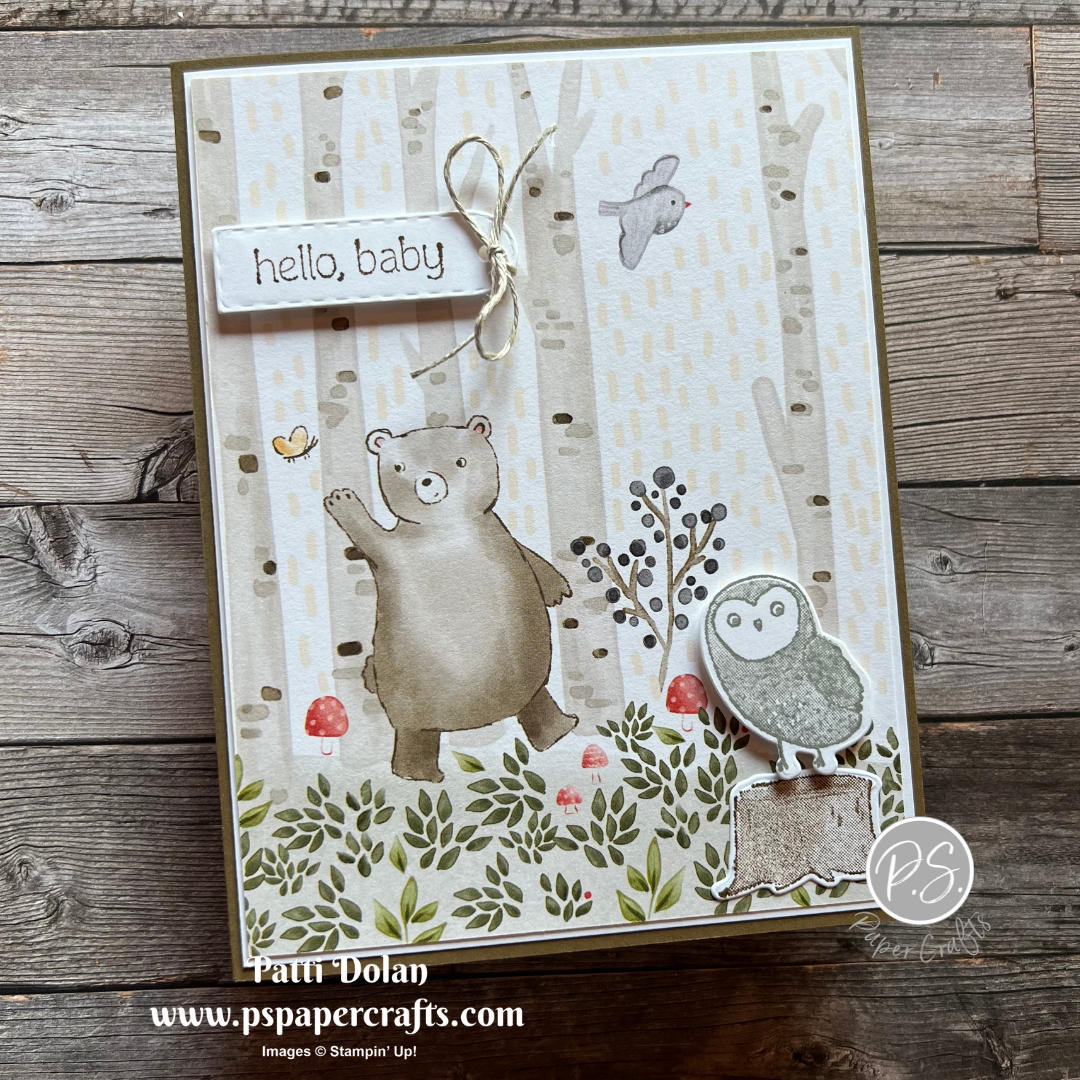
These products have the cutest images! You can purchase the stamp set and the dies separately or bundle them together and save 10%.


I love all the patterns in the Happy Forest Friends Designer Series Paper.


Tips & Instructions

  • Soft Sueded Card Base - 5 1/2 x 8 1/2, score at 4 1/4

  • Basic White Layer - 5 3/8 x 4 1/8, adhere to the card base.

  • Happy Forest Friends Designer Series Paper - 5 1/4 x 4, adhere to card.

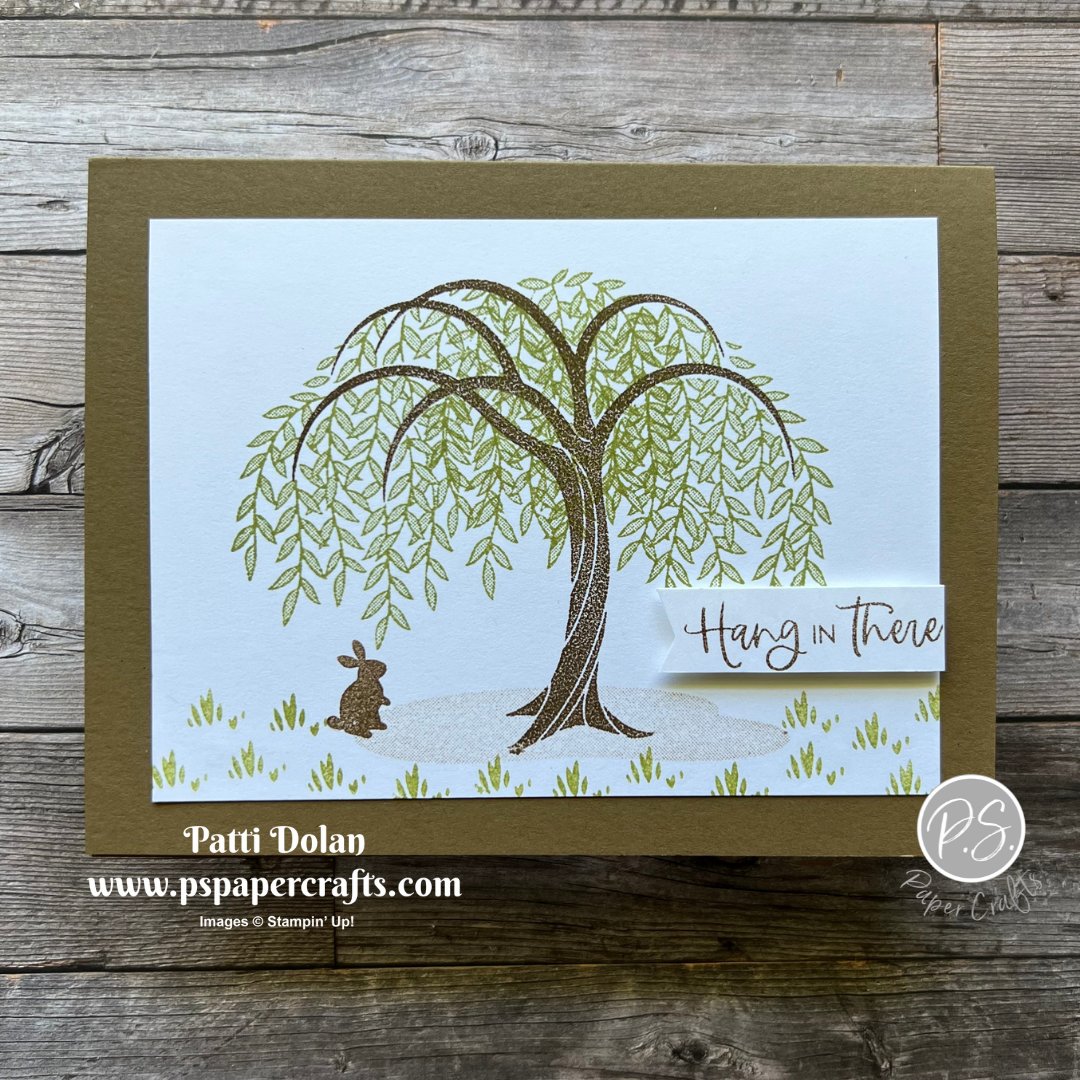
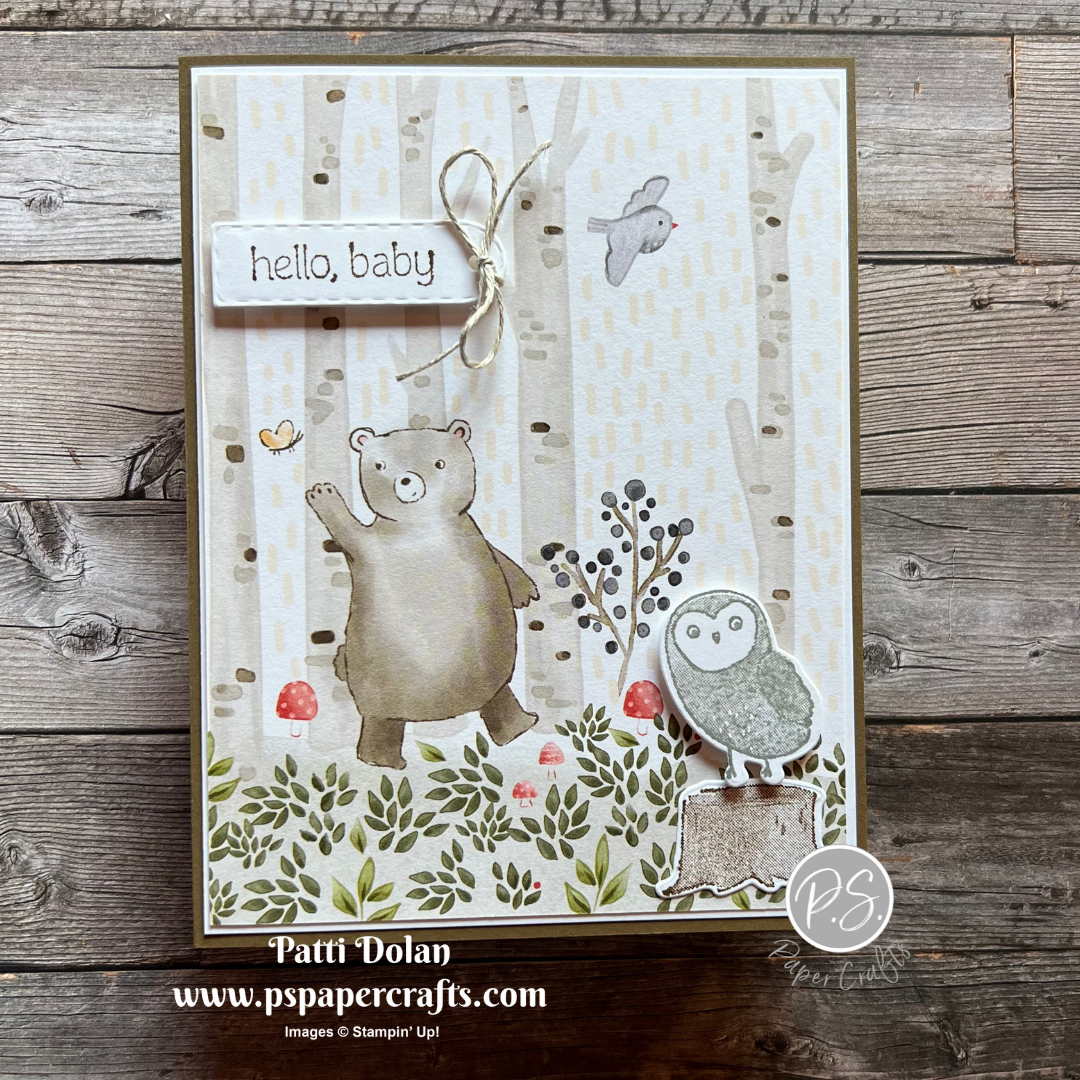
  • Stamp stump with Soft Suede Ink and owl with Smoky Slate Ink and cut with coordinating dies. Adhere stump to card flat and adhere the owl using Dimensionals.

  • Stamp sentiment with Soft Suede Ink and cut using the label die from the set. Tie bow through the hold with Linen Thread. Adhere to card using Dimensionals.


Don’t forget to decorate the envelope. I cut a piece of the Designer Series Paper 6 x 2 1/2 adhered it to the envelope flap and then trimmed off the excess.


On the inside layer stamp the sentiment with Soft Suede Ink. The sentiment is from the Charming Sentiments Stamp Set. Stamp the butterfly and fox with Calypso Coral Ink. Stamp the ground with Soft Suede Ink and the trees with Old Olive Ink.


Supply List

You can click on the item to purchase it from my Online Store.

Sketch Saturday - Splendid Thoughts

For this week’s sketch challenge I decided to make a card for the Fourth of July. There’s red, white and blue along with stars and stripes!


The sketch I used is from the weekly Atlantic Hearts Sketch Challenge. This was a fun one and I love all the cards that have been posted. These challenges are great and everyone comes up with such different ideas.


Tips & Instructions

  • Night Of Navy Card Base - 5 1/2 x 8 1/2, score at 4 1/4

  • Basic White Layer - 5 1/4 x 4

  • Using the Stylish Shapes Dies, cut the largest circle from Night Of Navy Cardstock, the next size down from Real Red Cardstock and the next size down the Basic White Cardstock.

  • Emboss the red circle using the Stripes 3D Embossing Folder.

  • Arrange and adhere circles to white layer and adhere layer to card base.

  • Punch stars from Basic White Cardstock using the Starlit Punch and adhere to blue circle.

  • Stamp sentiment with Night Of Navy Ink on Basic White Cardstock and cut banner using the Stylish Shapes Dies. Adhere to card using Dimensionals.


On the inside layer stamp sentiment with Night Of Navy Ink. Cut 1 1/2 x 1 1/2 square from Night Of Navy Cardstock and cut in half diagonally. Adhere to bottom corners on layer. Punch starts from Basic White Cardstock using the Starlit Punch adhere to triangles.


Supply List

You can click on the item to purchase it from my Online Store.

Cute Hippest Hippos Card

I made this adorable birthday card for my granddaughter’s birthday using the cute Hippest Hippos Stamp Set. She’s turning 2 and we’re going to the zoo for her birthday. I thought this stamp set would be perfect for her card.


The Hippest Hippos Stamp Set is a free during Sale-a-bration with a $50 product order. There are coordinating dies that you can earn for free as well.


Tips & Instructions

  • Thick Basic White Card Base - 5 1/2 x 8 1/2, score at 4 1/4

  • Fresh Freesia Cardstock - cut using the largest scalloped rectangle from the Scalloped Contours Dies. Weave a piece of Fresh Freesia Open Weave Ribbon through the scallops and tie a bow. Adhere to card base.

  • Cut Basic White Cardstock using the next sized down Scalloped Contours Dies.

  • Stamp hippo with Black Memento Ink and color using Light Smoky Slate, Light Petal Pink and Dark & Light Fresh Freesia Stampin’ Blends.

  • Stamp sentiment (from A Grand Kid Stamp Set using Fresh Freesia Ink.

  • Adhere stamped layer to card using Foam Adhesive Sheet (cut to size) or Dimensionals.

  • Add some Fun Flowers Resin Shapes.


On the inside layer stamp hippo with Black Memento Ink and color with Stampin’ Blends (Light Smoky Slate, Light Petal Pink, Light & Dark Fresh Freesia and Light Parakeet Party). Stamp sentiments with Fresh Freesia Ink. I used the sentiments from both the Hippest Hippos and A Grand Kid Stamp Set.


Supply List

You can click on the item to purchase it from my Online Store.

He's The Man - Cheers To The Years Card

I made this quick birthday card for my Son-In-Law’s birthday, which is today. I’ve been working to set up my temporary craft room before I make my final move and didn’t have much time.

I went back to a prior card to get the measurements to make this Book Binding Card. They are so easy to do and I think make a fun card.


The He’s The Man Specialty Designer Series Paper has such great patterns for masculine cards and the two sheets of die cuts are great for a variety of themes. You can easily make a card without even stamping!


Tips & Instructions

  • Early Espresso Card Base - 4 1/4 x 11, score at 4 1/4 and 5 1/2

  • He’s The Man Specialty Designer Series Paper - 4 x 4 and diagonal striped pattern 4 x 1. Adhere to card base.

  • Adhere the inside of the left part of the card together to create the book binding look.

  • Basic White Cardstock - 3 x 3, emboss using the Hive 3D Embossing Folder and add some Cajun Craze Ink with a Blending Brush. Adhere to card.

  • Punch our the sentiment die-cut and adhere to card using Dimensionals.

  • Add some Rustic Metallic Adhesive Backed Dots to binding and card front as desired.


Cut Basic White to 4 x 4 for the inside layer and add a 3/4 x 1 strip of Designer Series Paper. Stamp sentiment with Early Espresso Ink.


The sentiment is from the Charming Sentiments Stamp Set which is a great set to have in your craft room.


Supply List

You can click on the item to purchase it from my Online Store.

Wisteria Wishes Hello Card

I love using Designer Series Paper for die cutting flowers. I cut the pretty wisteria from the Texture Chic Specialty Paper. The flowers were cut from the same piece that I used for the border. The variation in color is beautiful!


The Wisteria Wishes Stamp Set can be bundled together with the Wisteria Dies and you can save 10% when you bundle them. The images are beautiful and you can use them hanging or upright like I did for this card.


The Texture Chic Specialty Designer Series Paper has patterns that feature gold foil on one side and a distressed, aged look on the other.


Tips & Instructions

  • Evening Evergreen Card Base - 5 1/2 x 8 1/2, score at 4 1/4

  • Gold Foil Sheet - 5 1/4 x 4, adhere to card base.
    (Tip - cut inside of foil sheet using a die to save for another project. It will be covered by other layers.)

  • Basic White Layer - 5 x 3 3/4. Stamp 3 stems with leaves using Evening Evergreen Ink leaving room for the border piece on the left. Adhere to Gold Foil Sheet.

  • Cut 3 flowers from the Designer Series Paper. Adhere 2 flat at the top of the stems and the center one with Dimensionals.

  • Stamp sentiment (from the Lovely & Lasting Stamp Set) on 1/2 strip of Basic White with Evening Evergreen Ink. I inked up only the “hello” from the stamp. Punch one end with the Banners Pick A Punch.

  • Texture Chic Specialty Designer Series Paper - 5 1/4 x 1, adhere to left side of card front, slipping the sentiment under it and adhere to card.

  • Add some Brushed Brass Butterflies.


On the inside layer stamp leaves from the Wisteria Wishes Stamp Set and the sentiment from the Lovely & Lasting Stamp Set with Evening Evergreen Ink.


Supply List

You can click on the item to purchase it from my Online Store.

Sketch Saturday - Artistically Inked

I had to really think on the products to use for this week’s sketch challenge. I wanted a die that would give a nice outline for an image and found it with the Artistic Dies.

After die cutting with Basic Black Cardstock, I adhered the piece to Petal Pink Cardstock and fussy cut around it.


The sketch is from the Atlantic Hearts Sketch Challenge. This was a fun one to do.


Tips & Instructions

  • Basic Black Card Base - 5 1/2 x 8 1/2, score at 4 1/4

  • Basic White Layer - 5 1/4 x 4, emboss using the Quatrefoil Tile Embossing Folder and adhere to card base.

  • Basic Black Cardstock - cut using the large die from the Artistic Dies and adhere to Petal Pink Cardstock using Liquid Glue.

  • Fussy cut around the die cut piece. I cut very close to the black and cut underneath the edge as much as possible. Adhere to card using Dimensionals.

  • Stamp sentiment on 3/4 strip of Basic Black Cardstock using Versamark Ink. Heat Emboss with White Embossing Powder.

  • Punch one end using the Banners Pick A Punch.


On the inside layer stamp sentiment with Black Memento Ink and leaves with Pear Pizzazz Ink. The sentiment is from the Potted Geraniums Stamp Set.


Supply List

You can click on the item to purchase it from my Online Store.

How To Make Beautiful Wisteria Flowers with Glimmer Paper

I’m so happy with how this card turned out. I used the Wisteria Dies to cut the flowers and leaves from Glimmer Paper. Tahitian Tide Ink was lightly blended on the background layer.


In the video I’ll show you these products and how to make this card.


The Wisteria Wishes Stamp Set has some great sentiments. The Wisteria Dies cut some of the stamped images and there are some that are intricate and can be used on their own. If you bundle the stamp set and the dies, you can save 10%.


Tips & Instructions

  • Starry Sky Card Base - 5 1/2 x 8 1/2, score at 4 1/4

  • Basic White Layer - 5 1/4 x 4, lightly blend Tahitian Tide Ink using a Blending Brush.

  • Cut 2 sets of leaves from Parakeet Party Glimmer Paper using the Wisteria Dies.

  • Cut flowers from Starry Sky and Orchid Oasis Glimmer Paper using Wisteria Dies.

  • Arrange and adhere flowers and leaves.
    Tip - cut one set of leaves in halve and trim off some of the branches.

  • Cut label from Starry Sky Cardstock using the Stylish Shapes Dies.

  • Stamp sentiment with Versamark Ink and heat emboss with White Embossing Powder.

  • Adhere sentiment with Dimensionals.

  • Add an Iridescent Pearl to label.


On the inside layer stamp sentiment with Starry Sky Ink and leaves on both sides with Parakeet Party Ink.


Supply List

You can click on the item to purchase it from my Online Store.

Sketch Saturday - Abigail Rose

The Abigail Rose Designer Series Paper worked so well for the design for this week’s sketch challenge.


The sketch is another one from the Atlantic Hearts Sketch Challenge. I played around with some scrap paper to figure out the angle before I cut into the Designer Series Paper.


Tips & Instructions

  • Early Espresso Card Base - 5 1/2 x 8 1/2, score at 4 1/4

  • Abigail Rose Designer Series Paper (dark pattern) - 5 1/4 x 4, adhere to card base

  • Abigail Rose Designer Series Paper (light pattern) - 5 1/4 x 4, cut left side and bottom at an angel and adhere to card.

  • Stamp flower with Early Espresso Ink and 2 sets of leaves with Mossy Meadow Ink. Cut with coordinating Cottage Flower Dies.

  • Color flower with Dark Petal Pink Stampin’ Blends Marker.

  • Adhere leaves to card with Liquid Glue and flower with Dimensionals.

  • Stamp sentiment on 3/4 strip of Basic White Cardstock with Early Espresso Ink. Cut to size and adhere to card with Dimensionals.

  • Add some Iridescent Pearls.


On the inside layer stamp the large flower with Early Espresso Ink.


Supply List

You can click on the item to purchase it from my Online Store.

Simple Suite Stampers Tutorial - In Colors / Tea Boutique

This month’s Simple Suite Stampers Tutorial Bundle is out and I made 2 of the cards from the tutorial on my video. We featured the new In Colors and Tea Boutique Suite; what a great combination!


Watch the video to see how to make these two pretty cards and to hear more about the tutorial bundle. You can get the bundle for free when you order from my Online Store or you can purchase the bundle by going to the Tutorials Button at the top of this blog post.


This is the card that I designed for the tutorial bundle. I love this pattern on the Tea Boutique Designer Series Paper. I used the Basic Borders Dies to create the scalloped edge and the Fabulous Frames Dies for the framed sentiment label.


The inside layer has a scalloped edge to coordinate with the card front.


This card was designed by Margaret Knight and I knew I wanted to make it when I saw the pretty floral design on the Designer Series Paper. It’s a simple card with some nice touches to dress it up. The sentiment is from the Cottage Rose Stamp Set and the label was cut using the Stylish Shapes Dies.


On the inside layer I stamped the flowers across the bottom with Parakeet Party and Sweet Sorbet Ink.


The Simple Suite Stampers Tutorial Bundle is chock full of inspiration. There are 12 projects designed by Stampin’ Up! Demonstrators with pictures, measurements and instructions.

When you place an order from my Online Store in June, I will send you this tutorial for free. You can also purchase the tutorial by clicking the Tutorials Button at the top of this post.


Supply List

You can click on the item to purchase it from my Online Store.

Special Anniversary Card using Willow Tree

This month is my daughter’s wedding anniversary and I decided to make a card using the Willow Tree Stamp Set.


She was married at a winery in Upstate NY under a willow tree so there is special meaning to it. She had a picture of her and her dad, who passed a way a few years earlier, under the tree. The picture was of her in her wedding dance costume dancing with her Dad at a dance recital on Father’s Day. We never realized years later how important that picture would become.


Tips & Instructions

  • Early Espresso Card Base - 5 1/2 x 8 1/2, score at 4 1/4

  • Basic White Cardstock - 5 1/2 x 4 1/4, cut using the largest Scalloped Contours Dies.

  • Stamp the sentiment with Garden Green Ink at the bottom of the scalloped layer.

  • Stamp tree with Early Espresso and leaves with Garden Green Ink.

  • Stamp ground with Early Espresso Ink, stamping off first to get a lighter shade.

  • Cut 3 hearts from Real Red Cardstock using the Sweet Hearts Dies and adhere to card.

  • Add a Hearts Pearl to the center of each heart.


On the inside stamp the sentiment with Early Espresso Ink and the greenery with Garden Green Ink. I used the Forever Fern Stamp Set because I liked the sentiment and thought the leaves went with the willow tree.


Supply List

You can click on the item to purchase it from my Online Store.

Sketch Saturday - Butterfly Kisses

Today’s card for this week’s sketch challenge has a bright and fun pattern. I used the Butterfly Kisses Designer Series Paper and the pattern worked perfectly for the sketch.


Here’s the sketch I used. It’s from the weekly Atlantic Hearts Sketch Challenge. This was a fun one to do!!!


Tips & Instructions

  • Starry Sky Card Base - 5 1/2 x 8 1/2, score at 4 1/4

  • Basic White Layer - 5 1/4 x 4

  • Butterfly Kisses Designer Series Paper Layer - 5 1/8 x 3 7/8

  • Basic White Strip - 5 1/8 x 1

  • Butterfly Kisses Designer Series Paper Strip - 5 1/2 x 7/8 having the pattern going the opposite way. You will trim this down to 5 1/8.

  • Adhere layers to card base and strips to card. Make sure you line up the pattern to line up to to the background layer pattern. I cut the strip a little longer to be able to get it where it lined up.

  • Stamp sentiment from Cottage Rose Stamp Set on strip of Basic White Cardstock and cut using the Stylish Shapes Dies. Adhere to card.

  • Cut circle from Basic White Cardstock using the Stylish Shapes Dies and adhere to card.

  • Fussy cut butterfly from Designer Series Paper and adhere to circle using Dimensionals.


On the inside layer stamp sentiment with Starry Sky Ink. Cut 2 triangle pieces from the Designer Series Paper and adhere to corners.


Supply List

You can click on the item to purchase it from my Online Store.

Simple Willow Tree Card

This card was so easy to make, just cardstock, ink and stamps. I love the willow tree and the cute little bunny.


The Willow Tree Stamp Set has an image for the tree and the branches fit right over it. There are dies for this set and for some reason I didn’t order them. I will definitely be ordering them in the future!


Tips & Instructions

  • Soft Suede Card Base - 5 1/2 x 8 1/2, score at 4 1/4

  • Basic White Cardstock - 4 3/4 x 3 1/2

  • Stamp tree with Soft Suede Ink.

  • Stamp ground with Crumb Cake Ink.

  • Stamp large set of leaves with Pear Pizzazz Ink making sure to line up with the tree branches. Stamp the smaller set of leaves over the top of the tree to fill in to top area.

  • Stamp bunny with Soft Suede Ink.

  • Stamp grass around the bottom with Pear Pizzazz Ink.

  • On a 1/2” strip of Basic White Cardstock stamp sentiment with Soft Suede Ink and banner one end. I used the Banners Build A Punch to do this. The sentiment is from the Wisteria Wishes Stamp Set.

  • Adhere the sentiment label using Dimensionals.


On the inside layer stamp part of the tree, leaves, ground and bunny with the same colors you used on the card front.


Supply List

You can click on the item to purchase it from my Online Store.

Abigail Rose W Fold Card

This is such a fun card to make. It’s called a W Fold and I found it featured on the Splitcoaststampers site and decided to CASE it. It was designed by Mary Deatherage.

I used the Abigail Rose Designer Series Paper and Cottage Rose Bundle for my card.


Watch the replay of my YouTube Live to see how easy it is to make this card once you have the measurements figured out. You can get all the measurements and instructions in the Project Sheet; just click the button below.


You can make this card either as a landscape or portrait design. Just remember to cut your Designer Series Paper in the correct direction and adhere your inside layers in the right direction.

This one is the landscape (horizontal) version.


For the inside sentiment I used the a stamp from the Potted Geraniums Stamp Set. I wanted to use this for a wedding and searched my stamps to find the right sentiment.


I made the same card but in the portrait (vertical) version.


Supply List

You can click on the item to purchase it from my Online Store.

Sketch Saturday - He's All That

The He’s The Man Designer Series Paper has such great patterns for masculine cards, perfect for Father’s Day which is just a few weeks away. This is my card for this week’s sketch challenge.


I followed the sketch from this week’s Atlantic Hearts Sketch Challenge to make my card. I love doing their sketch challenges. You can play along. Click the sketch to head over to the challenge.


Look at these great patterns in the He’s The Man Designer Series Paper. You get two sheets of die cuts and 10 sheets of double-sided patterned paper with great themes for guy cards.


Tips & Instructions

  • Sahara Sand Card Base - 5 1/2 x 8 1/2, score at 4 1/4.

  • He’s The Man Designer Series Paper - 5 1/2 x 4 (BBQ pattern) and 5 1/4 x 1 1/2 strip. Adhere to card base.

  • Basic Black - 4 x 3/4 strip, emboss using Hive 3D Embossing Folder and adhere to card.

  • Basic Black - cut using label die from All That Dies.

  • Basic White - stamp sentiment with Black Memento Ink and cut using oval die from All That Dies. Adhere to black label and adhere to card over embossed strip.

  • Adhere grill to card using Dimensionals (only put them on the grill part, not the flame).


On the inside layer stamp sentiment with Black Memento Ink and adhere stars die cut below the sentiment.


Supply List

You can click on the item to purchase it from my Online Store.

4 Easel Fun Fold Cards

I made these 4 Easel Cards using different stamp sets and Designer Series Paper. I love how they all turned out. It’s fun to use the same design but change up the stamps and paper to get a completely different look!

There’s a Project Sheet with instructions for each card. Click the button to get an online version that you can save or print.


Watch the video to see me make the Flowering Rain Boots Card and hear about the other cards and products used.


The boots with daffodils from the Flowering Rain Boots Bundle is a taller focal piece so I made this from a top folding card. This is the one I make in the video.


This is a beautiful card that can be used for a wedding or birthday. I used the Cottage Rose Bundle along with the Abigail Rose Designer Series Paper.


This cute Thanks card was made using the Happier Than Happy Bundle and Happy Forest Friends Designer Series Paper. This paper has such cute patterns.


This is a perfect masculine card for Father’s Day or a Birthday. I used the He’s The Man Designer Series Paper which has great die cut pieces included.


Supply List

You can click on the item to purchase it from my Online Store.

Card #1

Card #2

Card #3

Card #4


Sketch Saturday - Quiet Meadow

I love the Split Card Textures Dies and thought it would work perfectly for this week’s sketch challenge.


The sketch is from the Atlantic Hearts Sketch Challenge. This was a fun one to do. I love seeing what other crafters made for the challenge. It’s amazing all the different ideas. Click the button below the sketch to see the other cards. Play along if you want…it’s fun!


Tips & Instructions

  • Parakeet Party Card Base - 5 1/2 x 8 1/2, score at 4 1/4

  • Butterfly Kisses Designer Series Paper - 5 1/4 x 4, cut using the Split Card Textures Dies and adhere to card base.

  • Cut 3 butterflies from the Butterfly Kisses Designer Series Paper using the Meadows Dies.
    Tip - to get the butterfly facing the other way, cut by putting the die on the reverse side of the patterned paper.

  • Adhere the butterflies using Mini Dimensionals.

  • Stamp sentiment on scrap of Basic White Cardstock with Calypso Coral Ink, cut with label die in die set and adhere to card using Dimensionals.

  • Add 2 Rhinestones to the larger butterfly and one to the sentiment.


On the inside layer stamp the sentiment with Calypso Coral Ink. Cut 2 butterflies from the Designer Series Paper and adhere to layer.


Supply List

You can click on the item to purchase it from my Online Store.

Simple Olive Branch Sympathy Card

I used the Olive Branch and Bottled Happiness Stamp Sets to create this pretty Sympathy Card.


Watch the video to see the steps to make this card. I just love the way these olive branches stamp, lots of variation in color.


The Olive Branch Stamp Set has the large and small olive branches and some great sentiments. I think the thank you sentiment is perfect for an “olive branch”.


The Bottled Happiness is a great stamp set and you can use the bottle for a vase, wine bottle, message in a bottle or olive oil bottle!


Tips & Instructions

  • Old Olive Card Base - 5 1/2 x 8 1/2, score at 4 1/4

  • Very Vanilla Layer - 5 x 3 3/4

  • Stamp large olive branch and small olive branches using Old Olive Ink.

  • Stamp bottle with Crumb Cake Ink, stamping the outline direct and then the filler but stamp off first to get a lighter shade.

  • Stamp sentiment with Crumb Cake Ink. I stamped the “Sorry” and then cleaned the stamp, covered the “rry” with a piece of Post-It Tape and stamped the “So”.

  • Adhere layer using a piece of Foam Adhesive Sheet or Dimensionals.

  • Tie a bow with Linen Thread and adhere with a Glue Dot.

  • Add some Elegant Faceted Gems.


On the inside layer stamp the sentiment with Crumb Cake Ink and the small olive branches with Old Olive Ink.


Supply List

You can click on the item to purchase it from my Online Store.

Fun Lighthouse Point Cards

On today’s YouTube Live I made these two fun cards using the Lighthouse Point Bundle from Stampin’ Up! These are great masculine cards.


Watch the replay for details on this bundle and to learn how to make these cards.


I love that you can either stamp a lighthouse or die cut the pieces and build one. So versatile! You can save 10% when you bundle these products together.


I used Pacific Point for this card with a little bit of Daffodil Delight. I love this sentiment; such a nice way to describe someone!

Tips & Instructions:

  • Thick Basic White Card Base - 4 1/4 x 11, score at 5 1/2

  • Pacific Point Cardstock - 5 1/8 x 3 7/8

  • Basic White Cardstock - 5 x 3 3/4

  • Stamp lighthouse with Pacific Point Ink on scrap of Basic White Cardstock, stamping striped image directly and the background image stamping off twice on scrap of paper. Cut with coordinating die.

  • Stamp the water image across the bottom with Pacific Point, stamping off on scrap first. Stamp the straight line across the card and then fill in with the splotchy bottom part.

  • Stamp light with Daffodil Delight Ink.

  • Stamp some clouds, stamping off twice on scrap first.

  • Adhere lighthouse to card.

  • Adhere stamped layer to Pacific Point layer and then adhere to card base.

  • Stamp sentiment on Basic White scrap with Daffodil Delight Ink and cut with the larger label die. Adhere with Dimensionals.

  • Add some Basic Rhinestone Jewels.


On the inside layer, stamp the lighthouse and light like you did on the front. Stamp sentiment (from He’s All That Stamp Set) with Pacific Point Ink.


The background layer for this second card is from the Abstract Beauty Designer Series Paper. I love all the gold accents and decided to add gold to the top of the lighthouse and embossed the sentiment with gold.

Tips & Instructions:

  • Thick Basic White Card Base - 4 1/4 x 11, score at 5 1/2

  • Abstract Beauty Designer Series Paper - 5 1/2 x 3 3/4 , adhere to card base.

  • Cut lighthouse pieces

    • Background piece - Poppy Parade (cut off top)

    • Striped piece - Basic White

    • Top piece - Gold Foil

    • Railing piece - Basic White

  • Adhere pieces together and adhere to card.

  • Stamp sentiment with Versamark Ink and Heat Emboss with Gold Embossing Powder. Cut with small label die and adhere to card using Dimensionals.


On the inside stamp the lighthouse stripes with Poppy Parade Ink. Stamp the background image with Smoky Slate Ink, stamping off once or twice on scrap first. Stamp light with Daffodil Delight Ink. Add the 1/2” piece that you cut off from the front layer across the bottom.


Supply List

You can click on the item to purchase it from my Online Store.

Sketch Saturday - Cottage Rose

I made an elegant black and white card for this week’s sketch challenge. It was simple to make once I figured out the measurements. I always use scrap paper to play with sizes and placement.


The sketch is from the weekly Atlantic Hearts Sketch Challenge. I love doing their sketches. You should play along! They select the top 3 each week and it’s always fun to see what other people create and which are selected for the top 3.


The Perfectly Penciled Designer Series Paper is gorgeous. The floral patterns are delicate and pretty and the other side has fun, basic patterns.


Tips & Instructions

  • Basic Black Card Base - 5 1/2 x 8 1/2, score at 4 1/4

  • Basic White Cardstock - 5 1/4 x 4

  • Basic Black Cardstock:

    • Large - 4 3/8 x 2 3/8

    • 2 Small - 1 3/4 x 1 1/4

  • Perfectly Penciled Designer Series Paper:

    • Large - 4 1/4 x 2 1/4

    • 2 Small - 1 1/2 x 1 1/8

  • Adhere Designer Series Paper pieces to black pieces and arrange on the white layer. Adhere the 2 small pieces to layer.

  • Wrap piece of black twine around 3 times between the two small pieces and adhere to back. Adhere layer to card base.

  • Adhere the large layer using Dimensionals.

  • Stamp sentiment with Black Memento Ink on Basic White Cardstock. Punch with the Double Oval Punch. Punch scrap of Basic Black Cardstock with the scalloped oval. Adhere together and adhere to card.

  • Tie bow with twine and adhere with a Glue Dot.


On the inside layer stamp leaves with Black Memento Ink.


I used the Cottage Rose Stamp Set for the sentiment and the inside layer.


Supply List

You can click on the item to purchase it from my Online Store.

Pretty Potted Geranium Card

I love geraniums! I always planted them in clay pots and had them lining my porch steps when I lived in NY. My favorite are the red ones.

I got the idea for this card from the sample in the catalog. I changed it up a bit but love the basic layout.


The Potted Geraniums Stamp Set has such beautiful images and sentiments. You can create pretty flowers and leaves in two shades; there are outline and filler stamps that work together and it’s so easy to do because they are photopolymer.

I used Real Red and Mossy Meadow and stamping off first with the filler stamp to get the lighter shade. The dies cut out the stamped images and there’s a great label die.

You can save 10% when you purchase the stamp set and dies as a bundle. The dies are compatible Mini Stampin’ Cut & Emboss Machine.


Tips & Instructions

  • Pool Party Card Base - 5 1/2 x 8 1/2, score at 4 1/4

  • Basic White Cardstock - 5 x 3 3/4, lightly blend Pool Party Ink using a Blending Brush. Using a Pool Party Stampin’ Write Marker flick some ink around the layer. Adhere to card base.

  • Basic White Cardstock - 5 x 3/4, cut using the Split Card Textures Dies. Snip to cut it away from the solid half of the layer and cut it down a little bit and adhere over blended layer.

  • On Basic White Cardstock:

    • Stamp pot with Soft Suede Ink (stamping off first), soil with Soft Suede Ink, stake with Soft Suede Ink and sentiment with Real Red Ink.

    • Stamp 2 sets flowers with Real Red Ink, stamping the outline direct and then the filler after stamping off first.

    • Stamp leaves with Mossy Meadow Ink, stamping the outline direct and then the filler after stamping off first.

    • Cut images with the coordinating Geranium Dies.

  • Adhere pieces to pot and then to the card.

  • Add some Brushed Brass Butterflies.


The Split Card Textures Dies are so cool. It cuts out a pattern on half a card layer. I just snipped the edges to separate it to adhere it to the white layer.


On the inside layer stamp sentiment with Real Red Ink. Stamp the flower and leaves the same way you stamped them on the front.


Supply List

You can click on the item to purchase it from my Online Store.