Sketch Saturday - Flowering Blooms

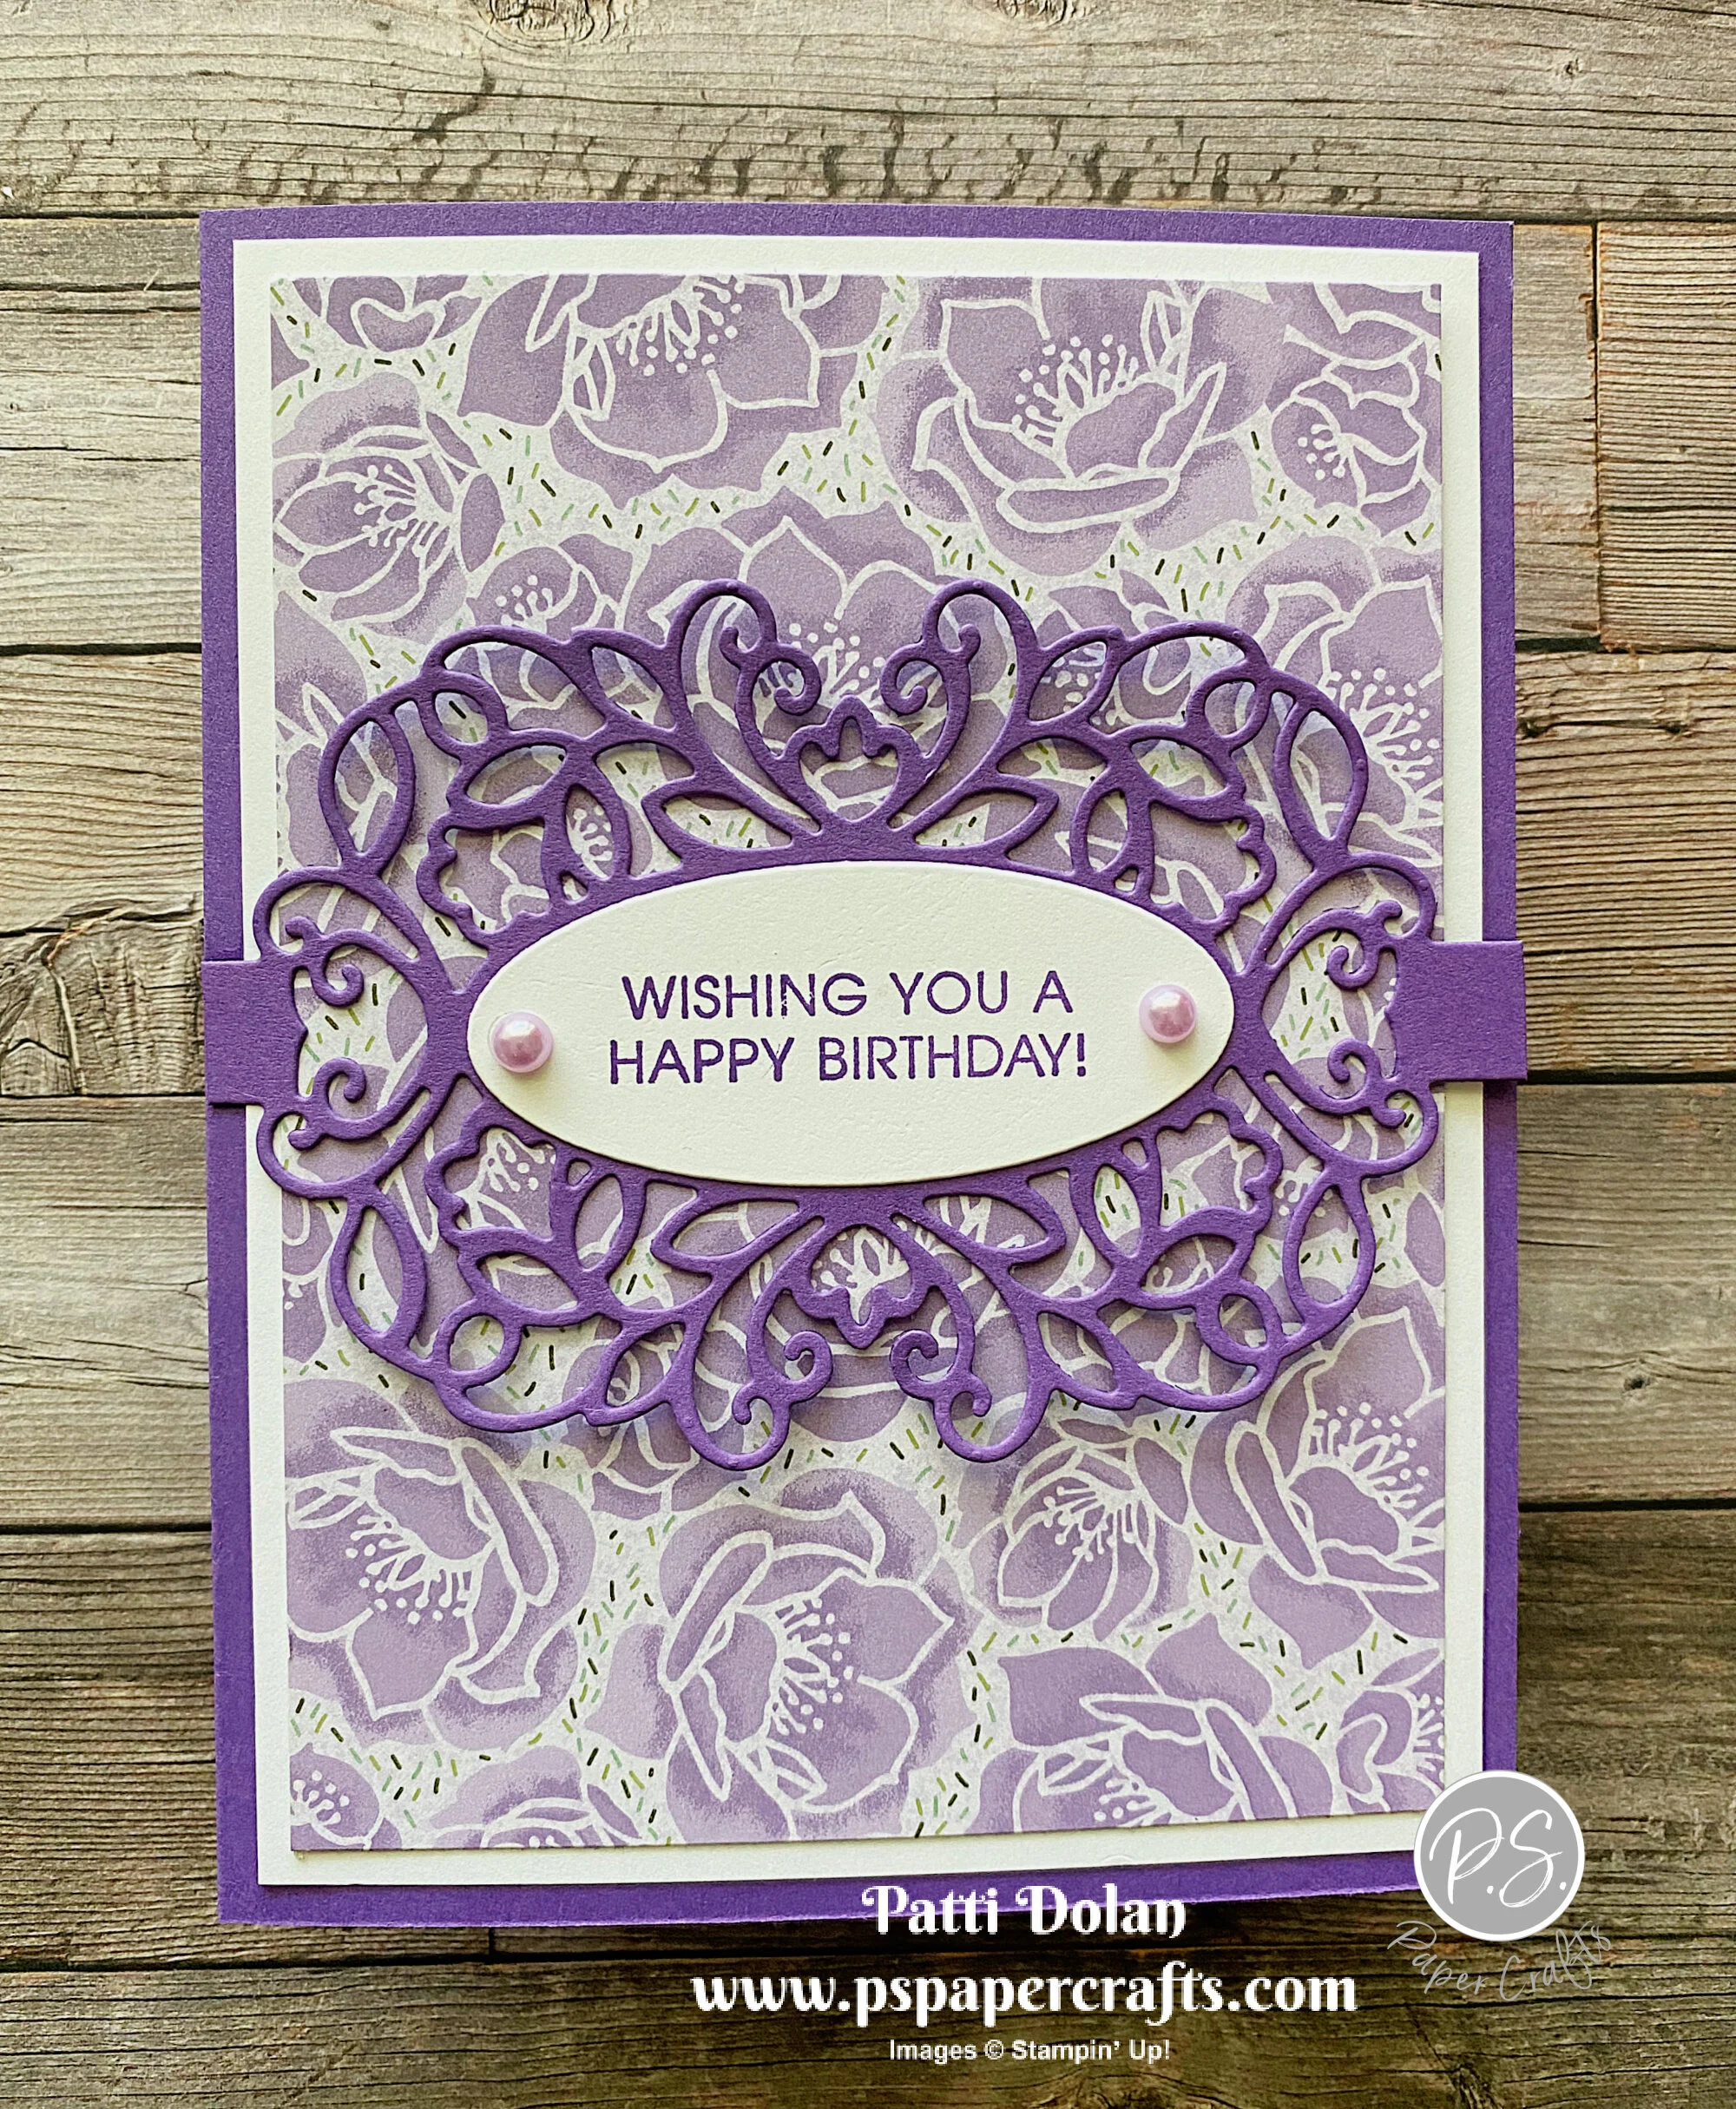
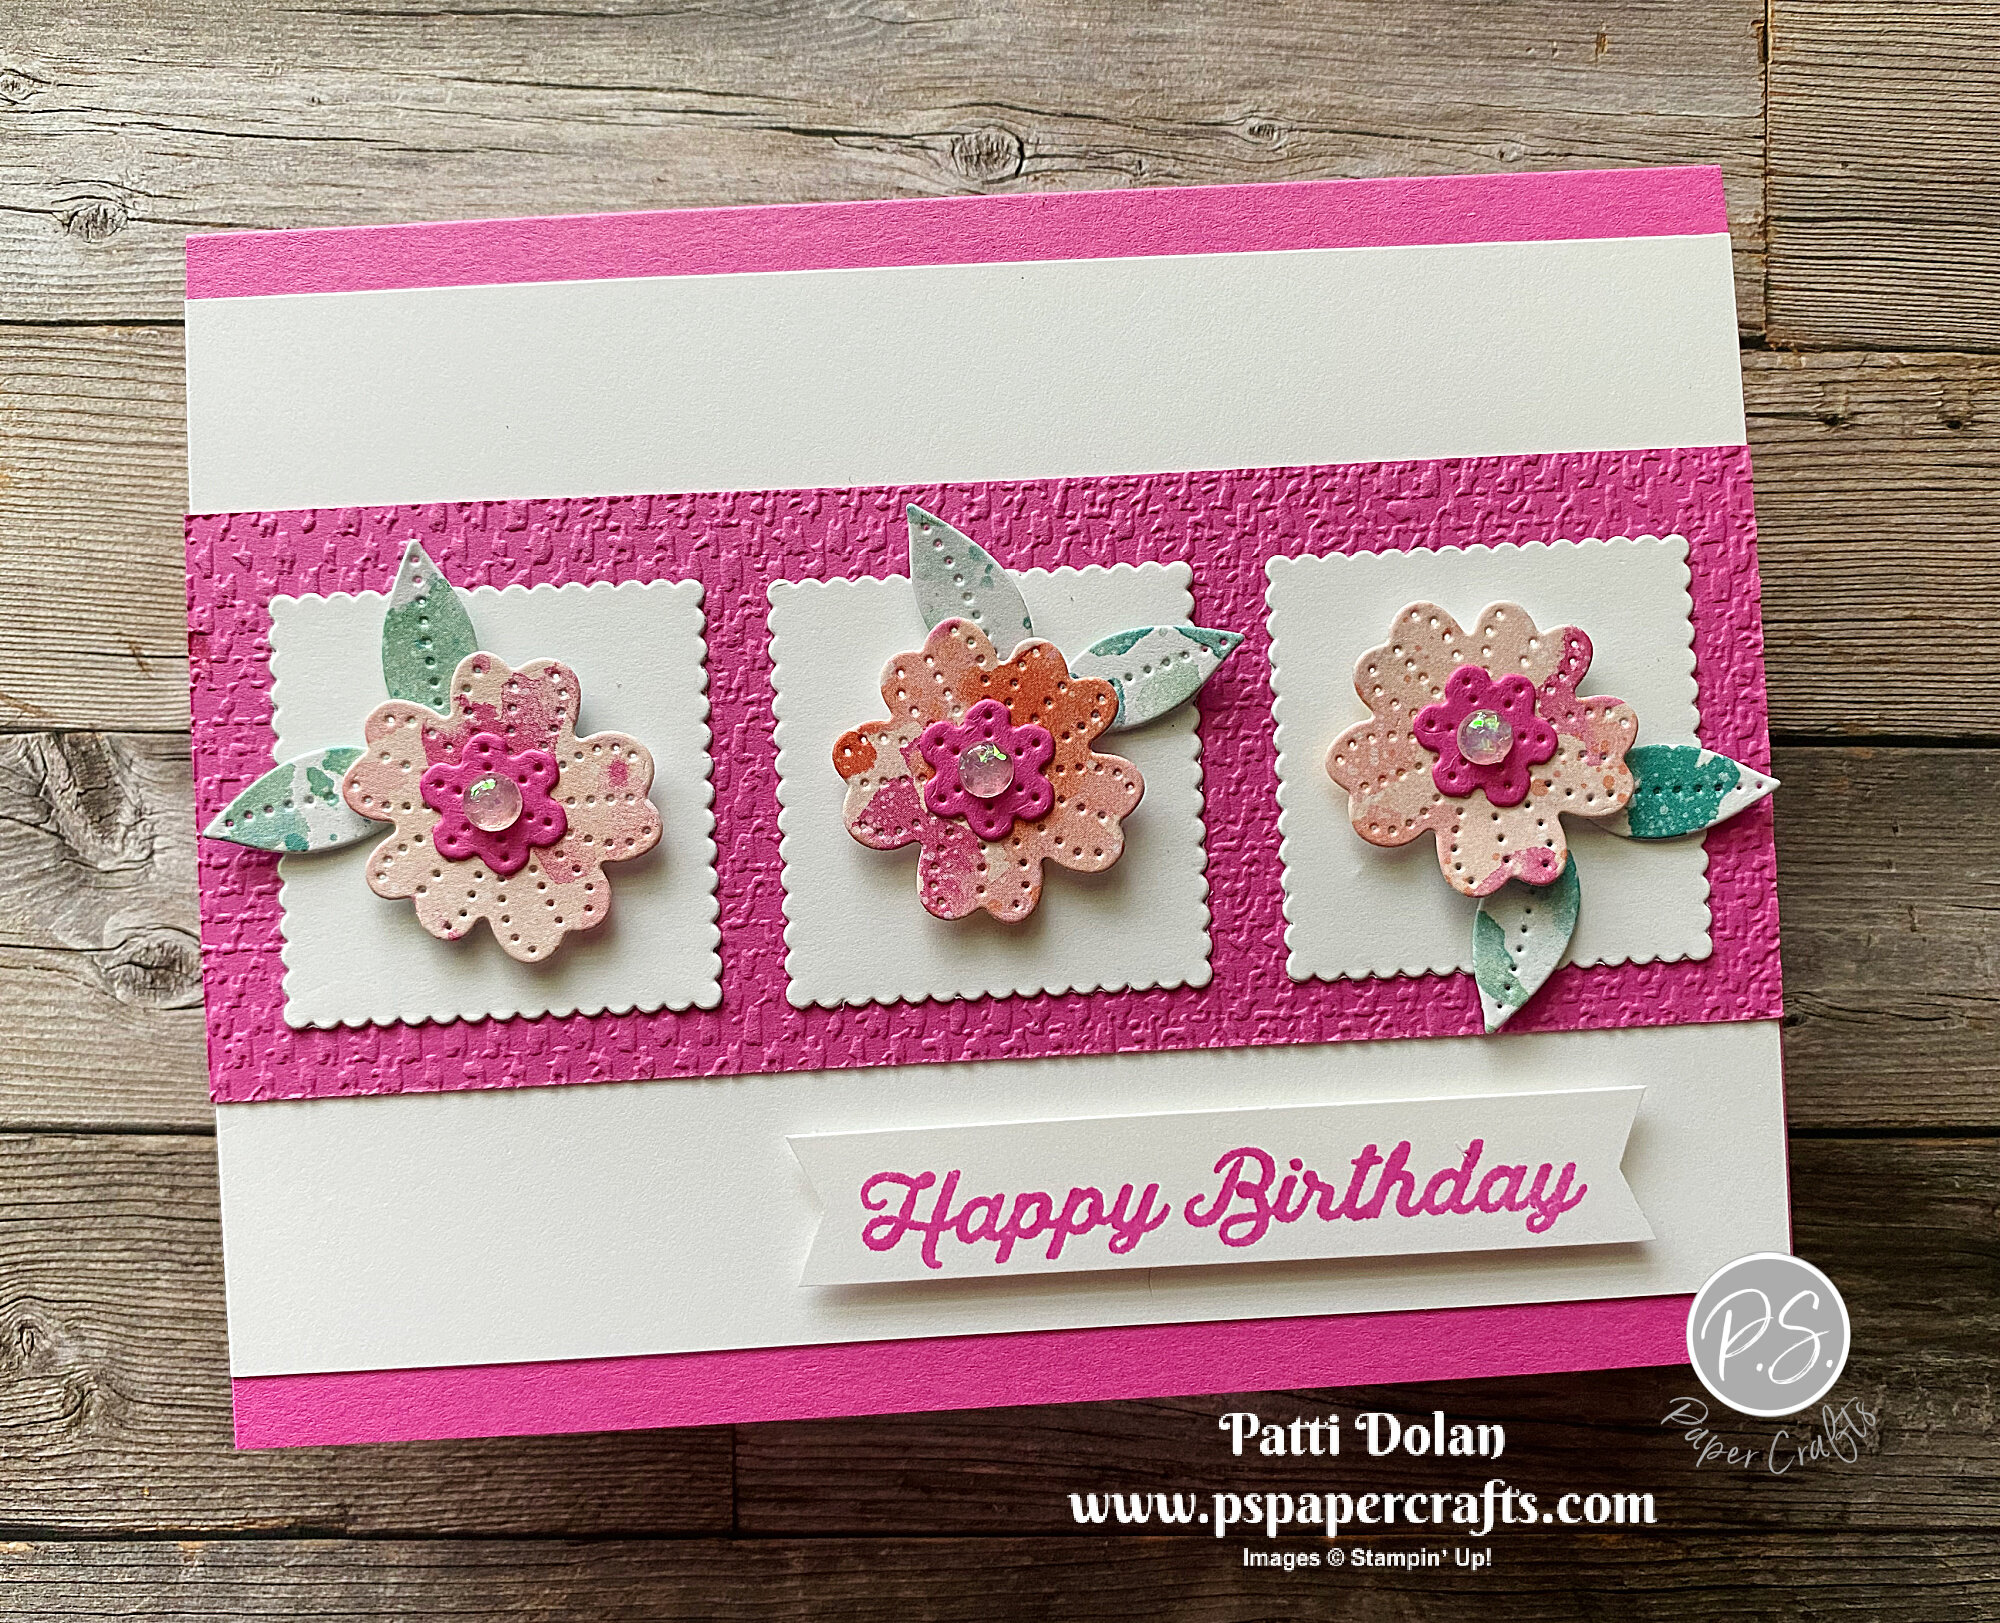
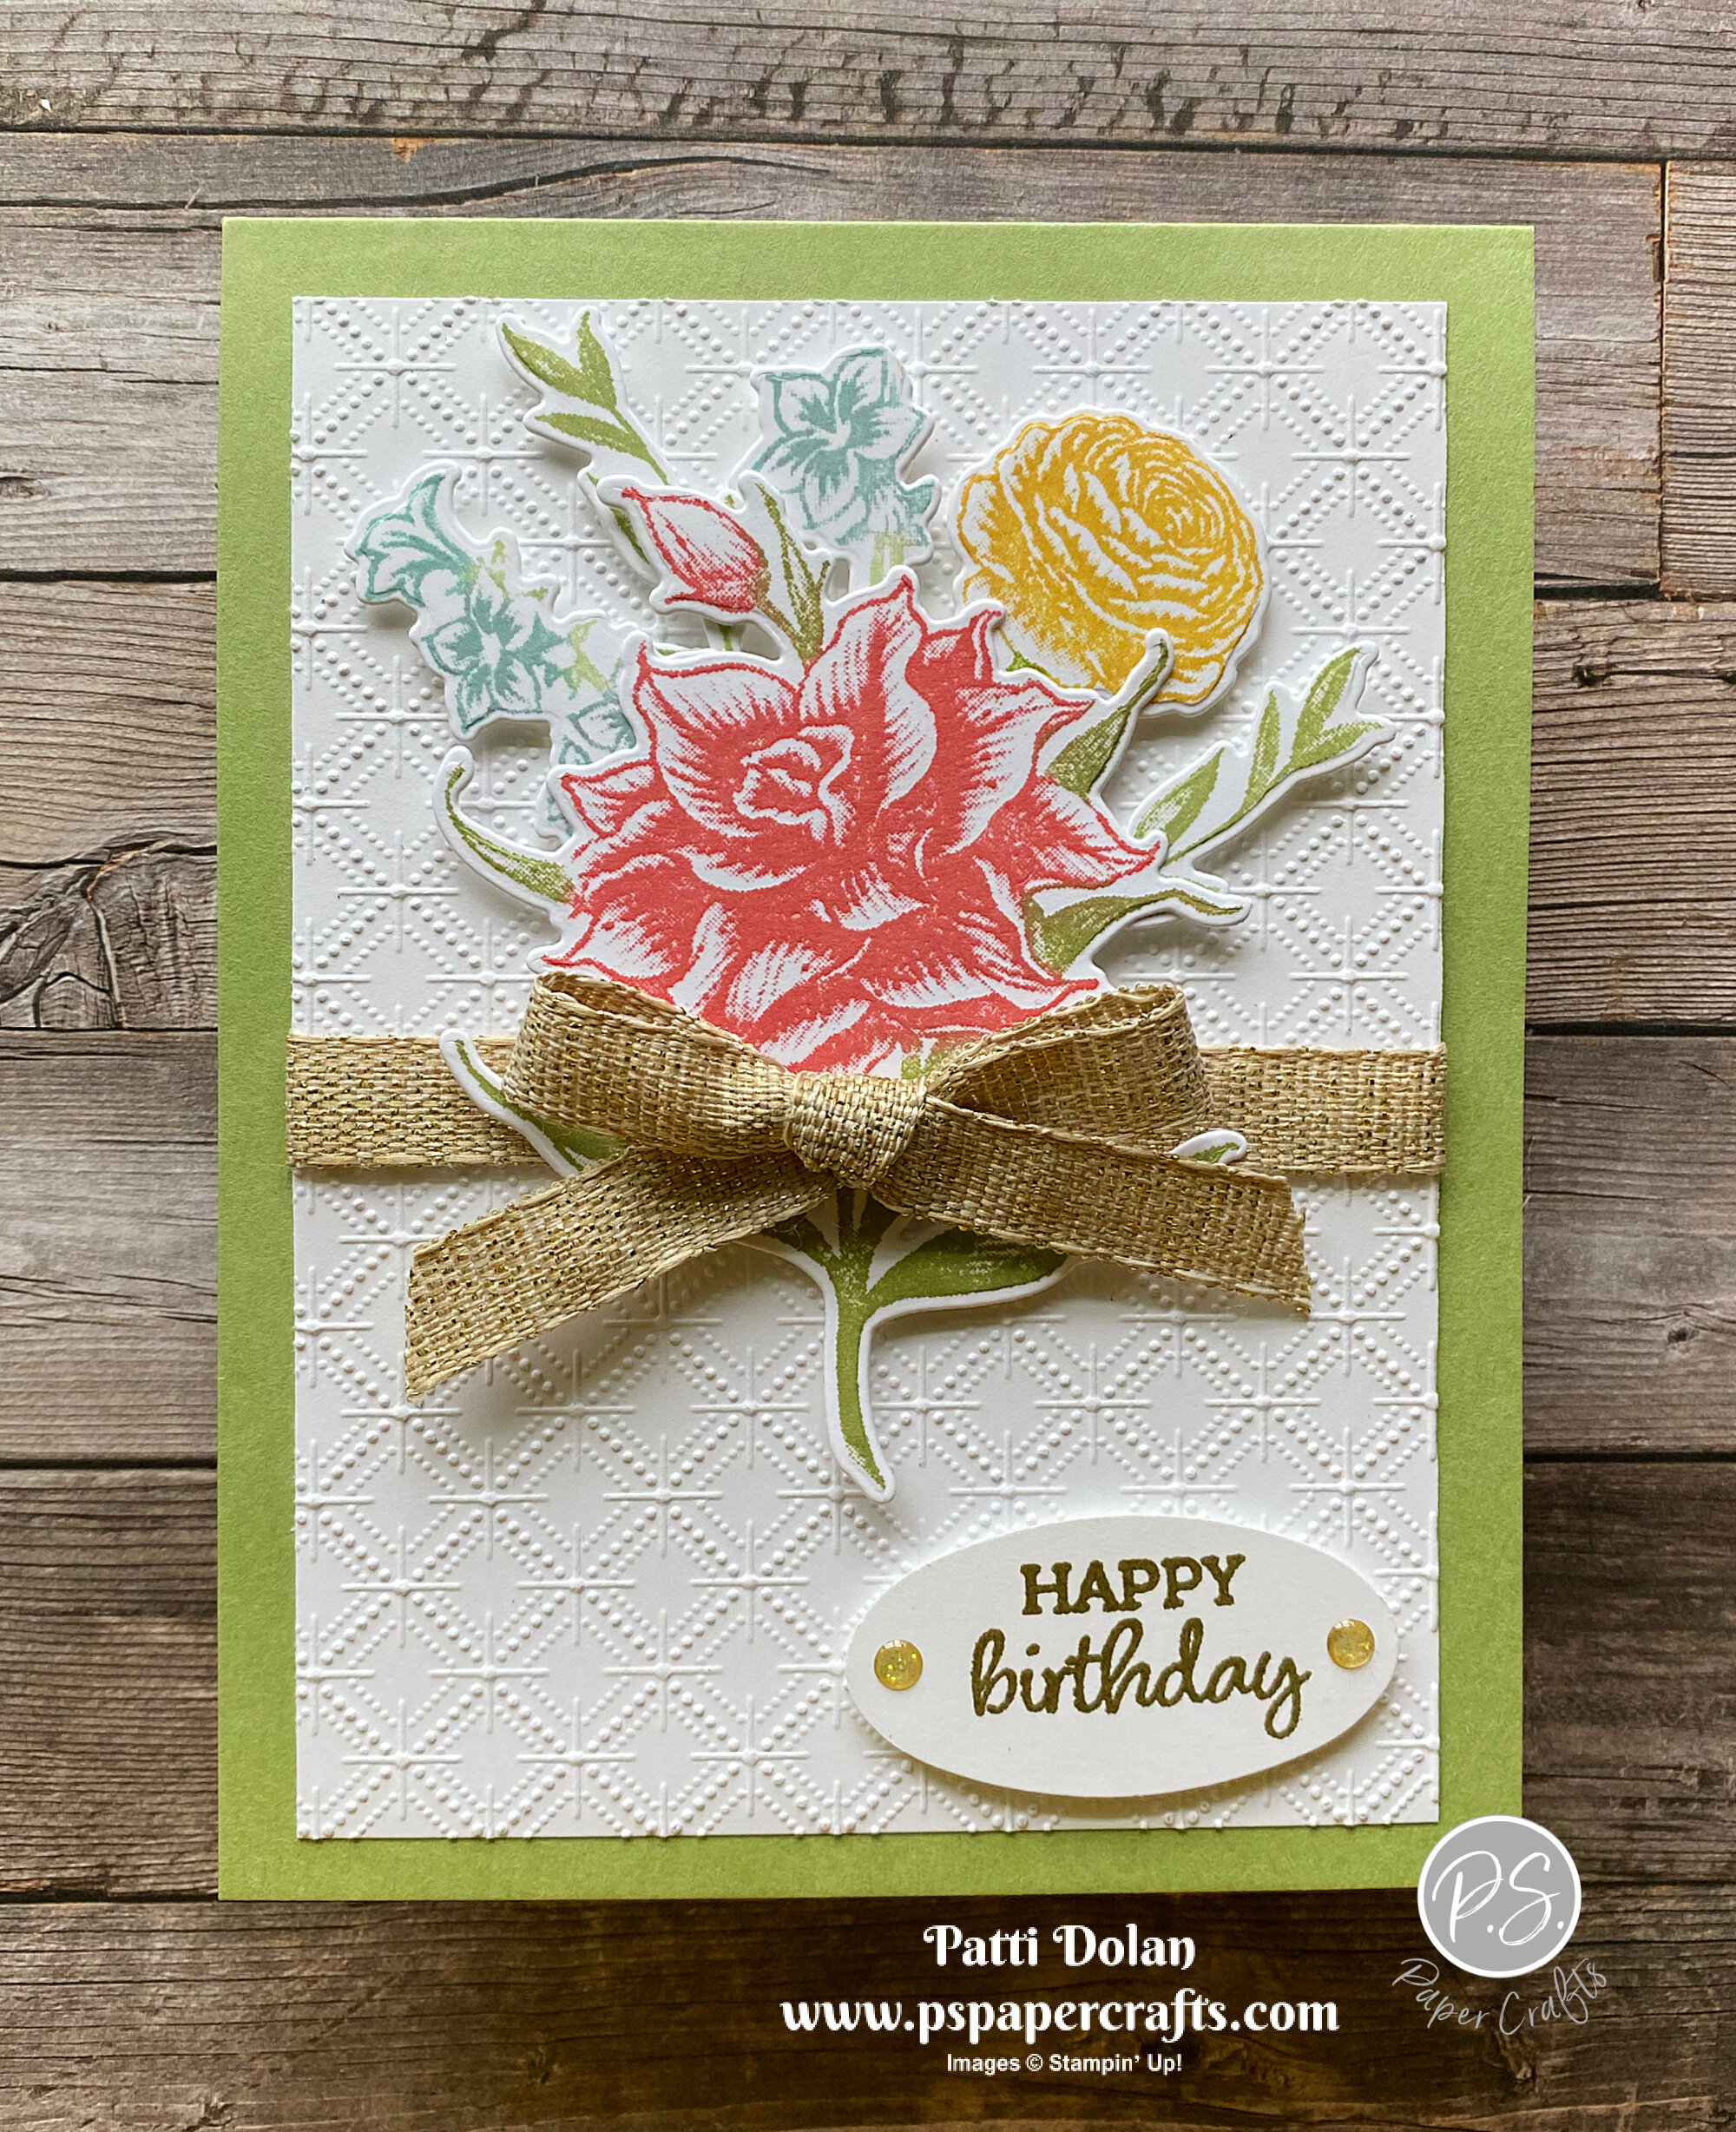
For today’s sketch challenge I used the Flowering Blooms Stamp Set with the coordinating dies to create a pretty spring bouquet.

 
Sketch Saturday - Flowering Blooms1.jpeg
 

The sketch is from the weekly Atlantic Hearts Sketch Challenge. Using a sketch is so helpful to get started designing a card.

 
Screen Shot 2021-03-20 at 12.21.51 PM.png
 

This stamps in this set are so beautiful. The way they are made, you just stamp the image and you’ll get all the different shades. It looks like you spent a lot of time to make them look this way.

 
Sketch Saturday - Flowering Blooms stamp.jpeg
 

I colored the stamps with Stampin’ Write Markers and then stamped them on the cardstock. This is a good way to get different colors on the image. Make sure you are using the water-based Stampin’ Write Markers and NOT the alcohol-based Stampin’ Blends

 
Sketch Saturday - Flowering Blooms markers.jpeg
 

Tips & Instructions

  • Pear Pizzazz Card Base - 4 1/4 x 11, score at 5 1/2 (Top Folding Card)

  • Basic White Layer - 5 x 3 3/4, emboss with Dainty Diamonds 3D Embossing Folder.

  • Wrap piece of Fine Art Ribbon around layer and adhere to the back. Adhere layer to card.

  • Stamp flowers on Basic White Cardstock. I used Stampin’ Write Markers to color the stamp, then breathed on it to moisten it, then stamped each image. The large flower was colored with Flirty Flamingo and Pear Pizzazz, the yellow flower with Daffodil Delight and Pear Pizzazz and the smallest with Pool Party and Soft Sea Foam. Color some extra leaves with Pear Pizzazz.

  • Cut the images using the coordinating dies and adhere the smaller flowers behind the large flower. You may have to snip off some of the ends. Adhere to card using Dimensionals.

  • Stamp sentiment (from the Oval Occasions Stamp Set) with Versamark and heat emboss with Gold Emboss Powder. Cut with coordinating oval from Double Oval Punch and adhere to card with Dimensionals.

  • Tie bow and adhere with Glue Dots. Add some Gold Glitter Enamel Dots to sentiment label.

 
Sketch Saturday - Flowering Blooms2.jpeg
 

On the inside stamp and emboss sentiments with Gold Emboss Powder. Color flower stamp with Daffodil Delight and Pear Pizzazz Stamin’ Write Markers and stamp on bottom corner.

 
Sketch Saturday - Flowering Blooms inside.jpeg
 

Supply List

Fun Fold - Triple Fold Cards

These are such cool fun fold cards that I CASEd from Mary Bush. They have a completely different look but were made following the same design.

 
Fun Fold Triple Fold Cards Both.jpeg
 

Watch the video to see how simple this Triple Fold Card is to make.


I made this sweet Easter/Spring Card using the Hydrangea Hill Designer Series Paper and Springtime Joy Stamp Set.

Tips & Instructions

  • Gorgeous Grape Card Base - 5 1/2 x 11, score at 1 3/4 and 5 1/2 and 9 3/4. Fold in half and then then fold both flaps to the left.

  • Hydrangea Hill Designer Series Paper - 5 1/4 x 3 1/2, 5 1/4 x 1 1/2 and 5 1/4 x 1. Adhere to card as shown in video.

  • Gorgeous Grape Strip - 11 x 1, wrap around card and adhere in front with strong adhesive.

  • Gorgeous Grape Cardstock - cut with Tasteful Labels Die

  • Basic White Cardstock - cut with Tasteful Labels Die. Stamp sentiment with Gorgeous Grape Ink on label and adhere label to Gorgeous Grape Label. Adhere to Belly Band.

  • Stamp bunny on Basic White Cardstock with Black Memento Ink. Color with Stampin’ Blends (Light Petal Pink, Dark Daffodil Delight, Dark Granny Apple Green). Fussy cut and adhere with Dimensionals.

  • Add Rhinestone to flower on bunny and Pastel Pearls to sentiment label.

 
Fun Fold Triple Fold - Easter.jpeg
 

On the inside stamp sentiment with Gorgeous Grape Ink. Stamp tulips across bottom and butterfly at top corner with Black Memento Ink. Color tulips and butterfly using Stampin’ Blends (Granny Apple Green, Daffodil Delight).

 
Fun Fold Triple Fold - Easter inside.jpeg
 

Follow the same steps from above using the Dandy Garden Designer Series Paper and Blackberry Bliss Cardstock. I used the Stitched So Sweetly Dies for the label and stamped the sentiment with Blackberry Bliss Ink. The sentiment is from the A Grand Kid Stamp Set. I punched the small dragonflies from the Designer Series Paper using the Dragonflies Punch.

 
Fun Fold Triple Fold Cards Dragonfly.jpeg
 

On the inside, stamp the sentiment with Blackberry Bliss Ink. Add a 4 x 1 strip of the Designer Series Paper across the bottom and a small dragonfly to the top corner.

 
Fun Fold Triple Fold Cards Dragonfly inside.jpeg
 

Supply List

Free As A Bird With Hydrangea Hill

Oh how I’m going to miss you Seaside Spray. This is one of the colors that will retire when the new catalog comes out in May. It’s one of my favorite colors.

 
Free As A Bird Hello Card2.jpeg
 

I used the Free As A Bird Stamp set and just cut out one of the birds on the branch with the Rectangular Postage Stamp Punch.

 
Free As A Bird Hello Card with stamp.jpeg
 

Tips & Instructions

  • Seaside Spray Card Base - 5 1/2 x 8 1/2, score at 4 1/4

  • Basic White Layer - 5 1/4 x 4

  • Hydrangea Hill Designer Series Paper Layer - 5 x 3 3/4, adhere to white layer.

  • Wrap Seaside Spray Metallic Ribbon around layers adhering to the back. Adhere layers to card base.

  • Cut Nested Label with Basic White Cardstock and cut off end. Stamp some leaves around with Granny Apple Green Ink. Adhere to card.

  • Stamp birds sitting on the brand on Basic White Cardstock with Black Memento Ink. I inked up just one end to get the one bird stamped.

  • Punch bird using the Rectangle Postage Stamp Punch.

  • Color image with Stampin’ Blends (Seaside Spray, Daffodil Delight, Crumb Cake, Pumpkin Pie and Granny Apple Green. Adhere to card using Dimensionals.

  • Stamp sentiment on scrap of Basic White and cut with Nested Labels Dies. Snip off end and adhere to card.

  • Tie bow with ribbon and adhere with Glue Dot.

  • Add some Pearls to centers of flowers.

 
Free As A Bird Hello Card1.jpeg
 

On the inside stamp with Black Memento Ink the bird image and just the tip of the birds on the branch image so you get the leaves and flowers. Color with Stampin Blends.

 
Free As A Bird Hello Card inside.jpeg
 

Supply List

Beautiful Butterfly Cards

I made these two cards using the pretty Butterfly Bijou Designer Series Paper. I cut two pieces into triangles and then placed them in alternating positions come up with these two different layouts.

 
Butterfly Cards Both.jpeg
 

I’ll show you how I made these cards on the video below. I cut and embossed those small butterflies to give them some additional texture to them.


Tips & Instructions

  • Bermuda Bay Card Base - 5 1/2 x 8 1/2, score at 4 1/4

  • Basic White Layer - 5 3/8 x 4 1/8

  • Butterfly Bijou Designer Series Paper - cut 2 pieces, one with butterflies and one with green design to 5 1/4 x 4. Cut each piece diagonally, rotate and cut the other side diagonally.

  • Lay triangles on Basic White Layer, alternating to create the pattern in the picture and adhere. Adhere layer to card base.

  • Using 2 1/4 Circle Punch, punch circle from Bermuda Bay Cardstock

  • Stamp sentiment on circle with VersaMark and heat emboss using White Embossing Powder.

  • Adhere circle to doily with Dimensionals and then adhere to card putting the adhesive behind the circle.

 
Butterfly Card - Birthday1.jpeg
 
  • Cut out 3 small butterflies from the Designer Series Paper and then emboss using the Tasteful Textile 3D embossing Folder. Adhere to card

  • Add Rhinestones to centers of the butterflies.

 
Butterfly Card - closeup.jpeg
 

To make a second card, use the leftover pieces. You can change up the sentiment to make it a Thinking Of You Card. The sentiments are from the Happy Thoughts Stamp Set.

 
Butterfly Card - Thinking Of You.jpeg
 

On the inside stamp the sentiment with Bermuda Bay Ink. Cut butterflies and emboss. Adhere to top and bottom corner.

 
Butterfly Card - inside.jpeg
 

Supply List

Elegant Birthday Card

When I saw this floral pattern on the Designer Series Paper from the Flowering Cactus Medley, I knew I had to use it to make a birthday card.

 
Elegant Birthday Card2.jpeg
 

This paper is so pretty and you can get it in the complete medley or just purchase the refill and get the paper, felt and twine. I’ll have both options listed in the supply list.

 
Screen Shot 2021-03-15 at 8.15.01 PM.png
 

I used the Detailed Bands Dies to cut this delicate layer for the sentiment. You can stamp the sentiment and cut it out with the oval die from this set and it fits perfectly on the background layer.

 
Screen Shot 2021-03-15 at 8.23.05 PM.png
 

Tips & Instructions

  • Gorgeous Grape Card Base - 5 1/2 x 8 1/2, score at 4 1/4

  • Basic White Layer - 5 1/4 x 4

  • Designer Series Paper Layer - 5 x 3 3/4

  • Cut large detailed band from a piece of Gorgeous Grape Cardstock.

  • Stamp sentiment on scrap of Basic White Cardstock using Gorgeous Grape Ink and cut with the oval die. Adhere to detailed layer.

  • Adhere sentiment to card. The band will hang over on each end; trim off excess .

  • Add some Pastel Pearls to sentiment.

 
Elegant Birthday Card1.jpeg
 

On the inside stamp sentiment with Gorgeous Grape Ink. Stamp the flower image 3 times across the bottom with Gorgeous Grape Ink but stamp off first to get a lighter shade. The sentiment is from the Band Together Stamp Set and the flowers are from the Flowering Cactus Medley.

 
Elegant Birthday Card inside.jpeg
 

Supply List

Sketch Saturday - Baby Pull Toys

I made this sweet fun fold baby card for this week’s sketch challenge. The sentiment “Love just got Real” is perfect, don’t you think?

 
Sketch Saturday - Baby Pull Toys card1.jpeg
 

The sketch is another from the Atlantic Hearts Sketch Challenge. I love doing these sketch challenges. It’s fun to stretch my creativity a little and to see what other crafters make.

 
Screen Shot 2021-03-12 at 8.58.28 PM.png
 

The Baby Pull Toys is just adorable. The images and sentiments are perfect for baby cards.

 
Sketch Saturday - Baby Pull Toys stamp.jpeg
 

Tips & Instructions

  • Soft Sea Foam Card Base - 5 1/2 x 8 1/2, score at 2 1/8 on both sides and fold to the center.

  • Ice Cream Corner Designer Series Paper - 2 pieces cut to 5 3/8 x 2, adhere to front flaps.

  • Stamp elephant image on scrap of Basic White Cardstock with Black Memento Ink. I covered the pull string with a Post-It Note, inked up the stamp and then removed the Post-It Note before I stamped it.

  • Punch with plain heart from Heart Punch Pack. Stamp just one star on heart.

  • Color the elephant with Light Smoky Slate and the wagon, wheels and star with Dark So Saffron Stampin’ Blends.

  • Punch scalloped heart from a scrap of Soft Sea Foam Cardstock with the Heart Punch Pack. Adhere hearts together.

  • Stamp sentiment on 1/2” strip of Basic White Cardstock with Black Memento Ink.

  • Punch both ends of sentiment strip with Banners Pick A Punch.

  • Adhere heart and sentiment strip to card using Dimensionals. Adhere just the left side of the heart and right side of the sentiment strip so the card will open.

 
Sketch Saturday - Baby Pull Toys card2.jpeg
 

On the inside stamp sentiment, giraffe, lion and stars with Black Memento Ink. Color using Stampin’ Blends (Light Crumb Cake, Light Pumpkin Pie, Dark Petal Pink and Dark Soft Sea Foam).

 
Sketch Saturday - Baby Pull Toys inside.jpeg
 

Supply List

Flowering Cactus Medley

I just LOVE this Flowering Cactus Medley. I made these two cards using it….one very simple and a one a little more complex but still easy to make.

 
Flowering Cactus Medley both.jpg
 

In the video I’ll show you the entire medley and then show you how to make these cards.


This is the cactus I mentioned in the video. I walk past it with my dog Bailey and can’t believe how big it is. If you look close you can see the flowers are budding.

 
Cactus Picture.jpg
 

These are the products you get in the medley. You can also get refills if you want.

 
Screen Shot 2021-03-11 at 9.18.11 PM.png
 

Tips & Instructions

  • Calypso Coral Card Base - 5 1/2 x 8 1/2, score at 4 1/4

  • Designer Series Paper Layer - 5 1/4 x 4, adhere to card base

  • Calypso Coral Strip - 5/8 x 4 5/8, emboss with die, cut in half and adhere to middle of the card.

  • Basic White - 4 1/2 x 3 1/4, stamp some smaller cactus image across the bottom with Pear Pizzazz and Mint Macaron Inks. Adhere layer to card.

  • Pear Pizzazz Cardstock - cut 2 cactus with die and sponge lightly with Pear Pizzazz Ink. Adhere one flat and the other with Dimensionals. Adhere felt flowers using Liquid Glue.

  • Stamp cactus image with Pear Pizzazz Ink and cut with coordinating Die. Adhere to card using Dimensionals.

  • Stamp small flowers with Calypso Coral Ink and cut with coordinating die. Adhere to top of cactus using Dimensionals or Glue Dots.

  • Stamp sentiment on 1/2” Basic White Strip with Calypso Coral Ink. Punch each end using the Banners Pick A Punch and adhere to card using Dimensionals.

  • Add Rhinestones to center of flowers.

 
Flowering Cactus Medley orange2.jpg
 

On the inside stamp sentiment with Calypso Coral Ink. Stamp some cactuses across the bottom with Pear Pizzazz Ink and add flowers with Calypso Coral Ink.

 
Flowering Cactus Medley inside.jpeg
 

Tips & Instructions

  • Mossy Meadow Card Base - 5 1/2 x 8 1/4, score at 4 1/4

  • Basic White Layer - 5 3/8 x 4 1/8, adhere to card base

  • Designer Series Paper Layer - 5 1/4 x 4, adhere to card

  • Cut largest circle from the Stitched Shapes Dies.

  • Cut cactus and flowers from the Designer Series Paper with coordinating dies and adhere to circle. Adhere circle to card using Dimensionals.

  • Stamp sentiment on 3/4 strip of Basic White Cardstock with Highland Heather Ink and punch with Banners Pick A Punch. Adhere to card using Dimensionals.

 
Flowering Cactus Medley purple1.jpg
 

On the inside stamp sentiment with Highland Heather Ink. Stamp cactus with Pear Pizzazz Ink and the small flowers with Highland Heather Ink.

 
Flowering Cactus Medley inside2.jpeg
 

Supply List

Circle Celebration Happy Thoughts Card

The Circle Celebration Stamp Set was a fun set to use. I wasn’t sure about it at first but then played with the stamps on scrap paper and decided to create my own background with it.

 
Circle Celebration Happy Thoughts Card2.jpg
 

You can really get creative with these stamps. My card is pretty simple but I can imagine some pretty cool projects with this set.

 
Circle Celebration Happy Thoughts Card stamp.jpg
 

Tips & Instructions

  • Pretty Peacock Card Base - 5 1/2 x 8 1/2, score at 4 1/4

  • Basic White Layer - 5 1/4 x 4

  • Stamp images randomly on white layer starting with the largest images and then filling in with the smaller ones. I added the dots to fill in spaces at the end. I used Rococo Rose, Terracotta Tile, Pretty Peacock and Seaside Spray Inks.

  • Wrap piece of Pretty Peacock Scalloped Linen Ribbon around stamped layer, adhering to the back and then adhere layer to card.

  • Stamp sentiment (from the Happy Thoughts Stamp Set) on piece of Basic White Cardstock with Pretty Peacock Ink and cut with Tasteful Labels Die.

  • Cut second label from piece of Peacock Cardstock. Cut label in half, spread pieces apart and adhere behind stamped label. Adhere to card using Dimensionals

  • Add Butterfly Gem to sentiment label and add Opal Rounds to some of the flower centers.

 
Circle Celebration Happy Thoughts Card1.jpg
 

The colors I used for today’s card are the 2019-2021 In Colors which will retire when the new catalog comes out in May. I love these colors and will be sad to see them retire.

 
Circle Celebration Happy Thoughts ink2.jpg
 

On the inside stamp a pattern of images across the bottom.

 
Circle Celebration Happy Thoughts inside.jpg
 

Supply List

Sweet Easter Card using Arrange A Wreath and Springtime Joy!

This is such a sweet Easter Card with that cute little bunny on it. I used the Arrange A Wreath Bundle along with the Springtime Joy Stamp Set.

 
Arrange A Wreath Easter Card3.jpg
 

Watch the video to see how to make this card. I’ll show you how I colored the bunny with a Stampin’ Blend and then removed some of the color with the Color Lifter.


Tips & Instructions

  • Melon Mambo Card Base - 5 1/2 x 8 1/2, score at 4 1/4

  • Basic White Layer - 5 1/4 x 4, emboss with Pinewood Planks Embossing Folder and adhere to card base.

  • Cut wreaths from Pear Pizzazz and Soft Sea Foam Cardstock and adhere together, adhere to card.

  • Stamp eggs with Melon Mambo and Daffodil Delight Inks and cut with coordinating die.

  • Stamp bunny with Black Memento Ink and fussy cut. Color bunny with Light Smoky Slate Blender Pen and then using the Color Lifter remove layer of ink. Color flowers with Light Melon Mambo Stampin’ Blend and leaves with Dark Sea Foam Stampin Blend.

  • Adhere bunny and eggs to wreath using Dimensionals.

  • Stamp sentiment on 3/4 strip of Basic White Cardstock with Melon Mambo Ink and punch each end with Triple Banner Punch.

  • Punch 7/8 strip of Melon Mambo Cardstock with Triple Banner Punch and adhere behind sentiment. Adhere to card using Dimensionals.

  • Add Rhinestone to largest flower on bunny and sentiment.

 
Arrange A Wreath Easter Card4.jpg
 

I plan on giving this to my sweet little granddaughter, Gianna for her first Easter.

 
Arrange A Wreath Easter Card2.jpg
 

On the inside stamp sentiment with Melon Mambo Ink. Stamp basket and butterfly with Black Memento Ink and color with Stampin’ Blends. I used Dark Soft Seafoam, Light Melon Mambo, and Daffodil Delight.

 
Arrange A Wreath Easter Card inside.jpg
 

Don’t forget my March Ordering Special. If you purchase $50 in product from my Online Store, I will send you a FREE package of Opal Rounds.

 
Patti's March Ordering Special.png
 

Supply List

Easter Hope Card

I made this beautiful Easter Card using the Gift Of Hope and His Love Stamp Sets. I wanted to have a cross in the flowers and found the one in the His Love set worked perfectly.

 
Easter Hope Card2.jpg
 

These two stamp sets have beautiful images and sentiments that can be used on their own or together to make meaningful Easter cards.

 
Easter Hope stamps.jpg
 

Tips & Instructions

  • Gorgeous Grape Card Base - 5 1/2 x 8 1/2, score at 4 1/4

  • Basic White Layer - 5 1/4 x 4, stamp floral image with Black Memento Ink and color with Stampin’ Blends. I used Light Highland Heather, Granny Apple Green and Seaside Spray.

  • Stamp cross and HOPE sentiment on Basic White Cardstock with Black Memento Ink and cut with 2nd from largest Layering Oval Die. Color cross with Stampin Blends, I used Light Highland Heather and Light & Dark Smoky Slate.

  • Cut largest scalloped oval from Gorgeous Grape Cardstock and adhere behind stamped oval.

  • Lay oval on card to determine positioning for sentiment. Stamp sentiment with Black Memento Ink on white layer and adhere to card.

  • Adhere ovals using Dimensionals.

  • Add Dimensionals to cross.

 
Easter Hope Card1.jpg
 

On the inside stamp sentiment and flowers using Black Memento Ink. Color like you colored the front.

 
Easter Hope Card inside.jpg
 

Place a $50 order from my Online Store during the month of March and receive a FREE package of Opal Rounds.

 
Patti's March Ordering Special.png
 

Supply List

Sketch Saturday - In Bloom

For this week’s sketch challenge I used the In Bloom Bundle. These Pierced Blooms Dies in the bundle are so pretty with all the stitching in them. I cut the flowers and leaves from the Butterfly Bijou Designer Series Paper and love how they turned out.

 
Sketch Saturday - In Bloom.jpg
 

The sketch I used is from the Atlantic Hearts Sketch Challenge.

 
Screen Shot 2021-03-06 at 2.58.03 PM.png
 

Tips & Instructions

  • Magenta Madness Card Base - 5 1/2 x 8 1/2, score at 4 1/4 (horizontal card)

  • Basic White Layer - 5 1/2 x 3 3/4, adhere to card base.

  • Magenta Madness Layer - 5 1/2 x 2, emboss with the Tasteful Textile 3D Embossing Folder and adhere to card.

  • Cut 3 scalloped squares from Basic White Cardstock using the 4th from smallest die from the Layering Squares Dies. Adhere across the card, spacing evenly.

  • Cut 3 flowers and 3 sets of leaves from the Butterfly Bijou Designer Series Paper using the Pierced Blooms Dies.

  • Cut 3 flower centers from Magenta Madness Cardstock and adhere to center of flowers.

  • Adhere the leaves to each square and then adhere flower using a Dimensional.

  • Add Opal Round to center of each flower.

  • Stamp the “Happy Birthday” part of the sentiment on 1/2” strip of Basic White Cardstock. See instructions below on how to mask off the part of the stamp you don’t want to stamp.

 
Masking Collage.png
 
  • Punch both ends of the sentiment strip using the Banners Pick A Punch and adhere using Dimensionals.

 
Sketch Saturday - In Bloom Card2.jpg
 

I love all the texture with the pierced flowers and the embossed layer.

 
Sketch Saturday - In Bloom closeup.jpg
 

On the inside, follow the masking steps to get the bottom part of the sentiment. Stamp the larger flower with Magenta Madness Ink but stamp off first to get a lighter shade. Stamp inside and dots using Magenta Madness Ink.

 
Sketch Saturday - In Bloom inside.jpg
 

Supply List

So Much Happy - Birthday Card

This is such a fun Birthday Card. I used the So Much Happy Bundle and Playing With Patterns Designer Series Paper to make it.

 
So Much Happy - Birthday Card2.jpg
 

Watch the video to see how to use the large HAPPY die. You can cut it diagonally like I did or straight across.


You can easily use the stamp set on its own or bundle it with the dies and save 10%.

 
Screen Shot 2021-03-04 at 5.25.16 PM.png
 

Tips & Instructions

  • Coastal Cabana Card Base - 4 1/4 x 11, score at 5 1/2 (side folding, horizontal card)

  • Playing With Patterns Layer - 5 1/4 x 4, cut the HAPPY sentiment using Happy Dies. Adhere to card base.

  • Stamp 3 balloons on Basic White Cardstock using Coastal Cabana, Calypso Coral and Crushed Curry Inks. Cut with coordinating die.

  • Back piece of Basic White Cardstock with Adhesive Sheet and cut 3 balloon strings and one bow with dies.

  • Arrange balloons on card and adhere the Crushed Curry balloon. Adhere the string and cut end to length you want. Adhere the other 2 balloons using Dimensionals. Adhere the strings and cut length. Adhere the bow where the strings meet.

  • Stamp sentiment on 1/2” strip of Basic White and punch banner on each end using the Triple Banner Punch. Adhere using Dimensionals.

  • Cut some stars from Purple Posy Cardstock and adhere to card as shown.

 
So Much Happy - Birthday Card1.jpg
 

On the inside stamp sentiment with Coastal Cabana Ink and the balloons and bows with Calypso Coral Ink.

 
So Much Happy - Birthday Card inside.jpg
 

Supply List

Sweet Springtime Joy Card

The Springtime Joy Stamp Set is so adorable. You can use it to make Easter cards or a spring card like the one I made.

 
Sweet Springtime Joy card2.jpg
 

I love the wreath of flowers on the little lamb and rabbits head. Add a few flowers and you have a cute little springtime scene.

 
Sweet Springtime Joy Stamp.jpg
 

I colored the flowers using Stampin’ Blends.

 
Sweet Springtime Joy Blends.jpg
 

Tips & Instructions

  • Gorgeous Grape Card Base - 5 1/2 x 8 1/2, score at 4 1/4

  • Hydrangea Hill Designer Series Paper - 5 x 3 3/4, adhere to card base.

  • Gorgeous Grape strip - 5 1/2 x 7/8, emboss with Ornate Floral 3D Embossing Folder and adhere to card.

  • Basic White Cardstock, cut using the largest rectangle from the Stitched So Sweetly Dies.

  • Stamp lamb, flowers and sentiment with Black Memento Ink. The butterfly is really upside down but I wanted it on the top left side so I put a small piece of washi tape over the antenna and ink up the stamp. Remove the washi tape and stamp on the layer.

  • Color the flowers, leaves and butterfly using Stampin’ Blends. I used all light colors - Granny Apple Green, Daffodil Delight, Highland Heather, Seaside Spray and Pumpkin Pie.

  • Adhere layer to card using Dimensionals.

  • Add some Rhinestones to flowers.

 
Sweet Springtime Joy card1.jpg
 

On the inside stamp images and sentiment with Black Memento Ink. Color using Stampin’ Blends.

 
Sweet Springtime Joy inside.jpg
 

Butterfly Brilliance Birthday Cards

When I look at these cards, I think Spring!!! The colors are so bright and cheerful. I used the Butterfly Brilliance Products to make them.

 
Butterfly Brilliance Birthday Cards both.jpg
 

In my video, I’ll show you all the products in this collection. They coordinate so well together and became available for purchase on March 2. When I was editing the video, I realized I said “beautiful” lots of times…so I guess I think these products are “beautiful”!


You can purchase the full collection or the different products separately. You can click the button below to see the flyer with details.

Tips & Instructions

  • Magenta Madness Card Base - 5 1/2 x 8 1/2, score at 4 1/4

  • Basic White Layer - 5 3/8 x 4 1/8, adhere to card base.

  • Butterfly Bijou Designer Series Paper Layer - 5 1/4 x 4, adhere to card.

  • Cut largest circled from a piece of Natural Touch Specialty Paper using the Stitched Shapes Dies and adhere to the card.

  • Cut largest butterfly using the detailed butterfly from a piece of Magenta Madness Cardstock using the Brilliant Wings Dies and adhere to circle using Mini Dimensionals on just the body.

  • Stamp sentiment (from the Oval Occasions Stamp Set) on scrap of Basic White Cardstock with Magenta Madness Ink and punch with the Double Oval Punch.

  • Punch piece of Natural Touch Specialty Paper using the scalloped oval from the Double Oval Punch and adhere behind stamped oval. Adhere to card.

  • Cut smallest butterfly from piece of the designer paper and adhere using a Mini Dimensional to sentiment label.

  • Add a large Rhinestone to large butterfly and 2 small Rhinestones to the small butterfly.

 
Butterfly Brilliance Birthday Magenta2.jpg
 

Follow the instructions above substituting Just Jade for the Magenta Madness Cardstock and Ink.

 
Butterfly Brilliance Birthday Green.jpg
 

On the inside, stamp sentiment. Cut the smallest detailed die from the designer paper and adhere below the sentiment.

 
Butterfly Brilliance Birthday Inside1.jpg
 

Supply List

To Color or Not To Color....

Stampin’ Up! has introduced a new product collection called Butterfly Bouquet and the butterflies are just beautiful.

Today I played with some of these products to make some simple cards. I made one card in black and white and a second with some color. Which do you like better?

 
Butterfly Brilliance Both1.jpg
 

Here’s a peek at the products in this collection. Come back tomorrow and watch my video to see a closer look.

 
02.02.21_SHAREABLE_OOP_Q1_NA.jpg
 

The butterflies in this stamp set are all grouped together in one large stamp and there is a die that cuts them all out in one shot.

 
Butterfly Brilliance stamp.jpg
 

Tips & Instructions

  • Basic Black Card Base - 5 1/2 x 8 1/2, score at 4 1/4

  • True Love Designer Series Paper 5 1/4 x 4

  • Basic White Layer - 4 3/4 x 3 1/2, stamp sentiment in bottom corner using Black Memento Ink. I used the sentiment from the Snailed It Stamp Set.

  • Basic White Cardstock - 6 x 5, stamp butterfly grouping with Black Memento Ink and cut with coordinating dies. I used the Stamparatus and stamped twice to get a dark image.

  • Adhere 3 butterflies to Basic White Layer and adhere layer using Foam Adhesive Sheet cut to fit layer.

  • Add Rhinestone to each butterfly.

 
Butterfly Brilliance B&W1.jpg
 

Follow the same steps as above but color the butterflies.

  • I used Stampin Blends (Light & Dark Highland Heather, Light Mint Macaron, Light Bermuda Bay, Light So Saffron, Light Pumpkin Pie).

  • Add some Wink Of Stella to the butterflies.

 
Butterfly Brilliance color1 .jpg
 

On the inside add one of the butterflies that you didn’t use on the card front.

 
Butterfly Brilliance inside.jpg
 

Supply List

Sale-A-Bration Ends Today - February 28, 2021

Today is the last day of Sale-A-Bration where you can earn FREE products by placing an order of $50 or $100 worth of products.

 
Sale-A-Bration Image.jpg
 

During Sale-A-Bration, Stampin’ Up! has a special promotion on their Starter Kit where you can get an additional 5 packs of 6x6 Designer Series Paper along with the already fantastic offer. This promotion also ends today.

Email me for more info - patt@pspapercrafts.com

 
Starter Kit Promotion.jpg
 

Sketch Saturday - Hey Birthday Chick

These little chicks are so cute. They are from the Hey Birthday Chick Stamp Set and I have them dancing across the card for this week’s Sketch Challenge.

 
Sketch Saturday - Hey Birthday Chick card1.jpg
 

The sketch is from the Atlantic Hearts Sketch Challenge. Instead of the diamonds I went with circles.

 
Screen Shot 2021-02-26 at 11.57.42 AM.png
 

The Hey Birthday Chick Stamp Set is a new product and it’s so much fun. Those chicks are just too cute!

 
Sketch Saturday - Hey Birthday Chick stamp.jpg
 

Tips & Instructions

  • Night Of Navy Card Base - 5 1/2 x 8 1/2, score at 4 1/4

  • Basic White Layer - 5 1/2 x 2 1/4, emboss with Hammered Metal 3D Embossing Folder and adhere to card.

  • Paper Blooms Designer Series Paper Strip - 5 1/2 x 1/2, adhere to card.

  • Stamp chicks on 3 circles from the Paper Blooms Designer Series Paper and cut with Layering Circles dies

 
Screen Shot 2021-02-26 at 9.54.18 PM.png
 
  • Cut 3 scalloped circles from Night Of Navy Cardstock using the Layering Circles Dies and adhere behind the stamped circles. Adhere to card with Dimensionals.

  • Stamp sentiment on Basic White scrap with Night Of Navy Ink and punch with Classic Label Punch. Adhere with Dimensionals.

 
Sketch Saturday - Hey Birthday Chick card2.jpg
 

On the inside stamp sentiment and confetti with Night Of Navy Ink. I stamped off first with the confetti to get a lighter shade.

 
Sketch Saturday - Hey Birthday Chick inside.jpg
 

Supply List

Beautiful A Touch Of Ink Cards

I made these two cards using the A Touch Of Ink Stamp Set. It has beautiful hummingbird, butterfly and floral images. There are filler stamps but I decided to use Watercolor Pencils to color them.

 
A Touch Of Ink Cards stamp.jpg
 

In the video, I’ll show you how to make these cards with the embossed vellum background layer, coloring with Watercolor Pencils and blending with Blender Pens.


This one features Gorgeous Grape. Below are the Tips & Instructions

  • Gorgeous Grape Card Base - 5 1/2 x 8 1/2, score at 4 1/4

  • Vellum Layer - 5 1/4 x 4, emboss with Parisian Flourish 3D Embossing Folder

  • Cut Basic White Cardstock with Ornate Layers Die and adhere to embossed vellum layer then adhere to card base.

  • Basic White Layer - 3 1/2 x 2 1/4, stamp butterfly and flowers with Black Memento Ink.

  • Color using Watercolor Pencils and blend with Blender Pens..

  • Adhere to ornate layer using Dimensionals.

  • Stamp sentiment on 1/2” strip of Basic White with Black Memento Ink. (Sentiment is from Itty Bitty Birthdays). Adhere to card using Dimensionals.

 
A Touch Of Ink Gorgeous Grape1.jpg
 

Follow the same steps as above using Granny Apple Green for the card base and stamp the hummingbird instead of the butterfly. Stamp sentiment on 3/4” strip of Basic White and cut to size.

 
A Touch Of Ink Green1.jpg
 

On the inside stamp the flowers and color like card front and stamp sentiment with Black Memento Ink.

 
A Touch Of Ink Cards inside.jpg
 

Supply List

Fun Berry Blessings Birthday Card

I love how bright and vibrant the Berry Delightful Designer Series Paper is. It just makes me smile!

 
Berry Blessings Birthday Card2.jpg
 

You can get the Berry Blessings Stamp Set and Berry Delightful Designer Series Paper as a Bundle for FREE during Sale-A-Bration when you order $100 worth of products. You need to do this soon; it ends February 28, 2021.

 
Screen Shot 2021-02-25 at 1.37.30 PM.png
 

Tips & Instructions

  • Night Of Navy Card Base - 5 1/2 x 8 1/2, score at 4 1/4

  • Basic White Layer - 5 1/4 x 4, adhere to card base.

  • Berry Delightful Designer Series Paper - 5 x 3 3/4, adhere to card.

  • Basic White Cardstock - cut with the largest scalloped Rectangle from the Stitched So Sweetly Dies.

  • Berry Delightful Designer Series Paper - 3 3/8 x 2 1/2, cut into 3 strips - each 1 1/8 x 2 1/2

  • Spread strips apart (keeping them in order) and adhere to scalloped rectangle.

  • Wrap Night Of Navy Twine around the scalloped rectangle 3 times and adhere to back.

  • Adhere layer to card using Dimensionals.

  • Basic White Strip - 3/4 x 2 1/2, stamp sentiment (from Berry Blessings) using Night Of Navy Ink and adhere with Dimensionals.

  • Tie bow with 2 strands of the twine and adhere with Glue Dot.

  • Add Holiday Rhinestone to sentiment label.

 
Berry Blessings Birthday Card1.jpg
 

On the inside

  • Stamp sentiment (from Sweet Strawberry) using Night Of Navy Ink.

  • Stamp blueberry outline with Night Of Navy Ink, stamping off once and then the filler stamping off twice.

  • Stamp leaf outline with Granny Apple Green Ink and then the filler, stamping off once.

 
Berry Blessings Birthday Card inside.jpg
 

Supply List

Beautiful Simply Succulents

I’m a big fan of succulents and living in Florida is the perfect place to grow them. The Simply Succulents Bundle has great images and I used a piece of the Oh So Ombre Designer Series Paper for the background.

 
Simple Succulents Card2.jpg
 

Watch the video to see how I stamped and colored these succulents to look like the real thing with the pretty Blackberry Bliss tips.


Tips & Instructions

  • Blackberry Bliss Card Base - 5 1/2 x 8 1/2, score at 4 1/4

  • Basic White Layer - 5 1/4 x 4

  • Oh So Ombre Designer Series Paper Layer - 5 x 3 3/4

  • Stamp large succulent image on Basic White Cardstock with Garden Green Ink. Color with Stampin’ Blends - tips with Light Blackberry Bliss, petals with Granny Apple Green and the smaller petals with Soft Sea Foam. Cut with coordinating die.

  • Stamp pot on Basic White Cardstock with Black Memento Ink. Color with Cinnamon Cider Stampin Blends and cut with coordinating die.

  • Stamp sentiment with Blackberry Bliss Ink on scrap of Basic White Ink and cut with label die.

  • Adhere pieces to card using Dimensionals on sentiment and succulents.

  • Tie bow with Linen Thread and adhere to pot with Glue Dot.

  • Add some Pearls.

 
Simple Succulents Card1.jpg
 

On the inside, stamp succulent image at top and bottom corner with Granny Apple Green Ink.

 
Simply Succulents Card Inside.jpg
 

Supply List