How To Make Simple, Sweet Treat Holders

These treat holders are really cute and so easy to make. They would be such a nice little gift to give out for Valentine’s Day or just to let someone know you appreciate them.

 
Sweet Treat Boxes both.jpg
 

In the video I’ll show you how to make these treat holders. There are great patterns in the Delightful Berry and the True Love Designer Series Papers to make these treat holders.


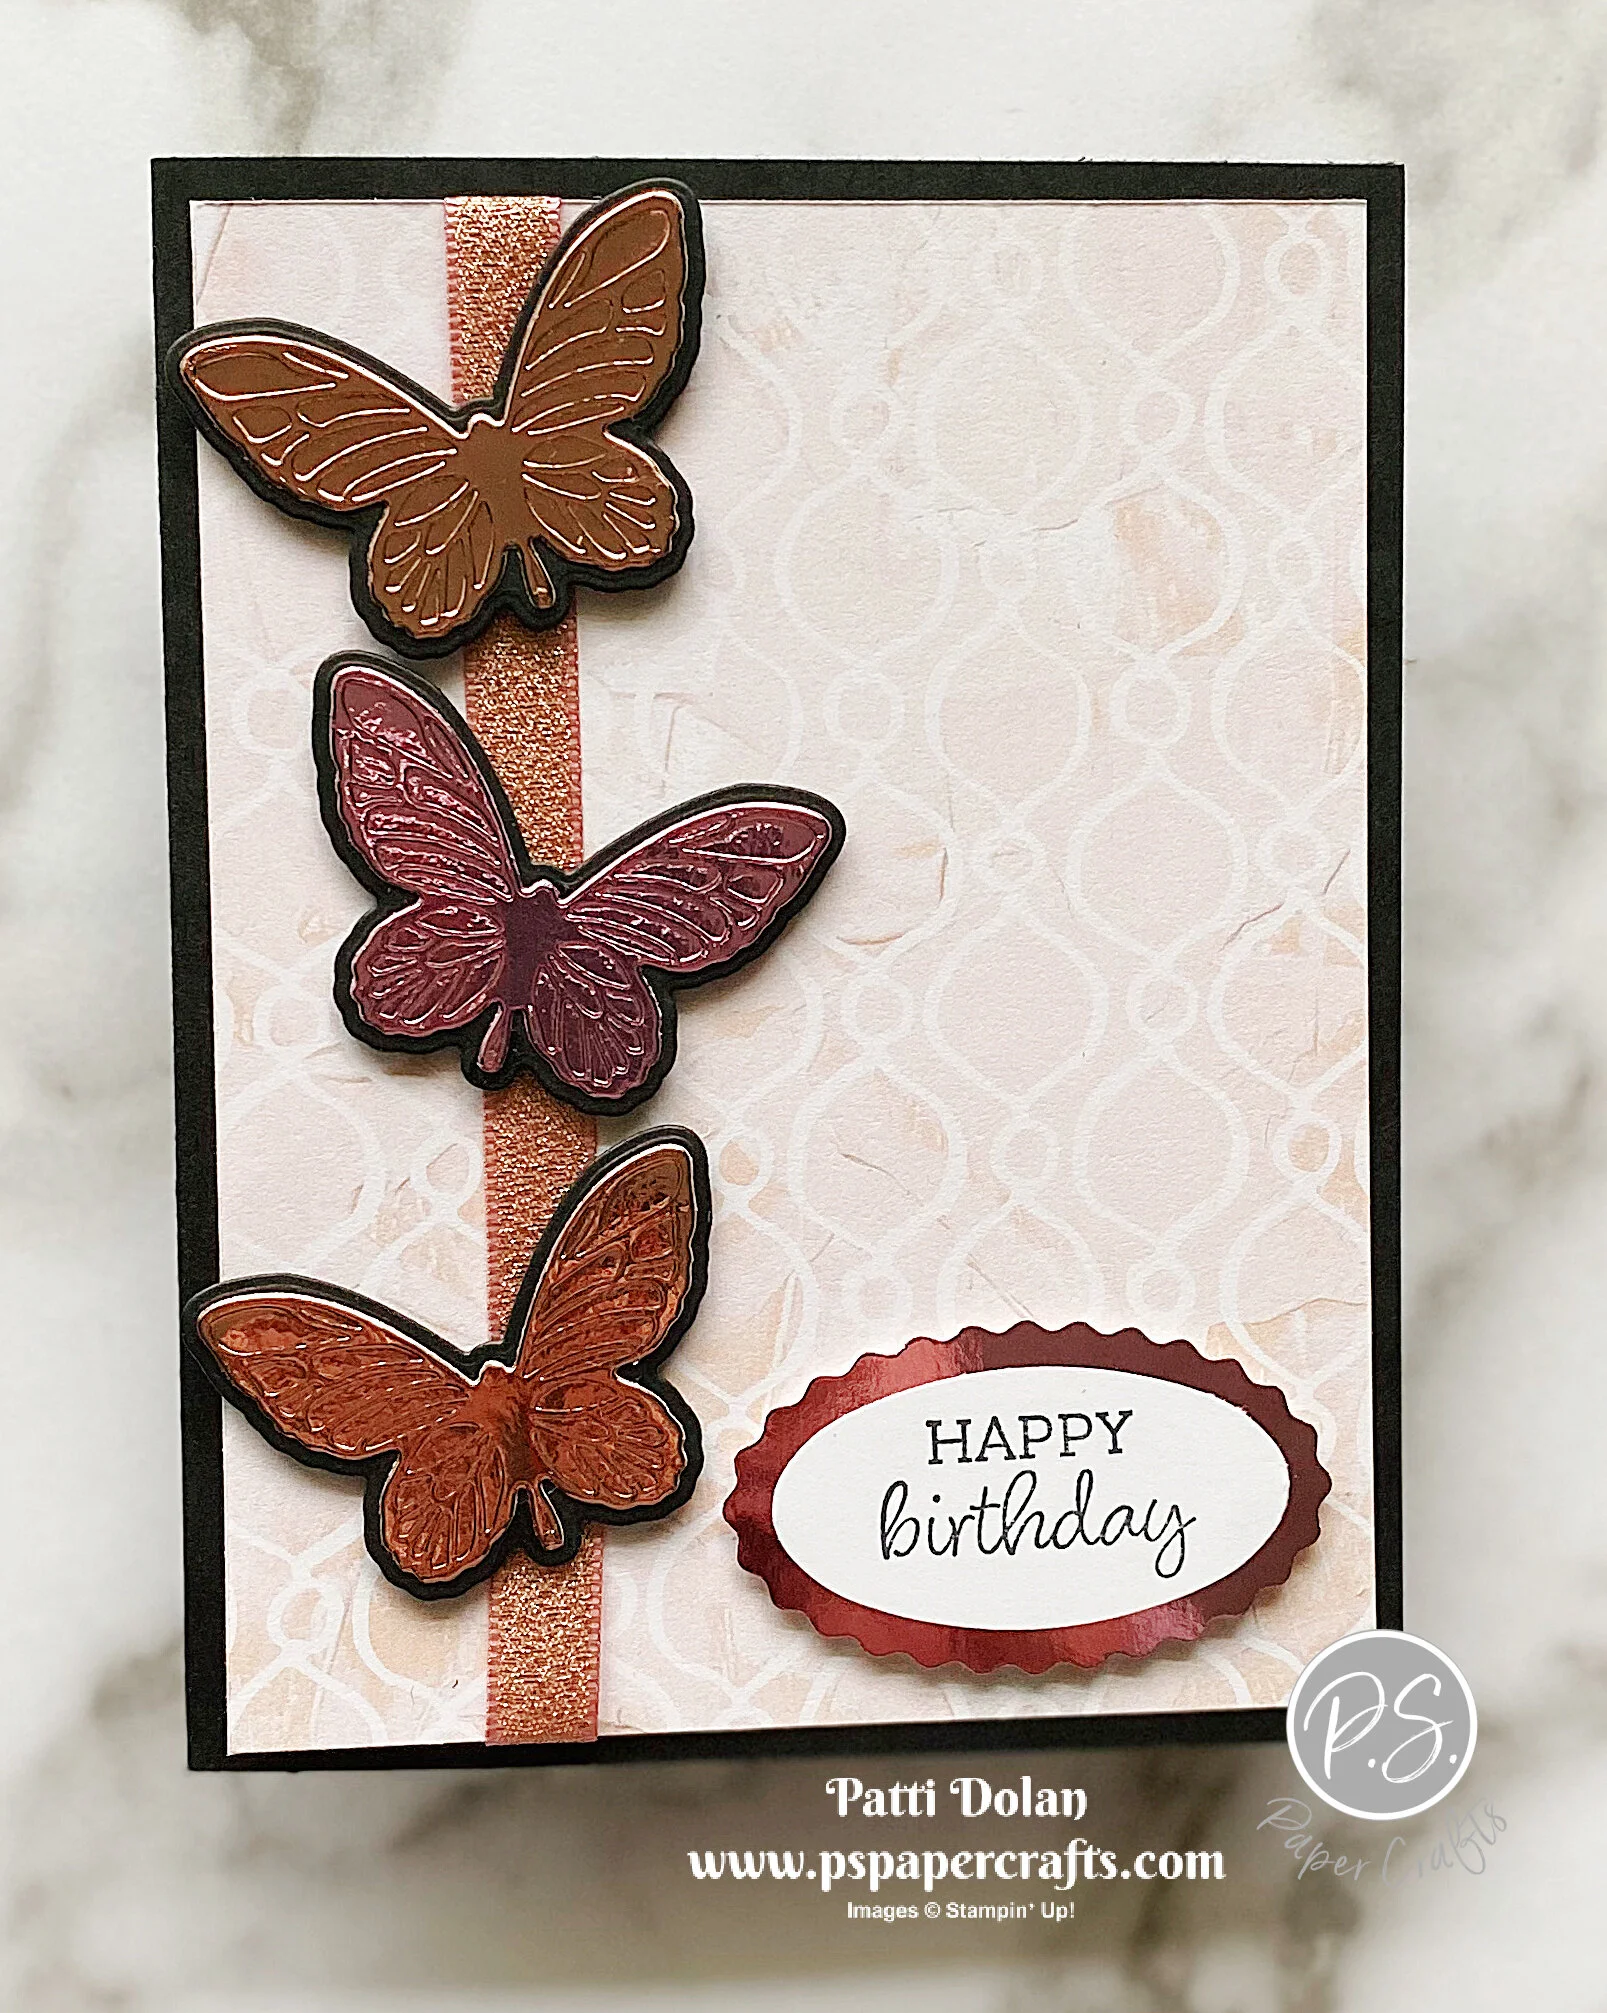
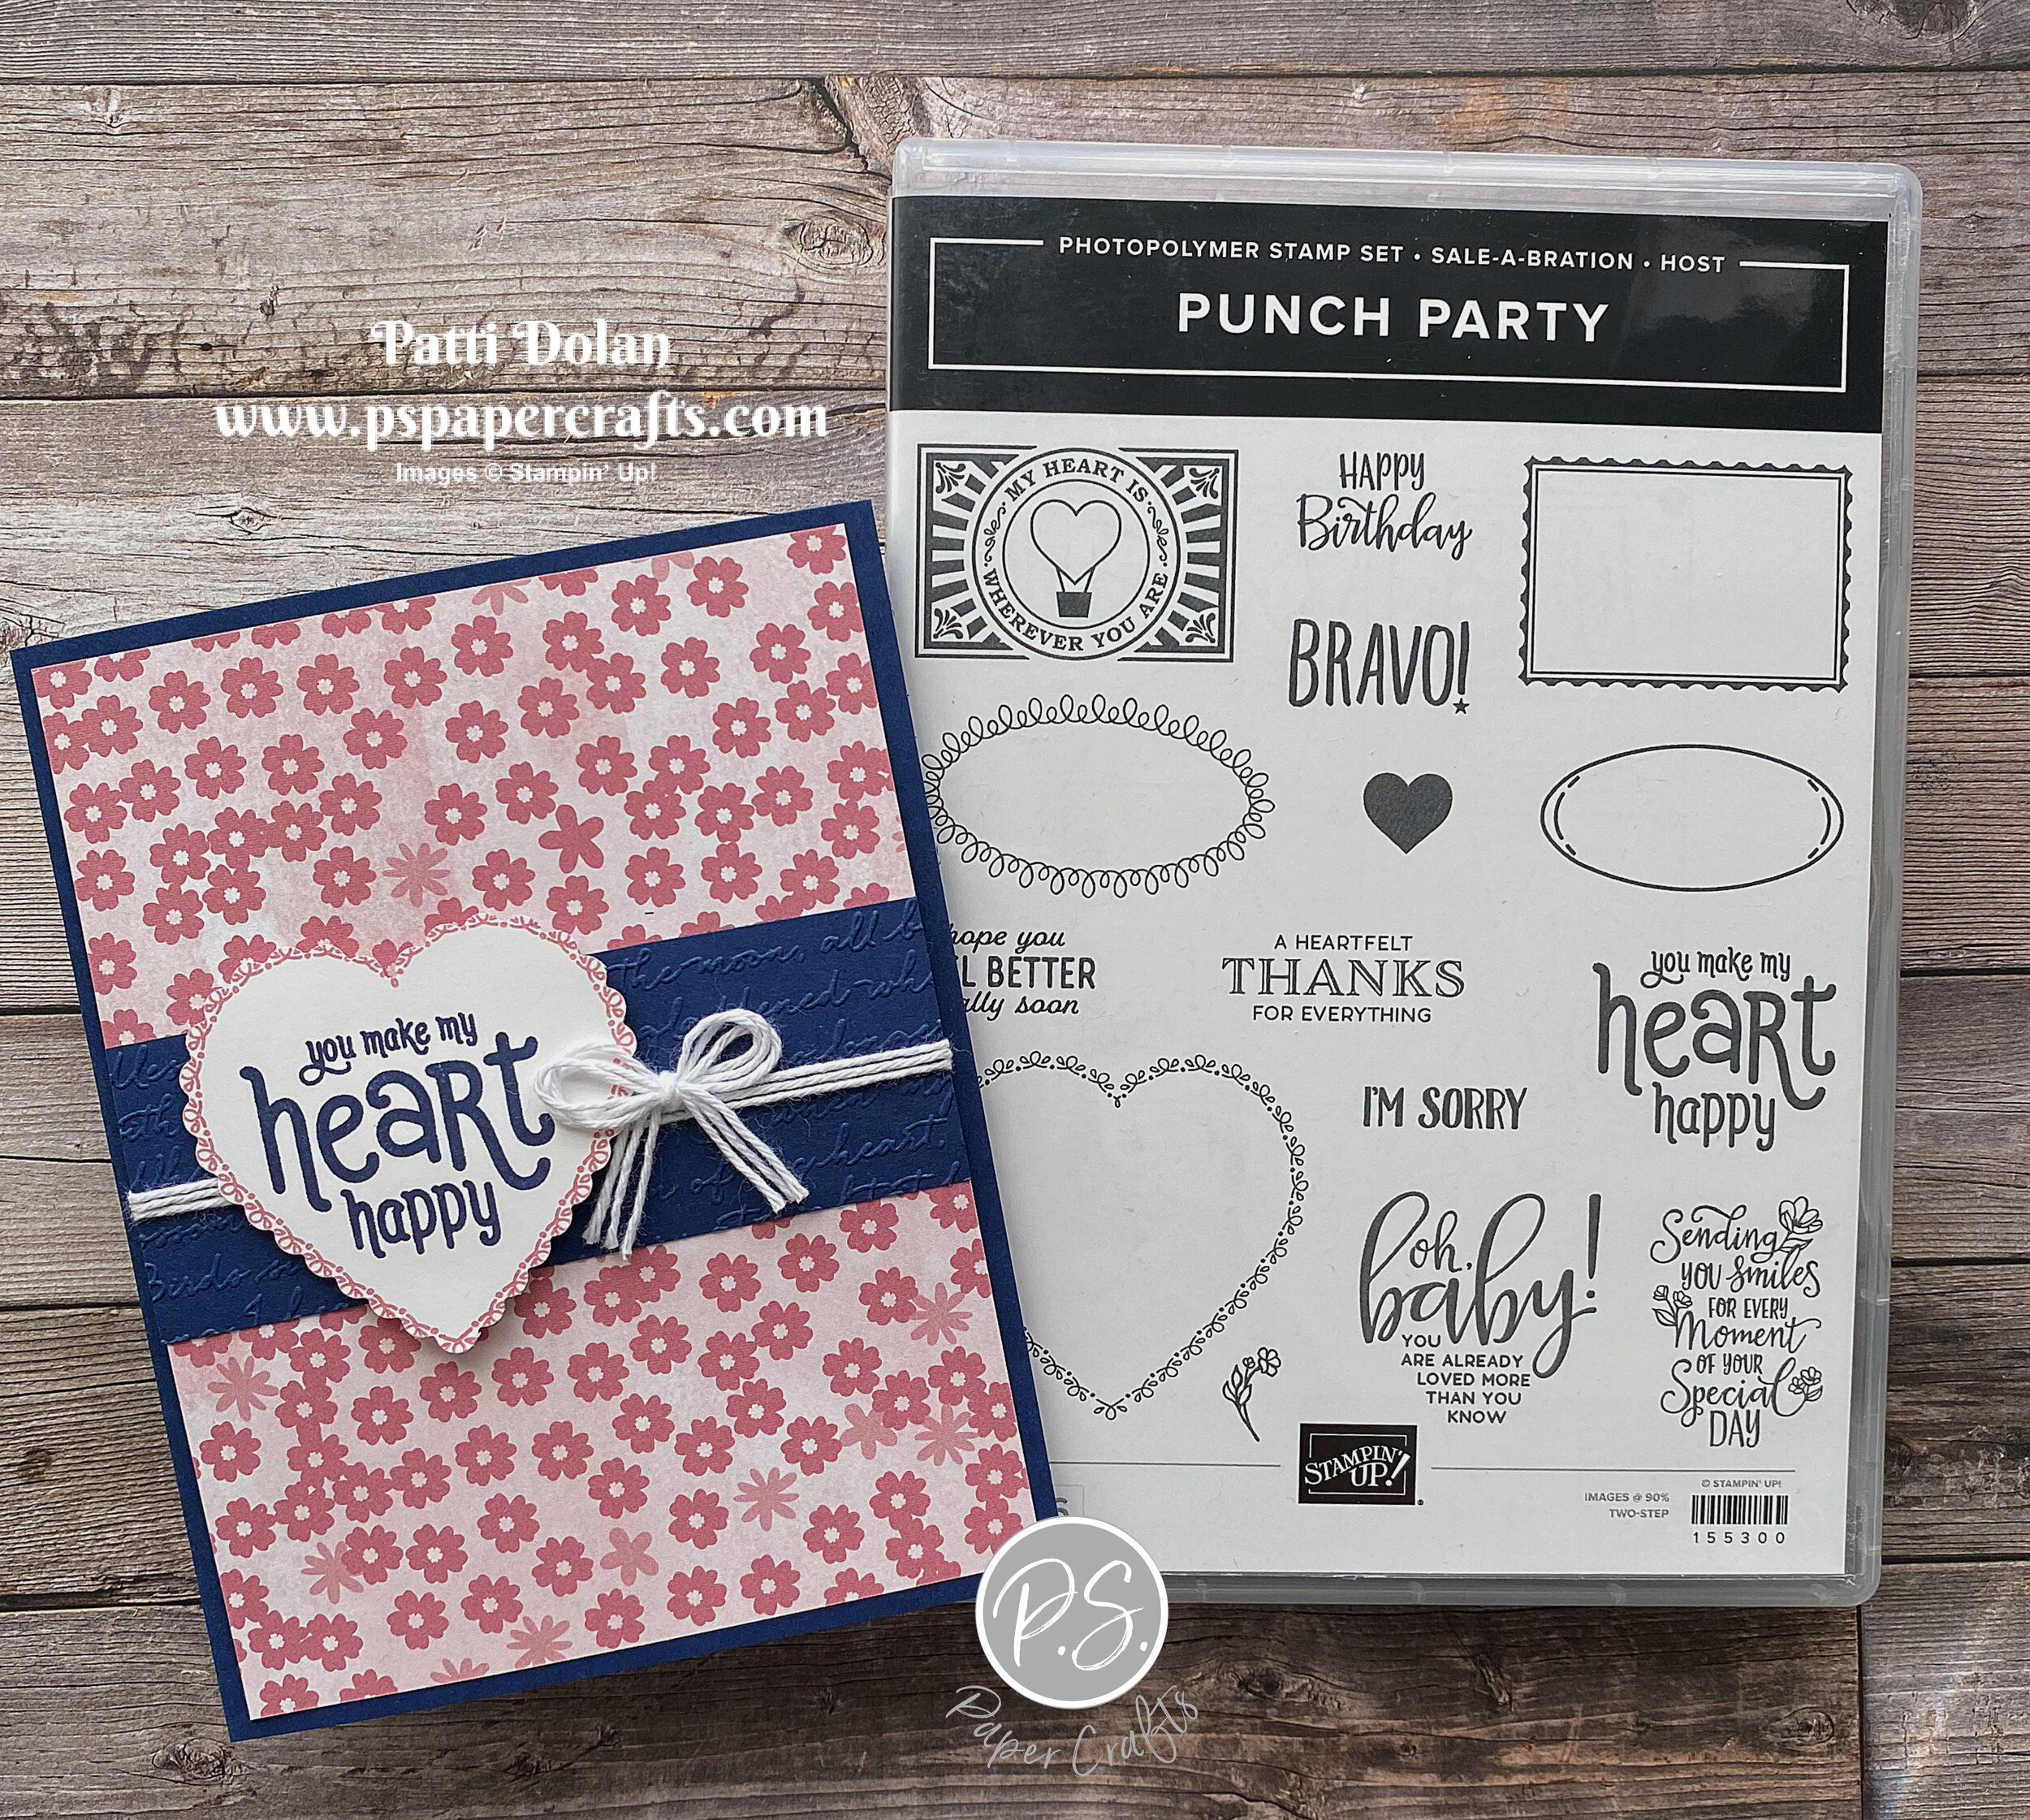
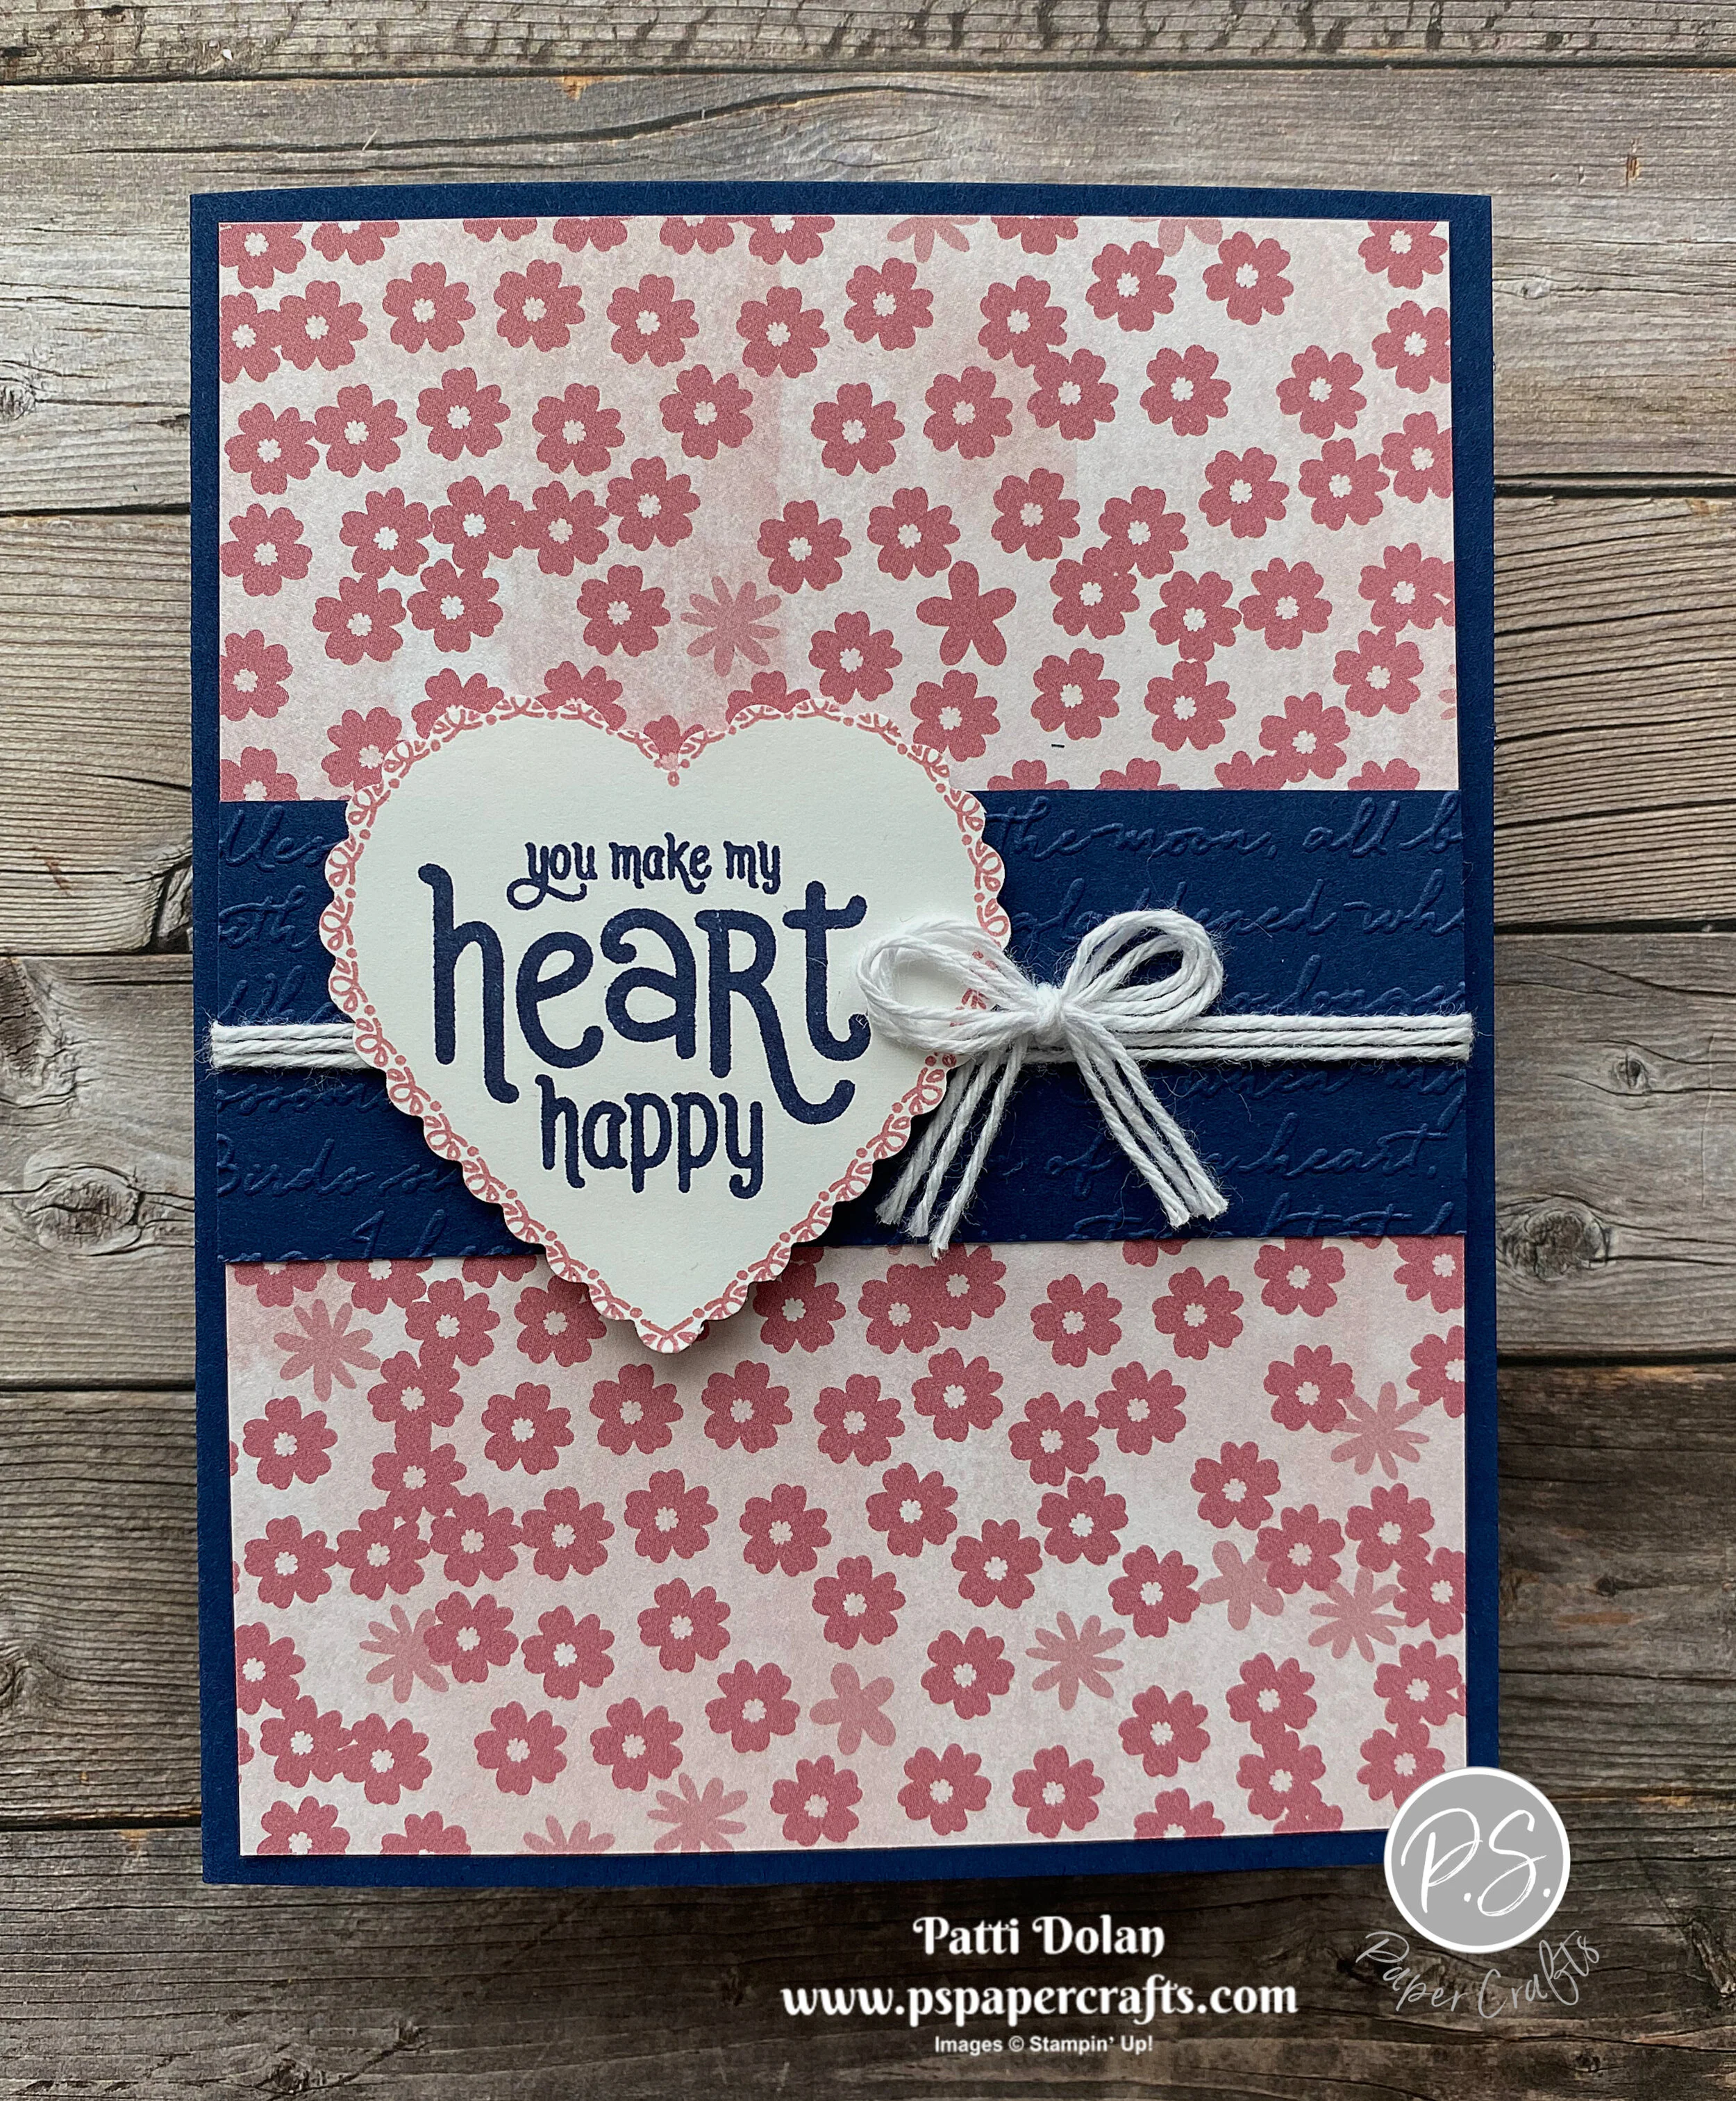
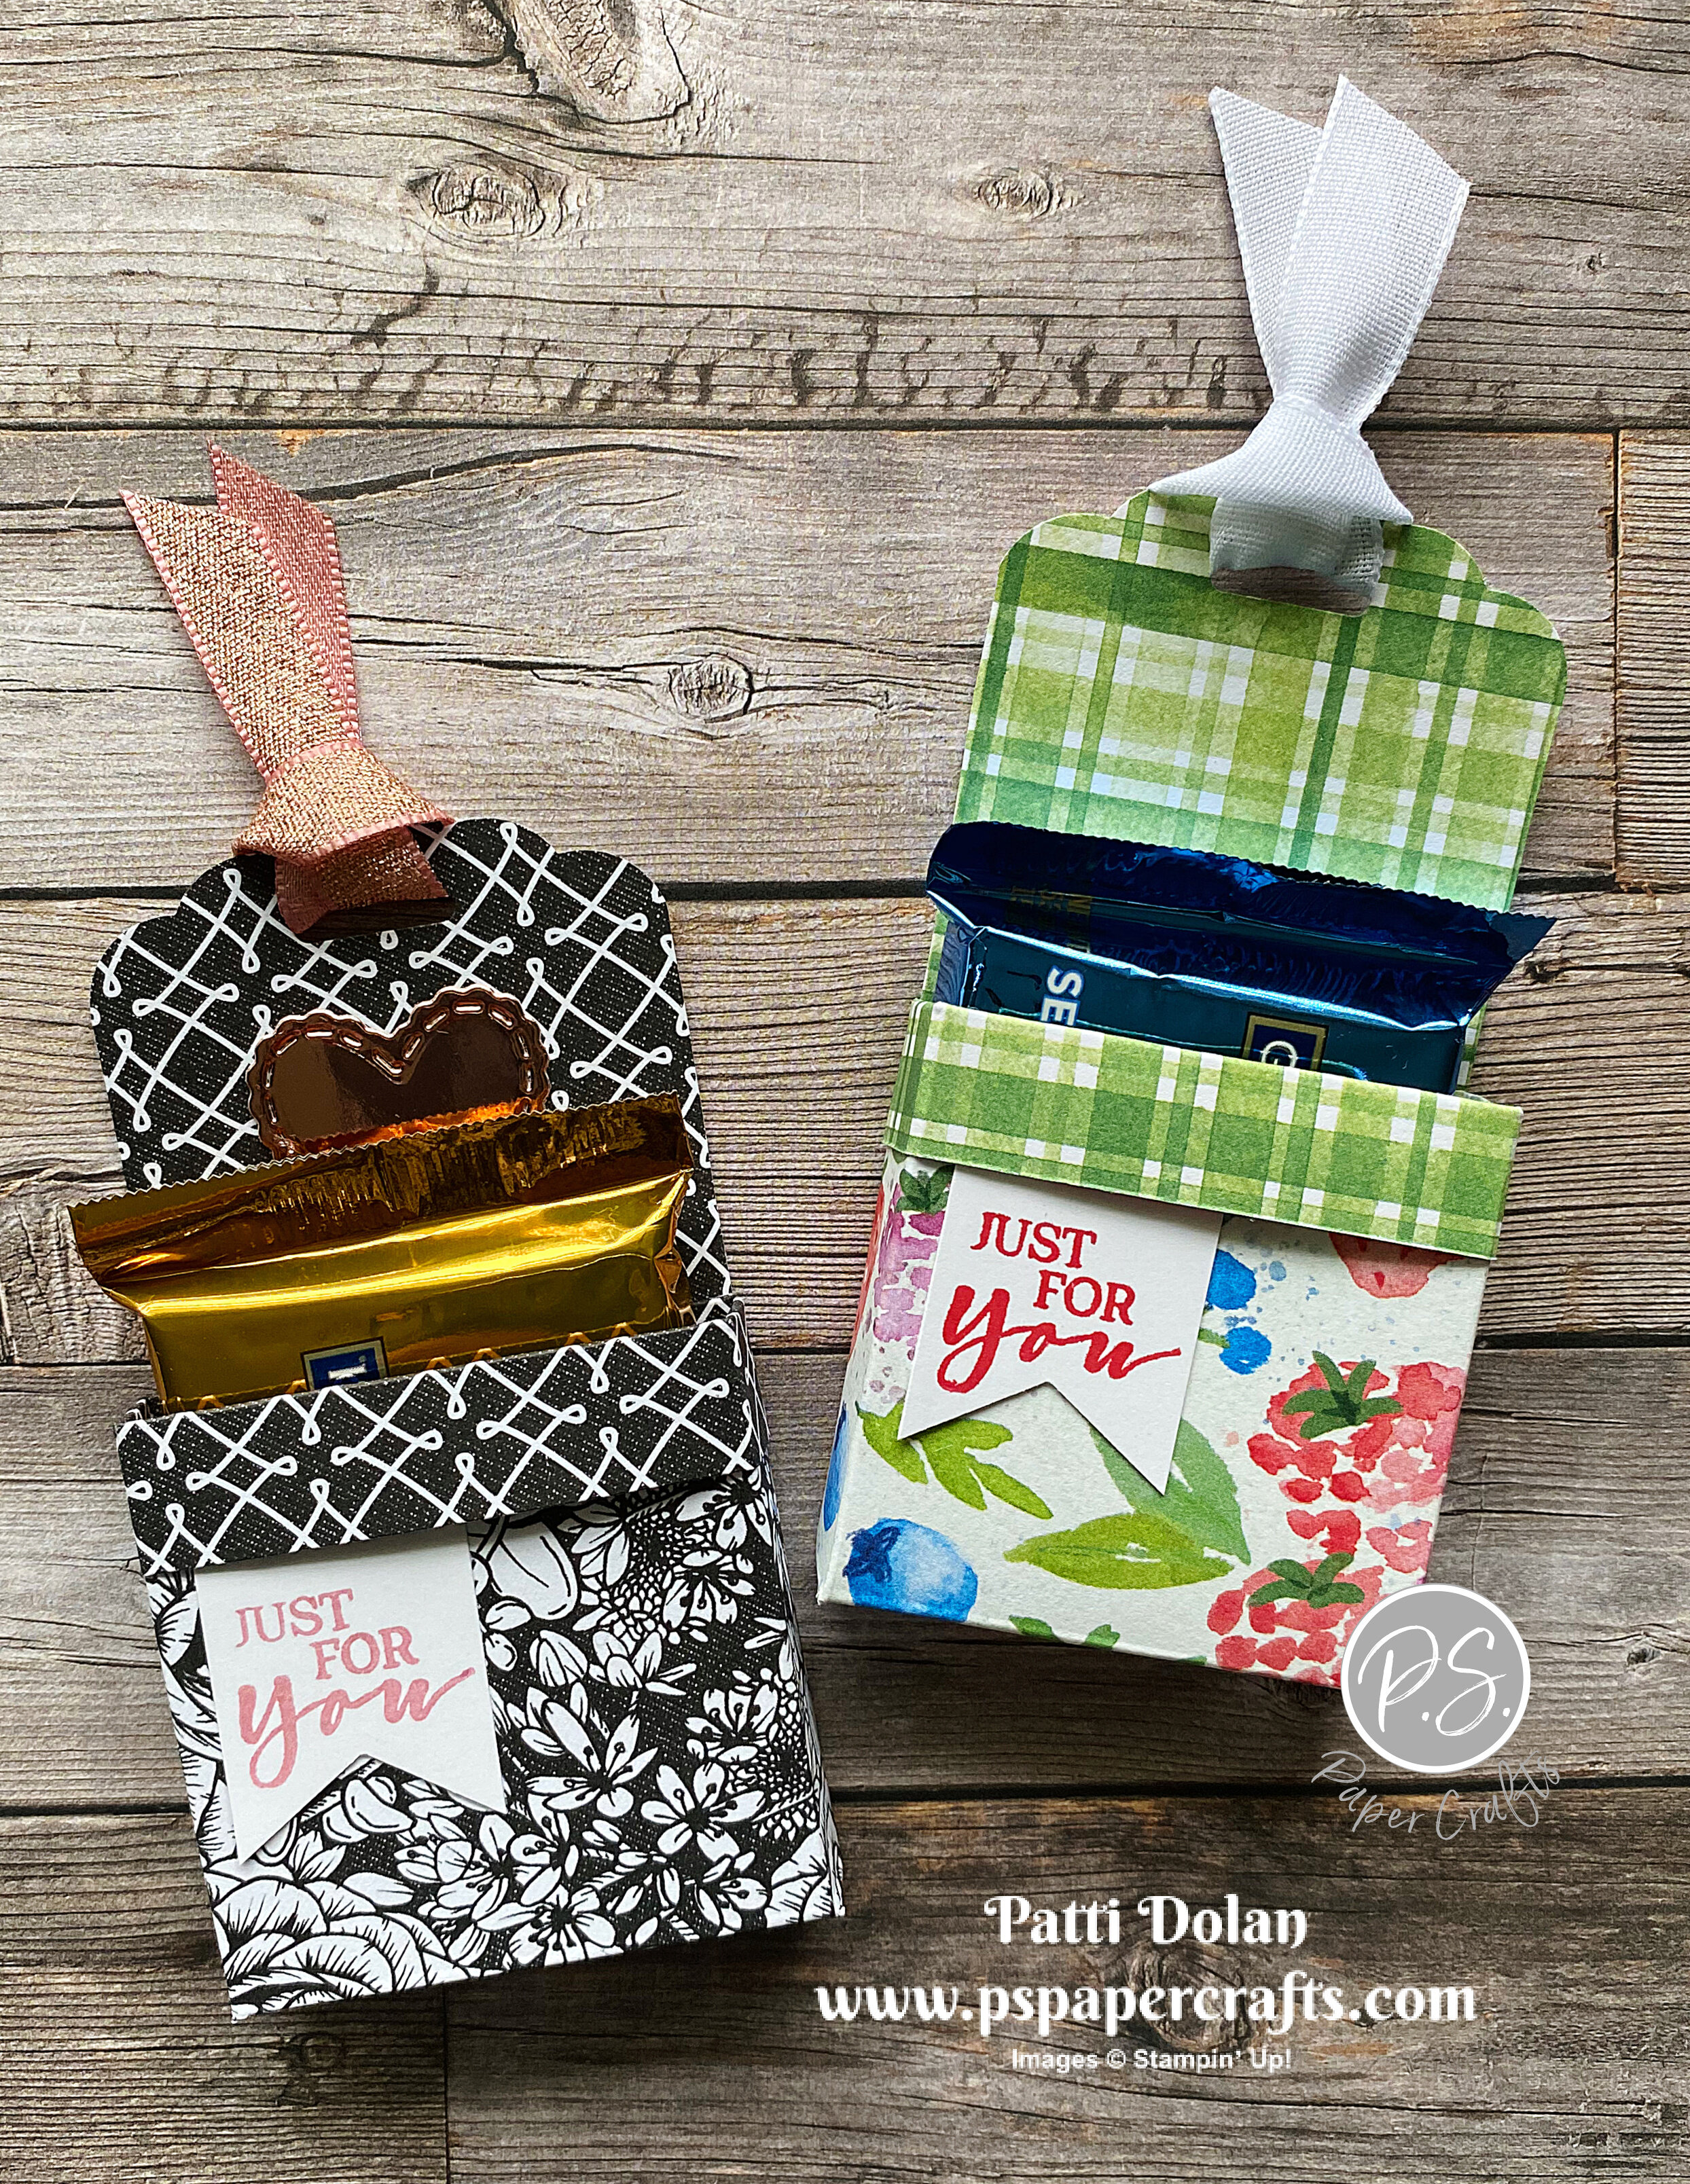
I used the True Love Designer Series Paper and Blushing Bride Metallic Ribbon on this one. The heart was cut from a piece of Love You Always Foil Sheets using the Be Mine Stitched Dies.

I punched the top with the Scalloped Tag Topper Punch. The sentiment was stamped with Poppy Parade Ink on a 7/8 strip of Basic White and punched to create a banner end with the Triple Banner Punch.

 
Sweet Treat Box Heart1.jpg
 

A piece of Ghirardelli Chocolate fits perfectly in this holder.

 
Sweet Treat Box Heart2.jpg
 

Here’s the template I used with the measurements.

  • Designer Series Paper - 7 x 3 1/2

  • Score on the 7” side at 1/4 and 3/4, then flip and score the other side at 1/4 and 3/4

  • Score on the 3 1/2 side at 1/2, 2 1/2 and 3

  • Cut away from the longer end to the 2 1/2 score line on both sides.

  • Fold and adhere as shown on the video.

 
Sweet Treat Box template.jpg
 

I used the Berry Delightful Designer Series Paper which is part of the Berry Blessings Bundle, a Free Sale-A-Bration product with a qualified order. The ribbon is from the Flowers For Every Season Ribbon Combo Pack.

I punched the top with the Scalloped Tag Topper Punch. The sentiment was stamped with Poppy Parade Ink on a 7/8 strip of Basic White and punched to create a banner end with the Triple Banner Punch.

 
Sweet Treat Box Berry2.jpg
 

I love how bright and cheerful this one is with the berry paper.

 
Sweet Treat Box Berry1.jpg
 

Supply List for both

Be My Valentine Card

This combination of Rococo Rose, Blushing Bride and Gold Foil is just perfect for a beautiful Valentine’s Day Card!

 
Be My Valentine Card2.jpg
 

I used the Always In My Heart Bundle. I think my favorite part of this card is the little hearts cut out across the bottom of the card. The die cuts along the tops of the heart but I just adhered both together on the card base.

This is one of the bundles in featured in my January Simple Stampers Tutorial pdf that you can get for FREE with an order from my Online Store during the month of January.

 
Screen Shot 2021-01-25 at 9.59.54 PM.png
 

Tips & Instructions

  • Blushing Bride Card Base - 5 1/2 x 8 1/2, score at 4 1/4

  • Rococo Rose Layer - 5 1/2 x 4 1/4, using the small hearts die, cut across the bottom of the layer.

  • Adhere the Rococo Rose layers to the card base. It will be in 2 pieces but is easily lined up.

  • Using the Heart Punch Pack punch heart from Blushing Bride Cardstock and scalloped heart from a Gold Foil Sheet. Sponge the edges of the pink heart using Blushing Bride Ink. Adhere hearts together and adhere to card.

  • On a piece of Rococo Rose Cardstock, stamp sentiment with Versamark and heat emboss with Gold Embossing Powder. Fold along score lines and adhere to card. I used Dimensionals in the center and Liquid Glue on the ends.

  • Cut hearts from Gold Foil and Blushing Bride Cardstock and adhere to card using Liquid Glue.

 
Be My Valentine Card1.jpg
 

On the inside stamp sentiment and hearts using Rococo Rose Ink.

 
Be My Valentine Card inside.jpg
 

Supply List

Sketch Saturday - Floating & Fluttering

For this week’s sketch card I used the Fluttering Dies to cut and emboss these pretty butterflies from the Love You Always Foil Sheets.

 
Sketch Saturday - Floating & Fluttering card1.jpg
 

This is the sketch I used for this card. It’s from the CAS(E) This Sketch Challenge from Splitcoaststampers and it’s the last one they are doing. I’m so sad that they are no longer doing these challenges.

 
Screen Shot 2021-01-22 at 9.37.49 PM.png
 

I cut and embossed scraps of Love You Always Foil Sheets. I then cut a plain butterfly from Basic Black Cardstock and then adhered them together which gives you a perfect outline for the butterfly.

 
Sketch Saturday - Floating & Fluttering collage.png
 

Tips & Instructions

  • Basic Black Card Base - 5 1/2 x 8 1/2, score at 4 1/4

  • Fine Art Floral Designer Series Paper - 5 1/4 x 4, wrap piece of Blushing Bride Metallic Ribbon around layer, adhering to the back and then adhere layer to card base.

  • Cut 3 plain butterflies from Basic Black Cardstock using the Fluttering Dies.

  • Cut and emboss 3 butterflies from Love You Always Foil Sheets (I cut 2 from the Blushing Bride sheet and 1 from the Rococo Rose sheet). Adhere butterflies to plain black butterflies.

  • Adhere butterflies to card over ribbon using Dimensionals.

  • Stamp sentiment with Black Memento Ink on scrap of Basic White Cardstock and punch with Plain Double Oval Punch. The sentiment is from the Oval Occasions Stamp Set.

  • Punch Rococo Rose Foil Sheet with the scalloped punch and adhere behind label. Adhere to card using Dimensionals.

 
Sketch Saturday - Floating & Fluttering card2.jpg
 

On the inside stamp sentiment with Black Memento Ink. Cut and emboss butterfly like the ones on the front and adhere above sentiment.

 
Sketch Saturday - Floating & Fluttering inside.jpg
 

Supply List

Woodland Wonder Fun Fold Birthday Card

This was such a fun card to make. I CASEd it from the Mini Catalog and I think it turned out so cute.

 
Woodland Wonder Fun Fold Birthday card2.jpg
 

In the video I’ll show you how to stamp the tree and add some extra trunk to make it fit the card. I colored everything with Stampin’ Blends.


Tips & Instructions

  • Seaside Spray Card Base - 5 1/2 x 8 1/2, score at 4 1/4

  • Whisper White Layer - 4 x 10 3/4, score at 5 1/4 and 8

  • Stamp tree images with Black Memento Ink. I stamped the top, then the middle and then part of the bottom to extend the length of the tree. Stamp the full bottom at the end. Watch the video to see how I did this.

  • Stamp whatever images you like. I added the bunny, sign, balloon, music notes and some butterflies. Stamp sentiment.

  • Stamp clouds with Seaside Spray Ink.

  • Color using Stampin’ Blends - Granny Apple Green, Crumb Cake, Seaside Spray, Daffodil Delight, Smoky Slate and Flirty Flamingo.

  • Fold on score lines and adhere the top 5 1/4 x 4 portion to card base.

 
Woodland Wonder Fun Fold Birthday card1.jpg
 

These critters in the tree are so cute. You can make the tree long or short and add whatever images you want.

 
Screen Shot 2021-01-21 at 10.22.44 PM.png
 

On the inside stamp the sentiment and some balloons. Color the balloons with Light Stampin’ Blends.

 
Woodland Wonder Fun Fold Birthday inside.jpg
 

Supply List

Art Gallery - I Miss You Card

Can’t you think of a bunch of people you could send an I Miss You Card to? During this pandemic, who wouldn’t love to get a pretty card letting them know they are missed.

 
Art Gallery - I Miss You card2.jpg
 

I’ve been playing with the Art Gallery Bundle and I love how beautiful the flower image stamps. It’s a 2-step stamp so you can use two colors or do what I did and stamp with the same color ink; one direct and one by stamping off first.

You can bundle the stamp set with the coordinating dies to save 10%. It’s well worth it to get both the stamp set and the dies.

 
Screen Shot 2021-01-20 at 8.51.53 PM.png
 

Tips & Instructions

  • Merry Merlot Card Base - 5 1/2 x 8 1/2, score at 4 1/4

  • Fine Art Floral Designer Series Paper - 5 1/4 x 4

  • Stamp floral image on designer paper with Merry Merlot Ink, stamping off first to get a lighter shade. Stamp multiple times making sure you stamp off first. Adhere layer to card base.

  • On scrap of Basic White Cardstock stamp leaf image with Garden Green Ink. Stamp the detailed flower image (one with fewer petals) using Merry Merlot Ink. Stamp the full flower image with Merry Merlot but stamp off first to get the lighter shade.

  • Cut leaf and flower image using the Floral Gallery Dies and adhere to card with Dimensionals.

  • Stamp sentiment on scrap of Basic White Cardstock with Merry Merlot Ink and cut with Floral Gallery Dies. Adhere to card with Dimensionals.

  • Tie bow with piece of Bumblebee Gingham Ribbon and adhere with a Glue Dot.

 
Art Gallery - I Miss You card1.jpg
 

On the inside stamp leaf image with Garden Green Ink and flower with Bumblebee Ink following the same steps as you did for the flower on the card front.

 
Art Gallery - I Miss You inside.jpg
 

Supply List

Fine Art Floral with Golden Garden Designer Specialty Acetate

Oh this Specialty Acetate is so pretty! The designs coordinate perfectly with the Fine Art Floral Designer Series Paper to outline the flowers with a beautiful gold lines.

 
Fine Art Floral with Acetate both.jpg
 

Watch the video to see how pretty this Fine Art Floral Suite is.


Tips & Instructions

  • Poppy Parade Card Base - 5 1/2 x 8 1/2, score at 4 1/4

  • Gold Foil Sheet - 5 3/8 x 4 1/8 (I cut the inside to save paper)

  • Lay Golden Garden Designer Specialty Acetate over the coordinating piece of Fine Art Floral Designer Series Paper and cut both at 5 1/4 x 4

  • Peel the film from back of acetate

  • Adhere acetate to designer paper layer putting adhesive across the middle so it will be hidden behind ribbon.

  • Adhere layers to gold layer and wrap piece of Fine Art Ribbon around the layers covering the adhesive and adhere to back.

  • Stamp sentiment on scrap of Basic White Cardstock with Poppy Parade Ink and punch with Double Oval Punch. The Happy Birthday sentiment is from the Punch Party Host Stamp Set.

  • Punch scrap of Gold Foil with the scalloped punch using the Double Oval Punch and adhere to sentiment label, then adhere to card using Dimensionals.

  • Tie a piece of ribbon around ribbon using a single knot. Add Gold Metallic Pearls to sentiment.

 
Fine Art Floral with Acetate card1.jpg
 

On this card the sentiment is from the Art Gallery Stamp Set.

 
Fine Art Floral with Acetate card3.jpg
 

On the inside stamp sentiment and flowers using Poppy Parade Ink. The sentiment I used is from the Punch Party Stamp Set.

 
Fine Art Floral with Acetate inside.jpg
 

Supply List

Punch Party Valentine's Card

I used the Punch Party Stamp Set to make this pretty card. The Designer Series Paper is Paper Blooms and its one of the Sale-A-Bration products that you can get for free with a qualifying order.

 
Punch Party Valentine's Card2.jpg
 

You can get the Punch Party Stamp Set for free if you host a party with sales over $300. It’s a great set that coordinates with multiple punches. If you want to host an online party, just email me and we can work out the details. patti@pspapercrafts.com

 
Punch Party Valentine's Card stamp.jpg
 

Tips & Instructions

  • Night Of Navy Card Base - 5 1/2 x 8 1/2, score at 4 1/4

  • Paper Blooms Designer Series Paper - 5 1/4 x 4

  • Night Of Navy Strip - 4 x 1 1/2, emboss with Scripty 3D Embossing Folder

  • Adhere embossed strip to Designer Series Paper layer and wrap White Bakers Twine around 3 times and adhere to back. Adhere layer to card base.

  • Stamp heart image on Basic White Cardstock using Rococo Rose Ink. Stamp sentiment inside the heart using Night Of Navy Ink and punch using the scalloped heart from the Heart Punch Pack.

  • Adhere heart to card using Dimensionals.

  • Tie bow with 3 strands of Bakers Twine and adhere to card using Glue Dots.

 
Punch Party Valentine's Card1.jpg
 

On the inside stamp sentiment with Night Of Navy Ink and heart with Rococo Rose Ink. Stamp 3 hearts with Rococo Rose Ink, stamping off first to get a lighter shade.

 
Punch Party Valentine's Card inside.jpg
 

Supply List

Love Patti.png
 

Sketch Saturday - Pretty Perennials

For this week’s sketch challenge I used the Pretty Perennials Stamp Set. This is a super, simple card where I used only stamps, ink and paper.

 
Sketch Saturday - Pretty Perennials card1.jpg
 

Below is the sketch I followed from the CAS(E) This Sketch Challenge from Splitcoaststampers.

 
Screen Shot 2021-01-16 at 1.17.55 PM.png
 

There are lots of flower images in this set and they have a watercolor look to them; so pretty!

 
Sketch Saturday - Pretty Perennials stamp.jpg
 

Tips & Instructions

  • Melon Mambo Card Base - 5 1/2 x 8 1/2, score at 4 1/4

  • Basic White Layer - 5 1/4 x 4

  • Stamp large sentiment using Melon Mambo Ink

  • Stamp flowers using Melon Mambo, Daffodil Delight, Calypso Coral and Coastal Cabana Inks. I stamped off the Coastal Cabana first to get a lighter color. Branches were stamped with Soft Suede Ink and leaves with Granny Apple Green Ink.

  • Stamp flower centers with Black Ink.

  • Stamp the BIRTHDAY sentiment on 1/2” scrap using Black Ink and cut to size. Adhere using Dimensionals.

  • Adhere layer to card base.

 
Sketch Saturday - Pretty Perennials card2.jpg
 

On the inside stamp the sentiment with Melon Mambo Ink. The sentiment I used is from the Queen Anne’s Lace Stamp Set.

Stamp flowers with Melon Mambo and Daffodil Delight Inks. Stamp flower centers with Black Ink and leaves with Granny Apple Ink.

 
Sketch Saturday - Pretty Perennials inside.jpg
 

Supply List

Beautiful Hydrangea Hill Cards

The Hydrangea Hill Suite is just gorgeous! I love hydrangeas so I was happy to start playing with this suite.

 
Beautiful Hydrangea Hill Cards - both.jpg
 

In my video below I’ll show you the products in this suite including this cool Mercury Glass Designer Acetate.


Tips & Instructions

  • Gorgeous Grape Card Base - 5 1/2 x 8 1/2, score at 4 1/4

  • Very Vanilla Layer - 5 1/4 x 4, emboss with Subtle 3D Embossing Folder.

  • Wrap piece of Gorgeous Grape Sheer Ribbon around embossed layer and adhere to back. Adhere layer to card base.

  • Using largest Stitched Nested Label Die, cut piece of Hydrangea Hill Mercury Glass Designer Acetate (Highland Heather) and adhere to card.

  • Cut flower from Gorgeous Grape Cardstock using Hydrangea Dies. Using a Take Your Pick tool, push the petals up from behind. I laid it on the Foam Pad from the Die Brush Tip set.

  • Color small pearls using Dark Highland Heather Stampin’ Blends Marker and adhere to center of flowers.

  • Cut large outline piece from a piece of Old Olive Cardstock and snip off the flower (you only need the stem and leaves)

  • Back a small piece of Mossy Meadow Cardstock with an Adhesive Sheet and cut the detailed stem and leaves. Remove the backing and adhere to the Old Olive leaves.

  • Adhere leaves and flower to card using Dimensionals.

  • Stamp sentiment on scrap of Very Vanilla using Gorgeous Grape Ink and cut with small tag die. Snip top of the label off and adhere to card using a Dimensional.

 
Beautiful Hydrangea Hill Card Purple.jpg
 

Follow the same steps for the Rococo Rose card with the following changes:

  • Old Olive Card Base - 5 1/2 x 8 1/2, score at 4 1/4

  • Use the Rococo Rose Hydrangea Hill Mercury Glass Designer Acetate.

  • Cut flower from Rococo Rose Cardstock.

  • Color Pearls with Light Rococo Rose Stampin’ Blends Marker.

  • Color Silver Metallic Edge Ribbon with Light Rococo Rose Stampin’ Blends Marker.

 
Beautiful Hydrangea Hill Card Pink.jpg
 

On the inside stamp sentiment and floral image. This sentiment is from the Peaceful Moments Stamp Set.

 
Beautiful Hydrangea Hill Card inside.jpg
 

Supply List

Simple Hydrangea Hill Birthday Card

I love that you can let our Designer Series Paper do the work. I made this card using a piece of the Hydrangea Hill paper and just added a sentiment and some pearls; so simple!

 
Hydrangea Hill Birthday Card2.jpg
 

These papers are so pretty. I love hydrangeas, they are one of my favorite flowers.

 
Screen Shot 2021-01-14 at 11.23.07 AM.png
 

Tips & Instructions

  • Gorgeous Grape Card Base - 5 1/2 x 8 1/2, score at 4 1/4

  • Hydrangea Hill Designer Series Paper - 5 1/4 x 4, adhere to card base.

  • Basic White scrap - stamp sentiment from Itty Bitty Birthdays using Gorgeous Grape Ink. Cut with Stitched Rectangle Dies. Adhere to card using Dimensionals.

  • Add 3 Pastel Pearls to top corner.

 
Hydrangea Hill Birthday Card1.jpg
 

On the inside stamp sentiment from Happiest Of Birthdays using Gorgeous Grape Ink. Stamp the flowers from Hydrangea Haven on top and bottom using Seaside Spray Ink. Stamp the filler with Seaside Spray Ink but stamp off first to get a lighter shade.

 
Hydrangea Hill Birthday Card inside.jpg
 

Supply List

Always In My Heart Card

I made this card for the monthly Simple Suite Stampers Tutorial Bundle. We featured the Love You Always Suite this month and you can get this pdf with 12 projects for FREE with an order from my Online Store.

 
Always In My Heart card2.jpg
 

I’ll show you how to make this card in the video below and go over some of the products in the Love You Always Suite.


The Always In My Heart Bundle has a beautiful stamp set and coordinating dies. My favorite die in this set is the large floral heart and I used it on this card.

 
Screen Shot 2021-01-13 at 1.48.13 PM.png
 

Tips & Instructions

  • Rococo Rose Card Base - 5 1/2 x 8 1/2, score at 4 1/4

  • Love You Always Specialty Designer Series Paper (Blushing Bride) - 5 1/4 x 4

  • Basic White Cardstock - cut floral heart using Floral Heart Dies.

  • Cut the inside heart from Rococo Rose Cardstock using Floral Heart Dies. (Don’t worry about getting the entire heart, you only need the inside piece.)

  • Stamp sentiment on Rococo Rose heart using Versamark and heat emboss with White Embossing Powder.

  • Adhere floral heart to piece of specialty paper.

  • Adhere inside heart using Dimensionals.

  • Adhere layer to card base.

  • Tie bow using Crinkled Seam Binding Ribbon and adhere with a Glue Dot.

 
Always In My Heart card1.jpg
 

Each month I collaborate with 11 Stampin’ Up Demonstrators to create a pdf Tutorial Bundle with 12 beautiful projects for you to make. If you order from my Online Store this month, you will get this bundle for FREE. The pdf contains 12 projects including pictures, measurements and instructions.

 
Screen Shot 2021-01-13 at 2.00.10 PM.png
 

Supply List

Love You!!!

The Love You Always Suite has everything you need for Valentine’s Day! This is the suite we are featuring in the Simple Suite Stampers pdf this month. You can get this pdf for FREE with any purchase from my online store in January. The pdf contains 12 beautiful projects with pictures, measurements and instructions.

 
Love You Card2.jpg
 

I used lots of different products from the suite to make this card to give you a better look at this suite. I also used the Heart Punch Pack to punch out the hearts.

 
Screen Shot 2021-01-11 at 11.16.16 PM.png
 

The True Love and Love You Always Specialty Designer Series Paper are just beautiful.

 
Screen Shot 2021-01-11 at 10.58.01 PM.png
 
Screen Shot 2021-01-11 at 10.58.39 PM.png
 

Tips & Instructions

  • Basic Black Card Base - 5 1/2 x 8 1/2, score at 4 1/4

  • True Love Designer Series Paper (striped) - 5 1/4 x 4

  • Vellum Cardstock - 5 1/4 x 3 1/4

  • Rococo Rose Cardstock - punch 2 scalloped hearts using the Heart Punch Pack

  • Blushing Bride Cardstock - punch 1 scalloped heart using the Heart Punch Pack

  • Love You Always Specialty Designer Series Paper - punch 3 plain hearts using the Heart Punch Pack (2 from the Blushing Bride and 1 from the Rococo Rose paper)

 
Screen Shot 2021-01-11 at 10.43.12 PM.png
 
  • Place Vellum piece over the striped piece and wrap a piece of Blushing Bride Metallic Ribbon around the layer. I put some adhesive on the back of the ribbon to adhere it to the vellum and then to the back of the striped piece.

  • Adhere hearts over the ribbon.

  • Back piece of Basic Black Cardstock with an Adhesive Sheet and cut the word Love twice using the Always Dies. Adhere one on top of the other to get a thicker sentiment. Then adhere to card.

  • Stamp the word YOU on scrap of white with Black Ink and cut with die. Adhere to card.

 
Love You Card1 .jpg
 

On the inside stamp sentiment with Black Ink and hearts with Rococo Rose Ink. The sentiment and hearts are from the Always In My Heart Stamp Set.

 
Love You Card - Inside.jpg
 

Supply List

Sketch Saturday - Darling Donkeys

I used the Darling Donkey Stamp Set for this week’s sketch. This donkey is just so sweet and it’s a Sale-A-Bration Product.

 
Darling Donkeys - Hey There Friend card1.jpg
 

I found this sketch on Pinterest from (MOJO)Monday and I changed it up a little bit by using ovals instead of circles and putting the smaller one on the left. That’s what I love about using sketches, you get a main idea from it and then make it your own.

 
Screen Shot 2021-01-04 at 8.34.58 PM.png
 

During Sale-A-Bration you can earn the Darling Donkeys Stamp Set for FREE with a $50 order (before tax & shipping). This Stamp Set has such cute images and sentiments.

 
Darling Donkeys - Hey There Friend stamp.jpg
 

The Oh So Ombre Designer Series Paper is also a FREE product with a $50 order. You get 48 sheets of 6x6 paper in 4 colors. Spend $100 and get both for FREE!

 
Screen Shot 2021-01-08 at 10.16.56 PM.png
 

Tips & Instructions

  • Bermuda Bay Card Base - 5 1/2 x 8 1/2, score at 4 1/4

  • Oh So Ombre Designer Series Paper - 5 1/4 x 4, adhere to card base.

  • Basic White Strip - 5 1/2 x 1, emboss (I used the Wrapped In Textures Embossing Folder which is retired). Adhere to middle of card.

  • Basic White Cardstock - cut one large and one small Layering Oval. Stamp donkey on a larger one and sentiment on smaller one using Black Memento Ink.

  • Color Donkey using Dark and Light Stampin’ Blends Markers.

  • Bermuda Bay Cardstock - cut one large and one small scalloped Layering Oval and adhere to stamped ovals.

  • Adhere sentiment oval to larger oval and adhere to card using Dimensionals as shown on card.

 
Darling Donkeys - Hey There Friend card2.jpg
 

On the inside adhere strip of the Oh So Ombre Designer Series Paper. Stamp a sentiment if you want.

 
Darling Donkeys - Hey There Friend inside.jpg
 

Supply List

Sweet Strawberry Fun Fold Card

This is such a simple Fun Fold Card and I love how it turned out using the Berry Delightful Designer Series Paper.

 
Sweet Strawberry Fun Fold Card2.jpg
 

I’ll show you the Sweet Strawberry Bundle with a fun stamp set and coordinating punch as well as some additional products you can earn for FREE with a $100 order. I’ll also show you how to make this fun fold card.


The Sweet Strawberry Bundle has a great stamp set and a coordinating Strawberry Builder Punch that punches the strawberry, green top, leaf and small flower.

 
Sweet Stawberry Bundle.jpg
 

During Sale-A-Bration, you can earn the Berry Blessings Bundle for free with a qualifying purchase. The paper is so bright and cheery and the Berry Blessings Stamp Set has some additional images and sentiments.

 
Screen Shot 2021-01-07 at 9.46.04 PM.png
 

Tips & Instructions

  • Green Garden Card Base - 4 1/4 x 11, score at 5 1/2 and again at 2 3/4.

  • Berry Delightful Designer Series Paper - 3 pieces, each at 4 x 2 1/2 (I used one with berries and 2 with the green plaid).

  • Basic White Cardstock - 4 x 2 1/2 for inside sentiment layer. Stamp sentiment using Garden Green Ink.

  • Basic White Sentiment Layer - stamp sentiment and cut using Stitched So Sweetly Dies.

  • Garden Green Cardstock - cut using Stitched So Sweetly Dies and adhere behind sentiment layer.

  • Basic White scrap - stamp 2 strawberries using Poppy Parade and 2 strawberry tops using Garden Green. Punch using coordinating Strawberry Builder Punch. Adhere tops to berries.

  • Adhere the Designer Series pieces to card and inside sentiment layer as shown on the video

  • Adhere sentiment layers making sure you only put adhesive on left side so the card will open.

  • Add the strawberries using Dimensionals (note: make sure the strawberries don’t adhere to card where it opens)

 
Sweet Strawberry Fun Fold Card1.jpg
 

Here’s what the inside looks like when its open.

 
Sweet Strawberry Fun Fold Card inside.jpg
 

Supply List

Dragonfly Garden Birthday Card

I love the elegance of this card. It was easy to make using the Dandy Laser-Cut Paper and it turned out beautiful!

 
Dragonfly Garden Birthday Card2.jpg
 

The Dandy Laser-Cut Paper is so delicate and pretty. You get 2 sheets, 1 each of 2 designs.

 
Screen Shot 2021-01-06 at 9.28.35 PM.png
 

The Dragonfly Bundle includes a stamp set and coordinating punch. The punch even punches out some of the images on the Dandy Garden Designer Series Paper.

 
Screen Shot 2021-01-06 at 9.34.42 PM.png
 

Tips & Instructions

  • Misty Moonlight Card Base - 5 1/2 x 8 1/2, score at 4 1/4

  • Basic White Layer - 5 1/4 x 4

  • Misty Moonlight Layer - 5 x 3 5/8

  • Adhere Dandy Laser-Cut Piece to Misty Moonlight Layer. I used small amounts of Liquid glue. Adhere layers to card base.

  • Stamp sentiment (from Itty Bitty Birthdays) on 1/2” strip of Basic White Cardstock using Black Memento Ink. Punch one end using Triple Banner Punch and adhere to card.

  • On scrap of Basic White Cardstock stamp dragonfly using Black Memento Ink and punch with Dragonfly Punch. Color wings using So Saffron Stampin’ Blends Marker. You can add some Wink Of Stella to the wings to give it a shine.

  • Adhere dragonfly to card using Dimensionals and add a Ladybug Trinket with a Glue Dot.

 
Dragonfly Garden Birthday Card1.jpg
 

On the inside stamp sentiment using Black Memento Ink and stamp flowers using Bumblebee Ink.

 
Dragonfly Garden Birthday Card inside.jpg
 

Supply List

Sand & Sea Birthday Card!

Today I made another card using the Sand & Sea Bundle and I used the Pearlescent Specialty Paper for the shells which is absolutely amazing! I hope you can see from the pictures and videos how beautiful it really is.

 
Sand & Sea Birthday Card2.jpg
 

In the video I’ll walk you through the entire suite and talk about how to emboss and die cut this large grouping of shells. It’s so cool how it works. Please excuse my head and my mispronunciation of the Pearlescent Specialty Paper…hope you have a sense of humor!!!


Tips & Instructions

  • Seaside Spray Card Base - 5 1/2 x 8 1/2, score at 4 1/4

  • White Cardstock - 5 1/4 x 4

  • Sand & Sea Designer Series Paper - 5 x 3 3/4

  • Stamp sentiment at top corner using Versamark and heat emboss with White Emboss Powder.

  • Pearlescent Specialty Paper - 6 x 4 1/2, die cut grouping of seashells using Seaside Seashells Dies.

  • Carefully stamp shells as shown in video using Blushing Bride, Seaside Spray and Sahara Sand Inks.

  • Emboss using Seashells 3D Embossing Folder. I found it helps to line up the seaweed on the outer edges to get the piece lined up.

  • Fussy cut the shells, saving the larger pieces of seaweed.

  • Color seaweed using Old Olive Stampin’ Blends Markers.

  • Adhere layers, seaweed and shells using Dimensionals on some of the shells.

 
Sand & Sea Birthday Card1.jpg
 

On the inside stamp sentiment using Seaside Spray Ink. Stamp shells and seaweed across the bottom. I used Old Olive, Blushing Bride and Sahara Sand Inks.

 
Sand & Sea Birthday Card inside.jpg
 

Supply List

Love You To The Beach and Back!

I used the new Sand & Sea Suite for this beautiful card! The Designer Series Paper for the background layer is so pretty. And don’t you just love the sentiment?

 
Love You To The Beach and Back card2.jpg
 

Check out my Blog tomorrow to see how to cut out and emboss this focal piece using the The Seaside Seashells Dies and coordinating Seashells 3D Embossing Folder. These products are amazing!

 
Screen Shot 2021-01-05 at 8.09.09 AM.png
 
 
Screen Shot 2021-01-05 at 8.11.03 AM.png
 

Tips & Instructions

  • Melon Mambo Card Base - 5 1/2 x 8 1/2, score at 4 14

  • Sand & Sea Designer Series Paper Layer - 5 3/8 x 4 1/8, adhere to card base.

  • Sahara Sand Cardstock - emboss using the Seashells 3D Embossing Folder and then cut using the Seaside Seashells Dies. Adhere to card.

  • On scrap of white cardstock, stamp sentiment and cut using Tasteful Labels Dies. Adhere using Dimensionals.

 
Love You To The Beach and Back card1.jpg
 

On the inside stamp sentiment using Melon Mambo Ink and the shells and seaweed using Melon Mambo, Sahara Sand and Pear Pizzazz Inks.

 
Love You To The Beach and Back inside.jpg
 

Supply List

Sketch Saturday - Forever & Always

For today’s card I used the Forever & Always Bundle along with the beautiful True Love Designer Series Paper. These black and white patterns are gorgeous. The sentiment is from the Lovely You Stamp Set.

 
Sketch Saturday - Forever & Always card2.jpg
 

The sketch is one I found on Pinterest from the Creative Memories site.

 
Screen Shot 2021-01-01 at 10.37.14 PM.png
 

Tips & Instructions

  • Basic Black Card Base - 5 1/2 x 8 1/2, score at 4 1/4

  • White Layer - 5 1/4 x 4

  • True Love Designer Series Paper - 3 strips 1 1/4 x 4 1/8, adhere to white layer

  • White strip 3/4 x about 4, stamp sentiment from the Lovely You Stamp Set using Black Memento Ink. Punch one end with Triple Banner Punch. Adhere to card.

  • Scrap of White Cardstock, stamp flower using Black Memento Ink. Color with Rococo Rose Stampin’ Blend Markers and cut with coordinating dies.

  • Add some Wink Of Stella to the flower and adhere to card on sentiment label using Dimensionals.

  • Color 3 small pearls using the Dark Rococo Rose Stampin’ Blend Marker and adhere to sentiment label.

 
Sketch Saturday - Forever & Always card1.jpg
 

On the inside stamp two of the smaller flowers using Black Memento Ink and color with Rococo Rose Stampin’ Blends Markers.

 
Sketch Saturday - Forever & Always inside.jpg
 

Supply List

Note: The new products used on this card will be available for purchase beginning January 5, 2021.

Wishing You The Berry Best Card

Isn’t this such a bright and cheery card! I love berries and fell in love with this Designer Series Paper when I saw it.

 
Berry Best Card2.jpg
 

I used a cross between the Sweet Strawberry Bundle and the FREE Sale-A-Bration Berry Blessings Stamp Set and Berry Delightful Designer Series Paper. I absolutely love these products.

 
Sweet Stawberry Bundle.jpg
 

These products below are FREE during Sale-A-Bration with a $100 purchase. The papers are so bright and vibrant and the Berry Blessings Stamp Set has beautiful images and sentiments and coordinate so well with the Sweet Strawberry Bundle.

 
Berry Blessing DSP & Stamp Set.jpg
 

Tips & Instructions

  • Night Of Navy Card Base - 5 1/2 x 8 1/2, score at 4 1/4.

  • Berry Delightful Designer Series Paper Layer - 5 1/4 x 4, adhere to card base.

  • Berry Delightful Designer Series Paper Strip - 4 1/4 x 1, adhere to middle of card.

  • Stamp sentiment from the Berry Blessings Stamp Set on white cardstock using Pacific Point Ink. Cut using the Celebration Labels Dies. Note: These dies are 50% off right now because they are retiring, what a great deal!

  • On the sentiment label stamp raspberry outline using Rich Razzleberry Ink. Stamp fill with Rich Razzleberry Ink but stamp off first to get lighter shade.

  • On the sentiment label stamp blueberry outline using Pacific Point Ink. Stamp fill with Pacific Point Ink but stamp off first to get lighter shade.

  • Adhere label to card using Dimensionals

 
Berry Best Card1.jpg
 

On the inside stamp sentiment from the Sweet Strawberry Stamp Set using Pacific Point Ink. Stamp blueberries and raspberries just like you stamped on the sentiment label. If there is a little white space at the top of the berries, you can stamp part of a leaf using Garden Green Ink.

 
Berry Best Card inside.jpg
 

Supply List

Note: The new products will be available beginning January 5, 2021 with the launch of the January-June 2021 Mini Catalog.

Treasured Medallion - You Are A Treasure!

Here’s my second card using the Treasured Medallion Bundle. I am loving these stamps.

 
Treasured Medallion - You're A Treasure card2.jpg
 

In the video I’ll show you how to use your Stamparatus to get this stamp to meet in the middle and make one overall image.


Tips & Instructions

  • Night Of Navy Card Base - 5 1/2 x 8 1/2, score at 4 1/4

  • Soft Sea Foam Layer - 5 1/2 x 3, using a pencil, lightly draw line at 2 3/4” to identify the middle of the layer. Erase pencil mark after stamping.

  • Watch the video to see how to line up the large stamp using the Stamparatus and a piece of plastic. Stamp image using Night Of Navy Ink twice, meeting in the middle.

  • Stamp the small flower images at each corner using Night Of Navy Ink.

  • On 3/4 strip of Soft Sea Foam Cardstock, stamp sentiment using Night Of Navy Ink and punch both ends with round Treasured Tags Pick A Punch.

  • On 1” strip (I use slightly under 1”) of Night Of Navy Cardstock punch both ends using the pointy end of the Treasured Tags Pick A Punch. Adhere behind sentiment label.

  • Run Stampin’ Seal+ across the top of the back of the stamped layer and adhere Scalloped Lace Trim. Repeat this on the bottom.

  • Adhere layer to card base.

  • Adhere sentiment using Dimensionals.

  • Add Rhinestones to center of the four small flowers.

 
Treasured Medallion - You're A Treasure card1.jpg
 

On the inside stamp image using Night Of Navy Ink on both sides of the layer.

 
Treasured Medallion - You're A Treasure inside.jpg
 

Supply List

Note: The new Treasured Medallion products will be available for purchase beginning January 5, 2021.