Treasured Medallion Birthday Card

I used the Treasured Medallion Stamp Set from the new Mini Catalog for this card. I stamped in black to create the background and then I stamped on Vellum Cardstock and colored with Stampin’ Write Markers for the focal piece.

 
Treasured Medallion Birthday Card2.jpg
 

This stamp set has beautiful images and pretty sentiments.

 
Treasured Medallion Birthday Card stamp.jpg
 

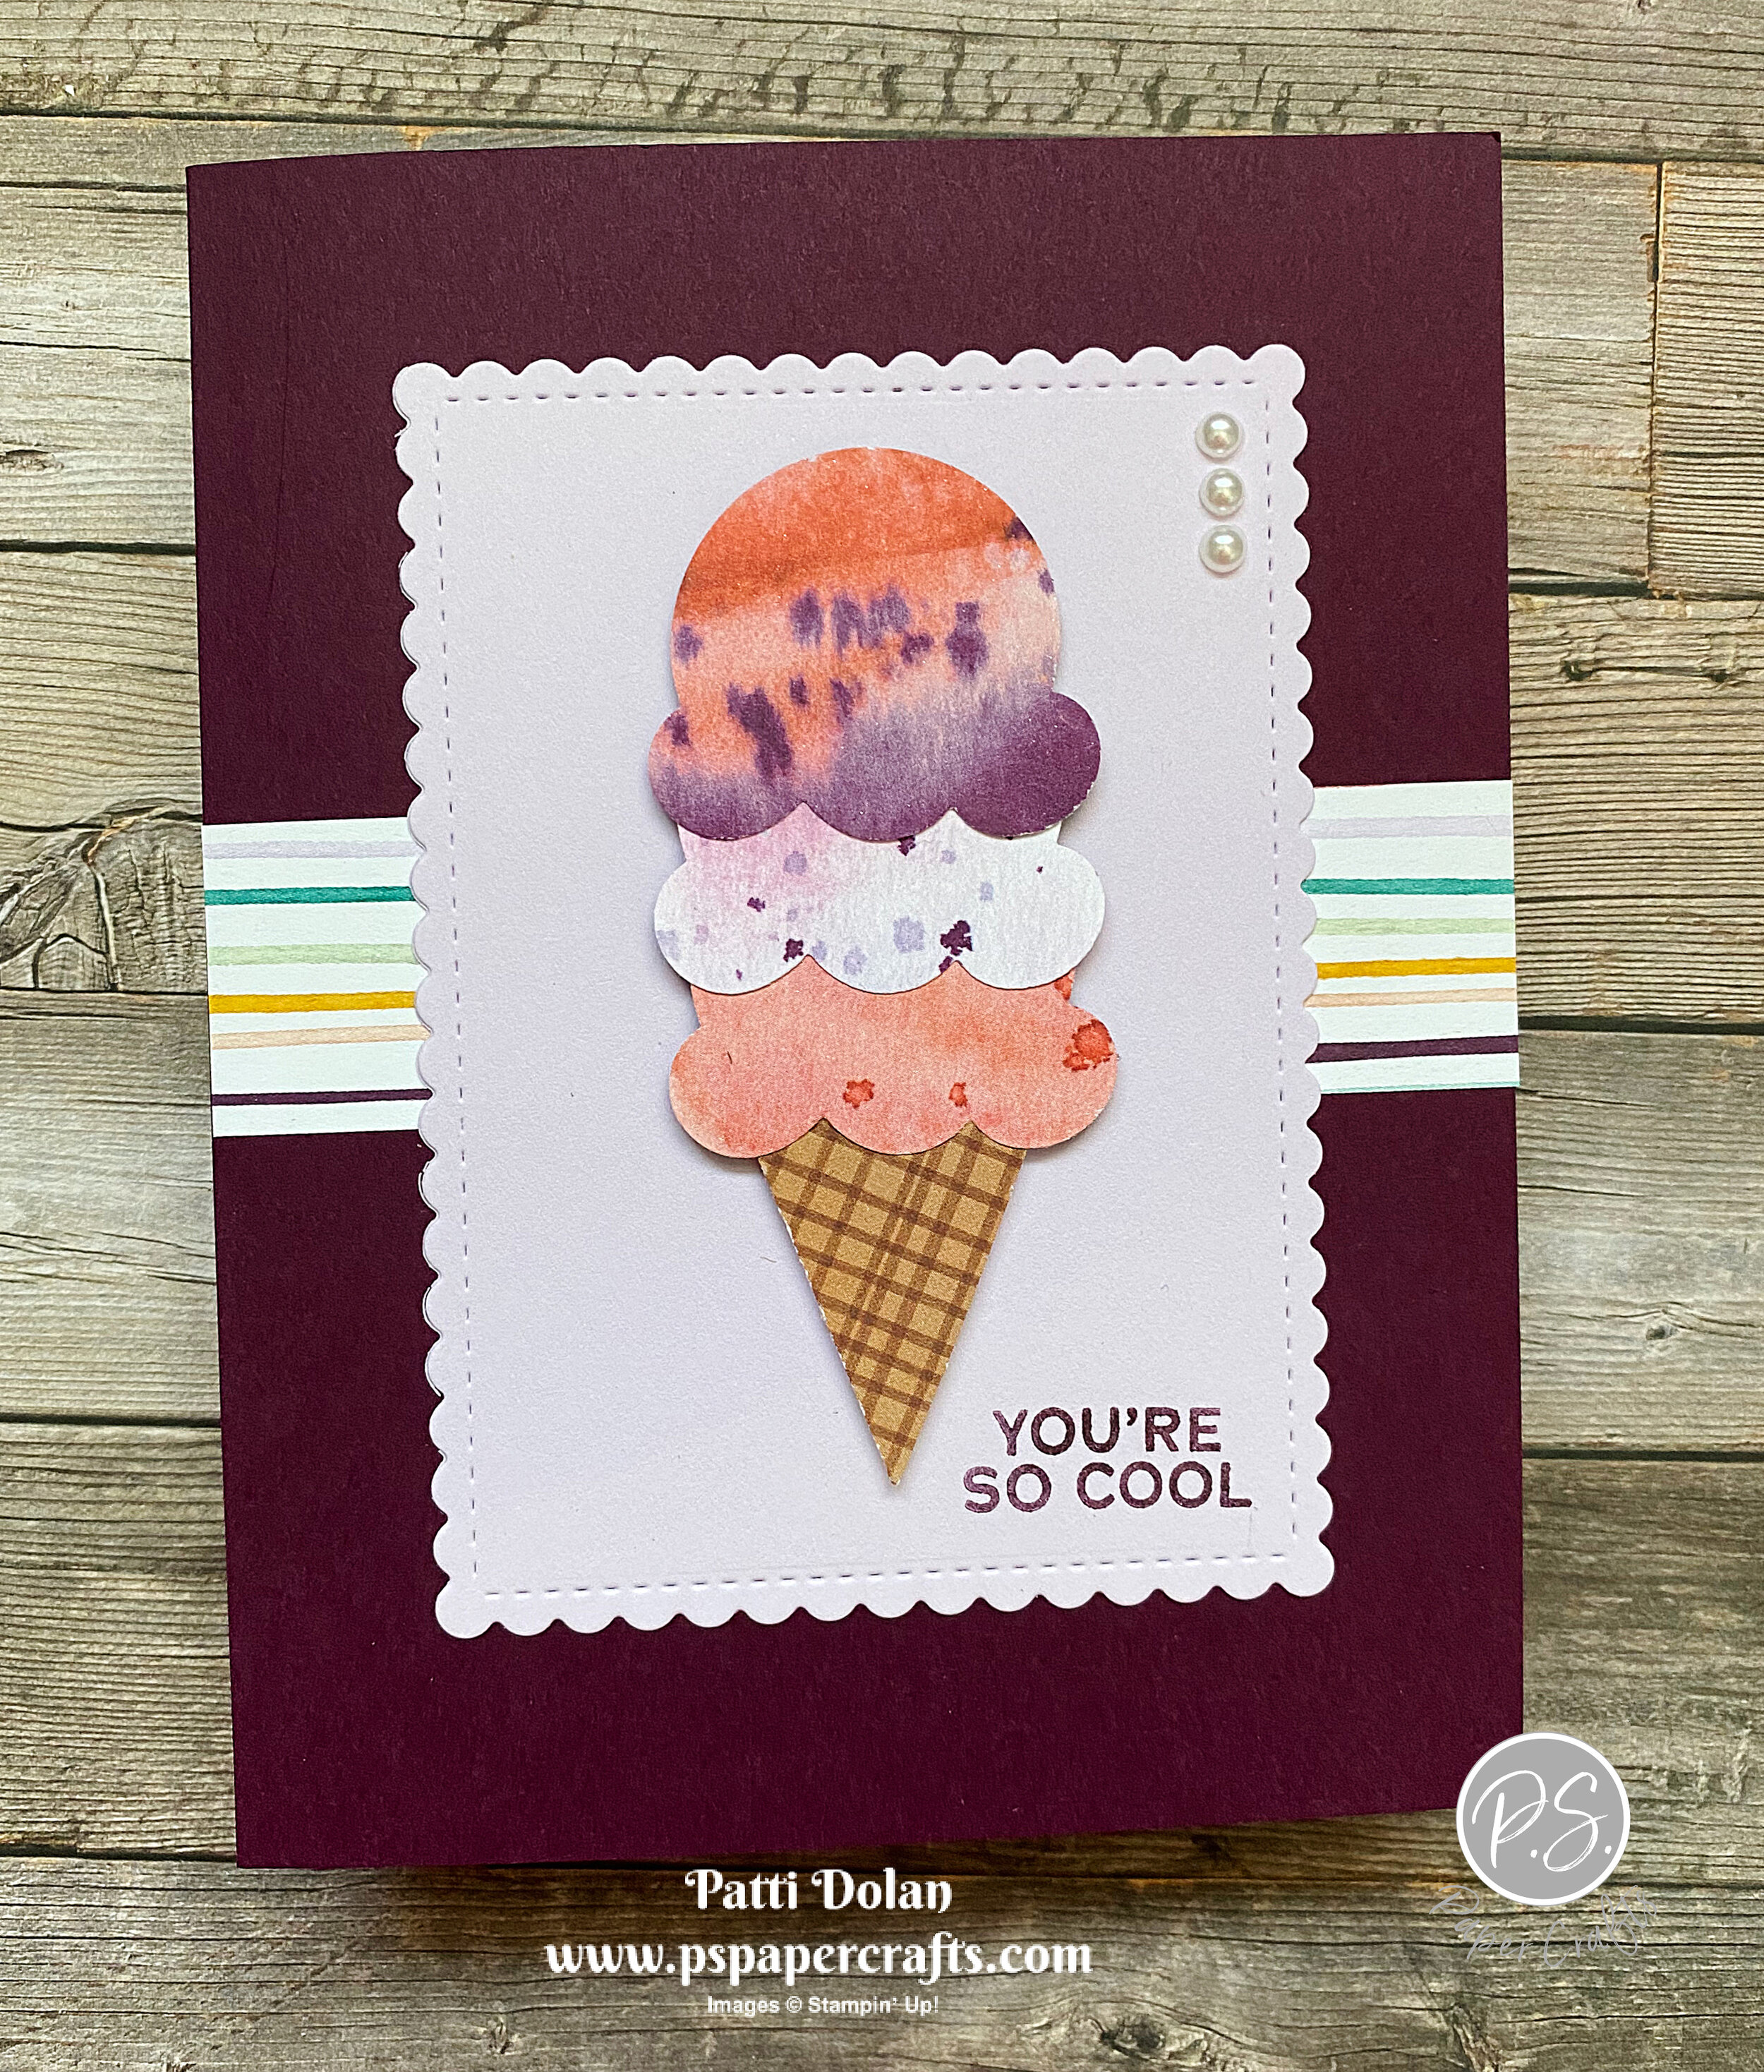
I used the In Colors to color the focal. These colors are beautiful together.

 
Treasured Medallion Birthday Card markers.jpg
 

Tips & Instructions

  • Magenta Madness Card Base - 5 1/2 x 8 1/2, score at 4 1/4.

  • White Layer - 5 1/4 x 4, adhere to card base.

  • Stamp the large medallion multiple times using black ink to fill the background layer

  • Stamp the large medallion on piece of Vellum Cardstock using Black Stazon Ink.

  • Color medallion using In Color Stampin’ Write Markers (Magenta Madness, Bumblebee, Just Jade and Misty Moonlight)

  • Cut the vellum to square, tightly fitting the medallion and cut white square to same size (you can do this after you adhere them together). I used some Multi-purpose Liquid glue to adhere them by putting a little on the back of the vellum and spreading it with my finger so you can’t see it and then adhered them together.

  • Adhere focal to card. You can pop up with Dimensionals if you want.

  • Stamp sentiment on 3/4” strip of white cardstock using Magenta Madness Ink.

  • Punch both ends of sentiment strip with Treasured Tags Pick A Punch and adhere to card using Dimensionals.

  • Adhere large Rhinestone to the center of the medallion and 2 small Rhinestones to sentiment label.

 
Treasured Medallion Birthday Card1.jpg
 

On the inside stamp sentiment with Magenta Madness Ink and stamp a black medallion on bottom corner.

 
Treasured Medallion Birthday Card inside.jpg
 

Supply List

Note: The new products used on this project will be available for purchase starting January 5, 2021 (Treasured Medallion Stamp Set and Treasured Tags Pick A Punch).

You're So Cool!!!

I made this card using the new Ice Cream Corner Suite. The products in this suite are from the new Jan-June 2021 Mini Catalog and they are amazing.

There’s a stamp set and coordinating punch and the Designer Series Paper is so fun.

 
Ice Cream Corner Birthday Card 2.jpg
 

I’ll show you all the products in this suite and how great the Designer Series Paper is to punch out the cone and different ice cream scoops.


You can make a quick and fun birthday card just by using the Ice Cream Corner Designer Series Paper, Punch and the Sweet Ice Cream Stamp Set.

 
Ice Cream Corner Birthday both.jpg
 

Tips & Instructions

  • Blackberry Bliss Card Base - 5 1/2 x 8 1/2, score at 4 1/4

  • Ice Cream Corner Designer Series Paper Strip - 4 1/4 x 1

  • Purple Posy Layer - cut using the largest rectangle from the Stitched So Sweetly Dies, stamp sentiment at bottom corner using Blackberry Bliss Ink.

  • Punch cone and 3 scoops of ice cream from the Ice Cream Corner Designer Series Paper. Adhere the scoops to the cone, overlapping each other.

  • Adhere cone to scalloped rectangle using Dimensionals and then adhere layer to card.

  • Add Wink Of Stella to the cones.

  • Add 3 Pearls.

 
Ice Cream Corner Birthday Card 1.jpg
 

On the inside stamp the sentiment with Blackberry Bliss Ink. Stamp cone with Cinnamon Cider Ink, stamping off first to get a lighter layer.

After I finished the video, I realized there is a stamp to add texture to the cone so I stamped it on the cone using straight Cinnamon Cider Ink.

Stamp one scoop with Blackberry Bliss Ink, stamping off first to get a lighter layer. Stamp some sprinkles with Blackberry Bliss Ink.

 
Ice Cream Corner Birthday Card inside.jpg
 

Supply List

Note: The new products are available for purchase starting January 5, 2021.

Thinking Of You Card using True Love Designer Series Paper

I made this card using the True Love Designer Series Paper which is a new product in the upcoming Mini Catalog. It’s black and white and I colored the flowers and leaves and then fussy cut them out. Isn’t it beautiful?

 
Thinking Of You - True Love card2.jpg
 

Here’s a look at the papers in this Designer Series Paper pack. Black and white papers are great to work with. You can color them in or use them as is.

This is one of the packs you will receive if you join my Paper Share. Participating in a Paper Share is a great way to get a taste of all the papers without investing a lot.

 
True Love DSP.jpg
 

Tips & Instructions

  • Rich Razzleberry Card Base - 5 1/2 x 8 1/2, score at 4 1/4

  • In Good Taste Designer Series Paper - 5 1/4 x 4 - Stamp sentiment using Old Olive Ink. The sentiment is from the Happy Thoughts Stamp Set which is a new set in the upcoming Mini Catalog.

  • True Love Designer Series Paper - color a cluster of flowers using Rich Razzleberry and Old Olive Stampin’ Blends and fussy cut. I cut right to the black outline and then touched up any white showing with a Black Stampin’ Write Marker.

  • Color 2 pieces of Silver Metallic Edge Ribbon using Light Old Olive Stampin’ Blend Marker. Wrap one piece around In Good Taste Designer Series Paper and adhere to back. Adhere layer to card base.

  • Adhere flowers to card using Dimensionals.

  • Tie bow with the second piece of colored ribbon and adhere to card using Glue Dot.

  • Adhere Rhinestones.

 
Thinking Of You - True Love card1.jpg
 

On the inside I added some additional flowers. I colored and cut some flowers that were on the edge of the 12 x 12 Designer Series Paper so they fit nicely on the inside layer.

 
Thinking Of You - True Love Inside.jpg
 

Supply List

Note: New products will not be available until January 5, 2021 with the launch of the January-June Mini Catalog.

Sketch Saturday - Flower & Field

I’m a day late but here’s my card for the Saturday Sketch post. I used some new product to make this card. The Flower & Field Designer Series Paper is gorgeous and it’s FREE during Sale-A-Bration with a $50 purchase starting January 5, 2021.

 
Sketch Saturday - Flower & Field card1.jpg
 

Here’s the sketch that I followed. It’s from the CAS(E) This Sketch Challenge from Splitcoaststampers. Their sketches are so fun to use.

 
Screen Shot 2020-12-20 at 12.47.42 PM.png
 

Tips & Instructions

  • Basic Black Card Base - 5 1/2 x 8 1/2, score at 4 1/4

  • Flower & Field Designer Series Paper - 5 1/2 x 4 then cut diagonally.

  • Bumblebee Cardstock - 7 x 3/4, emboss with the Greenery Embossing Folder.

  • Whisper White Layer - 5 1/4 x 4

  • Adhere the Designer Series Paper to white layer then adhere embossed layer along the Designer Series Paper and cut off the what’s hanging over (note, cut from the back).

  • Adhere layer to card base.

  • Stamp sentiment with Black Memento Ink. The Sentiment is from the Sweet Strawberry Stamp Set from the new Mini Catalog available for purchase starting January 5, 2021.

 
Sketch Saturday - Flower & Field card2.jpg
 

On the inside stamp the sentiment and floral images with Black Memento Ink. I colored the flowers with Pool Party and Granny Apple Green Stampin’ Blends.

 
Sketch Saturday - Flower & Field inside.jpg
 

Supply List

Note: New products not available for purchase until January 5, 2021.

Heal Your Heart Card!

I made this card for a dear friend who recently had a tragic loss and I think this sentiment is just what to tell her.

I used some new product from the Jan-June 2021 Mini Catalog and Sale-A-Bration Brochure which becomes available starting January 5, 2021. The Designer Series Paper is called Fine Art Floral and it’s beautiful. The Stamp Set is called Heal Your Heart and it’s free with a $50 order during Sale-A-Bration.

 
Heal Your Heart Card2.jpg
 

Tips & Instructions

  • Merry Merlot Card Base - 5 1/2 x 8 1/2, score at 4 1/4

  • Fine Art Floral Designer Series Paper - 5 1/4 x 4

  • Whisper White Cardstock - stamp sentiment with Merry Merlot Ink and cut with Hippo & Friends Dies.

  • Wrap piece of Whisper White Crinkled Seam Binding around Designer Series Paper and adhere to the back. Adhere layer to card base.

  • Adhere sentiment label to card using Dimensionals.

  • Tie bow with ribbon and adhere using a Glue Dot.

  • Add some Opal Rounds.

 
Heal Your Heart Card1.jpg
 

On the inside stamp flower using Flirty Flamingo Ink and sentiment using Merry Merlot Ink. Both are from the Art Gallery Stamp Set.

 
Heal Your Heart inside.jpg
 

Supply List

Note: the new product is not available until January 5, 2021. This includes the Fine Art Floral Designer Series Paper, Heal Your Heart Stamp Set, Art Gallery Stamp Set and Opal Rounds. If you want these products earlier, you can join my team and take advantage of pre-ordering.

Life Is Beautiful Snowman Card

The Life Is Beautiful Stamp Set is one of my favorites and it’s on the retiring list. I wanted to make one more card using it so I decided to make a snowman themed Christmas Card with it.

 
Life Is Beautiful Snowman Card2.jpg
 

In my video below I’ll show you how to make this card using the Snowman Splendor Stamp Set and Snowman Builder Punch.


Tips & Instructions

  • Pacific Point Card Base - 5 1/2 x 8 1/2, score at 4 1/4

  • Snowflake Splendor Designer Series Paper - 5 1/4 x 4

  • Stamp tree image from Life Is Beautiful on Designer Series Paper using Soft Suede Ink. I used my Stamparatus because it is a large stamp and also wanted to stamp it multiple times to get a darker image.

  • Stamp the sentiment using Pacific Point Ink.

  • Emboss a 4” piece of Whisper White using the Hammered Metal 3D Embossing Folder and tear across the top. Adhere to bottom of Designer Series Paper.

  • On a piece of Whisper White Cardstock stamp the snowman and hat and punch with the coordinating punch.

  • Color using Stampin’ Blends - the hat with Dark Real Red, Dark Shaded Spruce, Dark Smoky Slate and Light Seaside Spray and the snowman’s carrot with Dark Pumpkin Pie. I added a little Light Seaside Spray to the side of the snowman.

  • Adhere the snowman and hat using Dimensionals.

  • Punch the arms from a scrap of Soft Suede Cardstock and adhere behind the snowman.

  • Adhere layer to card base and add some Adhesive-Backed Snowflakes.

 
Life Is Beautiful Snowman Card1.jpg
 

On the inside stamp the sentiment and some snowflakes with Pacific Point Ink. To get a lighter shade for the snowflakes, I stamped off first.

 
Life Is Beautiful Snowman inside.jpg
 

Supply List

Pretty Pink Poinsettia!

I wanted to make a pink poinsettia using the Poinsettia Dies but wasn’t sure which pink to use. I decided on Petal Pink Cardstock and then I sponged it with Petal Pink Ink to make it a little darker. It turned out great!

 
Pretty Pink Poinsettia card2.jpg
 

These dies are awesome. I love that you can just cut the stamped poinsettia and leaves but the best part is that you can use the middle piece to emboss while you cut. The embossing adds beautiful texture.

 
Screen Shot 2020-12-15 at 10.39.09 AM.png
 

Tips & Instructions

  • Shaded Spruce Card Base - 5 1/2 x 8 1/2, score at 4 1/4

  • Shaded Spruce Layer - 5 1/4 x 4, emboss with Tasteful Textures 3D Embossing Folder and adhere to card base.

  • Petal Pink Cardstock - cut and emboss the 3 poinsettias and adhere together offsetting each. Sponge the poinsettia using Petal Pink Ink to get a darker shade.

  • Gold Foil Sheet - cut and emboss 3 leaves (1 large and 2 small) and one small poinsettia.

  • Adhere the small gold poinsettia to center of pink poinsettia.

  • Merry Merlot Cardstock - cut 2 sprigs.

  • Whisper White Strip - 1/2”, stamp sentiment (from Itty Bitty Christmas) with Shaded Spruce Ink. Punch both ends using the Lovely Labels Pick A Punch.

  • Gold Foil Strip - 3/4”, punch both ends using Lovely Labels Pick A Punch and adhere to sentiment strip, then adhere to card using Dimensionals.

  • Adhere poinsettia to card using 1 Dimensional in the center. Adhere the leaves and sprigs under the poinsettia.

 
Pretty Pink Poinsettia card1.jpg
 

On the inside, stamp sentiment (from For Unto Us) using Shaded Spruce Ink. Cut 2 small poinsettias using Gold Foil and adhere as shown.

 
Pretty Pink Poinsettia inside.jpg
 

Supply List

January - June 2021 Mini Catalog Designer Series Paper Share

I'm hosting a Paper Share from the new January - June 2021 Mini Catalog from Stampin' Up!  You will get a sample of all the new papers for the share plus a FREE sample of Designer Series Papers from the Sale-A-Bration Catalog. 

 
Jan-June 2021 Mini Designer Series Paper Share.jpg
 

What is a Paper Share you may ask? 

You get a taste of all the new Designer Series Papers that are in the new 2021 Jan-June Mini Catalog.  This is a great way to see and feel these new products without purchasing them all in full packages.  I'm always amazed when I pull out some Designer Series Paper and find something I didn't think I would use.

Here's how it works: 

  • I order all the products and cut them to share each package.  The papers are cut to 6x6.

  • You can send me a check or use PayPal but I will need to have the payment by January 4 so I can place the orders. 

  • Paper Share $38 plus $7.55 for shipping (no shipping charge for local pickup)

Schedule:

  • January 4: deadline to pay (I will send you a PayPal Invoice to be paid by January 2 or check cleared by January 5)

  • January 5: I will order all the paper

  • January 12-17: I will cut, label, bag and package all paper shares

  • January 17 (or earlier): I will start shipping paper shares (assuming there are no backorders)

You won't want to miss this!

Email me today patti@pspapercrafts.com to let me know you're in. 

I will need to know the following:

  • Name, email and address 

  • How you will pay (check or PayPal)  I will need your PayPal email address

  • How you want to receive it - mail or pick-up

Sketch Saturday - Merry Moose

For today’s sketch challenge, I used the Merry Moose Stamp Set and a piece of the Designer Series Paper from the Most Wonderful Time Medley. It’s simple, but peaceful!

 
Sketch Saturday - Merry Moose card1.jpg
 

I love doing these Clean And Simple Sketches for the Splitcoaststampers CAS(E) This Sketch Challenge. Here’s this week’s sketch.

 
Screen Shot 2020-12-12 at 11.47.55 AM.png
 

The Merry Moose Stamp Set has such fun images and sentiments. There is a coordinating Moose Punch that cuts out the moose.

 
Sketch Saturday - Merry Moose stamp.jpg
 

Tips & Instructions

  • Real Red Card Base - 5 1/2 x 8 1/2, score at 4 1/4

  • Whisper White Layer - 5 1/4 x 4

  • Most Wonderful Time Designer Series Paper - 5 1/8 x 3 7/8

  • Adhere layers to card base.

  • Stamp moose image with Soft Suede Ink and punch with coordinating Moose Punch. Adhere to card using Dimensionals

  • Stamp sentiment with Real Red Ink on scrap of Whisper White Cardstock and cut with Tasteful Labels Dies. Cut so the sentiment is towards the bottom of the label.

  • Cut scrap of Real Red Cardstock using the narrow stitched banner from the Tasteful Labels Dies.

  • Adhere the red banner behind the sentiment label. Cut off the top part of the labels. Adhere to card using Dimensionals.

 
Sketch Saturday - Merry Moose card2.jpg
 

On the inside stamp sentiment with Real Red Ink and some trees with Old Olive Ink.

 
Sketch Saturday - Merry Moose inside.jpg
 

Supply List

Three Quick Christmas Cards using the Most Wonderful Time Medley

I made some quick and easy Christmas cards using the refill for the Most Wonderful Time Product Medley. The refill has the most beautiful Designer Series Paper and pretty stickers that coordinate with it. The best part is that it’s on sale right now while supplies last.

 
Three Quick Christmas Cards Most Wonderful Time Medley all.jpg
 

In the video, I’ll show you the products in the medley refill. You are going to love the papers in this medley. They have gold accents and the stickers make it so easy.


Card #1 Instructions

  • Old Olive Card Base - 5 1/2 x 8 1/2, score at 4 1/4

  • Most Wonderful Time Designer Series Paper - 5 1/4 x 4, adhere to card base

  • Cut third from largest and smallest scalloped oval from a Gold Foil Sheet using the Layering Oval Dies.

  • Cut third from largest plain oval from gold star specialty paper and smallest plain oval from Whisper White Cardstock using the Layering Oval Dies.

  • Stamp sentiment with Old Olive Ink (from Itty Bitty Christmas) on the smallest white oval.

  • Adhere larger tree sticker to gold star oval at the bottom and trim off whatever hangs over. Adhere oval to gold scalloped oval and adhere to card using Dimensionals.

  • Adhere sentiment oval using one Dimensional on part that touches the card and regular adhesive on the part that touches the star oval.

  • Add Gold Glimmer Dot to sentiment label.

 
Three Quick Christmas Cards Most Wonderful Time Medley card1.jpg
 

Card #2 Instructions

  • Old Olive Card Base - 5 1/2 x 8 1/2, score at 4 1/4

  • Most Wonderful Time Designer Series Paper - 5 1/4 x 4

  • Wrap piece of Whisper White Crinkled Seam Binding Ribbon around layer and adhere to back. Adhere Layer to card. (Ribbon is optional)

  • Cut 2nd from largest rectangle from Old Olive using Stitched So Sweetly Dies.

  • Cut piece of Whisper White Cardstock at 3 1/4 x 2 1/8. Stamp sentiment in Old Olive Ink. Add deer and tree stickers to white layer and adhere layer to scalloped rectangle. Adhere to card using Dimensionals.

  • Tie bow and adhere using Dimensionals.

 
Three Quick Christmas Cards Most Wonderful Time Medley Card2.jpg
 

Card #3 Instructions

  • Real Red Card Base - 5 1/2 x 8 1/2, score at 4 1/4

  • Most Wonderful Time Designer Series Paper - 5 1/4 x 4 of floral design and a strip of 5 1/4 x 1 1/2 of striped design.

  • Adhere striped piece to floral layer. Wrap Real Red Double-stitched Satin Ribbon around seam and adhere to back. Adhere layer to card base.

  • Cut 3rd from largest scalloped circle from Real Red Cardstock using the Layering Circles Dies.

  • Cut 3rd from largest scalloped circle from Whisper White Cardstock using the Layering Circles Dies. Stamp sentiment using Real Red Ink (Sentiment from For Unto Us Stamp Set).

  • Adhere circles together and adhere to card using Dimensionals.

  • Tie bow with ribbon and adhere using a Glue Dot.

  • Add some Gold Glitter Dots.

 
Three Quick Christmas Cards Most Wonderful Time Medley Card3.jpg
 

Evergreen Forest Christmas Card - Catalog CASE

I CASEd (Copy And Share Everything) this card from the catalog. Isn’t the Evergreen Embossing Folder beautiful on the Brushed Metallic and Gold Foil papers?

 
Evergreen Forest Christmas Card both.jpg
 

The Brushed Metallic Cardstock comes in 3 different colors: Bronze, Copper and Gold. They are pretty sturdy and emboss beautifully.

 
Evergreen Forest Christmas Card2.jpg
 

Tips & Instructions

  • Shaded Spruce Card Base - 5 1/2 x 8 1/2, score at 4 1/4

  • Very Vanilla Layer - 5 1/4 x 4

  • Brushed Metallic Cardstock or Gold Foil Sheet - 5 1/2 x 2, adhere to Very Vanilla Layer

  • Using the Evergreen Forest 3D Embossing Folder, emboss the layer and adhere to card base.

  • Stamp sentiment on Very Vanilla scrap with either Shaded Spruce of Soft Suede Ink and cut using the second from largest circle from the Stitched Shapes Dies. Adhere to card using Dimensionals.

  • Add either Gilded Gems or Elegant Faceted Gems to card.

 
Evergreen Forest Christmas Card1.jpg
 

I stamped some trees and a sentiment on the inside. I have trees in so many stamp sets. This one is from the Merry Moose Stamp Set.

 
Evergreen Forest Christmas Card inside.jpg
 

The trees for this inside are from the In The Pines Stamp Set. Both sentiments are from the For Unto Us Stamp Set.

 
Evergreen Forest Christmas Card inside2.jpg
 

Supply List

Beautiful Garden Wishes Hello Card

I made another card using products from the Dandy Garden Suite. There are so many images that I love in this suite.

There are two bundles in this suite. Yesterday I used the Dragonfly Garden Bundle and today I’m using the stamp set from the Garden Wishes Bundle.

 
Garden Wishes Hello Card2.jpg
 

In the video below I’ll show you the products in the Dandy Garden Suite and demonstrate how to make this card.


Who would have thought that I would love dandelions….well, as long as they’re not on my lawn. The sentiments are so pretty and that bumblebee; gotta love that bee!

 
Garden Wishes Hello Card stamp.jpg
 

Tips & Instructions

  • Mossy Meadow Card Base - 5 1/2 x 8 1/2, score at 4 1/4

  • Dandy Garden 6 x 6 Designer Series Paper - 5 1/2 x 4 1/4, adhere to card base.

  • Bumblebee Cardstock - cut with 2nd largest Stitched Rectangle Die.

  • Whisper White Cardstock - cut with 3rd largested Stitched Rectangle Die.

  • Color the dandelion stamp using Stampin’ Write Markers. I used Bumblebee and Mossy Meadow. Color directly on stamp, then breath on it and stamp on the white rectangle.
    NOTE: Do not used Stampin’ Blends on your stamp, only Stampin’ Write Markers.

  • Stamp bumblebee and sentiment with Black Memento Ink.

  • Color bumblebee with Bumblebee and Basic Black Stampin’ Write Markers, just dotting to fill in a little bit. Color the wings with a Light Seaside Spray Stampin’ Blends Marker.

  • Add some Wink Of Stella to the bumblebee and the wings.

  • Adhere layers and then adhere to card using Dimensionals.

 
Garden Wishes Hello Card1.jpg
 

On the inside stamp sentiment with Black Memento Ink and stamp some of the seeds with Bumblebee Ink.

 
Garden Wishes Hello Card inside.jpg
 

Supply List

Note: the new Garden Wishes Bundle and Dandy Garden Designer Series Paper will be available for purchase starting Jan. 5, 2021

Dragonfly Garden Thank You Card

I’m so excited to show you one of the new products from the January - June, 2021 Mini Catalog.

Since I’m a Demonstrator I get to pre-order these products. You can start purchasing on January 5, 2021.

 
Dragonfly Garden Thank You Card2.jpg
 

The Dragonfly Garden Bundle has beautiful images and sentiments and has a coordinating Dragonflies Punch. Watch my video tomorrow and I’ll show you the products along with the Garden Wishes products in the Dandy Garden Suite. I know this is going to be one of my favorites!

 
Dragonfly Garden Thank You Card stamp.jpg
 

Tips & Instructions

  • Blackberry Bliss Card Base - 5 1/2 x 8 1/2, score at 4 1/4

  • Dandy Garden 6 x 6 Designer Series Paper Layer - 5 1/4 x 4, adhere to card base.

  • Dandy Garden 6 x 6 Designer Series Paper Strip - 4 x 3/4, adhere to card.

  • Stamp sentiment on Whisper White Cardstock with Blackberry Bliss Ink and punch with the Timeless Label Punch. Adhere to card using Dimensionals.

  • Stamp 3 dragonflies on Whisper White Cardstock with Black Memento Ink.

  • Color the dragonflies with Stampin’ Blends. I used Light & Dark Misty Moonlight on one, Light & Dark Blackberry Bliss on one and Dark So Saffron & Dark Crumb Cake on the third one.

  • Punch dragonflies with Dragonflies Punch and adhere to card using one Dimensional on each.

  • Add Gold Glitter Enamel Dot to sentiment label.

 
Dragonfly Garden Thank You Card1.jpg
 

I kept the inside very simple by stamping the group of butterflies with Blackberry Bliss Ink. This gives me lots of room to write a note.

 
Dragonfly Garden Thank You inside.jpg
 

Supply List

Note: the new Dragonfly Garden Bundle and Dandy Garden Designer Series Paper will be available for purchase starting Jan. 5, 2021

Year-End Closeout

Stampin’ Up! is having it’s Giant Year-End Closeout Event starting today!

You’ll get deep discounts on your favorite products from the August–December 2020 Mini Catalog. The Year-End Closeout happens only once a year, so don’t delay, while supplies last!

 
11.24.20_SHAREABLE_YEARENDSALE_NA.jpg
 

SALES PERIOD

8 December 2020–4 January 2021

  • No minimum purchase required.

  • Retiring items are available while supplies last.

  • Items and discounts may vary by market (depending on inventory levels).

  • Exclusions apply: Carryover items will not be discounted.

  • Due to increased shipping times and possible shipping delays during the month of December, we can’t guarantee delivery before Christmas.

  • Ordering Deadline - 4 January 2021; 11:50 PM (MT)

Screen Shot 2020-12-08 at 8.10.47 AM.png

The Clearance Rack has been refreshed and you can save up to 60% on products. Hurry, these are only available while supplies last!

Sketch Saturday - Poinsettia Petals

For today’s sketch challenge, I used Merry Merlot Cardstock to make a pretty poinsettia. I love this color for Christmas!

 
Sketch Saturday - Poinsettia Petals card1.jpg
 

The sketch I followed is for the CAS(E) This Sketch Challenge from Splitcoaststampers. I scored the lines at the top using the scoring blade on my Paper Trimmer to get the striped look.

 
Screen Shot 2020-12-05 at 2.13.10 PM.png
 

Tips & Instructions

  • Merry Merlot Card Base - 5 1/2 x 8 1/2, score at 4 1/4

  • Whisper White Layer - 5 1/4 x 4, score 5 lines, one every 1/4” and stamp sentiment beneath the scored lines using Merry Merlot Ink.

  • Merry Merlot Cardstock - cut poinsettias from Poinsettia Dies. I didn’t use the largest one. Adhere to each other by putting dot of glue at each center, offsetting each. Adhere to top corner using Dimensional only on the center.

  • Old Olive Cardstock - cut 4 of the smaller leaves and adhere under the poinsettia.

  • Gold Foil - cut 3 of the branches and adhere under the poinsettia. I cut them apart to have different sizes.

  • Add Gold Glitter Dot to center of the poinsettia.

 
Sketch Saturday - Poinsettia Petals card2.jpg
 

On the inside, stamp sentiment with Merry Merlot Ink and some leaves with Old Olive Ink.

 
Sketch Saturday - Poinsettia Petals inside.jpg
 

Supply List

Rustic Poinsettia Holiday Wreath

I made another wreath using the Wreath Builder Dies. I just love these dies. This time I added some poinsettia’s using the Poinsettia Dies.

 
Arrange A Wreath Poinsettia Card2.jpg
 

In the video below, I’ll show you how to make this card. The background layer is from the Poinsettia Place Designer Series Paper.


Tips & Instructions

  • Soft Suede Card Base - 5 1/2 x 8 1/2, score at 4 1/4

  • Poinsettia Place Layer - 5 1/4 x 4, adhere to card base.

  • Soft Suede Cardstock - cut background wreath.

  • Garden Green Cardstock - cut leafy wreath, adhere to Soft Suede wreath.

  • Very Vanilla Cardstock - punch with 2 1/2” Circle Punch. Stamp sentiment with Poppy Parade Ink. Adhere circle behind the wreaths. I used a very small amount of liquid glue around the edge of the circle.

  • Real Red Cardstock, cut 4 small poinsettias using the Poinsettia Dies. Adhere to wreath. I used Glue Dots to adhere them. Add Gold Glitter Dots to center of each wreath.

  • Tie bow with Real Red Sheer Ribbon and adhere to wreath using a glue dot.

  • Adhere wreath to card using Dimensionals.

 
Arrange A Wreath Poinsettia Card1.jpg
 

On the inside stamp the sentiment with Poppy Parade Ink. Stamp branches with Soft Suede Ink and the berries with Poppy Parade Ink.

 
Arrange A Wreath Poinsettia Card inside.jpg
 

Supply List

Simple Christmas Card - For Unto Us

This was one of the easiest Christmas cards I’ve made. I just love the patterned paper with the polka dots. It’s so fun and festive. I got this idea from a card in the Mini Catalog and changed it up.

 
Simple Christmas Card - For Unto Us card2.jpg
 

The sentiments in the For Unto Us Stamp Set are so beautiful and I’ve been using them quite a bit for my Christmas cards.

 
Simple Christmas Card - For Unto Us stamp.jpg
 

Tips & Instructions

  • Shaded Spruce Card Base - 5 1/2 x 8 1/2, score at 4 1/4

  • Whisper White Layer - 5 x 3 3/4

  • Trimming The Town Designer Series Paper Layer - 4 7/8 x 3 5/8, adhere to white layer and then to card base.

  • Stamp sentiment (from For Unto Us) using Poppy Parade Ink and cut with the Stitched So Sweetly Dies. Adhere to card using Dimensionals.

  • On scrap of Whisper White stamp 2 sets of holly leaves with Shaded Spruce Ink and 2 sets of berries with Poppy Parade Ink and fussy cut. The holly is from the Peace & Joy Stamp Set but you can use whatever holly you have on hand. Adhere to sentiment label. I used Glue Dots.

 
Simple Christmas Card - For Unto Us card1.jpg
 

On the inside stamp sentiment with Poppy Parade Ink. Stamp holly leaves with Shaded Spruce Ink and berries with Poppy Parade Ink.

 
Simple Christmas Card - For Unto Us inside.jpg
 

Supply List

Beautiful Sympathy Card

I made this beautiful Sympathy Card using the Dandelion Wishes and Woven Heirloom Stamp Sets. I love how it turned out with Seaside Spray as the main color.

 
Beautiful Sympathy Card2.jpg
 

In the video I’ll show you how I colored the stamp with Stampin’ Write Markers to get the two different colors. I love this technique.


These are the stamp sets; the Dandelion Wishes set has sweet dandelion images and the Woven Heirlooms set has beautiful sentiments in a pretty font.

 
Screen Shot 2020-12-01 at 9.44.19 PM.png
Screen Shot 2020-12-01 at 9.47.07 PM.png
 

Tips & Techniques

  • Seaside Spray Card Base - 5 1/2 x 8 1/2, score at 4 1/4

  • Whisper White Layer -5 1/4 x 4

  • Seaside Spray Layer - 5 x 3 3/4, emboss with the Dainty Diamonds 3D Embossing Folder

  • Wrap piece of Seaside Spray Metallic Ribbon around embossed layer and adhere to the back. Adhere embossed layer to white layer and then to the card base.

  • Cut Whisper White Cardstock with the largest of the scalloped rectangle from the Stitched So Sweetly Dies.

  • Color dandelion stamp using Basic Gray and Seaside Spray Stampin’ Write Markers. Breath on the stamp and then stamp on the scalloped rectangle. (Note - do not use Stampin’ Blends, they are alcohol based and won’t work with this technique.)

  • Stamp sentiment below the dandelions using Basic Gray Ink.

  • Adhere to card using Dimensionals.

  • Add Blue Adhesive-Backed Gems.

 
Beautiful Sympathy Card1.jpg
 

Stamp sentiment on this inside using Basic Gray Ink. Color dandelion seeds stamp with Basic Gray and Seaside Spray Ink, breath on it and stamp on top right corner.

 
Beautiful Sympathy Card inside.jpg
 

Supply List

Back On You Feet Get Well Card

This little turtle is so cute and I’m hoping just seeing it will cheer up a friend who’s sick.

 
Back On You Feet Card2.jpg
 

All the animals and sentiments in the Back On Your Feet Stamp Set are so fun to put a smile on someone’s face when they aren’t feeling well.

 
Screen Shot 2020-11-30 at 7.36.52 PM.png
 

Tips & Instructions

  • Just Jade Card Base - 5 1/2 x 8 1/2, score at 4 1/4

  • Whisper White Layer - 5 1/4 x 4

  • Flowers For Every Season - 5 x 3 3/4, adhere to Whisper White. Wrap ribbon around layers and adhere to the back. Adhere layers to card base.

  • Stamp turtle on scrap of Whisper White with Black Memento Ink and color with Stampin’ Blends. I used Dark and Light Just Jade and Light Crumb Cake. I also added a little Light Soft Sea Foam to the eye and the ground.

  • Cut turtle with second largest Stitched Circle from the Stitched Shapes Dies. Adhere over ribbon using Dimensionals

  • Stamp sentiment on 1” strip of Whisper White with Black Memento Ink. Punch both ends using the Lovely Labels Pick A Punch. Adhere using Dimensionals.

  • Tie bow and adhere using Glue Dots.

  • Add some Elegant Faceted Gems to the circle and sentiment label.

 
Back On You Feet Card1.jpg
 

On the inside stamp sentiment with Black Memento Ink. Add 3/4” strip of the Designer Series Paper along the bottom.

 
Back On You Feet inside.jpg
 

Sketch Saturday - Butterfly Wishes

For today’s sketch I made a birthday card using the Butterfly Wishes Stamp Set.

 
Sketch Saturday - Butterfly Wishes card1.jpg
 

I usually use a sketch from Splitcoaststampers but they are not doing a sketch challenge this week because of the holiday so I looked for one on Pinterest. There are so many sketches out there. This is the one I chose.

 
Screen Shot 2020-11-27 at 10.43.30 PM.png
 

The Butterfly Wishes Stamp Set has pretty butterfly images that coordinate with the Butterly Duet Punch.

 
Sketch Saturday - Butterfly Wishes stamp.jpg
 

Tips & Instructions

  • Calypso Coral Card Base - 5 1/2 x 8 1/2, score at 4 1/4

  • Whisper White Layer - 5 3/8 x 4 1/8

  • Playing With Patterns Designer Series Paper - 5 1/4 x 4. Adhere to Whisper White Layer and wrap ribbon around layers and adhere to back. Adhere to card.

  • Calypso Coral - 1 square - 2 x 2 and 2 squares - 1 1/2 x 1 1/2

  • Whisper White - 1 square - 1 7/8 x 1 7/8 and 2 squares - 1 3/8 x 1 3/8

  • Stamp 1 large butterfly and 2 small butterflies with Black Memento Ink on piece of Whisper White scrap and punch with Butterfly Duet Punch. Color with Stampin’ Blends. I used Dark Calypso Coral and Dark Daffodil Delight. I also colored the body and the gray areas with Dark Seaside Spray.

  • Adhere squares to each other. Adhere the small squares as a diamond on card. Adhere the larger one as a diamond using Dimensionals. Adhere the butterflies using Glue Dots on their bodies.

  • Stamp sentiment with Black Memento Ink and cut with smallest Layering Oval Die. Adhere to card over the ribbon using Dimensionals. Tie bow and adhere using Glue Dot.

 
Sketch Saturday - Butterfly Wishes card2.jpg
 

On the inside stamp sentiment and butterfly with Black Memento Ink.

 
Sketch Saturday - Butterfly Wishes inside.jpg
 

Supply List