


From My Heart Suite
If you want to make some cute Valentine’s Day cards or sweet little treat holders, the From My Heart Suite is just what you need.

The video below will show you all the goodies in this suite.
Look at these great projects you can make. The heart punches will punch out some of the heart images on the Designer Series Paper.

Let me know if I can help you place an order for any of these products. You can email me patti@pspapercrafts.com or text me 845-803-1068. I’m happy to help.

Sale-A-Bration Begins Today!!!
Let the Sale-A-Bration Begin!!!

Stampin’ Up! has kicked off Sale-A-Bration. This means that for every $50 or $100 you spend, you get a FREE qualifying product from the Sale-A-Bration Brochure. Click on the picture on the sidebar to view an online Brochure.
Stampin’ Up! has also launched the 2020 Spring Mini Catalog!!!

This catalog has so many beautiful products that I think you will just love. Some of my favorites are the Peaceful Poppies Suite, the Honey Bee Bundle and the Tropical Oasis Suite. There are stamp sets for Valentine's Day, Easter, Father's Day and Mother's Day.
Click on the catalog icon on the right to see an online catalog. I’ll be showing videos of these new products over the next week.
I saved the best for last!!! The very best deal is to purchase the Starter Kit. The cost is $99 and you get:
$125 worth of product, your choice
Mini Paper Cutter6 x 6 Designer Series Paper sample
Your Choice of Stamp Set (Host stamp sets and Sale-A-Bration stamp sets not included)
Free Shipping
20% discount on future orders
Access to team FaceBook pages, challenges, wonderful crafting community
What's stopping you? You can become a Stampin' Up! Demonstrator and just enjoy the discount and community or make it a business. No pressure, just lots of fun!!!
Just click the JOIN Button at the top or email me to get more info. patti@pspapercrafts.com

Peaceful Poppies Suite
Don’t you just love Poppies? They are so pretty and are a remembrance symbol for veterans.

The Peaceful Poppies Suite delivers a ton of beautiful images, sentiments and coordinating products to create beautiful cards. Watch the video to find out more.
Tips & Instructions
Basic Black Card Base - 5 1/2 x 8 1/2, score at 4 1/4
Poppy Parade Layer - 5 3/8 x 4 1/8, adhere to card base
Flirty Flamingo Layer - 5 1/4 x 4, cut bottom corner with die from Poppy Moments
Stamp 3 poppies with Black Memento Ink on Poppy Parade Cardstock and cut with coordinating die, adhere to card
Color outer edges of poppies with Dark Poppy Parade Blender Pen and color center with Wink Of Stella
Stamp 3 leaves with Old Olive Ink on Old Olive Cardstock and cut with coordinating die
Stamp sentiment with Black Memento Ink on Whisper White and cut with label die
Adhere flowers and leaves as shown and the sentiment label using Dimensionals

The card above is a sympathy card and the one below is a birthday card. I love the mixed fonts on the sentiments.
Supply List

Beautiful Poppies & Blackberry Bliss
The Peaceful Poppies Designer Series Paper is just gorgeous! And to pair it with Blackberry Bliss, amazing!!!

The colors are so rich in this Designer Series Paper. When I was in Israel last March, there were poppies everywhere and I loved seeing them.

There are two stamp sets in this suite that go great together.

Tips & Instructions
Blackberry Bliss Card Base - 5 1/2 x 8 1/2, score at 4 1/4
Peaceful Poppies Designer Series Paper - 5 1/4 x 4, adhere to card base
3/4 x 4 Whisper White Strip - stamp sentiment with Blackberry Bliss Ink and punch each end with Banner Triple Punch
Adhere sentiment label to card with Dimensionals
Adhere some Rhinestones randomly on the card

On the inside stamp sentiment with Blackberry Bliss Ink and flower with Black Memento Ink. Color flower with Blackberry Bliss and Old Olive Stampin’ Blend Markers.

Supply List

Sketch Saturday - Heart to Heart
Christmas is over, time for Valentine’s Day and the Heart to Heart Stamp Set is just perfect!

Here’s the sketch I found on Pinterest for this week’s Sketch Saturday card.

Tips & Instructions
Real Red Card Base - 5 1/2 x 8 1/2, score at 4 1/4
Flirty Flamingo Layer - 5 1/4 x 4
From My Heart Designer Series Paper Strip - 1 1/2 x 4, adhere to Flirty Flamingo Layer
Wrap Ribbon and Baker’s Twine around layer and adhere in the back, then adhere layer to card base
Cut heart from Real Red Cardstock and Designer Series Paper using the Be Mine Stitched Dies
Stamp sentiment on 1/2” strip of Whisper White and punch both ends with the Banner Triple Punch
Adhere hearts and sentiment using Dimensionals
Tie bow with Baker’s Twine and adhere with Mini Glue Dot
Adhere From My Heart Faceted Gems

On the inside stamp sentiment and heart image with Real Red Ink.

Supply List

Sketch Saturday - Dressed To Impress
Isn’t this a fun card? Be as bold as your lipstick! I love that!
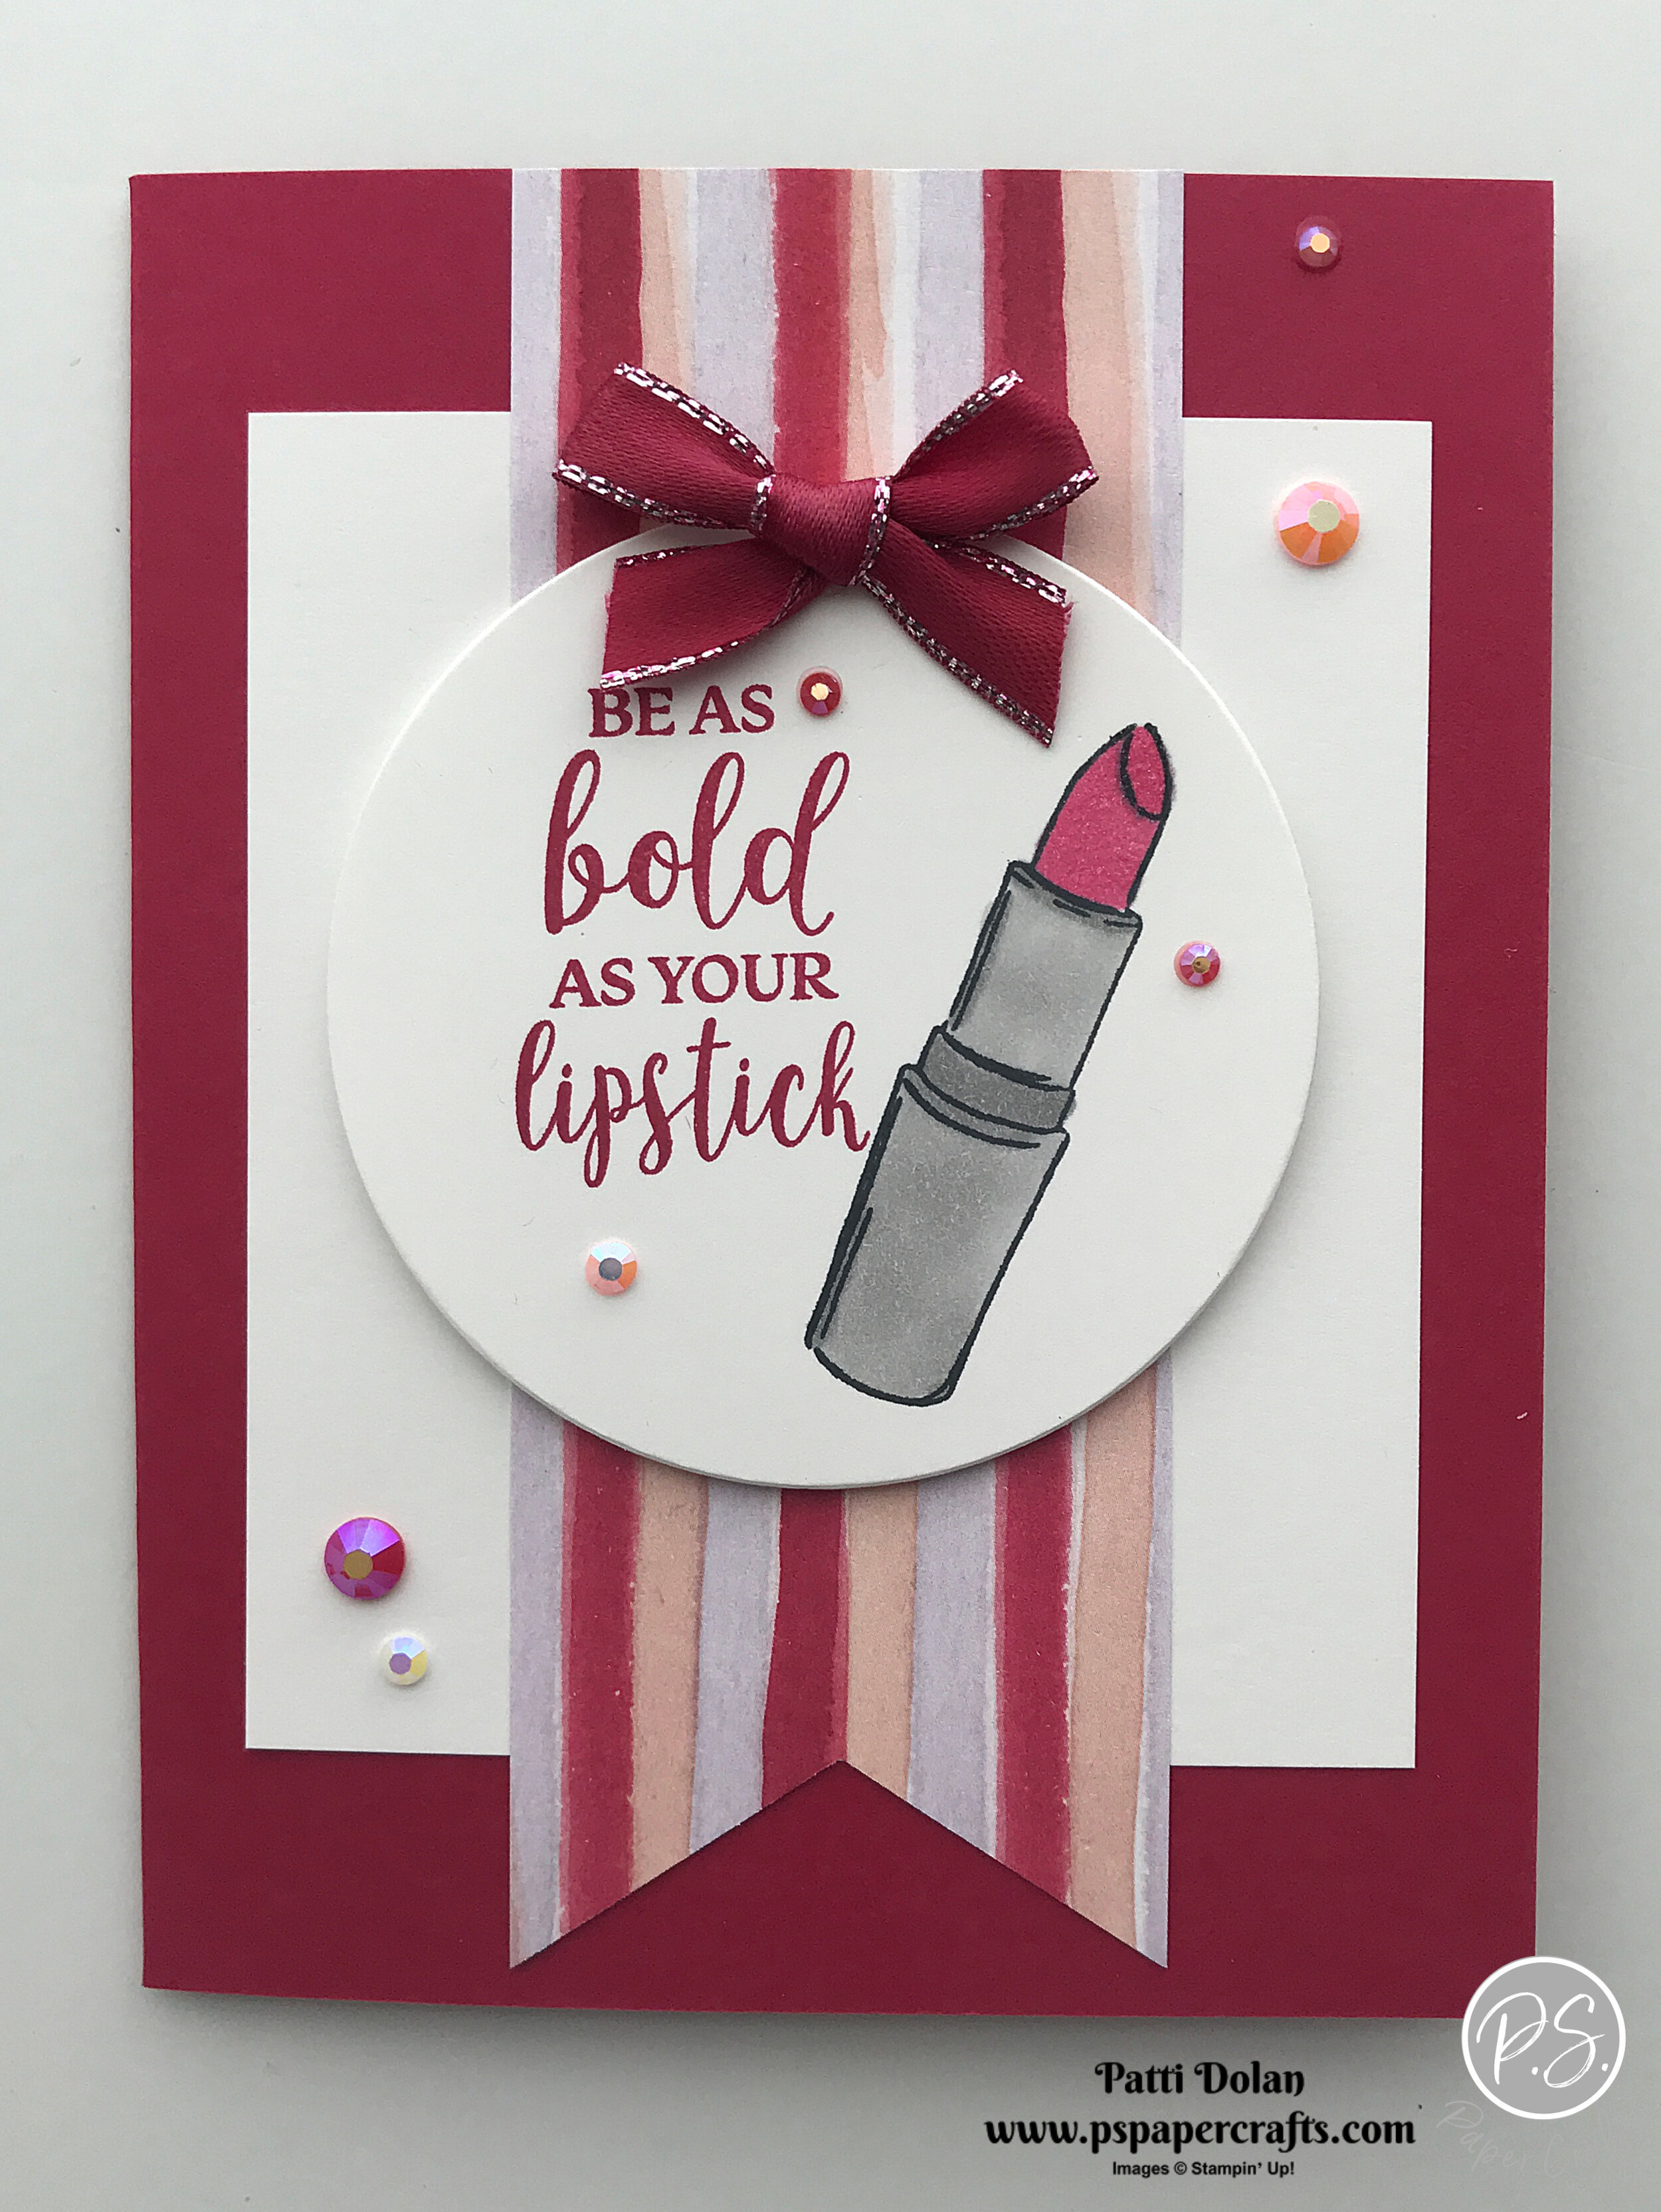
I found this sketch on Pinterest. I just search on card sketches and find tons of them out there. I love that crafters share their ideas.

The Dressed to Impress Stamp set is really fun. I love the images and the sentiments. There’s a whole suite that goes with this stamp set that you can purchase beginning January 3, 2019. Let me know if you want a catalog.

Tips & Instructions
Lovely Lipstick Card Base - 5 1/2 x 8 1/2, score at 4 1/4
Whisper White Layer - 3 1/2 x 4
Best Dressed Designer Series Paper 2 x 5 1/2, punch banner on one end with Banner Triple Punch and cut to size you want
Whisper White Circle - cut with largest Layering Circles Die
Stamp sentiment on circle with Lovely Lipstick Ink and lipstick with Black Memento Ink.
Color lipstick with Lovely Lipstick and Smoky Slate Stampin’ Blends and color the lipstick end with Wink Of Stella
Adhere layers to card base using Dimensionals on the circle
Color Metallic Edged Ribbon with Lovely Lipstick Stampin’ Blends and make a bow, adhere with Mini Glue Dot
Add some From My Heart Gems

I didn’t put a sentiment on the inside because I want to write a personal note. I couldn’t leave it blank thought so I cut a strip of the Designer Series Paper and adhered it along the side.

Supply List

Masculine Birthday Card using the Mountain Air Bundle
I am loving this bundle. You can create beautiful mountain scenes which is great for guy cards.

I have so much to share with you about this bundle so watch the video and get all the details.
Bet you can’t wait to get this one. It will be available starting January 3, 2019 during our Mini Catalog launch.

Tips & Instructions
Early Espresso Card Base - 5 1/2 x 8 1/2, score at 4 1/4 (horizontal, top folding)
Whisper White Layer - 5 1/4 x 4, lightly sponge top part using a Sponge Brayer and Balmy Blue Ink.
Sahara Sand Layer - 5 1/4 x about 3 1/2, stamp trees and cut with coordinating die as shown on the video. Cut the length to fit the area as you layer.
Tropical Oasis Designer Series Paper - cut mountains
Mossy Meadow Cardstock - back piece with Adhesive Sheet and then cut 2 trees
Scrap of Whisper White - stamp moon (stamp off first) with Smoky Slate Ink and punch with 1” Circle Punch
Scrap of Whisper White - stamp sentiment (from Peaceful Moments) with Early Espresso Ink and punch with Label Me Fancy Punch. Punch the slits on both ends.
Place all your pieces on card to get placement and stamp birds with Pacific Point Ink
Adhere layers and trees to card base and adhere moon using a Dimensional
Feed piece of Braided Burlap Trim through label and adhere to card using Dimensionals

Supply List

Mountain Air - Simple Hello Card
This tree is my favorite die in this bundle. There’s something about it that I just love; it’s simple and delicate.

The stamps in this set are reversible, meaning you can stamp on both sides. It’s really cool. One side has the detail and the other provides a background shadow. The dies can be used along with the stamps or on their own. This is such a versatile bundle.
You can order this from the new 2020 Mini-Catalog starting January 3, 2019.

Tips & Instructions
Mossy Meadow Card Base - 4 1/4 x 11, score 5 1/2 (top folding)
Whisper White Layer - 5 1/4 x 4
Nested Stitched Label cut from Whisper White Cardstock
Peaceful Poppies Designer Series Paper - cut tree from green paper and adhere to label
Stamp tree images with Mossy Meadow Ink on white layer, stamping as second time before re-inking
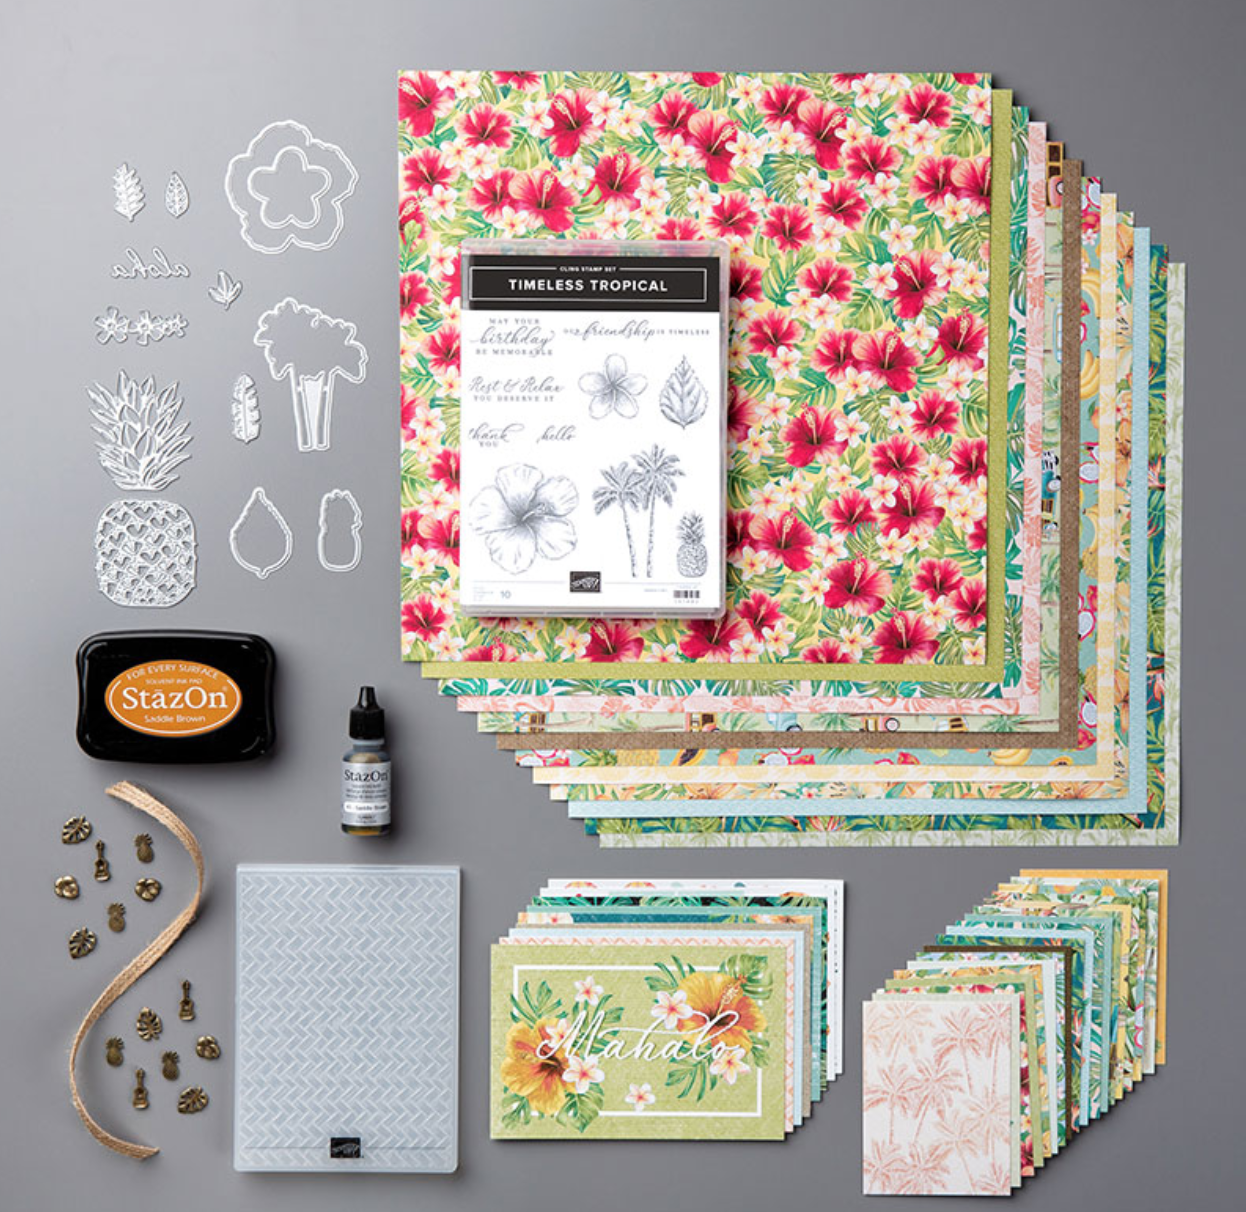
Stamp hello sentiment (from Timeless Tropical Stamp Set)
Adhere layer to card base
Adhere label with tree to card using Dimensionals

On the inside stamp the trees in the bottom corner. I didn’t put a sentiment inside; I’m not sure who I will give this card to and what I want to write.

Supply List

Sketch Saturday - Honey Bee
I’m starting to play with the new products from the 2020 Mini Catalog and this is one of my favorites…so far! I thought of a beehive when I saw the sketch and went to work with the new Honey Bee products.

This is the sketch I used for a challenge from Splitcoaststampers.

The Golden Honey Specialty Designer Series Paper is absolutely gorgeous. Its FREE during Sale-A-Bration! It’s black, white and gold foil. The Honey Bee Dies will cut some of the bee images….love that! If you purchase the bundle and some cardstock and you can get this paper for free starting January 3.

Tips & Instructions
Basic Black Card Base - 5 1/2 x 8 1/2, score at 4 1/4
Whisper White Layer 5 1/4 x 4, stamp sentiment with Black Memento and adhere to card base
Golden Honey Specialty Designer Series Paper 4 1/4 x about 3. Find an object to use to trace an oval and cut it. I used the top to a casserole dish. Do the same with a piece of Basic Black.
Adhere the Designer Series Paper over the Basic Black leaving a very small edge of black and then adhere to the card
Cut the bees from the Designer Series Paper using the coordinating dies and adhere using Dimensionals

On the inside, stamp sentiment with Black Memento Ink and cut another bee and adhere to bottom corner.

If you want any of the products I used on this project, just click on the item below or the Shop Now button and it will bring you to my Online Store. Please use the current Host Code when you go to checkout your order. You can also click directly on an item to order.
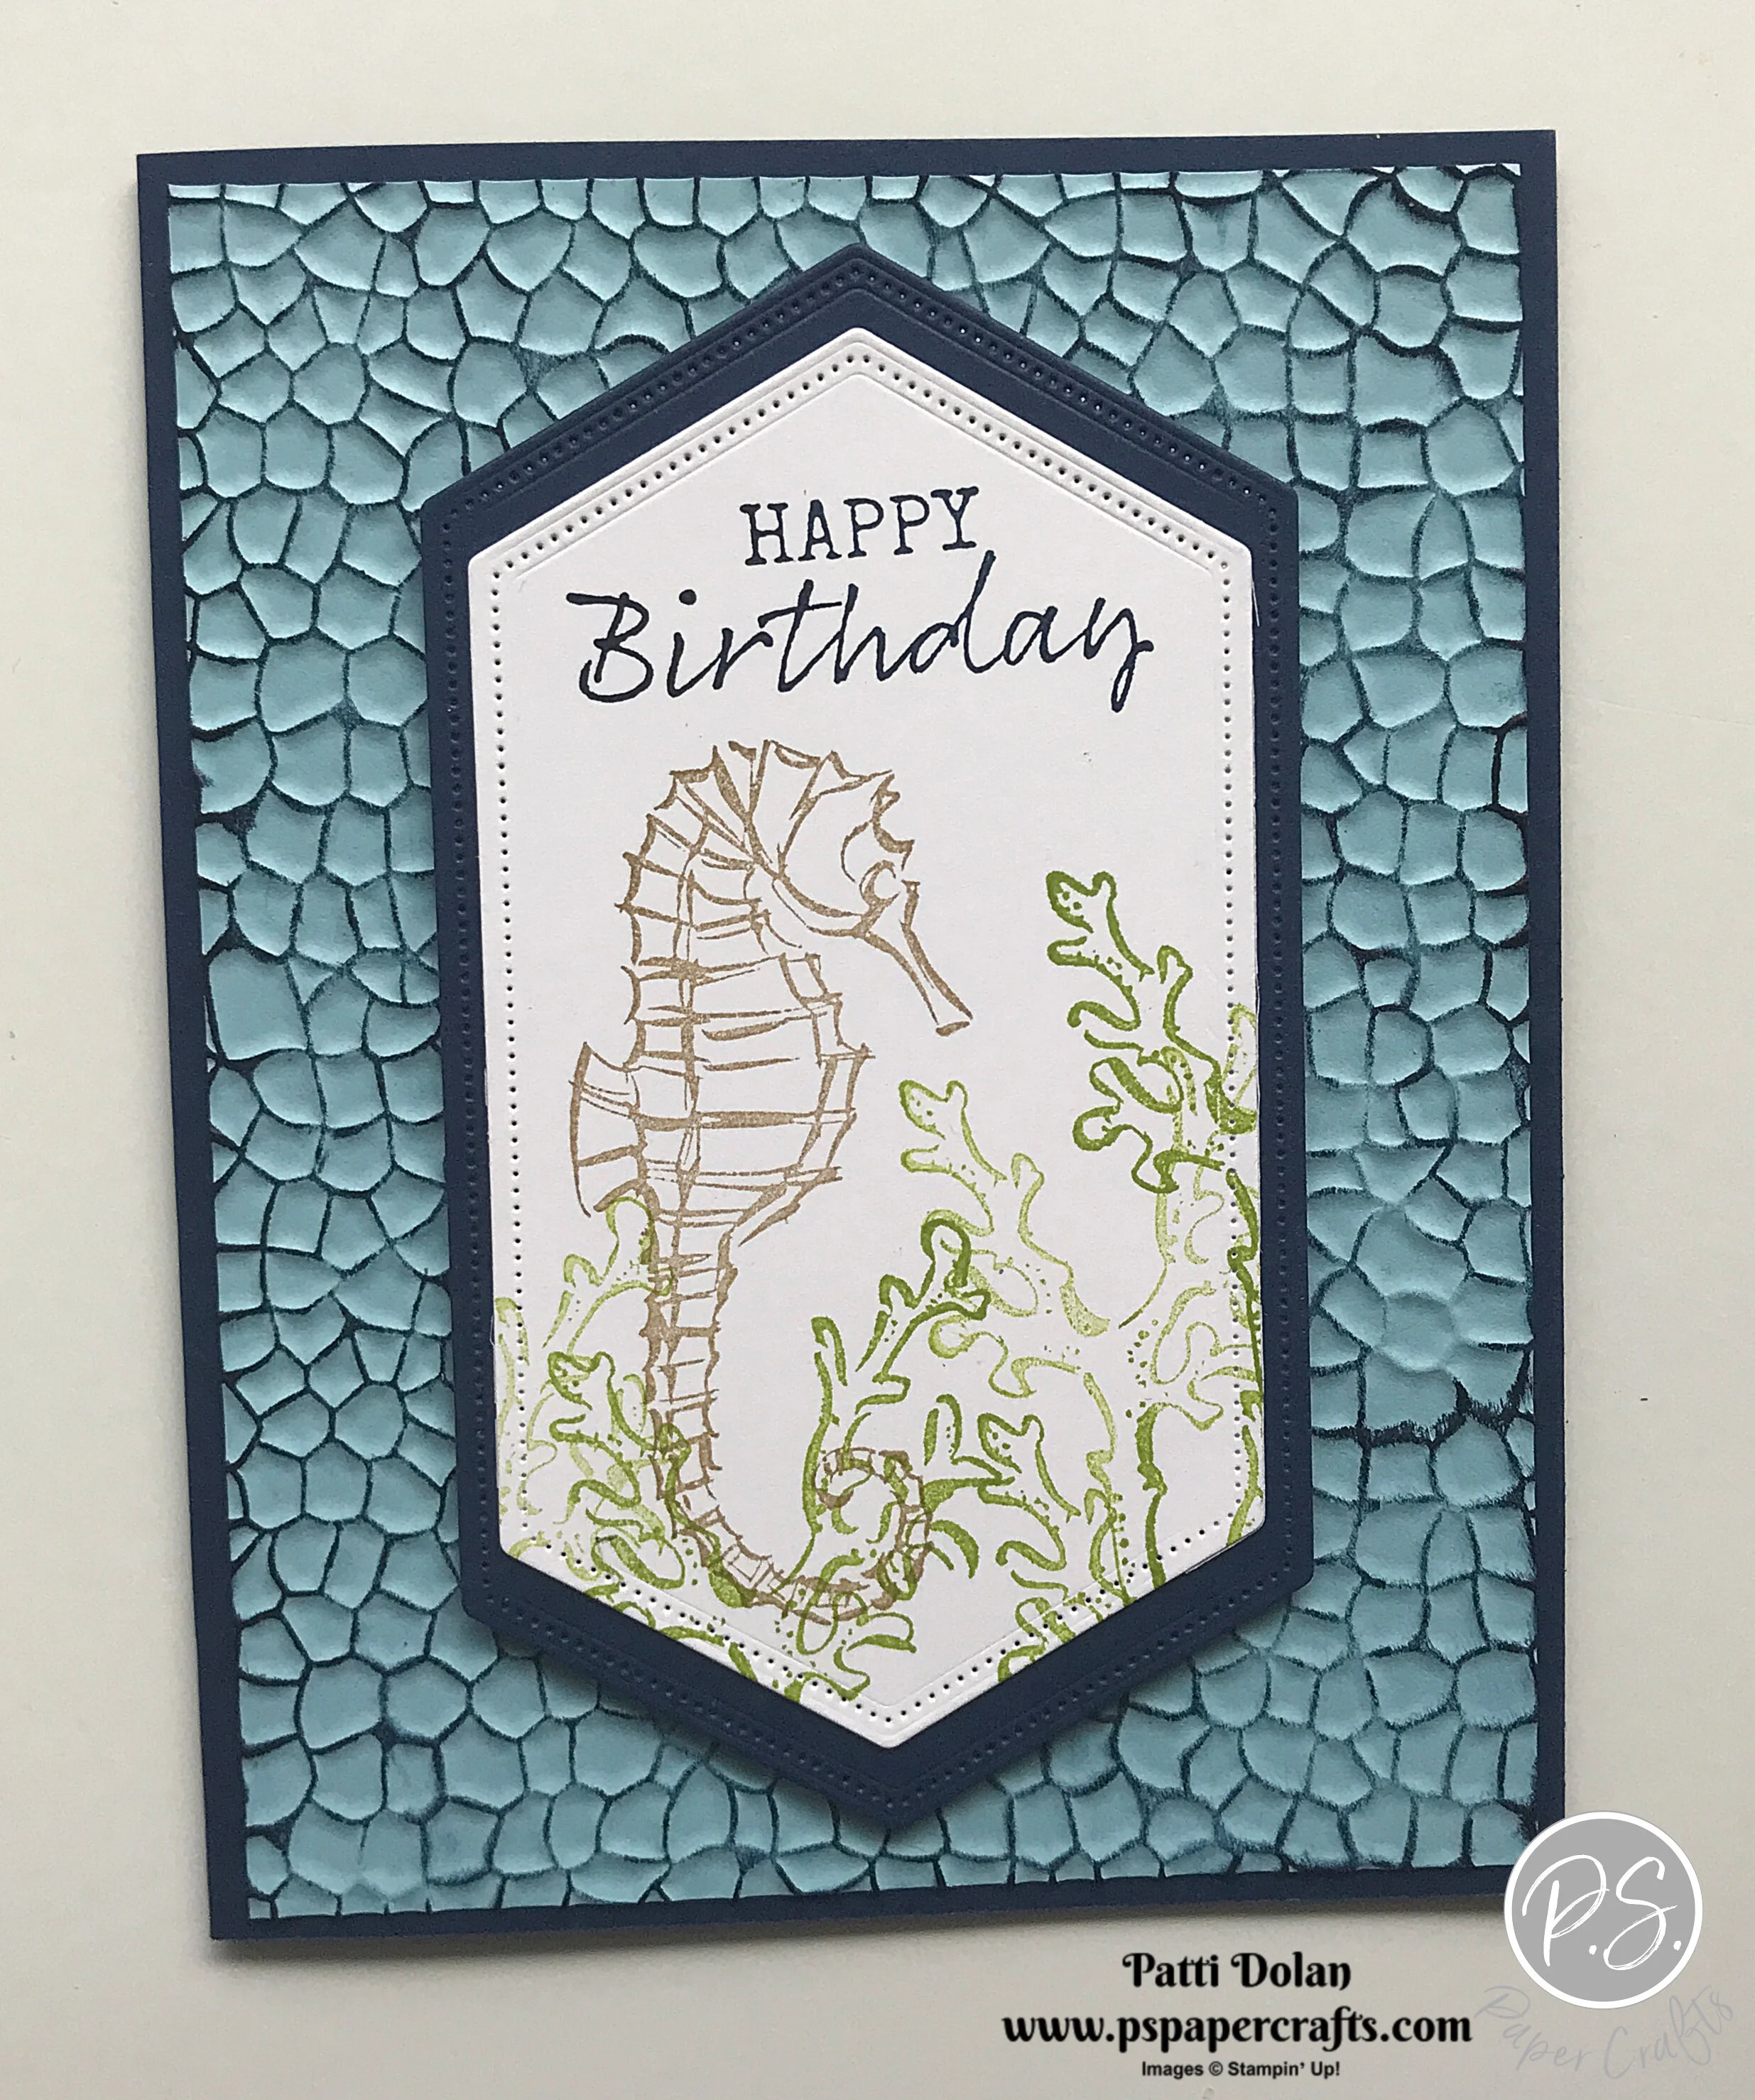
Seaside Notions Birthday Card
This was a fun card to make and can be sent to just about anyone, a guy, a gal or a kid! The Seaside Notions Stamp Set has such great images.
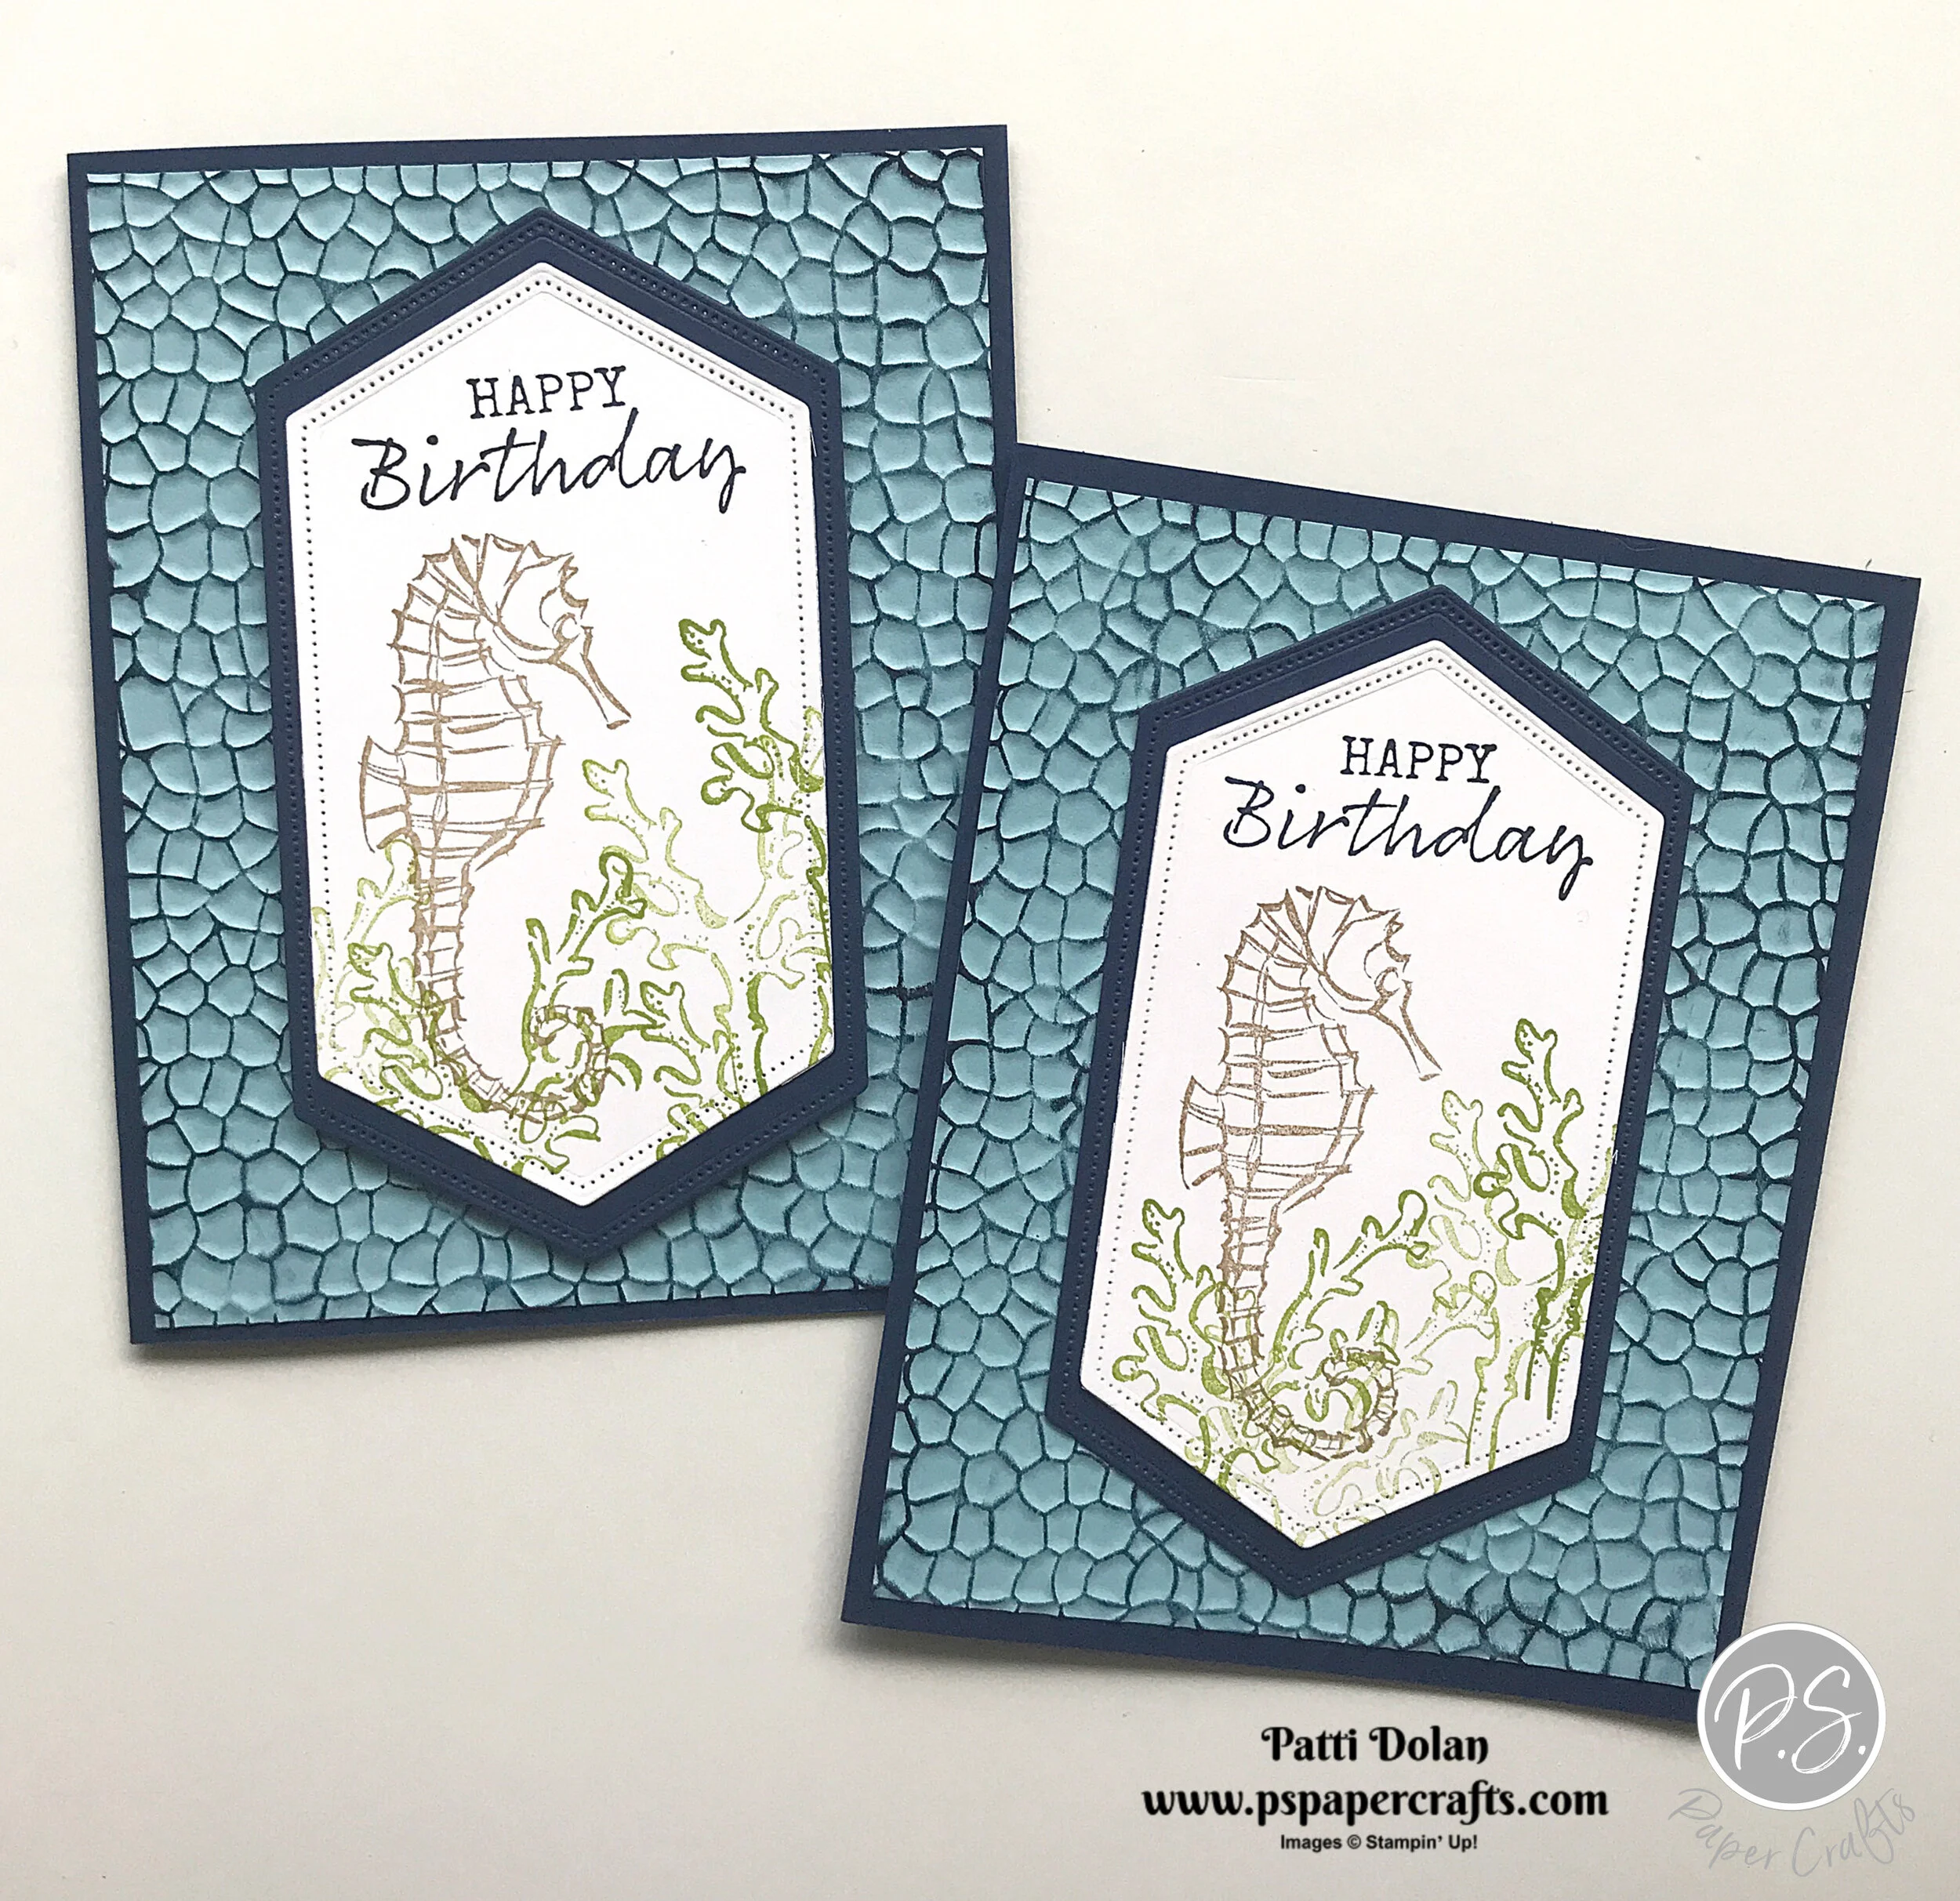
Watch my video to see how I made that background. It was easy to do with an embossing folder and an ink pad.
Tips & Techniques
Night Of Navy Card Base - 5 1/2 x 8 1/2, score at 4 1/4
Balmy Blue Layer - 5 1/4 x 4, emboss with Hammered Metal 3D Embossing Folder (be sure to use the Embossing Plate with it)
Lightly drag a Night Of Navy Ink Pad over the back (debossed side) of the embossed layer to ink just the high points of the layer
Night Of Navy - cut with largest Stitched Nested Label Die
Whisper White - cut with 2nd largest Stitched Nested Label Die, stamp sentiment with Night Of Navy, seahorse with Crumb Cake and seaweed with Granny Apple Green Inks and adhere to navy label
Adhere label to card with Dimensionals
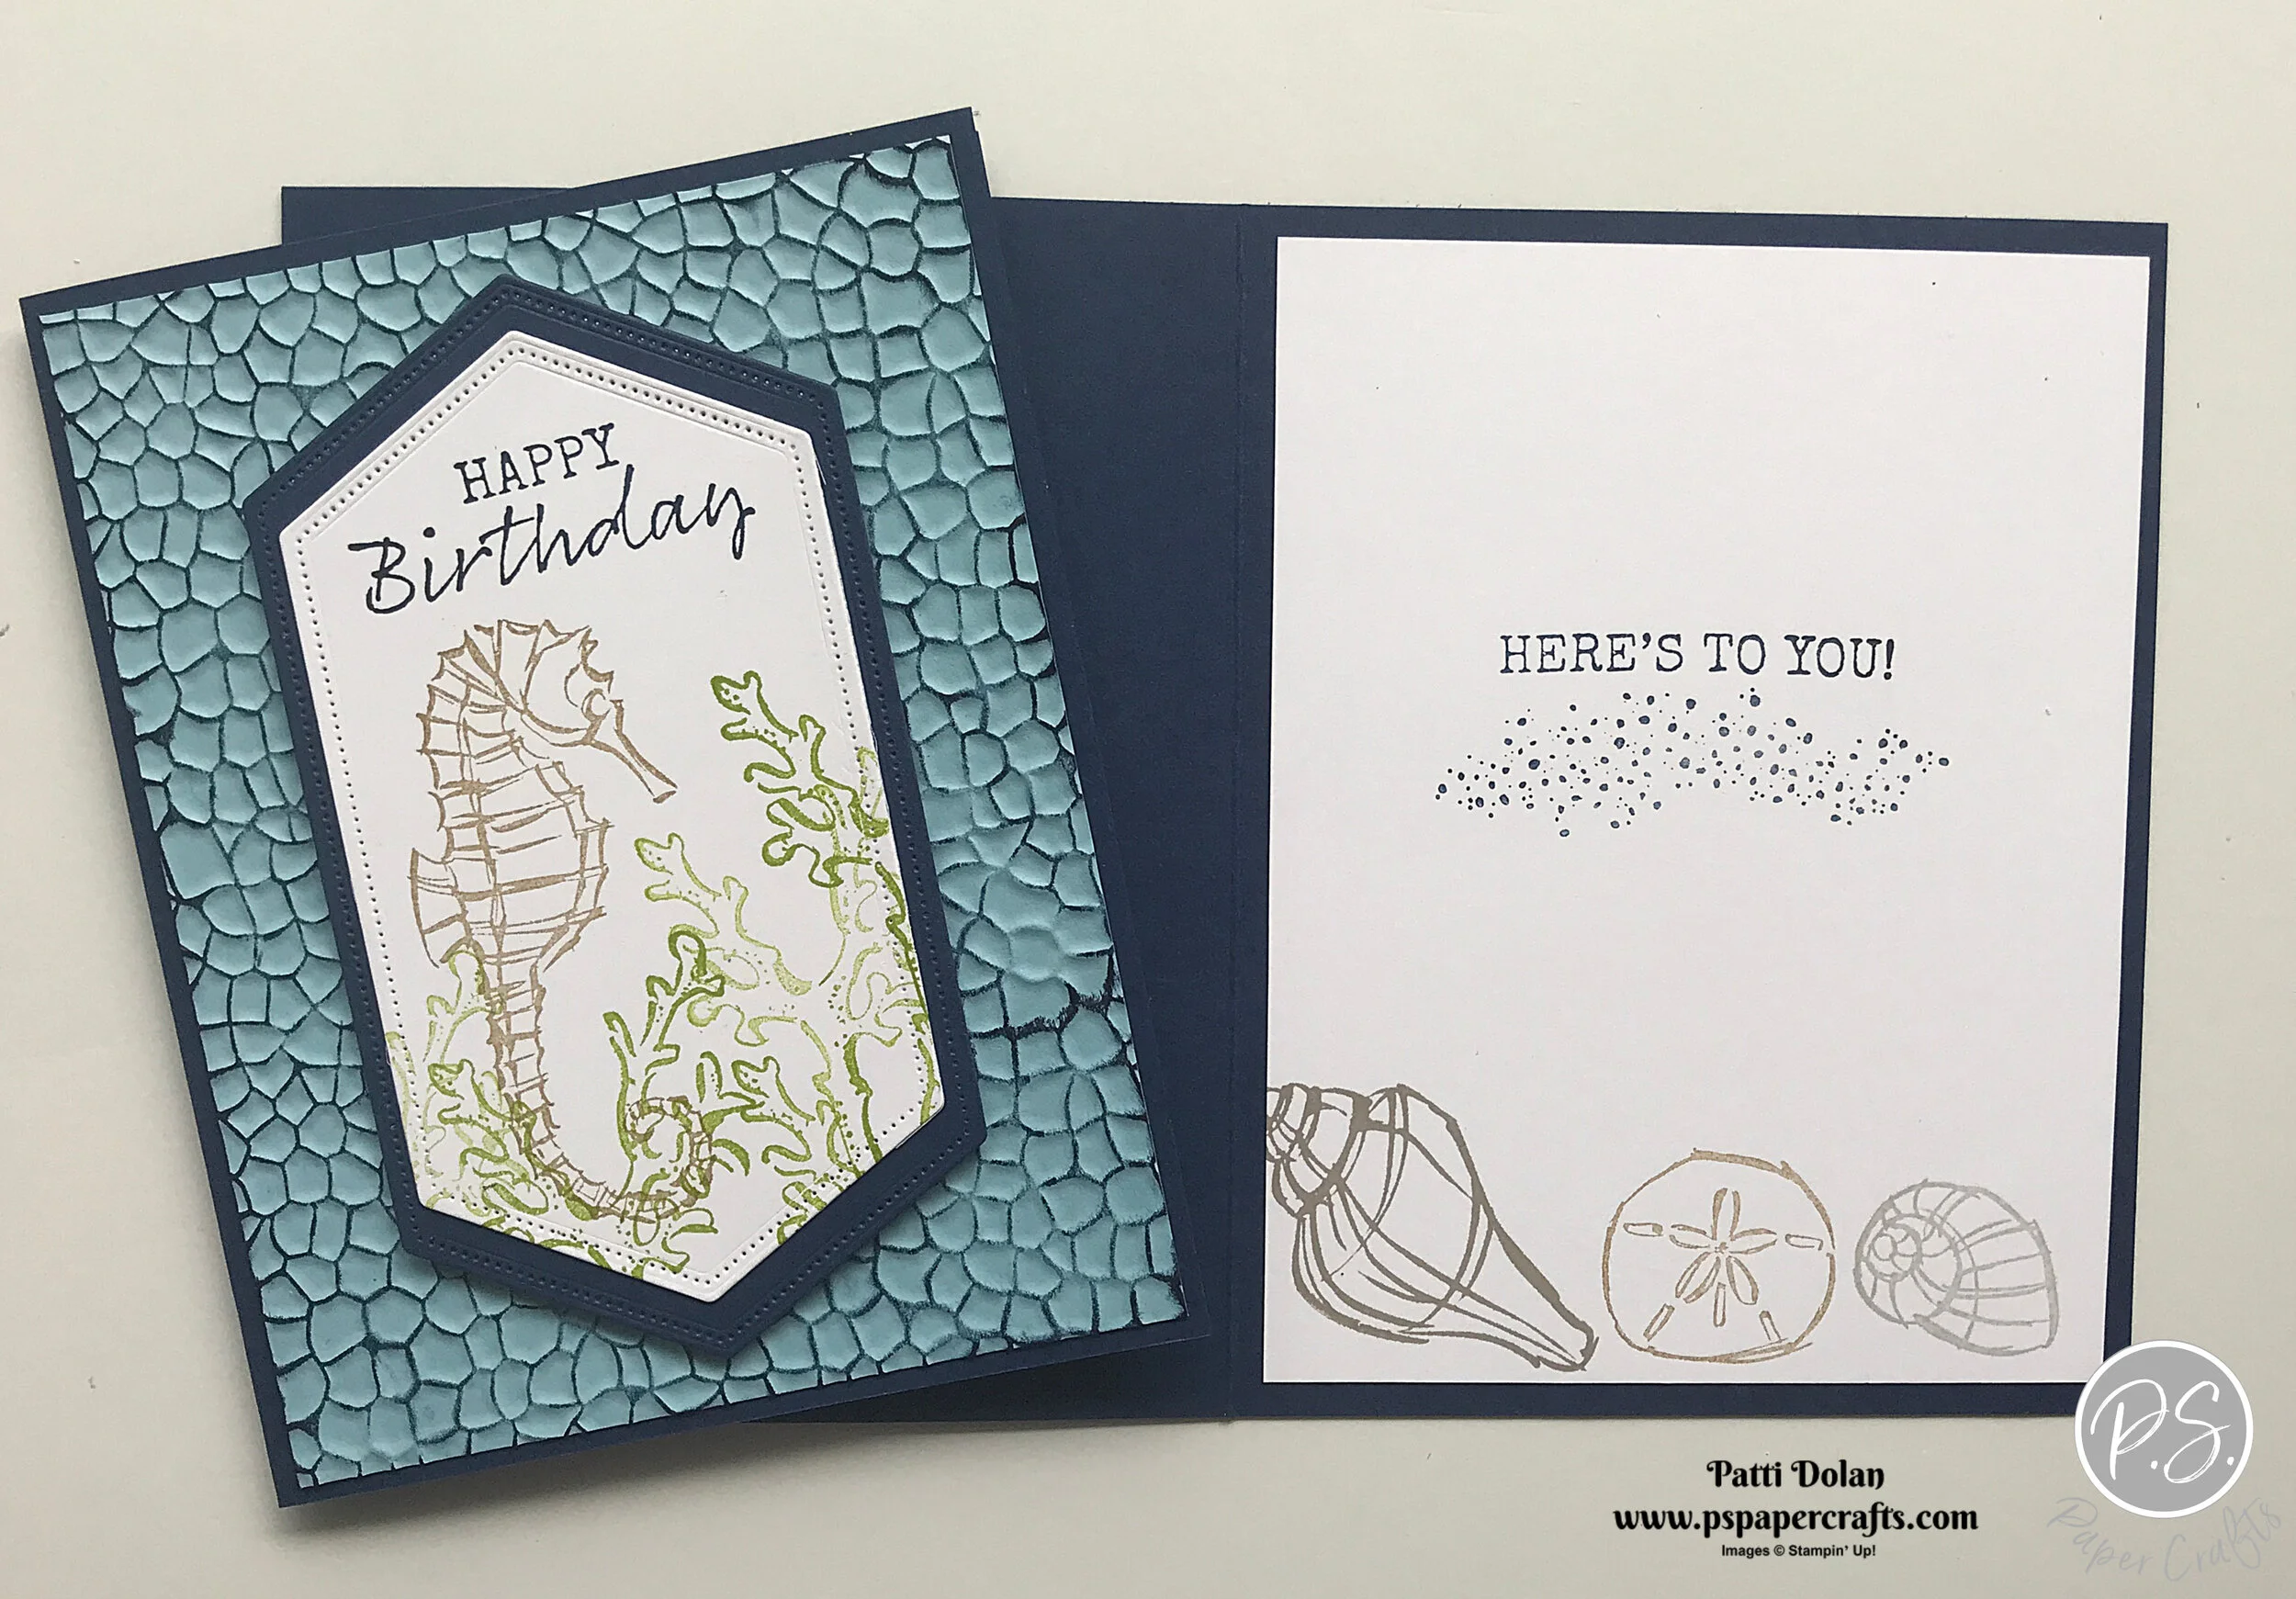
Here’s the inside I made after the video :) I stamped the sentiment and bubbles with Night Of Navy Ink and the shells and sand dollar with Gray Granite, Crumb Cake and Smoky Slate Inks.
If you want any of the products I used on this project, just click on the item below or the Shop Now button and it will bring you to my Online Store. Please use the current Host Code when you go to checkout your order. You can also click directly on an item to order.
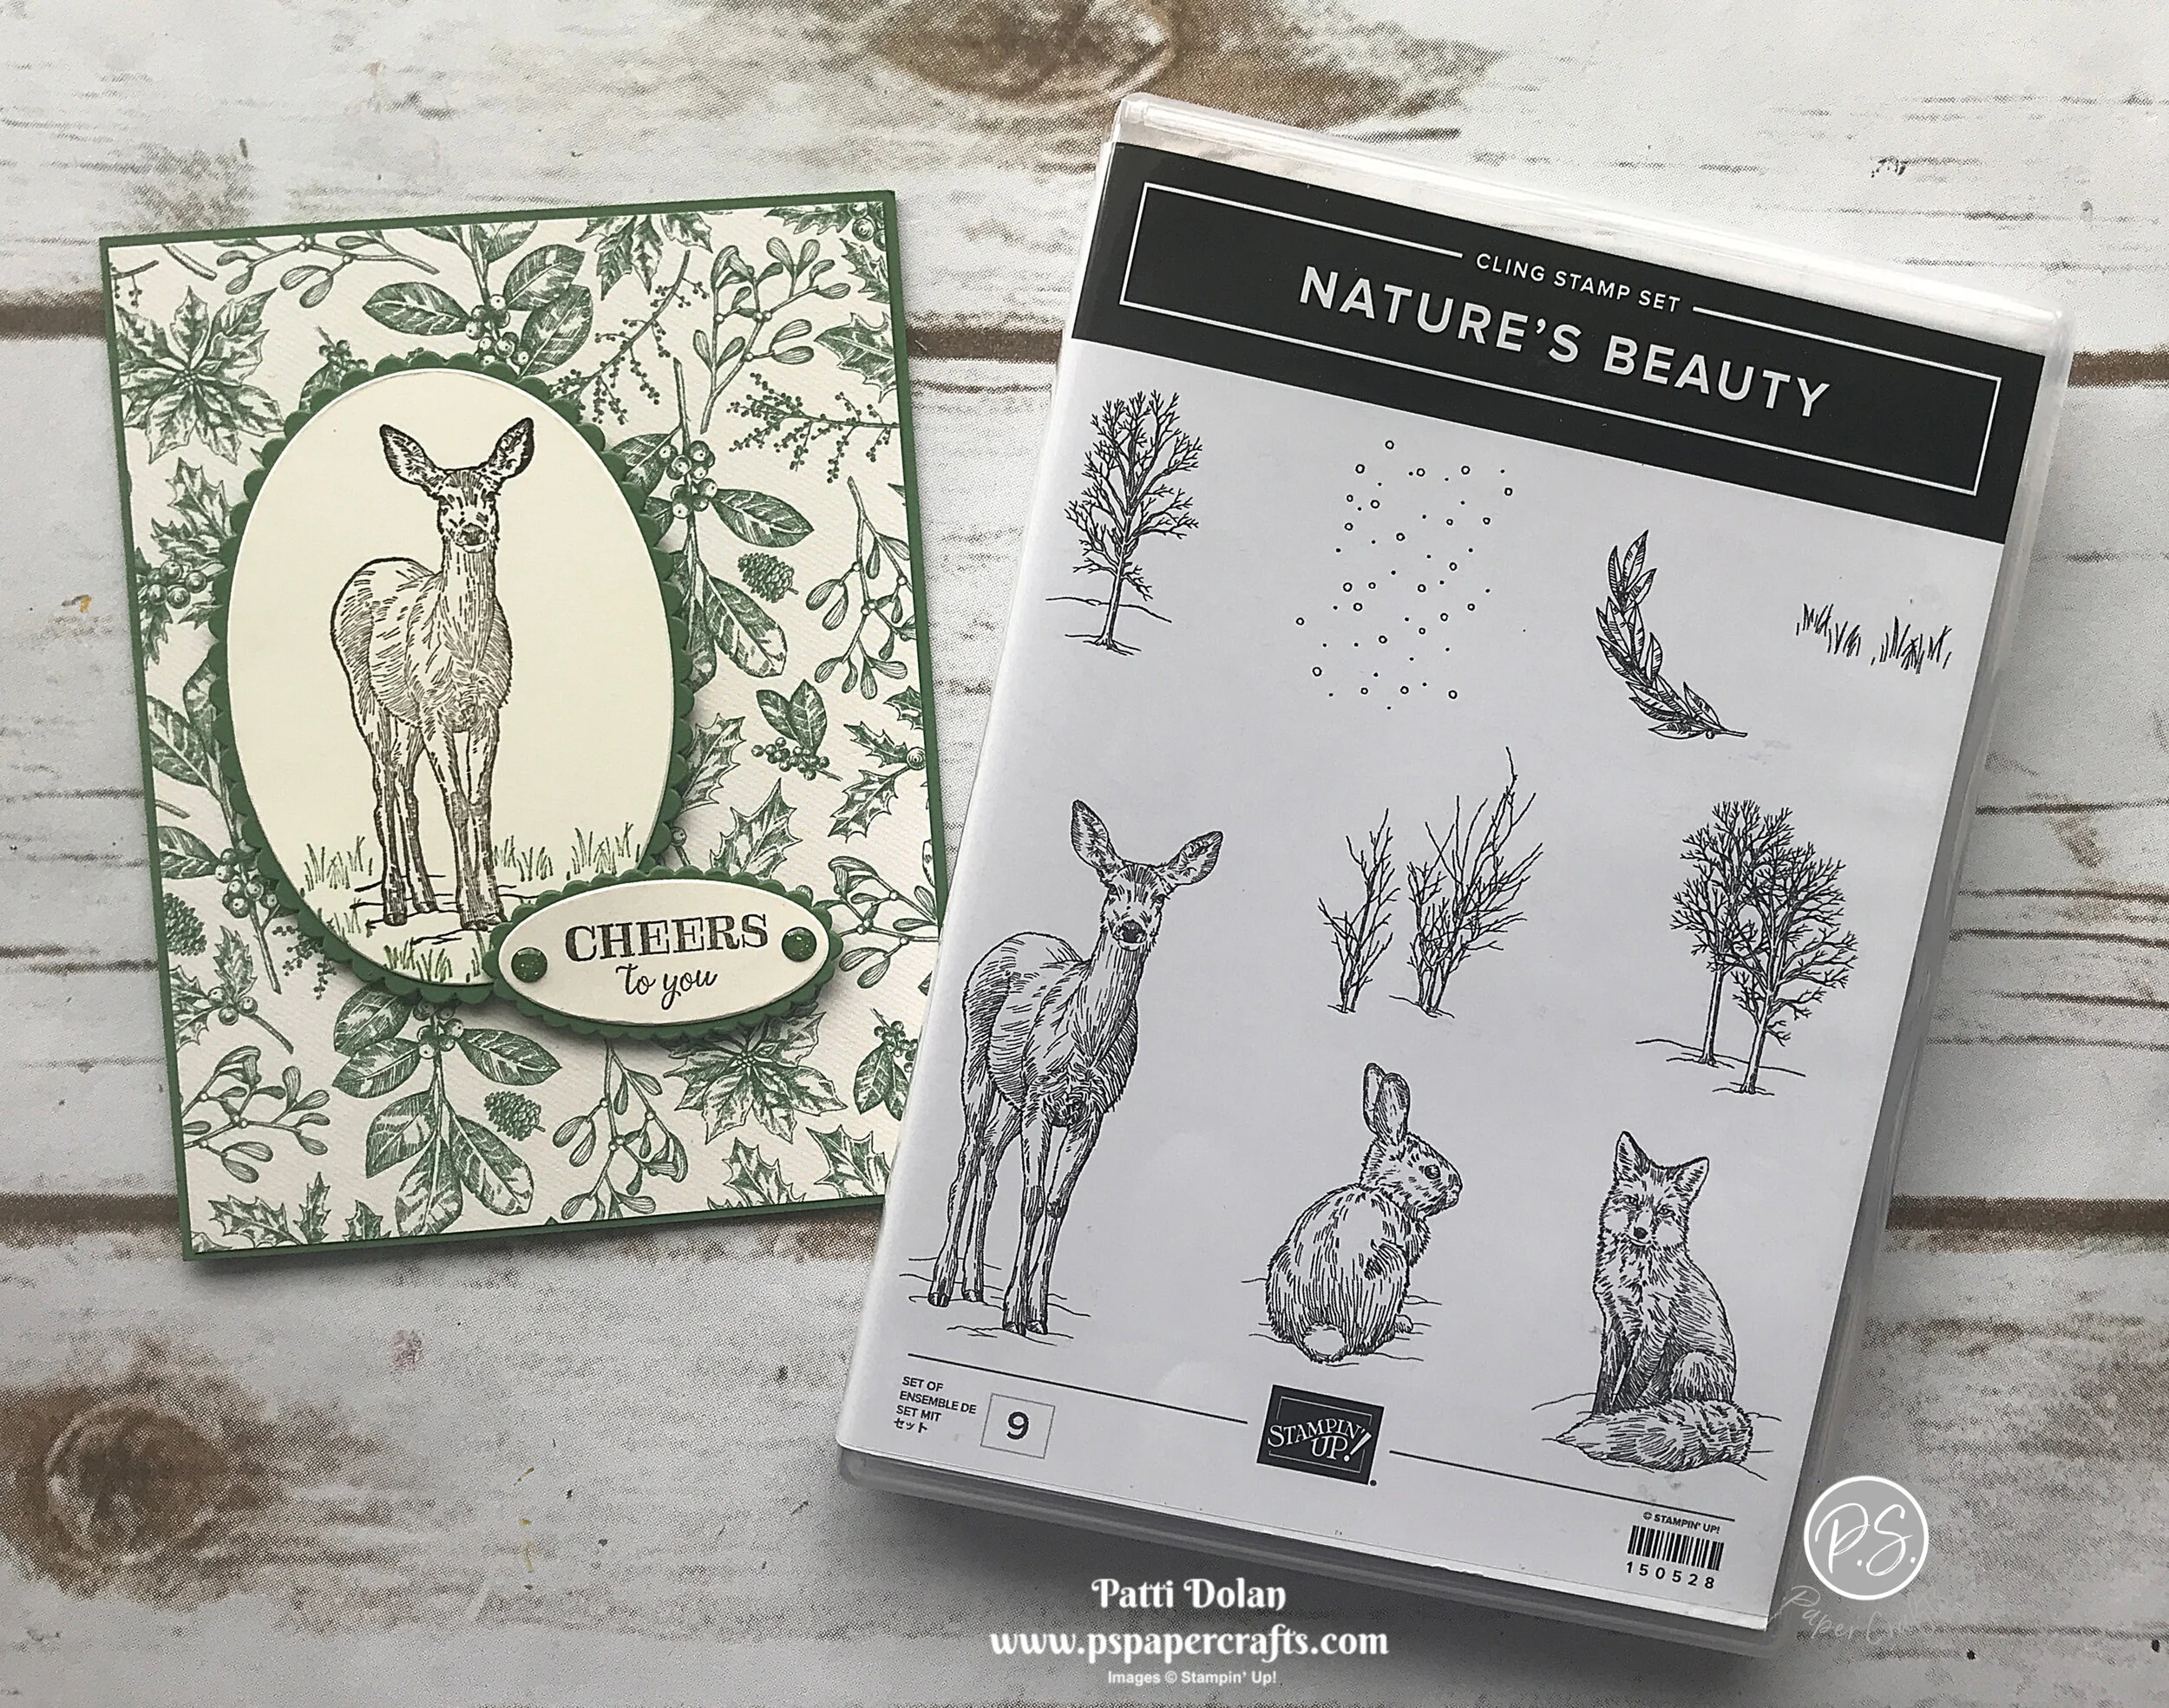
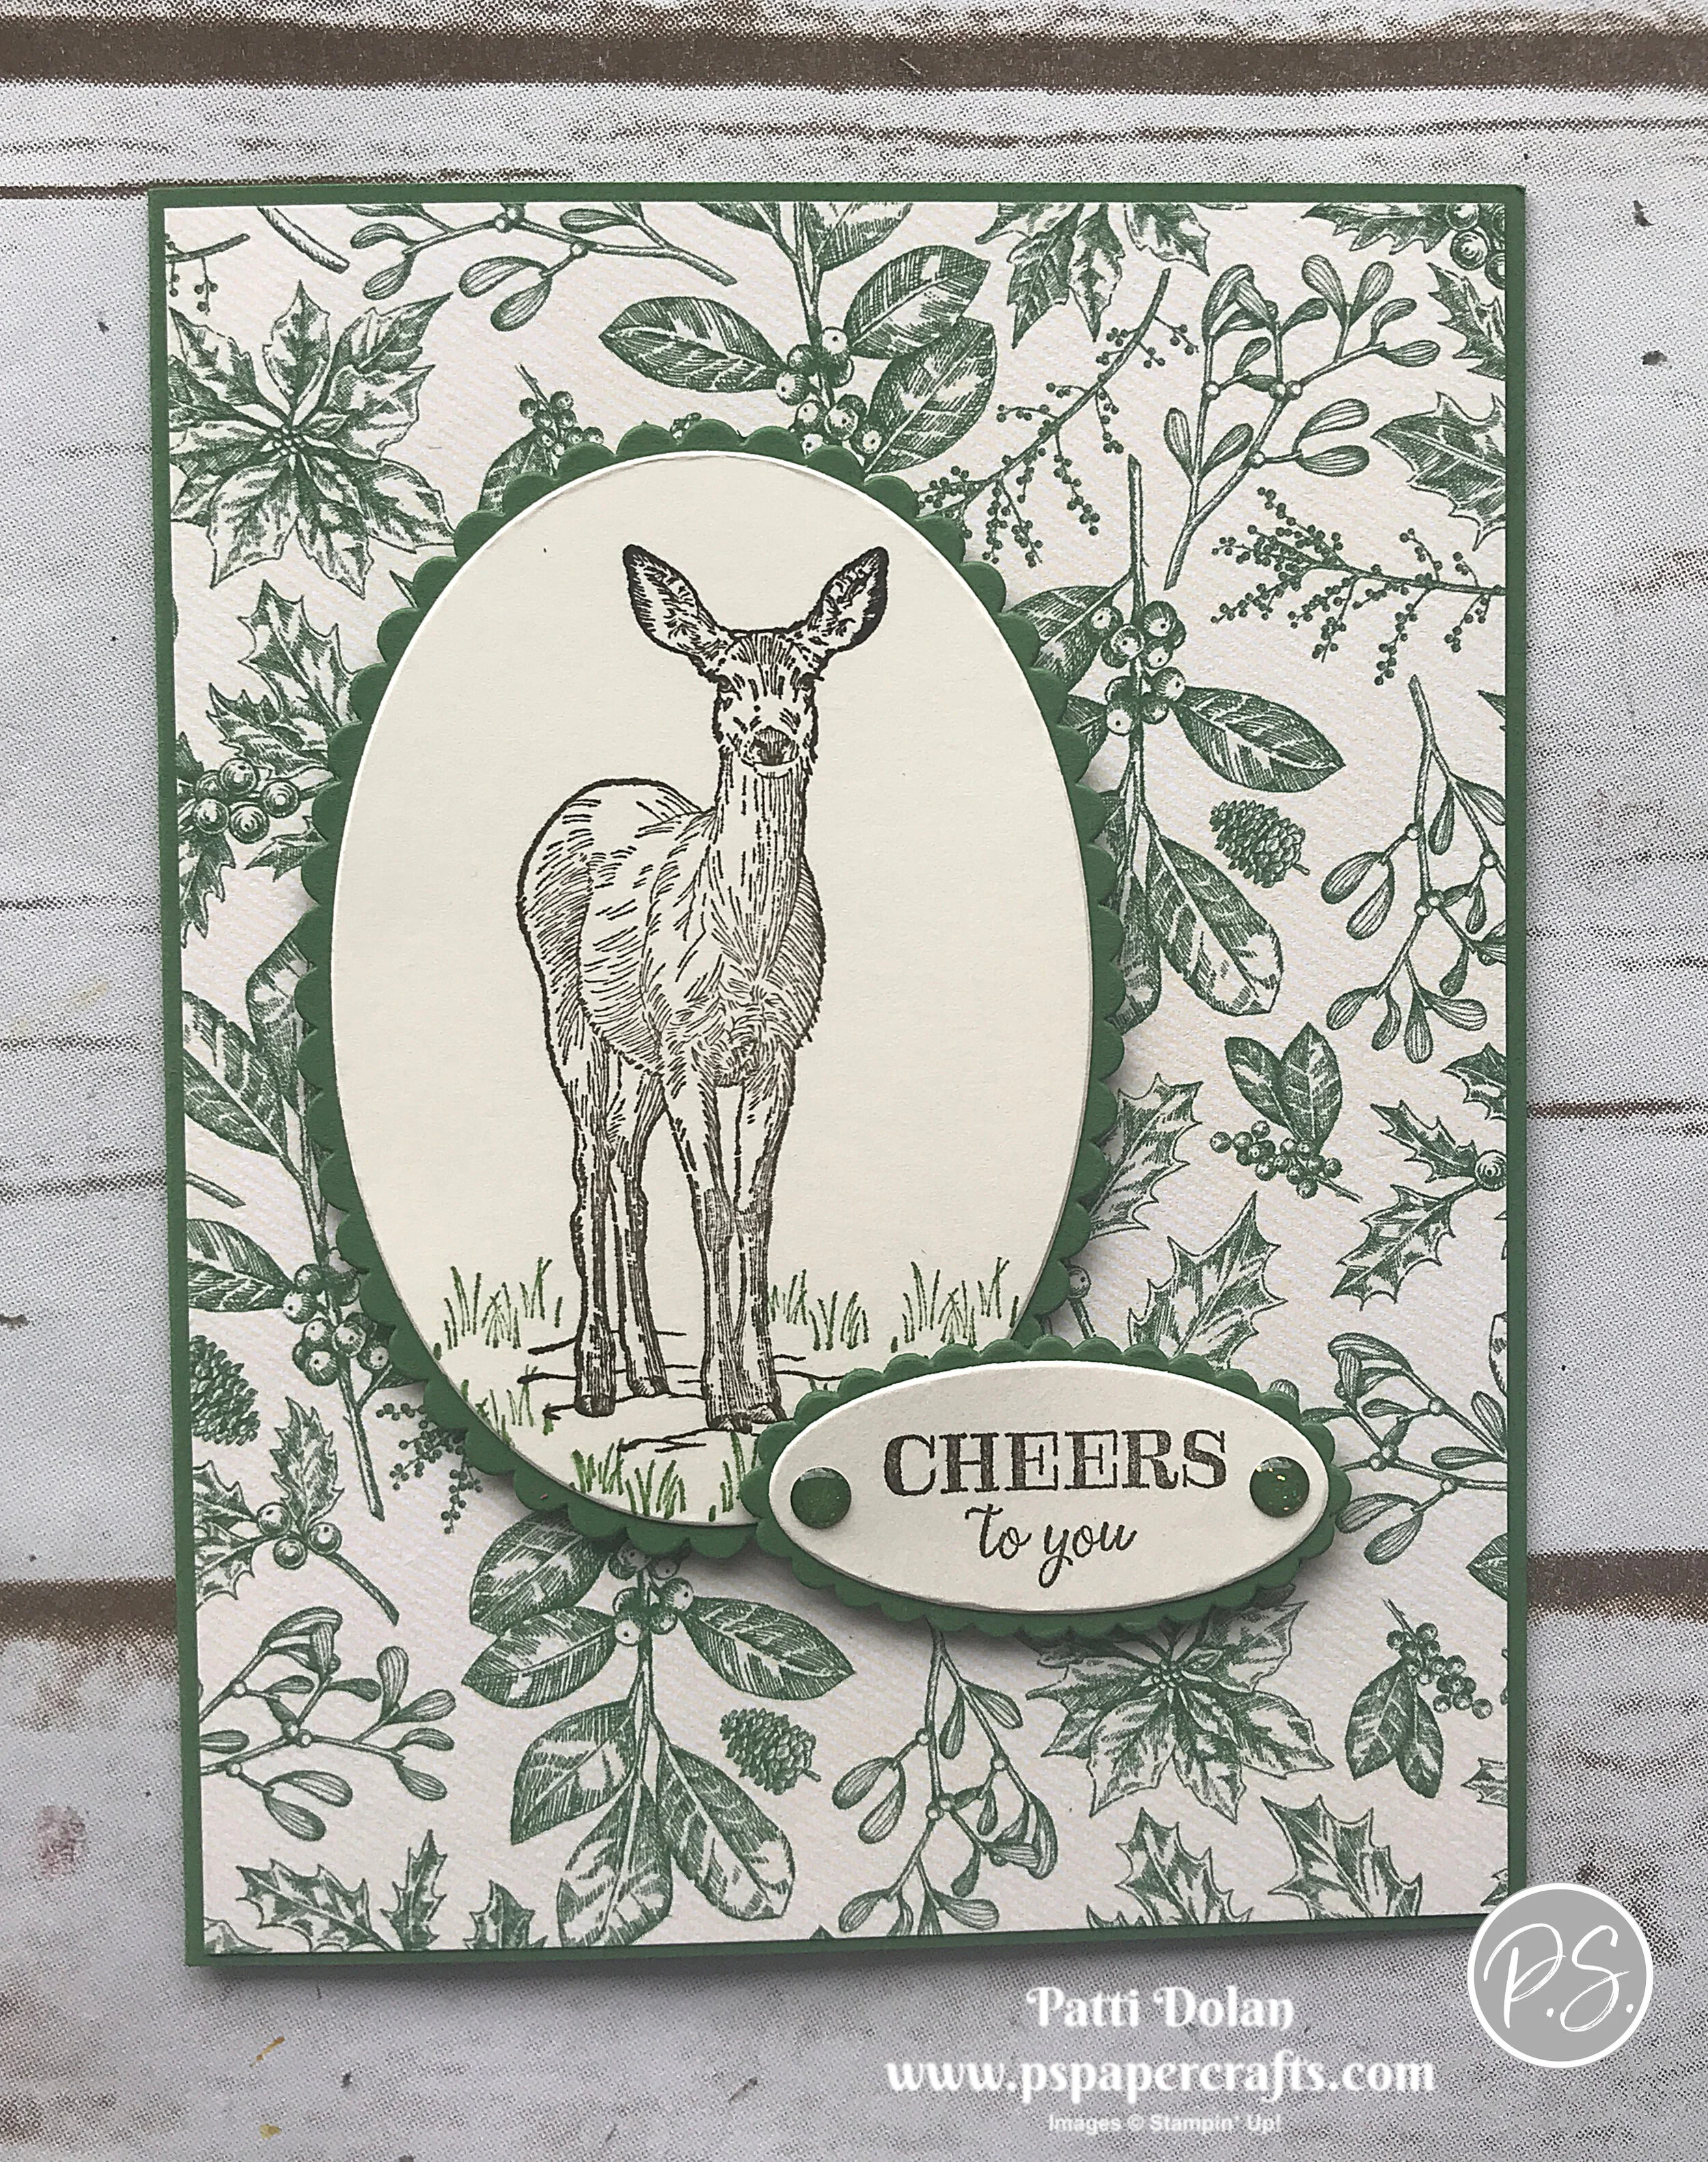
Masculine Winter Birthday Card
This is a great birthday card for a guy during the winter season. The Toile Tidings Designer Series Paper is perfect for this card.
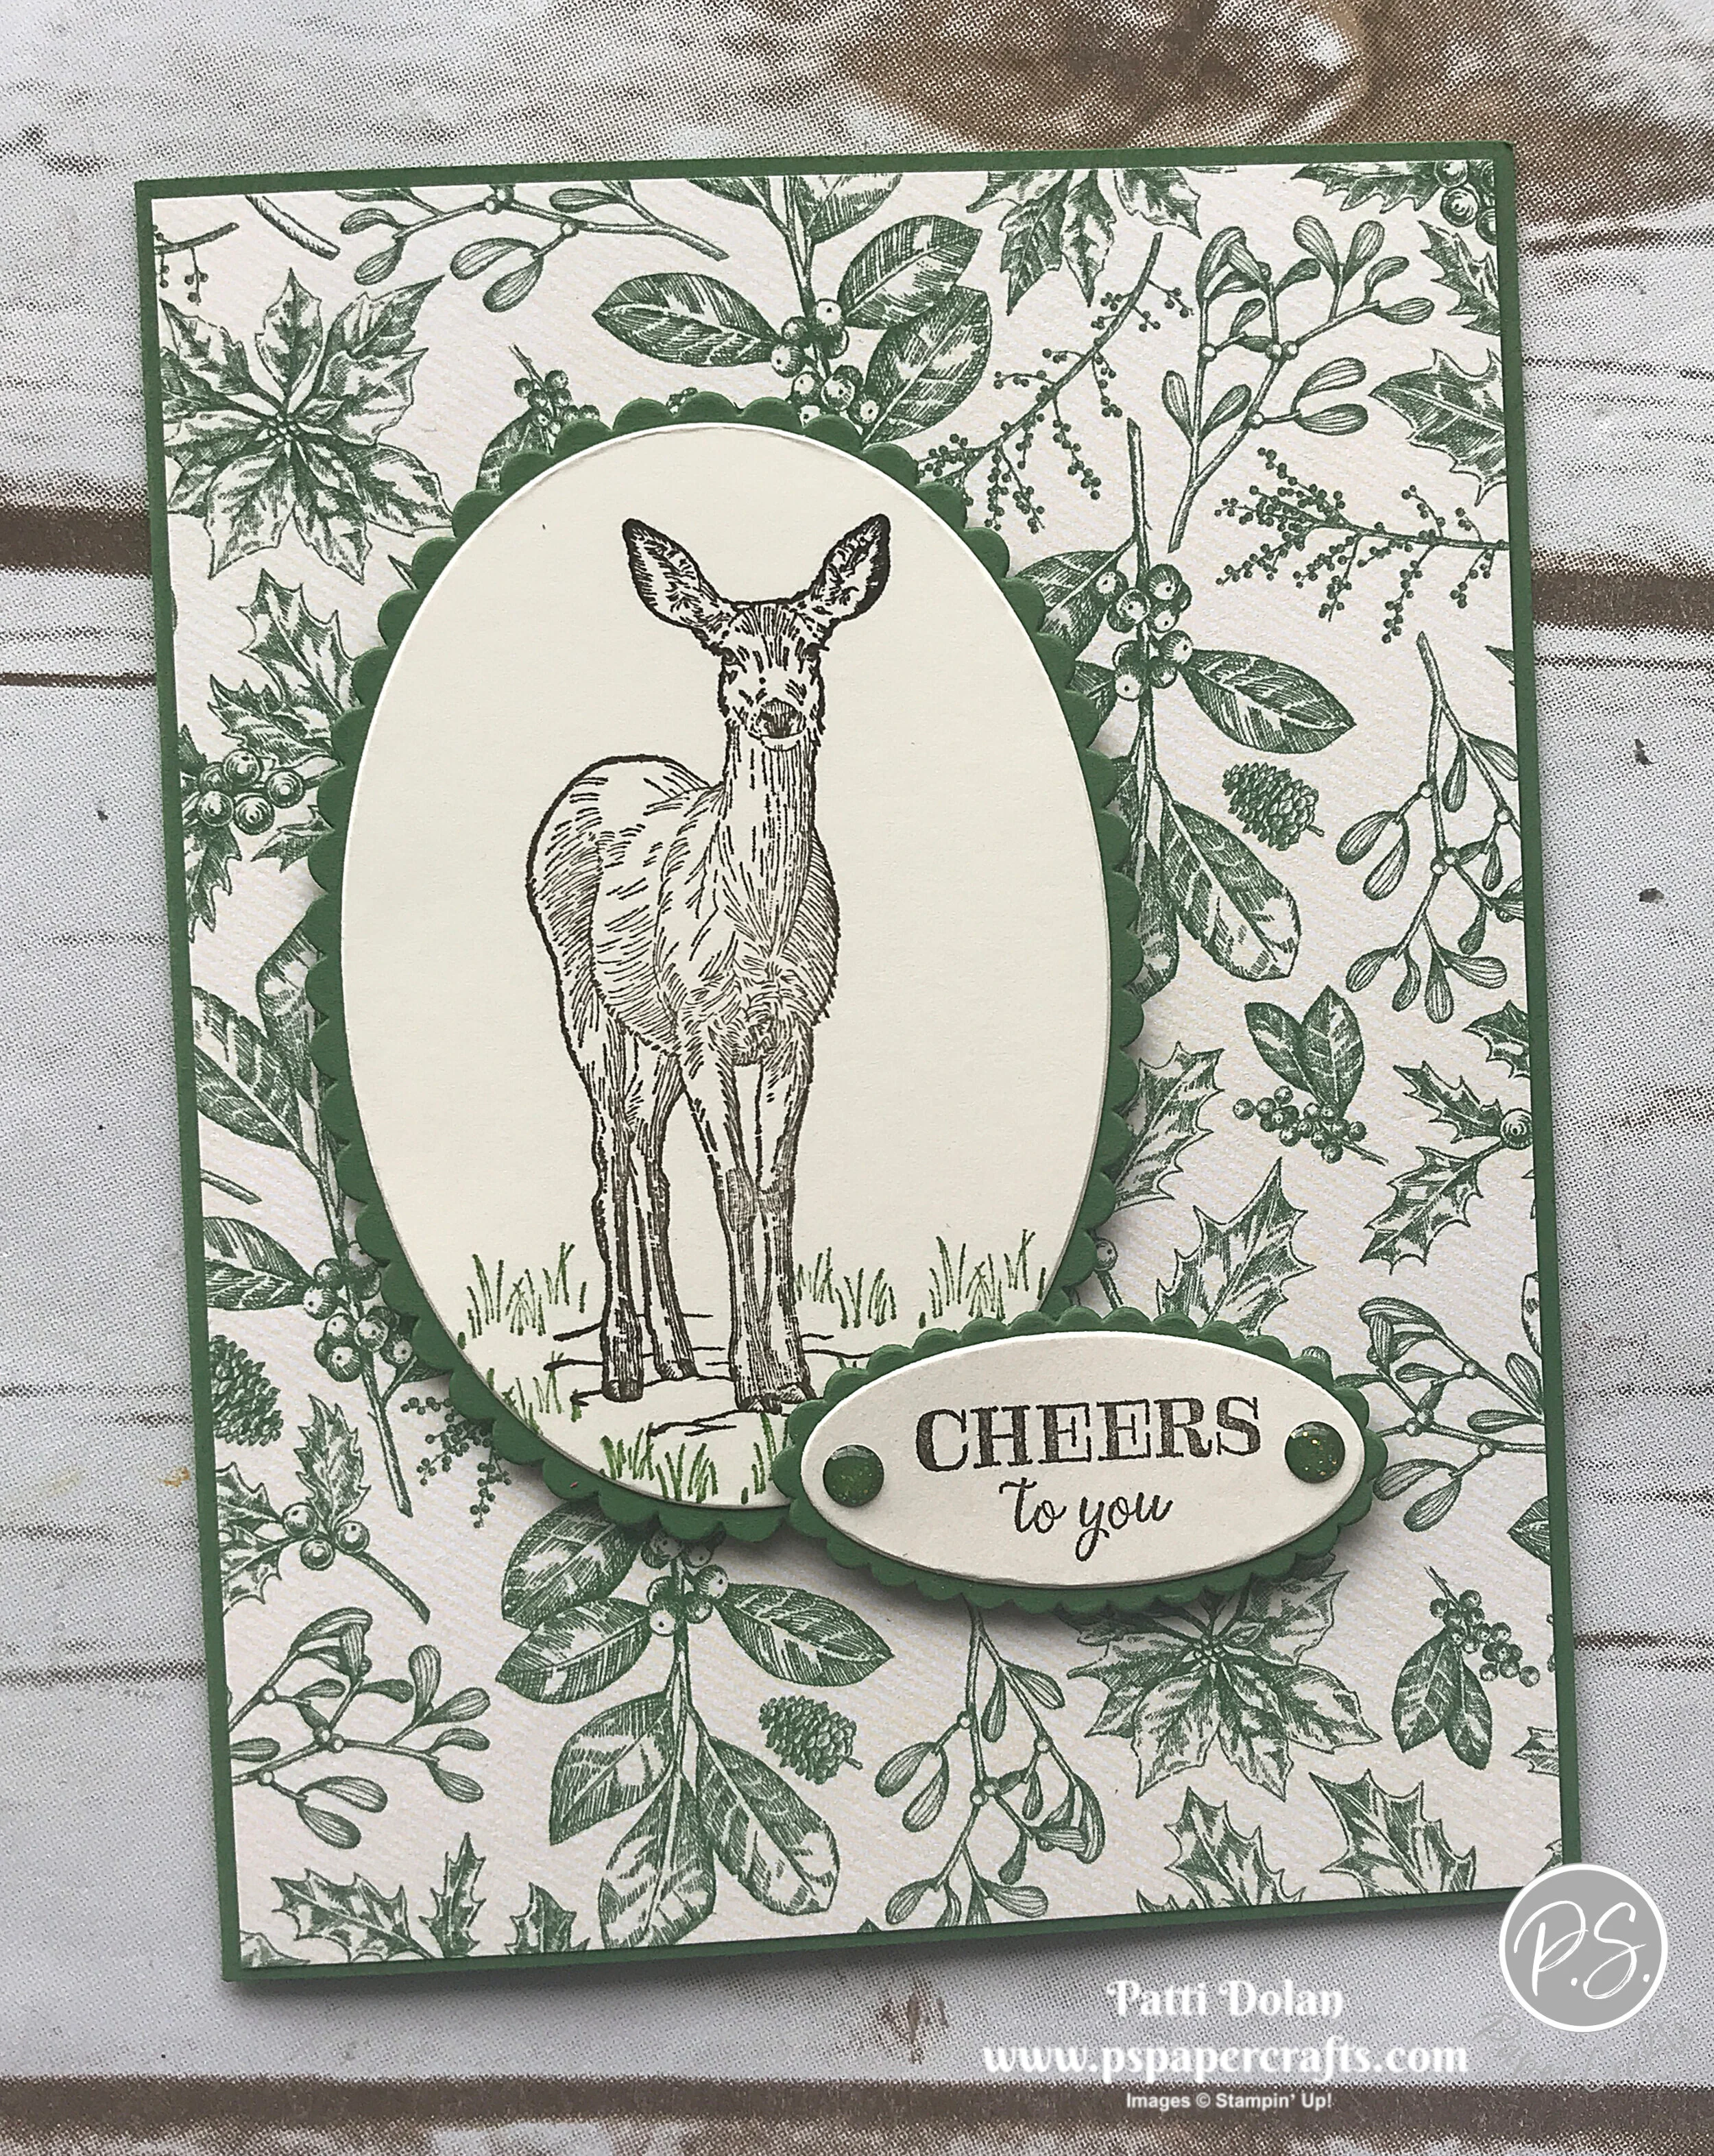
I love the deer in the Nature’s Beauty Stamp Set. Stampin’ Up! is donating $3 to Mental Health Organizations. What a great cause!
Tips & Instructions
Garden Green Card Base - 5 1/2 x 8 1/2, score at 4 1/4
Toile Tidings Designer Series Paper - 5 3/8 x 4 1/8 and adhere to card base
Cut Garden Green Cardstock using largest and smallest scalloped Layering Oval Dies
Cut Very Vanilla Cardstock using the 2nd largest and smallest Layering Oval Dies
Stamp Deer on larger oval and sentiment (from Itty Bitty Birthdays) on smaller oval with Early Espresso Ink and stamp some grass with Garden Green Ink
Adhere ovals to scalloped Ovals and adhere to card using Dimensions, be sure you don’t put a dimensional on the sentiment oval where it rests on the larger oval
Add two Enamel Glitter Dots to sentiment label
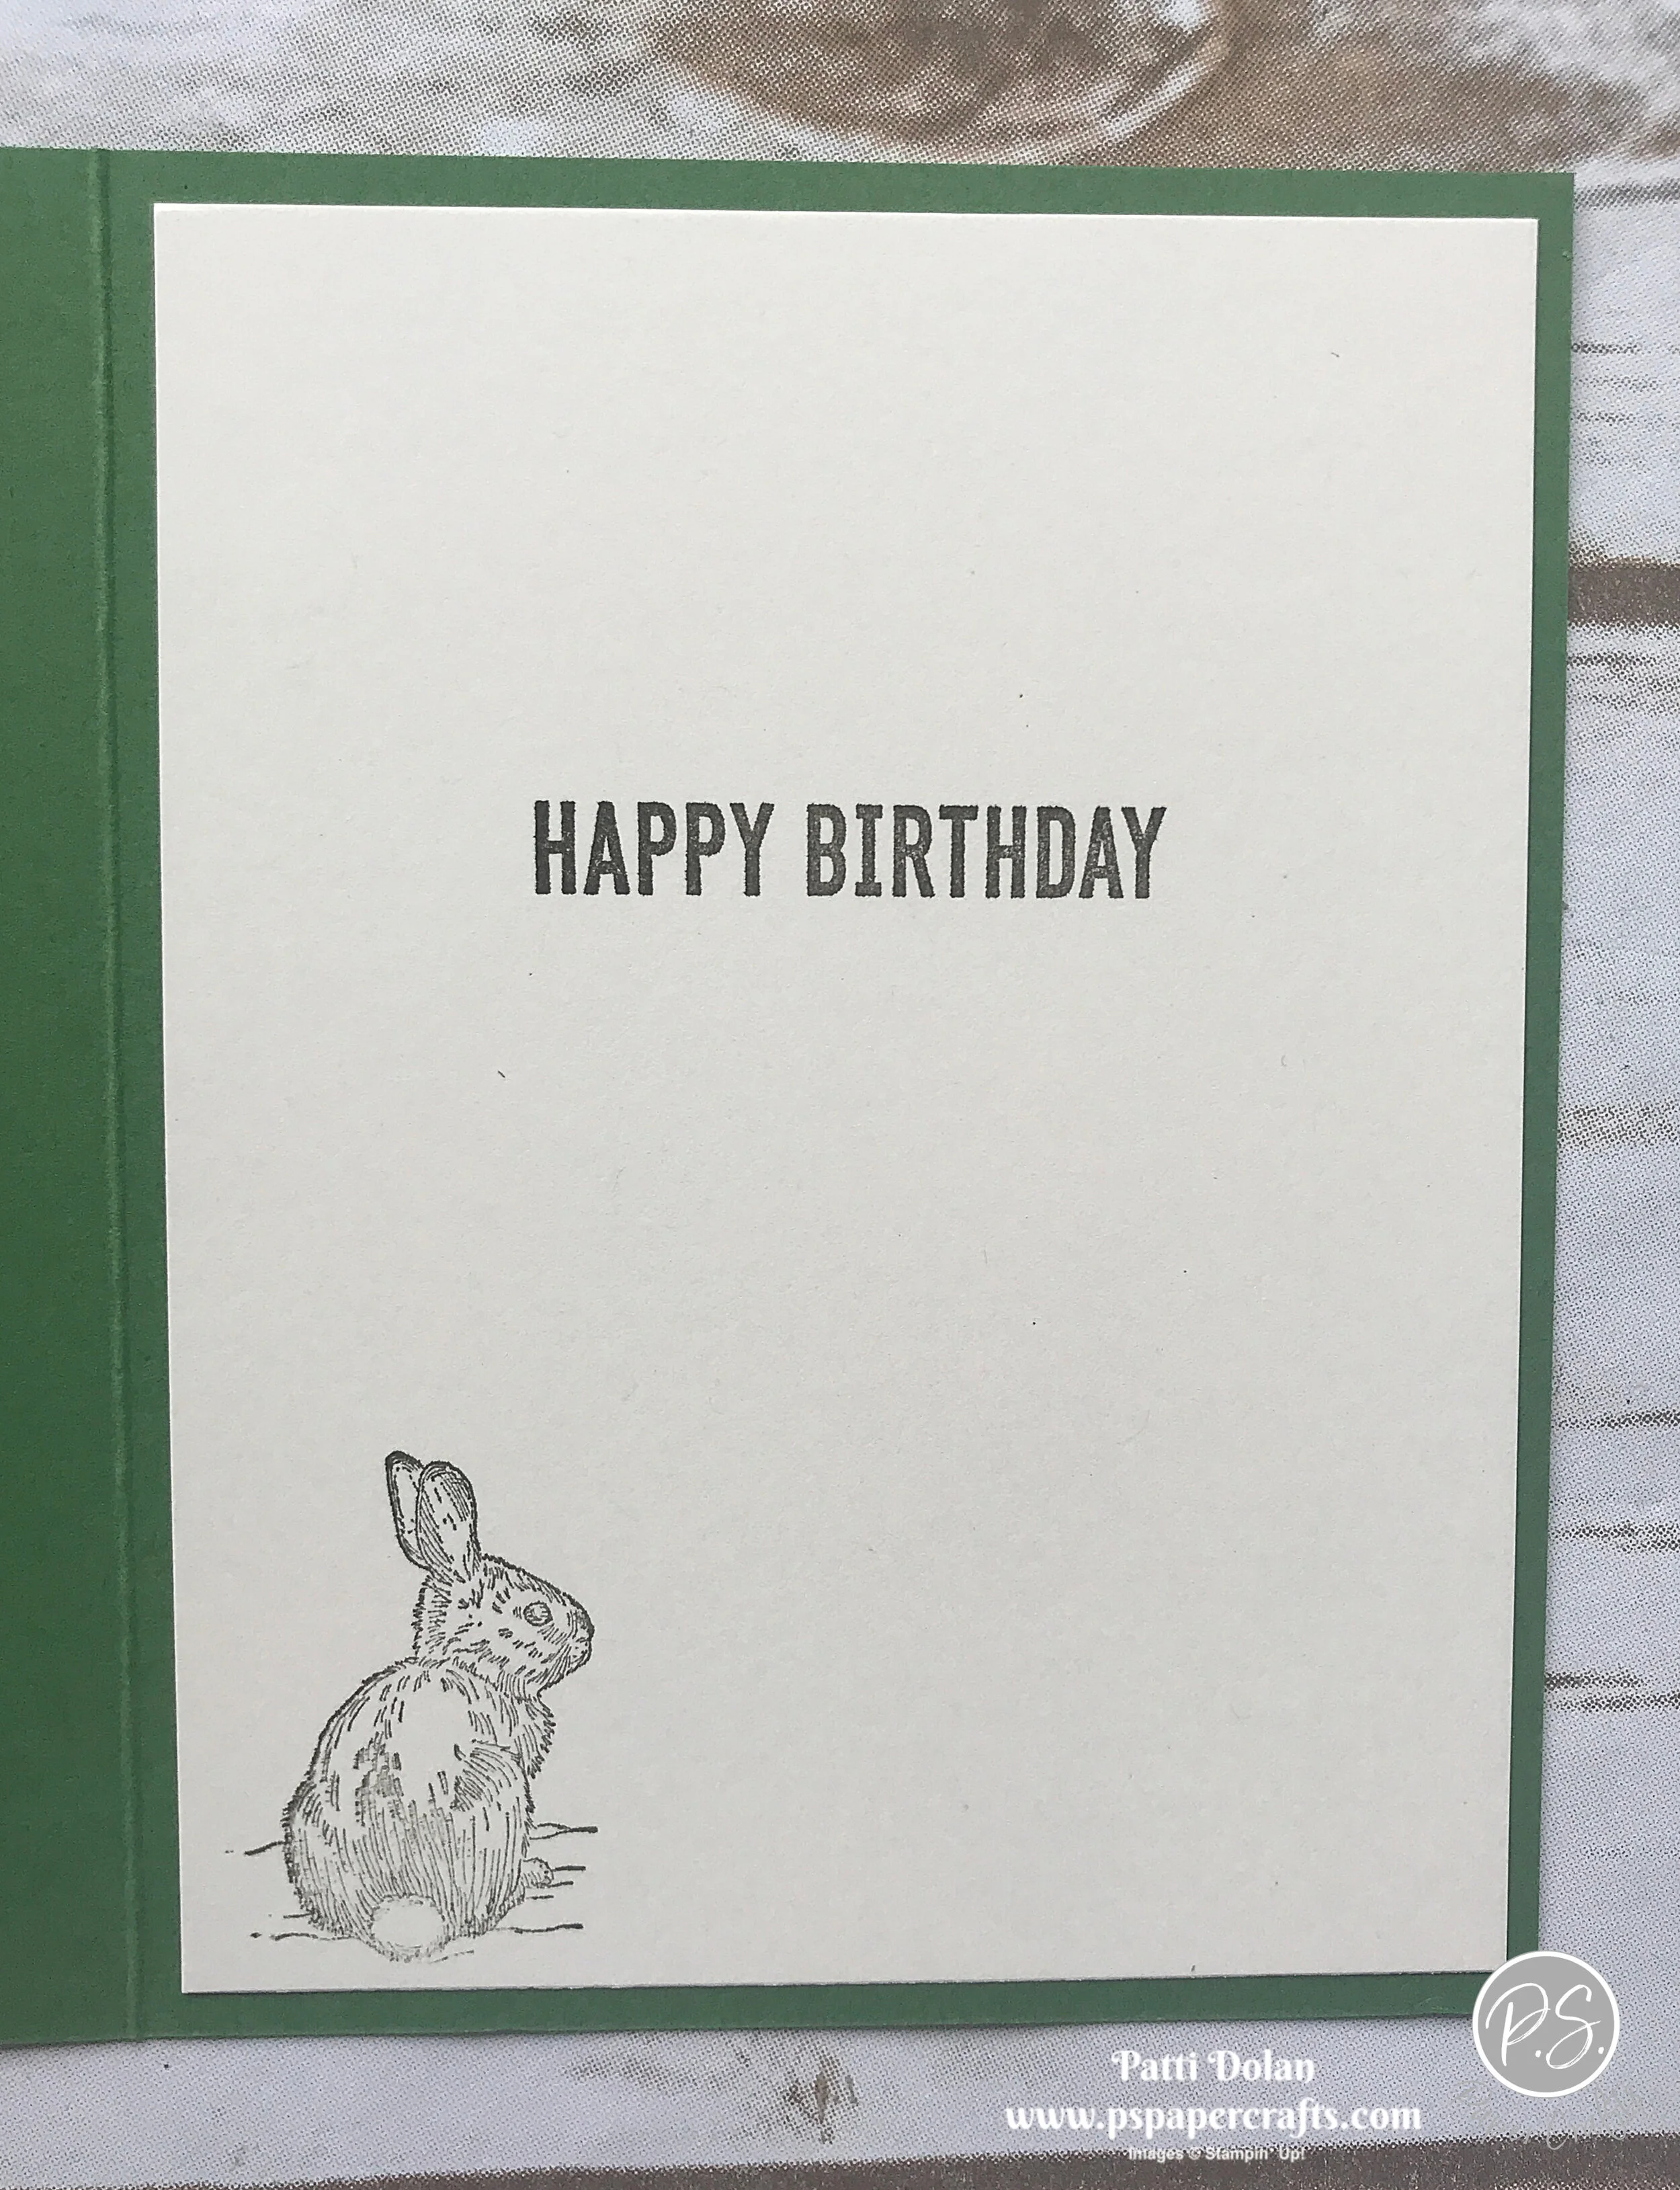
On the inside, stamp sentiment with Garden Green Ink and rabbit image with Early Espresso Ink.
If you want any of the products I used on this project, just click on the item below or the Shop Now button and it will bring you to my Online Store. Please use the current Host Code when you go to checkout your order. You can also click directly on an item to order.
Pretty Plaid Gift Card Holders
Today’s video is a rewind of a project I did a few years ago. I changed it up a little bit. The Wrapped In Plaid Designer Series Paper is great for this gift card holder for anyone.

Watch the video and then come back here to get all the measurements to make your own. I love how the gold glimmer tree picks up the gold accents from the plaid paper.
Tips & Instructions
Cherry Cobbler or Shaded Spruce - 6 x 5 1/4
On the 5 1/4 side score 3/4 on both sides - turn and on the 6” side score 1 1/4 and 3 3/4 using the Simply Score Tool
Cut off each of the rectangles on the four corners and then cut small diagonal to make tabs and round corners of base
Wrapped In Plaid Designer Series Paper 3 1/2 x 5 3/4, round all 4 corners
Belly Band - 1 x 6 either Cherry Cobbler or Shaded Spruce
Punch tree from Gold Glimmer Paper using the Pine Tree Punch
Sentiment layer - 1 x 3 1/2, round to two corners, stamp sentiment in Cherry Cobbler or Shaded Spruce (Itty Bitty Christmas Stamp Set)
Punch top of the tree and adhere to sentiment layer
Follow steps in video using strong adhesive (Tear & Tape or Multipurpose Liquid Glue)
Below is the Cherry Cobbler base and belly band.


Below is the Shaded Spruce base and belly band.


If you want any of the products I used on this project, just click on the item below or the Shop Now button and it will bring you to my Online Store. Please use the current Host Code when you go to checkout your order. You can also click directly on an item to order.
Seasons Greetings Old Fashioned Christmas
The Toile Tidings Designer Series Paper reminds me of an old fashioned Christmas. I cut out a small scene with the Cup of Cheer Dies.
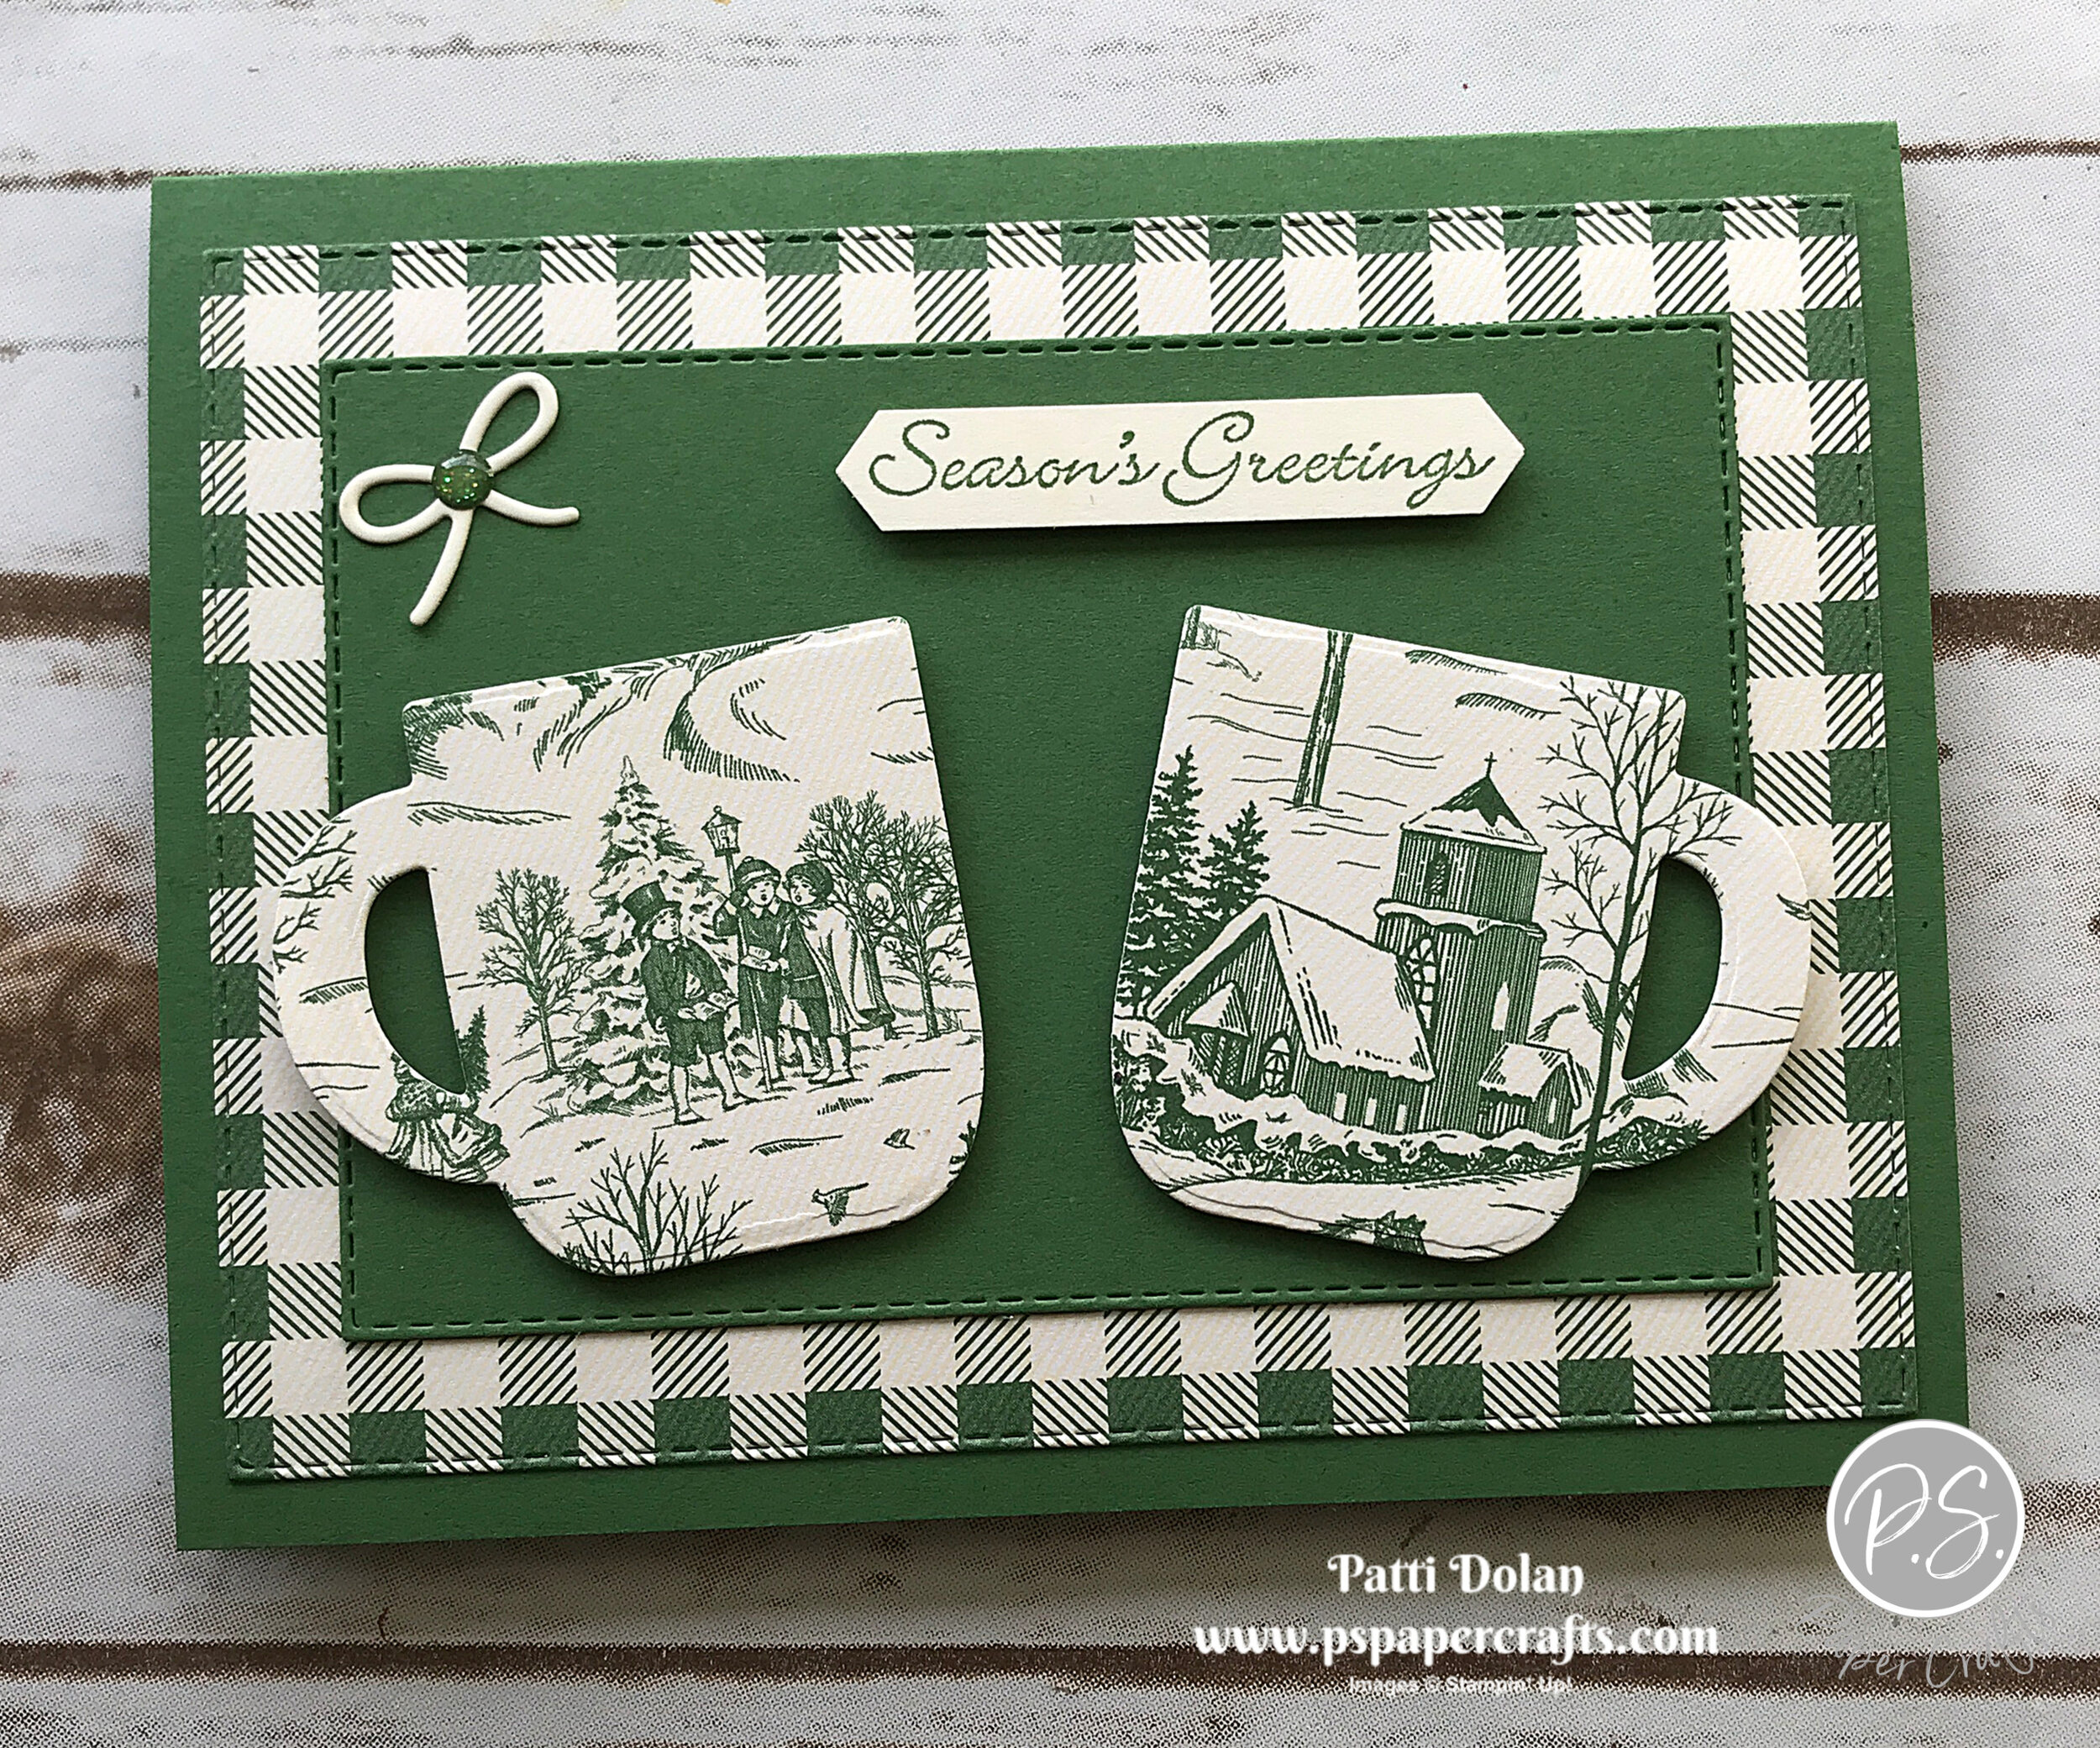
Tips & Instructions
Garden Green Card Base - 5 1/2 x 8 1/2, score at 4 1/4 (top folding horizontal)
Toile Tidings Designer Series Paper - cut with largest Stitched Rectangle Die
Garden Green - cut 3rd largest Stitched Rectangle Die
Cut 2 cups from the Toile Tidings Designer Series Paper making sure you have a scene in each
Stamp sentiment (from Itty Bitty Sentiments) with Garden Green Ink on scrap of Very Vanilla and punch with Classic Label Punch
Adhere layers to card base and adhere cups an sentiment label with Dimensionals
Cut bow from scrap of Very Vanilla and adhere as shown, add Glitter Enamel Dot to center

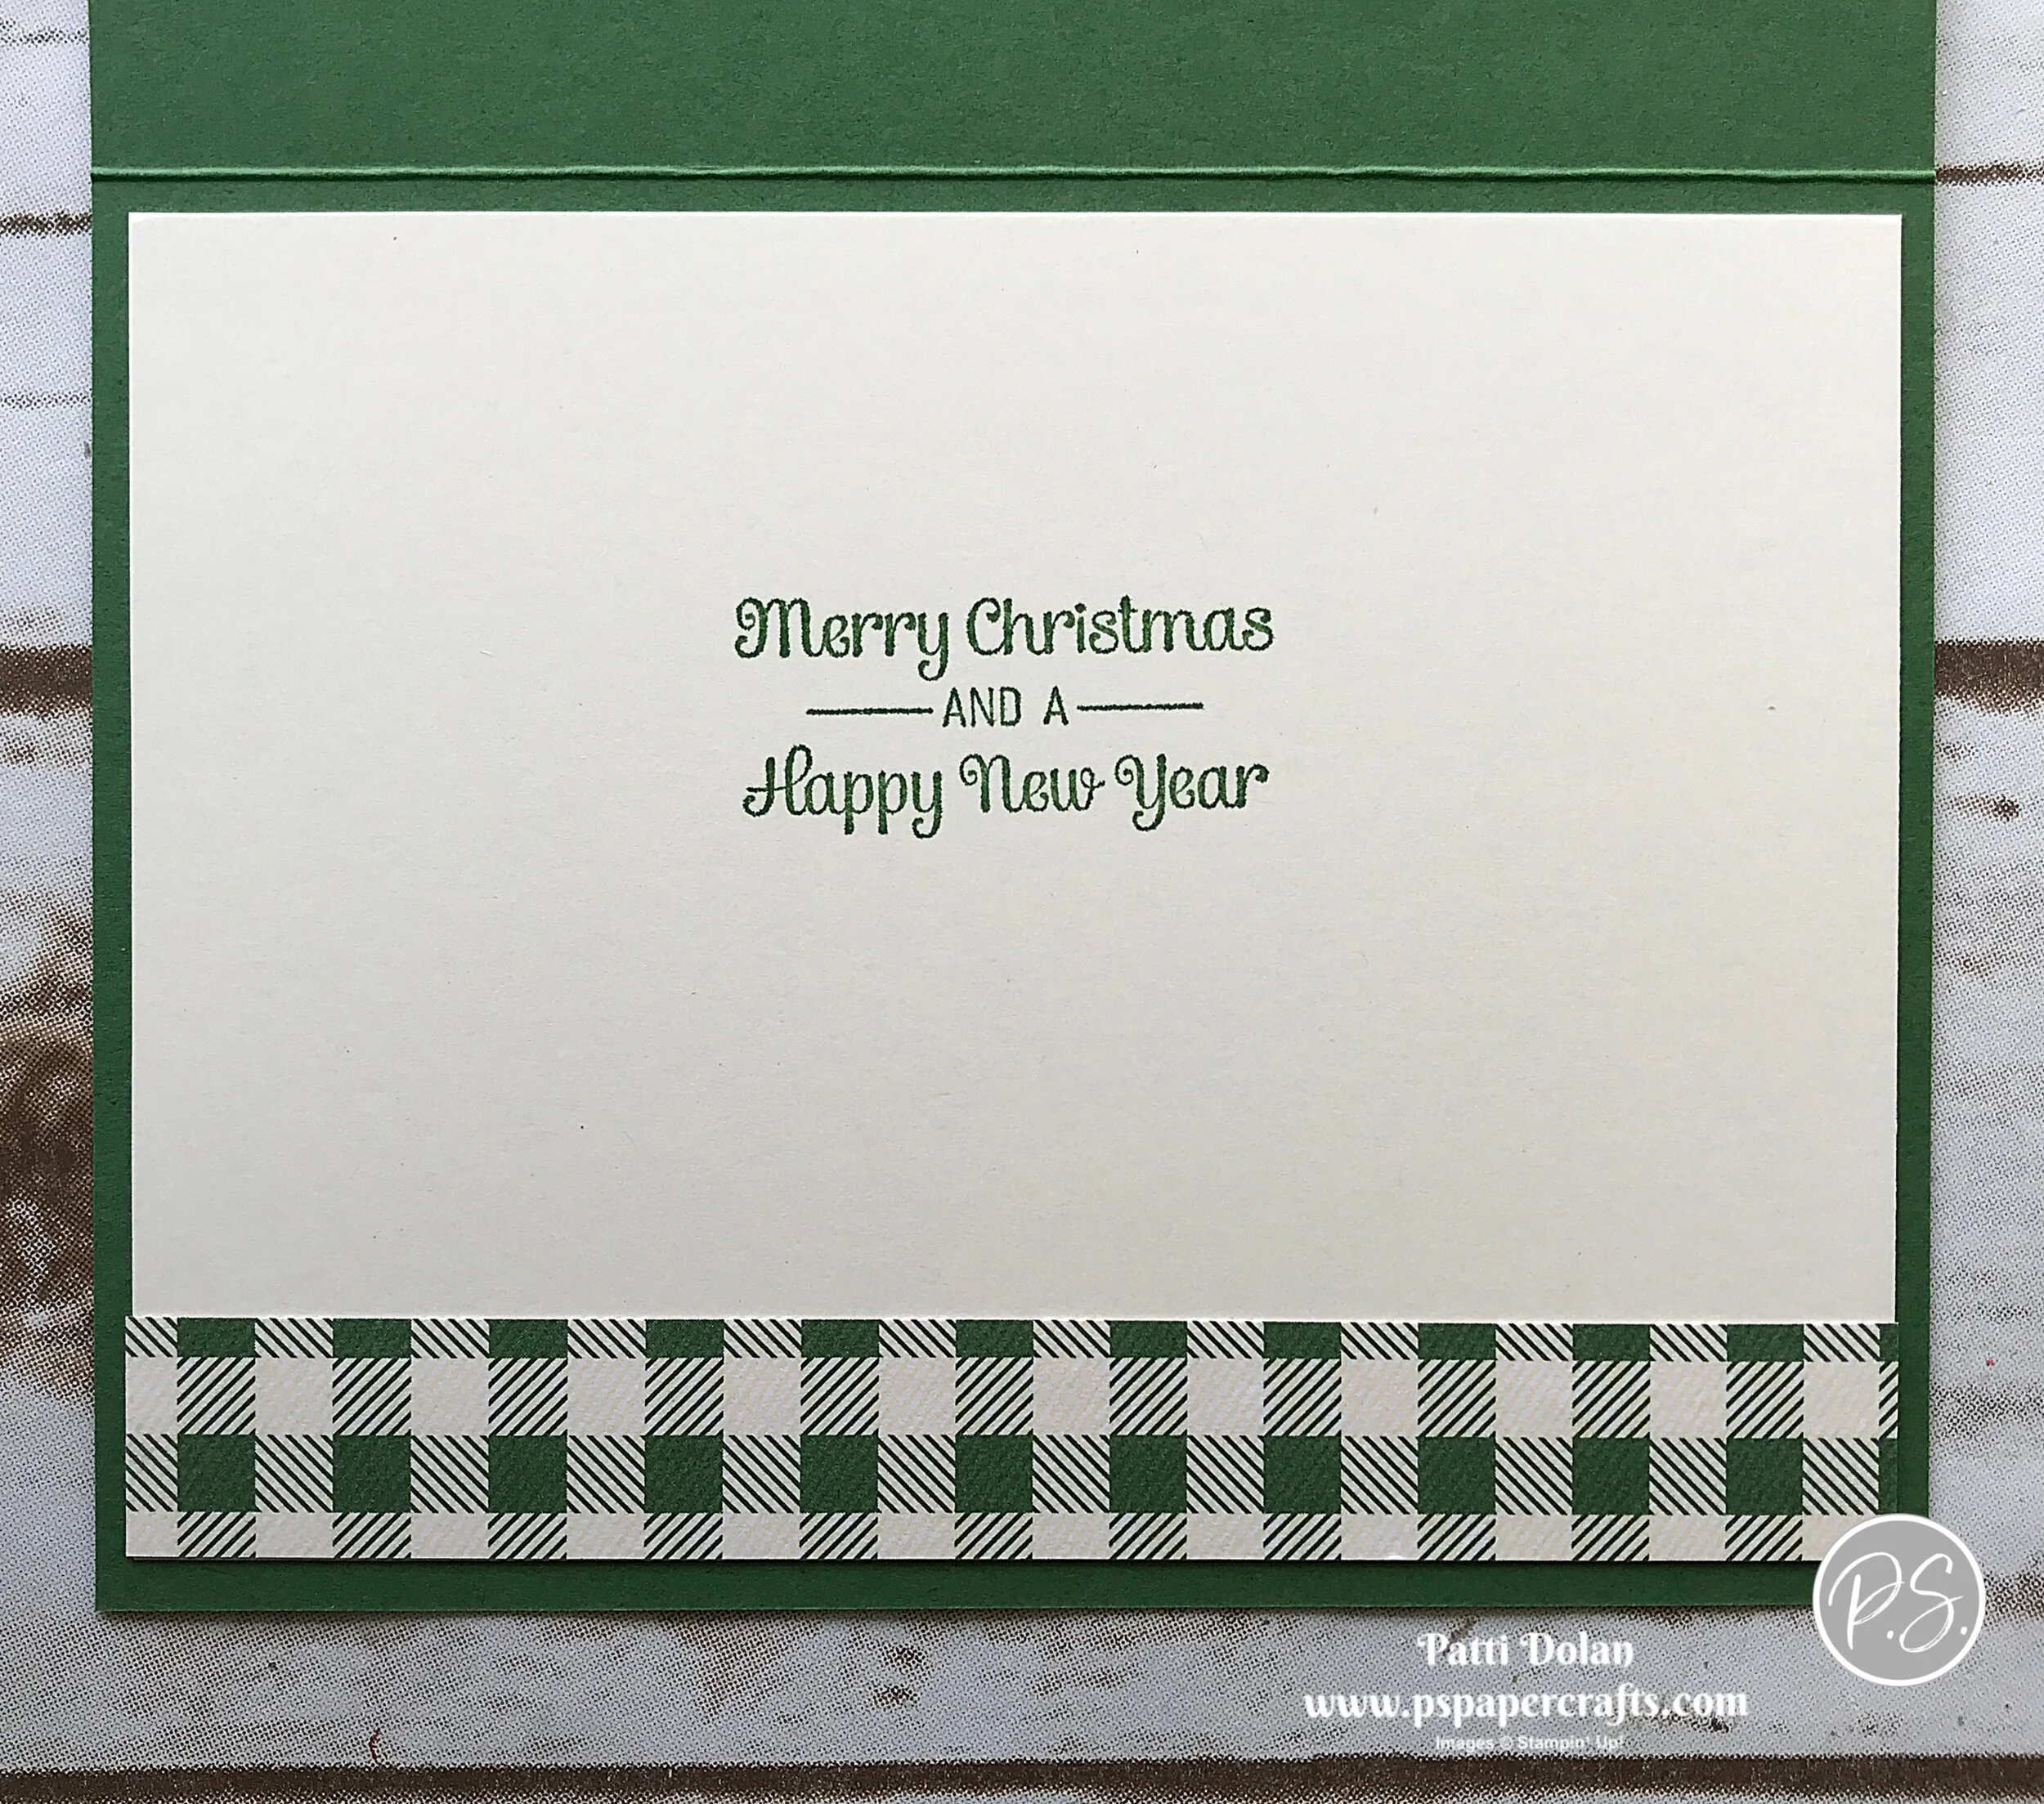
On the inside stamp the sentiment (from Itty Bitty Christmas) with Garden Green Ink. Adhere a 3/4 x 5 1/4 strip of Toile Tidings Designer Series Paper to the bottom.
If you want any of the products I used on this project, just click on the item below or the Shop Now button and it will bring you to my Online Store. Please use the current Host Code when you go to checkout your order. You can also click directly on an item to order.
Sketch Saturday - Feels Like Frost
It’s Saturday, time for another sketch. I am playing along with a challenge from the Splitcoaststampers CAS(E) This Sketch. I used a piece of Feels Like Frost Designer Series paper and just a few layers and a sentiment….easy, peasy.
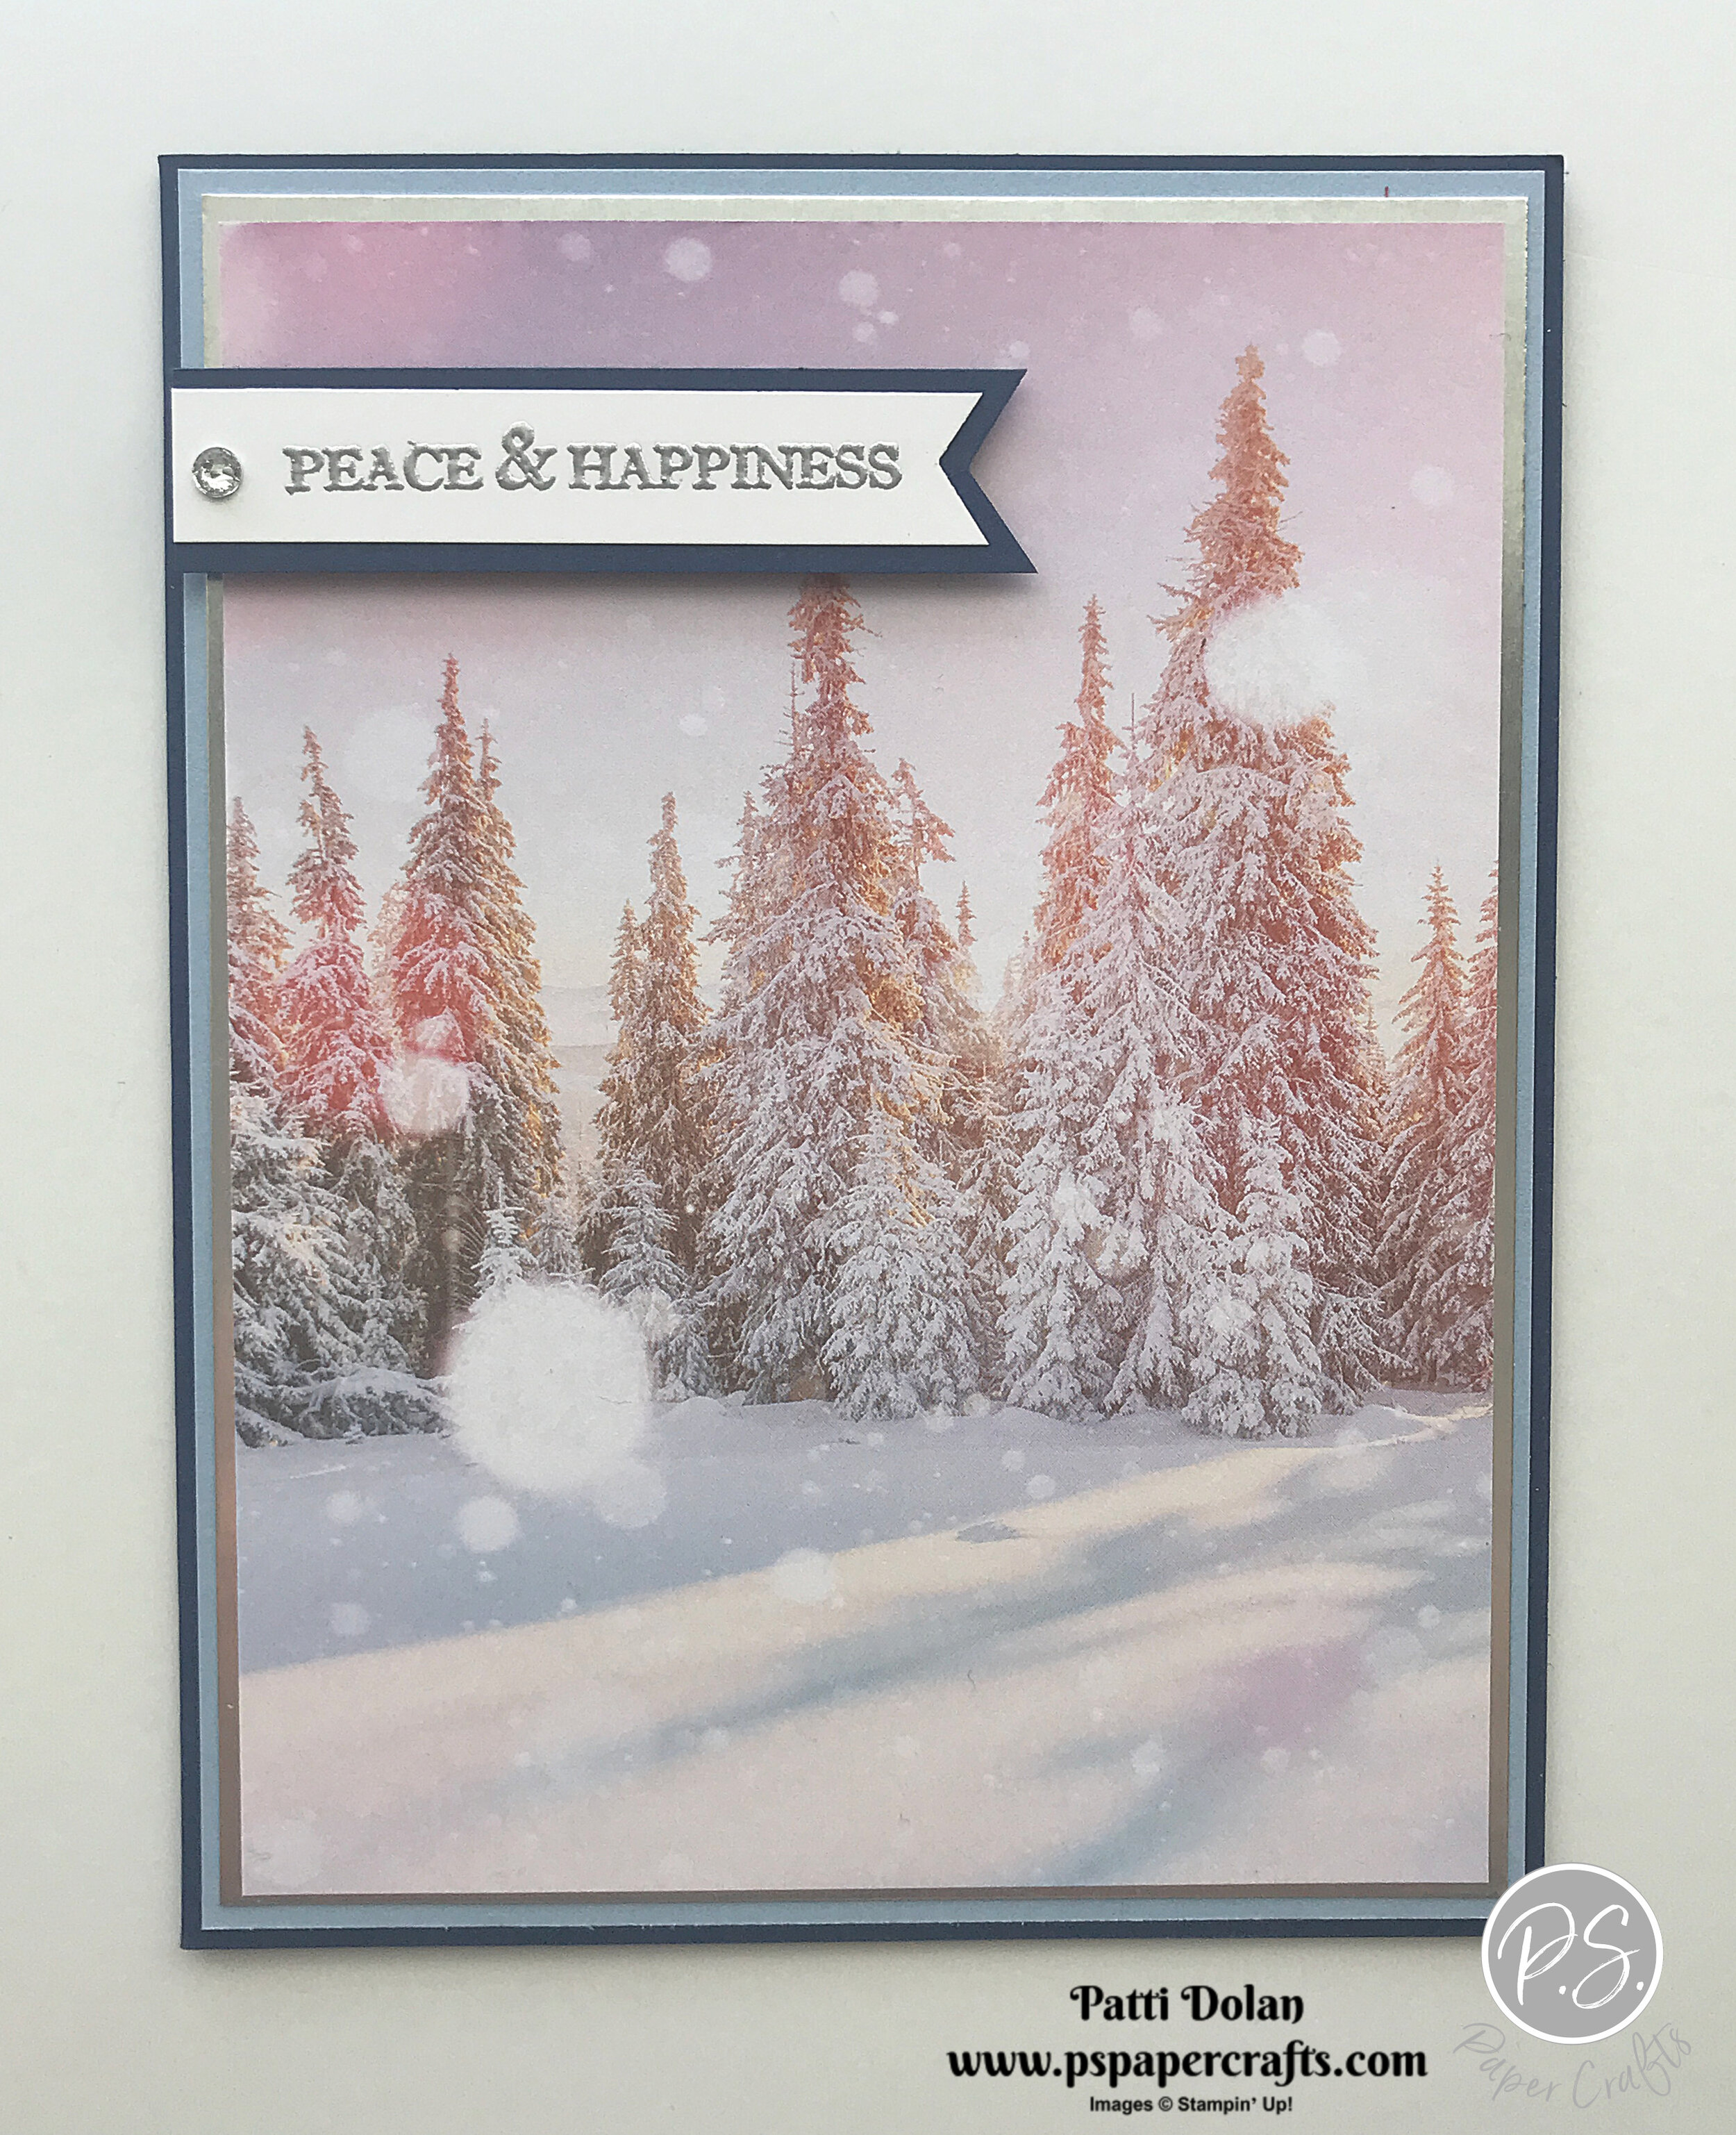
Here’s the link to the sketch if you want to see what other crafters have created. CAS(E) this Sketch #350

Tips & Instructions
Night Of Navy - 5 1/2 x 8 1/2, score at 4 1/4
Seaside Spray Layer - 5 3/8 x 4 1/8
Silver Foil Layer - 5 1/4 x 4
Feels Like Frost Designer Series Paper - 5 18 x 3 7/8
Whisper White Strip 1/2, punch one end with Banner Triple Punch and cut to about 2 1/2
Stamp sentiment (from Itty Bitty Christmas) using Versamark Ink and heat emboss with Silver Embossing Powder
Night Of Navy Strip 5/8, punch one end with Banner Triple Punch and cut so even border is around when adhering white strip to it
Adhere all layers
Adhere sentiment strip using dimensionals
Add Rhinestone

On the inside, stamp sentiment with Night Of Navy Ink

If you want any of the products I used on this project, just click on the item below or the Shop Now button and it will bring you to my Online Store. Please use the current Host Code when you go to checkout your order. You can also click directly on an item to order.
Cute Little Christmas Parcels
The Perfect Parcels Dies are great for creating little boxes for any occasion. I made these for Christmas treats.

In the video below I’ll show you how to put these parcels together and make the belly band to go around it.

Tips & Instructions
Cut 2 of the box pieces using the Perfect Parcel Dies (Garden Green or Real Red)
Fold all score lines and make box according to video. Make sure you use strong adhesive (Multi-Purpose Liquid Glue or Tear & Tape)
Belly Band - 3 1/4 x 8, score at 1 1/4, 2 5/8, 4 7/8, 6 2/8 (I used Toile Tidings Christmas Designer Series Paper for the green and Let It Snow Designer Series Paper for the red)
Wrap Belly Band around box and adhere edges to make the band. Be sure it can slide easily
To decorate the Red/Let It Snow box:
Fussy cut snowman
9/16 Whisper White Strip
3/4 Real Red Strip
Stamp sentiment (from Itty Bitty Christmas) with Real Red on white strip
Using Banner Triple Punch, punch banner end to both white and red strip and adhere together
Cut strip to size to fit behind snowman and adhere to box
Adhere snowman with Dimensionals

To decorate the Green/Toile Christmas box:
Cut Garden Green background piece for sentiment label
Cut Gold Foil detailed piece and adhere over the green background layer
Stamp sentiment (from Itty Bitty Christmas) on Very Vanilla with Versamark and heat emboss with Gold Embossing Powder and adhere over the label base
Adhere label to box using Dimensionals
Add some Gold Glitter Dots

I’ve listed the products to make both boxes. If you want any of the products I used, just click on the item below or the Shop Now button and it will bring you to my Online Store. Please use the current Host Code when you go to checkout your order. You can also click directly on an item to order.
Toile Christmas Wishes Card
The floral images in the Toile Christmas Bundle are so pretty. I colored the leaves and berries on the stamp with Stampin’ Write Markers and then stamped and cut with the coordinating dies.

Tips & Instructions
Garden Green Card Base - 5 1/2 x 8 1/2, score at 4 1/4
Whisper White - cut with largest Stitched Rectangle Die, adhere to card base
Real Red - cut with 2nd largest Stitched Rectangle Die, adhere to card
Floral Image Stamp - color leaves with Garden Green Stampin’ Write Marker and berries with Real Red Stampin’ Write Marker (NOTE - do NOT color stamp with Stampin’ Blends as they are alcohol markers). Breath on the stamp to moisten and then stamp on scrap of Whisper White. Repeat and cut both with coordinating die
Stamp sentiment with Real Red Ink and cut with coordinating die
Cut 3 leaves with leaf die from Garden Green Cardstock
Adhere floral images and leaves as shown on card
Adhere sentiment banner using Dimensionals
Make bow with 3 strands of Linen Thread and adhere with Mini Glue Dot

On the inside stamp floral image (color stamp with Garden Green and Real Red and stamp). Stamp sentiment with Real Red Ink.

If you want any of the products I used on this project, just click on the item below or the Shop Now button and it will bring you to my Online Store. Please use the current Host Code when you go to checkout your order. You can also click directly on an item to order.
Make a Beautiful Christmas Wreath with the Stamparatus!
The Stamparatus is the perfect tool to take a floral sprig and turn it into a beautiful Christmas wreath!

I used the Tidings All Around Stamp Set for the wreath and the So Many Stars Stamp Set for the “JOY” sentiment and I love how they turned out. In the video below, I’ll show you how to use the Stamparatus to make a wreath, so easy to do!
Tips & Instructions
Shaded Spruce Card Base - 5 1/2 x 8 1/2, score at 4 1/4
Whisper White Layer - 4 x 4
Using the Stamparatus, stamp floral sprig from Tidings All Around with Shaded Spruce Ink. Follow the template and steps on the video
Stamp the sentiment from So Many Starts in Real Red Ink
Adhere wreath layer to card base
Make Bow and adhere to bottom of the wreath with Mini Glue Dot
Add Red Rhinestones in groups of 3 around the wreath
I used the Real Red Ruched Ribbon on this card which I really love but it is a little bulky for the mail.

The ribbon on this card is the Silver Metallic-Edge Ribbon.

If you want any of the products I used on this project, just click on the item below or the Shop Now button and it will bring you to my Online Store. Please use the current Host Code when you go to checkout your order. You can also click directly on an item to order.
Simple Christmas Wreath - Tidings All Around
The wreaths you can make with the Tidings All Around Bundle are so simple but so pretty. The Old Olive/Pretty Peacock Reversible Ribbon is just beautiful.

Tips & Instructions
Pretty Peacock Card Base - 4 1/4 x 11, score at 5 1/2 (top folding)
Crumb Cake Layer - 5 1/2 x 3 3/4
Stamp wreath on Very Vanilla scrap using Old Olive Ink
Place wreath over Crumb Cake Layer to determine placement of sentiment and stamp sentiment with Pretty Peacock Ink
Adhere layers and wreath
Make bow with Old Olive/Pretty Peacock Reversible Ribbon and adhere with Mini Glue Dot


