Sketch Saturday - Christmas Friends

The Christmas Friends Bundle has the cutest images. I used it to create my card for this week’s Sketch Challenge, so fun!


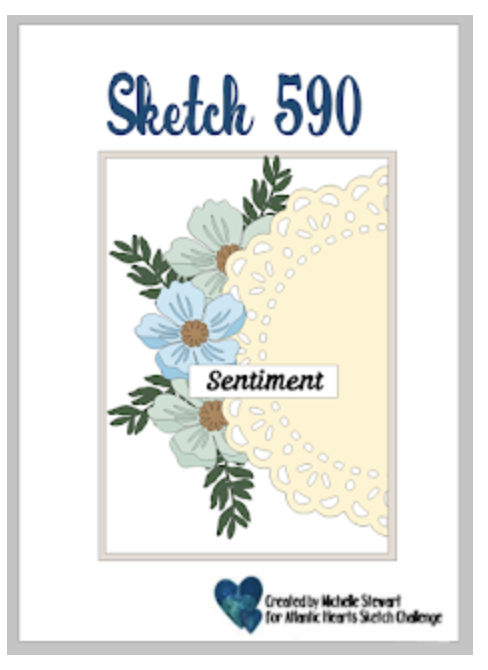
Here’s the sketch I used. It’s from the Atlantic Hearts Sketch Challenge. These are so fun to do!


Tips & Instructions

  • Shaded Spruce Card Base - 5 1/2 x 8 1/2, score at 4 1/4

  • Nests Of Winter Designer Series Paper - 3 x 4 1/2, adhere to the card front off center, towards the right side.

  • Die cut circle from Basic White using the circle from the Christmas Friends Dies. Stamp sentiment at the bottom of the circle in Real Red ink.

  • Stamp the bear image on a piece of Basic White in Black Memento Ink. Color with Stampin’ Blends Markers. I used Dark Real Red, Dark Shaded Spruce and Light Crumb Cake. Die cut using the coordinating die and adhere to the circle.

  • Add some Baker’s Twine behind the circle. I used tape to adhere it to the back. Adhere the circle to the card front with Dimensionals.


On the inside layer (4 x 5 1/4), stamp sentiment in Real Red ink. Stamp owl image in Black Memento ink. Color with light Crumb Cake and Dark Real Red Stampin’ Blends Markers.


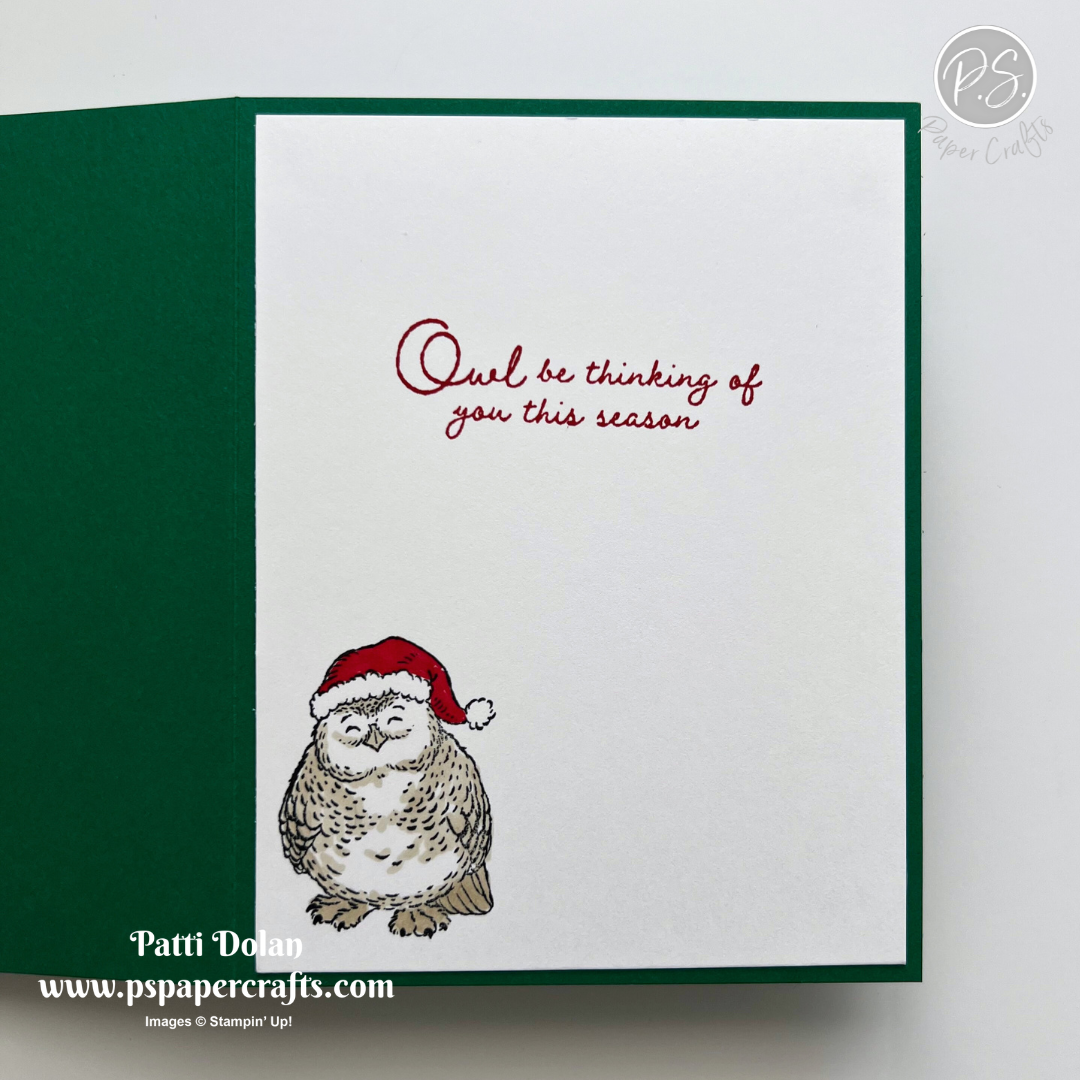
This bear is adorable and so is the sweet owl. The sentiments are fun as well.


Supply List

You can click on the item to purchase it from my Online Store.

The Christmas Friends Bundle and Nests of Winter Designer Series Paper will be available for purchase starting September 4, 2024.

Bay Window Fun Fold Cards

I love how these Bay Window Fun Fold Cards stand up to display a beautiful piece of artwork. The recipient of these cards will love to have them sitting on a table to look at!


Watch the video to see step by step instructions to make this design.

Click on the button below to get a printable pdf with measurements and instructions.


This card was made using new products from the upcoming Mini Catalog - A Little Festive Designer Series Paper, Christmas Labels Stamp Set and Cherry Cobbler Adhesive-Backed Berries. You can purchase these products starting September 4, 2024.


This card has a pretty nature scene that was created using the Thoughtful Journey Designer Series Paper and Thoughtful Wishes Stamp Set. I added a Brushed Brass Butterfly to finish it off.


Supply List

You can click on the item to purchase it from my Online Store.

Note - The A Little Festive Designer Series Paper, Christmas Labels Stamp Set and Cherry Cobbler & Pearl Adhesive-Backed Berries will be available when the new Mini Catalog launches on September 4, 2024.

Pocket Thoughts Birthday - Color Comb

I made this sweet birthday card with a fun pull up note using the Pocket Thoughts Bundle. The dies include 3 sizes of pockets that you can cut, fold and adhere to a card.


The Color Combo is from my August Inspiration Calendar - Boho Blue, Berry Burst and Bubble Bath, so pretty.

You can get my calendar each month when you subscribe to my email list.


Tips & Instructions

  • Boho Blue Card Base - 5 1/2 x 8 1/2, score at 4 1/4

  • Basic White Layer - 3 3/4 x 5, splatter Boho Blue ink all over the layer using a Boho Blue marker.

  • Bright & Beautiful Designer Series Paper - Die cut the middle size pocket using the Pocket Thoughts Dies. Fold the flaps and adhere to the white layer. Adhere layer to card base.

  • Basic White - 2 1/8 x 3 1/4, punch hole at the top and stamp sentiment in Berry Burst Ink. Splatter Berry Burst Ink using a Berry Burst marker. This will fit inside the pocket.

  • Using a Dark Bubble Bath Stampin’ Blends Marker, color a piece of Iridescent Striped Ribbon. Fold the ribbon in half and feed it through the hole, pull the ends through the fold.

  • Stamp the cupcake and fussy cut it. I colored right on the stamp using Stampin’ Write Markers (DO NOT USE STAMPIN’ BLENDS) I used Boho Blue for the cupcake holder and Berry Burst for the cupcake top. Stamp the coordinating cupcake top right over the top using Bubble Bath ink. Adhere the cupcake to the pocket.

  • Add some Berry Burst Tinsel Gems.


On the inside layer (4 x 5 1/4), stamp the sentiment in Boho Blue ink and stamp the cupcake the same way you did it on the front.


I love having this little notecard that fits in the pocket, so fun.


Supply List

You can click on the item to purchase it from my Online Store.

Sketch Challenge - Courage & Faith

I made this card for the weekly Splitcoaststampers Sketch Challenge using ink and Blending Brushes and the Courage & Faith Stamp Set. I love how it turned out.


Here’s the sketch I used. You can see all the projects posted for this week’s challenge by clicking on the sketch below.


Tips & Instructions

  • Basic Black Card Base - 5 1/2 x 8 1/2, score at 4 1/4

  • Shy Shamrock Layer - 3 7/8 x 5 1/8

  • Basic White Layer - 3 3/4 x 5

  • Cardstock - 3 1/2 x 3 3/4, die cut a large circle. I used the Spotlight On Nature Dies. You will lay this piece over the white layer. Use a piece of Post-It Note or Washi Tape to hold it in place. Use a Blending Brush to add ink to the circle. I used Azure Afternoon ink.

  • Cardstock - 3 x 3 1/4, die cut a smaller circle. Repeat the above steps using a different color ink. I used Shy Shamrock ink.

  • Die cut the smaller circle again using a piece of scrap or Post-It Note. Lay it over the small circle. Lay the cardstock that you used to cut the large circle over the layer. This will help when stamping the images so you don’t get ink outside the circle. Stamp the floral images in Black Memento ink.

  • Stamp the sentiment on the green circle in Black Memento ink.

  • Adhere the white layer to the green layer and then to the card base.

  • Add some Iridescent Pearls.


On the inside layer (4 x 5 1/4), stamp and floral images in Black Memento ink.


I love using our Blending Brushes to add ink to my cards!


Supply List

You can click on the item to purchase it from my Online Store.

Sketch Saturday - Autumn Leaves

Here’s my card for this week’s Atlantic Hearts Sketch Challenge. I used the Dotted Circles Embossing Folder to create the doily piece. Those pretty leaves were cut from the Meandering Meadows Designer Series Paper using the Autumn Leaves Dies.


Here’s the sketch I used. It’s a very delicate, feminine looking card.


Tips & Instructions

  • Very Vanilla Card Base - 5 1/2 x 8 1/2, score at 4 1/4

  • Very Vanilla - 4 x 5, die cut using the 5th from largest circle from the Deckled Circles Dies. Emboss using the Dotted Circles Embossing folder.

  • Adhere the circle to the card front letting it hang off the edge. Trim off the edge. (Note: Don’t put adhesive to the edge so you can slip some leaves behind it.)

  • Die cut the leaves from the backside of the Meandering Meadows Designer Series Paper using the Autumn Leaves Dies. Adhere to the card front slipping some behind the circle and using Dimensionals to add some to the top of he circle.

  • Stamp the sentiment (from the Changing Leaves Stamp Set) on a 3/4 x 3 strip of the Designer Series Paper in Versamark ink. Heat Emboss with White Embossing Powder. Cut each end at a diagonal and adhere the strip to the card with Dimensionals.

  • Add some gold Opal Rounds.


On the inside layer (4 x 5 1/4), adhere 2 leaves that you cut from the Designer Series Paper and a 3/4 x 4 strip of the Designer Series Paper.


I love die cutting from back side of our Designer Series Paper. It gives you a beautiful, textured look.


Supply List

You can click on the item to purchase it from my Online Store.

Triple Layer Cards - Two Ways

You can make the Triple Layer Design two different ways. You can either use a patterned paper or stamp the layers. Either way, they are beautiful.


Watch the video to see step by step instructions to make this design.

Click on the button below to get a printable pdf with measurements and instructions.


These cards were made using patterned paper and they are actually 4 layer, Quadruple Layer Cards 😆

I used the brand new Nests of Winter Designer Series Paper from the upcoming Mini Catalog on the first one and the Mediterranean Blooms Designer Series Paper on the second one.


These cards were made using stamps and ink. Just layer your white pieces together and stamp the images. The first card was stamped using the new Frozen Edges Stamp Set and the second with the Irresistible Blooms Stamp Set.


Supply List

You can click on the item to purchase it from my Online Store.

Note - The Nests of Winter, Winterly Tree Tops Stamp Set and Frozen Edges Stamp Set will be available when the new Mini Catalog launches on September 4, 2024.

Attention Shoppers - Color Combo

The Attention Shoppers Stamp Set and Dies are so fun. I’ve had them for a while and never used them. There are lots of images you can use to put into the shopping cart.


The Color Combo that I used is from my August Inspiration Calendar - Pretty Peacock, Balmy Blue and Fresh Freesia. You can get my calendar each month when you subscribe to me email list.


Tips & Instructions

  • Thick Basic White Card Base - 5 1/2 x 8 1/2, score at 4 1/4

  • Stamp sentiment at top right side in Pretty Peacock ink.

  • Regals Designer Series Paper (Pretty Peacock) - 1 1/2 x 5 1/2, adhere to the left side of the card front.

  • Die cut a piece of Basic White using the largest circle from the Spotlight On Nature Dies.

  • Stamp bottle, bag and flower images from the Attention Shoppers Stamp Set on Basic White in Black Memento ink. Color with Stampin’ Blends. Die cut with the coordinating dies.

  • Die cut the shopping cart and wheels from a piece of Silver Foil Sheet. Adhere the bottom part of the cart to the top part.

  • Arrange the images on the circle behind the shopping cart to determine placement. Adhere them to the circle and then adhere the circle to the card using Dimensionals. .

  • Add some Fresh Freesia Tinsel Gems.


On the inside layer (4 x 5 1/4), stamp sentiment in Pretty Peacock ink. Stamp the cake image in Black Memento ink and color with Stampin’ Blends. I used Fresh Freesia and Balmy Blue and then added some Lemon Lolly for the flames.


This shopping cart is so fun; I love that you can fill it with different images.


Supply List

You can click on the item to purchase it from my Online Store.

Sketch Challenge - Market Goodness

Boy, this week’s Sketch Challenge from Splitcoaststampers was a tough one. I decided use the To Market Designer Series Paper for the 3 boxes and I’m happy with how it turned out.


Here’s the sketch I used. You can see all the projects posted for this week’s challenge by clicking on the sketch below.


Tips & Instructions

  • Blackberry Bliss Card Base - 5 1/2 x 8 1/2, score at 4 1/4

  • Basic White Layer 4 x 5 1/4

  • To Market Designer Series Paper - 2 pieces cut to 3/4 x 4 (one plaid and one woodgrain)

  • Blackberry Bliss strip 1/4 x 4

  • Fussy cut 3 market bags from the Designer Series Paper.

  • Die cut some veggies from the Designer Series Paper using the Market Goodness Dies. I fussy cut the red pepper.

  • Adhere the veggies to the bags. Assemble the card as shown. I used Dimensionals for the bag in front.

  • Stamp sentiment in Blackberry Bliss Ink.


On the inside layer (4 x 5 1/4), adhere a 3/4 x 4 strip of Designer Series Paper.


I love that you can die cut those veggies from the Designer series Paper, so easy.


Supply List

You can click on the item to purchase it from my Online Store.

Triangle Cards

The Triangle Card design is so easy and you can make 2 cards at the same time. This is a great way to mass produce your Christmas Cards.


Watch the video to see step by step instructions to make this design.

Click on the button below to get a printable pdf with measurements and instructions.


I used some Online Exclusive products to make these beautiful Christmas Cards. The Seasons of Green & Gold Specialty Designer Series Paper is gorgeous. I used the Greetings of the Seasons Stamp Set and Dies.


These cards were made in with the To Market Designer Series Paper. The sentiment is form the Hooray for Surprises and the labels cut using the Something Fancy Dies.


Supply List

You can click on the item to purchase it from my Online Store.

Keeping Tabs - Color Combo

I CASEd (Copy And Share Everything) this card from the Annual Catalog. It’s a great place to get ideas. I used the Keeping Tabs Stamp Set and coordinating punch.


The color combo that I used is from my August Inspiration Calendar - Lemon Lime Twist, Coastal Cabana and Highland Heather. You can get my calendar each month when you subscribed to my email list.


Tips & Instructions

  • Coastal Card Base - 5 1/2 x 8 1/2, score at 4 1/4

  • Basic White Layer - 4 x 5 1/4

  • Basic White - stamp 12 floral tab images in Lemon Lime Twist ink and 12 floral tab images in Highland Heather ink. I used 1 1/4 strips and stamped the half of the tab with the floral design, stamping at the bottom of the strip. Punch using the coordinating punch.

  • Adhere the tabs to the white layer starting at the bottom and alternating the colors. Start with the two center pieces and adhere working from the bottom to the top. The top layer will hang off the top edge of the layer. Trim off from the back.

  • Next add work on each side, these will hang off the edge of the layer. TIP: use a Silicon Craft Sheet to keep the glue from getting on your workspace. Trim off the overhang from the back.

  • Adhere the layer to the card base.

  • Die cut the label using Unbounded Love Dies from Basic White and the mat from Coastal Cabana. Stamp sentiment in Coastal Cabana ink on the white label and adhere to the Coastal Cabana mat.

  • Punch 3 large boughs from Coastal Cabana using the Bough Punch. Adhere to the back of the label and then adhere the label to the card with Dimensionals.

  • Add some light Purple Fine Shimmer Gems.


On the inside layer (4 x 5 1/4), stamp sentiment in Coastal Cabana ink. The sentiment is from the Country Birdhouse Stamp Set. Stamp the floral part of the tab image across the bottom in Highland Heather ink. I used the tab image that has the floral just along the bottom and inked up only that part.


I loved this card when I saw it in the catalog and wanted to make it. I’m happy with how it turned out with these colors.


Supply List

You can click on the item to purchase it from my Online Store.

Sketch Challenge - Frosted Forest

This is the card I made for the weekly Splitcoaststampers Sketch Challenge using the Frosted Forest Bundle and the Meandering Meadows Designer Series Paper.


Here’s the sketch I used. You can see all the projects posted for this week’s challenge by clicking on the sketch below.


Tips & Instructions

  • Early Espresso Card Base - 5 1/2 x 8 1/2, score at 4 1/4

  • Basic White Layer - 4 x 5 1/4, adhere to the card base.

  • Crushed Curry Layer - 3 3/4 x 5, adhere to the card.

  • Meandering Meadows Designer Series Paper - 3 1/4 x 3 1/4

  • Die cut the trees from Early Espresso Cardstock using the Frosted Forest Dies. Adhere to the bottom of the Designer Series Paper and trim off any overhang. Adhere layer to the card.

  • Highland Heather - 1/2” strips. Use these to create the arrow pieces. The on on the top, right is about an inch long. Stamp the sentiment in Versamark ink on one of the strips. Heat Emboss with White Embossing Powder. Banner the end of the sentiment and then punch 3 arrows.

  • Adhere all the arrows to the card.


On the inside layer (4 x 5 1/4), stamp sentiment in Early Espresso ink and the dove in Highland Heather ink.


I love how the Crushed Curry layer pulls out the yellow in the patterned paper.


Supply List

You can click on the item to purchase it from my Online Store.

Tri-Fold Accordion Fun Fold Cards

I love how these Tri-Fold Accordion Cards turned out. They are so fun to open and I think anyone would be happy to receive a card like this.


Watch the video to see step by step instructions to make this design.

Click on the button below to get a printable pdf with measurements and instructions.


The embossing on these sand dollars are gorgeous, they look real. I made them using the Seaside Wishes Stamp Set and Hybrid Embossing Folder. The patterned paper is from the Full of Life Designer Series Paper Pack.


This card was made using the Pool Party Designer Series Paper from the Subtles pack along with the Spotlight On Nature Stamp Set and Dies.


Supply List

You can click on the item to purchase it from my Online Store.

Textured Floral Color Combo

I love to stamp my own background Paper. You can choose whatever colors you want. I went with the Color Combo from my August Inspiration Calender - Peach Pie, Petunia Pop and Azure Afternoon.


These are such pretty colors together. You can get my Inspiration Calendar each month when you subscribe to my email list.


Tips & Instructions

  • Azure Afternoon Card Base - 5 1/2 x 8 1/2, score at 4 1/4

  • Basic White Layer - 4 x 5 1/4

  • Stamp the floral images on the white layer starting with the largest image first, then filling in with the smaller, then the smallest. I didn’t use the two larger flowers because i thought they would be too big. Stamp the flowers in Petunia Pop, Peach Pie and Azure Afternoon inks. The very smallest flower was stamped in Petunia Pop ink but stamped off first on a piece of scrap to get a lighter shade.

  • Wrap piece of Petunia Pop Bordered Ribbon around the stamped layer and adhere it to the back. Adhere the layer to the card base.

  • Stamp the sentiment in Azure Afternoon ink on Basic White and die cut using the Perennial Postage Dies. Die cut using the next largest die from Azure Afternoon and adhere behind the sentiment label. Adhere to the card using Dimensionals.

  • Tie bow with the ribbon and adhere to the card with a Glue Dot.

  • Add some Peach Pie Shimmer Gems.


On the inside layer (4 x 5 1/4), stamp sentiment in Azure Afternoon ink. Stamp the flowers in Petunia Pop and Peach Pie inks.


This is such a bright and fun birthday card.


Supply List

You can click on the item to purchase it from my Online Store.

Sketch Challenge - Courage & Faith

I made this pretty card for the weekly Splitcoaststampers Sketch Challenge using the Courage & Faith Stamp Set, Wildly Flowering Designer Series Paper and Elegant Border Dies.


Here’s the sketch I used. You can see all the projects posted for this week’s challenge by clicking on the sketch below.


Tips & Instructions

  • Misty Moonlight Card Base - 4 1/4 x 11, score at 5 1/2 (top folding)

  • Basic White - 3 3/4 x 5 1/4

  • Wildly Flowering Designer Series Paper - 3 1/2 x 4 3/4

  • Lay the Wildly Flowering layer on top of the white layer, centering from left to right but keeping the bottom of both even. Using the Elegant Borders Dies die cut both pieces. Move the Wildly Flowering Layer up a little bit and adhere to the white layer. You may need to trim it down at the top.

  • Adhere the layers to the card base.

  • Die cut the sentiment label from Basic White using the Greetings of the Season Dies. Stamp sentiment from the Courage & Faith Stamp Set in Mossy Meadow ink.

  • Adhere the label to the card with Dimensionals.

  • Tie a bow with a piece of White Diagonal Trim and adhere to the label with a Glue Dot. Oops, my bow is a little crooked in the picture 🙃


On the inside layer (4 x 5 1/4), stamp sentiment in Mossy Meadow ink and the flower in Misty Moonlight ink. I used the Wildflower Designs Stamp Set.


I love this Scripture and am so happy with how this card turned out.


Supply List

You can click on the item to purchase it from my Online Store.

Double Box Fun Fold Card

My Friday Fun Fold is called a Double Box Card. They stand up so nicely to display them.


Watch the video to see step by step instructions to make this design.

Click on the button below to get a printable pdf with measurements and instructions.


I used the Countryside Inn Designer Series Paper along with the Round We Go Stamp Set and Dies for this card.


This card was using the beautiful Perennial Lavender Designer Series Paper. The sentiment is from the Simply Said Stamp Set and I die cut some floral pieces using the Painted Lavender Dies.


Supply List

You can click on the item to purchase it from my Online Store.

Bright Skies - Color Combo

Isn’t this a sweet card? I used the Bright Skies Stamp Set and Dies along with the Color Combo from my July Inspiration Calendar.


This week’s Color Combo is Blueberry Bushel, Summer Splash and Fresh Freesia; such great summer colors.

You can get my Inspiration Calendar each month when you subscribe to my email list.


Tips & Instructions

  • Blueberry Bushel Card Base - 5 1/2 x 8 1/2, score at 4 1/4

  • Basic White Layer - 4 x 5 1/4, cut off a couple of inches from the bottom using the long strip of clouds die from the Bright Skies Dies to separate the bottom from the top.

  • Using a Blending Brush, blend Summer Splash ink on the bottom piece to create a meadow.

  • Stamp the rain image on the top part of the white layer in Blueberry Bushel ink. I stamped off first to get a lighter shade and repeated to cover the layer.

  • On a piece of Basic White Stamp 3 small clouds with the striped image in Blueberry Bushel ink. Die cut with coordinating die.

  • Stamp the sentiment on Basic White in Blueberry Bushel ink and die cut with the large cloud die.

  • Die cut 5 stems with leaves from Summer Splash Cardstock and 5 flowers from Fresh Freesia Cardstock.

  • Adhere the clouds to the top white layer. Trim off any of the overhand. Adhere both layers to the card base, they will interlock with each other.

  • Adhere the flowers along the the green meadow.

  • Add some Fresh Freesia Tinsel Gems to the centers of the flowers.


On the inside layer (4 x 5 1/4), stamp sentiment in Blueberry Bushel ink. Stamp 3 stems with leaves in Summer Splash ink and tulips in Fresh Freesia ink.


This card just makes me happy!


Supply List

You can click on the item to purchase it from my Online Store.

Sketch Saturday - Masculine Birthday Card

The Country Wood Designer Series Paper is great for a masculine card. The birthday greeting was cut using the Mini Alphabet Dies and the background layer was embossed with the Timber 3D Embossing Folder. A perfect guy card!


I made the card for the weekly Splitcoaststampers Sketch Challenge using this sketch. You can see all the projects posted for this week’s challenge by clicking on the sketch below.


Tips & Instructions

  • Misty Moonlight Card Base - 5 1/2 x 8 1/2, score at 4 1/4

  • Basic Beige Layer - 4 x 5 1/4, emboss using the Timber 3D Embossing Folder.

  • Cut 3 strips of the Country Wood Designer Series Paper

    • 1 x 2 1/2

    • 1 x 3 1/4

    • 1 x 4

  • Die cut the letters from Misty Moonlight using the Mini Alphabet Dies. You will have to cut some letters multiple times. I used scraps to cut some of the repetitive letters.

  • Adhere the letters to the strips starting with the smallest strip at the top as shown on the card.

  • Adhere the strips to the embossed layer. Adhere layer to the card base.

  • Add some Adhesive-Backed Textured Dots.


On the inside layer (Basic Beige - 4 x 5 1/4), stamp the sentiment from the Softly Said Stamp Set in Misty Moonlight. Add a 1 x 4 strip of the Designer Series Paper to the bottom.


The wood patterned paper and woodgrain embossed layer are perfect for a masculine card.


Supply List

You can click on the item to purchase it from my Online Store.

Sketch Saturday - Lovely & Sweet

I made this pretty Sympathy Card for the weekly Atlantic Hearts Sketch Challenge. I love how it turned out.


Here’s the sketch I used. It’s a simple one but I love to see how everyone uses it.


Tips & Instructions

  • Pebbled Path Card Base - 5 1/2 x 8 1/2, score at 4 1/4

  • Basic White Layer - 3 3/4 x 5, emboss using the Distressed Tile 3D Embossing Folder and adhere to the card front.

  • Die cut a piece of Pebbled Path using the scalloped die from the Wildflower Designed Dies. You will use the scalloped Frame. Adhere the frame to the card.

  • Die cut a piece of Nature’s Sweetness Designer Series Paper with the same scalloped die. This time you will use the inside piece. Adhere this piece inside the frame.

  • Stamp sentiment on 3/4” strip of Basic White in Pebbled Path ink. Adhere to the card with Dimensionals.

  • Add some Iridescent Pearls.


On the inside layer (4 x 5 1/4), stamp sentiment in Pebbled Path ink. Add a 3/4 x 4 strip of the Designer Series Paper.


I love the embossed layer and the pretty pattern on the Designer Series Paper.


Supply List

You can click on the item to purchase it from my Online Store.

Stack, Shuffle & Cut Technique

What a fun way to make 3 quick cards showing off your patterned paper. It’s called the Stack, Shuffle & Cut Technique!


Watch the video to see step by step instructions to make these cards.

Click on the button below to get a printable pdf with measurements and instructions.


This card was made using the new Mediterranean Blooms Designer Series Paper. This paper is so beautiful, I love it. I cut the orange from the Designer Series Paper using the Citrus Bloom Dies, so easy!


I made this Mother’s Day Card using the pretty Perennial Lavender Designer Series Paper. The sentiments are from the Flower Cart Stamp Set.


Supply List

You can click on the item to purchase it from my Online Store.

Flowers of Beauty - Color Combo

I made this pretty Thank You Card using the Flowers of Beauty Dies and Market Goodness Stamp Set.


The color combo is from my July Inspiration Calendar - Gorgeous Grape, Garden Green and Daffodil Delight. With these colors of course I had to make a floral themed card!

You can get my Inspiration Calendar each month when you subscribe to my email list.


Tips & Instructions

  • Garden Green Card Base - 5 1/2 x 8 1/2, score at 4 1/4

  • Basic White Layer - 4 x 5 1/4, stamp sentiment from the Market Goodness Stamp Set in Gorgeous Grape ink.

  • Die cut the greenery pieces from Garden Green using the Flowers of Beauty Dies. Adhere them to the white layer.

  • Die cut the flowers from Gorgeous Grape and Daffodil Delight. You can cut a bunch of these flowers all at once with the dies.

  • Adhere the flowers to the greenery pieces.

  • Add some Iridescent Faceted Gems to the center of the flowers.


On the inside layer (4 x 5 1/4), stamp greenery image in Garden Green ink. There are 2 stamps that coordinate together to fill it in but I only used the one stamp to get a more delicate look. Stamp the groups of flowers in Gorgeous Grape ink.


These flowers are so pretty and I love this color combination.


Supply List

You can click on the item to purchase it from my Online Store.