Friends For Life Color Combo

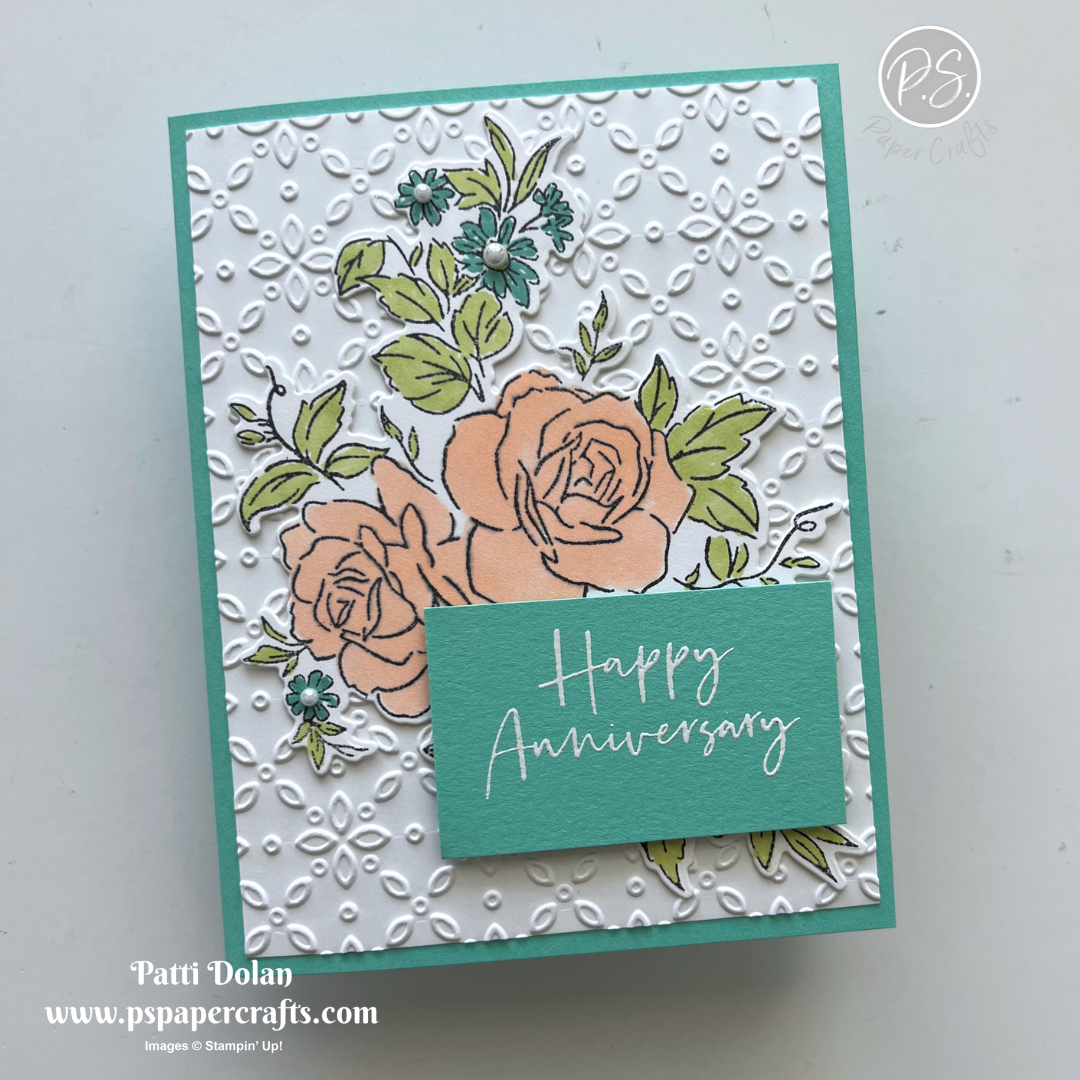
I made this pretty card for this week’s Color Combo using the Friends For Life Bundle. The leaves were cut from Shy Shamrock Glimmer Paper and they are gorgeous.


The colors are from my May Inspiration Calendar - Shy Shamrock, Lemon Lolly and Highland Heather. You can get my calendar each month when you subscribe to my email list.


Tips & Instructions

  • Lemon Lolly Card Base - 5 1/2 x 8 1/2, score at 4 1/4 and emboss the front using the Eyelet 3D Embossing Folder.

  • Basic White Layer - 3 1/2 x 4 3/4.

  • Die cut 2 large leaves from Shy Shamrock Glimmer Paper using the Friends For Life Dies. Adhere to the white layer.

  • Color a piece of Iridescent Striped Trim using a Dark Highland Heather Stampin’ Blends Marker, wrap it around the white layer and adhere to the back of the layer. Adhere layer to the card base.

  • Die Cut the hexagon shape from Basic White using the Wildflower Designs Dies. Stamp the sentiment in Highland Heather ink and adhere to the card using Dimensionals.

  • Die cut 3 small hearts from Highland Heather and adhere to the sentiment label.

  • Color another piece of the trim and tie a bow. Adhere to the card with a Mini Glue Dot.


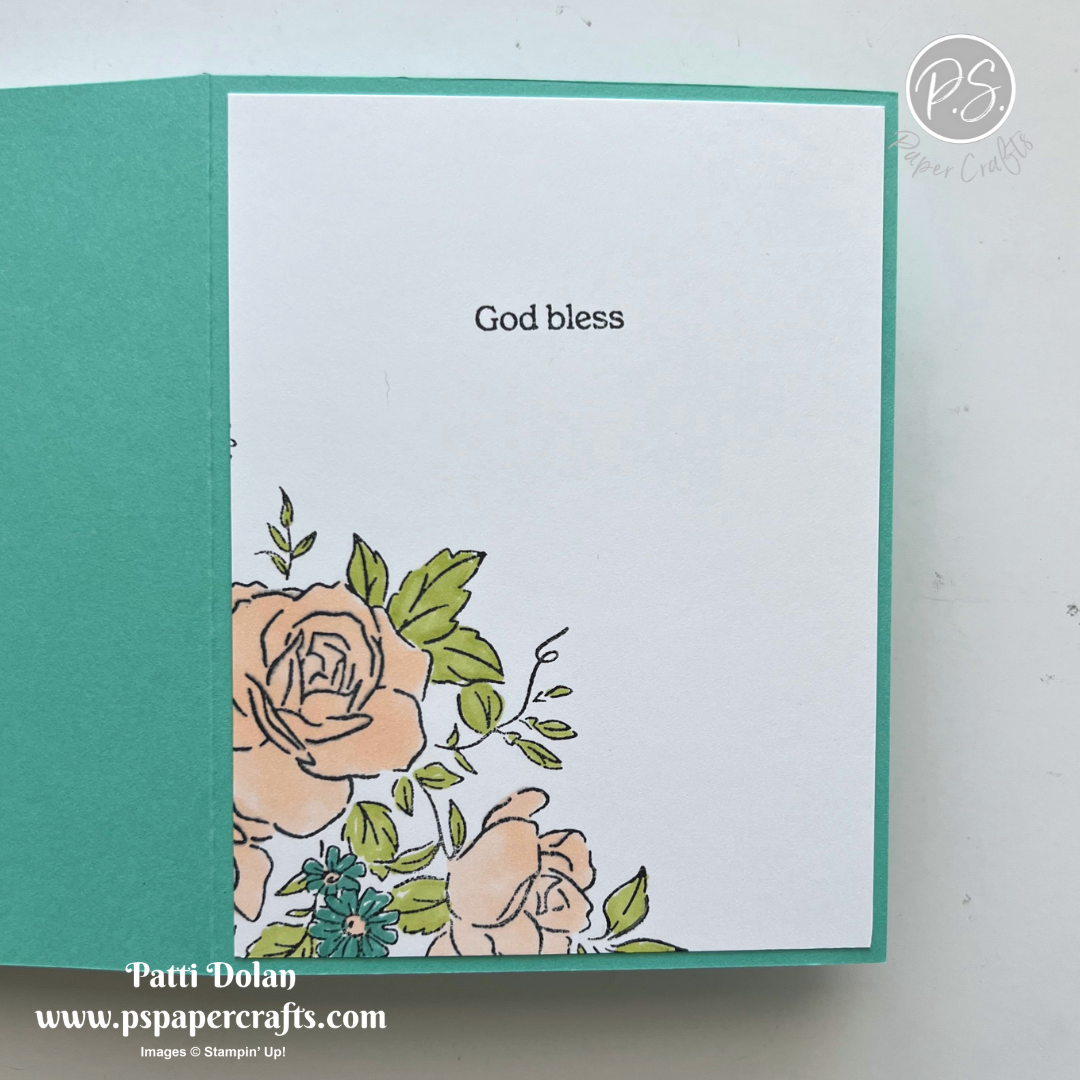
On the inside layer (4 x 5 1/4), stamp the leaf image in Shy Shamrock ink, stamping a second time without re-inking. Ink the stamp and stamp again on a piece of scrap and then on the inside layer. This will give you one dark image and 2 light images. Stamp the hearts in Highland Heather ink.


There’s lots of texture on this card with the embossed card front, the glimmer leaves and the pretty trim.


Supply List

You can click on the item to purchase it from my Online Store.

Sketch Challenge - Full of Life Birthday Card

This week’s Sketch Challenge from Splitcoaststampers was a real challenge for me. I decided to make a Bridge Fold Card and once I chose the paper, it all came together.


Here’s the sketch I used. You can see all the projects posted for this week’s challenge by clicking on the sketch below.


Tips & Instructions

  • Thick Basic White Card Base - 4 1/4 x 7, score at 5 1/2.

  • Thick Basic White Bottom Piece - 1 1/2 x 4 1/4

  • Berry Burst Layer - 2 1/4 x 5 3/4

  • Basic White Sentiment Label - 1 1/2 x 2

  • Blueberry Bushel Sentiment Mat - 1 3/4 x 2 1/4

  • Blueberry Bushel Strip - 1/2 x 3

  • Full of Life Designer Series Paper

    • Focal Piece - 2 x 5 1/2, adhere to the Berry Burst Layer.

    • Top & Bottom pieces) - each piece 1 1/4 x 4, adhere to top fold and white bottom piece.

    • Narrow Strip - 3/8 x 2 7/8, adhere to the Blueberry Bushel Strip.

  • To attach the bridge piece, put adhesive on the top part of the Berry Burst layer and adhere to the top folded piece.

  • Lay the bottom piece so it lines up completely with the bottom of the card. Put adhesive at the bottom of the Berry Burst layer and adhere to the bottom piece. This will attach the top and bottom of the card.

  • Stamp sentiment on white sentiment label in Berry Burst ink and adhere to the Blueberry Bushel mat. The sentiment is from the Simply Said Stamp Set.

  • Adhere the Sentiment and the narrow strip to the card with Dimensionals.

  • Add some Blueberry Bushel Tinsel Gems.


On the inside layer (4 x 5 1/4), stamp sentiment in Berry Burst ink making sure it will sit behind the front focal piece. I broke the sentiment into 2 lines by covering one word with Washi Tape, inking it up, removing the tape and stamping. Clean your stamp and repeat with the other word. Add a piece of Designer Series Paper cut to 3/4 x 4.


I love the watercolor look of this paper, it’s so bright and fun.


Supply List

You can click on the item to purchase it from my Online Store.

Fun Fold Gift Card Holders

I made these Fun Fold Gift Card Holders on my YouTube Channel today. The fold is a Z Fold and they are a great way to give someone a gift card.


Watch the video to see step by step instructions to make this design.

Click on the button below to get a printable pdf with measurements and instructions.


This card was made using Summer Splash from the 2024-2026 In Color Designer Series Paper and the Unbounded Love Stamp Set and Dies.


This Thanks Card was made using the A Little Latte Designer Series Paper and Latte Love Bundle. I love that you can die cut the cups from the paper, so easy.


Supply List

You can click on the item to purchase it from my Online Store.

Tropical Leaf Thank You Card

I made this simple thank you card using the Tropical Leaf Bundle. The bundle includes a stamp set and punch which makes it so easy to create a card like this.


The color combo is from my May Inspiration Calendar - Summer Splash, Crumb Cake and Pretty Peacock. I love how the leaves turned out. I used Summer Splash for the leaves and Pretty Peacock for the veins.

You can get my calendar each month when you subscribe to my email list.


Tips & Instructions

  • Pretty Peacock Card Base - 4 1/4 x 11, score at 5 1/2 (top folding)

  • Basic White - 4 x 5 1/4, stamp stems and the sentiment in Crumb Cake ink.

  • Stamp 3 large leaves on scraps of Basic White in Summer Splash Ink. Stamp the coordinating veins in Pretty Peacock ink. Punch with the Tropical Leaf Punch and adhere to the white layer using Dimensionals for the top leaf.

  • Adhere the layer to the card base.

  • Add some Pretty Peacock Blooming Pearls.


On the inside layer (4 x 5 1/4) stamp two leaves, veins and a piece of the stem with the colors you used on the card front.


Supply List

You can click on the item to purchase it from my Online Store.

Sketch Challenge - Irresistible Blooms

This is the card I made for the weekly Splitcoaststampers Sketch Challenge. I used the Irresistible Blooms Stamp Set and Dies along with the Flowering Zinnias Designer Series Paper.


Here’s the sketch. You can click on it to see the other cards posted for the challenge.


Tips & Instructions

  • Old Olive Card Base - 5 1/2 x 8 1/2, score at 4 1/4

  • Flowering Zinnias Designer Series Paper Layer - 4 1/4 x 5 1/2, adhere to the card base.

  • Die cut the long swirly piece from Old Oive using he Irresistible Blooms Die and adhere to the left side of the card.

  • Flowering Zinnias Designer Series Paper Strip - 1 x 4 1/4, adhere to the card.

  • Basic White Layer - 1 3/4 x 1 3/4, emboss using the Basics 3D Embossing Folder.

  • Old Olive Layer - 1 7/8 x 2 7/8, adhere to embossed layer and adhere to the card.

  • Stamp large flower in Berry Burst ink and the leaves in Old Olive ink on piece of Basic White and die cut using the coordinating dies. Adhere to the card using Dimensionals for the flower.

  • Stamp sentiment on a 1/2” strip of Basic White in Berry Burst ink and adhere with Dimentionals.


On the inside layer (4 x 5 1/4) stamp the large flower in Berry Burst ink.


I love all the texture and layers on this card.


Supply List

You can click on the item to purchase it from my Online Store.

Simple Unbounded Beauty Sympathy Card

The Unbounded Beauty Designer Series Paper has lots of beautiful patterns and I chose this one to make a Sympathy Card. It’s very simple but beautiful!


Tips & Instructions

  • Pretty In Pink Card Base - 5 1/2 x 8 1/2, score at 4 1/4

  • Basic White - 4 x 5 1/4, adhere to the card base.

  • Unbounded Beauty Designer Series Paper - 3 3/4 x 5, adhere to the white layer.

  • Die Cut the label with the leaves twice, once from Pretty In Pink and once from Basic White. You will use the Pretty In Pink frame and the Basic White insert. You can save the other pieces for another card.

  • Stamp the sentiment on the white label insert in Pretty In Pink Ink.

  • Adhere the frame and stamped insert piece to the card.

  • Add some Iridescent Faceted Gems.


On the inside layer (4 x 5 1/4) stamp the sentiment in Pretty In Pink ink and add a 3/4” x 4 strip of the Designer Series Paper.


I love the look of the leaves on the sentiment label that match the pattern in the paper.


Supply List

You can click on the item to purchase it from my Online Store.

Free Shipping from Stampin' Up!

Today, May 21, 2024, you can get FREE shipping on orders of $75 or more from Stampin' Up!  This is a great time to stock up on supplies, shop the Clearance Rack  or just treat yourself to something special from your wish list. 

This incredible deal only lasts for 24 hours!


My May Ordering Special is a pack of the Adhesive-Backed Pearl Trio.  I'll send you a pack for FREE when you place a $50 order (before shipping & tax) from my Online Store during the month of May.


Sketch Saturday - CItrus Blooms

I am loving the new Mediterranean Blooms Designer Series Paper and have been using it quite a bit lately. Today’s card was created for the weekly Atlantic Hearts Sketch Challenge.


Here’s the sketch from the challenge. Once I decided on the branch of lemons as the focal piece, it came together pretty quickly.


Tips & Instructions

  • Garden Green Card Base - 5 1/2 x 8 1/2, score at 4 1/4

  • Mediterranean Blooms Designer Series Paper - 4 x 5 1/4, adhere to the card base.

  • Garden Green Layer - 2 1/2 x 5 1/4, adhere to card.

  • Daffodil Delight Strips - cut 3 at 1/2” x 4 and adhere to card.

  • Basic White Layer - 2 1/4 x 5 1/4, emboss using the Cane Weave 3D Embossing Folder. Adhere to the green layer over the yellow strips.

  • Fussy cut the branch of lemons from the Designer Series Paper and adhere to the card with Dimensionals.

  • Stamp sentiment on scrap of Basic White in Garden Green ink and fussy cut. Adhere to the card with Dimensionals.

  • Add some Daffodil Delight Opal Rounds.


On the inside layer (4 x 5 1/4) stamp sentiment in Garden Green ink and add a 3/4” x 4 strip of Designer Series Paper.


Here’s a close up. The embossed layer makes me think of a trellis, so very much a garden look.


Supply List

You can click on the item to purchase it from my Online Store.

Square Column Fun Fold Cards

I made these simple Square Column Fun Fold Cards on my video today. One was made with Designer Series Paper panels and the other embossed panels and I’m so happy with how they turned out.


Watch the video to see step by step instructions to make this design.

Click on the button below to get a printable pdf with measurements and instructions.


This card was made using the new Thoughtful Journey Designer Series Paper. This paper has beautiful watercolor scenes. I also used the Thoughtful Wishes Bundle for the sentiment and die cuts.


This card has embossed panels that were created using the Fun Patterns Embossing Folder. I added some daisies that were die cut using the Cheerful Daisies Dies.


Supply List

You can click on the item to purchase it from my Online Store.

Hooray For Surprises Birthday Card

I used the Hooray For Surprises Stamp Set and Dies to make this fun birthday card. It’s simple but pretty.


The color combo is from my May Inspiration Calendar - Misty Moonlight, Petunia Pop and Bubble Bath. I love to figure out a card using specific colors, it stretches my creativity.

You can get my calendar every month when you subscribe to my email list.


Tips & Instructions

  • Misty Moonlight Card Base - 5 1/2 x 8 1/2, score at 4 1/4

  • Basic White Layer - 4 x 5 1/4

  • Petunia Pop Square - 2 3/4 x 2 3/4

  • Bubble Bath Square - 2 1/2 x 2 1/2

  • Stamp heart image on Basic White in Petunia Pop ink. Color the stems with a Light Bubble Bath Stampin’ Blends Marker. Die cut using the coordinating die.

  • Die cut 3 small flowers from Bubble Bath and adhere to the heart.

  • Adhere the squares together. Adhere the heart to the squares using Dimensionals.

  • Stamp sentiment in Misty Moonlight ink on white layer and adhere layer to card base.

  • Adhere squares to the card.

  • Add some Misty Moonlight Tinsel Gems to flower centers.


On the inside layer (4 x 5 1/4) stamp sentiment in Misty Moonlight ink and add some hearts using Petunia Pop ink.


Supply List

You can click on the item to purchase it from my Online Store.

Sketch Challenge - Thoughtful Wishes

I made this card for the weekly Splitcoaststampers Sketch Challenge using the beautiful Thoughtful Journey Designer Series Paper which has amazing watercolor scenes.


Here’s the sketch I used. You can click on it to see more cards posted for the challenge.


Tips & Instructions

  • Petunia Pop Card Base - 5 1/2 x 8 1/2, score at 4 1/4

  • Thoughtful Journey Designer Series Paper - 4 x 5 1/4, adhere to the card base.

  • Thoughtful Journey Designer Series Paper - cut using the Countryside Corners Dies. Cut a piece of Petunia Pop using the next largest die and adhere together. Adhere to the card with Dimensionals.

  • Stamp sentiment on a 1/2” strip of Basic White in Mossy Meadow ink. Cut each side of the strip on a diagonal and adhere to the card. I used Liquid Glue on the part that adheres to the focal piece and put a small piece of Dimensionals on the part that hangs over.

  • Add 3 of the larger Brushed Brass Butterflies to the side.


On the inside layer (4 x 5 1/4) stamp the flowers in Black Memento ink and color with a Light Mossy Meadow and Light Petunia Pop Stampin’ Blends Markers. Add a butterfly to the top corner.


Isn’t is just beautiful, I love this Designer Series Paper, so easy but so pretty.


Supply List

You can click on the item to purchase it from my Online Store.

Simple Suite Stampers - Unbounded Beauty

This is the card I made for the May Simple Suite Stampers Tutorial Bundle. We’re featuring the Unbounded Beauty Suite and I just love the Designer Series Paper.


You can get the Tutorial Bundle for free when you purchase $35 in product from my Online Store or you can purchase the bundle right here on my website, just click the Tutorials Button at the top. It contains 12 simple projects with pictures, measurement and instructions.


The New In Colors are highlighted in this suite and I chose Petunia Pop for the card base, glimmer paper and ink.


On the inside layer (4 x 5 1/4) I simply stamped a sentiment and added a strip of the Designer Series Paper.


I love the Glimmer Paper for the sentiment with the die cut leaves.


Supply List

You can click on the item to purchase it from my Online Store.

Sketch Saturday - Everyday Details

I wanted to make a dainty card for this week’s sketch challenge and started with the Elegant Borders Dies and then added the pretty teacup from the Everyday Details Stamp Set.


Here’s the sketch I used from the Atlantic Hearts Sketch Challenge.


Tips & Instructions

  • Bubble Bath Card Base - 5 1/2 x 8 1/2, score at 4 1/4

  • Basic White - 4 x 5 1/4, cut using the Elegant Borders Dies.

  • Stamp the teacup on the top half just above the border in Black Memento ink. Color using Stampin’ Blends. I used Bubble Bath, Old Olive and Petunia Pop.

  • Stamp the sentiment in Black Memento ink on the bottom piece.

  • Adhere both white pieces to the card base separating them a little bit.

  • Adhere a 1/8 x 4 strip of Petunia Pop just below the teacup.

  • Cut 2 strips of Petunia Pop Designer Series Paper at 1/4 x 4 and adhere to the top and bottom of the white layer.

  • Add an Iridescent Faceted Gem to the flower center.


On the inside layer (4 x 5 1/4) stamp the vase of flowers image in Black Memento ink. Color with Stampin’ Blends. I used Petunia Pop, Bubble Bath and Old Olive.


Isn’t this so sweet and dainty?


Supply List

You can click on the item to purchase it from my Online Store.

Diamond Fold Cards

These Diamond Fold Cards are so easy to make. There are lots of different designs for this fold but I like this one because it’s pretty and simple to make.


Watch the video to see step by step instructions to make this design.

Click on the button below to get a printable pdf with measurements and instructions.


This card was made using the new Mediterranean Blooms Designer Series Paper. This paper is so beautiful, I love it. I cut the orange from the Designer Series Paper using the Citrus Bloom Dies, so easy!


I made this Mother’s Day Card using the pretty Perennial Lavender Designer Series Paper. The sentiments are from the Flower Cart Stamp Set.


Supply List

You can click on the item to purchase it from my Online Store.

Spotlight On Nature - Color Combo

I made this pretty Thank You Card using the new Spotlight On Nature Bundle.


The color combo is from my May Inspiration Calendar - Peach Pie, Berry Burst and Lost Lagoon. This is a pretty combination.

You can get my Inspiration Calendar every month when you subscribe to my email list.


Tips & Instructions

  • Berry Burst - 5 1/2 x 8 1/2, score at 4 1/4

  • Basic White Layer - 3 3/4 x 5, stamp 2 branches with leaves in Black Memento ink and color with a Light Lost Lagoon Stampin’ Blends Marker. Adhere layer to card base.

  • Stamp the butterfly in Black Memento ink and color with Light Peach Pie and Light Berry Burst Stampin’ Blends Markers.

  • On a piece of Basic White, stamp the floral image in Black Memento ink and fussy cut. Color the leaves with a Light Lost Lagoon Stampin’ Blends Marker. Color the flowers with Light & Dark Peach Pie Stampin’ Blends Markers. Adhere to the white layer.

  • Stamp sentiment in Berry Burst ink on Basic White and die cut with the Spotlight On Nature Dies.

  • Die cut a larger circle from Berry Burst and adhere to the stamped circle. Adhere to the card using Dimensionals.


On the inside layer (3 3/4 x 5) stamp butterfly and floral image in Black Memento ink and color with Stampin’ Blends Markers.


This is a simple card and I love how it turned out. Here’s a closeup!


Supply List

You can click on the item to purchase it from my Online Store.

Sketch Challenge - Beside Me Father's Day Card

This is such a sweet Father’s Day Card. I love the sentiment to go along with the image. It’s from the Beside Me Stamp Set and I made the card for this week’s sketch challenge.


Here’s the sketch from the weekly Splitcoaststampers Sketch Challenge. If you click on the sketch, you can see the other projects posted for the challenge.


Tips & Instructions

  • Basic Beige Card Base - 5 1/2 x 8 1/2, score at 4 1/4

  • Country Lace Designer Series Paper 4 1/4 x 5 1/2

  • Basic Beige, die cut the middled sized frame using the Radiating Stitches Dies.

  • Basic White - 2 1/4 x 3 5/8, stamp image in Black Memento ink and color with Stampin’ Blends Markers. I used Boho Blue, Shy Shamrock, Crumb Cake, Poppy Parade, Peach Pie, Wild Wheat, Smoky Slate and Medium Light. Adhere layer to Basic Beige frame.

  • Wrap Linen Thread around the bottom of the Designer Series Paper Layer crossing in the middle and adhere to the back of the layer. Use the stamped layer to the determine where to put the Linen Thread.

  • Adhere the Designer Series Paper layer to the card base and then adhere the stamped layer to the card using Dimensionals.

  • Stamp sentiment on Basic White in Black Memento ink and die cut using the smallest rectangle from the Wild Ferns Dies. Adhere to the card using Dimensionals.


On the inside layer (4 x 5 1/4) stamp sentiment in Black Memento ink and add a 3/4 x 4 strip of Designer Series Paper to the bottom.


Supply List

You can click on the item to purchase it from my Online Store.

Citrus Blooms Birthday Card

I made this delicious card to celebrate the 900th Featured Stampers Challenge at Splitcoaststampers. We were asked to CASE (Copy And Share everything) a card from one of the Featured Stampers and I copied Sherri (happy-stamper) FS890.


Tips & Instructions

  • Granny Apple Green Card Base - 5 1/2 x 8 1/2, score at 4 1/4

  • Granny Apple Green Layer - 2 1/8 x 5 1/2, emboss using the Cane Weaver Embossing Folder. Adhere to the left side of the card front.

  • Peach Pie Layer - 2 1/8 x 5 1/2, adhere to the right side of the card front.

  • Basic White Layer - 2 x 5 3/8, stamp the citrus images in Black Memento Ink. Fill in spaces by stamping the flowers in Black Memento Ink.

  • Color the images with Stampin’ Blends Markers. I colored the oranges in Dark Peach Pie, the in Dark Granny Apple Green, the flower centers with a Dark Lemon Lolly, the stems with Light Crumb Cake and then I aded a little Light Lemon Lolly to the fo the center of the flower petals. Adhere the layer to the Peach Pie layer.

  • Stamp sentiment on a piece of Basic White in Granny Apple Green and die cut using the Unbounded Love Dies. Die cut the mat piece from Peach Pie and adhere to the sentiment label. Adhere to the card with Dimensionals.

  • Add some Peach Pie Resin Dots.


On the inside layer (4 x 5 1/4) stamp the sentiment in Granny Apple Green and the flowers in Peach Pie ink.


I love how this turned out. The Citrus Blooms Stamp Set is amazing.


Supply List

You can click on the item to purchase it from my Online Store.

Sketch Saturday - Fluffiest Friends Slimline Card

The Fluffiest Friends Stamp Set has the cutest little critters. I decided to use it to create my card for this week’s sketch challenge. It’s a Slimline Card.


Here’s the sketch I used from the Atlantic Hearts Sketch Challenge.


Tips & Instructions

  • Blackberry Bliss Card Base - 8 1/2 x 7, score at 3 1/2

  • Basic White Layer - 3 1/4 x 8 1/4, emboss using the Fun Patterns Embossing Folder. You will have to run it through your embossing machine twice to get the full layer embossed. It’s easy to line up but if you have a hard time doing that, don’t worry, you will cover that area with the pink layer. Adhere layer to the card base.

  • 2024-2026 In Color Designer Series Paper (Pretty In Pink) - 2 x 3 1/4. Wrap a piece of Pretty In Pink Ribbon around the top and adhere to the back of the layer. Adhere layer to the card.

  • Stamp the 3 critters on Basic White in Black Memento ink and die cut with the coordinating dies. Color with Stampin’ Blends Markers.

    • For the bear I used Light Crumb Cake, Light Wild Wheat, Dark Blackberry Bliss and for the nose Dark Smoky Slate.

    • For the bunny I used Light Pretty In Pink, and for the cupcake Light Wild Wheat, dark Pretty In Pink and Dark Blackberry Bliss.

    • For the kitty I used Light Smoky Slate and for the flower and pot Light Wild Wheat, Dark Blackberry Bliss and Dark Granny Apple Green.

  • Adhere the critters to the card with Dimensionals.

  • Stamp sentiment (from the Simply Said Stamp Set) on scrap of Basic White in Blackberry Bliss ink. Fussy cut around it and adhere to the card with Dimensionals.


On the inside layer (3 1/4 x 8 1/4), stamp the beaver in Black Memento ink and color with Light Smoky Slate and Dark Pretty In Pink Stampin’ Blends Markers. Stamp the sentiment in Blackberry Bliss ink.


Supply List

You can click on the item to purchase it from my Online Store.

Patchwork Border Cards

These Patchwork Border cards are so pretty. I made one by stamping the border and the other using patterned paper for the border. The products I used are from the Unbounded Beauty Suite.


Watch the video to see step by step instructions to make this design.

Click on the button below to get a printable pdf with measurements and instructions.


I stamped the images for the border for this card using the Flowers of Beauty Stamp Set and all the new In Colors - Petunia Pop. Shy Shamrock, Pretty In Pink, Peach Pie and Summer Splash. The sentiment is from the Stippled Rose Stamp Set.


You can get the same look with Designer Series Paper instead of stamping the pieces. The Unbounded Beauty Designer Series Paper has beautiful patterns.


Supply List

You can click on the item to purchase it from my Online Store.

Layers Of Beauty Anniversary Card

I used the new Layers Of Beauty Bundle to create this pretty Anniversary Card.


The Color Combo is from my May Inspiration Calendar - Petal Pink, Coastal Cabana and Granny Apple Green. I meant to use the new Pretty In Pink but I had Petal Pink on the calendar so I went with it.

You can get my calendar each month when you subscribe to my email list.


The Layers Of Beauty Bundle includes a stamp set, coordinating dies and coordinating masks. I didn’t use the masks on my card but definitely plan to play with them. There are 5 masks you can use to layer and add color.


Tips & Instructions

  • Coastal Cabana Card Base - 5 1/2 x 8 1/2, score at 4 1/4

  • Basic White Layer - 4 x 5 1/4, emboss using the Eyelet 3D Embossing Folder.

  • Stamp the large floral image on Basic White in Black Memento Ink. Color with Stampin’ Blends Markers. I used Light Petal Pink and Light Granny Apple Green for the roses and leaves. I colored the small flowers with a Coastal Cabana Stampin’ Write Marker.

  • Die cut the image using the coordinating die and adhere to the embossed layer. Adhere the layer to the card base.

  • Coastal Cabana - 1 1/2 x 2 1/2, stamp sentiment in Versamark ink and heat emboss with White Embossing Powder. Adhere to the card with Dimensionals.

  • Add some Iridescent Basic Pearls to the flower centers.


On the inside layer (4 x 5 1/4) stamp the large floral image at the bottom corner in Black Memento ink and color with markers. Stamp the sentiment in Black Memento ink.


The embossed layer gives the card an elegant look.


Supply List

You can click on the item to purchase it from my Online Store.