Simple Christmas Card using Shining Christmas Paper

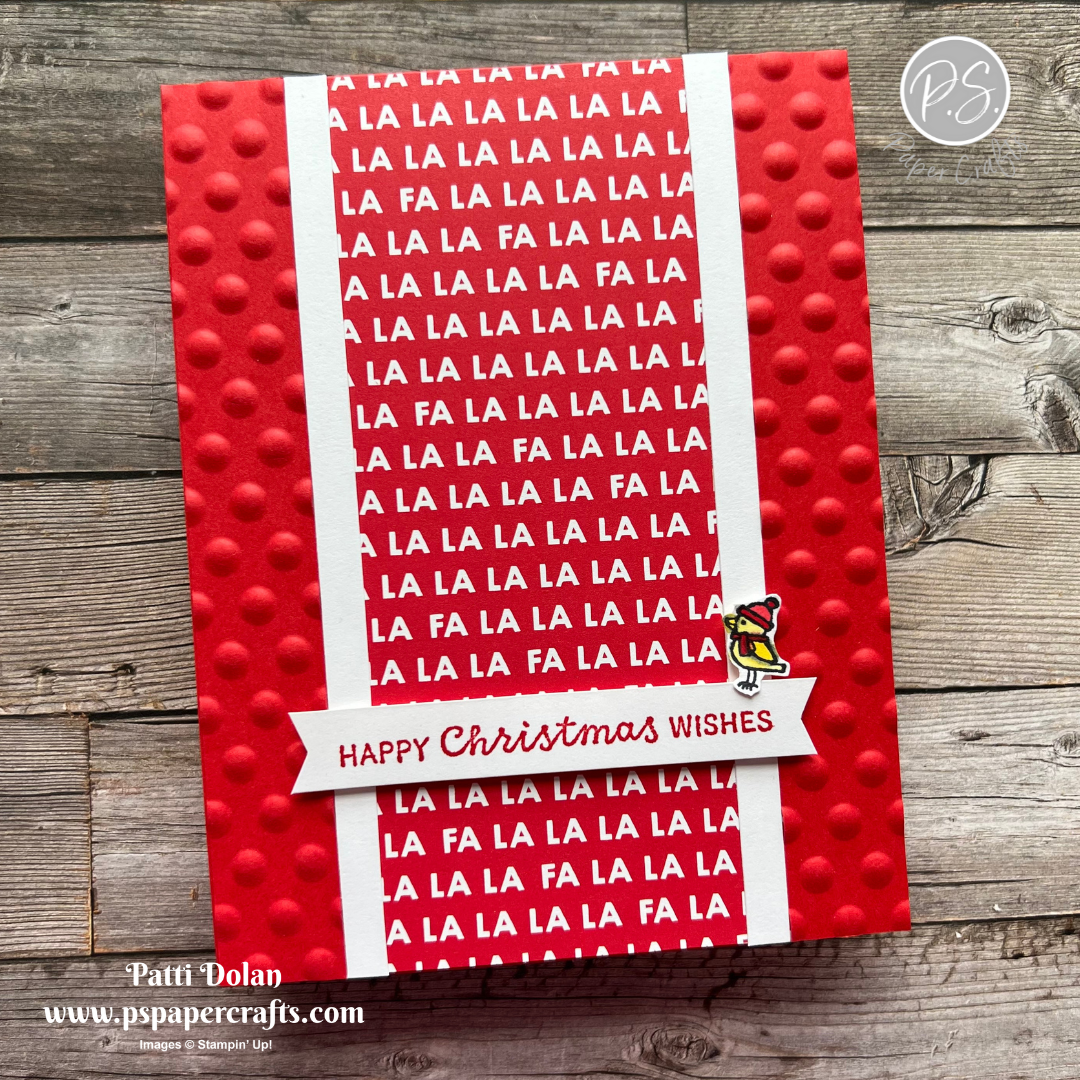
This is one of my favorite designs to make some quick cards and it works so well for stretching your patterned paper and for mass producing Christmas cards. You can even use an embossed piece of plain cardstock on the bottom portion.


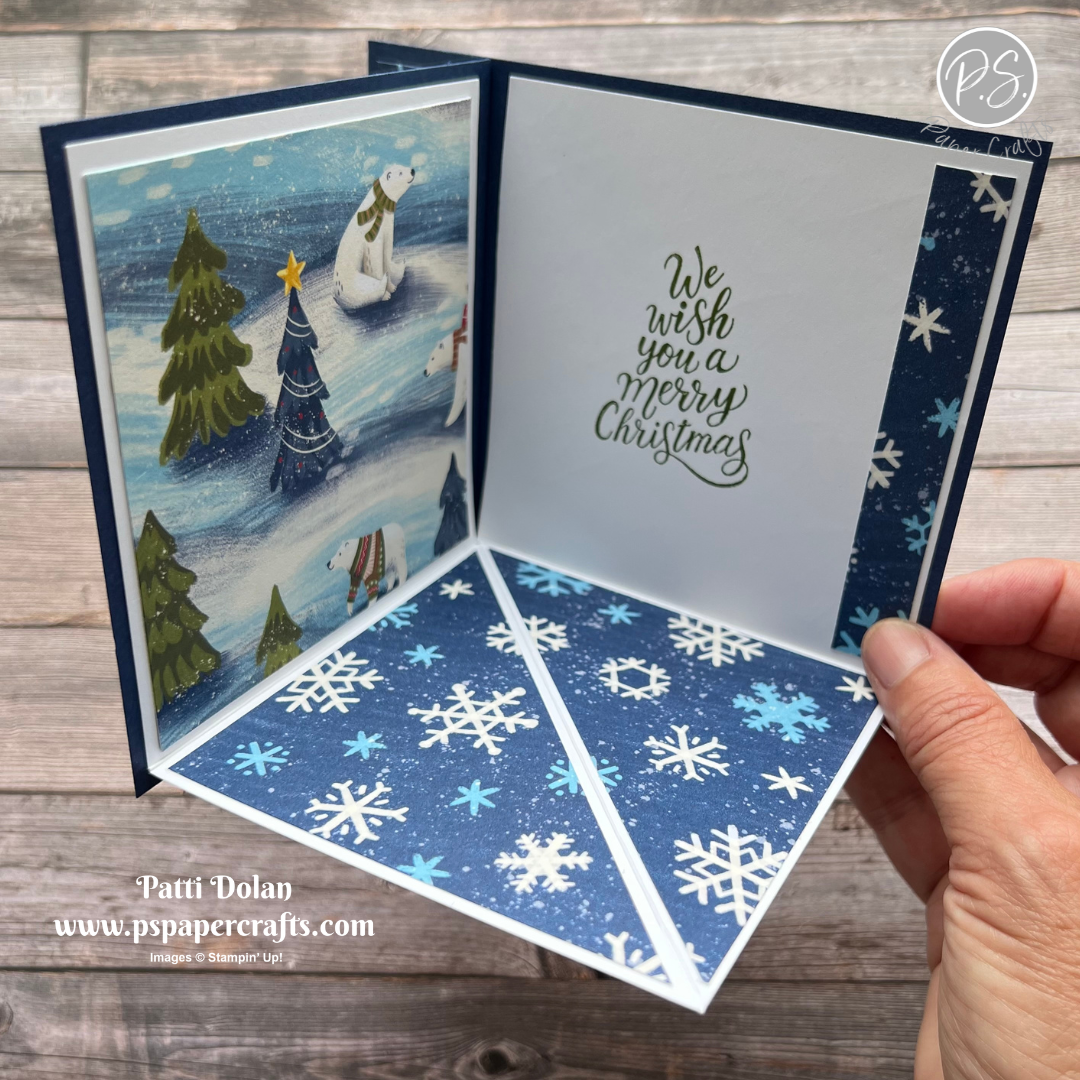
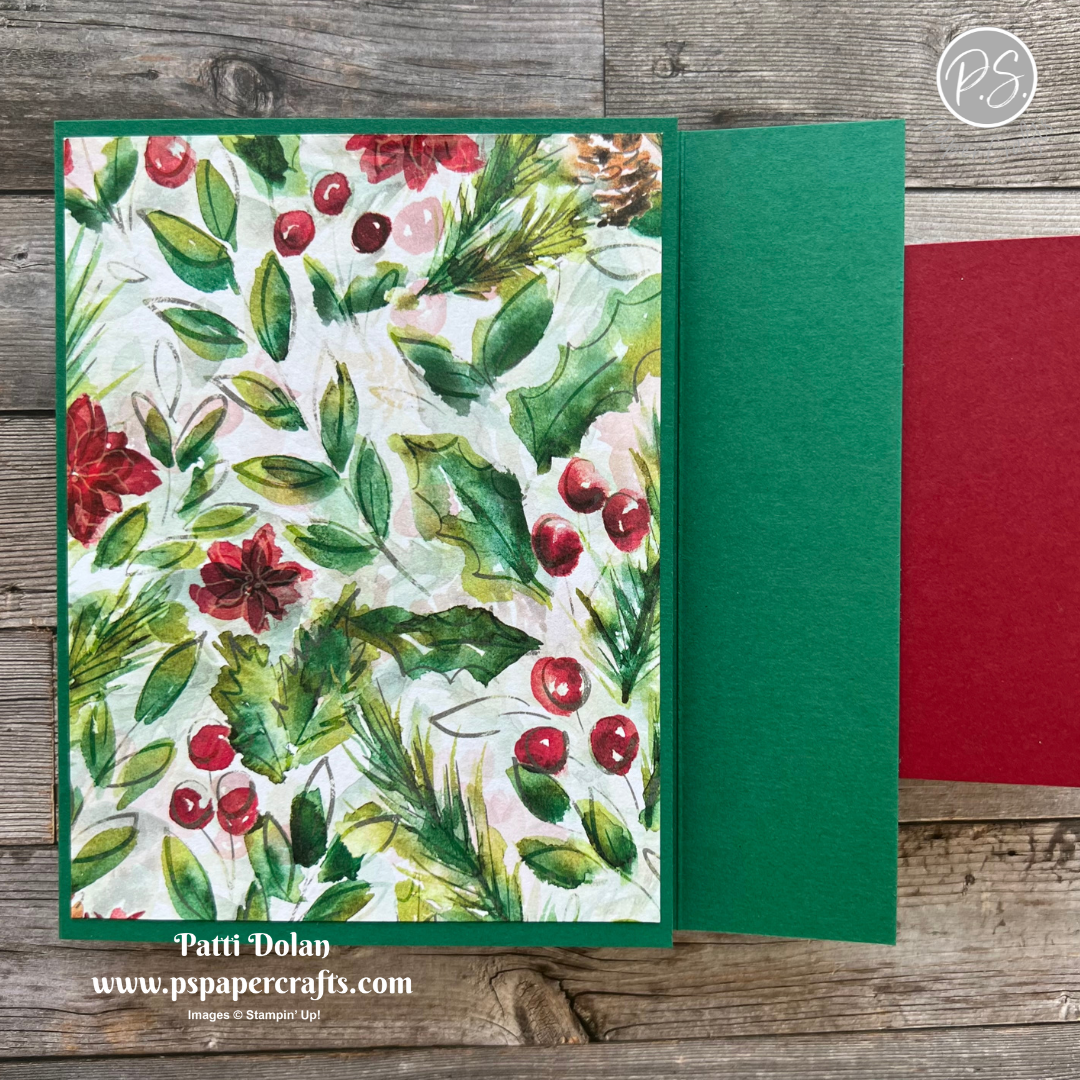
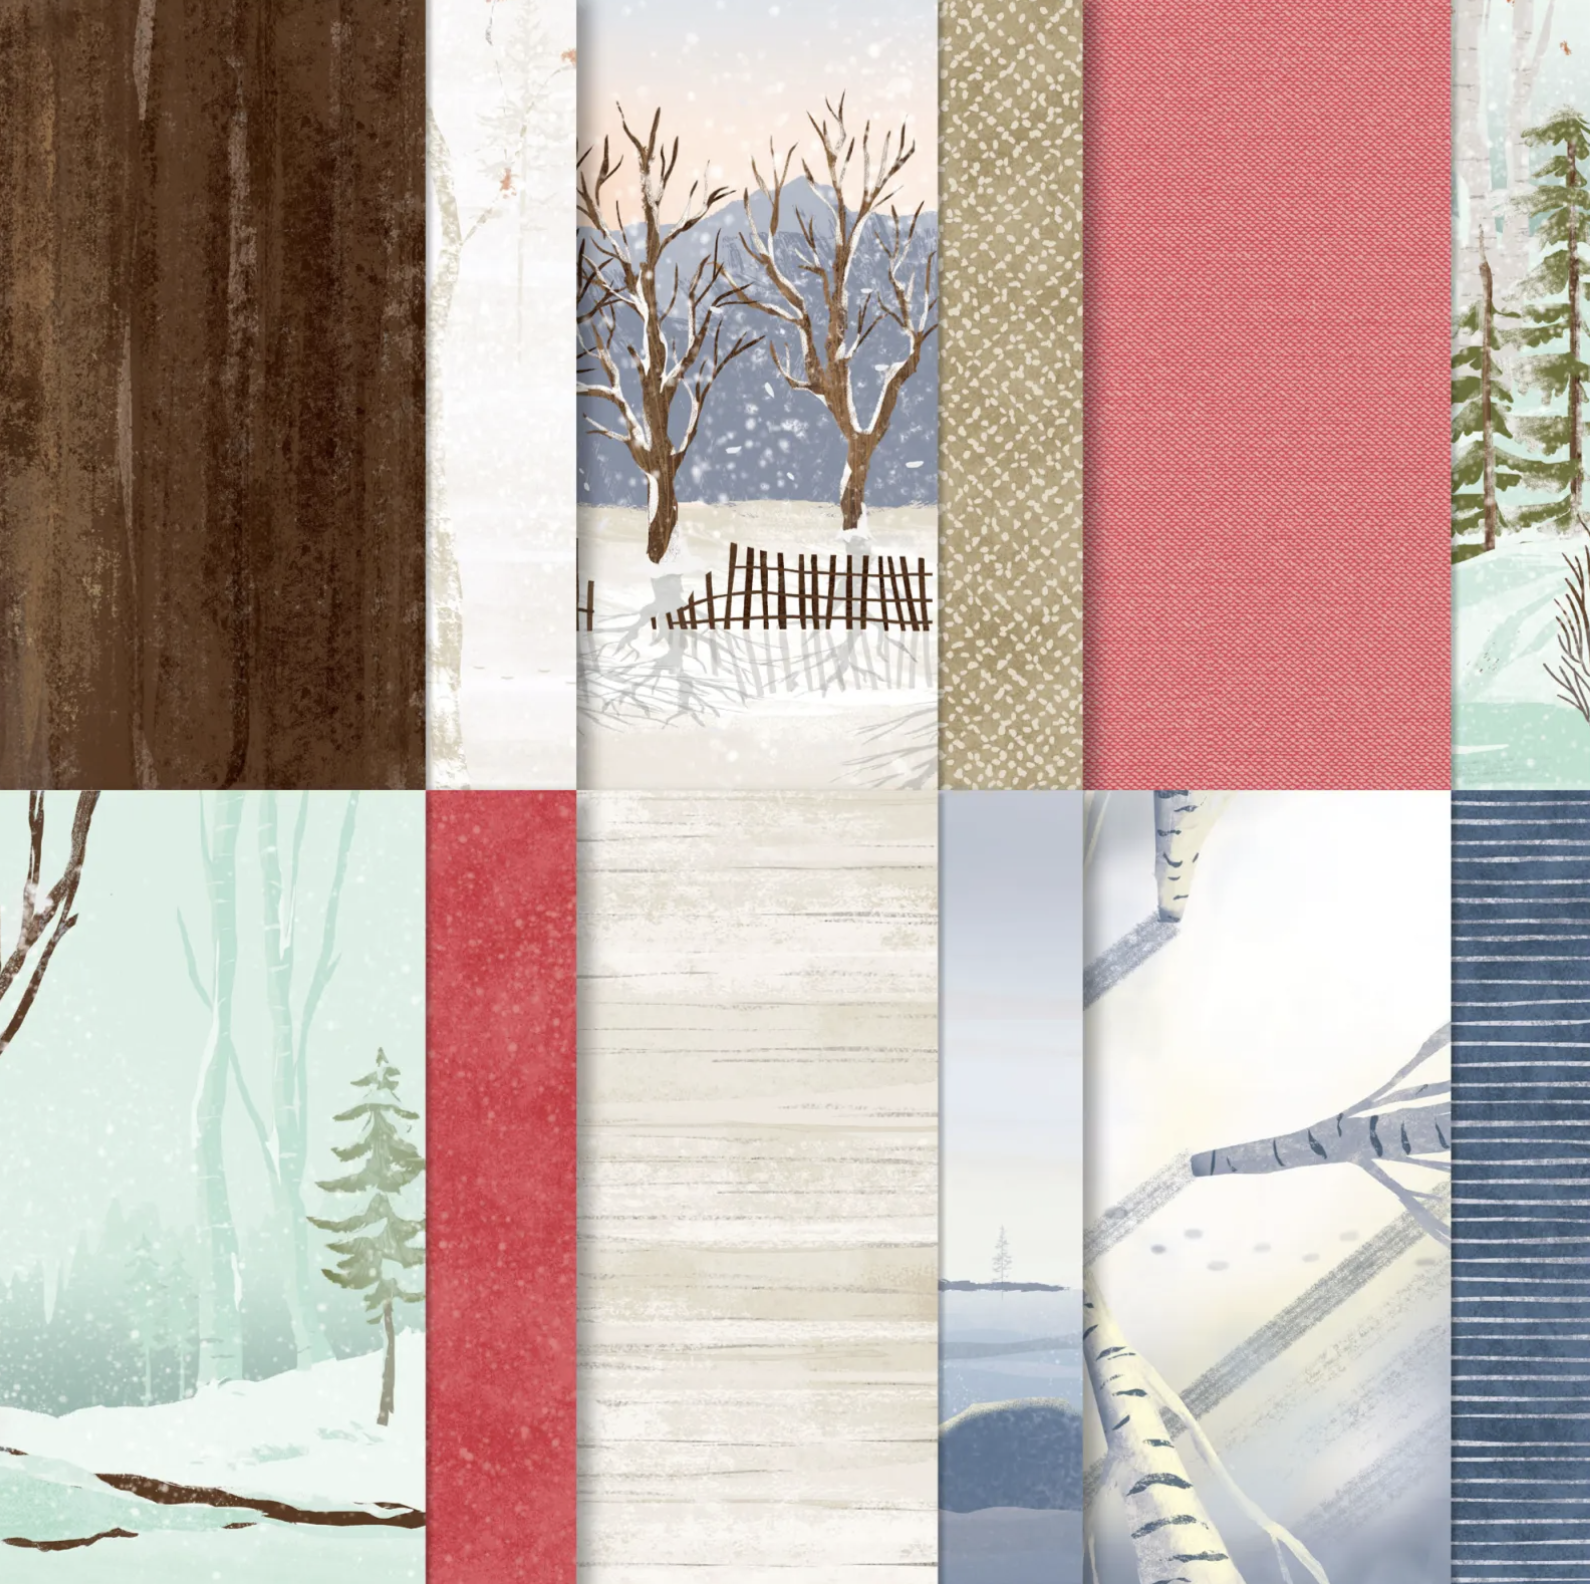
The Shining Christmas Specialty Designer Series Paper is one of the new ones that was just added to the online store. It has beautiful shiny accents and cheerful Christmassy designed, it’s perfect for any holiday crafting project.


Tips & Instructions

  • Cherry Cobbler Card Base - 5 1/2 x 8 1/2, score at 4 1/4

  • Shining Christmas Designer Series Paper

    • Trees - 5 1/2 x 3

    • Dots - 5 1/2 x 2

  • Basic White Strip - 5 1/2 x 1/2, emboss using the Snowflake Sky 3D Embossing Folder

  • Adhere the dot pattern to the bottom portion of the card front, then the tree pattern, overlapping. Adhere the embossed strip across the seam.

  • Stamp the sentiment with Mossy Meadow Ink on Basic White and punch using the Decorative Circle Punch.

  • Punch some sprigs from Mossy Meadow and Cherry Cobbler using the Bough Punch.

  • Adhere the sprigs behind the sentiment label and then adhere to the card using Dimensionals.


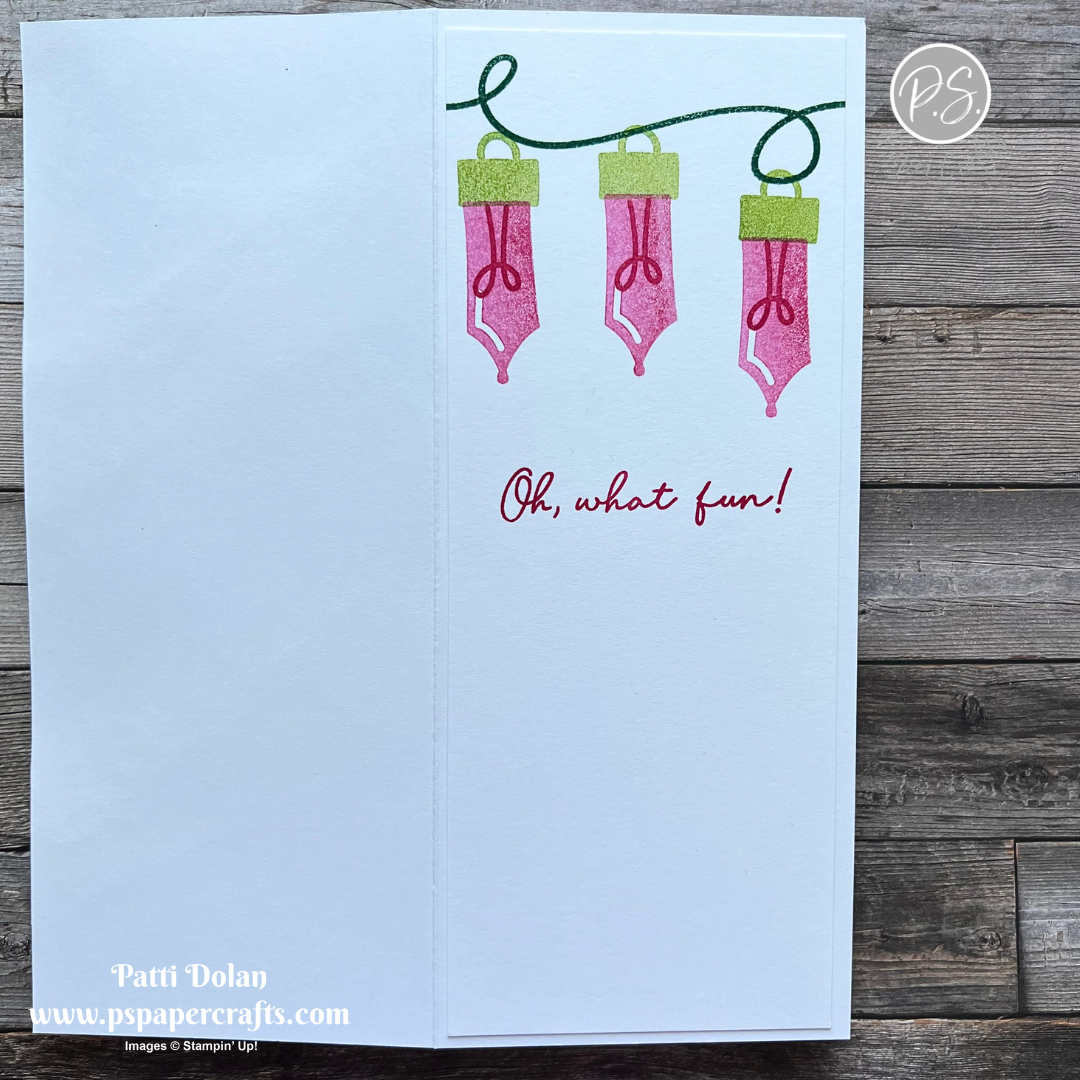
On the inside layer (5 1/4 x 4) stamp sentiment and sprigs with Mossy Meadow Ink. I stamped a second and third time with the sprig stamp without re-inking to get a variation of shades.


Supply List

You can click on the item to purchase it from my Online Store.

Sketch Saturday - Dainty Delight

I made this sweet, dainty wedding card for this week’s sketch challenge. The oval was made with 2 of the branches that I cut using the Dainty Delight Dies. The flowers were cut with those dies as well.


The sketch is from the weekly Atlantic Hearts Sketch Challenge. I love this sketch!!!


Tips & Instructions

  • Gorgeous Grape Card Base - 5 1/2 x 8 1/2, score at 4 1/4

  • Basic White Layer - 5 1/4 x 4, emboss using the crosshatch folder from the Basics 3D Embossing Folders. Adhere to card base.

  • Cut two branches from Granny Apple Green and adhere to card to create the oval.

  • Cut 3 flowers from Gorgeous Grape and 3 centers from Lemon Lolly. Adhere the centers to the flowers and adhere the flowers to the oval using Dimensionals for one of the flowers.

  • Stamp sentiment (from the Wonderful Thoughts Stamp Set) with Gorgeous Grape Ink on a 1/2 strip of Basic White. Punch both ends using the Banners Pick A Punch and adhere to card with Dimensionals.

  • Add some Gorgeous Grape Glossy Dots.


On the inside layer (5 1/4 x 4) stamp the sentiment with Gorgeous Grape Ink and the floral image with Black Memento Ink. Color the leaves with a Dark Granny Apple Green Stampin’ Blends Marker.

The sentiment is from the Wonderful Thoughts Stamp Set and the floral image is from the Dainty Delight Stamp Set.


Supply List

You can click on the item to purchase it from my Online Store.

W-V Fun Fold Cards

So why settle for ordinary when you can create extraordinary? Create this easy W V Fun Fold Card to make someone’s day!


Watch the video to learn how to make this fun fold and see the products I used. The Delightful Florals Designer Series Paper is a new one that was just introduced and it’s gorgeous!

Click the Project Sheet button to get a printable pdf with pictures, measurements and instructions.

This card was made using the Delightful Florals Designer Series Paper and Translucent Florals Stamp Set.


This card was made using the Inked Botanicals Designer Series Paper and Autumn Leaves Bundle.


Supply List

You can click on the item to purchase it from my Online Store.

Merriest Trees Christmas Card

I made this simple Christmas Card using the Merriest Trees Bundle and the Snowflake Sky Embossing Folder. The dies for the Christmas Tree is so cool, there are 5 dies that you layer on top of each other to create the tree.


This week’s color combo is Sweet Sorbet, Cherry Cobbler and Old Olive. I had a hard time getting started and when I decided to use the Merriest Trees, it came together quickly.


Tips & Instructions

  • Cherry Cobbler Card Base - 5 1/2 x 8 1/2, score at 4 1/4

  • Basic White Layer - 5 1/4 x 4, emboss using the Snowflake Sky Embossing Folder and adhere to card base.

  • Cut the five tree layers from Old Olive using the Merriest Trees Dies and adhere to create the layered tree.

  • Cut the garland pieces from Sweet Sorbet and adhere to the tree with small amounts of Liquid Glue.

  • Stamp bow with Cherry Cobbler Ink on Basic White and cut with coordinating die. Adhere to tree. Adhere tree to card with Dimensionals.

  • Stamp sentiment with Sweet Sorbet on Basic White and punch each end with the Banners Pick A Punch. Adhere to card with Dimensionals.


On the inside layer (5 1/4 x 4) stamp sentiment with Old Olive Ink.


Supply List

You can click on the item to purchase it from my Online Store.

Sketch Challenge - Pick Of The Patch

Here’s the card I made for this week’s Splitcoaststampers Sketch Challenge using the Pick Of The Patch Bundle. The background layers are from the Tartan Foil Specialty Designer Series Paper.


Here’s the sketch I used. You can click on it to see other projects posted for this week’s challenge.


Tips & Instructions

  • Copper Clay Card Base - 5 1/2 x 8 1/2, score at 4 1/4

  • Basic White Layer - 5 1/4 x 4, adhere to the card base.

  • Copper Clay Mats - 4 1/4 x 3 and 4 3/4 x 2

  • Tartan Foil Specialty Designer Series Paper

    • White pattern - 4 x 2 3/4

    • Copper pattern - 4 1/2 x 1 3/4

  • Adhere the Tartan Foil pieces to the coordinating Copper Clay pieces and adhere to the card.

  • Stamp 2 large pumpkins and one medium pumpkin with Pumpkin Pie Ink on Basic White and punch with coordinating punch.

  • Punch 3 stems from Copper Clay and adhere to pumpkins.

  • Cut smallest label from Basic White using the Nested Essentials Dies. Stamp sentiment with Pumpkin Pie Ink towards the right side of the label leaving room for the pumpkin. Adhere to the card.

  • Adhere the pumpkins to the card with Dimensionals.


On the inside layer (5 1/4 x 4) stamp sentiment and two pumpkins with Pumpkin Pie Ink. Stamp stems with Copper Clay Ink. I inked up just the top of the stem to get a shorter stem for the small pumpkin.


Supply List

You can click on the item to purchase it from my Online Store.

Simple Suite Stampers Tutorial - Les Shoppes

Check out these two cards made using the Les Shoppes Suite of products. The Designer Series Paper is so fun and the cards are completely different from each other.


Each month I participate with a group of Stampin’ Up! Demonstrators to create a tutorial bundle featuring a suite of products. It’s filled with 12 projects with pictures, measurements and instructions.


When you place an order from my Online Store in September, I’ll send you this tutorial bundle for free or you can purchase it at my website by clicking the Tutorials Button at the top of this page or click the button below.

For this first card, I fussy cut the building and shrubs from the Designer Series Paper and adhered them to the background patterned paper.


This is such a simple card but I love the patterns of both papers. The added gems really finishes the card off nicely.


Supply List

You can click on the item to purchase it from my Online Store.

Sketch Saturday - Festive & Fun

Poppy Parade is such a great color for Christmas cards. It’s fun and festive. I made this card for this week’s Atlantic Hearts Sketch Challenge using the Merry Bold & Bright Designer Series Paper and the cute Festive & Fun Stamp Set.


This is the sketch that I used. It’s very simple but you can do so much with it!


Tips & Instructions

  • Poppy Parade Card Base - 4 1/4 x 11, score at 5 1/2 (top folding)

  • Poppy Parade Strips - cut 2 at 5 1/2 x 3/4 and emboss using the Basics Embossing Folders. (Tip, you can emboss a 5 1/2 x 1 1/2 piece and then cut it in half.)

  • Basic White Strips - cut 2 at 5 1/2 x 1/4

  • Merry Bold & Bright Designer Series Paper - 5 1/2 x 3

  • Layer the pieces on the card base, starting with the Designer Series Paper, then the embossed strips and finally the white strips.

  • Stamp sentiment on a 1/2 strip of Basic White with Poppy Parade Ink and banner each end with the Banners Pick A Punch. Adhere to card with Dimensionals.

  • Stamp the cute little bird with Black Memento on a scrap of Basic White and color with Stampin’ Blends. I used Poppy Parade and Lemon Lolly. Fussy cut and adhere with Dimensionals.


On the inside layer (5 1/4 x 4) stamp sentiment with Poppy Parade Ink. Stamp the beaver and bird with Black Memento Ink and Stampin’ Blends. I used Crumb Cake for the beaver, Dark Poppy Parade for the candy cane and Poppy Parade & Lemon Lolly for the bird.


Supply List

You can click on the item to purchase it from my Online Store.

Corner Pop Up Fun Fold Cards

I have another Fun Fold for you today. It’s called a Corner Pop Up Card. These are easy to make and it’s a surprise when you open it up.


You have to watch the video to see how it opens. Click the Project Sheet button below to get a printable pdf with pictures, measurements and instructions.


This card was made using the Beary Christmas Designer Series Paper and the Merriest Trees Stamp Set.


This card was made using the Zoo Crew Designer Series Paper and Circle Sayings Stamp Set. I cut the circles with the Deckled Circle Dies and the sentiment with the Double Oval Punch.


Supply List

You can click on the item to purchase it from my Online Store.

Rustic Crate Hello Card

Making fall cards makes me happy. I love fall colors and the Rustic Crate Stamp Set has great images to color.


The color combo I used for this card is from my Inspiration Calendar - Copper Clay, Crushed Curry and Blueberry Bushel.


Tips & Instructions

  • Crushed Curry Card Base - 5 1/2 x 8 1/2, score at 4 1/4

  • Basic White - cut using the second from largest scalloped rectangle from the Scalloped Contours Dies.

  • Cut hello word from Blueberry Bushel 3 times and glue together to create a thicker sentiment.

  • Stamp floral image on Basic White with Black Memento Ink. Color with Crushed Curry and Blueberry Bushel Ink by pressing a small clear block into the ink pad and using a Wink of Stella brush to pick up ink and paint the image with it.

  • Stamp crate with Copper Clay Ink.

  • Cut floral image and crate with coordinating dies from the Rustic Crate Dies.

  • Adhere the floral image to the crate and adhere to white layer using Dimensionals.

  • Adhere sentiment using Liquid Glue.

  • Tie bow with Copper Clay Jute Trim and adhere with a Glue Dot.

  • Add 3 Copper Clay Adhesive-Backed Speckled Dots.


The sparkle on the floral image is so pretty in person. I’m not sure the picture does it justice. Coloring with Ink and Wink of Stella is a great technique.


On the inside layer (5 1/4 x 4) stamp the floral image with Black Memento Ink and color with the inks and Wink of Stella.


Supply List

You can click on the item to purchase it from my Online Store.

Sketch Challenge - Stars At Night

I made this card for this week’s Splitcoaststampers Sketch Challenge. The products are from the new Mini Catalog which launches today. The Stars At Night Bundle pairs so well with the Shining Brightly Designer Series Paper.


Here’s the sketch for this week. I’m on the sketch team so I create a card for them each week. You can click on the sketch to see the other projects posted for this week’s challenge.


Tips & Instructions

  • Night of Navy Card Base - 5 1/2 x 8 1/2, score at 4 1/4

  • Shining Brightly Designer Series Paper (white) - 5 1/4 x 4, cut off top right corner and adhere to the card base.

  • Shining Brightly Designer Series Paper (blue) - 5 x 2, adhere to the card.

  • Cut starburst from Night of Navy using the Stars At Night Dies

  • Cut small star from a Gold Foil Sheet and adhere to blue sunburst. Adhere sunburst to card with Dimensionals. Add an Adhesive-Backed Star Trinket to the center.

  • Stamp sentiment with Night of Navy Ink on scrap of Very Vanilla. Fussy cut around it and adhere with Dimensionals.


On the inside layer (Very Vanilla 5 1/4 x 4) stamp sentiment with Night of Navy. Add a 4 x 3/4 strip of the Designer Series Paper.


All About Autumn

I love when a patterned paper does the work for you on a card! The All About Autumn Designer Series Paper is gorgeous with detailed photographs on one side and pretty patterns with distressed copper foil accents on the other side.


Tips & Instructions

  • Copper Clay Card Base - 5 1/2 x 8 1/2, score at 4 1/4

  • Basic White Layer - 5 3/8 x 4 1/8

  • All About Autumn Specialty Designer Series Paper - 5 1/4 x 4, adhere to white layer. Wrap piece of Linen Thread around the layers 3 times and adhere to the back. Adhere layer to card base.

  • Stamp sentiment with Copper Clay Ink on a scrap of Basic White and cut using the Autumn Leaves Dies.

  • Cut 2 maple leaves and 3 small leaves from the backside of the Designer Series Paper.

  • Adhere leaves to card front with Liquid Glue and the label with Dimensionals.

  • Tie bow with a piece of Linen Thread and adhere with at Glue Dot.

  • Add a Copper Clay Adhesive-Backed Speckled Dot.


The copper accents on the backside of the Designer Series Paper works so well for die cutting the leaves.


On the inside layer (5 1/4 x 4) adhere 2 leaves cut from the Designer Series Paper.


Note: the Autumn Leaves Bundle will be available starting September 6, 2023 with the launch of the new Mini Catalog.

The All About Autumn Specialty Designer Series Paper will be available starting September 11, 2023.

Sketch Saturday - Autumn Leaves

Here’s my card for this week’s sketch challenge. I created this pretty fall background using the Abundant Beauty Decorative Masks and blending 3 different ink colors with the mask.


The sketch is from the Atlantic Hearts Sketch Challenge. This was an easy one for me.


Tips & Instructions

  • Crushed Curry Card Base - 5 1/2 x 8 1/2, score at 4 1/4

  • Basic White Layer - 5 1/4 x 4

  • Tape the Abundant Beauty Decorative Mask over the Basic White Layer. Use Blending Brushes to add ink to the layer. I started at the bottom with Cherry Cobbler, then Calypso Coral and the top area with Crushed Curry.

  • Remove the mask. You can rinse it off with water and let it dry to use again for another project.

  • Cut the layer into 3 pieces. I cut the top at 1 1/4, the second at 1 1/2 and the bottom at 2 3/8. Adhere the pieces to another 5 1/4 x 4 Basic White Layer leaving a small gap between each piece. Adhere layer to card base.

  • Basic White scrap - cut the second largest tag from the Tailor Made Tags Dies.

  • Use a Dark Calypso Coral Stampin’ Blends to splatter ink on the tag. You can use any of the colors and can use a Stampin’ Blends or Stampin’ Write Marker.

  • Stamp a leaf with Crushed Curry Ink on a scrap of Basic White, stamping off on scrap paper to get a lighter shade. Cut with the coordinating die.

  • Cut the leaf veins from a piece of Oxidized Copper Specialty Paper and adhere to the leaf. Adhere leaf to tag and then adhere the tag to the card with Dimensionals.

  • Tie a bow with a piece of Copper Ribbon and adhere with a Glue Dot.

  • On a 5/8 strip of Basic White, stamp sentiment with Versamark Ink and heat emboss with Copper Embossing Powder. Adhere to card with Dimensionals.

  • Add some Copper Brushed Metallic Adhesive-Backed Dots.


Here’s a close-up of the card. You can use whatever fall colors you want!


On the inside Layer I added a few leaves that I cut from Calypso Coral and Crushed Curry using the Autumn Leaves Dies.


Supply List

You can click on the item to purchase it from my Online Store.

Note: the Autumn Leaves Bundle and Abundant Beauty Decorative Masks and Copper Ribbon will be available starting September 6, 2023 with the launch of the new Mini Catalog.

Double Flap Fold Card

Happy Friday!!! I have a new Fun Fold card for you called the Double Flap Fold Card. For these cards I used new products from the upcoming Mini Catalog that you can purchase starting September 6, 2023. I am so happy with how these turned out.


Watch the video to see all the steps to make these cards and then click on the Project Sheet button to get a printable pdf with measurements and instructions.


The first card was made using the Beary Cute Stamp Set and A Walk In The Park Designer Series Paper. This paper is the Stampin’ Up! Making A Difference product and $3 will be donated for each pack sold to support organizations dedicated to spreading cheer and providing support to those in neeed.


The other card was made using the Joy of Noel Bundle along with the Joy of Christmas Designer Series Paper.


Shop these new products from my Online Store starting September 6, 2023 when the new Mini Catalog launches.

Lasting Joy Birthday Wishes

For this week’s color combo I was looking for some fun flowers to stamp and found them in the Lasting Joy Stamp Set.


The Color Combo from my Inspiration Calendar this week is Night of Navy, Granny Apple Green and Tahitian Tide.


You can get my Inspiration Calendar each month when you subscribe to my Email List.

Tips & Instructions

  • Thick Basic White Card Base - 5 1/2 x 8 1/2, score at 4 1/4

  • Night of Navy - cut using the largest frame from the Radiating Stitches Dies.

  • Basic White - cut using the next size frame from the Radiating Stitches Dies.

  • Stamp flowers and leaves on the white layer using the Lasting Joy Stamp Set. I stamped the largest flower with Tahitian Tide Ink first, then the small grouping of flowers with Night of Navy Ink. Stamp the leaves that coordinate with the grouping of flowers with Granny Apple Green Ink. Stamp the large leaves with Granny Apple Green Ink. Fill in with the small flower and leaves using Night of Navy and Granny Apple Green Inks.

  • Adhere stamped layer to Nigh of Navy layer. Wrap a piece Night of Navy Bordered Ribbon around the layers and adhere to the back. Adhere layers to card base.

  • Stamp sentiment on scrap of Basic White and punch with the Double Oval Punch.

  • Punch a scrap of Night of Navy with the scalloped Oval and adhere to white label. Adhere to card with Dimensionals.

  • Tie bow and adhere with Glue Dot.

  • Add some Tahitian Tide Pearls.


On the inside layer stamp sentiment with Night of Navy Ink. Stamp flowers and leaves like you did on the card front.


Supply List

You can click on the item to purchase it from my Online Store.

Sketch Challenge - Magical Meadow

The Winter Meadow Designer Series Paper is so pretty and I decided to use it for this week’s Splitcoaststampers Sketch Challenge.


Here’s the sketch, clean and simple! You can click on it to see the other projects posted for this week’s challenge.


Tips & Instructions

  • Blueberry Bushel Card Base - 5 1/2 x 8 1/2, score at 4 1/4

  • Winter Meadow Designer Series Paper Layer - 5 1/4 x 4

  • Basic White Strip - 4 x 3/8, emboss with the Snowflake Sky 3D Embossing Folder. Cut the largest banner shape from the Nested Essentials Dies with Basic White and emboss with the same folder.

  • Using the blue side of the Designer Series Paper cut the next size banner shape and the shape for the label (the smallest one).

  • Stamp sentiment on label with Versamark Ink and emboss with White Embossing Powder.

  • Adhere the white embossed strip, label and 2 banner pieces to the Designer Series Paper layer. Trim off any excess from the banners and then adhere layer to the card.

  • Add some Adhesive-Backed Glitter Sequins to the label.


On the inside layer stamp sentiment with Blueberry Bushel Ink and the greenery with Garden Green and Shaded Spruce Ink.


Supply List

You can click on the item to purchase it from my Online Store.

Note: the Magical Meadow Stamp Set, Winter Meadow Designer Series Paper and Snowflake Sky 3D Embossing Folder will be available starting September 6, 2023 with the launch of the new Mini Catalog.

Rustic Crate Autumn Card

Fall is my favorite season and the Rustic Crate Bundle from the new Mini Catalog is such a great set for the season. The background layer is from the All About Autumn Designer Series Paper which is gorgeous with copper foil accents.


Tips & Instructions

  • Copper Clay Card Base - 4 1/4 x 11, score at 5 1/2 (top folding)

  • Basic White Layer - 5 1/8 x 3 7/8

  • All About Autumn Designer Series Paper Layer - 5 x 3 3/4, adhere to white layer and wrap piece of Copper Clay Textured Ribbon around layers and adhere to the back. Adhere layers to card base.

  • Basic White - cut using the largest rectangle from the Nested Essentials Dies.

  • Cut crate from the wood pattern in the Designer Series Paper. Cut the two side pieces from a scrap of Copper Clay and adhere to the crate.

  • Stamp the pumpkin and flower image with Black Memento Ink. Color with Stampin’ Blends. I used Dark Pumpkin Pie for the pumpkins, Dark Lemon Lolly for the corn, Dark Granny Apple Green for the husks, Dark Old Olive for the leaves and Dark Daffodil Delight for the sunflowers. Use some Light Blackberry Bliss for the sunflower centers and then bring it outside the edges of the center and blend with the Daffodil Delight. Cut with coordinating die.

  • Adhere to stamped image to the crate and then adhere to the white rectangle. Adhere to card using Dimensionals.

  • Cut the small label from Basic White using the die and stamp sentiment with Copper Clay Ink. Adhere to crate.

  • Tie bow with ribbon and adhere with a Glue Dot.

  • Add some small Copper Clay Adhesive-Backed Solid Gems to the sentiment label.


The crate die embosses as it cuts, so cool!


On the inside layer stamp and color the images the same as you did on the card front.


Supply List

You can click on the item to purchase it from my Online Store.

Note: the Rustic Crate Bundle and All About Autumn Designer Series Paper will be available starting September 6, 2023 with the launch of the new Mini Catalog.

Sketch Saturday - Trucking Along

This week’s sketch was fun using the Trucking Along Stamp Set paired with the One Horse Open Sleigh Designer Series Paper. I cut the squares to create a scene instead of just various patterns and colors.


The sketch is from the weekly Atlantic Hearts Sketch Challenge. It’s a great way to get inspiration!


The Trucking Along Stamp Set has great images, the truck reminds me of a truck that was at an orchard where we went apple picking last year. That’s my son and grandkids, it was a beautiful day!


You can stamp lots of things in the truck: flowers, a Christmas tree, gifts and even a palm tree.


Tips & Instructions

  • Misty Moonlight Card Base - 5 1/2 x 8 1/2, score at 4 1/4

  • Cut One Horse Open Sleigh Designer Series Paper in 1 1/4 x 1 1/4 pieces keeping them in order to create the scene. Adhere the pieces 3 across and 4 down leaving off the middle pieces.

  • Early Espresso Layer - 2 5/8 x 2 5/8

  • Basic White Layer - 2 1/2 x 2 1/2, stamp truck, tree and sentiment with Black Memento Ink. Color with Stampin’ Blends. I used Light Cherry Cobbler for the truck, Light Smokey Slate for the windows and hubcaps and Dark Smokey Slate for the tires and bumpers. Add Wink of Stella to the windows and hubcaps. Color tree with Dark Shaded Spruce.

  • Adhere the stamped layer to the Early Espresso Layer and adhere to card with Dimensionals.

  • Add some white Adhesive-Backed Sequins. These will be available for purchase from the new Mini Catalog starting September 6, 2023.


The One Horse Open Sleigh Designer Series Paper has beautiful winter scenes on one side and a rustic pattern on the other side.


On the inside layer add a 5 1/4 x 3/4 strip of the Designer Series Paper and stamp the sentiment with Black Memento Ink. I didn’t adhere the paper until after I stamped but I laid it on the white layer to get placement for the sentiment.


Supply List

You can click on the item to purchase it from my Online Store.

Note: the Trucking Along Stamp Set and One Horse Open Sleigh Designer Series Paper are Online Exclusives.

Beautiful Autumn Card using Magical Meadow

I love stamping my own background and the Magical Meadow Stamp Set has great images to create a pretty fall pattern. The sentiment is from the Autumn Leaves Stamp Set.


The color combo that I used for this card is from my Inspiration Calendar - Pretty Peacock, Pecan Pie and Crumb Cake, perfect for an Autumn Card.


Tips & Instructions

  • Crumb Cake Card Base - 5 1/2 x 8 1/2, score at 4 1/4

  • Very Vanilla Layer - 5 1/4 x 4

  • Stamp images on the Very Vanilla Layer starting with the largest image with Pretty Peacock Ink, the next size down with Pecan Pie Ink and the berry image with Pretty Peacock Ink, stamping off first. I filled in around the edges with the leafy image using Crumb Cake Ink.

  • Wrap piece of Pecan Pie Bordered Ribbon around the layer and adhere to the back. Adhere layer to card base.

  • Use the Nested Essentials Dies to cut a Very Vanilla rectangle and the next size up Crumb Cake rectangle. Stamp the sentiment from the Autumn Leaves Stamp Set with Pretty Peacock Ink. Adhere together and then adhere to card using Dimensionals.

  • Tie bow with ribbon and adhere with a Glue Dot.

  • Add a Pretty Peacock Tinsel Gem to sentiment label.


On the inside layer (cut Very Vanilla 5 1/4 x 4) stamp the images with Pretty Peacock and Pecan Pie on the bottom corner. Stamp the berry image with Pretty Peacock, stamping off first on the top corner.


Supply List

You can click on the item to purchase it from my Online Store.

Note: the new Magical Meadow and Autumn Leaves Stamp Sets will be available starting September 6, 2023

Sketch Challenge - Merry & Bright

For this week’s Splitcoaststampers Sketch Challenge I made a Slimline Christmas Card using products from the new Merry Bold & Bright Suite.


Here’s the sketch that I used. You can click on the sketch to see the other projects posted for this week’s challenge.


Tips & Instructions

  • Thick Basic White Card Base - 8 1/2 x 7, score at 3 1/2 (on the 7 side)

  • Merry Bold & Bright Designer Series Paper - 3 strips cut at 5 1/2 x 1 1/2

  • Melon Mambo Foil Sheet - 2 strips cut at 5 1/2 x 1 1/2

  • Adhere the strips on the card base as shown on the picture. I adhered the Melon Mambo Foil strips first and then the Christmas lights pattern. Trim off the overhang cutting from the back side of the card.

  • Melon Mambo Foil - cut circle using the 6th from smallest Deckled Circle Dies.

  • Granny Apple Green - cut circle using the 5th from smallest Deckled Circle Dies. Stamp sentiment with Versamark and then heat emboss with White Embossing Powder. Tip - Arrange the words how you want on a clear block, then stamp.

  • Adhere the circles together and then adhere to the card using Dimensionals.

  • Add some Adhesive-backed Glitter Sequins.


I’m hoping you can see the Melon Mambo Foil Paper, it has a nice shine to it!


On the inside layer (8 1/4 x 3 1/4) stamp string using Shaded Spruce Ink and the light tops with Granny Apple Green Ink. Stamp the light bulbs with Melon Mambo Ink stamping off first to get a lighter shade and then stamp the filament with Melon Mambo Ink. Stamp sentiment with Melon Mambo Ink.


The new Merry Bold & Bright Suite and Deckled Circle products will be available starting September 6, 2023

Countryside Inn Tutorial Bundle

This month’s Simple Suite Stampers Tutorial Bundle features the Countryside Inn Suite. Here’s the card that I made for the bundle. The Designer Series Paper is so pretty that I wanted to highlight it.


You can get this bundle for free when you purchase from my Online Store or you can purchase the bundle by clicking the button below. This tutorial bundle contains 12 projects with pictures, measurements and instructions designed by 12 Stampin’ Up! Demonstrators.


The Countryside Inn Designer Series Paper was inspired by fine china and wallpaper patterns. It includes gorgeous florals, woodland animals, nature and ceramic designs.


The inside is very simple with a strip of the Designer Series Paper.


Supply List

You can click on the item to purchase it from my Online Store.