Triangle Fun Fold Cards

The Triangle Fun Fold is so easy to make and the design is really pretty. Have fun with it by changing the patterned paper and stamp set.


I’ll walk you through all the steps to make this fun fold card and you can get all the measurements by clicking the button below to get a printable Project Sheet.


I mentioned that there is a video with the designer of the Masterfully Made Designer Series Paper where she explains the process she used to create these patterns. Click on the picture below to see the video, it’s really amazing.


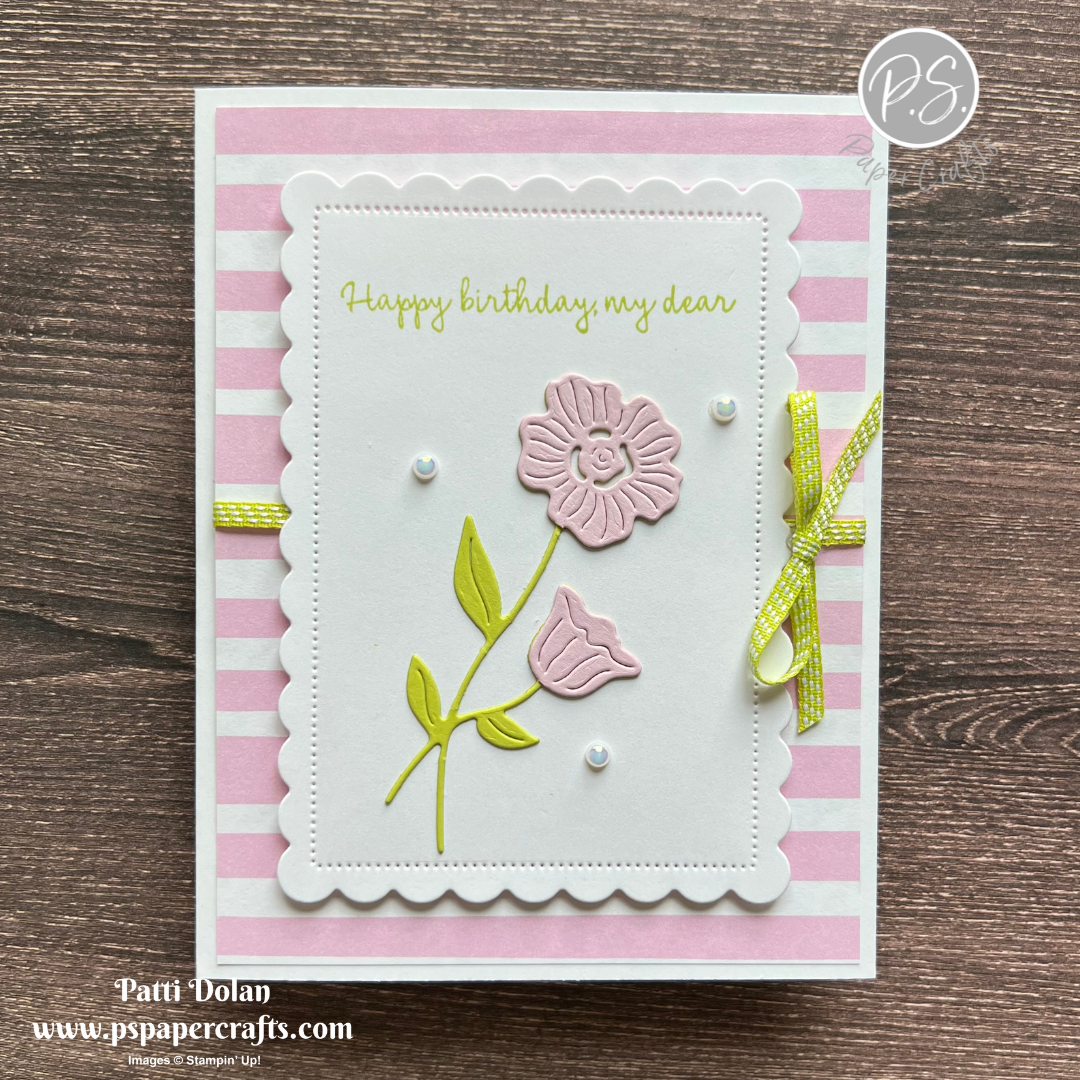
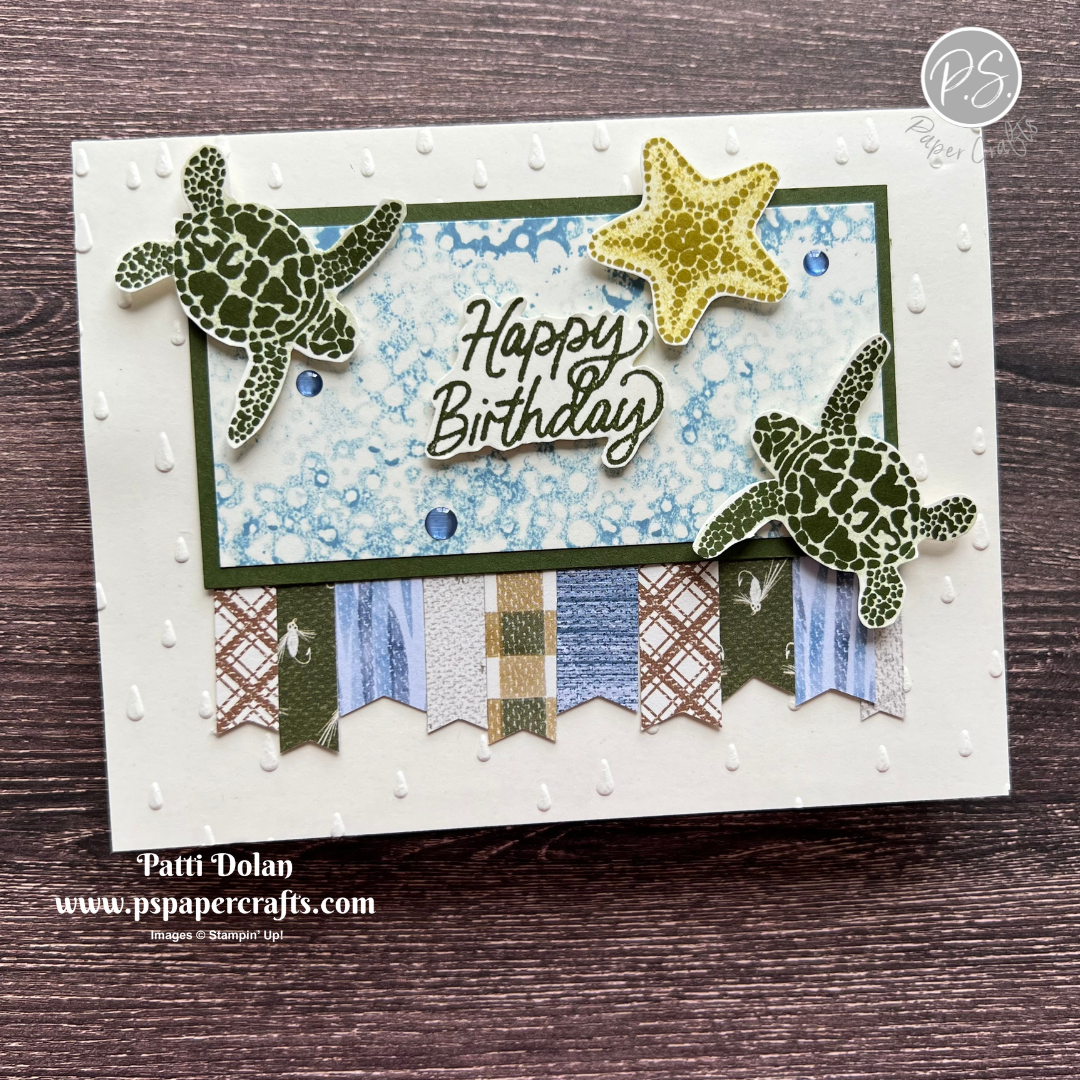
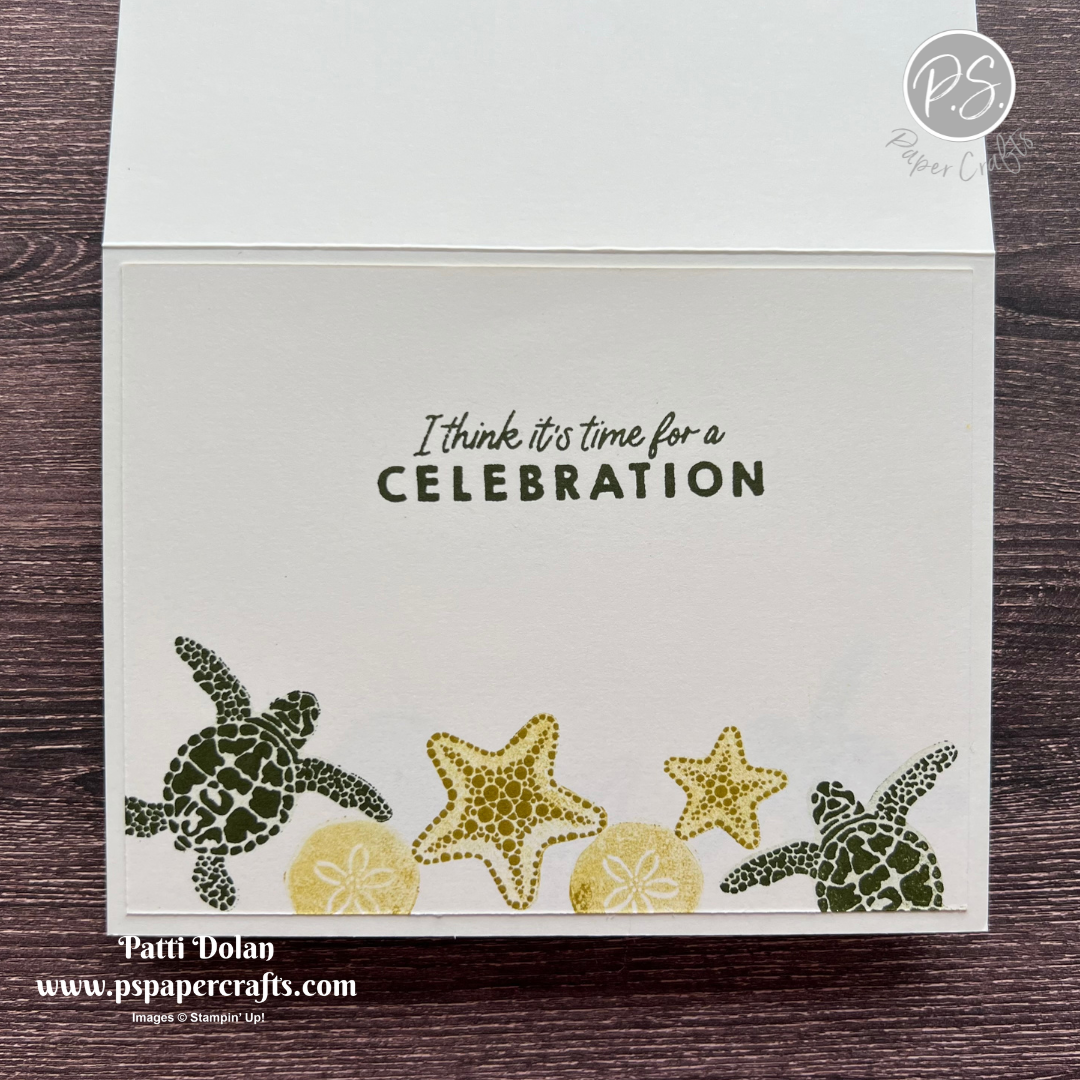
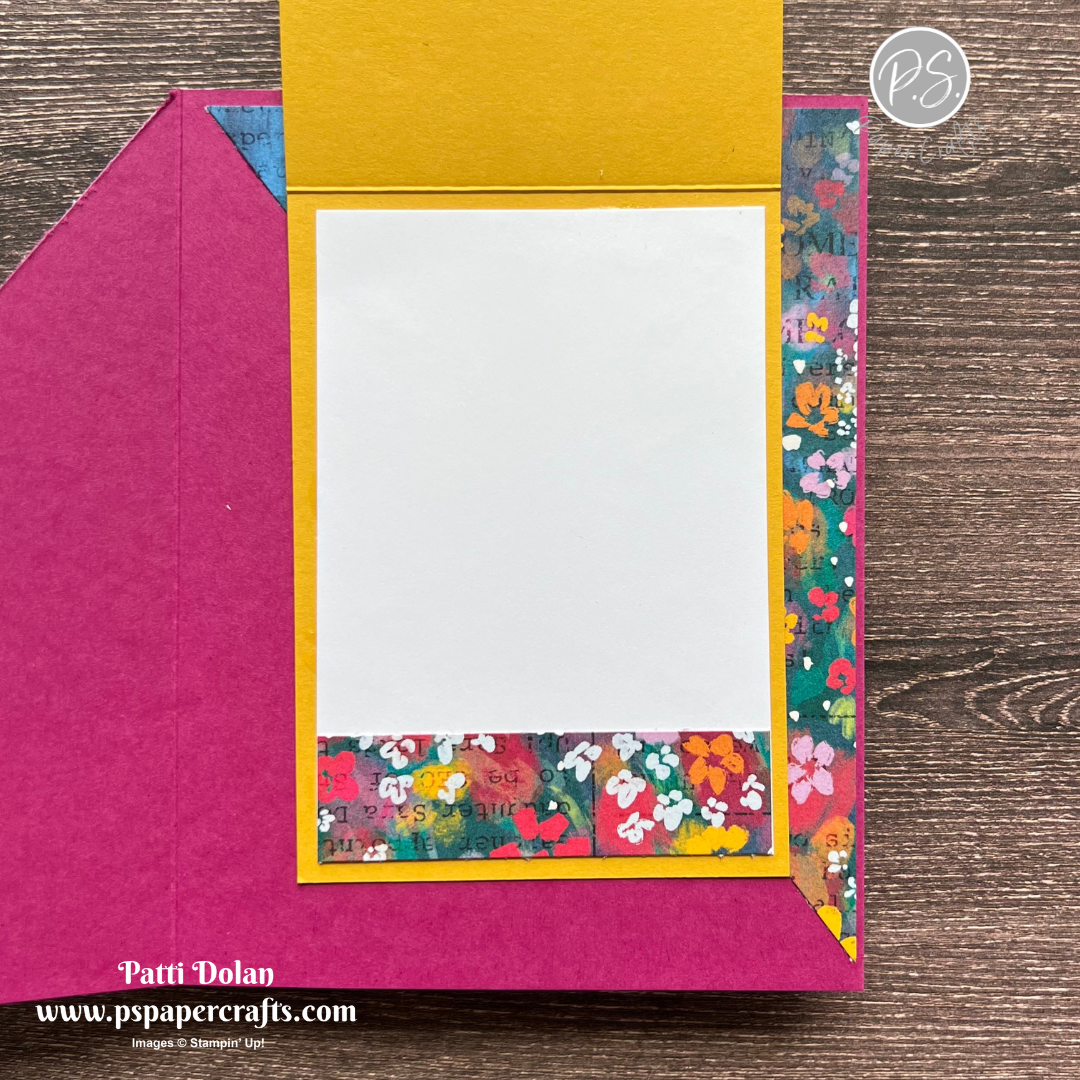
This first card was made using the Masterfully Made Designer Series Paper along with the Gorgeously Made Stamp Set.


I used the Fresh As A Daisy Designer Series Paper along with the Cheerful Daisies Stamp Set for this card.


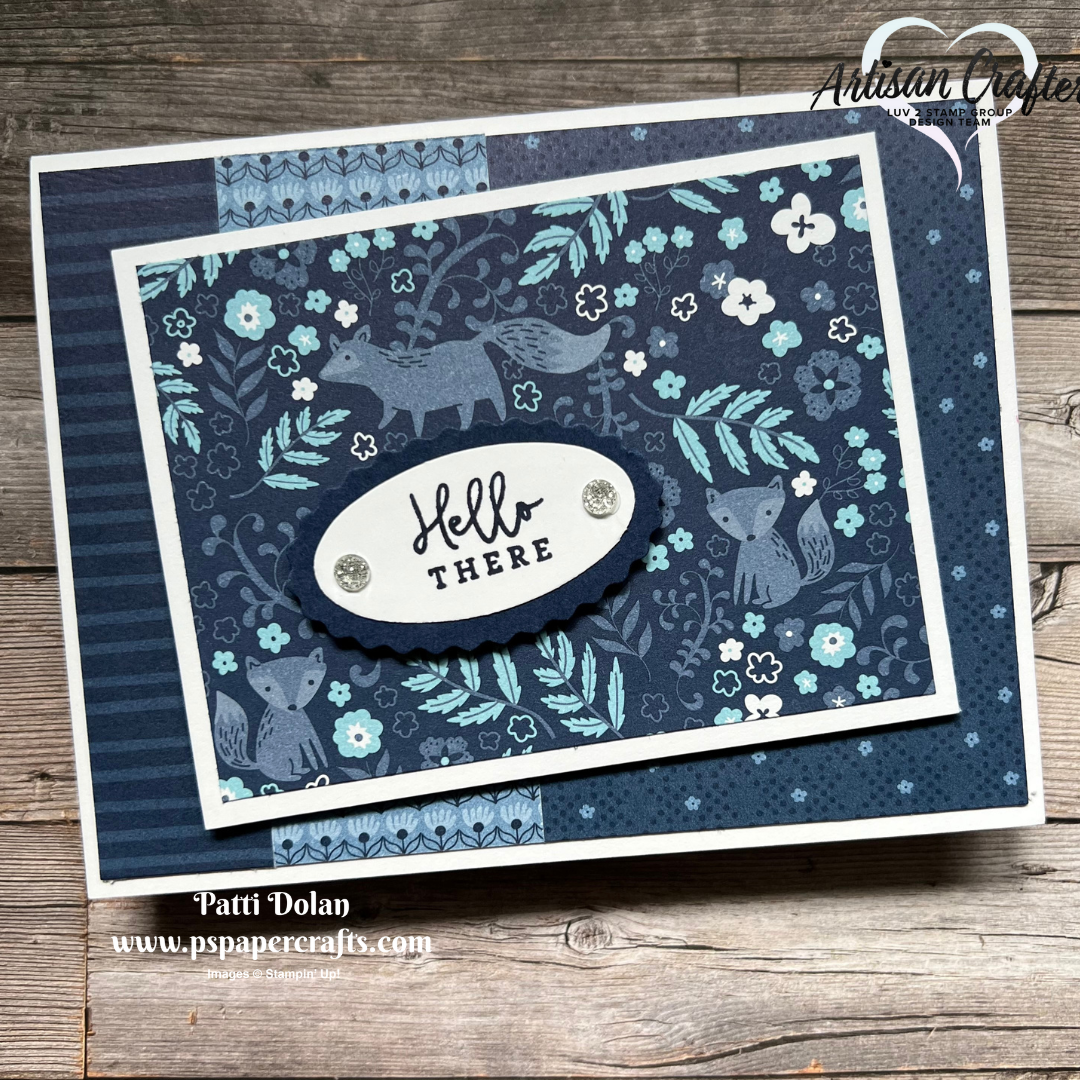
My final card was made using the Countryside Inn Designer Series Paper and the Seasonal Branches Stamp Set.


Supply List

You can click on the item to purchase it from my Online Store.

Pretty Friendship Card using Happy Hedgehogs

It’s fun to use other stamps in a stamp set. This pretty tree and sweet bird is from the Happy Hedgehog Stamp Set. I made it for this week’s Color Combo.


The colors for this week are Balmy Blue, Boho Blue and Parakeet Party. This combo is from my monthly Inspiration Calendar. If you subscribe to my email list, you will receive my Inspiration Calendar each month.

Tips & Instructions

  • Boho Blue Card Base - 5 1/2 x 8 1/2, score at 4 1/4

  • Basic White Layer - 5 1/4 x 4

  • Boho Blue In Color Designer Series Paper - 5 1/8 x 3 7/8, adhere to white layer. Wrap white Baker’s Twine around layers 3 times and adhere to the back. Adhere layer to card base.

  • Basic White - 4 x 2 1/2 - stamp sentiment, tree and bird with Black Memento Ink. Color with Stampin’ Blends. I used Dark Boho Blue and Light Balmy Blue for the bird, Light Parakeet Party for the leaves, Light Balmy Blue for the open flowers with Dark Parakeet Party for the center and Dark Balmy Blue for the flower buds. Use Dark Pebbled Path for the trunk and Dark Parakeet Party for the grass. Use Dark Pumpkin Pie for the beak.

  • Adhere stamped layer to a 4 1/8 x 2 5/8 piece of Boho Blue and adhere that to a 4 1/4 x 2 3/4 piece of Basic White. Adhere to card with Dimensionals.

  • Tie bow with Baker’s Twine and adhere with a Glue Dot.


On the inside layer stamp tree and butterfly. Color with Stampin’ Blends. Color tree like the one on the front and use Dark Parakeet Party and Light Boho Blue for the butterfly.


This is a great combination of colors for this card. It’s very sweet and pretty.


Supply List

You can click on the item to purchase it from my Online Store.

Sketch Challenge - Enchanted Butterfly

Here’s my card for this week’s Splitcoaststampers Sketch Challenge. This was my first time using the doily dies and I thought it was perfect for this sketch.


This is the sketch and you can click on it to see the other projects posted for this week’s challenge.


Tips & Instructions

  • Thick Basic White Card Base - 5 1/2 x 8 1/2, score at 4 1/4

  • Berry Burst Layer - 4 x 3 1/2, adhere to left side of card base leaving a border around.

  • Masterfully Made Designer Series Paper - 4 x 1 3/4, adhere to right side of card base leaving a border around.

  • Lemon Lolly Strip - 4 x 1/2, emboss using the Stripes & Splatters 3D Embossing Folder. I ran it through the machine twice to get the full length embossed. Adhere over the seam.

  • Basic White - 4 x 4, adhere a 3 7/8 x 3 7/8 piece of Adhesive Sheet to the back. Cut doily using the Delightfully Doily Dies. Use the Take Your Pick Die Brush to get the pieces out of the doily. Remove the release paper from back and adhere to card front.

  • Cut a circle from a scrap of Basic White using the circle die from the Delightfully Doily Dies. Stamp sentiment with Black Memento Ink (from the Charming Sentiments Stamp Set). I inked up just the word “there” and stamped it, cleaned my stamp and then inked up the word “hey,” and stamped it. Adhere the circle to the center of the doily.

  • Stamp the butterfly on scrap of Basic White. The Enchanted Butterfly Stamp Set is a reversible stamp set. Ink the back side of the stamp with Lemon Lolly and stamp. Clean your stamp, flip it over and ink the detailed side with Black Memento Ink and stamp. Fussy cut the butterfly and adhere to the white circle with a Dimensional in the body so the wings can be free flowing. Bend the wings up a little.

  • Add some white Sparkle Gems to the card putting 2 small ones on the butterfly body.


On the inside layer add a 5 1/4 x 1/2 strip of the Masterfully Made Designer Series Paper.


Supply List

You can click on the item to purchase it from my Online Store.

Timeless Charm Pretty Pink Birthday Card

Isn’t this card so sweet. I love the Bubble Bath and Lemon Lime Twist colors together.


The Timeless Charm Bundle is a new Online Exclusive and has pretty floral images and dies. You can save 10% when you purchase it as a bundle.


Tips & Instructions

  • Thick Basic White Card Base

  • Delightfully Eclectic Designer Series Paper - 5 1/4 x 4

  • Wrap piece of Lemon Lime Twist Ribbon around the Designer Series Paper Layer and adhere to the back. Adhere layer to card base.

  • Cut 2nd from largest rectangle from Basic White using the Scalloped Contour Dies.

  • Stamp sentiment with Lemon Lime Twist Ink on the white rectangle.

  • Cut flower image from Lemon Lime Twist and a second one from Bubble Bath. Snip off the flowers from the Bubble Bath piece and adhere them to the Lemon Lime Twist Piece. Adhere to the card.

  • Tie a bow with the ribbon and adhere using a Glue Dot.

  • Add some Iridescent Pearls.


On the inside layer stamp sentiment with Bubble Bath Ink and floral pieces with Lemon Lime Twist Ink. I stamped the larger leafy image off on scrap first to get a lighter shade.


I love the details on the flower and leaves with the embossing that you get when you die cut them.


Supply List

You can click on the item to purchase it from my Online Store.

Sketch Saturday - Lazy Days

This week’s sketch was a real challenge for me….lot’s of pieces but I pulled it together using the Lazy Days Bundle and a piece of Fresh As A Daisy Designer Series Paper. I always use scrap paper to get my measurements figured out.


The sketch is from the weekly Atlantic Hearts Sketch Challenge.


Tips & Instructions

  • Azure Afternoon Card Base - 5 1/2 x 8 1/2, score at 4 1/4

  • Basic White Layer - 5 1/4 x 4, adhere to card base.

  • Parakeet Parade Banner - 3 3/4 x 1 1/4, banner one end

  • Fresh As A Daisy Designer Series Paper Layer (blue pattern) - 4 1/2 x 2 3/4

  • Basic White - 2 3/4 x 1/4, emboss using the Geometric Patterns Embossing Folder

  • Vellum Cardstock - cut using 3rd from largest circle from the Stylish Shapes Dies. Cut off the bottom.

  • Stamp rocking chair with Parakeet Party Ink on Basic White and cut with coordinating die.

  • Arrange pieces and adhere together and to card base. Use Dimensionals on the rocker, sticking to the vellum circle and put adhesive on the circle behind the chair so you don’t see the glue show through.

  • Stamp sentiments on 3/8 strip of Basic White with Azure Afternoon Ink and adhere using Dimensionals.

  • Add some Parakeet Party Pearls.


On the inside layer stamp hanging plant and barrel with plant with Black Memento Ink and color with Stampin’ Blends. I used Crumb Cake, Parakeet Party and Azure Afternoon.


Supply List

You can click on the item to purchase it from my Online Store.

Sweet Citrus - Thanks A Bunch

This was a fun card to make using my weekly color combo and the Sweet Citrus products. The stamp set has a coordinating embossing folder and dies, so cool.


The color combination from my Inspiration Calendar is Calypso Coral, Lemon Lolly and Petal Pink. I decided that citrus would be the perfect images for these colors. The Petal Pink really worked well for the grapefruit. You can get my Inspiration Calendar each month when you subscribe to my Email List.


Tips & Instructions

  • Thick Basic White Card Base - 5 1/2 x 8 1/2, score at 4 1/4

  • Inked Botanicals Designer Series Paper Layer - 5 x 3 3/4, wrap piece of Petal Pink Ribbon around the layer and adhere to the back. Adhere layer to card base.

  • Basic White - 2 pieces cut to 4 x 2 3/4. Cut one using the small frame from the Darling Details Dies. Stamp sentiment with Calypso Coral Ink on the white layer and adhere the frame to it. Adhere to card using Dimensionals.

  • Ink the citrus rinds with Lemon Lolly and Calypso Coral. There’s plenty of space between each fruit to ink them up. Stamp on Basic White. Ink up the fruit with Petal Pink and Calypso Coral Ink and stamp into the rinds..

  • Lay the die in the Embossing Folder and the stamped images, lining them up and cut with your Stampin’ Cut & Emboss Machine using just the base place and 3D Embossing Plate.

  • Adhere the pieces to the corner of the frame using Dimensionals on some of them.

  • Tie bow with ribbon and adhere with a Glue Dot.


On the inside layer stamp flowers with Calypso Coral Ink and the centers with Lemon Lolly Ink. Add two 4 x 1/8 strips of the Designer Series Paper.


Supply List

You can click on the item to purchase it from my Online Store.

Sketch Challenge - Dainty Details

Here’s my card for this week’s Splitcoaststampers Sketch Challenge using the Dainty Details Bundle. This bundle has lots of goodies, flowers, leaves, borders and frames.


This is the sketch I used. You can click on it to see the other projects posted for this week’s sketch challenge.


Tips & Instructions

  • Sweet Sorbet Card Base - 5 1/2 x 8 1/2, score at 4 1/4

  • Basic White Layer - 5 1/4 x 4, emboss with the crosshatch folder from the Basics 3D Embossing Folder. Adhere to card base.

  • Sweet Sorbet - 3 7/8 x 2 5/8, cut center using the small frame from the Darling Details Dies. Cut off the four corners at an angle. Adhere to card front.

  • Basic White - cut a second frame from the Darling Details Dies and use the center piece to lay into the frame.

  • Stamp sentiment with Sweet Sorbet on the white center piece and adhere inside the frame.

  • Stamp large flower with Sweet Sorbet and the smaller flower with Lemon Lolly stamping direct with the detailed image and stamping off on scrap first with the filler image. Cut with coordinating dies.

  • Stamp leaves with Garden Green stamping direct for the outline and veins and stamping off first on scrap for the filler image. Cut with coordinating die.

  • Cut floral outline pieces from Parakeet Party and Lemon Lolly. Cut small leaves from Parakeet Party.

  • Adhere the large flower with Dimensionals and then arrange and adhere the other floral pieces and leaves behind it.

  • Add 3 Sweet Sorbet Pearls.


On the inside layer stamp sentiment with Sweet Sorbet Ink. The inside sentiment is from the Charming Sentiments Stamp Set. Cut the floral piece from Lemon Lolly and adhere to bottom corner.


Supply List

You can click on the item to purchase it from my Online Store.

Fun Taco Fiesta Birthday Card

This is the first time I’m using the Taco Fiesta Stamp Set and it’s such a cute and fun set. Doesn’t it just make you smile?


The stamp set has all the makings of some fun Mexican food and adorable faces to add to them. The sentiments are a cute play on words.


Tips & Instructions

  • Poppy Parade Card Base - 4 1/4 x 11, score at 5 1/2 (top folding).

  • Delightfully Eclectic Designer Series Paper Layer - 5 1/4 x 4, adhere to card base.

  • Poppy Parade Strip - 4 x 3/4, emboss using the Geometric Patterns Embossing Folder and adhere to card front.

  • Stamp cactus, bowl of guacamole, avocado, sombrero and chips with Black Memento Ink on Basic White. Stamp faces as desired with Black Memento Ink. Color with Stampin’ Blends. I used Light and Dark Old Olive, Light Smokey Slate, Dark Poppy Parade and Light Wild Wheat.

  • Fussy cut the stamped images. I cut right up to the outline and then used a Basic Black Stampin’ Write marker to clean up any white that was showing. Just take the brush end of the marker and go around each piece to add a little black to the edge. Glue the hat to cactus and nachos to the dip.

  • Cut the largest rectangle from Basic White using the Nested Essentials Dies. Arrange the pieces you cut to determine placement for the sentiment and stamp sentiment with Crushed Curry Ink. Adhere the cut pieces using Dimensionals and Mini Dimensionals.

  • Adhere the rectangle piece to the card front with Dimensionals.

  • Add some Calypso Coral Pastel Adhesive-Backed Sequins. This color works well for this card.


On the inside layer stamp sentiment with Crushed Curry Ink and add some confetti with Poppy Parade Ink. Stamp the taco, dip and peppers with Black Memento Ink and color with Stampin’ Blends. Add the cute faces with Black Memento Ink if you want.


Supply List

You can click on the item to purchase it from my Online Store.

Sketch Saturday - Sea Turtle

This was a fun card to make for this week’s sketch challenge. The Sea Turtle Stamp Set is amazing. It’s a reversible set which means you can ink up and stamp both sides, the detailed and the background for a filler.


The sketch is from the weekly Atlantic Hearts Sketch Challenge. All the banners were cut from the Let’s Go Fishing Designer Series Paper.


Tips & Instructions

  • Thick Very Vanilla Card Base - 5 1/2 x 8 1/2, score at 4 1/4

  • Very Vanilla Layer - 5 1/2 x 4 1/4, emboss using the Raindrops Embossing Folder and adhere to the card base.

  • Mossy Meadow Layer - 4 1/4 x 2 1/4

  • Very Vanilla Layer - 4 x 2, stamp bubble image with Boho Blue, stamping off to get a lighter shade. Stamp to fill in the entire layer. Adhere layer to Mossy Green Layer.

  • Cut strips of the Let’s Go Fishing Designer Series Paper at 1/4, 1/2 and 3/5 by about 2. Punch one end using the Banners Pick A Punch (or with paper snips). Adhere across the bottom of the layers varying pattern, size and length. To adhere them I put a strip of Stampin’ Seal+ across the back of the layer and just line the banners across. Adhere layer with banners to card.

  • Stamp 2 small turtles and one large starfish on scraps of Very Vanilla. I used Mossy Meadow on the turtles stamping the detailed side directly first and then flip the stamp over and ink up the back. Stamp off twice on scrap paper and stamp to fill in the background. Stamp the Starfish with Wild Wheat Ink directly on the detailed side and then flip the stamp over and ink up the back and stamp off once than stamp over the starfish to fill it in.

  • Fussy cut the turtles and starfish and adhere to card using Dimensionals.

  • Stamp sentiment (from the Beautiful Balloons Stamp Set) with Mossy Meadow Ink on scrap of Very Vanilla and fussy cut around it. Adhere with Dimensionals.

  • Add some Boho Blue Dots.


This is a great masculine birthday card!


On the inside layer stamp some turtles, starfish and sand dollars using both sides of the stamp and stamping off like I did on the front. Stamp the sentiment with Mossy Meadow Ink.


Supply List

You can click on the item to purchase it from my Online Store.

Easy Bookbinding Fun Fold Cards

Bookbinding Fun Fold Cards are simple to make and fun to give. I’ve made them in the past but it’s always good to put a new twist on them with different papers and stamp sets.


Watch the video to see how to make this style card and then click the project sheet button below to get a pdf with instructions that you can print and save.

I have to apologize for being out of camera for some of the video. I’m in my new home and still unpacking and working out the kinks in my new setup.


I used the Fresh As A Daisy Designer Series Paper for this card. The sentiment is from the Quiet Meadow Stamp Set.


This card was made with the Bright & Beautiful Designer Series Paper and Beautiful Balloons Bundle. I love how bright and vibrant the colors are.


Supply List

You can click on the item to purchase it from my Online Store.

Earthen Textures Gratitude Card

Most of the cards I’ve seen using Earthen Textures Bundle have been very earthy but I decided to add some bright and soft pinks!


To make this card, I used the color combination from my Inspiration Calendar. These were tough colors to use together. Berry Burst and Bubble Bath work very well, but throw in and Wild Wheat and it gets tougher.

You can get my monthly Inspiration Calendar when you subscribe to my email list. I send it out at the beginning of each month.


Tips & Instructions

  • Thick Basic White Card Base - 5 1/2 x 8 1/2, score at 4 1/4

  • Wild Wheat Layer, cut using the largest die from the Countryside Corners Dies and adhere to card base.

  • Basic White Layer, cut using the 2nd from largest die from the Countryside Corners Dies and adhere to Wild Wheat layer.

  • Stamp vase with Bubble Bath Ink and cut with coordinating die. Cut vase design piece from Berry Burst, adhere to the vase and trim off excess.

  • Stamp the wheat with Wild Wheat Ink and branch with Bubble Bath Ink on Basic White and cut with coordinating Die. Cut branch with Berry Burst with die.

  • Adhere the 3 floral pieces to the back of the vase and adhere to white layer with Dimensionals.

  • Stamp sentiment with Wild Wheat Ink on 3/8 strip of Basic White. Cut banner at both ends and adhere to card using Dimensionals on one end and Liquid Glue on the end that will rest on the vase.

  • Add some Pastel Adhesive-Backed Sequins.


On the inside layer stamp vase with Berry Burst and wheat twice with Wild Wheat Ink. Masking Tip - cover the vase with a scrap of printer paper or Post-It Note when stamping the wheat so the stems don’t show.


Supply List

You can click on the item to purchase it from my Online Store.

Don't Miss Out!

Stampin’ Up! has some big things going on starting today!


  • Bonus Days begins and runs through July 31.  Earn $5 coupons with every $50 in orders.  Save the email you'll receive with the coupon code to redeem them in August.

  • New Online Exclusives have been added and they are amazing!  Check out the One Horse Open Sleigh Suite, the Designer Series Paper is beautiful and the Trucking Along Bundle is sure to be popular with the Truck Punch.

  • Stampin' Up updated their Clearance Rack.  Save up to 60% but hurry, when they're gone, they are gone!

  • 50% Off Paper Pumpkin Sale - Refills, past kits and ad ons - 48 hours only while they last.  This sale is 48 hours only - July 6-7. Note, these are for Paper Pumpkin Subscribers only.   

Sketch Challenge - Zany Zoo

I made this cute kid’s birthday card for this week’s Splitcoaststampers Sketch Challenge using the Zany Zoo Bundle along with the Zoo Crew Designer Series Paper.


Here’s the sketch I used. You can click on the sketch to see other projects posted for this week’s challenge.


Tips & Instructions

  • Basic Black Card Base - 5 1/2 x 8 1/2, score at 4 1/4

  • Basic White Layer - 5 1/4 x 4, adhere to the card base.

  • Zoo Crew Designer Series Paper - 3 x 4, cut pocket shape. (Tip, I created a template using a piece of scrap paper. I cut it to 3 x 4 and then folded it in half and cut off the bottom at an angle. Open it up and you have the pocket bottom) Lay template over your patterned paper and cut along the angles. Trim down to get the size you want.

  • Zoo Crew Designer Series Paper - 3 x 3/4, adhere to the top of the pocket. Adhere pocket to card base using Dimensionals. (Tip, put Dimensionals away from the edge so you can slip the animals and the ribbon behind.)

  • Fussy cut the animals and adhere behind the pocket. Stamp some notes with Black Memento Ink.

  • Cut 3 pieces of Lemon Lime Twist Ribbon and stick them together. I used Glue Dots. Adhere behind the pocket with Liquid Glue.

  • Cut 2 large flowers from Lemon Lime Twist and adhere to the pocket. Add Lemon Lime Twist Tinsel Gems to the centers.

  • Stamp sentiment on 1/2” strip of Basic White with Black Memento Ink and cut to size.


On the inside layer stamp sentiment, turtle and notes with Black Memento Ink. Color turtle shell with Lemon Lime Twist Stampin’ Blends Marker.


Supply List

You can click on the item to purchase it from my Online Store.

Elegant Timeless Arrangements - Thank You Card

The white leaves on the white background give this card such an elegant look and then there are the flowers and leaves with colors that pop.


This is such a fun bundle to use to create pretty sentiments with floral backgrounds. I’m using this bundle in my July Card Class To Go. There are lots of nice sentiments and you can use the floral and greenery backgrounds in any color and any combination you want.


Tips & Instructions

  • Thick Basic White Card Base - 5 1/2 x 8 1/2, score at 4 1/4

  • Basic White Layer - 5 1/2 x 4 1/4, cut using the leafy Gorgeous Garden Dies and adhere to card base using small dots of glue around the rim and behind the leaves.

  • Stamp the sentiment on a scrap of Basic White with Sweet Sorbet Ink and cut using one of the label dies in the Timeless Arrangements Dies.

  • Cut the floral and greenery pieces from scraps of Sweet Sorbet, Parakeet Party and Garden Green. Arrange and adhere behind the sentiment label and adhere to the card with Dimensionals.

  • Add some Sweet Sorbet Pearls.


The Gorgeous Garden Dies are amazing. The will cover a full card front and really make a statement. You don’t need to add much to finish off a pretty card.


On the inside stamp the sentiment from Sweet Sorbet Ink and the greenery images with Parakeet Party and Green Garden Inks.


Supply List

You can click on the item to purchase it from my Online Store.

Sketch Challenge - Darling Details

This week’s Splitcoaststampers Sketch Challenge was fun for me. When I saw the 3 circles, I knew I wanted to use flowers and then the swirly die from the Irresistible Blooms works so well for a vine with flowers.


Here’s the sketch. You can click on it to see other projects posted for this week’s challenge.


Tips & Instructions

  • Granny Apple Green Card Base - 5 1/2 x 8 1/2, score at 4 1/4

  • Basic White Layer - 5 1/4 x 4

  • Granny Apple Green - cut with swirly detailed die from the Irresistible Blooms Dies. Adhere to white layer and trim off overhang and adhere layer to card base.

  • Stamp 3 large flowers on Basic White with Gorgeous Grape Ink. Stamp the details directly first and then stamp the filler image stamping off first to get a lighter shade. Cut with coordinating Darling Details Die and adhere to the card with Dimensionals..

  • Stamp 4 small flowers with Gorgeous Grape Ink on Basic White and cut with coordinating die. Adhere to the swirly piece with Mini Dimensionals.

  • Stamp sentiment with Gorgeous Grape on 1/2” strip of Basic White and cut each end at an angle. Adhere to card with Dimensionals.

  • Add some Iridescent Pearls to small flower centers.


On the inside layer stamp one large flower and 3 small flowers with Gorgeous Grape Ink.


Supply List

You can click on the item to purchase it from my Online Store.

Nature's Prints meets Earthen Elegance

I paired the Nature’s Prints Stamp Set and Dies with the Earthen Elegance Designer Series Paper to make this card. These are a wonderful pairing, even the names go together.


This week’s color combination worked so well with these products. This combo is from my June Inspiration Calendar. It’s fun to pick some colors and then create from there.

Tips & Instructions

  • Pecan Pie Card Base - 5 1/2 x 8 1/2, score at 4 1/4

  • Basic White Layer - 5 1/4 x 4

  • Earthen Elegance Designer Series Paper - 5 1/8 x 3 7/8, adhere to white layer.

  • Wrap Crumb Cake Baker’s Twine around the layers 3 times and adhere to the back. Adhere layer to card base.

  • Stamp large greenery image on Basic White with Pretty Peacock Ink and cut with coordinating die.

  • Stamp medium greenery image on Basic White with Crumb Cake Ink two times and cut each with coordinating die.

  • Die cut 2 sprigs from Pecan Pie and 3 small sprigs from Pretty Peacock.

  • Arrange and adhere greenery pieces on card front.

  • Stamp sentiment on scrap of Basic White with Pretty Peacock Ink and cut with label die. Adhere using Dimensionals.

  • Tie bow with 3 strands of Baker’s Twine and adhere with a Glue Dot.

  • Add some Pretty Peacock Adhesive-Backed Tinsel Gems.


On the inside layer stamp large greenery image with Pretty Peacock Ink, stamp a second and third time without re-inking.


Supply List

You can click on the item to purchase it from my Online Store.

Sketch Challenge - Countryside Inn

For this week’s sketch challenge, I decided to use different patterns from the Countryside Inn Designer Series Paper. I just love this paper!


Here’s the sketch from the Splitcoaststampers Sketch Challenge. You can see the other projects for this challenge by clicking the sketch below.


The Countryside Inn Designer Series Paper is so charming with shades of blues and white. It’s inspired by fine china and wallpaper patterns and includes gorgeous florals, woodland animals, nature and ceramic designs. Best of all it’s on sale during the month of June and you can save 15%.


Tips & Instructions

  • Thick Basic White Card Base - 5 1/2 x 8 1/2, score at 4 1/4

  • Basic White Layer - 5 1/4 x 4

  • Countryside Inn Designer Series Paper pieces. Adhere the pieces to the white layer to cover it.

    • 4 x 1 (dark pattern)

    • 4 x 1 1/2 (light pattern

    • 4 x 2 3/4 (dark pattern)

  • Adhere layer to card base.

  • Basic White Small Layer - 4 1/4 x 3 1/4

  • Countryside Inn Designer Series Paper Layer - 4 x 3 (I cut it to include the cute foxes). Adhere to the white layer and adhere to card at an angle using a Foam Sheet or Dimensionals.

  • Stamp sentiment with Night Of Navy Ink on scrap of Basic White and punch with the Double Oval Punch.

  • Punch scrap of Night Of Navy with the scalloped oval and adhere behind the stamped oval. Adhere to card with Foam Sheet or Dimensionals.

  • Add some Adhesive-Backed Sparkle Gems.


Adhere a 5 1/4 x 1 strip of the Designer Series Paper to the inside layer making sure you cut a piece to include the foxes.


Supply List

You can click on the item to purchase it from my Online Store.

Cute Cards from the Zoo Crew Tutorial Bundle

The Zoo Crew Suite Collection has the most fun images! You can stamp and cut with coordinating dies or cut the images from the Designer Series Paper with the dies. We used this suite for this month’s Simple Suite Stampers Tutorial Bundle.


Watch the video to see how to make 2 of the cards from the Tutorial. The Pool Party along with Basic Black are great colors together.


You can get this Tutorial Bundle for FREE when you purchase from my Online Store in June or you can purchase it directly from my website.

Click the picture below to get the the link for my Tutorials.


This first card has a cute koala bear juggling cupcakes; so fun for a kid’s birthday.


The inside has this sweet raccoon with some balloons!


This is one of my favorite animals in the suite. I thought it was an alpaca but when I read the products description I found that it’s actually a knitting llama!


The inside is very simple, just a scalloped border on the bottom and a sentiment.


Supply List

You can click on the item to purchase it from my Online Store.

Pretty Textured Florals Birthday Blooms Card

This Birthday Blooms card has such vibrant, bright colors with beautiful flowers from the Textured Floral Bundle. I love that it’s set against a classic gingham background.


The color combination I used is from my June Inspiration Calendar: Melon Mambo, Lemon Lime Twist and Blueberry Bushel, a perfect combination.

Tips & Instructions

  • Blueberry Bushel Card Base - 5 1/2 x 8 1/2, score at 4 1/4

  • Basic White Layer - 5 1/4 x 4

  • Glorious Gingham Designer Series Paper (Blueberry Bushel) Layer - 5 1/8 x 3 7/8, adhere to the white layer and then adhere to the card base.

  • Basic White - cut using the largest rectangle from the Nested Essentials Dies and stamp sentiment with Blueberry Bushel Ink. Adhere to card with Dimensionals. Tip, put the Dimensionals in the center so you can slide the greenery behind it.

  • Stamp flowers with Melon Mambo Ink on Basic White and cut with coordinating dies.

  • Cut some greenery pieces from Lemon Lime Twist.

  • Adhere the greenery pieces behind the label and adhere the flowers to the label.

  • Add some Lemon Lime Twist Tinsel Gems.


On the inside stamp sentiment with Blueberry Bushel Ink. The sentiment is from the Cheerful Daisies Stamp Set but you can use any birthday sentiment. Stamp the leaves with Lemon Lime Twist and stamp a second time without re-inking.


Supply List

You can click on the item to purchase it from my Online Store.

Sketch Challenge - Sea Turtle

Here’s the card that I made for this week’s Splitcoaststampers Sketch Challenge using the Sea Turtle Stamp Set.


The sketch is pretty simple but I love simple! Click on the picture to see other cards posted for this week’s challenge.


This stamp set has amazing images and it’s a reversible. You can stamp with both sides of the stamp so you can stamp the background in one color and the detailed layer in a different color.


Tips & Instructions

  • Thick Basic White Card Base - 5 1/2 x 8 1/2, score at 4 1/4

  • Azure Afternoon Layer - 5 1/8 x 3 7/8

  • Basic White - 5 x 3 3/4, stamp the bubble image across the entire layer with Azure Afternoon, stamping off each time on a piece of scrap first to get a lighter color. Adhere to Azure Afternoon layer and then adhere to the card base.

  • On a piece of Basic White, ink the back of the large sea turtle with Crumb Cake Ink, stamping off first to get a lighter shade. Ink the front, detailed side of the stamp with Old Olive Ink and stamp over the Crumb Cake Image.

  • Fussy Cut the turtle and adhere to the card using Dimensionals.

  • Stamp sentiment (from the Gorgeously Made Stamp Set) with Old Olive Ink on a 1/2 strip of Basic White. Cut both ends at an angle and adhere to card using Dimensionals.

  • Add 3 white Sparkle Gems.


On the inside layer stamp the bubble image with Azure Afternoon, stamping off first to get a lighter shade. Stamp the small turtle with Crumb Cake and Old Olive (like you did on the front). Stamp 2 star fish with Crumb Cake Ink, inking the back and stamping off and then the front detailed image. Stamp some fish with Azure Afternoon Ink.


Supply List

You can click on the item to purchase it from my Online Store.