Beautiful Hello Card with Forever Greenery

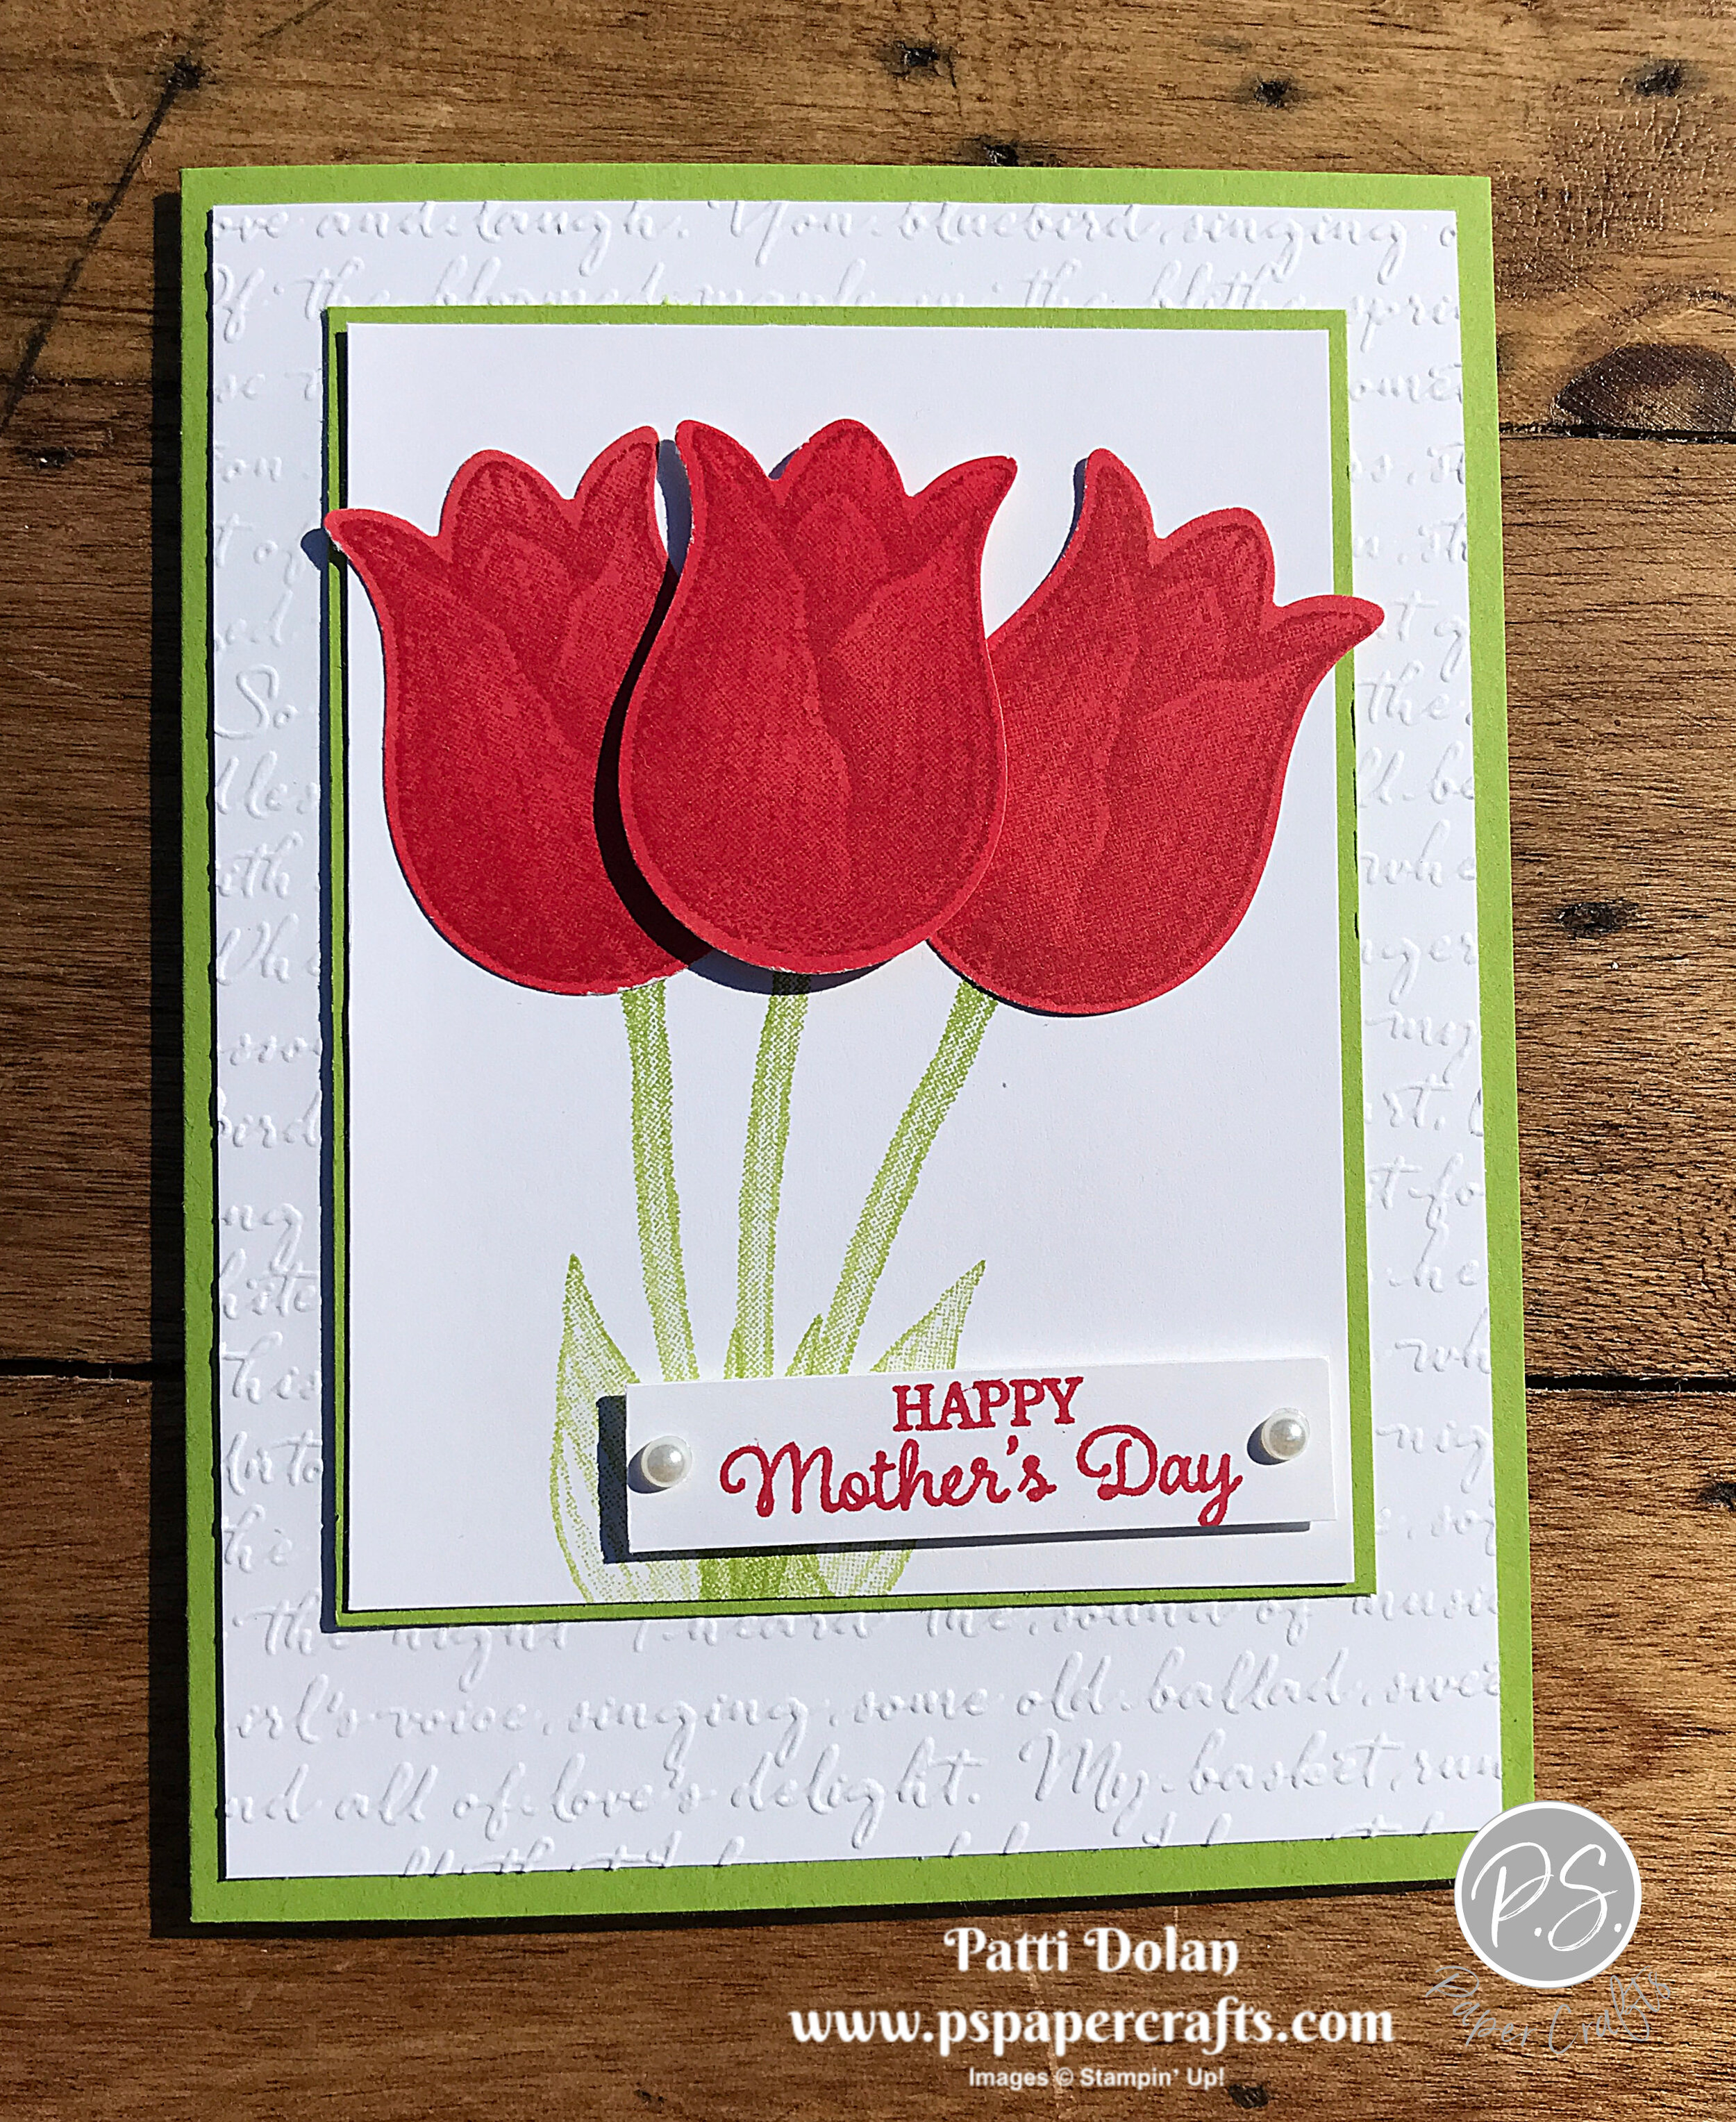
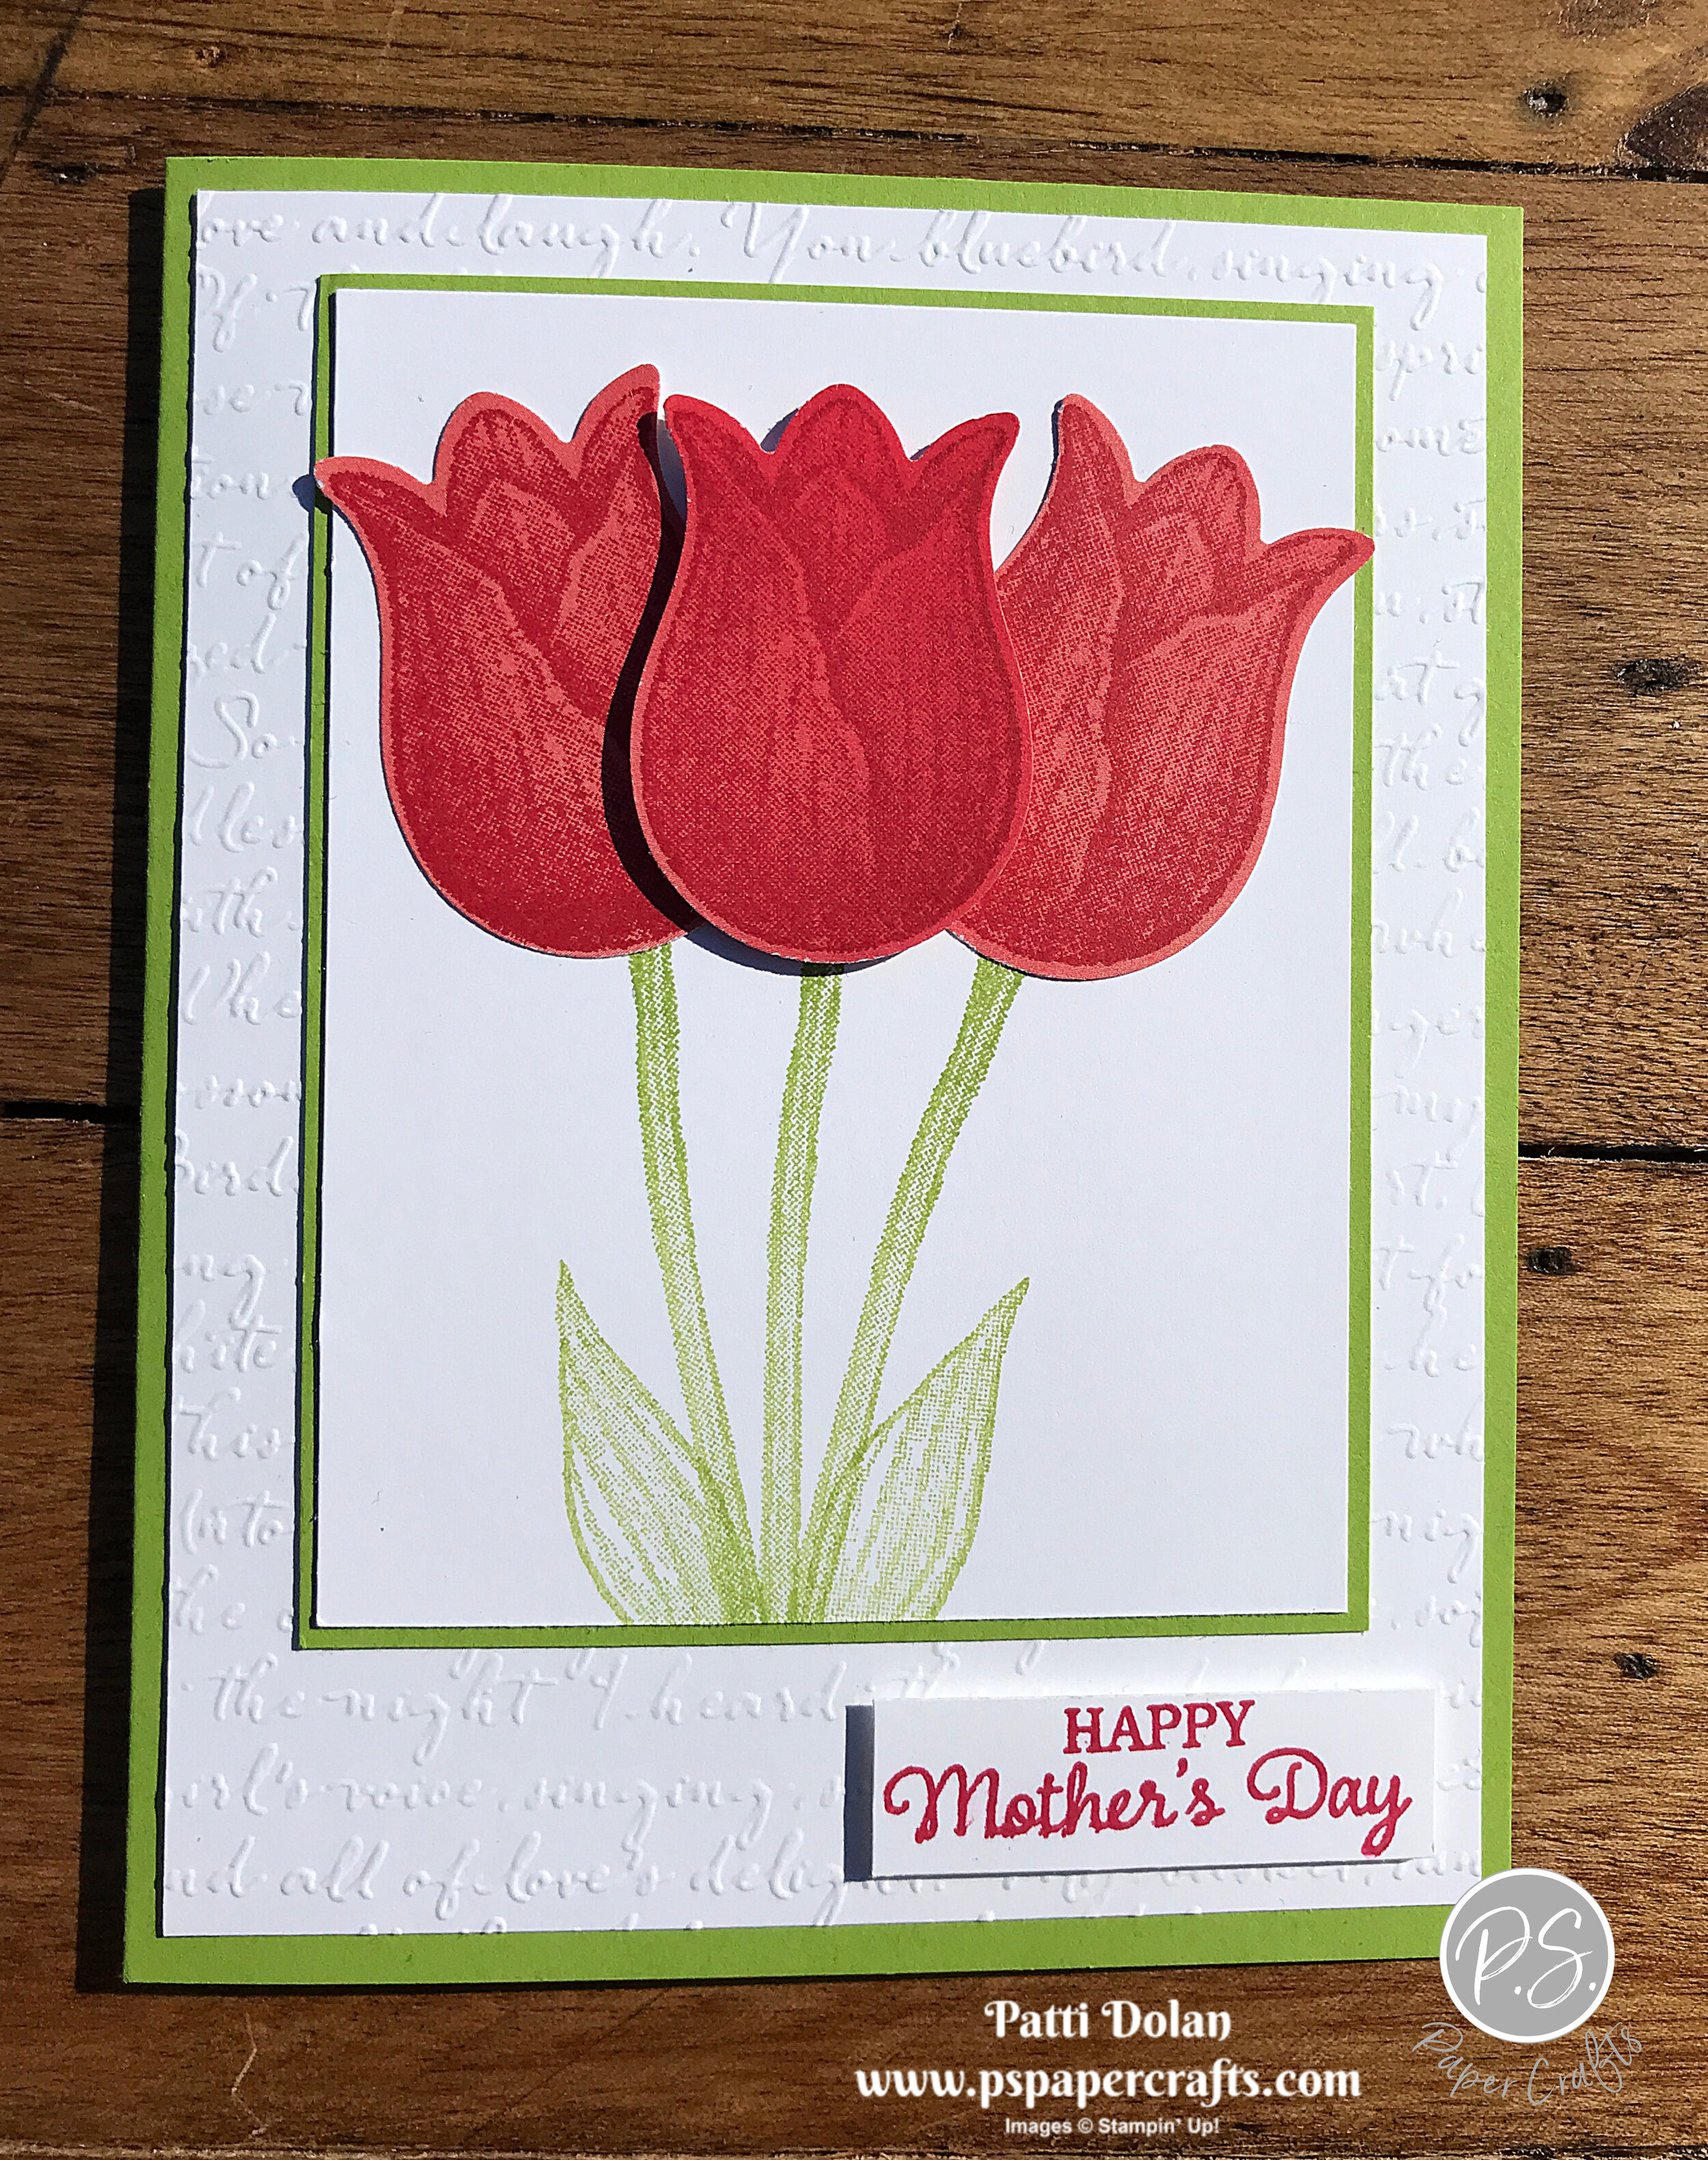
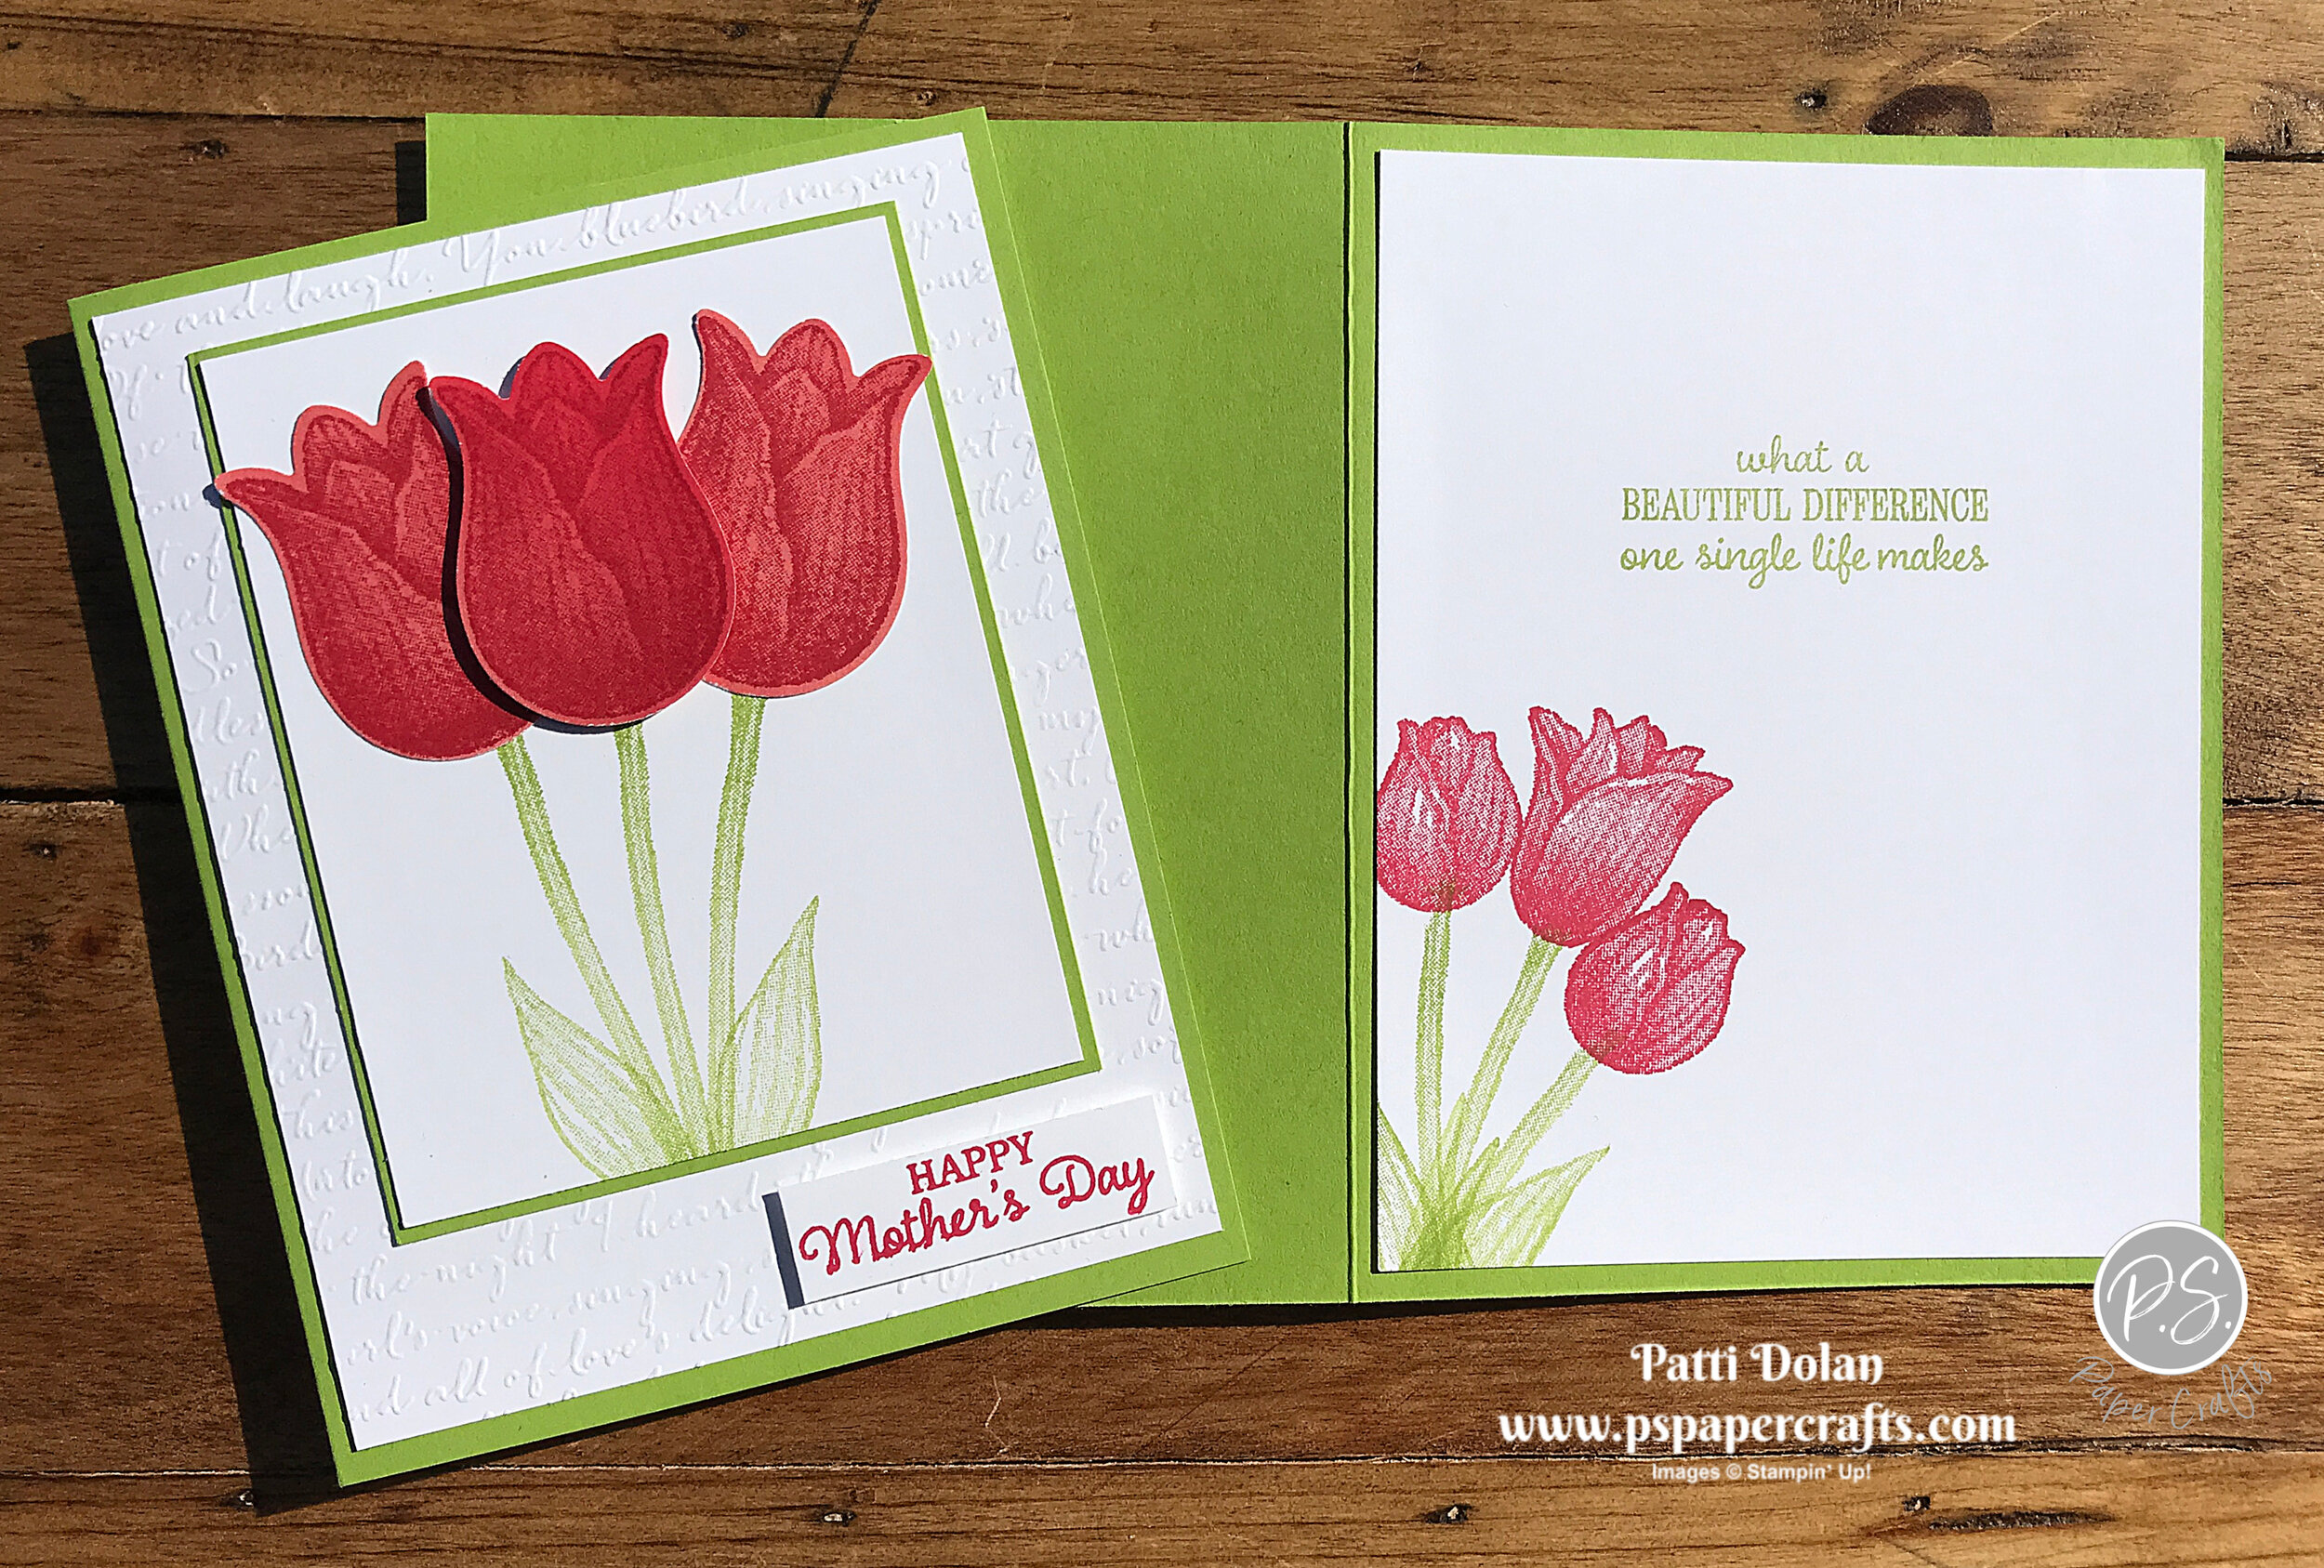
I decided to try using one of the Greenery Embossing Folders on this card. You get two in the package and they are 3 3/8” wide so you can create a nice layer on your card.

 
Hello Card with Forever Greenery Card2.jpg
 

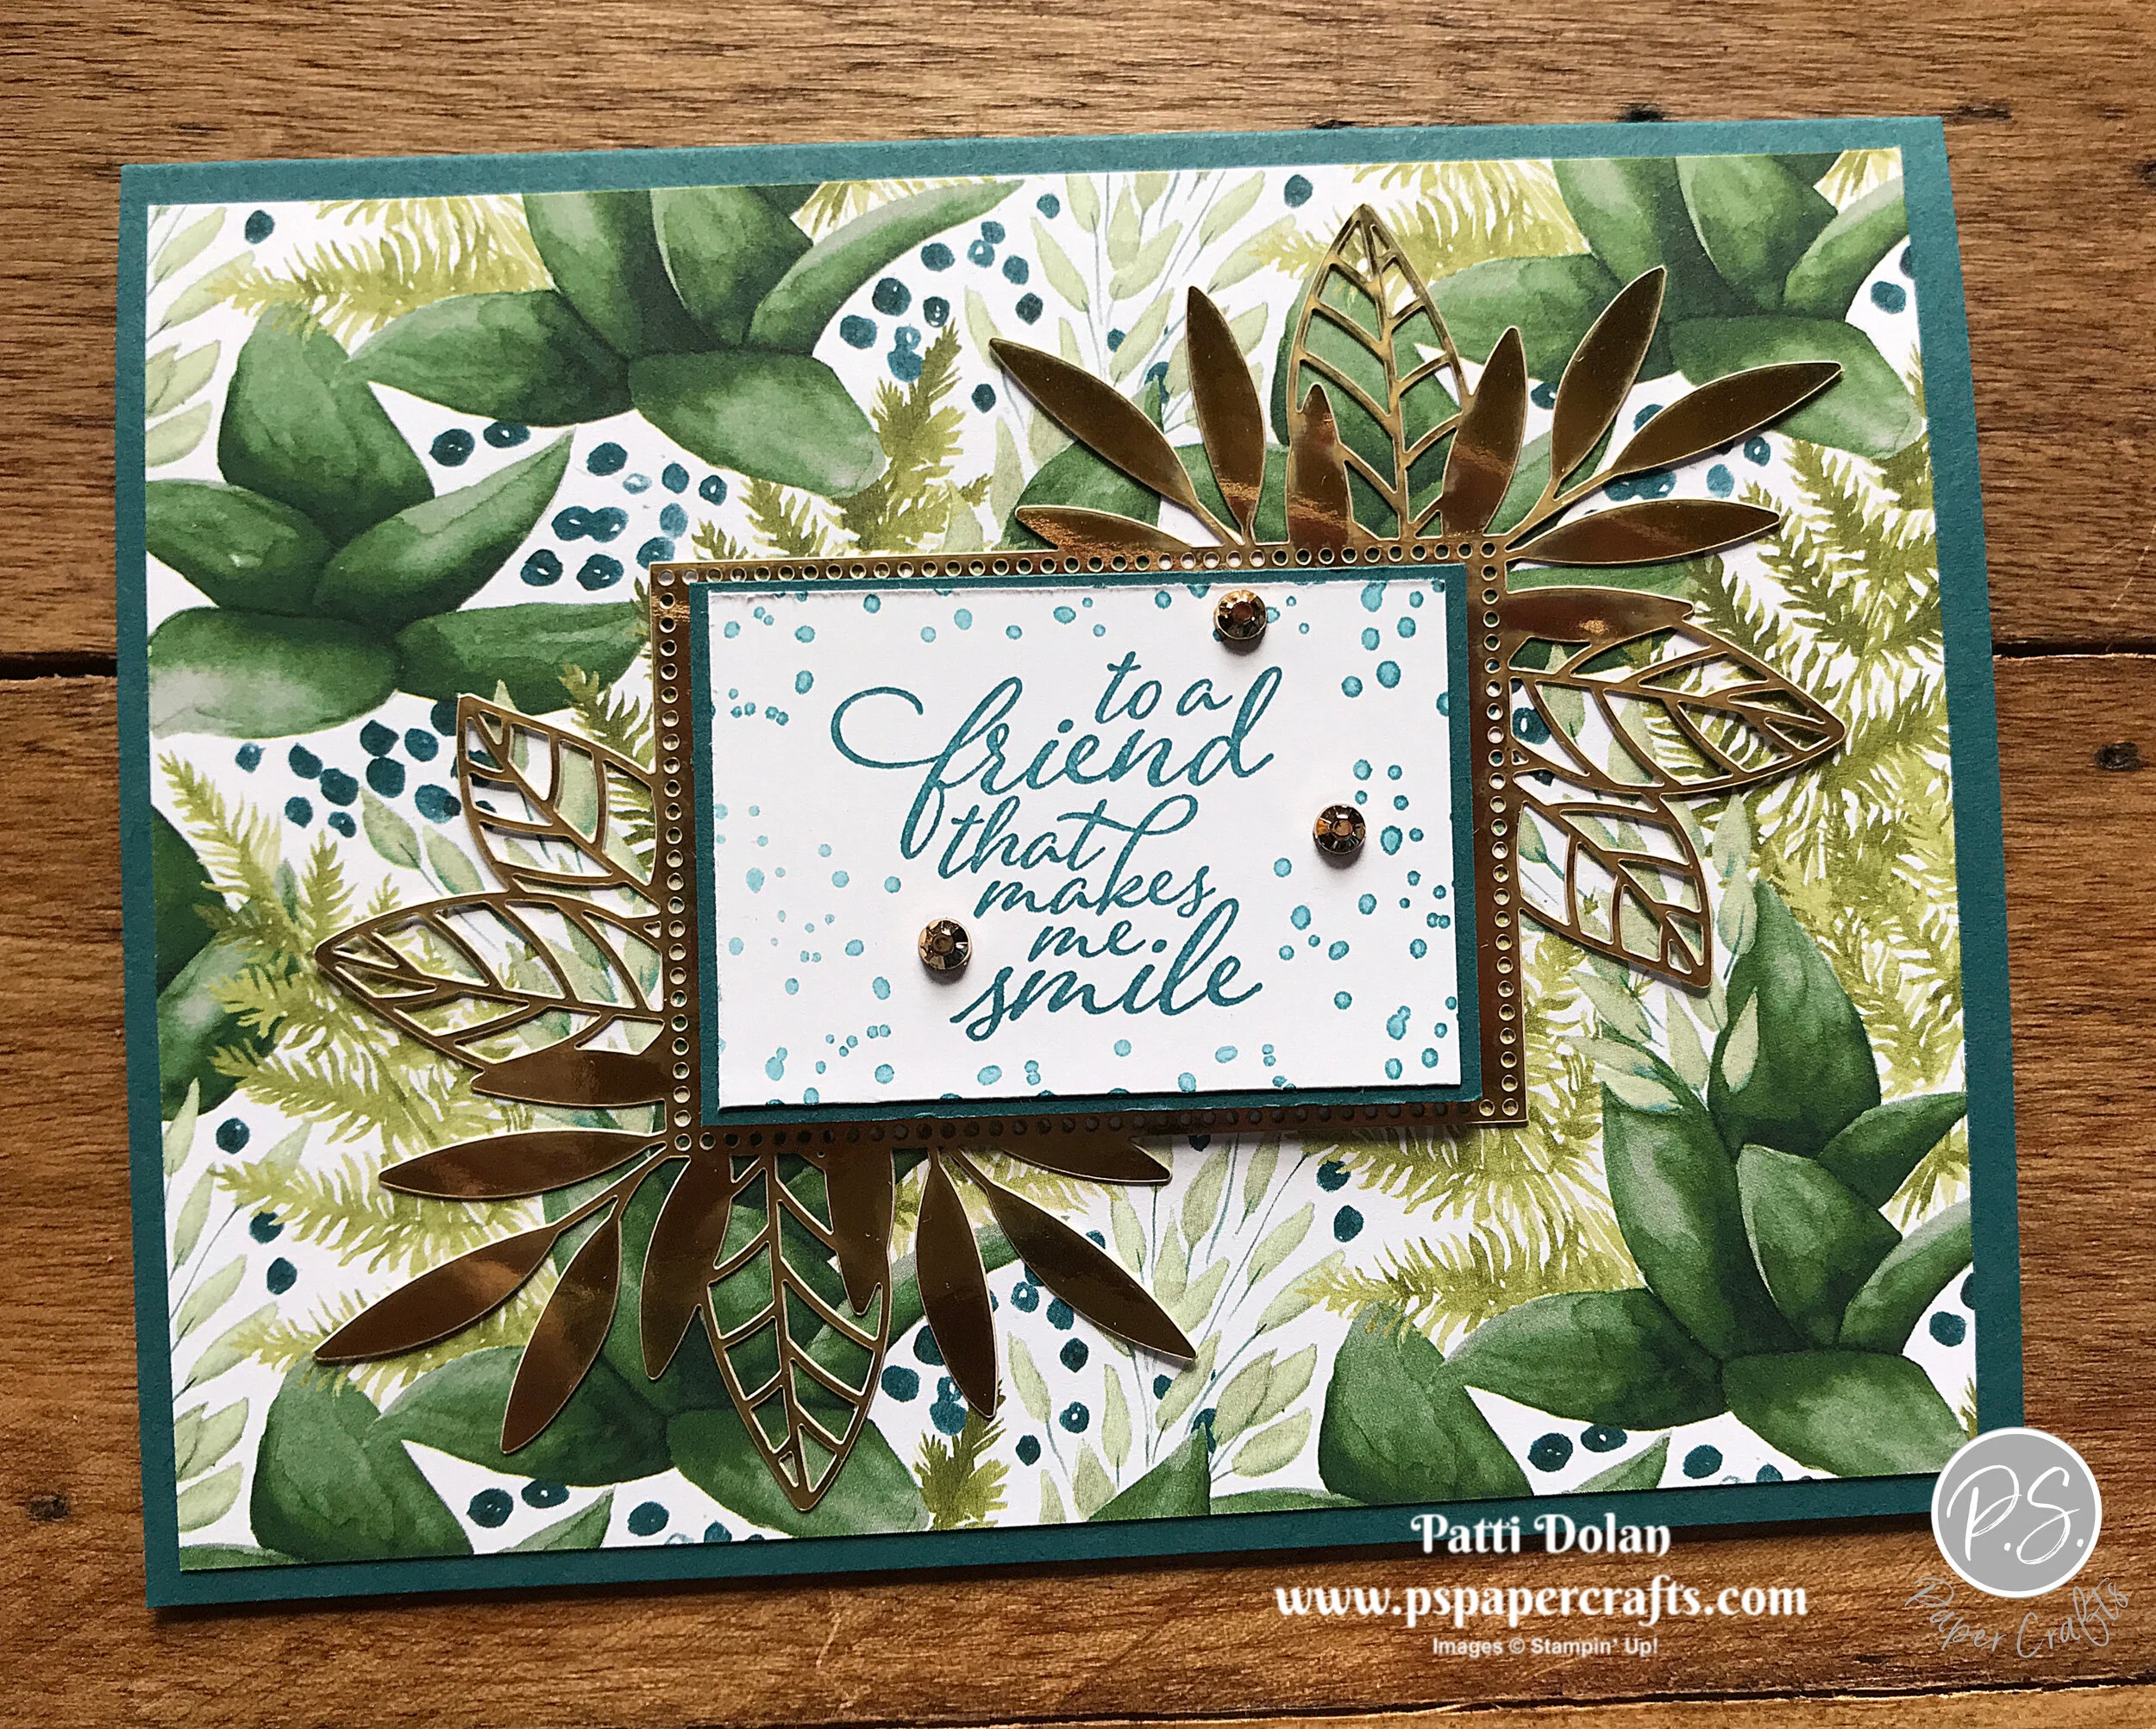
I am loving the Forever Greenery Suite. The stamp set is Distinktive which means they have photo-realistic style images. Distinktive stamps have a special texture that gives added depth and dimension in a single step.

 
Hello Card with Forever Greenery stamp.jpg
 

Tips & Instructions

  • Pretty Peacock Card Base - 5 1/2 x 8 1/2, score at 4 1/4

  • Forever Greenery Designer Series Paper - 5 3/8 x 4 1/8, adhere to card base

  • Just Jade Layer - 5 3/8 x 3 1/4, emboss with Greenery Embossing Folder and adhere to card

  • Stamp sentiment and small leaf image with Pretty Peacock Ink on scrap of Whisper White Cardstock and cut with larger circle die from Tasteful Label Dies

  • Adhere 2 foil pieces from the Forever Gold Laser-cut Specialty Papers to card and adhere sentiment label over them using Dimensionals

 
Hello Card with Forever Greenery card1.jpg
 

On the inside stamp leaf images at top and bottom corners with Pretty Peacock Ink

 
Hello Card with Forever Greenery inside.jpg
 

Supply List

Music From The Heart Birthday Card

This is a great card for a teen or young adult. It’s fun but not too fancy!!!

 
Music From The Heart Birthday Card2.jpg
 

Watch the video to see how I created the guitar with combining the treble clef and the guitar neck images.


Tips & Instructions

  • Night Of Navy Card Base - 5 1/2 x 8 1/2, score at 4 1/4

  • Crumb Cake Layer - 5 x 3 3/4, stamp notes randomly with Night Of Navy Ink

  • Wrap piece of Denim Ribbon around layer, adhere to back and then adhere to card base

  • Crumb Cake Focal Layer - 3 1/2 x 2 1/2, stamp guitar, sentiment and notes as shown in the video with Night Of Navy Ink (stamp off first when stamping the notes)

  • Night Of Navy Layer - 3 5/8 x 2 5/8, adhere to focal layer and then adhere to card using Dimensionals

  • Add 3 Rhinestones

 
Music From The Heart Birthday Card.jpg
 

On the inside stamp notes across the bottom and sentiment with Night Of Navy Ink.

 
Music From The Heart Birthday Card inside.jpg
 

Supply List

Masculine - You're A Classic Card

This is a great card for Father’s Day or a guy’s Birthday! I paired the Geared Up Garage Stamp Set with the World Of Good Designer Series Paper.

 
Masculine - You're A Classic Card2.jpg
 

The car image reminds me of the car that I learned how to drive a stick shift on. It was a red Datsun 240z. The dies coordinate so nicely with the stamps and there’s a bunch of gears you can cut out as well.

 
Masculine - You're A Classic Card stamp set.jpg
 

Tips & Instructions

  • Basic Black Card Base - 5 1/2 x 8 1/2, score at 4 1/4

  • World Of Good Specialty Designer Series Paper - 5 1/4 x 4, adhere to card base

  • Whisper White Cardstock - cut using the 4th largest rectangle from the Stitched Rectangle Dies

  • Stamp card with Black Memento Ink and cut with coordinating die

  • Color with Stampin Blends (Real Red and Smoky Slate) and add some Wink Of Stella to the headlights and windows

  • Stamp smoke across bottom of rectangle with Smoky Slate Ink, stamping off first to get lighter color.

  • Stamp sentiment with Real Red Ink

  • Adhere car using Dimentionals and adhere rectangle to card

  • Add 3 Gilded Gems

 
Masculine - You're A Classic Card.jpg
 

On the inside stamp sentiment with Real Red Ink. Stamp Smoke across bottom with Smoky Slate Ink, stamping off first.

 
Masculine - You're A Classic Card inside.jpg
 

Supply List

Sketch Saturday - Timeless Tropical

Here’s the card I made for this week’s sketch challenge. It’s a great masculine card. I love these trees, there’s something about them that makes me happy!

 
Sketch Saturday - Timeless Tropical Card1.jpg
 

The sketch is another CAS(E) This Sketch Challenge from Splitcoastampers. This is an easy one.

 
Screen Shot 2020-05-23 at 11.44.45 AM.png
 

I’m glad this stamp set and matching dies will carry over to the new Annual Catalog but the Tropical Oasis Designer Series Paper will retire and is only available until June 2 or while supplies last.

 
Sketch Saturday - Timeless Tropical Bundle.jpg
 

Tips & Instructions

  • Early Espresso Card Base - 5 1/2 x 8 1/2, score at 4 1/4

  • Tropical Oasis Designer Series Layer - 5 x 3 3/4, adhere to card base as shown on card

  • Tropical Oasis Designer Series Paper strip - 3 7/8 x 1, adhere to card

  • Stamp sentiment with Early Espresso Ink on 3/4 x 2 1/4 piece of Whisper White Cardstock and adhere to card using Dimensionals.

  • Color Palm Tree Stamp with Stampin’ Write Markers (DO NOT USE STAMPIN’ BLENDS) I used Early Espresso for the trunk and Old Olive & Pretty Peacock for the palms. I did the “Thumping Technique” on the palms by coloring with Old Olive and then thumping with Pretty Peacock. Breath on stamp and stamp on Whisper White Cardstock, then cut with coordinating die.

    Thumping Technique - using Stampin’ Write Markers color stamp with lighter shade and then bounce marker on stamp with darker shades to get a variation of color. Breath on stamp and then stamp on cardstock.
    (Note: you can use whatever browns and greens you want to color the palm trees.)

  • Adhere trees with Dimensionals, cutting small pieces of the Dimensionals for the trunks and adhere to card

  • Add 3 large Gilded Gems

 
Sketch Saturday - Timeless Tropical Card2.jpg
 

On the inside stamp sentiment with Early Espresso Ink. Color the pineapple with Stampin’ Write Markers. I used Mango Melody for the bottom and Old Olive for the leaves.

 
Sketch Saturday - Timeless Tropical Inside (1).jpg
 

Supply List

In Good Taste - You Are So Special

I CASEd (Copy And Share Everything) this card from the new Annual Catalog and changed it up a bit. I love this new In Good Taste Designer Series Paper. It has beautiful wood and tile designs.

 
In Good Taste - You Are So Special card2.jpg
 

Watch the video below to see all the papers in the In Good Taste Designer Series Paper package. I’ll also show you how I colored the flowers using a Rococo Rose Stamp Pad, a Clear Block and a Blender Pen.


The Tasteful Touches Stamp Set is so pretty with such delicate images and beautiful sentiments.

 
In Good Taste - You Are So Special Stamp Set.jpg
 

Tips & Instructions

  • Basic Black Card Base - 5 1/2 x 8 1/2, score at 4 1/4

  • In Good Taste Designer Series Paper layer - 5 1/4 x 4, adhere to card base

  • Basic Black Strip - 4 1/4 x 1 1/4

  • Lay the Basic Black Strip on card to determine placement and stamp the greenery image with Shaded Spruce Ink so it shows above and below the strip and adhere strip to card

  • Stamp 2 flowers on Whisper White Cardstock with Black Memento Ink and fussy cut flower

  • Press Clear Block onto Rococo Rose Ink Pad to pick up some ink and using Blender Pen color the flowers as shown in video

  • Add Wink Of Stella to center of the flowers and adhere to card

  • Stamp sentiment with Black Memento Ink on 2 1/4 x 1 piece of Whisper White Cardstock and adhere using Dimensionals

  • Tie bow with 2 strands of Bakers Twine and adhere with Mini Glue Dot

  • Add Pearls to card

 
In Good Taste - You Are So Special Card.jpg
 

Stamp greenery image on inside with Shaded Spruce Ink.

 
In Good Taste - You Are So Special inside.jpg
 

Supply List

Gorgeous Forever Greenery Friendship Card

Are you ready for some beautiful, new products? The Forever Greenery Suite in the new Annual Catalog fits the bill. I absolutely love this suite!

 
Forever Greenery - Card2.jpg
 

The Forever Fern Stamp Set has such pretty images and I love the fonts on the sentiments.

 
Forever Greenery - Stamp Set.jpg
 

The Forever Greenery Designer Series Paper is so rich and vibrant. Here’s a peek at what it looks like but the picture doesn’t do it justice.

 
Forever Greenery - DSP.jpg
 

The suite includes Forever Gold Laser-cut Specialty Paper which I used on this card for the background layer for the sentiment.

 
Forever Greenery - Laser Cut2.jpg
 
 
Forever Greenery - Laser Cut.jpg
 

Tips & Instructions

  • Pretty Peacock Card Base - 5 1/2 x 8 1/2, score at 4 1/4

  • Forever Greenery Designer Series Paper layer - 5 1/4 x 4, adhere to card base

  • Whisper White Scrap - 2 1/8 x 1 1/2, stamp sentiment with Pretty Peacock Ink and stamp dots around the sentiment with Pretty Peacock Ink, stamping off first

  • Adhere to 2 1/4 x 1 9/16 piece of Pretty Peacock Cardstock

  • Adhere sentiment to Gold Laser-cut piece and adhere to card with Dimensionals

  • Add 3 Gilded Gems to sentiment label

 
Forever Greenery - Card.jpg
 

On the inside stamp greenery images with Old Olive Ink and Pretty Peacock Ink.

 
Forever Greenery - inside.jpg
 

Supply List

Beautiful Moments Thinking Of You Card

Do you ever have an idea and get excited about it and then it doesn’t work out? Well, this idea turned out great…I love this card!

 
Beautiful Moments Thinking Of You Card2.jpg
 

In the video I’ll show you how to cut the Best Dressed Designer Series Paper with the Petal Labels Dies to create this beautiful frame for the sketch of the woman. The paper and dies are both on the retiring list.


I wasn’t sure about the Beautiful Moments Stamp Set and delayed in purchasing it but I really love the sketches and the sentiments. I’m glad it’s carrying over to the new catalog.

 
Beautiful Moments Thinking Of You Card Stamps.jpg
 

Tips & Instructions

  • Blackberry Bliss Card Base - 5 1/2 x 8 1/2, score at 4 1/4

  • Best Dressed Designer Series Paper Layer - 5 1/4 x 4, cut with large floral die

  • Whisper White Layer - 5 x 3 3/4, stamp woman in center with Blackberry Bliss Ink and adhere behind Designer Series Paper layer making sure she is centered with some room for the sentiment at the bottom

  • Adhere layer to card

  • Stamp sentiment with Old Olive Ink on Whisper White scrap and cut with Stitched Nested Label Die

  • Adhere sentiment to card with Dimensionals

  • Adhere Noble Peacock Rhinestone

 
Beautiful Moments Thinking Of You Card1.jpg
 

On the inside stamp small floral image across the bottom with Old Olive Ink.

 
Beautiful Moments Thinking Of You inside.jpg
 

Supply List

Pretty Sympathy Card

I made this sympathy card for a good friend of mine whose brother just passed away. This is such a hard time for loss with the pandemic and social distancing. I’m hoping this will help let her know that she is loved and cared for.

 
Pretty Sympathy Card2.jpg
 

I used the Forever Blossoms Bundle and the sentiment is from Here’s A Card Stamp Set. I just purchased this set and it has great sentiments.

 
Pretty Sympathy Card stamp sets.jpg
 

Tips & Instructions

  • Pool Party Card Base - 5 1/2 x 8 1/2, score at 4 1/4

  • Parisian Blossoms Specialty Designer Series Paper - 5 1/4 x 4 (ON SALE)

  • Whisper White scrap - stamp sentiment with Black Memento Ink and cut with 2nd largest oval Stitched Shapes Dies (cut with sentiment towards the right side to leave room for flowers)

  • Stamp 3 flowers with Black Memento Ink on scrap of Whisper White and cut with coordinating die

  • Color flowers with Dark and Light Rococo Rose Stampin’ Blends Markers

  • Cut leaves with dies from Old Olive Cardstock

  • Adhere flowers and leaves to oval

  • Wrap piece of Whisper White Flax Ribbon (ON SALE) around the Designer Series Paper and adhere to back; adhere layer to card base

  • Adhere oval with flowers to card using Dimensionals

  • Add 3 Rhinestones to center of flowers

 
Pretty Sympathy Card.jpg
 

On the inside stamp floral image and sentiment with Black Memento Ink.

 
Pretty Sympathy Card inside.jpg
 

Supply List

Sketch Saturday - Under My Umbrella

The Under My Umbrella Bundle is so cute. There is a punch that coordinates with the stamps to make it so easy to punch the umbrellas from some pretty papers.

 
Sketch Saturday - Under My Umbrella.jpg
 

The sketch I used is a CAS(E) This Sketch Challenge from Splitcoaststampers.

 
Screen Shot 2020-05-15 at 10.15.58 PM.png
 

Tips & Instructions

  • Daffodil Delight Card Base - 5 1/2 x 8 1/2, score at 4 1/4

  • Basic Black Layer - 5 1/4 x 4

  • Whisper White Layer - 5 1/8 x 3 7/8

  • Stamp largest image from the Artisan Textures Stamp Set using Daffodil Delight In, stamping off on scrap first. Repeat a little lower to make the image bigger.

  • Color the Hello part of the sentiment with a Basic Black Stampin’ Write Marker and stamp at the top part of the yellow image

  • Stamp closed umbrella with Black Memento Ink on a small piece of Best Dressed Designer Series Paper and punch with coordinating punch

  • Punch umbrella handle from a scrap of Basic Black Cardstock

  • Adhere umbrella and handle to Whisper White Layer

  • Stamp the 2 flower bunches using Black Memento Ink

  • Color the flowers using Lovely Lipstick and Light Blackberry Bliss Stampin’ Blends Markers and the leaves with Light Granny Apple Green Stampin’ Blends Marker

  • Fussy cut the flowers and adhere to top of umbrella using Mini Dimensionals

  • Adhere layers to the card and add some Rhinestones

 
Sketch Saturday - Under My Umbrella2.jpg
 

On the inside stamp the boots using Black Memento Ink and color with Light Daffodil Delight and Light Granny Apple Green Stampin’ Blends Markers. Stamp sentiment using Black Memento Ink.

 
Sketch Saturday - Under My Umbrella inside.jpg
 

Supply List

Mountain Air Father's Day Card

The Mountain Air Bundle is great for masculine cards and is just perfect for a Father’s Day Card!

 
Mountain Air Father's Day Card2.jpg
 

In the video I’ll show you the stamps which are reversible as well as the Majestic Mountain Dies that coordinate with the stamps. If you purchase as a bundle, you save 10%.


Tips & Instructions

  • Pretty Peacock Card Base - 5 1/2 x 8 1/2, score at 4 1/4

  • Whisper White Layer - 5 1/4 x 4

  • Whisper White piece - 5 1/4 wide - use to stamp and cut the trees and mountains

  • Stamp water using the backside of the tree stamp with Seaside Spray Ink, stamping off first (make sure you use just the bottom of the stamp so you get a solid image as shown in the video)

  • Stamp trees with Pretty Peacock just overlapping the water and cut with tree line die

  • Stamp and cut 2 sets of mountains, one with Smoky Slate Ink and one with Highland Heather Ink, stamping off first to get a lighter image

  • Adhere the trees and mountains together and then lay on top of the Whisper White Layer

  • Stamp clouds above the mountains with Smoky Slate Ink, stamping off first to get a lighter color

  • Adhere mountains to Whisper White Layer and adhere layer to card base

  • Punch Whisper White circle from 1 1/4 Circle Punch and Pretty Peacock scalloped circle from 1 3/8 Scalloped Circle Punch (on sale)

  • Stamp sentiment (from A Wish For Everything) with Pretty Peacock Ink on white circle and adhere to scalloped circle

  • Adhere sentiment to card with Dimensionals

 
Mountain Air Father's Day Card.jpg
 

On the inside stamp the sentiment with Smoky Slate Ink and the trees with Pretty Peacock Ink.

 
Mountain Air Father's Day Card inside.jpg
 

Supply List

Serene Thinking Of You Card

I used the Bokeh Dots Stamp for the starry night layer and added the bird silhouette to create this peaceful thinking of you card.

 
Serene Thinking Of You Card2.jpg
 

This Bokeh Dots Stamp Set is really great but it’s on the retiring list along with the Lilypad Lake Stamp Set and coordinating Lakeside Dies.

 
Serene Thinking Of You Card stamps.jpg
 

Tips & Instructions

  • Night Of Navy Card Base - 5 1/2 x 8 1/2, score at 4 1/4

  • Whisper White Layer - 5 1/4 x 4

  • Night Of Navy 4” - cut water with Lakeside Die, trim off top 3 waves and adhere to white layer

  • Stamp starry night image with Pacific Point Ink on scrap of Whisper White Cardstock, cut to size and adhere to white layer

  • Cut bird from Basic Black Cardstock and adhere to card using Dimensionals

  • Adhere layer to card base

  • Color the Thinking of you portion of the sentiment with Basic Black Stampin’ Write Marker and stamp on scrap of Whisper White Cardstock, then punch with Classic Label Punch

  • Add some Rhinestones to sentiment and to center of some of the stars

 
Serene Thinking Of You Card.jpg
 

On the inside stamp bird and sentiment with Black Memento Ink.

 
Serene Thinking Of You Card inside.jpg
 

Supply List

Fun Fold Bonanza Buddies Birthday Card

This is a really fun card and the way it sits up open can put a smile on the recipient’s face just by looking at it.

The Bonanza Buddies Stamp Set and Birthday Bonanza Designer Series Paper are on the retiring list. If you want them, you should order soon, they are available until June 2, 2020 or while supplies last.

 
Fun Fold Bonanza Buddy Birthday toucan.jpg
 

Once you have all the pieces cut out, it’s so easy to put together. I’ll show you how in the video below and then further down in the Blog Post you can see all the measurements.


Tips & Instructions

  • Bermuda Bay Card Base - 5 1/2 x 8 1/2, score at 4 1/4, measure 1 1/4 on both ends of the front flap and cut up to fold and then across fold as shown in the video)

  • Score front flap at 2 1/8 and fold

  • Daffodil Delight Layer - 4 1/8 x 2 7/8 and adhere to center of card base

  • Cut 2 pieces of Birthday Bonanza Designer Series Paper (candles) at 4 1/8 x 1 1/8 and adhere on either side of the Daffodil Delight Layer

  • Cut 2 pieces of Birthday Bonanza Designer Series Paper (confetti) at 2 7/8 x 2 and adhere to front of card

  • Cut one of the images from the Birthday Bonanza Designer Series Paper using 4th from smallest scalloped Layering Circles Dies and adhere to bottom part of front flap

  • Cut 2 pieces of Whisper White Cardstock at 2 7/8 x 2 adhere to inside of the flap, stamping inside sentiment first if wanted

  • Stamp Happy Birthday sentiment on piece of Whisper White Cardstock and punch with Label Me Fancy Punch

  • Adhere sentiment label using Dimensionals to Daffodil Delight layer

 
Fun Fold Bonanza Buddy Birthday koala.jpg
 

This is what the card looks like flat so you can easily put it in an envelope.

 
Fun Fold Bonanza Buddy Birthday toucan2.jpg
 

Here’s a look at the inside when it’s all opened up. You can put the sentiment on the Daffodil Delight Layer if you want or leave the sentiment off completely.

 
Fun Fold Bonanza Buddy Birthday inside.jpg
 

Supply List

Daisy Lane Birthday Card

I used the Noble Peacock Specialty Designer Series Paper for this card. It is so pretty with foil accents and it’s one of the retiring products that’s on sale. I cut the center with a Nested Labels Die to highlight the daisy.

 
Daisy Lane Birthday Card2.jpg
 

The Daisy Lane Stamp Set has a coordinating punch for the daisy. I stamped and punched 2 of them and adhered them together to have a fuller flower.

 
Daisy Lane Birthday Card stamp.jpg
 

Tips & Instructions

  • Old Olive Card Base - 4 1/4 x 11, score at 5 1/2 (top folding)

  • Noble Peacock Specialty Designer Series Paper - 5 1/4 x 4, cut center with Nested Label Die

  • Whisper White Layer - 5 x 3 3/4

  • Lay the Designer Series Paper Layer over Whisper White Layer to determine placement of flower and stamp stem image using Old Olive Ink

  • Stamp 2 daisies with Mango Melody Ink on Whisper White and punch with coordinating Medium Daisy Punch

  • Adhere daisies together by putting a little adhesive (I used liquid glue) on the center of one and offsetting the other and adhere to top of stem

  • Adhere Designer Series Paper to Whisper White Layer using Dimensionals and then adhere to card base

  • Stamp sentiment (from Itty Bitty Birthdays) with Old Olive Ink on scrap of Whisper White and punch with Classic Label Punch, adhere to card

  • Add Gold Faceted Gem or Perennial Essences Floral Center (on sale) to flower

 
Daisy Lane Birthday Card.jpg
 

On the inside stamp sentiments with Old Olive and Mango Melody Inks. Stamp greenery image with Old Olive, stamping multiple times without re-inking.

 
Daisy Lane Birthday Card inside.jpg
 

Supply List

Sketch Saturday - Rooted In Nature

Today’s card was made using the Rooted In Nature Stamp Set. I did a little bit of Thumping on the tree to get variation in the leaves. Thumping is just bouncing your markers on a stamp using different shades.

 
Sketch Saturday - Rooted In Nature Card1.jpg
 

The sketch is a CAS(E) This Sketch Challenge from Splitcoaststampers.

 
Screen Shot 2020-05-08 at 1.21.43 PM.png
 

This is a great stamp set to use for guy cards. This card could be used for a Father’s Day card.

 
Sketch Saturday - Rooted In Nature.jpg
 

Tips & Techniques

  • Mossy Meadow Card Base - 5 1/2 x 8 1/2, score at 4 1/4

  • Mossy Meadow Layer - 5 1/2 x 4 1/4

  • Very Vanilla Layer - 4 1/2 x 4 1/4

  • Ink large tree stamp with Pear Pizzaz Ink

  • Before stamping, use darker green Stampin’ Write Markers and “thump” (bounce) the markers on the leaves, then color the trunk and branches with Early Espresso Stampin’ Write Marker

  • Breath on the stamp to moisten and stamp on Very Vanilla Layer

  • Stamp sentiment with Early Espresso Ink

  • Adhere stamped layer to Mossy Meadow Layer

  • Wrap Braided Burlap Trim around top and bottom of layer using Tear & Tape

  • Adhere layer to card base

 
Sketch Saturday - Rooted In Nature Card2.jpg
 

On the inside stamp the leaf images with Pear Pizzaz Ink, stamping a second time to get a lighter shade.

 
Sketch Saturday - Rooted In Nature inside.jpg
 

Supply List

Wild About You Peek-a-boo Card

This is a fun Peek-A-Boo card using the Animal Outing Stamp Set. The cute Kangaroo or Rhino peek through from the inside!

 
Wild About You Peekaboo both.jpg
 

In the video I’ll show you all the steps to make this card. I used a template to make sure everything lined up correctly.


I used a sheet of the Dinoroar Designer Series Paper for the background layer which is on sale right now since it’s on the retirement list.

 
Wild About You Peekaboo Rhino.jpg
 

Tips & Instructions

  • Pretty Peacock Card Base - 5 1/2 x 8 1/2, score at 4 1/4, using template cut hole with Layering Circles Die

  • Dinoroar Designer Series Paper Layer - 5 3/8 x 4 1/8, using template cut hole with Layering Circles Die

  • Using template, draw circle lightly with pencil on 5 3/8 x 4 1/8 Whisper White inside layer and stamp image with Black Memento Ink using circle as guide

  • Erase circle and color image with Stampin’ Blends (I used Soft Suede, Light Crumb Cake and Smoky Slate for the kangaroo and Smoky Slate for the Rhino along with Dark Pineapple Punch and Dark Pool Party for the bird.)

  • Cut rings as shown on the video from Old Olive and Pretty Peacock

  • Adhere rings to Designer Series Paper Layer and then adhere layer to card making sure the circle lines up

  • Adhere inside layer making sure the image shows through the peek-a-boo hold

  • Stamp sentiment on 1 1/8 wide strip of Whisper White with Pretty Peacock Ink and punch one end with Banner Triple Punch

  • Punch one end of 1 1/4 wide strip of Pretty Peacock and adhere to Whisper White Strip leaving a small border

  • Cut strip to size you want and adhere to card

 
Wild About You Peekaboo Kangaroo.jpg
 

Supply List

Pressed Petals Mother's Day Card

Here’s one last Mother’s Day Card for the year. It was a quick card to make because I used the Pressed Petals Specialty Designer Series Paper. I CASEd (Copy And Share Everything) this from the catalog and changed it up a little bit.

 
Pressed Petals Mother's Day Card2.jpg
 

The Pressed Petals Specialty Designer Series Paper is rustic and so pretty. I just love it.

 
Pressed Petals DSP.png
 

Tips & Instructions

  • Mossy Meadow Card Base - 5 1/2 x 8 1/2, score at 4 1/4

  • Pressed Petals Specialty Designer Series Paper Layer - cut wreath piece to 5 3/8 x 4 1/8 and adhere to card base

  • Night Of Navy strip - 1 x 3 1/2 (after its punched with the Banner Triple Punch

  • Stamp sentiment (from Timeless Tulips) with Night Of Navy Ink on Whisper White scrap and punch with Pretty Label Punch

  • Adhere sentiment label to strip and then adhere to card using Dimensionals

  • Tie bow with Linen Thread, adhere to sentiment label and adhere Designer Element

 
Pressed Petals Mother's Day Card.jpg
 

Cut and adhere flower strip across bottom of the inside layer.

 
Pressed Petals Mother's Day Card inside.jpg
 

Supply List

Wishing I was in Quarantine With You

The Share Sunshine pdf has some great sentiments for what we’re all going through right now with the COVID-19 Pandemic.

 
Wishing I was in Quarantine With You both.jpg
 

You can purchase the Share Sunshine PDF Download and Stampin’ Up! will donate 100% of the proceeds to COVID-19 efforts. 

Product: Share Sunshine PDF Download. Buy it here!

Price: $12.00 USD

Dates: April 28 – June 2, 2020 or later; if the offer period extends beyond June 2.

ORGANIZATIONS RECEIVING PROCEEDS (you choose):

  • The World Health Organization’s COVID-Solidarity Response Fund

  • United Way Worldwide’s COVID-19 Community Response and Recovery Fund 


Watch my video to see how to make these cards. This is a very important time for card-makers to send cards to people, especially those that are alone.


The sentiments will print in a few different colors so you have options. I stamped the drink to coordinate with the sentiment colors.

 
Wishing I was in Quarantine With You Card.jpg
 

Tips & Instructions

  • Night Of Navy Card Base - 4 1/4 x 11, score at 5 1/2 (top folding)

  • Whisper White Layer - 4 7/8 x 3 5/8

  • See A Silhouette Designer Series Paper - cut with Stitched Rectangle Die

  • Adhere layers to card base

  • Cut Adirondack chair from Whisper White Cardstock using the Seasonal Layers Dies and adhere using Dimensionals (I cut small strips to fit on the chair)

  • Stamp drink with either Pool Party or Rich Razzleberry Ink, cut with coordinating die and adhere with Dimensional

  • Cut sentiment from Share Sunshine pdf using the Stitched Rectangle Dies and adhere using Dimensionals

 
Wishing I was in Quarantine With You2.jpg
 

On the inside stamp flowers with either Pool Party or Rich Razzleberry Ink. Cut inside sentiment from the Share Sunshine pdf using the Stitched Rectangle Dies and adhere to inside layer.

 
Wishing I was in Quarantine With You inside.jpg
 

Supply List

Beautiful Friendship Birthday Card

Wouldn’t you love to receive a birthday card like this? Gorgeous Grape is one of my favorite colors for floral cards.

 
Beautiful Friendship Birthday Card2.jpg
 

I love the Beautiful Friendship Stamp Set! The images and sentiments are so pretty!

 
Beautiful Friendship Birthday Card stamp.jpg
 

Tips & Instructions

  • Gorgeous Grape Card Base - 5 1/2 x 8 1/2, score at 4 1/4

  • Whisper White Layer - 5 1/2 x 3 1/4

  • Stamp flower images across top and bottom with Gorgeous Grape Ink (I stamped twice on top and twice on bottom) and stamp flower center with Crushed Curry Ink

  • Stamp flower sprig image with Mint Macaron Ink in white spaces

  • Punch sprigs with Sprig Punch from Old Olive Cardstock

  • Punch leaves with Leaf Punch from Granny Apple Green Cardstock

  • Cut oval from Whisper White Cardstock using Stitched Shapes Dies

  • Stamp flower sprig image with Mint Macaron Ink (stamping off first) and stamp sentiment with Gorgeous Grape Ink

  • Arrange sprigs and leaves on card and adhere

  • Adhere sentiment label using Dimensionals

 
Beautiful Friendship Birthday Card.jpg
 

On the inside layer stamp sentiment (from Bonanza Buddies) and flowers with Gorgeous Grape Ink. Stamp leaves with Granny Apple Green Ink.

 
Beautiful Friendship Birthday Card inside.jpg
 

Supply List

Sketch Saturday - Parisian Blossoms

Today’s card uses the beautiful Parisian Blossoms Specialty Designer Series Paper. I love the images and the champagne foil accents.

 
Sketch Saturday - Parisian Blossoms.jpg
 

The sketch is the Splitcoaststampers CAS(E) This Sketch Challenge and it was a challenge.

 
Screen Shot 2020-05-02 at 3.36.20 PM.png
 

Tips & Instructions

  • Basic Black Card Base - 5 1/2 x 8 1/2, score at 4 1/4

  • Parisian Blossoms Designer Series Paper - 5 3/8 x 4 1/8

  • Parisian Blossoms Designer Series Paper - cut 2 triangles (I played around with cutting the pieces with scrap paper until I got the sizes and shapes that I wanted and then used those as templates.

  • Adhere layers to card base

  • Cut small piece of Basic Black Cardstock and adhere Multipurpose Adhesive Sheet to it

  • Cut Miss You! sentiment using Well Written Dies and adhere to card

 
Sketch Saturday - Parisian Blossoms Card2.jpg
 

On the inside stamp floral image with Black Memento Ink. Color with Light Mossy Meadow and Light Petal Pink Stampin’ Blends.

 
Sketch Saturday - Parisian Blossoms inside.jpg
 

Supply List

Vibrant Tulip Mother's Day Card

I stamped these tulips with Real Red Ink on Peaceful Poppies Designer Series Paper to get this deep, vibrant look. Isn’t it pretty?

 
Vibrant Tulip Mother's Day Card2.jpg
 

In the video I’ll show you how I stamped and punched the tulips, embossed the background layer and put it all together to make a beautiful Mother’s Day Card.


Tips & Instructions

  • Granny Apple Green Card Base - 5 1/2 x 8 1/2, score at 4 1/4

  • Whisper White Layer - 5 1/4 x 4, emboss with Scripty 3D Embossing Folder

  • Granny Apple Green Layer - 4 1/8 x 3 1/4

  • Whisper White Layer 4 x 3 1/8

  • Stamp 3 large tulips on Peaceful Poppies Designer Series Paper and punch with coordinating Tulip Punch

  • Lay out the tulips on Whisper White Layer to determine position and stamp stems and leaves with Granny Apple Green Ink

  • Adhere 2 tulips with Liquid Glue and adhere the center tulip using Dimensionals

  • Adhere all layers to card base

  • Stamp sentiment on 1/2 strip of Whisper White with Real Red Ink and adhere to card with Dimensionals

  • Adhere Pearls to sentiment (optional)

 
Vibrant Tulip Mother's Day Card.jpg
 

On the inside stamp sentiment with Granny Apple Green Ink. Stamp stems and leaves with Granny Apple Green Ink and tulips with Real Red Ink.

 
Vibrant Tulip Mother's Day Card inside.jpg
 

Supply List