Beautiful Friendship Birthday Card

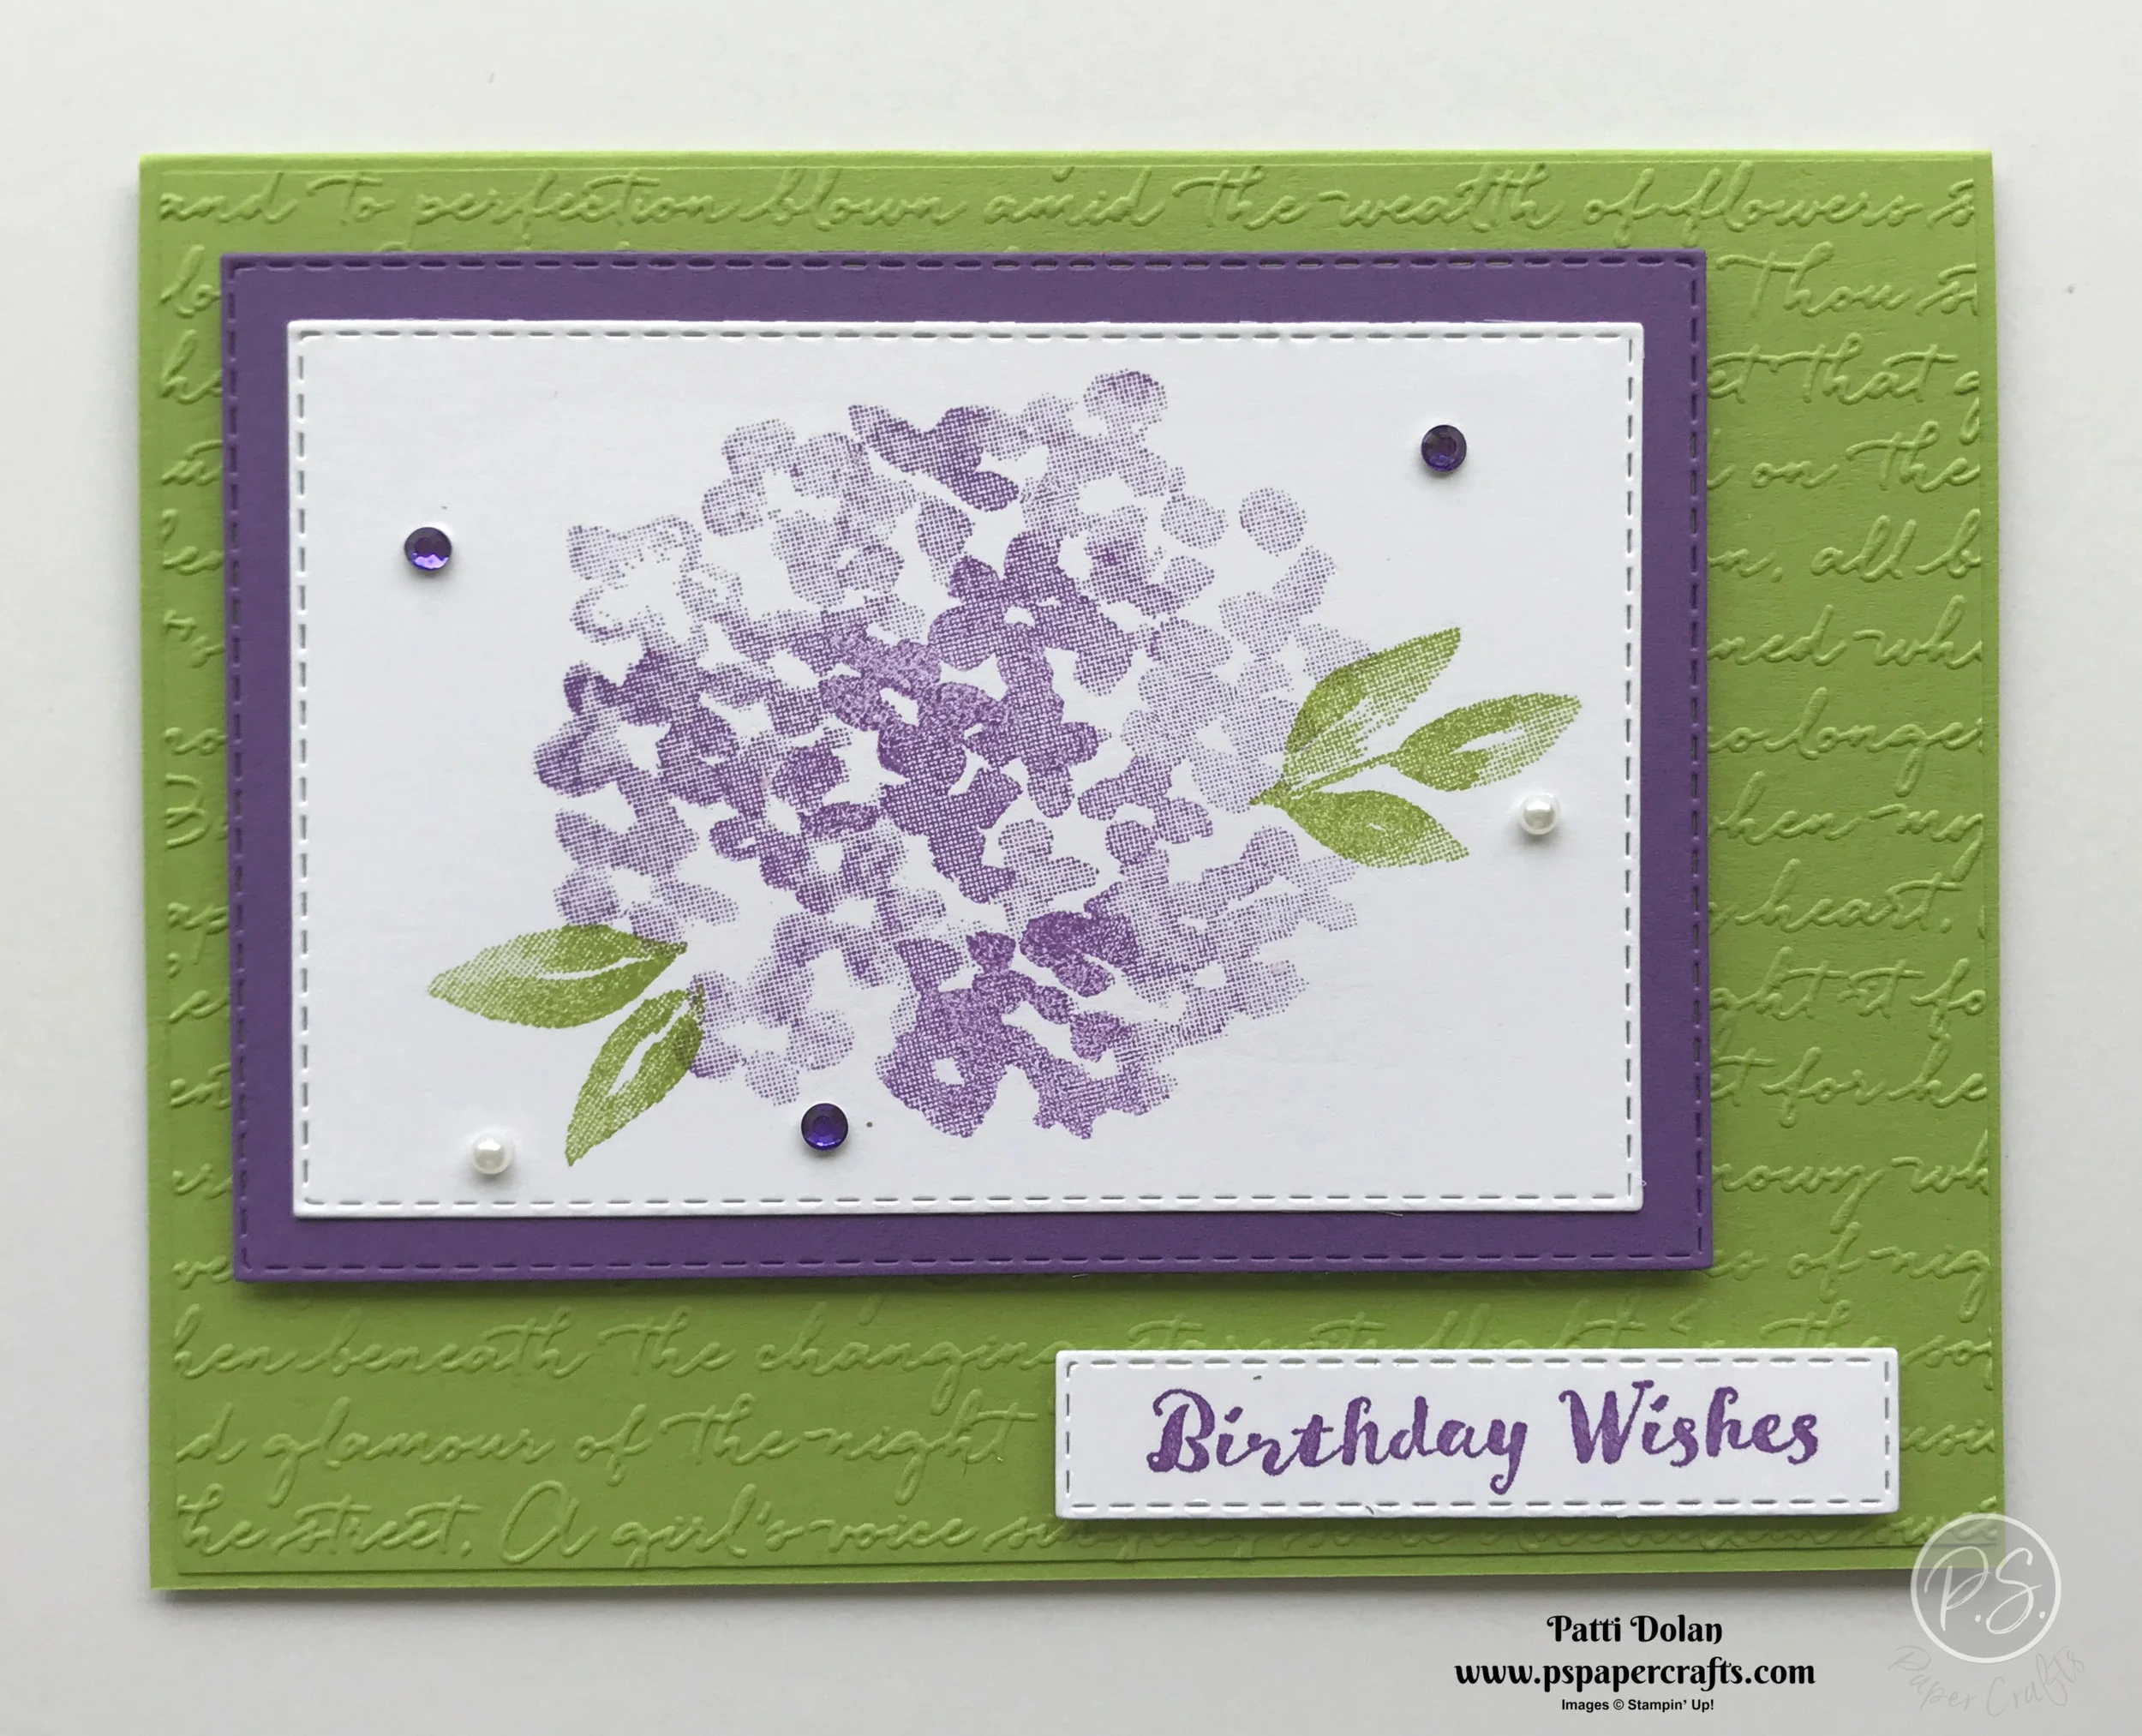
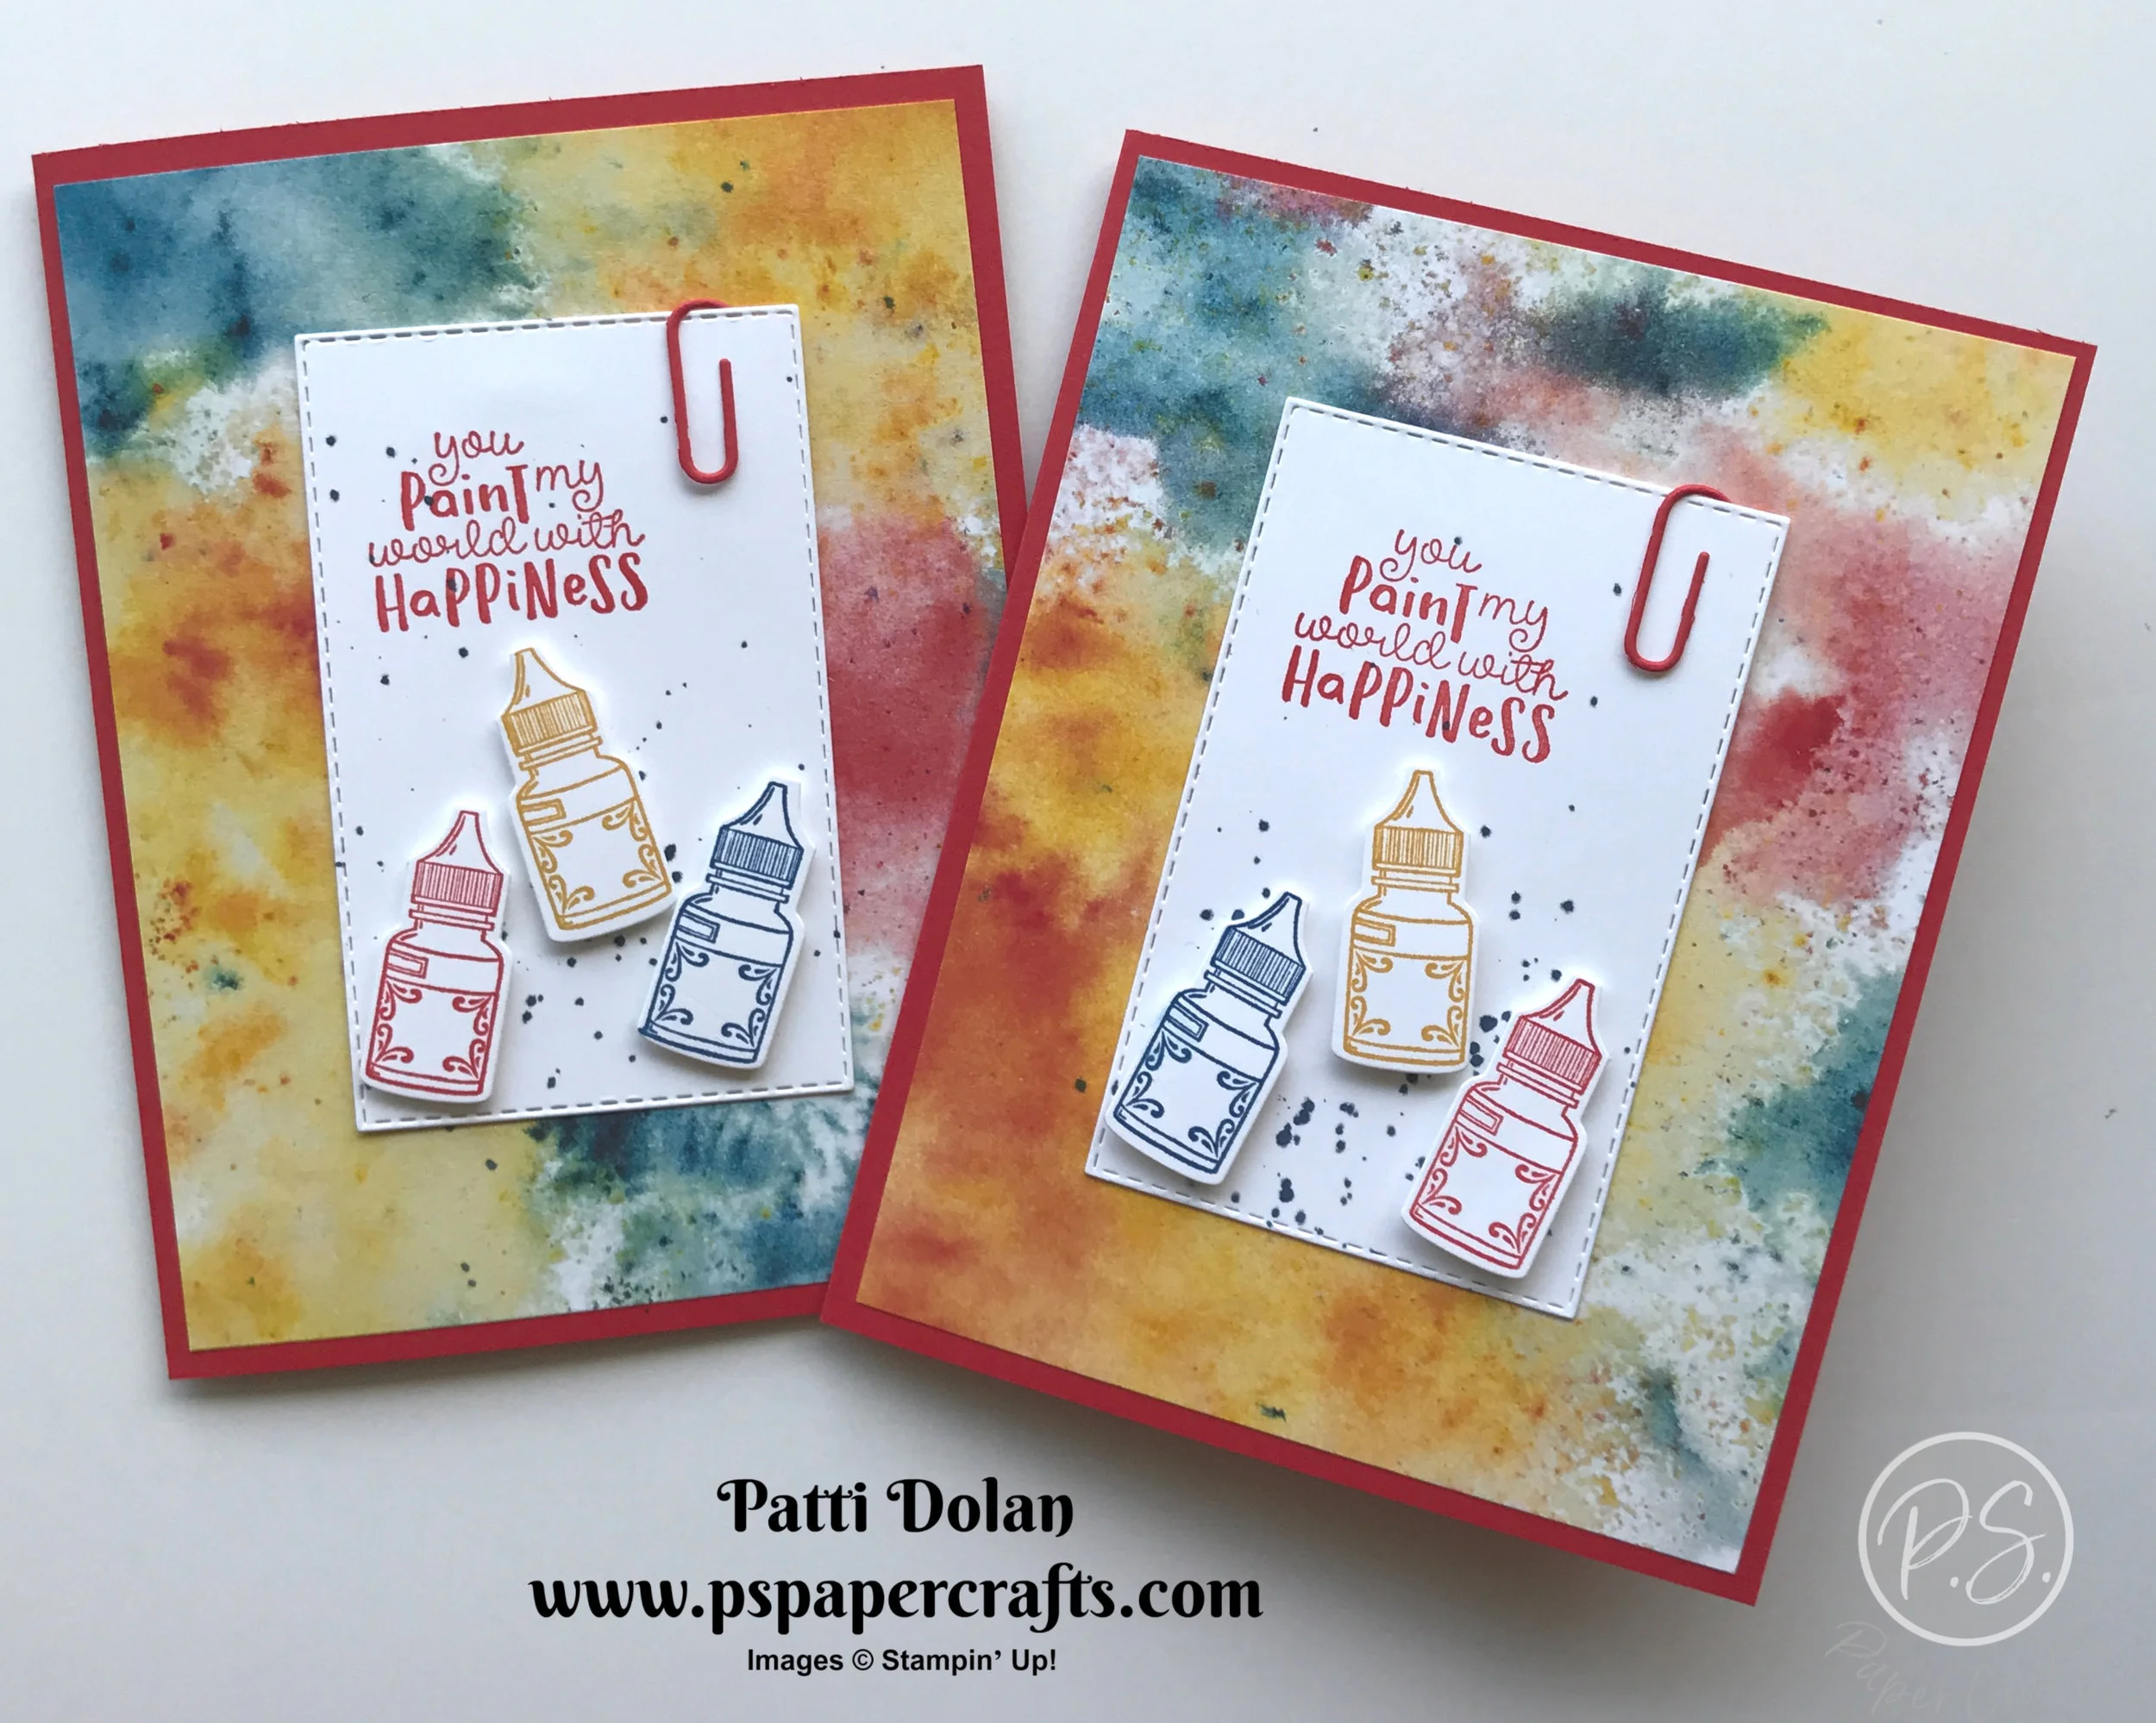
These hydrangeas are just so gorgeous, one of my favorite flowers and this Beautiful Friendship Stamp Set has such pretty images!

 
Beautiful Friendship Birthday2.jpg
 

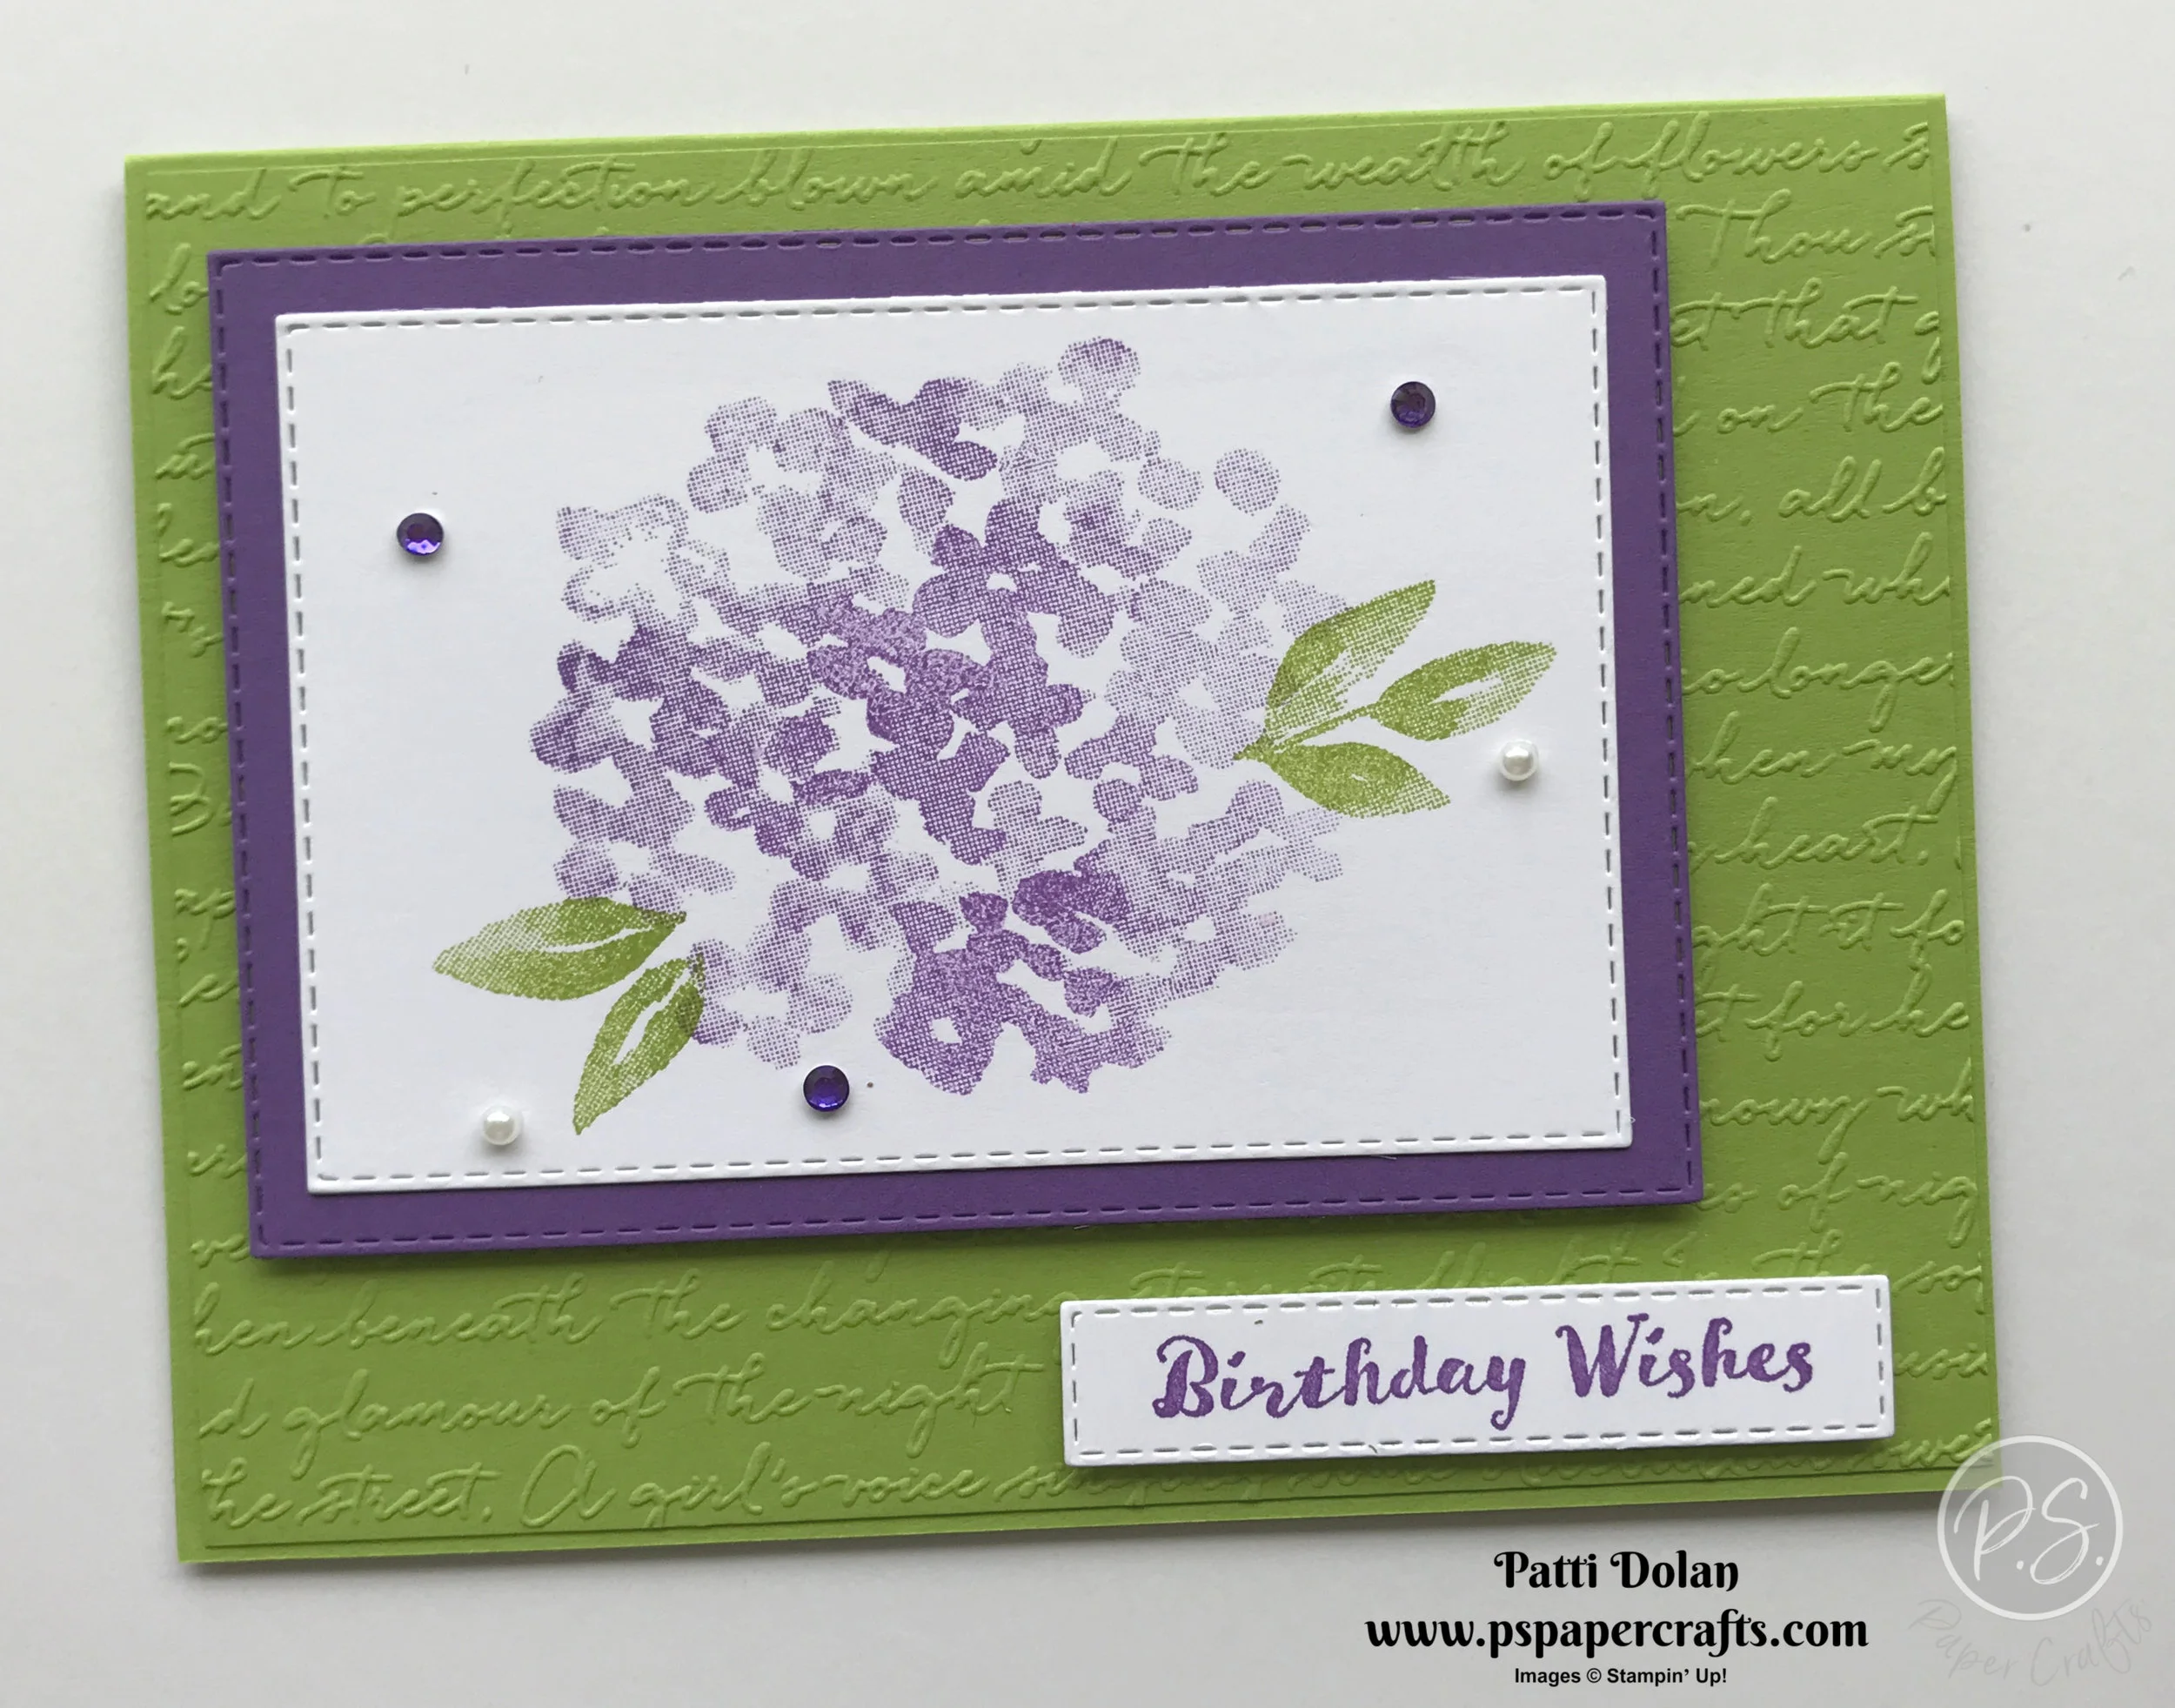
The colors for this card are Gorgeous Grape and Granny Apple Green which is a wonderful color combo. The background layer was embossed with the new 3D Scripty Embossing Folder. Watch the video; I’ll tell you about the new Embossing Plate to use with the 3D Embossing Folders.

Tips & Instructions

  • Granny Apple Green Card Base - 5 1/2 x 8 1/2, score at 4 1/4

  • Granny Apple Green Layer - 5 3/8 x 4 1/8, emboss with Scripty Embossing Folder

  • Gorgeous Grape Layer - cut with 3rd largest Stitched Rectangle Die

  • Whisper White Layer - cut with 4th largest Stitched Rectangle Die

  • Stamp flower image with Gorgeous Grape Ink and leaf images with Granny Apple Green Ink on the white stitched rectangle

  • Adhere layers, using Dimensionals for the grape layer on the embossed layer

  • Stamp sentiment (from Itty Bitty Birthdays) on smaller rectangle with Gorgeous Grape Ink and adhere with Dimensionals

  • Add purple Rhinestones and Pearls

 
Beautiful Friendship Birthday.jpg
 

On the inside, stamp sprigs with Granny Apple Green Ink and sentiment with Gorgeous Grape Ink.

 
Beautiful Friendship Birthday Inside.jpg
 

If you want any of the products I used on this project, just click on the item below or the Shop Now button and it will bring you to my Online Store. Please use the current Host Code when you go to checkout your order. You can also click directly on an item to order. 

Paper Pumpkin Add-On Special

Stampin' Up! has a great Add-On for the August Paper Pumpkin Kit. 

 
07.11.19_SHAREABLE_PP_GIFT_OF_FALL.jpg
 

The Kit for August is called Gift Of Fall and includes 6 gift bags and 12 coordinating gift tags.  For just $10 more you can get the Gift of Fall Add-On Bundle which includes 24 card bases of 2 different designs with coordinating envelopes.  Watch the video below to get a feel for the kit and add-on.

Not a Paper Pumpkin Subscriber?  You need to subscribe by August 10th to get in on this kit.  You must be a subscriber to purchase the Gift of Fall Add-On which can be ordered starting August 1 while supplies last. 

August Kit Information

  • Makes 6 fall-themed gift bags

  • Makes 12 fall-themed gift tags

  • Coordinating colors: Blackberry Bliss, Calypso Coral, Crumb Cake, Crushed Curry, Merry Merlot, Mint Macaron, Old Olive, Pretty Peacock, and Soft Suede


Add-On Information

  • Gift of Fall Add-On Bundle (item 152885)

  • Price: $10.00 usd

  • Includes 24 card bases of 2 different designs with coordinating envelopes (note card size)

  • Product dimensions

    • Cards: 5" x 3-1/2" (12.7 x 8.9 cm)

    • Envelopes: 5-1/8" x 3-5/8" (13 x 9.2 cm)

  • Available August 1, while supplies last

  • Not included with an August Paper Pumpkin subscription

Important note: The Gift of Fall Add-On Bundle is not needed to complete the August kit projects.

Beautiful Friendship Congratulations Card

I think this is my new favorite stamp set…for now!!!

 
Beautiful Friendship Congratulations.jpg
 

The stamps are made so when you ink them up, you get variations of color which adds so much texture. They really are so pretty!!!

 
Beautiful Friendship Congratulations3.jpg
 

Tips & Instructions

  • Garden Green Card Base - 5 1/2 x 8 1/2, score at 4 1/4

  • Whisper White Layer - 5 1/4 x 4

  • Stamp floral image with Flirty Flamingo Ink on an angle toward the top and the bottom as shown on card and adhere to card base

  • Stamp Leaves with Garden Green Ink and flower center with So Saffron Ink

  • Whisper White Strip - 4 1/4 x 1 - stamp sentiment with Black Ink and punch banner with Banner Triple Punch

  • Garden Green Strip - 4 1/4 x 1 1/8 - punch banner with Banner Triple Punch so that it extends a little longer than white strip

  • Adhere white banner to green banner and adhere over center of flowers using Dimensionals

  • Add Rhinestones

 
Beautiful Friendship Congratulations2.jpg
 

On the inside, stamp smaller flower image on inside top right and bottom left corner with Flirty Flamingo Ink.

 
Beautiful Friendship Congratulations Inside.jpg
 

If you want any of the products I used on this project, just click on the item below or the Shop Now button and it will bring you to my Online Store. Please use the current Host Code when you go to checkout your order. You can also click directly on an item to order. 

Sketch Saturday - Vibrant Vases

Today’s Sketch is from a Team Challenge and it was a little challenging :)

Here’s the sketch.

 
Screen Shot 2019-08-03 at 12.16.50 PM.png
 

I used the Vibrant Vases Stamp Set for the beautiful vases with the flowers and the sentiment is from the Varied Vases Stamp Set.

 
Sketch Saturday - Vibrant Vases4.jpg
 

Tips & Instructions

  • Pear Pizzazz Card Base - 5 1/2 x 8 1/2, score at 4 1/4

  • Flirty Flamingo Squares - 5 pieces at 2x2 each

  • Whisper White Squares - 5 pieces at 1 7/8 x 1 7/8

  • Whisper White Strip for sentiment - 4 1/4 x 1/2

  • Stamp vases and flower with black Ink on the 4 squares and on the 5th square turn it to be a diamond shape

  • On the focal diamond shaped image, use the filler stamp to color in the vase with Pear Pizzazz Ink and the flower with Flirty Flamingo Ink. Color the leaves with a Blender Pen picking up the ink from the Pear Pizzazz Ink Pad or use a Stampin’ Write Marker.

  • Adhere each square to the Flirty Flamingo layer

  • Adhere 4 squares to card base and adhere the diamond shaped one with Dimensionals

  • Stamp sentiment with black ink on strip and adhere with Dimensionals

  • Make bow with 3 strands of Whisper White Linen Thread and adhere with glue dot

 
Sketch Saturday - Vibrant Vases3.jpg
 

On the inside stamp sentiment from and another flower and vase with black ink.

 
Sketch Saturday - Vibrant Vases inside.jpg
 

If you want any of the products I used on this project, just click on the item below or the Shop Now button and it will bring you to my Online Store. Please use the current Host Code when you go to checkout your order. You can also click directly on an item to order. 

Woven Threads Daisy Lane Birthday Card

The Woven Heirlooms Designer Series Paper made these beautiful daisies, just punch, stack and add a Clear Faceted Gem. They pop right off the card!

 
Daisy Lane Woven Threads Card both.jpg
 

This Designer Series Paper is so pretty, it’s subtle and I love how both the background and flowers turned out. Watch the video to see how I made these cards.

Tips & Instructions

  • Rococo Rose Card Base - 5 1/2 x 8 1/2, score at 4 1/4

  • Woven Threads Designer Series Paper - cut with largest Stitched Rectangle Die

  • Woven Threads Designer Series Paper - punch 4 flowers with Medium Daisy Punch

  • Stamp stems on Stitched Rectangle layer with Old Olive Ink and adhere to card base

  • Put a little Liquid Glue on center of 2 daisies and lay a second daisy on each, offsetting to create a full set of petals.

  • Adhere daisies at top of stems and add a Clear Faceted Gem to center of each

  • Stamp sentiment with Old Olive Ink

The sentiment for this card is from the Butterfly Wishes Stamp Set.

 
Daisy Lane Woven Threads Card birthday.jpg
 

I used the “Smile” sentiment from the Daisy Lane Stamp Set for this card.

 
Daisy Lane Woven Threads Card smile.jpg
 

If you want any of the products I used on this project, just click on the item below or the Shop Now button and it will bring you to my Online Store. Please use the current Host Code when you go to checkout your order. You can also click directly on an item to order. 

Kid's Dinosaur Birthday Card

Here’s a fun card featuring the Dinoroar Designer Series Paper and the Mosaic 3D Embossing Folder!

 
Dinosaur Birthday2.jpg
 

Since I didn’t have the Dinoroar Stamp Set and wanted to make a cute card for my grandson, I decided to cut out the dinosaurs and use the Mosaic 3D Embossing Folder and I’m so happy with how it turned out. The frame is from the Woven Heirlooms Dies which went perfectly with this layout.

Tips & Instructions

  • Old Olive Card Base - 4 1/4 x 11, score at 5 1/2 (top folding)

  • Whisper White Layer - 5 1/4 x 4, emboss with Mosaic 3D Embossing Folder and adhere to card base

  • Lovely Lipstick Frame - Cut with Woven Heirlooms Dies

  • Whisper White Layer 3 1/4 x 2 1/4

  • Cut dinosaurs from Dinoroar Designer Series Paper.

  • Adhere Whisper White Layer to card and the Lovely Lipstick Frame over it.

  • Adhere Dinosaurs to card with Dimensionals and add 3 Enamel Shapes.

  • 4 x 1/2 Whisper White Strip, stamp sentiment in Old Olive and adhere with Dimensionals. Add Enamel Shapes on each side of the sentiment.

 
Dinosaur Birthday.jpg
 

Cut another dinosaur for the inside and stamp the sentiment with Old Olive Ink.

 
Dinosaur Birthday Inside.jpg
 

If you want any of the products I used on this project, just click on the item below or the Shop Now button and it will bring you to my Online Store. Please use the current Host Code when you go to checkout your order. You can also click directly on an item to order. 

Sketch Saturday - Magnolia Thinking of You

I found today’s sketch on Pinterest from “Less is More” and I used the Magnolia 3D Embossing Folder for the beautiful flower impressions.

 
Sketch Saturday - Magnolia Lane (1).jpg
 
 
Screen Shot 2019-07-25 at 9.43.22 AM.png
 

Tips & Instructions

  • Old Olive Card Base - 5 1/2 x 8 1/2, score at 4 1/4

  • Very Vanilla Layer - 5 3/8 x 4 1/8, emboss magnolias (they will not fit completely)

  • Color flowers, leaves and center with Stampin’ Blends (Petal Pink, Old Olive and So Saffron)

  • Stamp sentiment with Old Olive Ink

  • Add some Wink of Stella to flower centers

 
Card Sketch - Magnolia Lane2.jpg
 

On the inside, stamp flower image with Old Olive Ink on 5 1/4 x 4 piece of Very Vanilla Cardstock.

 
Sketch Saturday - Magnolia Lane Inside (1).jpg
 

If you want any of the products I used on this project, just click on the item below or the Shop Now button and it will bring you to my Online Store. Please use the current Host Code when you go to checkout your order. You can also click directly on an item to order. 

Woven Heirlooms Sympathy Card

I love the Embossing Folder from the Woven Heirlooms Bundle and the sentiments are done with such beautiful fonts.

 
Woven Threads Sympathy2.jpg
 

Tips & Instructions

  • Very Vanilla Card Base - 5 1/2 x 8 1/2, score at 4 1/4

  • Blueberry Bushel Layer - 5 1/4 x 4, emboss with rectangle 3D Embossing Folder

  • Very Vanilla Layer - 3 x 2, stamp sentiment with Blueberry Bushel Ink and adhere to center with Dimensionals

  • Add Pearls and Blue Rhinestones

 
Woven Threads Sympathy.jpg
 

Stamp sentiment and swirl images on inside with Blueberry Bushel Ink.

 
Woven Threads Sympathy Inside.jpg
 

If you want any of the products I used on this project, just click on the item below or the Shop Now button and it will bring you to my Online Store. Please use the current Host Code when you go to checkout your order. You can also click directly on an item to order. 

Four Sweet Scalloped Note Cards

The Scalloped Note Cards are such a great value and make such pretty, dainty cards.

 
Scalloped Note Cards Daisy Both.jpg
 

I’ll walk you through these Daisy Lane cards in the video and show you a couple of other cards I made.

For the Daisy cards use the Daisy Lane Bundle.

  • Stamp 6 daisies with Daffodil Delight Ink and cut with coordinating punch.

  • Stack two together, offsetting to create each daisy.

  • Adhere to card base and add Perennial Essence Floral Center to each Daisy.

  • Stamp sentiment with Black Ink and cut with label from Stitched Labels Dies.

 
Scalloped Notecards Daisy Green.jpg
 

This one uses the Terracotta Tile Note Card and I used Terracotta Tile Ink for the sentiment.

 
Scalloped Notecards Daisy Lane Terracotta2.jpg
 

The Light Pink Note Card is so pretty and goes well with the Butterfly Wishes Stamp Set.

  • Cut piece of Whisper White Cardstock and punch each corner with the Detailed Trio Punch.

  • Color stamp with Stampin Write Markers (branch with Soft Suede, leaves with Garden Green and flowers with Flirty Flamingo). Breath on stamp to moisten and then stamp image on white layer.

  • Stamp sentiment with Black Ink.

  • Stamp small butterfly image with black ink and punch with Butterfly Duet Punch and adhere with Dimensional.

  • Adhere white layer to card base and add pearls to each corner punch.

 
Scalloped Notecards Butterfly Wishes2.jpg
 

I like the Balmy Blue Note Card with the Free As A Bird Stamp Set.

  • Stamp the large and small flower images with Versamark and cover with White Emboss Powder. Heat until powder melts and image is shiny.

  • Stamp bird image with black ink and color with Stampin’ Blends. Fussy cut bird.

  • Cut circle with circle punch and stamp small flower image with Calypso Coral Ink. Stamp sentiment with black ink and adhere to doily (I used a retired doily so yours will look a little different. Adhere to card overhanging a little and cut what is overhanging.

  • Adhere bird with Dimensionals


If you want any of the products I used on this project, just click on the item below or the Shop Now button and it will bring you to my Online Store. Please use the current Host Code when you go to checkout your order. You can also click directly on an item to order. 

Sketch Saturday - Magnolia Lane

This week’s sketch is one that I found on Pinterest from Sunday Stamps.

 
Screen Shot 2019-07-15 at 2.48.31 PM.png
 

I used the beautiful Magnolia Lane Designer Series Paper along with Petal Pink and Mossy Meadow. I love that color combo.

 
Sketch Saturday - Magnolia Lane.jpg
 

Tips & Instructions

  • Mossy Meadow Card Base (Top Folding) - 4 1/4 x 11, score at 5 1/2

  • Petal Pink Layer (3 pieces) - 4 x 1 5/8

  • Magnolia Lane Designer Series Paper (3 pieces) - 3 7/8 x 1 1/2

  • Whisper White - Stamp sentiment (from Butterfly Wishes Stamp Set) with Black Ink and punch with Story Label Punch

  • Punch 2 sprigs from Mossy Meadow Cardstock using Sprig Punch and 2 leaves from Perennial Essences Vellum using Leaf Punch

  • Adhere layers, sprigs and leaves and then adhere label using Dimensionals

  • Add pearls to label

 
Sketch Saturday - Magnolia Lane2.jpg
 

On the inside, stamp sentiment with Black Ink and Flower (from the Good Morning Magnolia Stamp Set) with Mossy Meadow.

 
Sketch Saturday - Magnolia Lane Inside.jpg
 

If you want any of the products I used on this project, just click on the item below or the Shop Now button and it will bring you to my Online Store. Please use the current Host Code when you go to checkout your order. You can also click directly on an item to order. 

Fun Happy Birthday Card!

I’m having fun playing with the See A Silhouette Designer Series Paper. I cut the border and cut the letters for “happy” from it.

 
Happy Birthday - See A Silhouette2.jpg
 

Tips & Instructions

  • Crushed Curry Card Base - 5 1/2 x 8 1/2, score at 4 1/4

  • Whisper White Layer - 5 1/4 x 4

  • See A Silhouette Designer Series Paper - 5 1/8 and cut zig zag along pattern and adhere to white layer. Adhere to card

  • Cut the letters for happy from See A Silhouette Designer Series Paper and adhere to white layer with Dimensionals

  • Stamp the word BIRTHDAY from Itty Bitty Birthdays Stamp Set with Poppy Parade Ink. Cover the word HAPPY with a Post-It Note and press stamp on ink pad. Remove the Post-It Note from stamp and stamp on the card.

  • Add some Glitter Dots and Sequins

 
Happy Birthday - See A Silhouette.jpg
 

On the inside, stamp sentiment with Poppy Parade and the dots with Daffodil Delight. I found that the Crushed Curry Ink wasn’t bright enough so I used Daffodil Delight.

 
Happy Birthday - See A Silhouette inside.jpg
 

If you want any of the products I used on this project, just click on the item below or the Shop Now button and it will bring you to my Online Store. Please use the current Host Code when you go to checkout your order. You can also click directly on an item to order. 

It Starts With Art

This was a fun card to make, a little messy but fun!

 
It Starts With Art Happiness Both.jpg
 

I used the See A Silhouette Designer Series Paper for the background and it works so well with the It Starts With Art Stamp Set. Watch the video below to see how I made these cards.

Tips & Instructions

  • Poppy Parade Card Base - 5 1/2 x 8 1/2, scored at 4 1/4

  • See A Silhouette Designer Series Paper - 5 1/4 x 4

  • Whisper White Stitched Rectangle

  • Stamp sentiment with Poppy Parade Ink on the Stitched Rectangle

  • Add a drop of Night Of Navy (or Blueberry Bushel) Ink on a Clear Block and using an Aqua Painter squeeze a little water on it. Mix a little and then flick the Aqua Painter to get drops on Stitched Rectangle

  • Stamp 3 ink jars (one in Poppy Parade, one in Blueberry Bushel and one in Crushed Curry) and cut with coordinating die and adhere to Stitched Rectangle using Dimensionals

  • Cut paper clip with from Poppy Parade with die and adhere to Stitched Rectangle. Put your adhesive on the back - I used Liquid Glue.

  • Adhere layers to card base

 
It Starts With Art Happiness.jpg
 

Stamp image and then sentiment with Poppy Parade on the inside.

 
It Starts With Art Happiness inside.jpg
 

If you want any of the products I used on this project, just click on the item below or the Shop Now button and it will bring you to my Online Store. Please use the current Host Code when you go to checkout your order. You can also click directly on an item to order.

Sketch Saturday - Path Of Petals

Today’s sketch is from a challenge from the Splitcoaststamps CAS(E) this Sketch #330 Challenge

 
Sketch Saturday - Path Of Petals Card.jpg
 

This is the sketch from the challenge.

 
Screen Shot 2019-07-12 at 10.30.10 PM.png
 

I used the Path Of Petals Bundle to create this beautiful card. The floral piece was cut with Pretty Peacock Cardstock using the smaller floral die and the sentiment was cut with the oval which fits perfectly inside of it.

 
Sketch Saturday - Path Of Petals Bundle.jpg
 

Tips & Instructions

  • Pretty Peacock Card Base - 5 1/2 x 8 1/2, scored at 4 1/4

  • Whisper White Layer - 5 1/4 x 4, emboss with Scripty 3D Embossing Folder

  • Cut Pretty Peacock Cardstock using smaller floral die

  • Stamp sentiment on Whisper White Cardstock with Pretty Peacock Ink and cut with oval die

  • Adhere sentiment to floral piece

  • Wrap White Bakers Twine around embossed layer twice and adhere in back.

  • Adhere floral piece to card with Dimensionals over twine - Using two strands, tie bow and adhere with Mini Glue Dot

  • Adhere Layer to card base

 
Sketch Saturday - Path Of Petals Card3.jpg
 

Stamp sentiment on inside layer with Pretty Peacock Ink. Stamp floral image on scrap paper first and then on bottom corner inside the card. Stampin on scrap paper gives you a lighter color.

 
Sketch Saturday - Path Of Petals inside.jpg
 

If you want any of the products I used on this project, just click on the item below or the Shop Now button and it will bring you to my Online Store. Please use the current Host Code when you go to checkout your order. You can also click directly on an item to order.

Back On Your Feet - Get Well

This is such a fun Stamp Set to make Get Well Cards with.

 
Back On Your Feet Turtle Both.jpg
 

I made the background by stamping the turtle with Versamark randomly on the Granny Apple Green layer of cardstock. Watch the video to follow along with me.

Tips & Instructions

  • Crumb Cake Card Base - 5 1/2 x 8 1/2, scored at 4 1/4

  • Granny Apple Green Layer - 5 1/4 x 4 - stamp turtle image randomly with Versamark

  • Stamp turtle image on Whisper White Stitched Circle (2nd largest) with Tuxedo Black Memento Ink and color with Stampin’ Blends

  • Cut Crumb Cake with Scalloped Circle (3rd largest) and adhere to Stitched Circle

  • Cut Whisper White Stitched Rectangle and stamp sentiment with Tuxedo Black Memento Ink

  • Wrap ribbon around Granny Apple Green layer and adhere to back. Adhere circles over ribbon with Dimensionals and adhere sentiment with Dimensionals

  • Add 3 Glitter Enamel Dots

 
Back On Your Feet Turtle3.jpg
 

Stamp the sentiment (from Healing Hugs) with Tuxedo Black Memento Ink and leave image twice with Granny Apple Green Ink.

 
Back On Your Feet Turtle Inside.jpg
 

If you want any of the products I used on this project, just click on the item below or the Shop Now button and it will bring you to my Online Store. Please use the current Host Code when you go to checkout your order. You can also click directly on an item to order. 

Pressed Petals - Thinking Of You

I love the rustic look of the Pressed Petals Designer Series Paper. The ribbon I used coordinates perfectly with it!

 
Pressed Petals Thinking of You.jpg
 

Tips & Instructions

  • Rococo Rose Card Base - 5 1/2 x 8 1/2, scored at 4 1/4

  • Pressed Petals Designer Series Paper Layer - 5 1/4 x 4

  • Very Vanilla Label - stamp sentiment and punch with Story Label Punch

  • Adhere Rococo Rose Scalloped Linen Ribbon around Designer Series Paper Layer

  • Adhere label with Dimensionals

 
Pressed Petals Thinking of You2.jpg
 
 
Pressed Petals Thinking of You4.jpg
 

On the inside I stamped the leaf image (from the Daisy Lane Stamp Set) with Pear Pizzazz Ink, lifting and stamping again without re-inking.

 
Pressed Petals Thinking of You inside.jpg
 

If you want any of the products I used on this project, just click on the item below or the Shop Now button and it will bring you to my Online Store. Please use the current Host Code when you go to checkout your order. You can also click directly on an item to order. 

Beautiful Pressed Petals Cards

The Pressed Petals Designer Series Paper is gorgeous. I made 7 cards using this one sheet and I love them all!!!

 
Pressed Petals 7 Cards.jpg
 

The cards are very simple but the Designer Series Paper is so pretty you don’t need to add much to make a beautiful card. Watch the video to see how I made all 7 cards.


Below I’ll tell you all the measurements and products I used for each card.

Card 1 - Pear Pizzazz Card Base 5 1/2 x 8 1/2, scored at 4 1/4, Very Vanilla Layer 4 1/2 x 3 1/2, DSP layer 4 1/4 x 3 1/4. Stamp sentiment (from A Little Lace) with Mossy Meadow on a 4 1/4 x 1/2 strip of Very Vanilla. Add Rococo Rose Faceted Dots.

 
Pressed Petals card1 small.jpg
 

Card 2 - Rococo Rose Card Base - 5 1/2 x 8 1/2, scored at 4 1/4. Cut DSP to 5 1/4 x 4. Stamp sentiment (from Verdant Garden) with Mossy Meadow Ink. Add pearls.

 
Pressed Petals card2.jpg
 

Card 3 (4 x 4 card) - Mossy Meadow Card Base 8 x 4, scored at 4. Very Vanilla Layer 3 1/2 x 3 1/2, DSP layer 3 1/4 x 3 1/4. Stamp sentiment (from Good Morning Magnolia) with Mossy Meadow Ink on Stitched Oval. Tie 3 strands of Mossy Meadow Linen Thread into a bow and adhere with Mini Glue Dot.

 
Pressed Petals card3.jpg
 

Card 4 - Merry Merlot Card Base - 5 1/2 x 8 1/2, scored at 4 1/4. Layer of DSP 5 1/4 x 4. Add Lace Ribbon to side. Stamp sentiment on Very Vanilla with Merry Merlot Ink on label cut from Parcels & Petals Bundle.

 
Pressed Petals card4.jpg
 

Card 5 (4 x 4 card) - Merry Merlot Card Base - 8 x 4, scored at 4. Very Vanilla Layer 3 1/2 x 3 1/2, DSP layer 3 1/4 x 3 1/4. Stamp sentiment (from Good Morning Magnolia) with Merry Merlot Ink on Very Vanilla Stitched Oval. Add Nobel Peacock Rhinestones.

 
Pressed Petals card5.jpg
 

Card 6 - Night Of Navy Card Base - 5 1/2 x 8 1/2, scored at 4 1/4. Daffodil Delight Layer 5 1/4 x 4 and DSP layer 5 x 3 3/4. Stamp sentiment (from Parcels & Petals) with Night Of Navy Ink on Whisper White Label cut with Story Label Punch. Cut left side of label off. Adhere Polka Dot Ribbon to DSP & Daffodil Delight layers prior to adhering to card base. Tie additional piece of ribbon around ribbon you adhered to look like a bow.

 
Pressed Petals card6.jpg
 

Card 7 - Mossy Meadow Card Base 5 1/2 x 8 1/2, scored at 4 1/4. Daffodil Delight Layer 5 1/4 x 4 1/8 and DSP Layer 5 1/8 x 4. Stamp sentiment (from Good Morning Magnolia) with Mossy Meadow Ink on Whisper White label cut from the Smooth Sailing Die. Add Nobel Peacock Rhinestones.

 
Pressed Petals card7.jpg
 

If you want any of the products I used on this project, just click on the item below or the Shop Now button and it will bring you to my Online Store. Please use the current Host Code when you go to checkout your order. You can also click directly on an item to order.

Quick & Easy Masculine Birthday Card

Create a simple birthday card for a guy using the Come Sail Away Designer Series Paper.

 
Come Sail Away Birthday2.jpg
 

I used the Designer Series Paper for the background and also for the strip with the knots behind the sentiment label.

 
Screen Shot 2019-07-08 at 10.58.03 PM.png
 

Tips & Instructions

  • Night Of Navy Card Base - 5 1/2 x 8 1/2, scored at 4 1/4

  • Come Sail Away Designer Series Paper Layer 5 1/4 x 4

  • Come Sail Away Designer Series Paper Strip - cut the width of the knots x 4 1/4

  • Stamp sentiment on Whisper White scrap with Night Of Navy Ink and punch with Story Label Punch

  • Adhere Layer to Card Base and Strip over layer. Adhere Label using Dimensionals

  • Color 2 Pearls with Dark Night Of Navy Stampin’ Blends Marker and adhere to Label

  • Adhere Come Sail Away Trinket to Label with Mini Glue Dot

 
Come Sail Away Birthday.jpg
 

Stamp sentiment, birds and sailboat on the inside using Night Of Navy Ink.

 
Come Sail Away Birthday Inside.jpg
 

If you want any of the products I used on this project, just click on the item below or the Shop Now button and it will bring you to my Online Store. Please use the current Host Code when you go to checkout your order. You can also click directly on an item to order. 

Sketch Saturday - Mosaic Mood

Today’s sketch is a challenge from the Stampin’ Up! team that I’m on. We have sketch or color challenges in our Facebook Group all the time. It’s so much fun to see what everyone creates.

Here’s the card I made from the sketch. I used the Mosaic 3D Embossing Folder on the card front and cut a piece of the Mosaic Mood Specialty Designer Series Paper for the focal piece.

 
Saturday Sketch - Mosaic Mood.jpg
 

Here’s the sketch I followed.

 
Screen Shot 2019-07-04 at 11.35.13 AM.png
 

Tips & Instructions

  • Garden Green Card Base - 5 1/2 x 8 1/2, scored at 4 1/4 - emboss card front with the Mosaic 3D Embossing Folder

  • Crushed Curry Layer - 4 1/8 x 3 3/8

  • Mosaic Mood Specialty Designer Series Paper - 4 x 3 1/4

  • Very Vanilla Strip - 1/2 x 3 3/4 - Stamp sentiment (A Little Lace Stamp Set) with Garden Green Ink

  • Adhere Layers and adhere to card base

  • Adhere sentiment strip using Dimensionals

  • Add Rhinestones to sentiment strip

 
Saturday Sketch - Mosaic Mood2.jpg
 

I cut 2 strips 4 x 1/2 from the Designer Series Paper and attached to the top and bottom of the inside layer.

 
Saturday Sketch - Mosaic Mood inside.jpg
 

If you ever thought about joining Stampin’ Up! now is the perfect time. They have a special going on. Between July 1 to August 31, 2019 you can get $155 worth of products (you choose) and pay only $99. Then you get a $10 coupon code to spend the following month. Once you join, you get 20% off your purchase and you can be part of this group as well; it’s really a wonderful group of people. Just let me know if you want more info. about it.

If you want any of the products I used on this project, just click on the item below or the Shop Now button and it will bring you to my Online Store. Please use the current Host Code when you go to checkout your order. You can also click directly on an item to order. 

Set Sail in the Direction of your DREAMS!

I love how the waves came out on these cards using the High Seas 3D Embossing Folder. The sailboats are sitting right in the water.

 
Sailing Home Sailboats both.jpg
 

I embossed a piece of Pacific Point Cardstock with the High Seas folder and then cut along the waves to get it to the right size for this card. You can see how I did it on the video below.

Tips & Instructions

  • Balmy Blue Card Base - 5 1/2 x 8 1/2, score at 4 1/4

  • Pacific Point Layer - 5 1/2 by approx 3 - emboss with High Seas 3D Embossing folder and then cut down to size along the waves

  • Stamp sentiment, 1 large sailboat and 2 small sailboats with Tuxedo Black Memento Ink and cut out with coordinating dies

  • Color sailboats with Stampin’ Blends Markers

  • Stamp birds at top of card base with Pacific Point Ink

  • Adhere waves to card base with Liquid Glue

  • Adhere sentiment and sailboats to card with Dimensionals

  • Adhere trinket at bottom of sentiment with Mini Glue Dots

 
Sailing Home Sailboats Card.jpg
 
 
Sailing Home Sailboats Card2.jpg
 

If you want any of the products I used on this project, just click on the item below or the Shop Now button and it will bring you to my Online Store. Please use the current Host Code when you go to checkout your order. You can also click directly on an item to order. 

Sigh....Such a Sad Sloth

Here’s another card made with the Back On You Feet Stamp Set. He’s so sad; he reminds me of Eeyore from Winnie the Pooh…sigh!

 
Back On Your Feet Sloth Stamp.jpg
 

This would be a great card to brighten up someone’s day who’s going through a rough time. Doesn’t he just make you smile….he’s so cute!

 
Back On Your Feet Sloth Card2.jpg
 

Tips & Instructions

  • Granny Apple Green Card Base - 5 1/2 x 8 1/2, scored at 4 1/4

  • Whisper White Layer - 5 1/4 x 4 - stamp leaf image from the Daisy Lane Stamp Set randomly to create background

  • Stamp Sloth Image and Sentiment with Tuxedo Black Memento Ink and cut with Stitched Nested Labels

  • Color Sloth with Stampin’ Blends Markers

  • Cut off edges to line up to Whisper White Layer and ddhere to layer

  • Adhere layer to card base with Dimensionals

 
Back On Your Feet Sloth Card.jpg
 

Isn’t this a great sentiment? I stamped it with black ink and then stamped the leaf image with Granny Apple Green lifting after the first stamp and stamping a second and third time without re-inking.

 
Back On Your Feet Sloth inside.jpg
 

If you want any of the products I used on this project, just click on the item below or the Shop Now button and it will bring you to my Online Store. Please use the current Host Code when you go to checkout your order. You can also click directly on an item to order.